

淘宝店 https://item.taobao.com/item.htm?spm=a1z0d.6639537.1997196601.13.20ac7484WLa1MH&id=43172714968
官网 https://pulsesensor.com/pages/pulsesensor-playground-toolbox
/* PulseSensor™ Starter Project and Signal Tester
* The Best Way to Get Started With, or See the Raw Signal of, your PulseSensor™ & Arduino.
*
* Here is a link to the tutorial
* https://pulsesensor.com/pages/code-and-guide
*
* WATCH ME (Tutorial Video):
* https://www.youtube.com/watch?v=82T_zBZQkOE
*
*
-------------------------------------------------------------
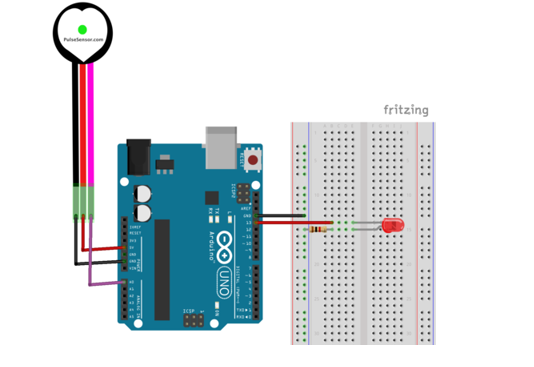
1) This shows a live human Heartbeat Pulse.
2) Live visualization in Arduino's Cool "Serial Plotter".
3) Blink an LED on each Heartbeat.
4) This is the direct Pulse Sensor's Signal.
5) A great first-step in troubleshooting your circuit and connections.
6) "Human-readable" code that is newbie friendly."
*/
// Variables
int PulseSensorPurplePin = 0; // Pulse Sensor PURPLE WIRE connected to ANALOG PIN 0
int LED13 = 13; // The on-board Arduion LED
int Signal; // holds the incoming raw data. Signal value can range from 0-1024
int Threshold = 550; // Determine which Signal to "count as a beat", and which to ingore.
// The SetUp Function:
void setup() {
pinMode(LED13,OUTPUT); // pin that will blink to your heartbeat!
Serial.begin(9600); // Set's up Serial Communication at certain speed.
}
// The Main Loop Function
void loop() {
Signal = analogRead(PulseSensorPurplePin); // Read the PulseSensor's value.
// Assign this value to the "Signal" variable.
Serial.println(Signal); // Send the Signal value to Serial Plotter.
if(Signal > Threshold){ // If the signal is above "550", then "turn-on" Arduino's on-Board LED.
digitalWrite(LED13,HIGH);
} else {
digitalWrite(LED13,LOW); // Else, the sigal must be below "550", so "turn-off" this LED.
}
delay(10);
}
/*
   Code to detect pulses from the PulseSensor,
   using an interrupt service routine.

   Here is a link to the tutorial\
   https://pulsesensor.com/pages/getting-advanced

   Copyright World Famous Electronics LLC - see LICENSE
   Contributors:
     Joel Murphy, https://pulsesensor.com
     Yury Gitman, https://pulsesensor.com
     Bradford Needham, @bneedhamia, https://bluepapertech.com

   Licensed under the MIT License, a copy of which
   should have been included with this software.

   This software is not intended for medical use.
*/

/*
   Every Sketch that uses the PulseSensor Playground must
   define USE_ARDUINO_INTERRUPTS before including PulseSensorPlayground.h.
   Here, #define USE_ARDUINO_INTERRUPTS true tells the library to use
   interrupts to automatically read and process PulseSensor data.

   See ProcessEverySample.ino for an example of not using interrupts.
*/
#define USE_ARDUINO_INTERRUPTS true
#include <PulseSensorPlayground.h>

/*
   The format of our output.

   Set this to PROCESSING_VISUALIZER if you're going to run
    the Processing Visualizer Sketch.
    See https://github.com/WorldFamousElectronics/PulseSensor_Amped_Processing_Visualizer

   Set this to SERIAL_PLOTTER if you're going to run
    the Arduino IDE's Serial Plotter.
*/
const int OUTPUT_TYPE = SERIAL_PLOTTER;

/*
   Pinout:
     PIN_INPUT = Analog Input. Connected to the pulse sensor
      purple (signal) wire.
     PIN_BLINK = digital Output. Connected to an LED (and 220 ohm resistor)
      that will flash on each detected pulse.
     PIN_FADE = digital Output. PWM pin onnected to an LED (and resistor)
      that will smoothly fade with each pulse.
      NOTE: PIN_FADE must be a pin that supports PWM. Do not use
      pin 9 or 10, because those pins' PWM interferes with the sample timer.
*/
const int PIN_INPUT = A0;
const int PIN_BLINK = 13;    // Pin 13 is the on-board LED
const int PIN_FADE = 5;
const int THRESHOLD = 550;   // Adjust this number to avoid noise when idle

/*
   All the PulseSensor Playground functions.
*/
PulseSensorPlayground pulseSensor;

void setup() {
  /*
     Use 115200 baud because that's what the Processing Sketch expects to read,
     and because that speed provides about 11 bytes per millisecond.

     If we used a slower baud rate, we'd likely write bytes faster than
     they can be transmitted, which would mess up the timing
     of readSensor() calls, which would make the pulse measurement
     not work properly.
  */
  Serial.begin(115200);

  // Configure the PulseSensor manager.

  pulseSensor.analogInput(PIN_INPUT);
  pulseSensor.blinkOnPulse(PIN_BLINK);
  pulseSensor.fadeOnPulse(PIN_FADE);

  pulseSensor.setSerial(Serial);
  pulseSensor.setOutputType(OUTPUT_TYPE);
  pulseSensor.setThreshold(THRESHOLD);

  // Now that everything is ready, start reading the PulseSensor signal.
  if (!pulseSensor.begin()) {
    /*
       PulseSensor initialization failed,
       likely because our particular Arduino platform interrupts
       aren't supported yet.

       If your Sketch hangs here, try ProcessEverySample.ino,
       which doesn't use interrupts.
    */
    for(;;) {
      // Flash the led to show things didn't work.
      digitalWrite(PIN_BLINK, LOW);
      delay(50);
      digitalWrite(PIN_BLINK, HIGH);
      delay(50);
    }
  }
}

void loop() {
  /*
     Wait a bit.
     We don't output every sample, because our baud rate
     won't support that much I/O.
  */
  delay(20);

  // write the latest sample to Serial.
 pulseSensor.outputSample();

  /*
     If a beat has happened since we last checked,
     write the per-beat information to Serial.
   */
  if (pulseSensor.sawStartOfBeat()) {
   pulseSensor.outputBeat();
  }
}
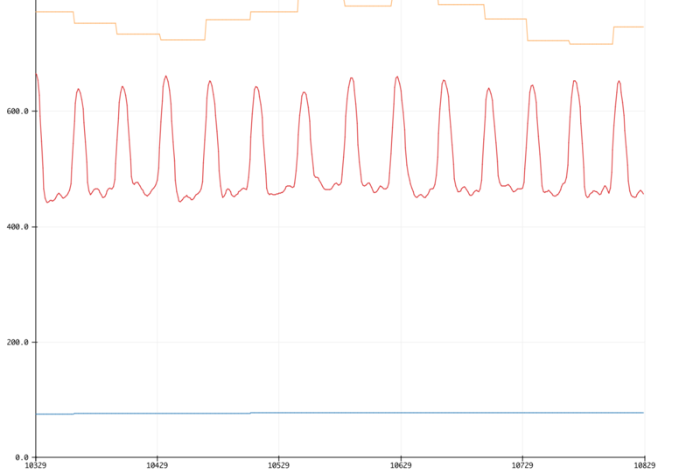
/*  Getting_BPM_to_Monitor prints the BPM to the Serial Monitor, using the least lines of code and PulseSensor Library.
 *  Tutorial Webpage: https://pulsesensor.com/pages/getting-advanced
 *
--------Use This Sketch To------------------------------------------
1) Displays user's live and changing BPM, Beats Per Minute, in Arduino's native Serial Monitor.
2) Print: "♥  A HeartBeat Happened !" when a beat is detected, live.
2) Learn about using a PulseSensor Library "Object".
4) Blinks LED on PIN 13 with user's Heartbeat.
--------------------------------------------------------------------*/

#define USE_ARDUINO_INTERRUPTS true    // Set-up low-level interrupts for most acurate BPM math.
#include <PulseSensorPlayground.h>     // Includes the PulseSensorPlayground Library.

//  Variables
const int PulseWire = 0;       // PulseSensor PURPLE WIRE connected to ANALOG PIN 0
const int LED13 = 13;          // The on-board Arduino LED, close to PIN 13.
int Threshold = 550;           // Determine which Signal to "count as a beat" and which to ignore.
                               // Use the "Gettting Started Project" to fine-tune Threshold Value beyond default setting.
                               // Otherwise leave the default "550" value.

PulseSensorPlayground pulseSensor;  // Creates an instance of the PulseSensorPlayground object called "pulseSensor"


void setup() {

  Serial.begin(9600);          // For Serial Monitor

  // Configure the PulseSensor object, by assigning our variables to it.
  pulseSensor.analogInput(PulseWire);
  pulseSensor.blinkOnPulse(LED13);       //auto-magically blink Arduino's LED with heartbeat.
  pulseSensor.setThreshold(Threshold);

  // Double-check the "pulseSensor" object was created and "began" seeing a signal.
   if (pulseSensor.begin()) {
    Serial.println("We created a pulseSensor Object !");  //This prints one time at Arduino power-up,  or on Arduino reset.
  }
}


void loop() {

 int myBPM = pulseSensor.getBeatsPerMinute();  // Calls function on our pulseSensor object that returns BPM as an "int".
                                               // "myBPM" hold this BPM value now.

if (pulseSensor.sawStartOfBeat()) {            // Constantly test to see if "a beat happened".
 Serial.println("♥  A HeartBeat Happened ! "); // If test is "true", print a message "a heartbeat happened".
 Serial.print("BPM: ");                        // Print phrase "BPM: "
 Serial.println(myBPM);                        // Print the value inside of myBPM.
}

  delay(20);                    // considered best practice in a simple sketch.

}
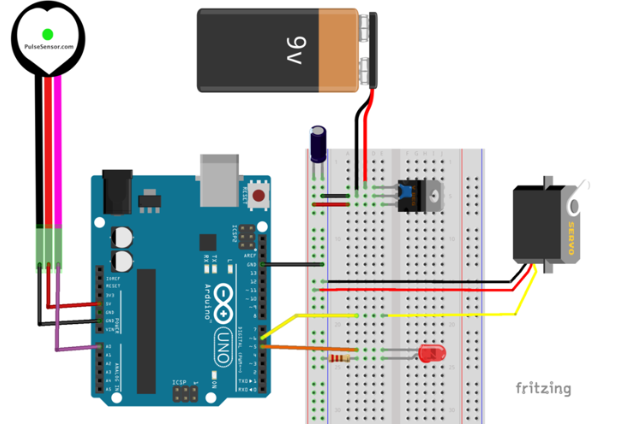
/*
   Code to detect pulses from the PulseSensor
   and move a servo motor to the beat.
   uses an interrupt service routine.

   Here is a link to the tutorial
   https://pulsesensor.com/pages/pulse-sensor-servo-tutorial

   Copyright World Famous Electronics LLC - see LICENSE
   Contributors:
     Joel Murphy, https://pulsesensor.com
     Yury Gitman, https://pulsesensor.com
     Bradford Needham, @bneedhamia, https://bluepapertech.com

   Licensed under the MIT License, a copy of which
   should have been included with this software.

   This software is not intended for medical use.
*/

/*
  Include Servo.h BEFORE you include PusleSensorPlayground.h
*/
#include <Servo.h>

/*
   Every Sketch that uses the PulseSensor Playground must
   define USE_ARDUINO_INTERRUPTS before including PulseSensorPlayground.h.
   Here, #define USE_ARDUINO_INTERRUPTS true tells the library to use
   interrupts to automatically read and process PulseSensor data.

   See ProcessEverySample.ino for an example of not using interrupts.
*/
#define USE_ARDUINO_INTERRUPTS true
#include <PulseSensorPlayground.h>

/*
   The format of our output.

   Set this to PROCESSING_VISUALIZER if you're going to run
    the Processing Visualizer Sketch.
    See https://github.com/WorldFamousElectronics/PulseSensor_Amped_Processing_Visualizer

   Set this to SERIAL_PLOTTER if you're going to run
    the Arduino IDE's Serial Plotter.
*/
const int OUTPUT_TYPE = SERIAL_PLOTTER;

/*
   Pinout:
     PIN_INPUT = Analog Input. Connected to the pulse sensor
      purple (signal) wire.
     PIN_BLINK = digital Output. Connected to an LED (and 220 ohm resistor)
      that will flash on each detected pulse.
     PIN_FADE = digital Output. PWM pin onnected to an LED (and resistor)
      that will smoothly fade with each pulse.
      NOTE: PIN_FADE must be a pin that supports PWM. Do not use
      pin 9 or 10, because those pins' PWM interferes with the sample timer.
*/
const int PIN_INPUT = A0;
const int PIN_BLINK = 13;    // Pin 13 is the on-board LED
const int PIN_FADE = 5;
const int THRESHOLD = 550;   // Adjust this number to avoid noise when idle

/*
   All the PulseSensor Playground functions.
*/
PulseSensorPlayground pulseSensor;

/*
  Make a heart servo, the pin to control it with, and a servo position variable
*/
Servo heart;
const int SERVO_PIN = 6;
int pos = 90;

void setup() {
  /*
     Use 115200 baud because that's what the Processing Sketch expects to read,
     and because that speed provides about 11 bytes per millisecond.

     If we used a slower baud rate, we'd likely write bytes faster than
     they can be transmitted, which would mess up the timing
     of readSensor() calls, which would make the pulse measurement
     not work properly.
  */
  Serial.begin(115200);
  // set up the heart servo on SERVO_PIN
  // set servo position to pos (90 degrees, mid position)
  heart.attach(SERVO_PIN);
  heart.write(pos);

  // Configure the PulseSensor manager.
  pulseSensor.analogInput(PIN_INPUT);
  pulseSensor.blinkOnPulse(PIN_BLINK);
  pulseSensor.fadeOnPulse(PIN_FADE);

  pulseSensor.setSerial(Serial);
  pulseSensor.setOutputType(OUTPUT_TYPE);
  pulseSensor.setThreshold(THRESHOLD);

  // Now that everything is ready, start reading the PulseSensor signal.
  if (!pulseSensor.begin()) {
    /*
       PulseSensor initialization failed,
       likely because our particular Arduino platform interrupts
       aren't supported yet.

       If your Sketch hangs here, try ProcessEverySample.ino,
       which doesn't use interrupts.
    */
    for(;;) {
      // Flash the led to show things didn't work.
      digitalWrite(PIN_BLINK, LOW);
      delay(50);
      digitalWrite(PIN_BLINK, HIGH);
      delay(50);
    }
  }
}

void loop() {
  /*
     Wait a bit.
     We don't output every sample, because our baud rate
     won't support that much I/O.
  */
  delay(20);

  // write the latest sample to Serial.
  pulseSensor.outputSample();

  // write the latest analog value to the heart servo
  moveServo(pulseSensor.getLatestSample());

  /*
     If a beat has happened since we last checked,
     write the per-beat information to Serial.
   */
  if (pulseSensor.sawStartOfBeat()) {
    pulseSensor.outputBeat();
  }
}

/*
  Map the Pulse Sensor Signal to the Servo range
  Pulse Sensor = 0 <> 1023
  Servo = 0 <> 180
  Modify as you see fit!
*/
void moveServo(int value){
  pos = map(value,0,1023,0,180);
  heart.write(pos);
}
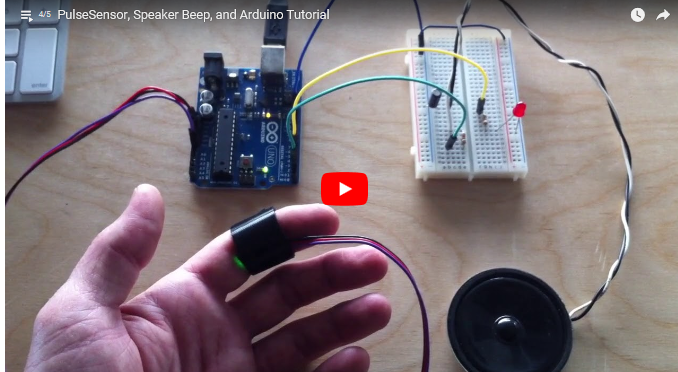
/*
   Code to detect pulses from the PulseSensor,
   using an interrupt service routine.

   >>>>  THIS EXAMPLE OUTPUTS USES TONE COMMAND <<<<
   >>>>  TO MAKE A SPEAKER BEEP WITH HEARTBEAT! <<<<

   Here is a link to the tutorial
   https://pulsesensor.com/pages/pulse-sensor-speaker-tutorial

   Copyright World Famous Electronics LLC - see LICENSE
   Contributors:
     Joel Murphy, https://pulsesensor.com
     Yury Gitman, https://pulsesensor.com
     Bradford Needham, @bneedhamia, https://bluepapertech.com

   Licensed under the MIT License, a copy of which
   should have been included with this software.

   This software is not intended for medical use.
*/

/*
   Every Sketch that uses the PulseSensor Playground must
   define USE_ARDUINO_INTERRUPTS before including PulseSensorPlayground.h.
   Here, #define USE_ARDUINO_INTERRUPTS true tells the library to use
   interrupts to automatically read and process PulseSensor data.

   See ProcessEverySample.ino for an example of not using interrupts.
*/
#define USE_ARDUINO_INTERRUPTS true
#include <PulseSensorPlayground.h>

/*
   The format of our output.

   Set this to PROCESSING_VISUALIZER if you're going to run
    the Processing Visualizer Sketch.
    See https://github.com/WorldFamousElectronics/PulseSensor_Amped_Processing_Visualizer

   Set this to SERIAL_PLOTTER if you're going to run
    the Arduino IDE's Serial Plotter.
*/
const int OUTPUT_TYPE = SERIAL_PLOTTER;

/*
   Pinout:
     PIN_INPUT = Analog Input. Connected to the pulse sensor
      purple (signal) wire.
     PIN_BLINK = digital Output. Connected to an LED (and 220 ohm resistor)
      that will flash on each detected pulse.
     PIN_FADE = digital Output. PWM pin onnected to an LED (and resistor)
      that will smoothly fade with each pulse.
      NOTE: PIN_FADE must be a pin that supports PWM. Do not use
      pin 9 or 10, because those pins' PWM interferes with the sample timer.
*/
const int PIN_INPUT = A0;
const int PIN_BLINK = 13;    // Pin 13 is the on-board LED
const int PIN_FADE = 5;
const int THRESHOLD = 550;   // Adjust this number to avoid noise when idle

/*
   All the PulseSensor Playground functions.
*/
PulseSensorPlayground pulseSensor;

/*
  Setup the things we need for driving the Speaker
  NOTE: Speaker MUST be AC coupled! Connect PIN_SPEAKER to red speaker wire.
        Then connect black speaker wire to + side of electrolytic capacitor.
        Then connect - side of electrolytic capacitor to GND.
        Capacitor value should be 1uF or higher!
        Follow this tutorial:
        [link]
*/
const int PIN_SPEAKER = 2;    // speaker on pin2 makes a beep with heartbeat


void setup() {
  /*
     Use 115200 baud because that's what the Processing Sketch expects to read,
     and because that speed provides about 11 bytes per millisecond.

     If we used a slower baud rate, we'd likely write bytes faster than
     they can be transmitted, which would mess up the timing
     of readSensor() calls, which would make the pulse measurement
     not work properly.
  */
  Serial.begin(115200);

  // Configure the PulseSensor manager.

  pulseSensor.analogInput(PIN_INPUT);
  pulseSensor.blinkOnPulse(PIN_BLINK);
  pulseSensor.fadeOnPulse(PIN_FADE);

  pulseSensor.setSerial(Serial);
  pulseSensor.setOutputType(OUTPUT_TYPE);
  pulseSensor.setThreshold(THRESHOLD);

  // Now that everything is ready, start reading the PulseSensor signal.
  if (!pulseSensor.begin()) {
    /*
       PulseSensor initialization failed,
       likely because our particular Arduino platform interrupts
       aren't supported yet.

       If your Sketch hangs here, try ProcessEverySample.ino,
       which doesn't use interrupts.
    */
    for(;;) {
      // Flash the led to show things didn't work.
      digitalWrite(PIN_BLINK, LOW);
      delay(50);
      digitalWrite(PIN_BLINK, HIGH);
      delay(50);
    }
  }
}

void loop() {
  /*
     Wait a bit.
     We don't output every sample, because our baud rate
     won't support that much I/O.
  */
  delay(20);

  // write the latest sample to Serial.
  pulseSensor.outputSample();

  /*
     If a beat has happened since we last checked,
     write the per-beat information to Serial.
     write a frequency to the PIN_SPEAKER
     NOTE: Do not set the optional duration of tone! That is blocking!
   */
  if (pulseSensor.sawStartOfBeat()) {
    pulseSensor.outputBeat();
    tone(PIN_SPEAKER,1047);              // tone(pin,frequency)
  }

  /*
    The Pulse variable is true only for a short time after the heartbeat is detected
    Use this to time the duration of the beep
  */
  if(pulseSensor.isInsideBeat() == false){
    noTone(PIN_SPEAKER);
  }

}

 浙公网安备 33010602011771号