

官方论文
- 《pySLAM:一个开源、模块化且可扩展的SLAM框架》,作者: Luigi Freda
- “pySLAM 和 slamplay:用于快速原型设计和集成的模块化、可扩展的 SLAM 工具”, Luigi Freda , RSS 2025 工作坊:统一视觉 SLAM
- “语义 pySLAM:在同一框架下统一语义地图构建方法”,David Morilla-Cabello,Eduardo Montijano,
RSS 2025 工作坊:统一视觉 SLAM
推荐书目:
- 计算机视觉中的多视图几何,作者:Richard Hartley 和 Andrew Zisserman
- 伊马、斯特凡诺·索阿托、雅娜·科塞卡、S·尚卡尔·萨斯特里著《三维视觉邀请》
- 蒂莫西·D·巴福特著《机器人状态估计》
- 计算机视觉:算法与应用,作者:理查德·塞利斯基
- 视觉SLAM导论(作者:高翔、张涛)
- 《深度学习》,作者:伊恩·古德费洛、约书亚·本吉奥和亚伦·库维尔
- 神经网络与深度学习,作者:迈克尔·尼尔森
建议材料:
- Davide Scaramuzza 的《移动机器人视觉算法》
- Jana Kosecka 主讲的CS 682 计算机视觉
- ORB-SLAM:一种多功能且精确的单目SLAM系统,作者:R. Mur-Artal、JMM Montiel 和 JD Tardos
- H. Strasdat、AJ Davison、JMM Montiel 和 K. Konolige 合著的《用于恒定时间视觉 SLAM 的双窗口优化》
- 宽基线立体视觉在深度学习领域的作用,作者:Dmytro Mishkin
- 学习还是不学习:基于基本矩阵的视觉定位(作者:周群杰、托斯滕·萨特勒、马克·波勒菲斯、劳拉·莱尔-泰克斯)
- 超棒的本地-全局描述符库
- 神经网络特征匹配简介
- 视觉地点识别:教程
- 用于图像序列中快速位置识别的二进制词袋
手动创建环境
如果已经有环境并且安装了torch
1 注销torch安装

2 修改激活环境的名字

项目代码
https://github.com/luigifreda/pyslam

环境
cuda11.8 rtx3070 ubuntu20 conda python3.11 opencv
环境变量

nvcc --version

export CUDA_HOME="/usr/local/cuda-11.8"  # ✅ 正确写法
export PATH="/usr/local/cuda-11.8/bin:$PATH"
export LD_LIBRARY_PATH="/usr/local/cuda-11.8/lib64:$LD_LIBRARY_PATH"

export TORCH_CUDA_ARCH_LIST="8.6"  # rtx3070
opencv
讲道理应该是一个版本,从c++编译python和c++ 到系统环境和工程目录,官方安装脚本默认了,但是我们的电脑之前现装过了,
估计干扰了安装脚本的判断认为已经有了跳过了。
1 编译库时候用到的c++ opencv,
虽然系统变量是operncv 3.4.9 但是实际用的是opencv4.5
# opencv版本制定
# opencv3.4.9 OpenCVConfig位置
export OpenCV_DIR=/home/r9000k/v1_software/opencv/opencv349/install/share/OpenCV
export LD_LIBRARY_PATH=/home/r9000k/v1_software/opencv/opencv349/install/lib:$LD_LIBRARY_PATH
#export CPLUS_INCLUDE_PATH=/home/r9000k/v1_software/opencv/opencv349/install/include/opencv2:$CPLUS_INCLUDE_PATH
export CPLUS_INCLUDE_PATH=/home/r9000k/v1_software/opencv/opencv349/install/include:$CPLUS_INCLUDE_PATH
2 运行python 使用opencv

conda 环境
# conda
__conda_setup="$('/home/r9000k/anaconda3/bin/conda' 'shell.bash' 'hook' 2> /dev/null)"
if [ $? -eq 0 ]; then
   eval "$__conda_setup"
else
   if [ -f "/home/r9000k/anaconda3/etc/profile.d/conda.sh" ]; then
       . "/home/r9000k/anaconda3/etc/profile.d/conda.sh"
   else
       export PATH="/home/r9000k/anaconda3/bin:$PATH"
   fi
fi
unset __conda_setup
ros 环境注销
# ros默認加入環境變量
#source /opt/ros/noetic/setup.bash
#source /home/r9000k/v1_software/opencv/catkin_ws_cv_bridge/devel/setup.bash
1 安装
下载
git clone --recursive https://github.com/luigifreda/pyslam.git
cd pyslam
安装
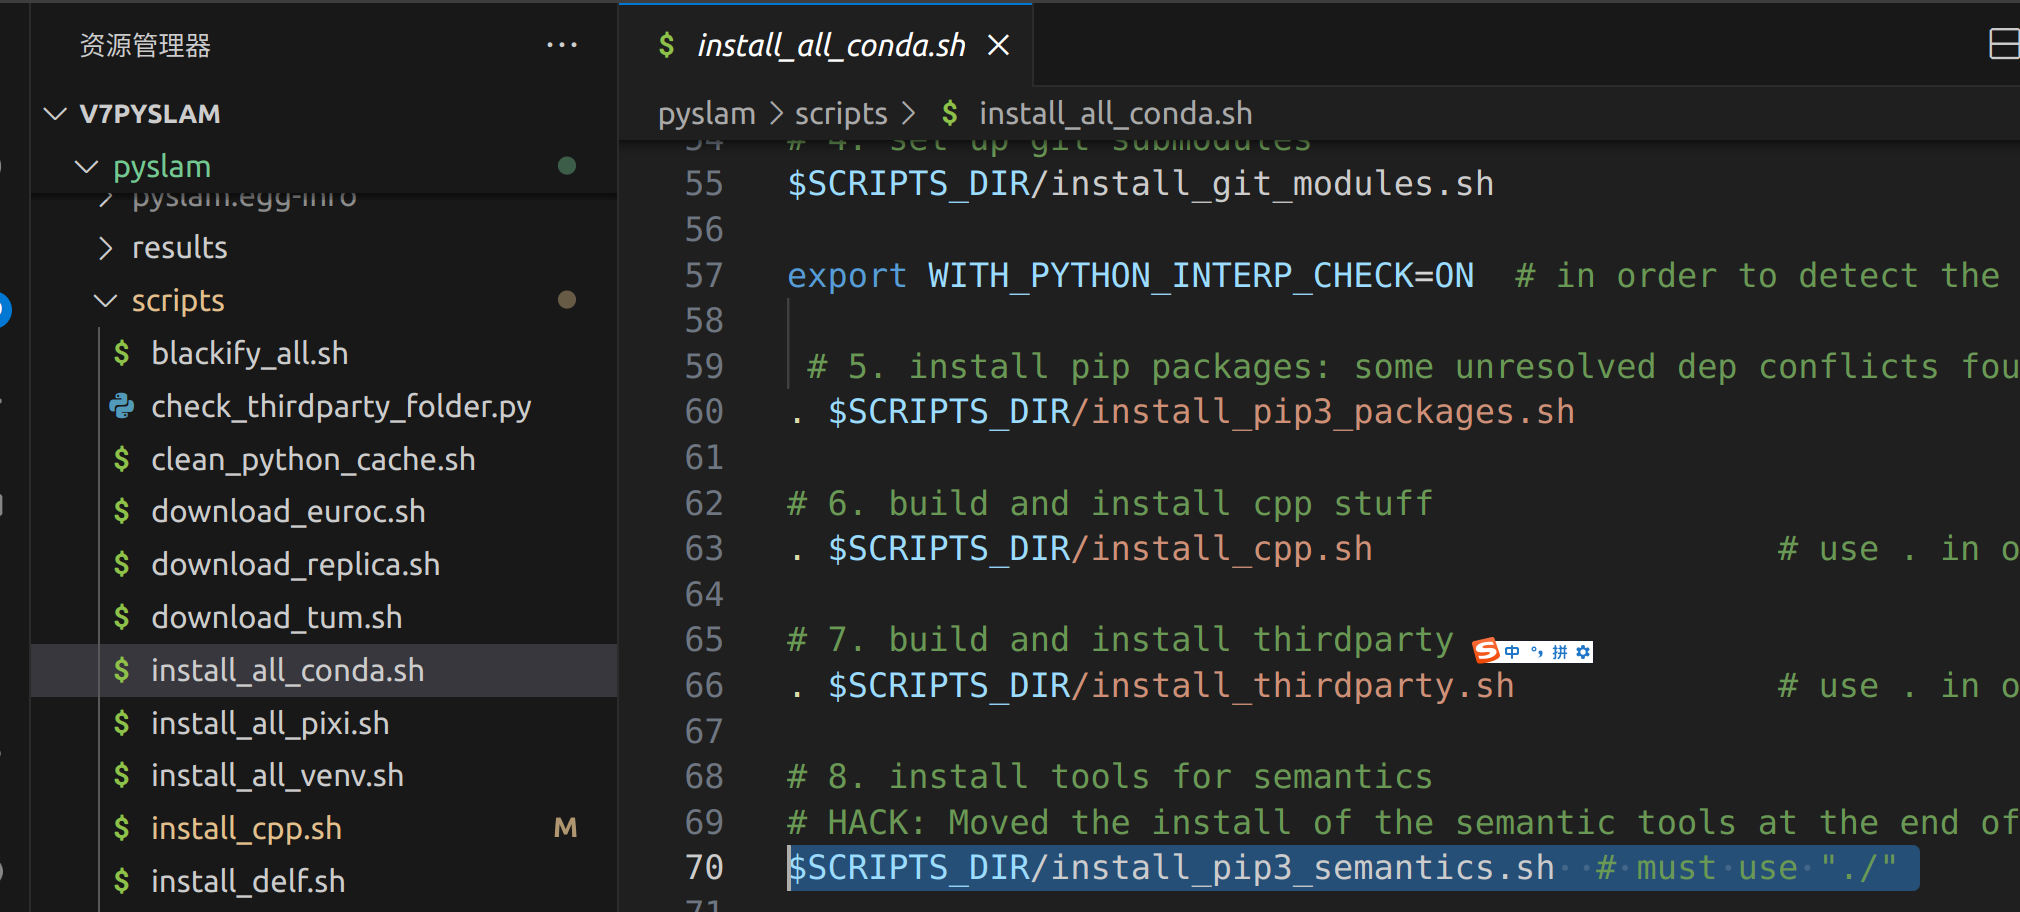
./install_all.sh
但是会出很多问题,在此之前
首先执行一次自动安装,下载所有数据和配置文件
2 手动解决问题
2-0 创建conda环境
./install_all.sh

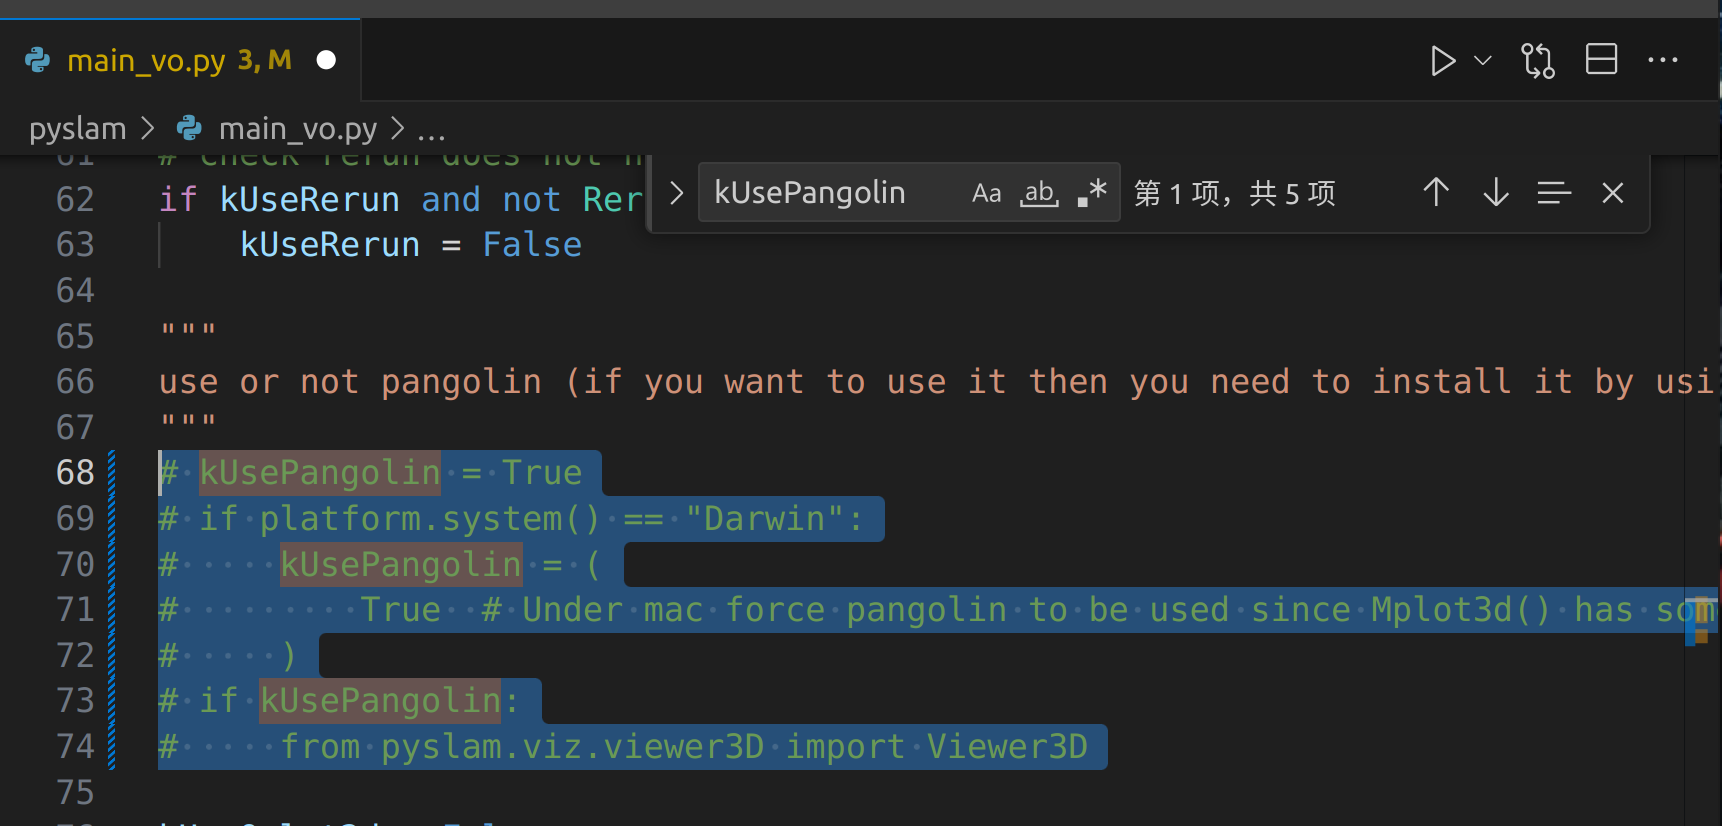
创建 名字是pyslam python3.11的conda 环境


2-1装默认库
numpy 一定要低于2.0
pip install "numpy<2" --force-reinstall
最后所有装完 在执行一次
pip install --upgrade pip setuptools wheel build
pip install -e .

# NOTE: these are the "system" packages that are needed within conda to build code from source
conda install -y -c conda-forge \
    pkg-config \
    glew \
    cmake \
    suitesparse \
    lapack \
    glew glfw mesa-libgl-devel-cos7-x86_64 \
    libtiff zlib jpeg eigen tbb libpng \
    x264 ffmpeg \
    freetype cairo \
    pygobject gtk2 gtk3 glib xorg-xorgproto \
    libwebp expat \
    compilers gcc_linux-64 gxx_linux-64 tbb tbb-devel \
    boost openblas
2-3 安装pytorch
脚本虽然自动装 但是各种问题
查看
python -c "import torch; print(torch.__version__)"

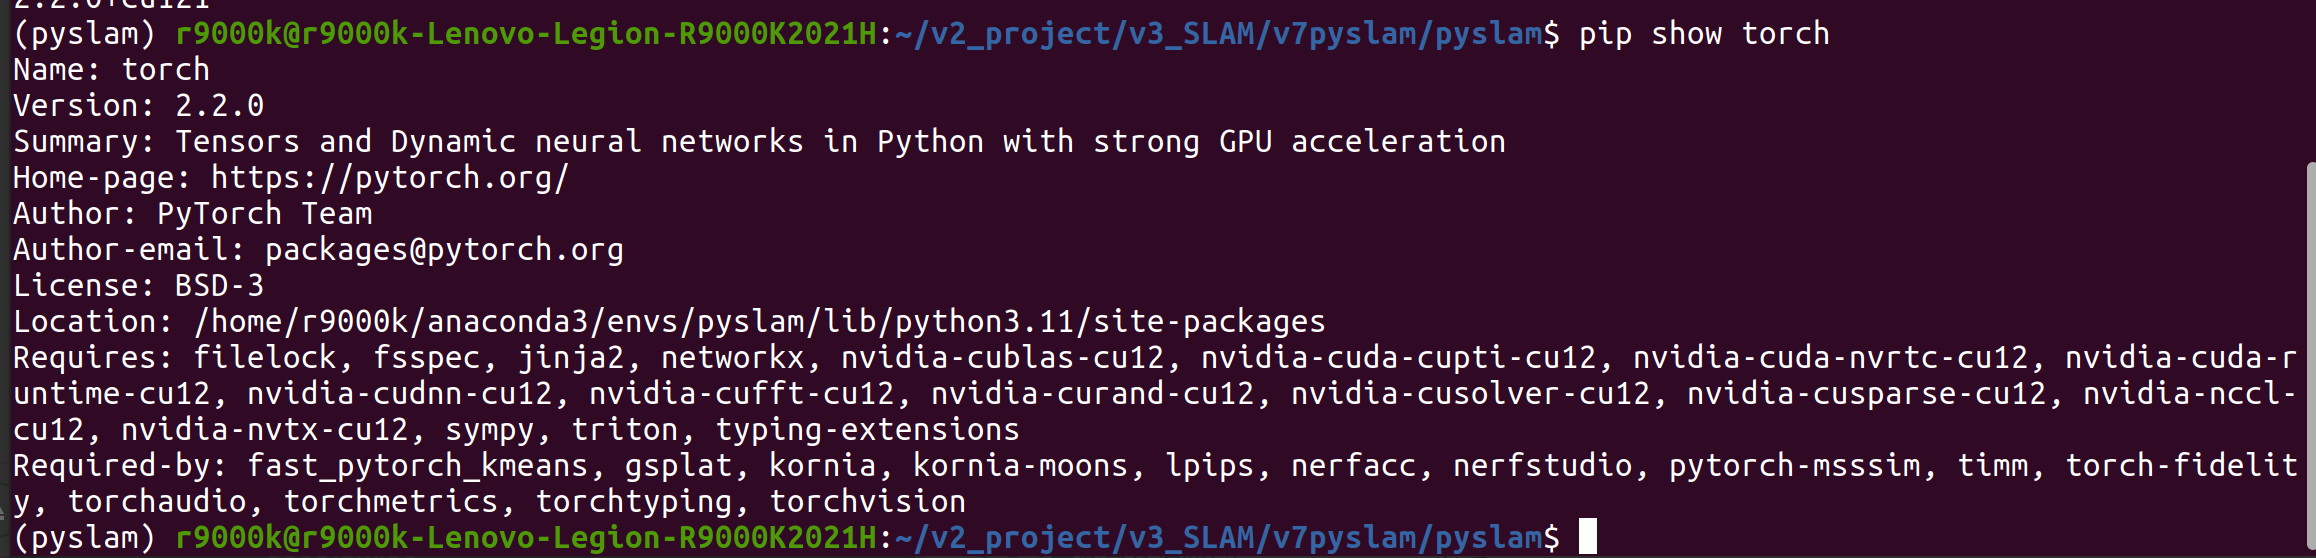
# 检查驱动版本
nvidia-smi
(我系统明明是cuda11.8 为啥这里显示12.2 不小心更新了管理器? )

# 激活环境
conda activate pyslam
# 安装特定版本的PyTorch 2.2
pip install torch==2.2.0 torchvision==0.17.0 torchaudio==2.2.0 --index-url https://download.pytorch.org/whl/cu118
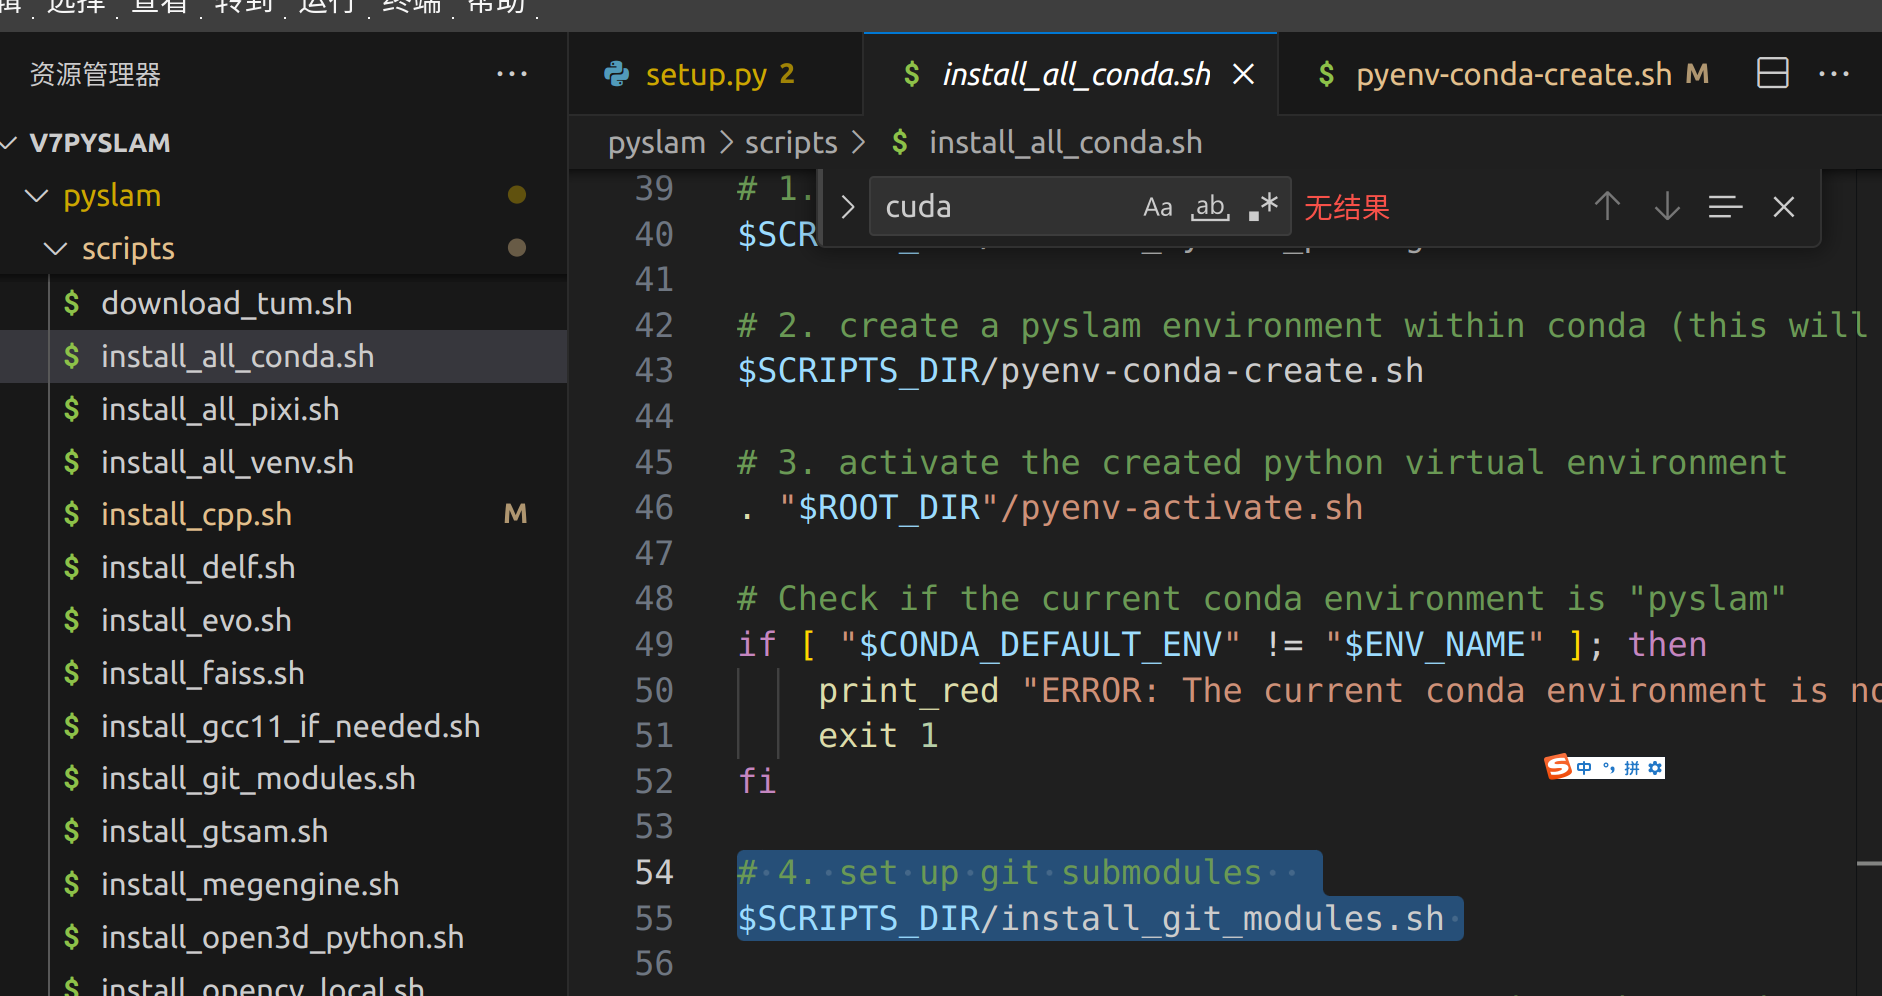
# 每次新脚本记得激活环境activate the created python virtual environment

# 4. set up git submodules
5 安装pip库

5-1 安装opencv


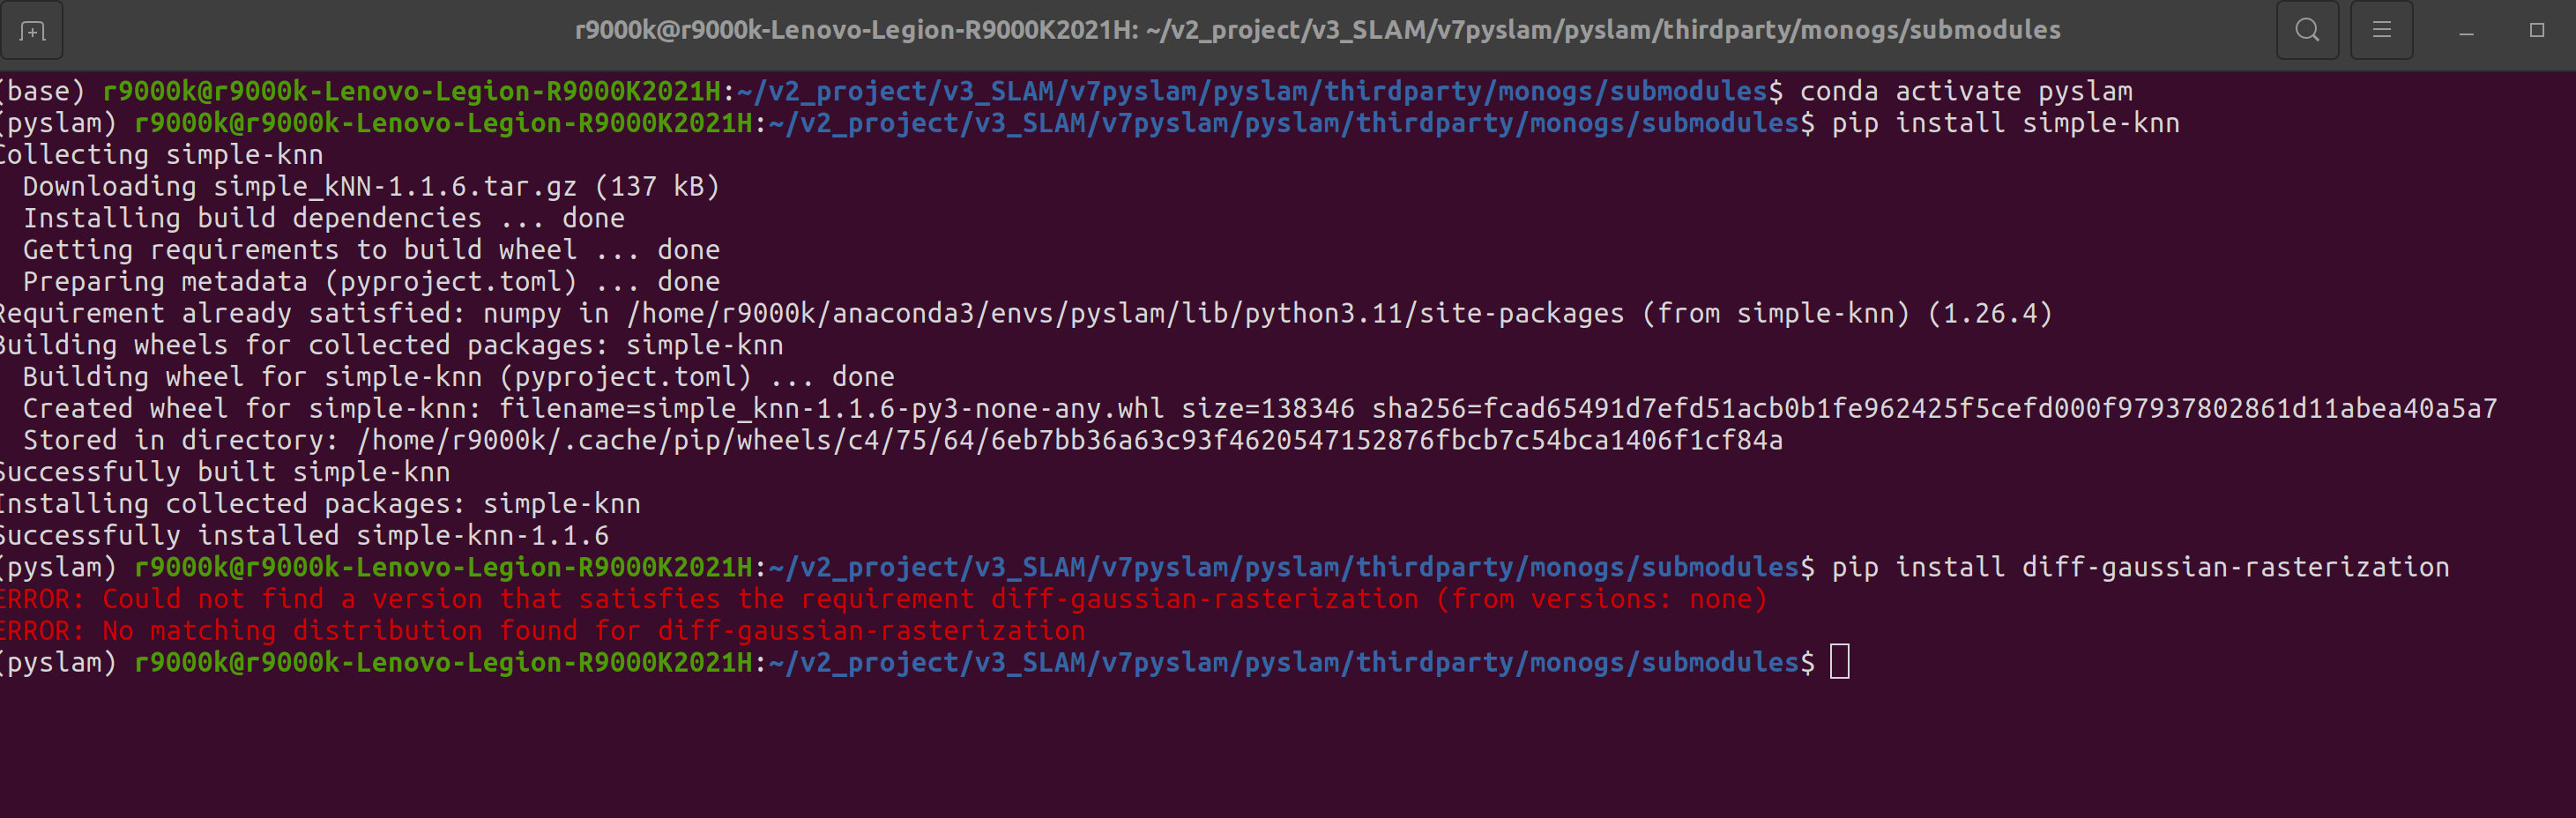
5-2安装 monogs 3D高斯 可跳过不装
如果报错 手动安装
当初装3d高斯项目 通过sudo解决么,但是这个不行,一但sudo 就会导致python 环境切换到默认环境的py3.8,脱离当前环境
后来单独pip install 名字 也通过了。

如果不行再试试这个或者跳过 不影响其他的执行
    sudo /home/r9000k/anaconda3/envs/pyslam/bin/python3.11 -m pip install ./thirdparty/monogs/submodules/simple-knn
    sudo /home/r9000k/anaconda3/envs/pyslam/bin/python3.11 -m pip install ./thirdparty/monogs/submodules/diff-gaussian-rasterization

这里报错了,是高斯渲染工程安装时候报的2个错误额,我这里先不用monogs,先跳过。
- 运行高斯散射和基于dust3r的方法需要CUDA 。请运行以下命令检查是否已安装合适的CUDA工具包版本。
./cuda_config.sh - 解决
https://www.cnblogs.com/gooutlook/p/17677113.html
报错原因是要给sudo权限,但是sudo 回到导致切换到系统环境 所以conda环境 p要给全路径python
但是sudo 还是切换到python3.8
sudo /home/r9000k/anaconda3/envs/pyslam/bin/python3.11 -m pip install ./thirdparty/monogs/submodules/simple-knn


sudo /home/r9000k/anaconda3/envs/pyslam/bin/python3.11 -m pip install ./thirdparty/monogs/submodules/diff-gaussian-rasterization
5-3 其他安装
鉴于为了适配sma3 我在python3.12 重新安装了
但是 tensorflow==2.16.2 可能存在不适配,但是我应该用不到这部分。
# Install tesorflow and related packages
pip install tensorflow==2.13
pip install tensorflow_hub  # required by VPR
pip install tf_slim==1.1.0
pip install protobuf==3.20.3 --force-reinstall # delf

pip3 install -U imgviz

pip install "numpy<2"
6 编译c++ 库
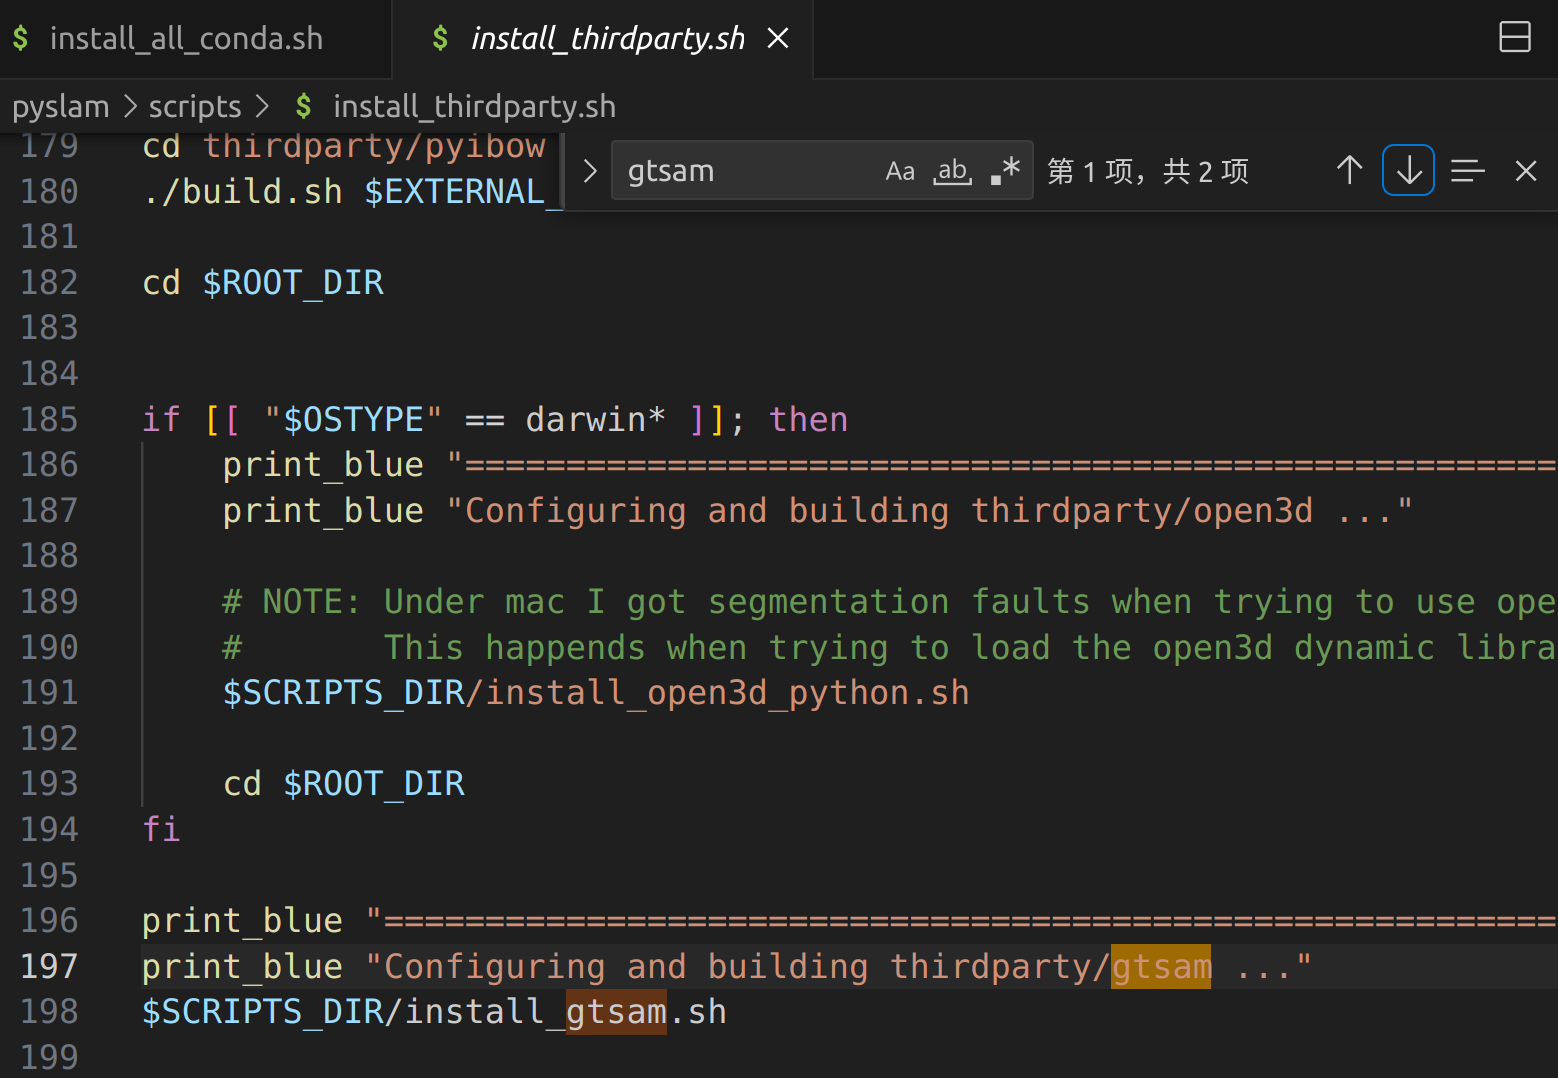
6-1 修改opencv 依赖路径
直接安装源码自带的
如果系统没装的话,讲道理自动脚本应该从源码编译了opoencv4.1以及python版本,但是我这个系统环境有opencv3.49.
我也编译了4.5 但是没加载到默认系统环境中

#pixi shell           # If you use pixi, this activates the pyslam environment.
. pyenv-activate.sh   # Activate `pyslam` python environment. Only needed once in a new terminal. Not needed with pixi.
./scripts/opencv_check.py

这里把自己的opencv4.5.5编译好的 拷贝过来了。

或者自己编译的库拷贝到工程目录下

编译通过

7 安装 . $SCRIPTS_DIR/install_thirdparty.sh

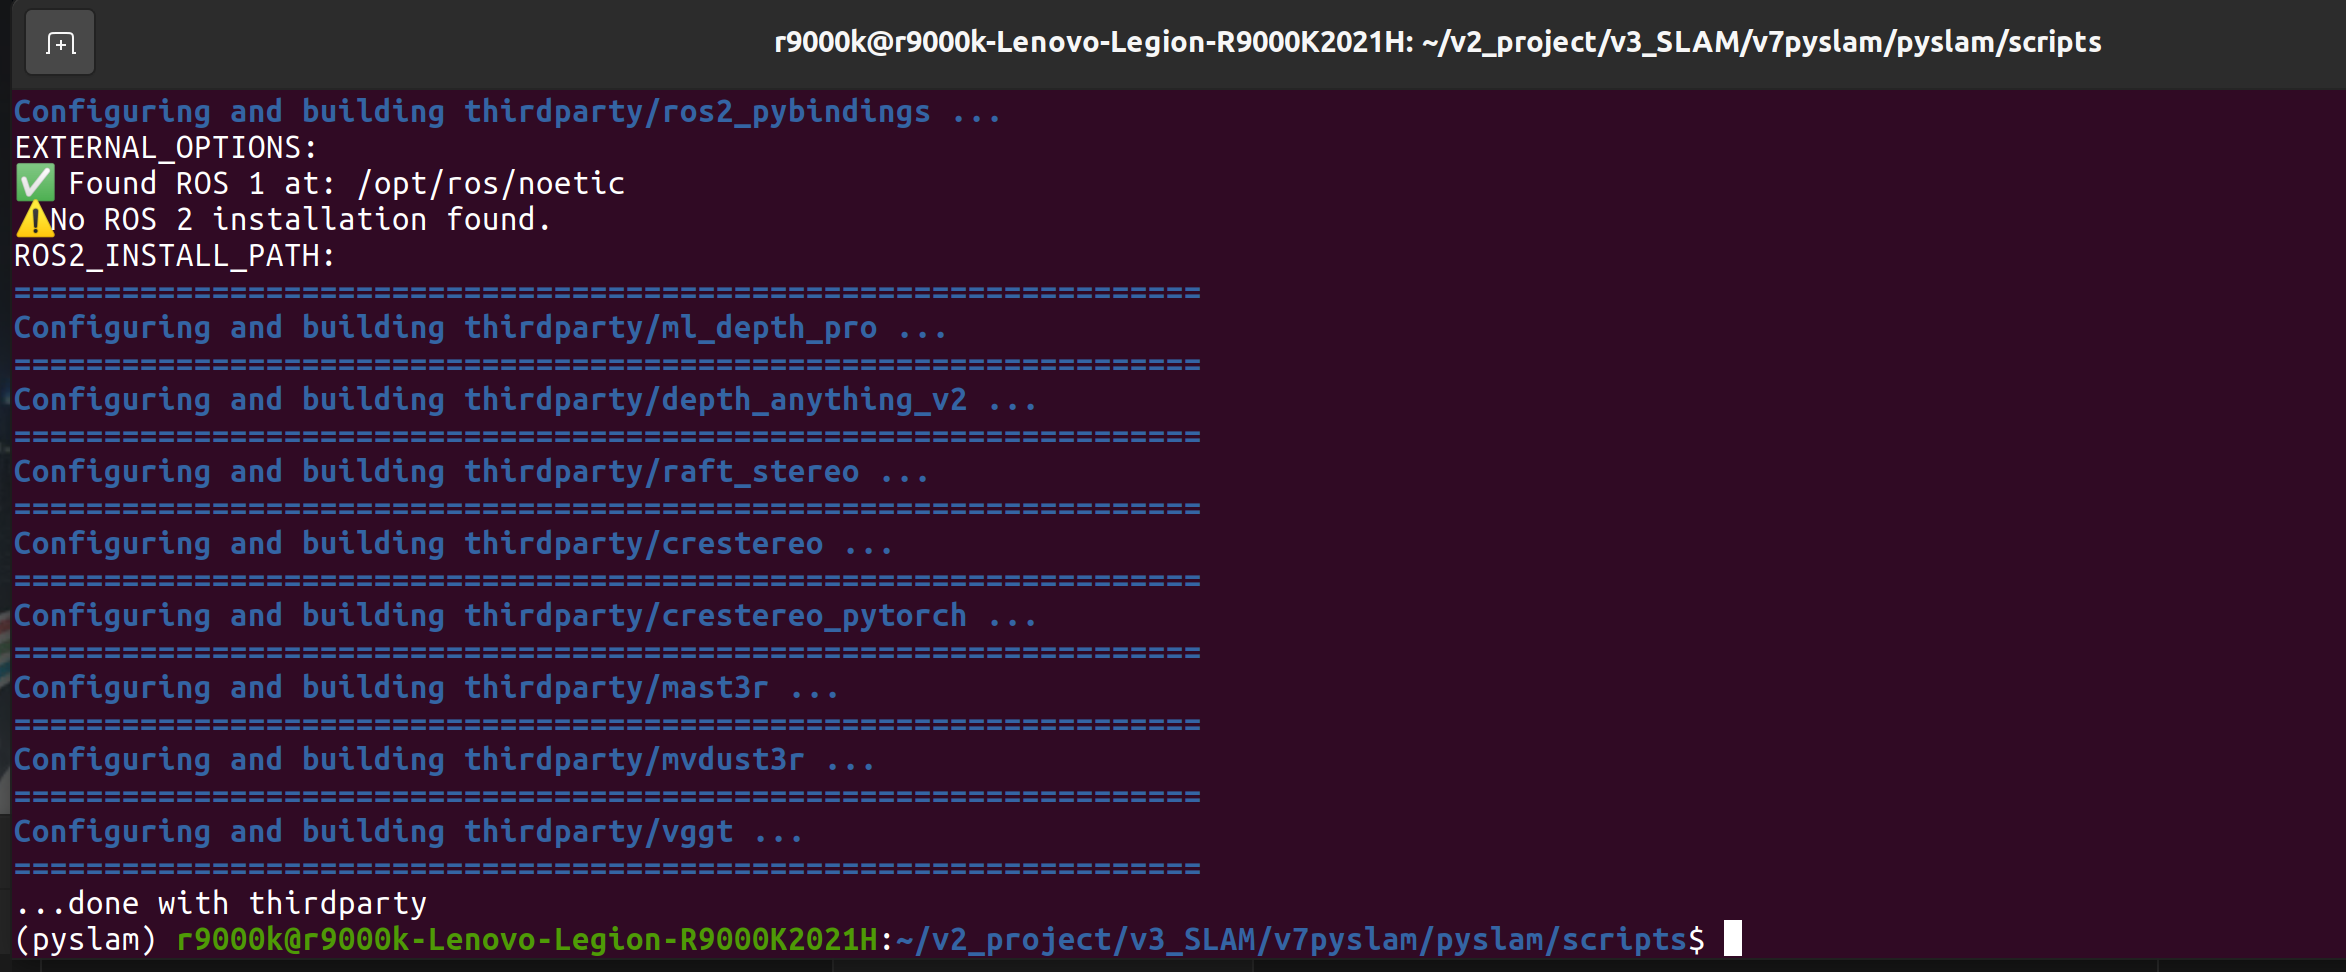
8 $SCRIPTS_DIR/install_pip3_semantics.sh

安装的包说明
- transformers==4.38.2 - Hugging Face的Transformer模型库
- f3rm - 密集特征字段模型(用于CLIP)
- timm==1.0.15 - PyTorch图像模型
- opencv-python - 计算机视觉库
- numpy<2 - 数值计算库(1.x版本)

9 最后确认安装
必须执行
pip install "numpy<2" --force-reinstall
pip install opencv-python
pip install opencv-contrib-python
请注意 pip 的opencv版本和 install_cpp.sh以及 install_opencv_local.sh 可能不是一个版本
理论上应该用的是同一套。
10 其他报错
错误1 gtsam tbb 库不对应问题 报错,核心原因检测到系统里有两个这种库,反复编译了都不行。
单独执行 main_vo.py 报错,但是main_slam.py就不报错
核心在于引用了
from pyslam.viz.viewer3D import Viewer3D

注销这个库的使用
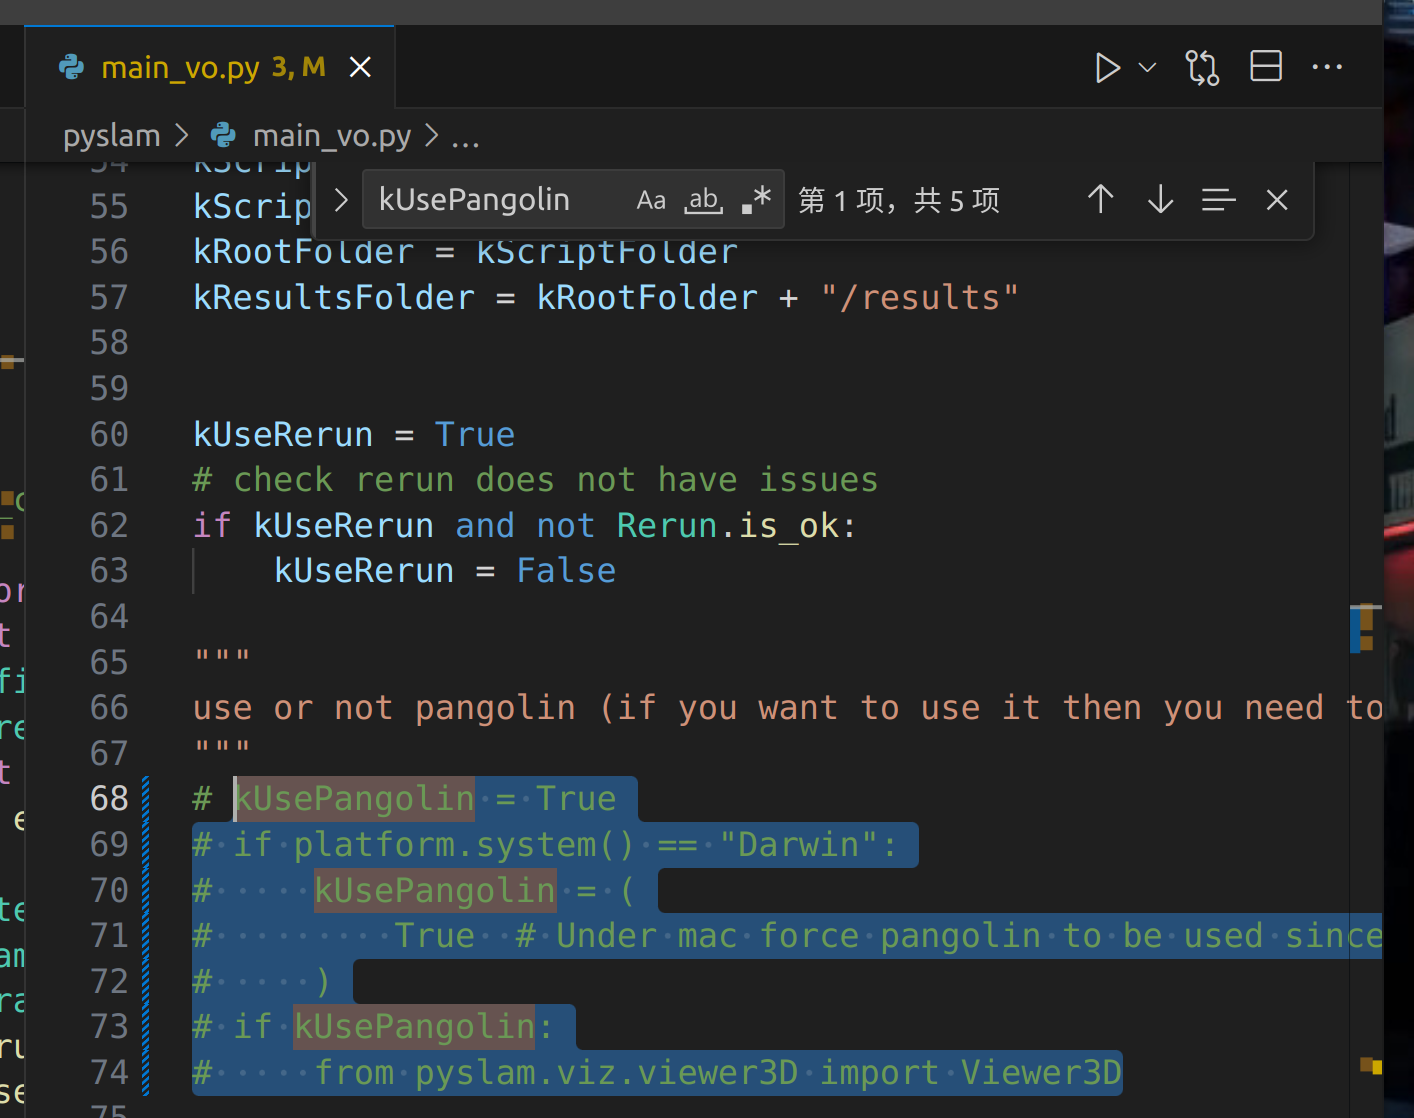
注销这个库的引用就可以看了

但是为什么 main_slam.py就可以用?

说明:gtsam是图优化引擎
目前,pySLAM 同时支持g2o和gtsam进行图优化,g2o默认引擎为 。您可以gtsam通过在 中设置True以下参数来启用pyslam/config_parameters.py:
  # Optimization engine
  kOptimizationFrontEndUseGtsam = True
  kOptimizationBundleAdjustUseGtsam = True
  kOptimizationLoopClosingUseGtsam = True
此外,该gtsam_factors软件包还为原始 gtsam 框架中未提供的功能提供了自定义 Python 绑定。详情请参见此处。
原版本自动安装脚本
2 如果使用的是tensorflow 更高级版本
# 升级到兼容的版本组合
pip install --upgrade tensorflow
pip install --upgrade protobuf
pip install PyQt5 PyQt5-tools
pip install evo==1.12.0
pip install kornia
卸载原有的pango
11 运行测试
激活环境
conda activate pyslam
11-1单纯测试vo
python main_vo.py
要注销
frame: 1095, timestamp: 113.6706
num inliers in pose estimation: 1246
average pixel shift: 7.525677680969238
# matched points:  1750 , # inliers:  1288 , matcher type:  LK , tracker type:  LK
absolute scale:  0.8037401087913717
estimated t with norm |t|:  1.0  (just for sake of clarity)
drawing feature tracks, num features matched: 1750
# outliers:  462
detector: SHI_TOMASI , #features: 2000 , [kp-filter: SAT ]
# new detected points:  2000
..................................
frame: 1096, timestamp: 113.7746
num inliers in pose estimation: 1270
average pixel shift: 7.703734397888184
# matched points:  1888 , # inliers:  1465 , matcher type:  LK , tracker type:  LK
absolute scale:  0.7995783056042577
estimated t with norm |t|:  1.0  (just for sake of clarity)
drawing feature tracks, num features matched: 1888
# outliers:  423
detector: SHI_TOMASI , #features: 1969 , [kp-filter: SAT ]
# new detected points:  1969
11-2全流程建图定位
python mian_slam.py
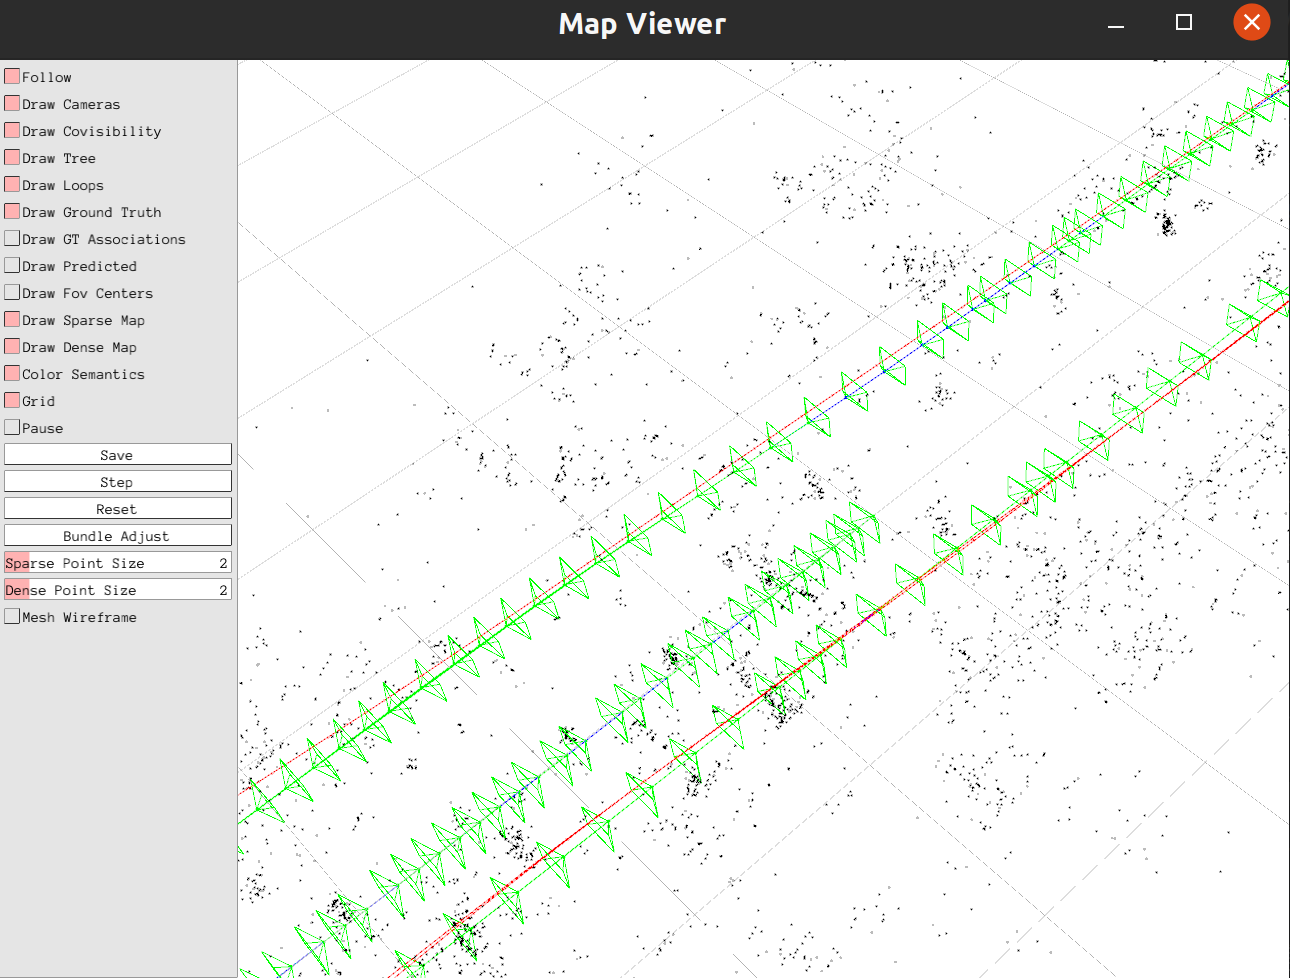
image: 1099, timestamp: 114.1903, duration: 0.10400000000001342
 @tracking MONOCULAR, img id: 1099, frame id: 1099, state: OK
img.shape: (370, 1226, 3), camera: 370x1226
timestamp:  114.1903
detector: ORB2 , #features: 2000
descriptor: ORB2 , #features: 2000
detector: ORB2 , descriptor: ORB2 , #features: 2000  (#ref: 2000 ), [kp-filter: NONE ]
#replaced points:  13
using motion model for next pose prediction
>>>> tracking previous frame ...
search frame by projection
checking orientation consistency - valid matches % : 86.53846153846155 % of  104 matches
# matched map points in prev frame: 90
descriptor sigma:  95.9021159492344
pose opt proj-frame-frame
pose optimization: available 104 points, found 26 bad points
     error^2: 0.910099,  ok: 1
>>>> tracking local map...
# matched map points in local map: 41, perc%: 1.88
pose opt proj-map-frame
pose optimization: available 119 points, found 9 bad points
     error^2: 1.104111,  ok: 1
#cleaned vo points:  0
 F(1099) #matched points: 110, KF(1095) #matched points: 186
is_local_mapping_idle:  True , local_mapping_queue_size:  0
 NEW KF
 Adding new KF with id 1099, img shape: (370, 1226, 3), img_right shape: None, depth shape: None
New keyframe created: 1099, local_mapping_queue_size: 1
 map: 20769 points, 485 keyframes
Tracking: elapsed_time:  0.10176682472229004
 @local mapping
search_frame_for_triangulation - timer:  0.001037254
..................................
search_frame_for_triangulation - timer:  0.000606554
image: 1100, timestamp: 114.2943, duration: 0.09999999999999432
 @tracking MONOCULAR, img id: 1100, frame id: 1100, state: OK
img.shape: (370, 1226, 3), camera: 370x1226
timestamp:  114.2943
search_frame_for_triangulation - timer:  0.000704261
detector: ORB2 , #features: 2000
descriptor: ORB2 , #features: 2000
detector: ORB2 , descriptor: ORB2 , #features: 2000  (#ref: 2000 ), [kp-filter: NONE ]
#replaced points:  0
using motion model for next pose prediction
>>>> tracking previous frame ...
search frame by projection
search_frame_for_triangulation - timer:  0.004561907
checking orientation consistency - valid matches % : 86.73469387755102 % of  98 matches
# matched map points in prev frame: 85
descriptor sigma:  96.54184435431097
pose opt proj-frame-frame
search_frame_for_triangulation - timer:  0.015111979
pose optimization: available 98 points, found 27 bad points
     error^2: 1.061821,  ok: 1
search_frame_for_triangulation - timer:  0.003814207
>>>> tracking local map...
search_frame_for_triangulation - timer:  0.000934381
search_frame_for_triangulation - timer:  0.000884725
search_frame_for_triangulation - timer:  0.000851761
search_frame_for_triangulation - timer:  0.000738341
search_frame_for_triangulation - timer:  0.000663265
search_frame_for_triangulation - timer:  0.000659353
search_frame_for_triangulation - timer:  0.000537903
search_frame_for_triangulation - timer:  0.000801197
search_frame_for_triangulation - timer:  0.000639868
search_frame_for_triangulation - timer:  0.000612352
search_frame_for_triangulation - timer:  0.000601526
search_frame_for_triangulation - timer:  0.001145714
search_frame_for_triangulation - timer:  0.000454445
# matched map points in local map: 79, perc%: 3.51
pose opt proj-map-frame
search_frame_for_triangulation - timer:  0.011566376
pose optimization: available 150 points, found 13 bad points
     error^2: 1.064196,  ok: 1
#cleaned vo points:  0
 F(1100) #matched points: 137, KF(1099) #matched points: 119
is_local_mapping_idle:  False , local_mapping_queue_size:  0
 map: 20852 points, 485 keyframes
Tracking: elapsed_time:  0.11638092994689941
 local optimization - perc bad observations: 0.64 %
 KF(1099) #points: 164
其他测试
文件config.yaml作为配置系统、目标数据集及其在pyslam/config_parameters.py中设置的全局配置参数的单一入口点。
要使用 VO 和 SLAM 脚本处理不同的数据集,您需要更新config.yaml文件:
type请在相应部分选择您的数据集DATASET(更多详情请参见下文“数据集”部分)。这将标识相应的数据集部分(例如KITTI_DATASET,、TUM_DATASET等)。- 在选定的数据集部分选择
sensor_type(mono,,)。stereorgbd - 在数据集部分选择相机文件(更多详细信息请参见下面的“相机设置”
settings部分)。 - 请据此进行设置。更多详情请参见下面的“数据集”
groudtruth_file部分(另请参见文件)。io/ground_truth.pyio/convert_groundtruth_to_simple.py
您可以使用config.yamlGLOBAL_PARAMETERS文件中的相应部分来覆盖pyslam/config_parameters.py中设置的全局配置参数。这在运行SLAM 评估时尤其有用。
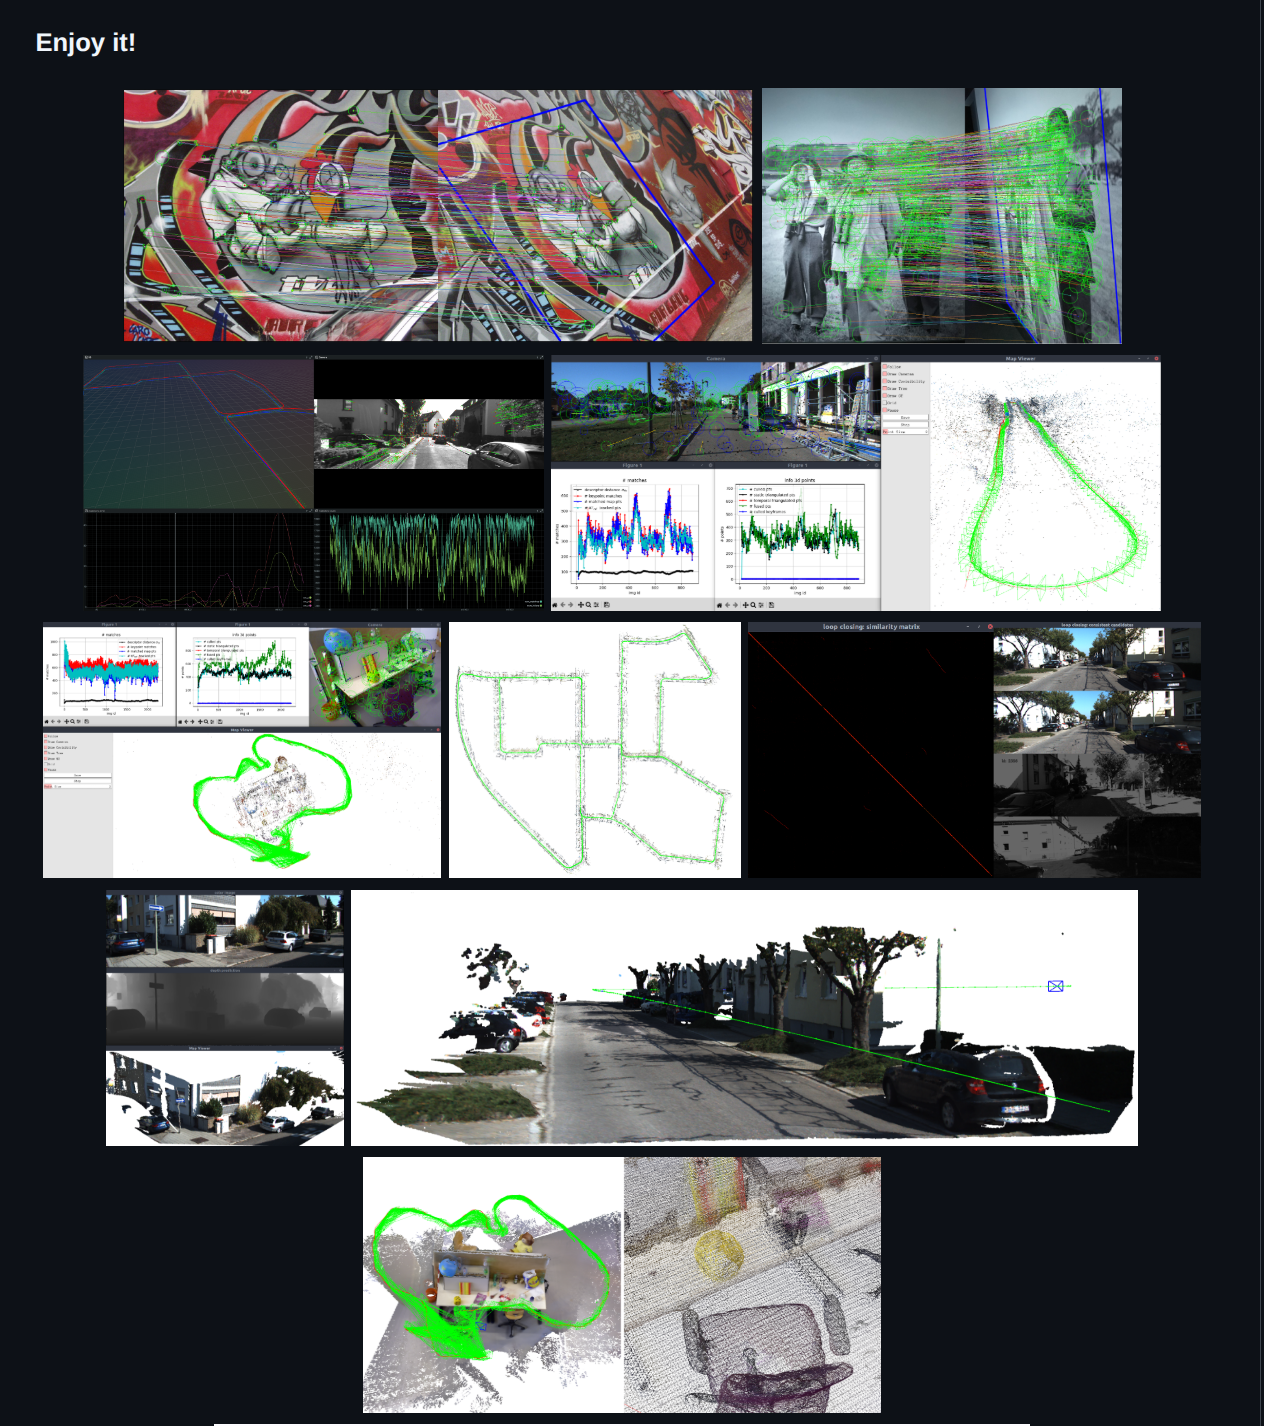
如果您只想测试基本特征跟踪功能(特征检测器+特征描述符+特征匹配器)并体验不同的可用本地特征,请运行
#pixi shell           # If you use pixi, this activates the pyslam environment.
. pyenv-activate.sh   # Activate `pyslam` python environment. Only needed once in a new terminal. Not needed with pixi.
./main_feature_matching.py
在上述任何脚本中,您可以从ORB、SIFT、SURF、BRISK、AKAZE、SuperPoint等中选择任何检测器/描述符(有关更多信息,请参阅下面的“支持的本地功能”部分)。
子文件夹中提供了一些基本示例test/cv。特别是对于特征检测/描述,您可能还需要查看test/cv/test_feature_manager.py文件。
在运行完整 SLAM 时,默认情况下启用回环检测,可以通过设置禁用kUseLoopClosing=False。pyslam/config_parameters.py不同的配置选项可以在pyslam/loop_closing/loop_detector_configs.pyLoopDetectorConfigs中找到:代码注释提供了更多有用的详细信息。
可以通过使用示例中的示例来开始尝试循环闭合方法。建议从test/loopclosing示例test/loopclosing/test_loop_detector.py开始。
DBoW2,,DBoW3并且VLAD需要预训练词汇表。基于 ORB 的词汇表会自动下载到data文件夹中(参见pyslam/loop_closing/loop_detector_configs.py)。
要创建新词汇,请按照以下步骤操作:
-
生成描述符数组:使用脚本
test/loopclosing/test_gen_des_array_from_imgs.py生成用于训练新词汇表的描述符数组。通过跟踪器配置选择所需的描述符类型。 -
DBOW 词汇生成:使用脚本训练目标 DBOW 词汇表
test/loopclosing/test_gen_dbow_voc_from_des_array.py。 -
VLAD 词汇生成:使用脚本训练目标 VLAD“词汇”
test/loopclosing/test_gen_vlad_voc_from_des_array.py。
训练好词汇表后,您可以将其添加到pyslam/loop_closing/loop_detector_vocabulary.py中,并在pyslam/loop_closing/loop_detector_configs.py中创建一个使用该词汇表的新循环检测器配置。
大多数方法不需要预先训练词汇表。具体来说:
iBoW并且OBindex2:这些方法逐步构建二进制词袋,并在需要时将(前端)非二进制描述符转换为二进制描述符。- 其他方法:如 、 、 、 、 等方法
HDC_DELF直接SAD提取AlexNet其特定的全局描述符NetVLAD,并使用专用聚合器处理它们,而与所使用的前端描述符无关。CosPlaceEigenPlacesMegaloc
如上所述,只有DBoW2、DBoW3和VLAD需要预先训练的词汇表。
当选择基于预训练词汇表(例如DBoW2,、DBoW3和VLAD)的循环检测方法时,请确保以下几点:
- 后端和前端使用相同的描述符类型(这也会自动检查一致性),或者它们的描述符管理器是独立的(更多详细信息请参见pyslam/loop_closing/loop_detector_configs.py
LoopDetectorConfigs中的配置选项)。 - 我们提供了相应的预训练词汇表。更多详情,请参阅词汇管理部分。
如果您缺少与所选前端描述符类型兼容的词汇表,您可以采用以下方法之一:
- 创建并加载词汇表(请参阅词汇表管理部分)。
- 选择一种
*_INDEPENDENT与独立本地特征管理器配合使用的循环检测器方法。 - 选择一种无需使用专业术语的闭环闭合方法。
有关更多详细信息,请参阅文件pyslam/loop_closing/loop_detector_configs.py。
SLAM 后端包含一个体积重建流程。该流程默认处于禁用状态。您可以通过设置kUseVolumetricIntegration=True并选择您偏好的方法kVolumetricIntegrationType来启用它pyslam/config_parameters.py。目前有两种方法可用:TSDF和GAUSSIAN_SPLATTING(参见pyslam/dense/volumetric_integrator_factory.py)。请注意,您需要 CUDA 才能运行GAUSSIAN_SPLATTING方法。
目前,体积重建流程使用以下组件:
- RGBD数据集
- 当使用 深度估计器时
- 在后端使用立体数据集时(您不能在后端使用单目数据集进行深度预测,更多详情请点击此处)
- 在前端(模拟 RGBD 传感器),可以对每个处理过的关键帧进行深度预测/估计。
要获得网格作为输出,请进行kVolumetricIntegrationExtractMesh=True设置pyslam/config_parameters.py。
使用此脚本main_map_dense_reconstruction.py可以重新加载已保存的稀疏地图,并以已定位的关键帧作为输入执行密集重建。您可以直接在脚本中选择所需的密集重建方法。
- 要检查体积积分器正在做什么,请在另一个 shell 中运行
tail -f logs/volumetric_integrator.log(从存储库根文件夹)。 - 要保存获得的密集图和稀疏图,请按
SaveGUI 上的按钮。
您可以使用CloudCompare检查输出点云/网格。
对于已保存的高斯散射模型,您可以通过以下方式将其可视化:
- 使用超片编辑器(将保存的高斯散射点云拖放到
.ply编辑器界面中)。 - 进入文件夹
test/gaussian_splatting并运行:python test_gsm.py --load <gs_checkpoint_path>
该目录<gs_checkpoint_path>应具有以下结构:├── gs_checkpoint_path ├── pointcloud # folder containing different subfolders, each one with a saved .ply econding the Gaussian splatting model at a specific iteration/checkpoint ├── last_camera.json ├── config.yml
如果您在运行 SLAM 时目标是进行体素重建,则可以启用关键帧生成策略,该策略旨在管理关键帧视场 (FOV) 中心的空间分布。相机的 FOV 中心定义为图像中心的反投影,该反投影是使用帧的中值深度计算得出的。启用此策略后,仅当新关键帧的 FOV 中心与最近的现有关键帧的 FOV 中心之间的距离超过预定义距离时,才会生成新关键帧。您可以通过在 YAML 设置中设置以下参数来启用此策略:
KeyFrame.useFovCentersBasedGeneration: 1  # compute 3D fov centers of camera frames by using median depth and use their distances to control keyframe generation
KeyFrame.maxFovCentersDistance: 0.2       # max distance between fov centers in order to generate a keyframe
可用的深度预测模型既可用于 SLAM 后端,也可用于前端。
- 后端:可以通过设置参数并在其中选择您喜欢的参数,在体积重建流程中启用深度预测。
kVolumetricIntegrationUseDepthEstimator=TruekVolumetricIntegrationDepthEstimatorTypepyslam/config_parameters.py - 前端:可以通过在前端设置参数来启用深度预测
kUseDepthEstimatorInFrontEnd。pyslam/config_parameters.py此功能可根据输入的彩色图像估算深度图像,以模拟 RGBD 相机。请注意,此功能目前仍处于实验阶段 [WIP]。
备注:
- 对于单目SLAM,请勿在后端体积积分中使用深度预测:SLAM的(伪)尺度会与深度预测的绝对尺度冲突。对于单目数据集,您可以在前端启用深度预测(以模拟RGBD传感器)。
- 深度推断可能非常慢(例如,在普通机器上使用 DepthPro 处理每张图像大约需要 1 秒)。因此,由此产生的体重建流程可能非常慢。
更多详情请参阅文件depth_estimation/depth_estimator_factory.py。系统支持立体视觉和单目视觉预测方法。您可以使用脚本测试深度预测/估计main_depth_prediction.py。

kDoSemanticMapping=True可以通过设置参数来启用语义映射管道pyslam/config_parameters.py。配置所用语义映射模块的最佳方法是在文件中进行修改pyslam/semantics/semantic_mapping_configs.py。
目前有多种语义映射方法可供选择(详见此处)。我们目前支持使用密集语义分割进行语义映射。
DEEPLABV3:来自torchvision,预先训练于 COCO/VOC。SEGFORMER:来自transformers,预先在 Cityscapes 或 ADE20k 上训练。CLIP:来自f3rm开放词汇支持包。
将语义特征赋予图像上的关键点,并将这些关键点融合到地图点中。语义特征可以是:
- 标签:分类标签,以数字形式表示。
- 概率向量:每个类别的概率向量。
- 特征向量:从编码器获得的特征向量。这通常用于开放词汇映射。
测试可用分割模型的最简单方法是运行:test/semantics/test_semantic_segmentation.py。


 浙公网安备 33010602011771号