

https://github.com/facebookresearch/sam2
未来加速
专门针对无人机的SAM变体
- MobileSAM: 轻量版,适合无人机边缘计算
- EfficientSAM: 高效率版本
- EdgeSAM: 边缘设备优化
3. SAM 2 与 SAM 的对比
性能提升
准确性:SAM 2 在图像分割任务中的准确度显著高于 SAM,速度提升了 6 倍。
视频分割:SAM 2 在视频对象分割任务中表现优异,特别是在跟踪物体部件方面,优于现有的专门视频分割模型。
功能扩展
视频支持:SAM 2 将 SAM 的图像分割能力扩展到了视频领域,支持实时视频分割和对象跟踪。
记忆机制:SAM 2 引入了流式内存模块,能够在视频帧之间保持对象连续性,解决了遮挡和动态变化问题。
交互性与效率
交互时间减少:SAM 2 所需的交互时间比 SAM 减少了三倍,显著提高了用户效率。
多掩码生成:SAM 2 在复杂场景中能够生成多个有效掩码,并根据置信度选择最佳结果,进一步提升了分割精度。
1 测试
大模型 8秒 1800*1200 压缩一半

单张图片测试
cuda11.8
# 使用前需要先安装 SAM 2。代码需要python>=3.10、 以及torch>=2.5.1和。请按照此处的torchvision>=0.20.1说明安装 PyTorch 和 TorchVision 依赖项。您可以使用以下方式在 GPU 机器
# # 创建名为 sam2 的 Python 3.10 环境
# conda create -n sam2 python=3.10 -y
# # Linux/Mac
# conda activate sam2
# win10
# activate sam2
# 安装 PyTorch (CUDA 11.8 版本)
# conda install pytorch==2.5.1 torchvision==0.20.1 torchaudio==2.5.1 pytorch-cuda=11.8 -c pytorch -c nvidia -y
# pip install torch==2.5.1 torchvision==0.20.1 torchaudio==2.5.1 --index-url https://download.pytorch.org/whl/cu118
# 安装核心依赖 报错的话手动逐个装库 去掉版本号
# pip install numpy>=1.24.4 tqdm>=4.66.1 hydra-core>=1.3.2 iopath>=0.1.10 pillow>=9.4.0 --use-pep517
#然后执行 总体安装
# # 开发模式安装(可编辑)
#pip install -e .
#如果需要notebooks交互
#pip install -e ".[notebooks]"
# 默认cuda开启
# #下载权重
# cd checkpoints && \
# ./download_ckpts.sh && \
# cd ..
# sam2.1_hiera_tiny.pt
# sam2.1_hiera_small.pt
# sam2.1_hiera_base_plus.pt
# sam2.1_hiera_large.pt
import cv2
import torch
import time
import numpy as np
from sam2.build_sam import build_sam2
from sam2.sam2_image_predictor import SAM2ImagePredictor
from sam2.automatic_mask_generator import SAM2AutomaticMaskGenerator
# 1 图像缩放倍数
scalse=3
# 2. 使用 OpenCV 加载图像
image_path = "npu2pm.JPG"
# 模型参数
mode_test='base'
model_ = {
"base": ("sam2.1_hiera_b.yaml", "sam2.1_hiera_base_plus.pt"),
"large": ("sam2.1_hiera_l.yaml", "sam2.1_hiera_large.pt"),
"small": ("sam2.1_hiera_s.yaml", "sam2.1_hiera_small.pt"),
"tiny": ("sam2.1_hiera_t.yaml", "sam2.1_hiera_tiny.pt")
}
model_type, mode_path = model_.get(mode_test) # 默认数据
#E:\v0_Project\V0_Mybao\v8_slam\2分割\sam2-main\test
checkpoint = "../checkpoints/"+mode_path
model_cfg = "../sam2/configs/sam2.1/"+model_type
# project_dir="E:/v0_Project/V0_Mybao/v8_slam/2分割/sam2-main/test/"
# 1. 设置设备(GPU/CPU)
# select the device for computation
if torch.cuda.is_available():
device = torch.device("cuda")
elif torch.backends.mps.is_available():
device = torch.device("mps")
else:
device = torch.device("cpu")
print(f"using device: {device}")
print("PyTorch version:", torch.__version__)
# print("Torchvision version:", torchvision.__version__)
print("CUDA is available:", torch.cuda.is_available())
if device.type == "cuda":
# use bfloat16 for the entire notebook
torch.autocast("cuda", dtype=torch.bfloat16).__enter__()
# turn on tfloat32 for Ampere GPUs (https://pytorch.org/docs/stable/notes/cuda.html#tensorfloat-32-tf32-on-ampere-devices)
if torch.cuda.get_device_properties(0).major >= 8:
torch.backends.cuda.matmul.allow_tf32 = True
torch.backends.cudnn.allow_tf32 = True
# predictor = SAM2ImagePredictor(build_sam2(model_cfg, checkpoint))
sam2 = build_sam2(model_cfg, checkpoint, device=device, apply_postprocessing=False)
#mask_generator = SAM2AutomaticMaskGenerator(sam2)
'''
速度优化建议
降低点采样密度
减少 points_per_side(如从64→32)或增大 crop_n_points_downscale_factor(如从2→3)。
放宽过滤阈值
降低 pred_iou_thresh(如0.7→0.6)和 stability_score_thresh(如0.92→0.85)。
减少多尺度计算
设置 crop_n_layers=0(禁用多尺度)或 use_m2m=False。
增大批次大小
提高 points_per_batch(如128→256)以提升GPU利用率。
质量优化建议
提高点采样覆盖
增加 points_per_side(如64→128)或减少 crop_n_points_downscale_factor(如2→1)。
严格过滤低质量掩码
提高 pred_iou_thresh(如0.7→0.8)和 stability_score_thresh(如0.92→0.95)。
启用多尺度处理
设置 crop_n_layers=2并保持 use_m2m=True。
总结
速度敏感场景:减少点数、禁用多尺度、放宽阈值。
SAM2AutomaticMaskGenerator(
points_per_side=32, # 减少采样点
crop_n_layers=0, # 禁用多尺度
pred_iou_thresh=0.6, # 放宽IoU阈值
points_per_batch=256, # 增大批次
use_m2m=False # 禁用Mask2Mask
)
质量敏感场景:增加点数、启用多尺度、严格过滤。
SAM2AutomaticMaskGenerator(
points_per_side=128, # 增加采样点
crop_n_layers=2, # 启用多尺度
pred_iou_thresh=0.8, # 严格IoU阈值
min_mask_region_area=10, # 保留更小目标
use_m2m=True # 启用Mask2Mask
)
平衡模式:调整 points_per_side和 crop_n_layers为核心杠杆。
'''
#大模型 8秒
# mask_generator = SAM2AutomaticMaskGenerator(
# model=sam2,
# points_per_side=64, #单边均匀采样的点数(总点数 = points_per_side²)
# points_per_batch=128, #每批处理的点数(GPU并行计算分块)
# pred_iou_thresh=0.7, #掩码预测IoU的阈值(低于此值的掩码被丢弃)
# stability_score_thresh=0.92, #稳定性分数阈值(衡量掩码对输入扰动的鲁棒性)
# stability_score_offset=0.7, #稳定性分数计算的偏移量(值↑ → 分数计算更宽松)
# crop_n_layers=0, #多尺度裁剪的层数(0=禁用,值↑ → 更多尺度) 禁用多尺度)
# box_nms_thresh=0.7, #边界框非极大值抑制(NMS)的IoU阈值
# crop_n_points_downscale_factor=2, #多尺度裁剪时点数的降采样比例(值↑ → 点数↓)
# min_mask_region_area=25.0, #最小掩码区域面积(像素数小于此值的掩码被丢弃)
# use_m2m=True, # 是否使用Mask2Mask后处理(利用前一尺度结果优化下一尺度)
# )
mask_generator = SAM2AutomaticMaskGenerator(
model=sam2,
points_per_side=32,
points_per_batch=128,
pred_iou_thresh=0.7,
stability_score_thresh=0.92,
stability_score_offset=0.7,
crop_n_layers=0,
box_nms_thresh=0.7,
crop_n_points_downscale_factor=2,
min_mask_region_area=25.0,
use_m2m=False,
)
image_cv = cv2.imread(image_path) # OpenCV 默认 BGR 格式
if image_cv is None:
raise ValueError("无法加载图像,请检查路径是否正确!")
# 3. 转换 BGR → RGB(SAM2 需要 RGB 格式)
height, width = image_cv.shape[:2]
new_width = int(width // scalse)
new_height = int(height // scalse)
image = cv2.resize(image_cv, (new_width, new_height))
image = cv2.cvtColor(image, cv2.COLOR_BGR2RGB) # 转为RGB格式
'''
input_prompts
1 点提示 (point prompts)
格式:(x, y)坐标 + 标签(1=前景点,0=背景点)
示例:[{"type": "point", "data": [[x1, y1], [x2, y2]], "labels": [1, 0]}]
(前景点 (x1,y1)+ 背景点 (x2,y2))
2 框提示 (box prompts)
格式:[x_min, y_min, x_max, y_max]
示例:[{"type": "box", "data": [x1, y1, x2, y2]}]
(框住目标区域)
3 掩码提示 (mask prompts)
格式:低分辨率掩码(如 256x256的粗糙分割)
示例:[{"type": "mask", "data": <low_res_mask_tensor>}]
4 文本提示 (text prompts)
格式:描述目标的文本(如果模型支持)
示例:[{"type": "text", "data": "a dog"}]
5 无提示 (None)
如果不提供提示,SAM2 会生成整个图像的全局分割掩码
'''
# 4. 设置提示(示例:点提示)
# input_prompts = [
# {"type": "point", "data": [[100, 200]], "labels": [1]} # 前景点 (x=100, y=200)
# ]
input_prompts=None
# 5. 推理
start_time = time.time()
# with torch.inference_mode(), torch.autocast("cuda", dtype=torch.bfloat16):
# predictor.set_image(image_rgb) # 传入 RGB 格式的 numpy 数组
# masks, scores, _ = predictor.predict(input_prompts)
'''
segmentation : the mask
area : the area of the mask in pixels
bbox : the boundary box of the mask in XYWH format
predicted_iou : the model's own prediction for the quality of the mask
point_coords : the sampled input point that generated this mask
stability_score : an additional measure of mask quality
crop_box : the crop of the image used to generate this mask in XYWH format
'''
masks = mask_generator.generate(image)
end_time = time.time()
print(f"预测耗时:{end_time - start_time:.4f} 秒") # 保留4位小数
print(len(masks))
import random
def show_anns_with_opencv(anns, image=None, borders=True, alpha=0.7):
"""
用 OpenCV 可视化 SAM2 的分割结果
:param anns: SAM2 输出的掩码列表(每个元素包含 'segmentation' 和 'area')
:param image: 原始图像(BGR格式),若为 None 则生成空白背景
:param borders: 是否绘制边界
:param alpha: 掩码透明度 (0~1)
"""
if len(anns) == 0:
return None
# 按面积排序(从大到小)
sorted_anns = sorted(anns, key=lambda x: x['area'], reverse=True)
# 初始化画布(若未提供原始图像,用白色背景)
if image is None:
h, w = sorted_anns[0]['segmentation'].shape[:2]
canvas = np.ones((h, w, 3), dtype=np.uint8) * 255
else:
canvas = image.copy()
# 遍历所有掩码
for ann in sorted_anns:
mask = ann['segmentation'].astype(np.uint8) # 二值掩码 (0/1)
# 生成随机颜色 (BGR格式)
color = (random.randint(1, 255), random.randint(0, 255), random.randint(0, 255))
# 将掩码叠加到画布上(半透明)
colored_mask = np.zeros_like(canvas)
colored_mask[mask > 0] = color
canvas = cv2.addWeighted(canvas, 1, colored_mask, alpha, 0)
# 绘制边界(可选)
if borders:
contours, _ = cv2.findContours(mask, cv2.RETR_EXTERNAL, cv2.CHAIN_APPROX_SIMPLE)
# 平滑轮廓(可选)
contours = [cv2.approxPolyDP(cnt, epsilon=0.01*cv2.arcLength(cnt, True), closed=True) for cnt in contours]
cv2.drawContours(canvas, contours, -1, (0, 0, 255), thickness=1) # 红色边界
return canvas
#SAM2 输出的掩码可能是 bool类型(True/False)或 float类型(0.0/1.0)
# output_image=show_anns_with_opencv(masks,image)
output_image = image.copy()
for mask in masks:
# 为每个掩膜随机生成颜色
color = np.random.randint(0, 256, 3)
# 半透明叠加掩膜区域
output_image[mask['segmentation']] = color * 0.6 + output_image[mask['segmentation']] * 0.4
# 保存结果
cv2.imwrite("Result_"+mode_test+"_"+str(scalse)+"_"+image_path, cv2.cvtColor(output_image, cv2.COLOR_RGB2BGR))
# 打印分割结果统计
print(f"检测到 {len(masks)} 个分割区域")
print("第一个掩膜信息示例:", {k: v for k, v in masks[0].items() if k != 'segmentation'})
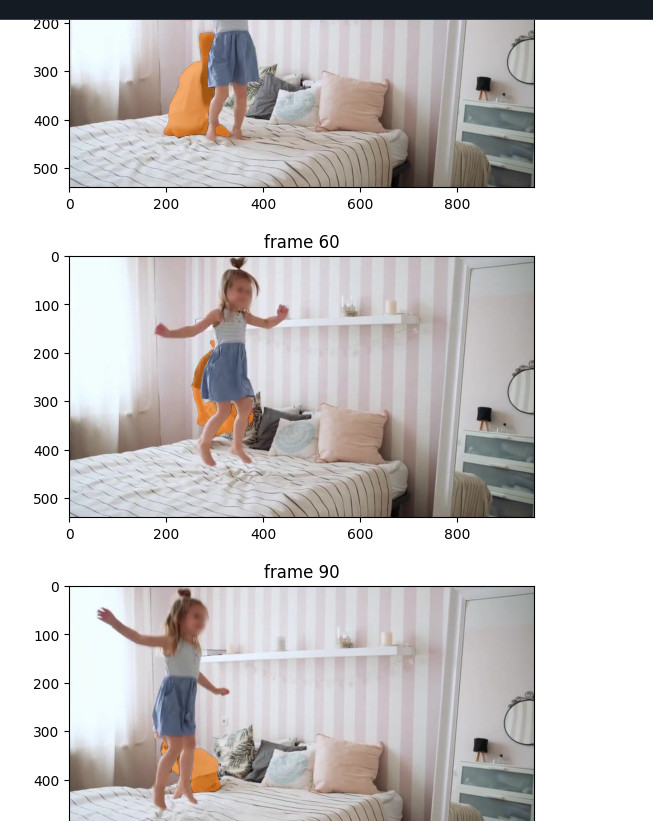
视频跟踪测试
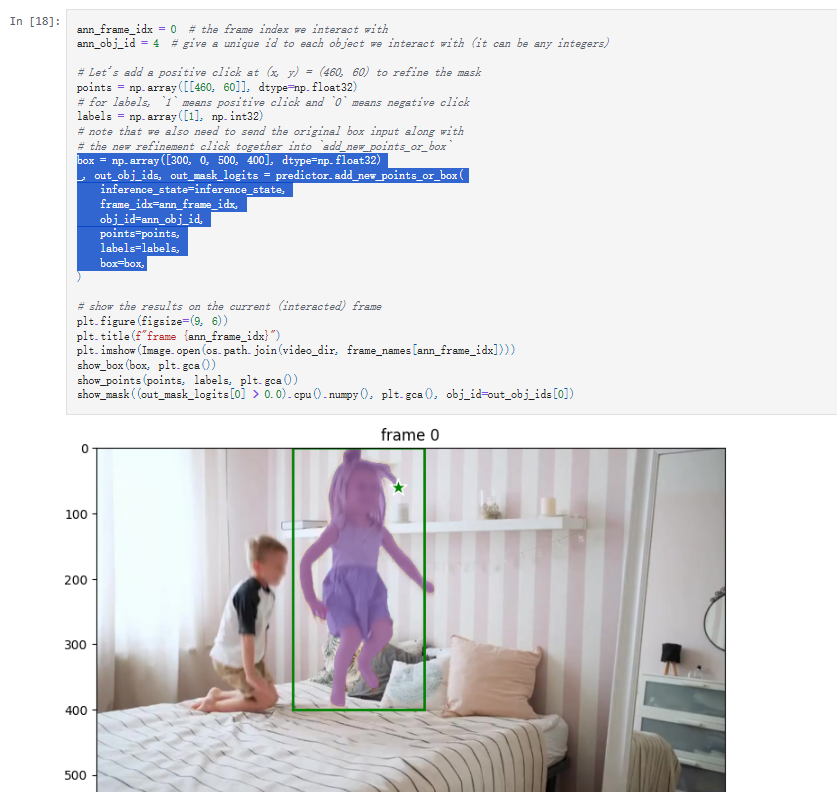
有关如何添加点击或框提示、进行细化以及跟踪视频中的多个对象的详细信息,请参阅video_predictor_example.ipynb中的示例(也可在此处的Colab 中)。

设置跟踪条件
'''
input_prompts
1 点提示 (point prompts)
格式:(x, y)坐标 + 标签(1=前景点,0=背景点)
示例:[{"type": "point", "data": [[x1, y1], [x2, y2]], "labels": [1, 0]}]
(前景点 (x1,y1)+ 背景点 (x2,y2))
2 框提示 (box prompts)
格式:[x_min, y_min, x_max, y_max]
示例:[{"type": "box", "data": [x1, y1, x2, y2]}]
(框住目标区域)
3 掩码提示 (mask prompts)
格式:低分辨率掩码(如 256x256的粗糙分割)
示例:[{"type": "mask", "data": <low_res_mask_tensor>}]
4 文本提示 (text prompts)
格式:描述目标的文本(如果模型支持)
示例:[{"type": "text", "data": "a dog"}]
5 无提示 (None)
如果不提供提示,SAM2 会生成整个图像的全局分割掩码
'''

 浙公网安备 33010602011771号