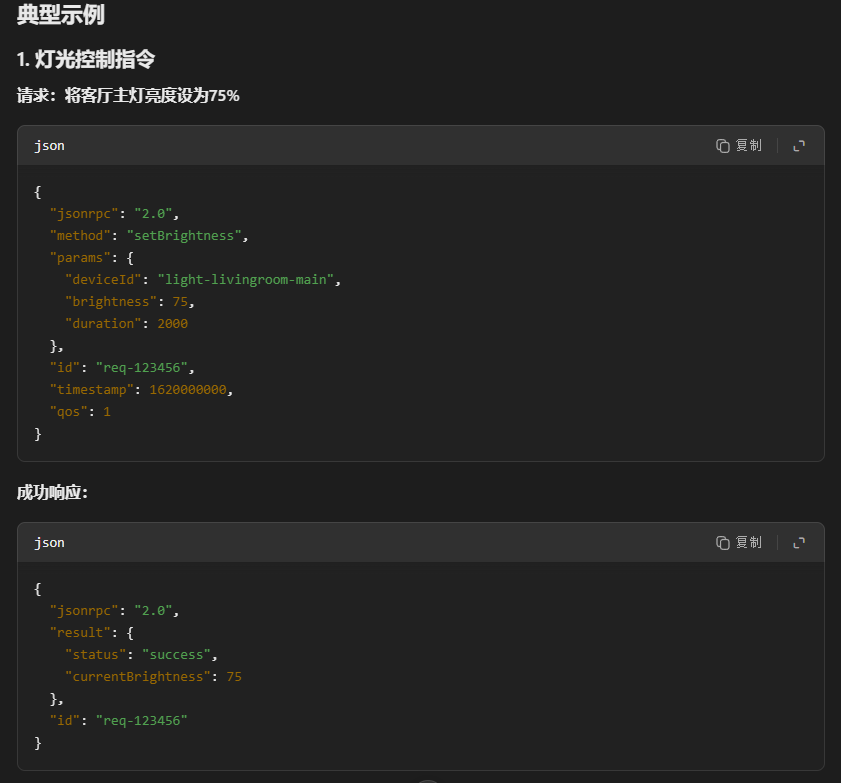
JSON-RPC 2.0 格式
MCP 协议物联网控制用法说明
https://github.com/78/xiaozhi-esp32/blob/main/docs/mcp-usage.md
【AI大模型应用开发】2.1 Function Calling连接外部世界 - 入门与实战(1)
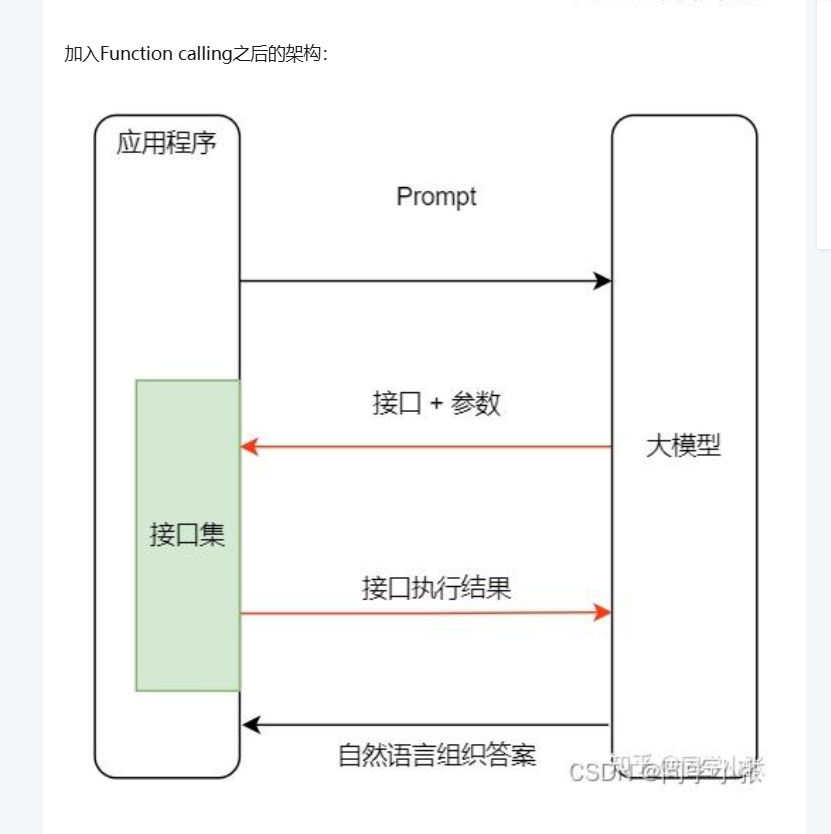
附篇:虾哥小智ESP32语音对讲机器人 - Function Calling 完整技术解析

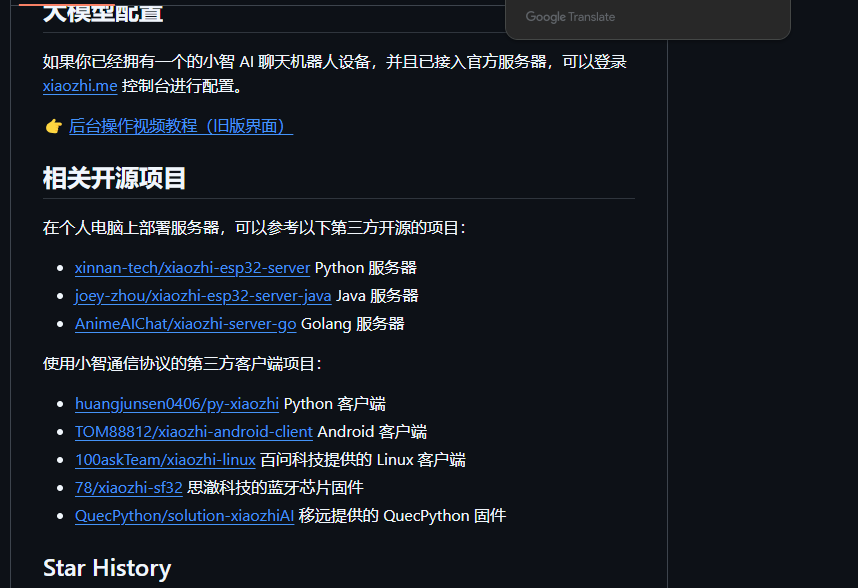

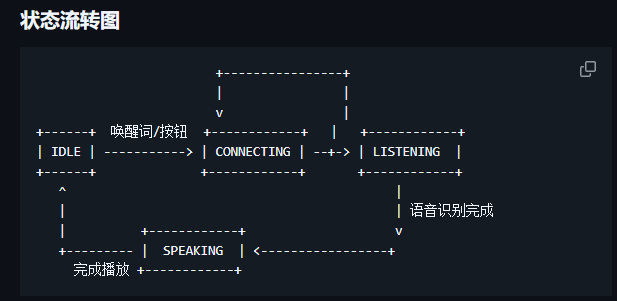
- AI语音交互:支持语音输入与识别,实现智能人机交互,提供自然流畅的对话体验
- 视觉多模态:支持图像识别和处理,提供多模态交互能力,理解图像内容
- 智能唤醒:支持多种唤醒词激活交互,免去手动操作的烦恼(可配置开启)
- 自动对话模式:实现连续对话体验,提升用户交互流畅度
- 系统控制工具:系统状态监控、应用程序管理、音量控制、设备管理等
- 日程管理工具:全功能日程管理,支持创建、查询、更新、删除事件,智能分类和提醒
- 定时任务工具:倒计时器功能,支持延时执行MCP工具,多任务并行管理
- 音乐播放工具:在线音乐搜索播放,支持播放控制、歌词显示、本地缓存管理
- 12306查询工具:12306铁路票务查询,支持车票查询、中转查询、列车路线查询
- 搜索工具:网络搜索和网页内容获取,支持必应搜索和智能内容解析
- 菜谱工具:丰富菜谱库,支持菜谱搜索、分类查询、智能推荐
- 地图工具:高德地图服务,支持地理编码、路径规划、周边搜索、天气查询
- 八字命理工具:传统八字命理分析,支持八字计算、婚姻分析、黄历查询
- 摄像头工具:图像捕获和AI分析,支持拍照识别和智能问答
- 设备管理架构:基于Thing模式的统一设备管理,支持属性和方法的异步调用
- 智能家居控制:支持灯光、音量、温度传感器等设备控制
- 状态同步机制:实时状态监控,支持增量更新和并发状态获取
- 可扩展设计:模块化设备驱动,易于添加新设备类型
- 多级音频处理:支持Opus编解码、实时重采样
- 语音活动检测:VAD检测器实现智能打断,支持语音活动实时监控
- 唤醒词检测:基于Vosk的离线语音识别,支持多唤醒词和拼音匹配
- 音频流管理:独立输入输出流,支持流重建和错误恢复
- 图形化界面:基于PyQt5的现代GUI,支持小智表情与文本显示,增强视觉体验
- 命令行模式:支持CLI运行,适用于嵌入式设备或无GUI环境
- 系统托盘:后台运行支持,集成系统托盘功能
- 全局快捷键:支持全局快捷键操作,提升使用便捷性
- 设置界面:完整的设置管理界面,支持配置自定义
- 加密音频传输:支持WSS协议,保障音频数据的安全性,防止信息泄露
- 设备激活系统:支持v1/v2双协议激活,自动处理验证码和设备指纹
- 错误恢复:完整的错误处理和恢复机制,支持断线重连
- 系统兼容:兼容Windows 10+、macOS 10.15+和Linux系统
- 协议支持:支持WebSocket和MQTT双协议通信
- 多环境部署:支持GUI和CLI双模式,适应不同部署环境
- 平台优化:针对不同平台的音频和系统控制优化
- 模块化架构:清晰的代码结构和职责分离,便于二次开发
- 异步优先:基于asyncio的事件驱动架构,高性能并发处理
- 配置管理:分层配置系统,支持点记法访问和动态更新
- 日志系统:完整的日志记录和调试支持
- API文档:详细的代码文档和使用指南
- 音频处理: Opus编解码、实时重采样
- 语音识别: Vosk离线模型、语音活动检测、唤醒词识别
- 协议通信: WebSocket/MQTT双协议支持、加密传输
- 配置系统: 分层配置、点记法访问、动态更新
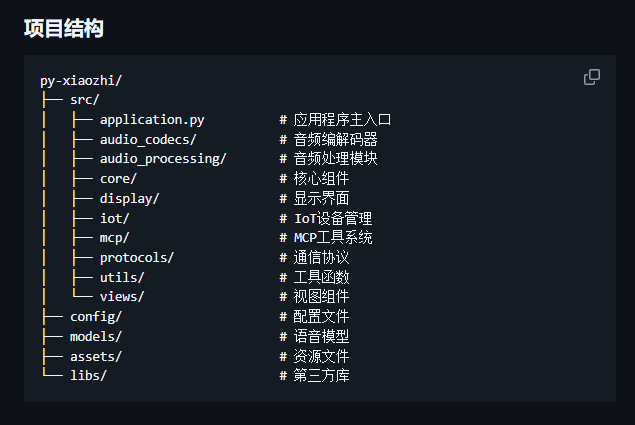
https://blog.csdn.net/weixin_46084533/article/details/148412996

https://blog.csdn.net/weixin_46084533/article/details/148422568?sharetype=blogdetail&sharerId=148422568&sharerefer=PC&sharesource=weixin_46084533&spm=1011.2480.3001.8118&login=from_csdn


1 现有程序输出

初次单纯唤醒,没有回复,送入物联网信息。

:26:22.917 -> 连接中...
19:26:23.551 -> =============== OnWebSocketConnected
19:26:23.722 -> ==================hello iot设备属性和操作函数信息josn上报 :
19:26:23.722 ->  {"session_id":"","type":"iot","update":true,"descriptors":[{"name":"Speaker","description":"扬声器","properties":{"volume":{"description":"当前音量值","type":"number"}},"methods":{"SetVolume":{"description":"设置音量","parameters":{"volume":{"description":"0到100之间的整数","type":"number"}}}}}]}
19:26:23.755 -> ==================hello iot设备属性和操作函数信息josn上报 :
19:26:23.755 ->  {"session_id":"","type":"iot","update":true,"descriptors":[{"name":"Led","description":"LED灯","properties":{"state":{"description":"LED灯开关状态","type":"boolean"}},"methods":{"TurnOff":{"description":"关闭LED灯","parameters":{}},"TurnOn":{"description":"打开LED灯","parameters":{}}}}]}
19:26:23.788 -> ==================hello iot设备属性和操作函数信息josn上报 :
19:26:23.788 ->  {"session_id":"","type":"iot","update":true,"descriptors":[{"name":"WS2812B","description":"RGB灯环","properties":{"color1":{"description":"1号灯颜色","type":"string"},"LedNums":{"description":"灯的数量","type":"number"},"brightness":{"description":"亮度(0-255)","type":"number"}},"methods":{"Clear":{"description":"清除所有LED","parameters":{}},"SetBrightness":{"description":"设置亮度","parameters":{"brightness":{"description":"亮度值(0-255)","type":"number"}}},"SetRangeIndexsColor":{"description":"设置连续LED范围颜色","parameters":{"start":{"description":"起始LED索引(1-总数)","type":"number"},"end":{"description":"结束LED索引(1-总数)","type":"number"},"red":{"description":"红色值(0-255)","type":"number"},"green":{"description":"绿色值(0-255)","type":"number"},"blue":{"description":"蓝色值(0-255)","type":"number"}}},"SetIndexColor":{"description":"设置指定LED颜色","parameters":{"index":{"description":"LED索引(1-总数)","type":"number"},"red":{"description":"红色值(0-255)","type":"number"},"green":{"description":"绿色值(0-255)","type":"number"},"blue":{"description":"蓝色值(0-255)","type":"number"}}}}}]}
19:26:23.889 -> ==================hello iot设备当前状态json上报 : {"session_id":"","type":"iot","update":true,"states":[{"name":"Speaker","state":{"volume":70}}]}
19:26:23.889 -> ==================hello iot设备当前状态json上报 : {"session_id":"","type":"iot","update":true,"states":[{"name":"Led","state":{"state":false}}]}
19:26:23.928 -> ==================hello iot设备当前状态json上报 : {"session_id":"","type":"iot","update":true,"states":[{"name":"WS2812B","state":{"color1":"{\"red\":0,\"green\":0,\"blue\":0}","LedNums":1,"brightness":128}}]}
19:26:23.928 -> ==================hello 设置ai处于聆听状态 s
19:26:23.928 -> ==================hello 1发送IOT设备信息json
19:26:23.974 -> state changed from 3 to 4
19:26:23.974 -> ==================hello 2单独唤醒小智 : {"session_id":"68f49dd6","type":"listen","state":"detect","text":"你好小智"}
19:26:23.974 -> 聆听中...
19:26:24.006 -> ==================tts
19:26:24.006 -> ==================tts start
19:26:24.040 -> state changed from 4 to 5
19:26:24.040 -> ==================stt
19:26:48.352 -> ==================hello 设置ai处于聆听状态 s
19:26:48.352 -> state changed from 5 to 4
19:26:48.352 -> 聆听中...
19:26:54.336 -> ==================tts
19:26:54.336 -> ==================tts start
19:26:54.336 -> state changed from 4 to 5
19:26:54.336 -> 说话中...
19:26:54.336 -> ==================stt
19:26:54.336 -> ==================stt >> 查询黄色灯的状态。
19:26:54.336 -> role: user 使用者询问语音内容,: 查询黄色灯的状态。
19:26:54.927 -> ==================llm
19:26:54.927 -> ==================llm emotion: happy
19:26:54.927 -> emotion: happy
19:26:55.335 -> ==================tts
19:26:55.335 -> ==================tts sentence_start
19:26:55.335 -> ==================tts sentence_start << 现在一号灯是关着的状态,颜色是黑色 ~
19:26:55.335 -> role: assistant 智能AI回复消息, content: 现在一号灯是关着的状态,颜色是黑色 ~
19:26:59.445 -> ==================tts
19:26:59.445 -> ==================tts sentence_end
19:26:59.445 -> ==================tts
19:26:59.445 -> ==================tts sentence_start
19:26:59.445 -> ==================tts sentence_start << 要帮你打开调成黄色吗?
19:26:59.445 -> role: assistant 智能AI回复消息, content: 要帮你打开调成黄色吗?
19:27:01.857 -> ==================tts
19:27:01.857 -> ==================tts sentence_end
19:27:01.857 -> ==================tts
19:27:01.857 -> ==================tts stop
19:27:01.947 -> ==================hello 设置ai处于聆听状态 s
19:27:01.992 -> state changed from 5 to 4
19:27:01.992 -> 聆听中...
19:27:04.742 -> ==================tts
19:27:04.742 -> ==================tts start
19:27:04.832 -> state changed from 4 to 5
19:27:04.832 -> 说话中...
19:27:04.832 -> ==================stt
19:27:04.832 -> ==================stt >> 需要。
19:27:04.832 -> role: user 使用者询问语音内容,: 需要。
19:27:05.239 -> ==================llm
19:27:05.239 -> ==================llm emotion: happy
19:27:05.239 -> emotion: happy
19:27:05.373 -> ==================tts
19:27:05.373 -> ==================tts sentence_start
19:27:05.373 -> ==================tts sentence_start << 好哒~
19:27:05.373 -> role: assistant 智能AI回复消息, content: 好哒~
19:27:06.630 -> ==================tts
19:27:06.630 -> ==================tts sentence_end
19:27:06.630 -> ==================tts
19:27:06.630 -> ==================tts sentence_start
19:27:06.630 -> ==================tts sentence_start << 马上把一号灯调成黄色!
19:27:06.630 -> role: assistant 智能AI回复消息, content: 马上把一号灯调成黄色!
19:27:09.154 -> ==================tts
19:27:09.154 -> ==================tts sentence_end
19:27:09.154 -> ==================iot 唤醒IOT物联网函数 : iot
19:27:09.154 -> ==================iot唤醒IOT物联网函数 : 名字 WS2812B  方法 SetIndexColor
19:27:09.154 -> ==================iot唤醒IOT物联网函数 参数 Parameters:
19:27:09.154 ->   [index] = 1 (number)
19:27:09.154 ->   [red] = 255 (number)
19:27:09.154 ->   [green] = 255 (number)
19:27:09.197 ->   [blue] = 0 (number)
19:27:09.197 -> IOT message: WS2812B, function: SetIndexColor
19:27:09.197 -> key: blue, value: 0
19:27:09.197 -> ==================tts
19:27:09.197 -> ==================tts start

19:27:09.197 -> ==================tts already speaking
19:27:09.197 -> key: green, value: 255
19:27:09.197 -> key: index, value: 1
19:27:09.197 -> key: red, value: 255
19:27:09.197 -> Set LED 1 to color RGB(255, 255, 0)
19:27:09.561 -> ==================llm
19:27:09.561 -> ==================llm emotion: laughing
19:27:09.561 -> emotion: laughing
19:27:09.652 -> ==================tts
19:27:09.652 -> ==================tts sentence_start
19:27:09.652 -> ==================tts sentence_start << 搞定啦!
19:27:09.652 -> role: assistant 智能AI回复消息, content: 搞定啦!
19:27:11.268 -> ==================tts
19:27:11.268 -> ==================tts sentence_end
19:27:11.268 -> ==================tts
19:27:11.268 -> ==================tts sentence_start
19:27:11.268 -> ==================tts sentence_start << 一号灯现在亮起暖暖的黄色咯~
19:27:11.312 -> role: assistant 智能AI回复消息, content: 一号灯现在亮起暖暖的黄色咯~
19:27:14.468 -> ==================tts
19:27:14.468 -> ==================tts sentence_end
19:27:14.505 -> ==================tts
19:27:14.505 -> ==================tts stop
19:27:14.721 -> ==================hello iot设备当前状态json上报 : {"session_id":"","type":"iot","update":true,"states":[{"name":"WS2812B","state":{"color1":"{\"red\":255,\"green\":255,\"blue\":0}"}}]}
19:27:14.757 -> ==================hello 设置ai处于聆听状态 s
19:27:14.757 -> state changed from 5 to 4
19:27:14.757 -> 聆听中...
19:27:18.138 -> ==================tts
19:27:18.138 -> ==================tts start
19:27:18.174 -> state changed from 4 to 5
19:27:18.174 -> 说话中...
19:27:18.174 -> ==================stt
19:27:18.174 -> ==================stt >> 退一下吧。
19:27:18.174 -> role: user 使用者询问语音内容,: 退一下吧。
19:27:18.668 -> ==================llm
19:27:18.668 -> ==================llm emotion: happy
19:27:18.702 -> emotion: happy
19:27:18.826 -> ==================tts
19:27:18.826 -> ==================tts sentence_start
19:27:18.826 -> ==================tts sentence_start << 好的~再见啦!
19:27:18.868 -> role: assistant 智能AI回复消息, content: 好的~再见啦!
19:27:20.943 -> ==================tts
19:27:20.943 -> ==================tts sentence_end
19:27:20.943 -> ==================tts
19:27:20.943 -> ==================tts stop
19:27:21.211 -> state changed from 5 to 2
19:27:21.211 -> 等待对话...
2 通信协议
https://xujiwei.com/blog/2025/04/ai-xiaozhi-esp32-protocol/
参考资料
异常处理
服务端主动断开连接
在跟小智 AI 说“再见”的时候,服务端会主动断连接,因此在这个时候,如果重新开始了手动对话,或者使用唤醒词触发对话,就需要重新连接服务器。
通信过程
小智 AI 客户端与服务端,可以使用 WebSocket 或者 MQTT 协议,这里为了方便就直接用 WebSocket 协议来学习了。
协议概述
在小智 AI 的通信过程中,WebSocket 用于实现客户端和服务器之间的实时、双向通信。主要传输以下类型的数据:
- 控制指令: 如开始/停止监听、中断TTS等。
- 文本信息: 如 LLM 的响应、情绪指令、配置信息等。
- 音频数据:
- 客户端 -> 服务器: 录制的 Opus 编码音频流。
- 服务器 -> 客户端: TTS 生成的 Opus 编码音频流。
- 状态同步: 如 TTS 播放开始/结束。
通信主要使用两种格式:
- JSON: 用于传输文本、控制指令和状态信息。
- Binary: 用于传输 Opus 编码的音频数据。
建立连接
-
客户端发起连接:客户端根据配置中的
WEBSOCKET_URL向服务器发起 WebSocket 连接请求。 -
发送头部信息:在建立 WebSocket 连接时,客户端需要发送必要的 HTTP 头部信息,包括:
-
Authorization:Bearer <access_token>(配置中WEBSOCKET_ACCESS_TOKEN) -
Protocol-Version:1(协议版本号) -
Client-Id: 客户端标识 -
Device-Id: 设备标识(通过是设备 MAC 地址) -
目前以上几个字段,除了 Device-Id 需要客户端生成,其他的都是固定值,可以使用以下设置:
- "WEBSOCKET_URL": "wss://api.tenclass.net/xiaozhi/v1/",
- "WEBSOCKET_ACCESS_TOKEN": "test-token",
- "CLIENT_ID": "1dd91545-082a-454e-a131-1c8251375c9c",
-
-
服务器响应:服务器接受连接。
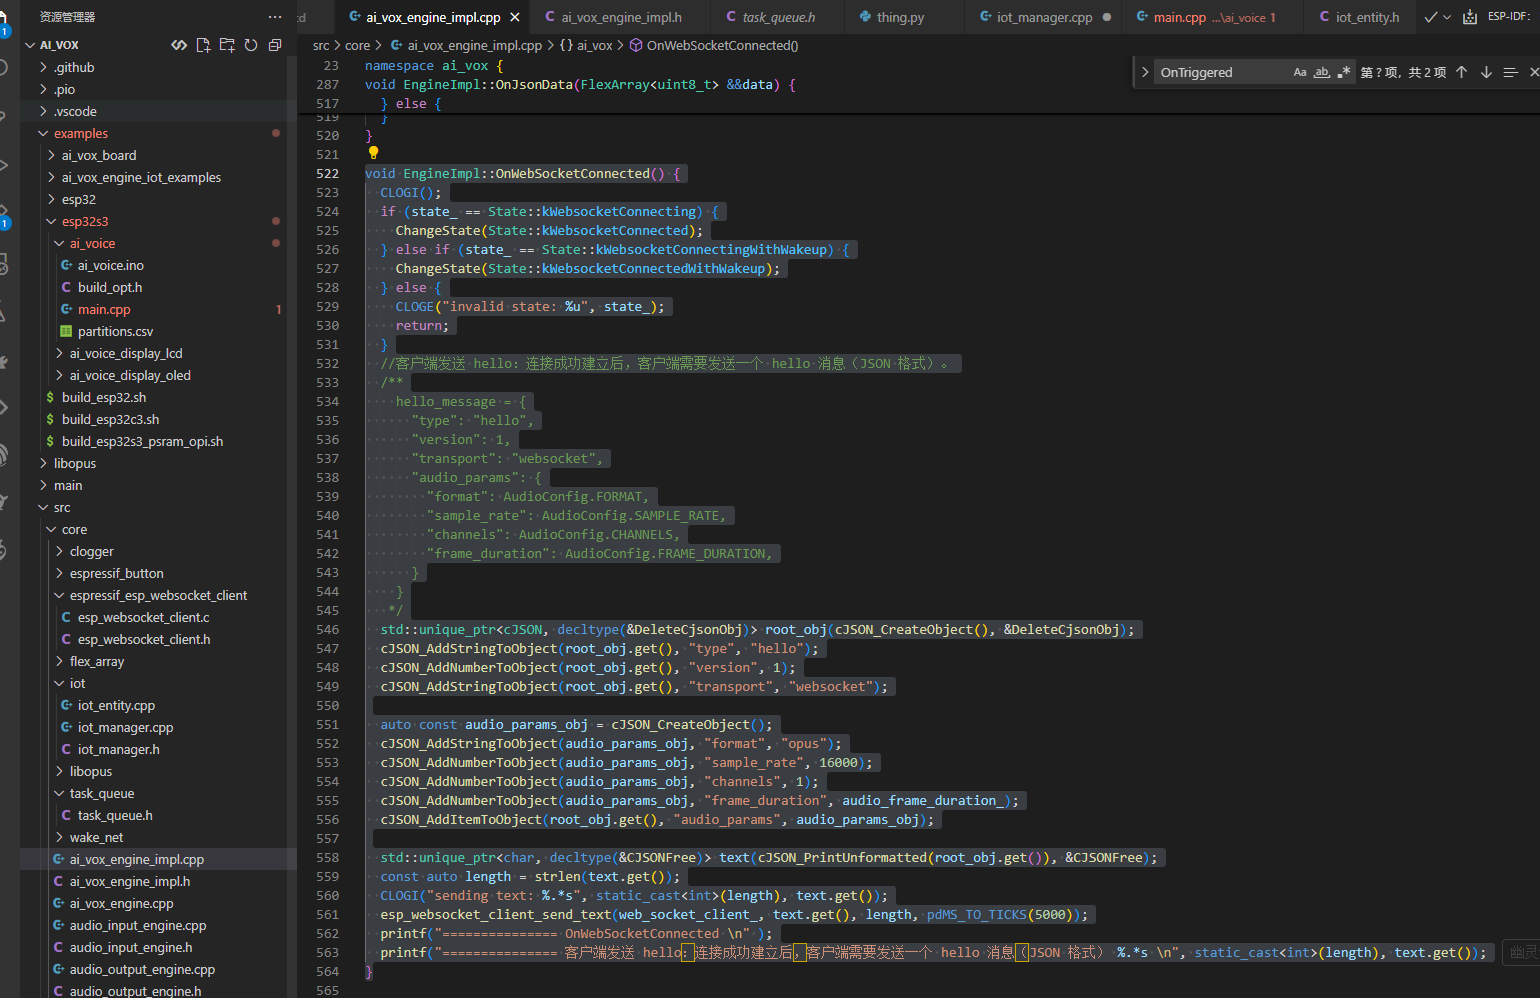
4客户端发送 hello:连接成功建立后,客户端需要发送一个 hello 消息(JSON 格式)。
hello_message = {
 "type": "hello",
 "version": 1,
 "transport": "websocket",
 "audio_params": {
   "format": AudioConfig.FORMAT,
   "sample_rate": AudioConfig.SAMPLE_RATE,
   "channels": AudioConfig.CHANNELS,
   "frame_duration": AudioConfig.FRAME_DURATION,
 }
}
这里会预置音频编码参数,不过问题不大,后面服务端会推送它能接受的设置。
对应代码

5 服务器响应 hello:提供会话 ID 和可能的初始配置。
{
 "type": "hello",
 "version": 1,
 "transport": "websocket",
 "audio_params": {
   "format": "opus",
   "sample_rate": 24000,
   "channels": 1,
   "frame_duration": 20
 },
 "session_id": "a1f81xs89"
}
注意:客户端必须存储 session_id 用于后续所有需要会话标识的消息。
注意2:这里需要使用 audio_params 更新本地 Opus 编码设置。
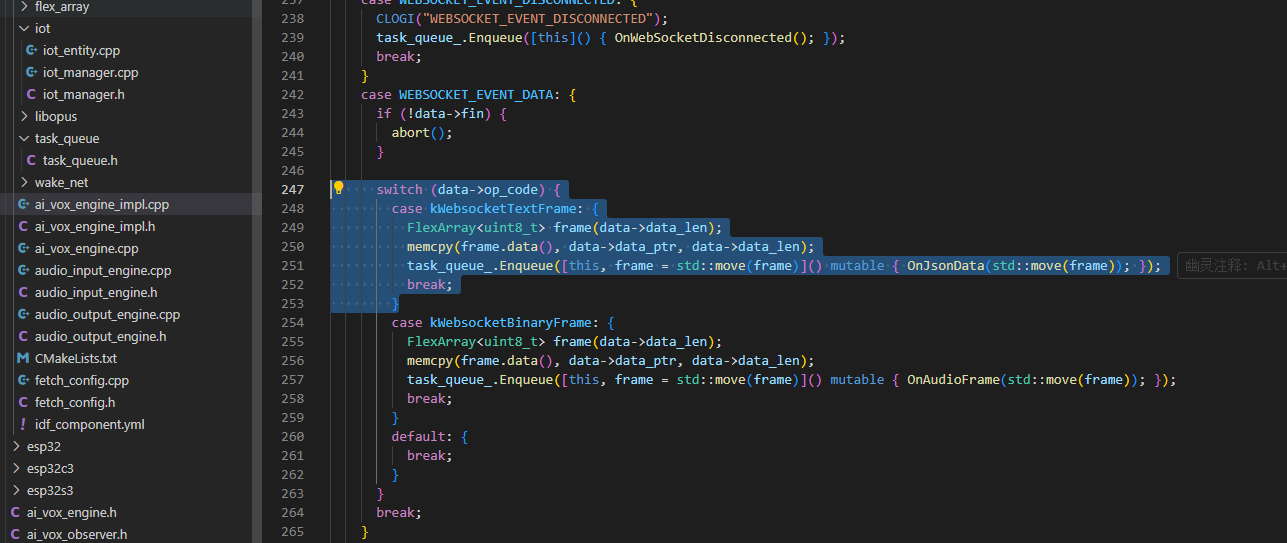
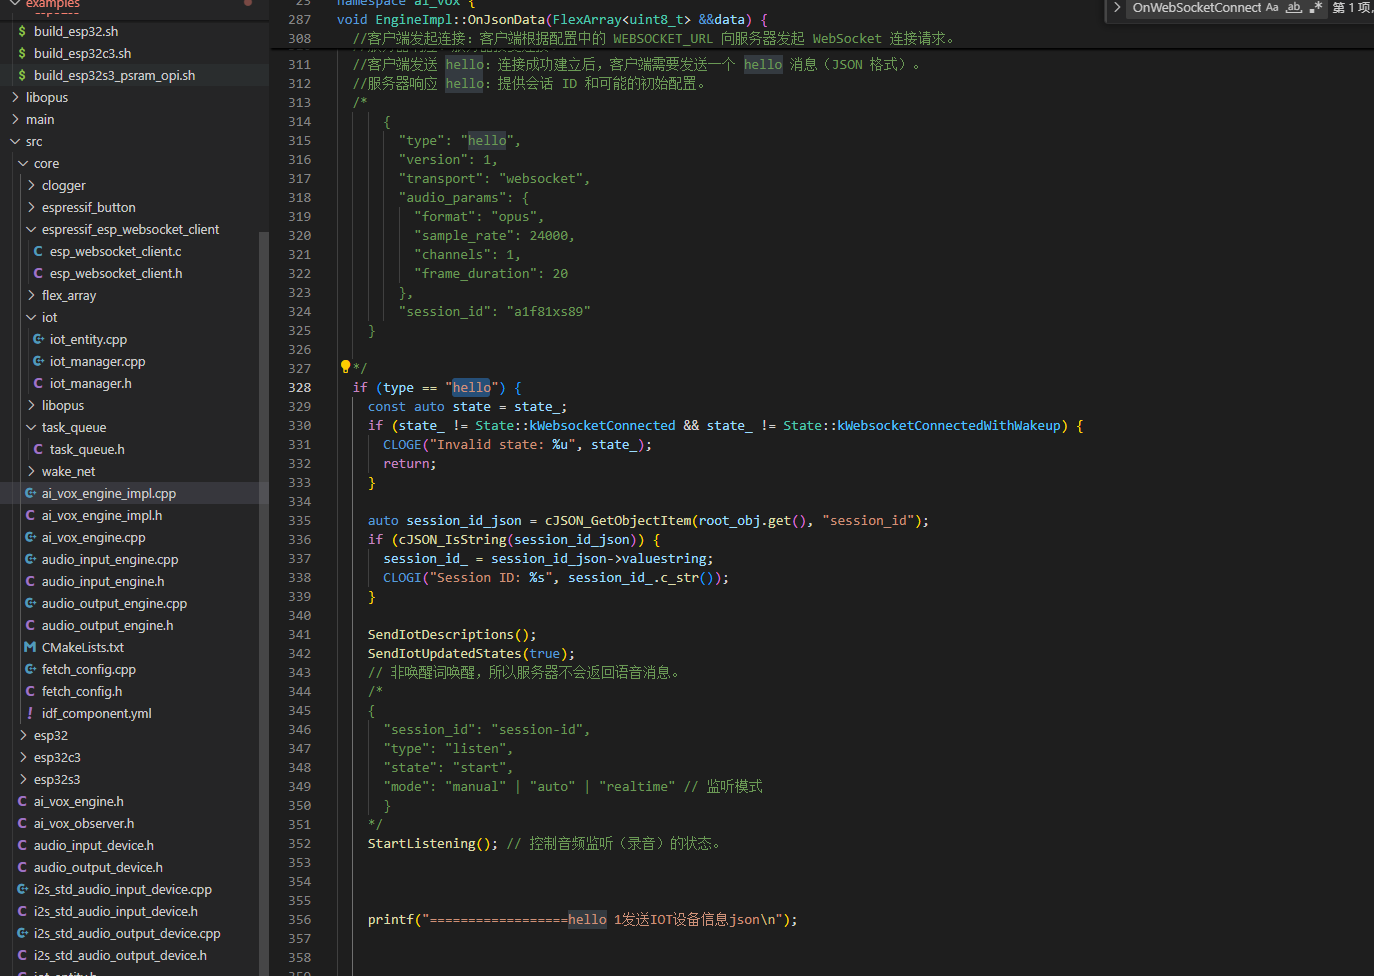
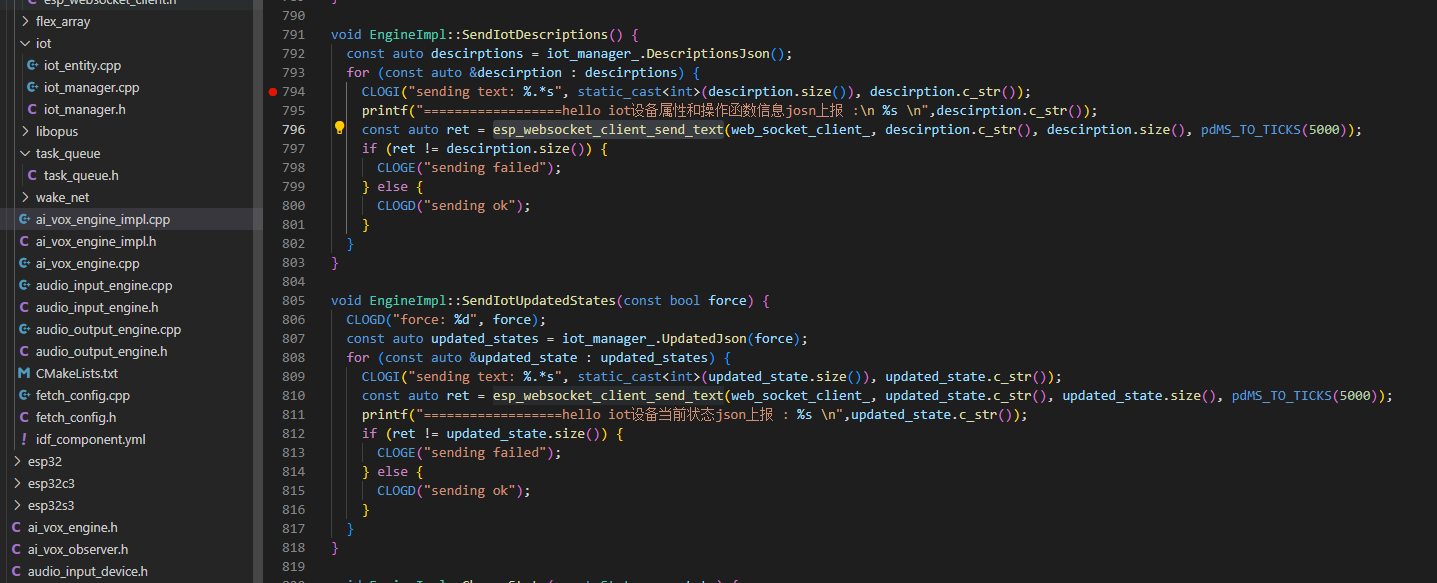
上报IOT设备属性和状态描述
服务端认证
在第一次连接到小智 AI 官方后台时,需要在控制台中添加设备。
添加设备的方式也很便捷,在客户端连接到服务端并发送第一条语音消息时,服务器会返回一条语音,并带一个 6 位数的验证码,可以在后台添加设备。
至此就完成了和小智 AI 服务端 WebSocket 连接的建立,可以开始后续对话流程了。
listen (JSON)
控制音频监听(录音)的状态。
-
开始监听:
{
"session_id": "session-id",
"type": "listen",
"state": "start",
"mode": "manual" | "auto" | "realtime" // 监听模式
}

停止监听:
{
"session_id": "session-id",
"type": "listen",
"state": "stop"
}
wake_word (JSON)
如果是通过唤醒词开始对话,要使用另外一个类型的 listen 消息,通知服务器检测到了唤醒词,这样服务端会立即返回一条语音消息。
格式:
{
"session_id": "session-id",
"type": "listen",
"state": "detect",
"text": "你好小智" // 根据实际唤醒词修改
}
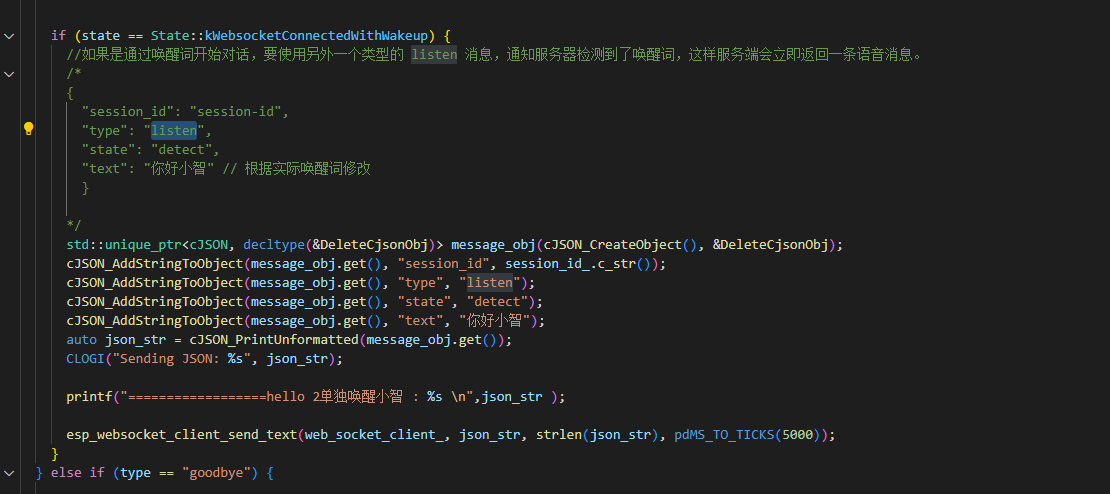
abort (JSON)
请求服务器中断当前正在进行的操作(主要是 TTS 语音播放)。
{
"session_id": "session-id",
"type": "abort",
"reason": "wake_word_detected" // (可选) 中断原因
}
这个主要是在小智 AI 服务端输出一段长语音但是又想重新开始新对话时使用。
audio (Binary)
发送录制的音频数据。
- 格式: 二进制数据帧 (Binary Frame)。
- 内容: 根据
session_info中audio_config约定的格式(默认为 Opus)编码的音频数据块。
IoT 消息
这块暂时不玩,以后再研究具体格式。
服务端消息
小智 AI 服务端返回的消息类型也分 JSON 和 Binary,其中 JSON 类型消息依赖 type 字段来区分实际内容。
示例 JSON 消息格式:
{
  "type": "tts",
  "state": "start",
  "sample_rate": 24000,
  "session_id": "session-id"
}
其中 type 字段用来标识消息类型,有 llm、tts、stt 等。
type=tts (JSON)
这个消息就是小智 AI 服务端返回的主要消息类型了,包括情绪、语音播放、语音转文本,都是在这个类型的消息中返回的。
可以说小智 AI 的整个交互流程中,主要的工作量都是由服务端完成了,客户端的实现都可以比较轻量。
在 type=tts 类型的消息中,根据 state 字段的不同,也需要针对性的进行处理。
state=start
小智 AI 服务端在收到客户端的语音数据后,生成了对应的 LLM 聊天对话内容,开始返回 语音数据,这里也同样给了一个音频数据 sample_rate 参数,可以同步更新播放配置。
{
  "type": "tts",
  "state": "start",
  "sample_rate": 24000,
  "session_id": "session-id"
}
state=sentence_start
小智 AI 返回的对话中一句话的开始,text 字段包含了所说语音的文本内容。
{
  "type": "tts",
  "state": "sentence_start",
  "text": "感觉你心情不太好,发生了什么事吗?",
  "session_id": "session-id"
}
state=sentence_end
小智 AI 返回的对话中一句话的结束。
{
  "type": "tts",
  "state": "sentence_end",
  "text": "感觉你心情不太好,发生了什么事吗?",
  "session_id": "session-id"
}
state=stop
小智 AI 对于之前收到的语音,生成的响应内容已经整体结束,客户端可以继续进行录音操作。
{
  "type": "tts",
  "state": "stop",
  "session_id": "session-id"
}
type=llm (JSON)
这个消息返回了大模型在回复时所需要表达的情绪,text 是一个 Emoji 表情,emotion 对应了情绪的单词,在不能显示 Emoji 的设备上,可以由单词去对应到图片进行展示。
{
  "type": "llm",
  "text": "🤔",
  "emotion": "thinking",
  "session_id": "session-id"
}
emotion 可选的值如下:
static const std::vector<Emotion> emotions = {
  {"😶", "neutral"},
  {"🙂", "happy"},
  {"😆", "laughing"},
  {"😂", "funny"},
  {"😔", "sad"},
  {"😠", "angry"},
  {"😭", "crying"},
  {"😍", "loving"},
  {"😳", "embarrassed"},
  {"😯", "surprised"},
  {"😱", "shocked"},
  {"🤔", "thinking"},
  {"😉", "winking"},
  {"😎", "cool"},
  {"😌", "relaxed"},
  {"🤤", "delicious"},
  {"😘", "kissy"},
  {"😏", "confident"},
  {"😴", "sleepy"},
  {"😜", "silly"},
  {"🙄", "confused"}
};
type=stt (JSON)
这个是小智 AI 服务端由客户端发送的语音识别出来的文本,可以显示在屏幕上展示双方完整的对话内容。
{
  "type": "stt",
  "text": "今天天气怎么样",
  "session_id": "session-id"
}
type=iot (JSON)
和客户端消息一样,这个现在还没研究,以后再看看。
audio (Binary)
小智 AI 服务端发送的 TTS 音频数据。
- 格式: 二进制数据帧 (Binary Frame)。
- 内容: 根据
hello消息中audio_params约定的格式(默认为 Opus)编码的 TTS 音频数据块。客户端接收后应立即进行解码和播放。
核心交互流程图
手动对话交互流程
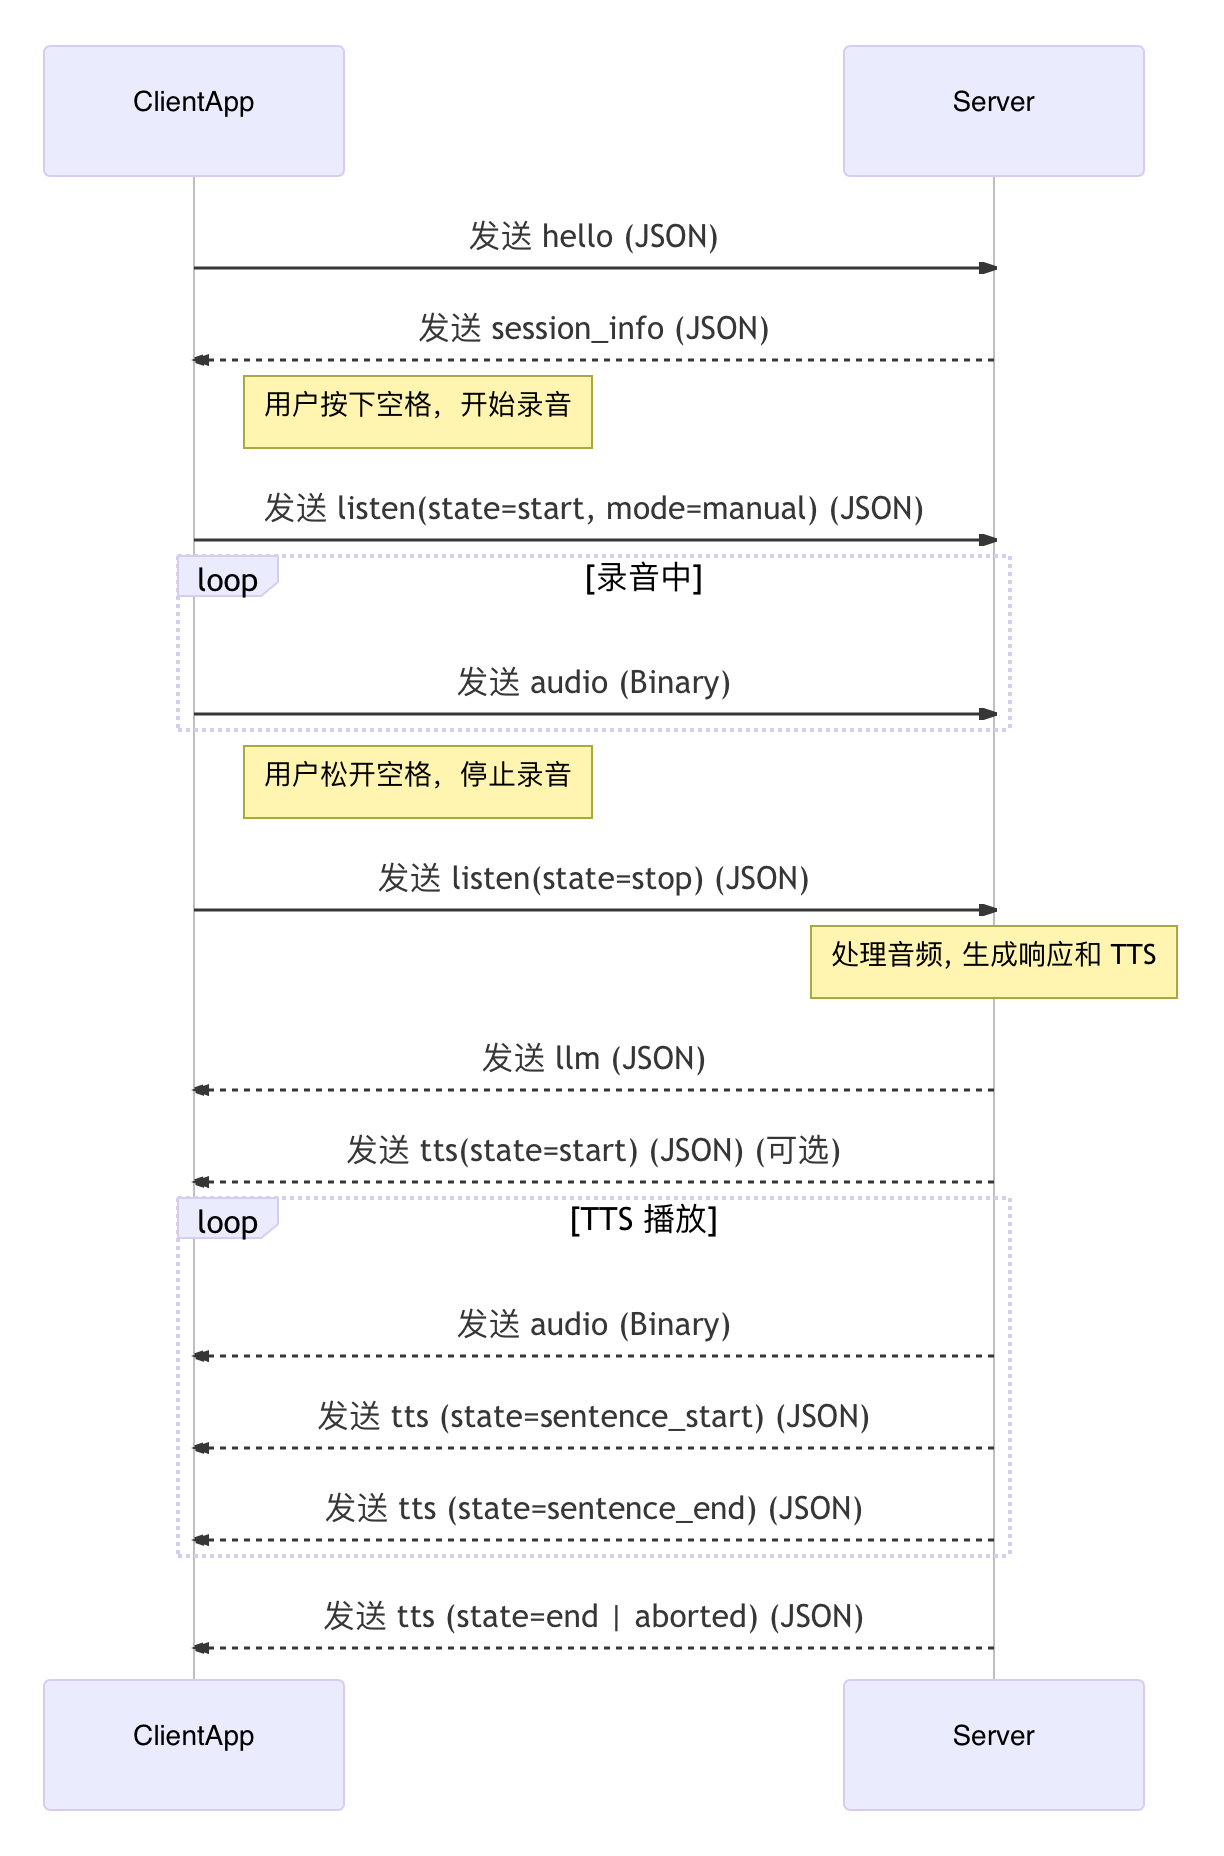
自动对话交互流程图

服务端主动断开连接
在跟小智 AI 说“再见”的时候,服务端会主动断连接,因此在这个时候,如果重新开始了手动对话,或者使用唤醒词触发对话,就需要重新连接服务器。
网络异常
网络异常时,按正常初始化流程重新连接 WebSocket 即可。
总结
整体来说,小智 AI 的通信协议还是比较简单的,大概理了一遍之后,也能用 Cursor + AI 快速搞一个 Python 版本的客户端出来,后面再对接一下 ESP32 试试。
另外,这里的流程和消息是参考了官方仓库和实际交互过程的报文总结的,可能会存在不准确的地方,如果有错误,欢迎指正。
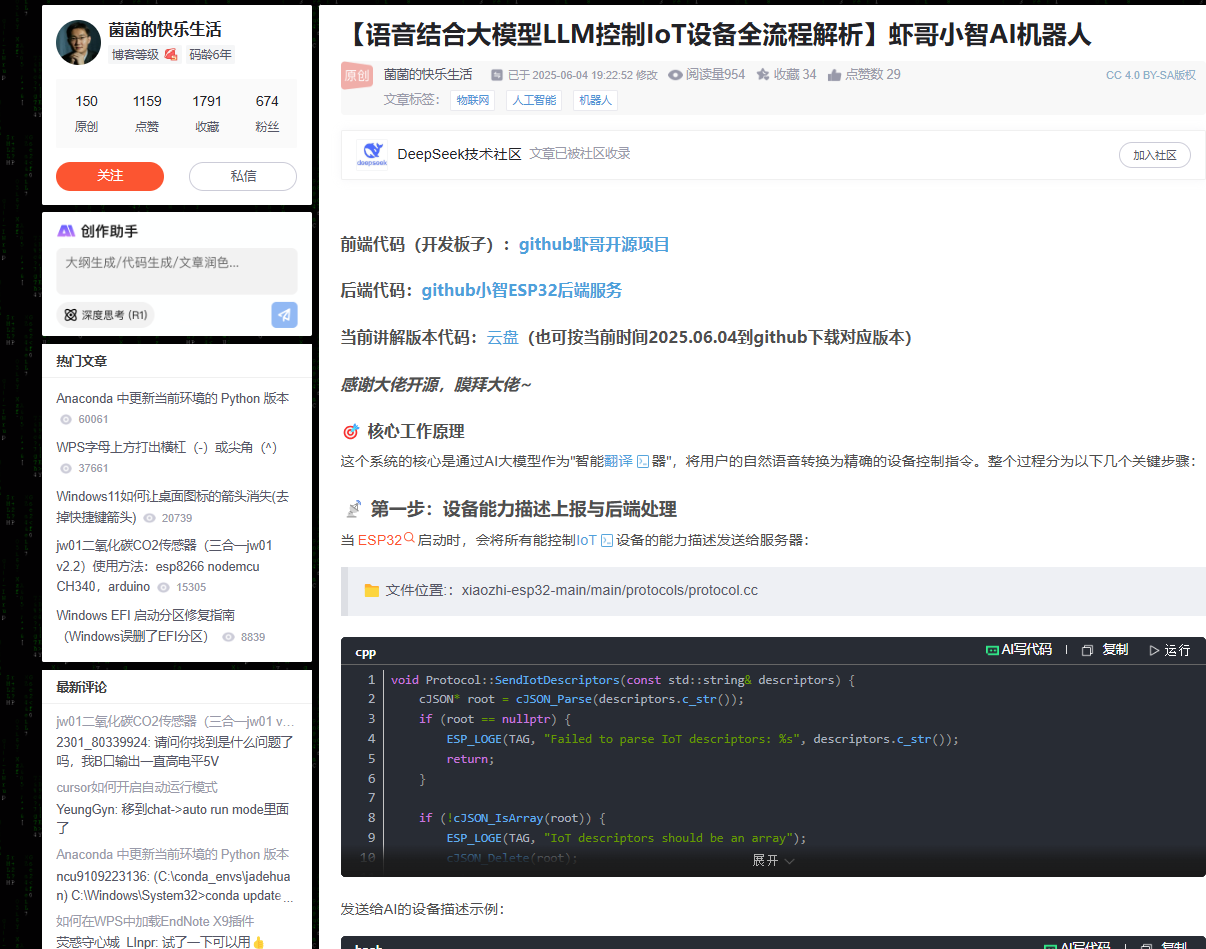
【语音结合大模型LLM控制IoT设备全流程解析】虾哥小智AI机器人
https://deepseek.csdn.net/6863864ca6db534ba2b53026.html
ESP32端任务完成硬件初始化与音频处理生成并上报设备能力描述实现语音采集及Opus编码基于WebSocket协议进行通信执行IoT控制指令后端服务器任务通过ASR技术将语音转为文字与AI大模型(如LLM)交互解析语义生成并下发IoT控制指令通过TTS技术合成语音反馈关键映射逻辑ESP32启动时向服务器上报设备能力(如支持的传感器、执行器等)服务器将设备能力作为上下文(Context)传递给AI大
前端代码(开发板子):github虾哥开源项目
后端代码:github小智ESP32后端服务
当前讲解版本代码:云盘(也可按当前时间2025.06.04到github下载对应版本)
感谢大佬开源,膜拜大佬~
🎯 核心工作原理
这个系统的核心是通过AI大模型作为"智能翻译器",将用户的自然语音转换为精确的设备控制指令。整个过程分为以下几个关键步骤:
📡 第一步:设备能力描述上报与后端处理
当ESP32启动时,会将所有能控制IoT设备的能力描述发送给服务器:
文件位置::xiaozhi-esp32-main/main/protocols/protocol.cc
void Protocol::SendIotDescriptors(const std::string& descriptors) {
    cJSON* root = cJSON_Parse(descriptors.c_str());
    if (root == nullptr) {
        ESP_LOGE(TAG, "Failed to parse IoT descriptors: %s", descriptors.c_str());
        return;
    }

    if (!cJSON_IsArray(root)) {
        ESP_LOGE(TAG, "IoT descriptors should be an array");
        cJSON_Delete(root);
        return;
    }

    int arraySize = cJSON_GetArraySize(root);
    for (int i = 0; i < arraySize; ++i) {
        cJSON* descriptor = cJSON_GetArrayItem(root, i);
        if (descriptor == nullptr) {
            ESP_LOGE(TAG, "Failed to get IoT descriptor at index %d", i);
            continue;
        }

        cJSON* messageRoot = cJSON_CreateObject();
        cJSON_AddStringToObject(messageRoot, "session_id", session_id_.c_str());
        cJSON_AddStringToObject(messageRoot, "type", "iot");
        cJSON_AddBoolToObject(messageRoot, "update", true);

        cJSON* descriptorArray = cJSON_CreateArray();
        cJSON_AddItemToArray(descriptorArray, cJSON_Duplicate(descriptor, 1));
        cJSON_AddItemToObject(messageRoot, "descriptors", descriptorArray);

        char* message = cJSON_PrintUnformatted(messageRoot);
        if (message == nullptr) {
            ESP_LOGE(TAG, "Failed to print JSON message for IoT descriptor at index %d", i);
            cJSON_Delete(messageRoot);
            continue;
        }

        SendText(std::string(message));
        cJSON_free(message);
        cJSON_Delete(messageRoot);
    }

    cJSON_Delete(root);
}
发送给AI的设备描述示例:
{
  "session_id": "xxx",
  "type": "iot",
  "update": true,
  "descriptors": [{
    "name": "SmartFan",
    "description": "一个智能风扇,支持调速和多种模式",
    "properties": {
      "power": {"description": "风扇是否开启", "type": "boolean"},
      "speed": {"description": "当前风扇速度(0-100)", "type": "number"},
      "mode": {"description": "当前工作模式", "type": "string"}
    },
    "methods": {
      "turn_on": {"description": "开启风扇", "parameters": {}},
      "set_speed": {
        "description": "设置风扇速度",
        "parameters": {
          "speed": {"description": "风扇速度,0-100之间的整数", "type": "number"}
        }
      }
    }
  }]
}
后端接收IoT设备能力描述代码
📁 文件位置:
xiaozhi-esp32-server-main/main/xiaozhi-server/core/handle/textHandle.py
# 处理IoT消息
elif msg_json["type"] == "iot":
    conn.logger.bind(tag=TAG).info(f"收到iot消息:{message}")
    if "descriptors" in msg_json:
        # 异步处理设备能力描述
        asyncio.create_task(handleIotDescriptors(conn, msg_json["descriptors"]))
    if "states" in msg_json:
        # 异步处理设备状态更新
        asyncio.create_task(handleIotStatus(conn, msg_json["states"]))
后端处理设备能力描述代码
async def handleIotDescriptors(conn, descriptors):
    """处理物联网描述"""
    functions_changed = False

    for descriptor in descriptors:
        # 如果descriptor没有properties和methods,则直接跳过
        if "properties" not in descriptor and "methods" not in descriptor:
            continue

        # 创建IOT设备描述符
        iot_descriptor = IotDescriptor(
            descriptor["name"],
            descriptor["description"],
            descriptor["properties"],
            descriptor["methods"],
        )
        conn.iot_descriptors[descriptor["name"]] = iot_descriptor

        if conn.load_function_plugin:
            # 注册或获取设备类型
            device_type_registry = conn.func_handler.device_type_registry
            type_id = register_device_type(descriptor, device_type_registry)
            device_functions = device_type_registry.get_device_functions(type_id)

            # 在连接级注册设备函数
            if hasattr(conn, "func_handler"):
                for func_name, func_item in device_functions.items():
                    conn.func_handler.function_registry.register_function(
                        func_name, func_item
                    )
                    conn.logger.bind(tag=TAG).info(
                        f"注册IOT函数到function handler: {func_name}"
                    )
                    functions_changed = True

    # 如果注册了新函数,更新function描述列表
    if functions_changed and hasattr(conn, "func_handler"):
        conn.func_handler.upload_functions_desc()
        func_names = conn.func_handler.current_support_functions()
        conn.logger.bind(tag=TAG).info(
            f"更新function描述列表完成,当前支持的函数: {func_names}"
        )
第二步:用户语音输入与识别
用户说话:“小智,把风扇调到80%” → 语音识别(ASR) → 文本:“把风扇调到80%”
文件位置: xiaozhi-esp32-main/main/application.cc
// 音频处理器初始化和音频采集
audio_processor_->Initialize(codec);
audio_processor_->OnOutput([this](std::vector<int16_t>&& data) {
    // 在后台任务中处理音频编码
    background_task_->Schedule([this, data = std::move(data)]() mutable {
        // 使用Opus编码器编码PCM音频数据
        opus_encoder_->Encode(std::move(data), [this](std::vector<uint8_t>&& opus) {
            AudioStreamPacket packet;
            packet.payload = std::move(opus);

            #ifdef CONFIG_USE_SERVER_AEC
            {
                std::lock_guard<std::mutex> lock(timestamp_mutex_);
                if (!timestamp_queue_.empty()) {
                    packet.timestamp = timestamp_queue_.front();
                    timestamp_queue_.pop_front();
                } else {
                    packet.timestamp = 0;
                }
            }
            #endif

            // 将编码后的音频包加入发送队列
            std::lock_guard<std::mutex> lock(mutex_);
            if (audio_send_queue_.size() >= MAX_AUDIO_PACKETS_IN_QUEUE) {
                ESP_LOGW(TAG, "Too many audio packets in queue, drop the oldest packet");
                audio_send_queue_.pop_front();
            }
            audio_send_queue_.emplace_back(std::move(packet));
            xEventGroupSetBits(event_group_, SEND_AUDIO_EVENT); // 触发发送事件
        });
    });
});
第三步:语音WebSocket发送代码与后端处理
文件位置: xiaozhi-esp32-main/main/protocols/websocket_protocol.cc
bool WebsocketProtocol::SendAudio(const AudioStreamPacket& packet) {
    if (websocket_ == nullptr) {
        return false;
    }

    if (version_ == 3) {
        // 协议版本3的二进制格式
        std::string serialized;
        serialized.resize(sizeof(BinaryProtocol3) + packet.payload.size());
        auto bp3 = (BinaryProtocol3*)serialized.data();
        bp3->type = 0;
        bp3->reserved = 0;
        bp3->payload_size = htons(packet.payload.size());
        memcpy(bp3->payload, packet.payload.data(), packet.payload.size());

        // 通过WebSocket发送二进制数据
        return websocket_->Send(serialized.data(), serialized.size(), true);
    } else {
        // 简单版本直接发送Opus数据
        return websocket_->Send(packet.payload.data(), packet.payload.size(), true);
    }
}
后端语音转文字(ASR)处理代码
📁 文件位置:
xiaozhi-esp32-server-main/main/xiaozhi-server/core/handle/receiveAudioHandle.py
async def handleAudioMessage(conn, audio):
    if conn.vad is None:
        return
    if conn.asr is None or not hasattr(conn.asr, "conn") or conn.asr.conn is None:
        return

    # 当前片段是否有人说话
    have_voice = conn.vad.is_vad(conn, audio)
    if have_voice:
        if conn.client_is_speaking:
            await handleAbortMessage(conn)

    # 设备长时间空闲检测,用于say goodbye
    await no_voice_close_connect(conn, have_voice)
    # 接收音频进行ASR处理
    await conn.asr.receive_audio(audio, have_voice)

async def startToChat(conn, text):
    # 首先进行意图分析
    intent_handled = await handle_user_intent(conn, text)

    if intent_handled:
        # 如果意图已被处理,不再进行聊天
        return

    # 意图未被处理,继续常规聊天流程
    await send_stt_message(conn, text)  # 发送STT结果给ESP32
    conn.executor.submit(conn.chat, text)  # 提交给LLM处理
第四步:后端发送给LLM(大语言模型)与指令发送
📁 文件位置:
xiaozhi-esp32-server-main/main/xiaozhi-server/core/connection.py
def chat(self, query, tool_call=False):
    self.logger.bind(tag=TAG).info(f"大模型收到用户消息: {query}")
    self.llm_finish_task = False

    if not tool_call:
        self.dialogue.put(Message(role="user", content=query))

    # 定义可用的IoT控制函数
    functions = None
    if self.intent_type == "function_call" and hasattr(self, "func_handler"):
        # 获取所有已注册的IoT控制函数
        functions = self.func_handler.get_functions()

    # 添加MCP工具支持
    if hasattr(self, "mcp_client"):
        mcp_tools = self.mcp_client.get_available_tools()
        if mcp_tools is not None and len(mcp_tools) > 0:
            if functions is None:
                functions = []
            functions.extend(mcp_tools)

    try:
        # 使用记忆功能
        memory_str = None
        if self.memory is not None:
            future = asyncio.run_coroutine_threadsafe(
                self.memory.query_memory(query), self.loop
            )
            memory_str = future.result()

        uuid_str = str(uuid.uuid4()).replace("-", "")
        self.sentence_id = uuid_str

        if functions is not None:
            # 使用支持functions的streaming接口,发送给LLM的格式:
            # {
            #   "messages": [对话历史],
            #   "functions": [
            #     {
            #       "type": "function",
            #       "function": {
            #         "name": "lamp_turn_on",
            #         "description": "智能灯 - 打开灯",
            #         "parameters": {
            #           "type": "object",
            #           "properties": {
            #             "response_success": {"type": "string", "description": "操作成功时的友好回复"},
            #             "response_failure": {"type": "string", "description": "操作失败时的友好回复"}
            #           },
            #           "required": ["response_success", "response_failure"]
            #         }
            #       }
            #     }
            #   ]
            # }
            llm_responses = self.llm.response_with_functions(
                self.session_id,
                self.dialogue.get_llm_dialogue_with_memory(memory_str),
                functions=functions,
            )
        else:
            # 普通对话模式
            llm_responses = self.llm.response(
                self.session_id,
                self.dialogue.get_llm_dialogue_with_memory(memory_str),
            )
    except Exception as e:
        self.logger.bind(tag=TAG).error(f"LLM 处理出错 {query}: {e}")
        return None

    # 处理LLM的流式响应...
后端WebSocket发送IoT指令给前端板子代码
📁 文件位置:
xiaozhi-esp32-server-main/main/xiaozhi-server/core/handle/iotHandle.py
async def send_iot_conn(conn, name, method_name, parameters):
    """发送物联网指令"""
    for key, value in conn.iot_descriptors.items():
        if key == name:
            # 找到了设备
            for method in value.methods:
                # 找到了方法
                if method["name"] == method_name:
                    # 构建命令对象
                    command = {
                        "name": name,
                        "method": method_name,
                    }

                    # 只有当参数不为空时才添加parameters字段
                    if parameters:
                        command["parameters"] = parameters

                    # 发送JSON格式的IoT控制指令
                    send_message = json.dumps({"type": "iot", "commands": [command]})
                    await conn.websocket.send(send_message)
                    conn.logger.bind(tag=TAG).info(f"发送物联网指令: {send_message}")
                    return
    conn.logger.bind(tag=TAG).error(f"未找到方法{method_name}")

# IoT控制函数的具体实现
def create_iot_function(device_name, method_name, method_info):
    """根据IOT设备描述生成通用的控制函数"""

    async def iot_control_function(
        conn, response_success=None, response_failure=None, **params
    ):
        try:
            # 设置默认响应消息
            if not response_success:
                response_success = "操作成功"
            if not response_failure:
                response_failure = "操作失败"

            # 发送控制命令到ESP32
            await send_iot_conn(conn, device_name, method_name, params)
            # 等待一小段时间让状态更新
            await asyncio.sleep(0.1)

            # 生成结果信息
            result = f"{device_name}的{method_name}操作执行成功"

            # 处理响应中可能的占位符
            response = response_success
            # 替换{value}占位符
            for param_name, param_value in params.items():
                if "{" + param_name + "}" in response:
                    response = response.replace(
                        "{" + param_name + "}", str(param_value)
                    )
                if "{value}" in response:
                    response = response.replace("{value}", str(param_value))
                    break

            return ActionResponse(Action.RESPONSE, result, response)
        except Exception as e:
            conn.logger.bind(tag=TAG).error(
                f"执行{device_name}的{method_name}操作失败: {e}"
            )
            response = response_failure
            return ActionResponse(Action.ERROR, str(e), response)

    return wrap_async_function(iot_control_function)
第五步:ESP32执行指令
ESP32接收到指令后,通过Thing类的Invoke方法执行:
📁 文件位置: xiaozhi-esp32-main/main/iot/thing.cc
void Thing::Invoke(const cJSON* command) {
    auto method_name = cJSON_GetObjectItem(command, "method");
    auto input_params = cJSON_GetObjectItem(command, "parameters");

    try {
        auto& method = methods_[method_name->valuestring];
        for (auto& param : method.parameters()) {
            auto input_param = cJSON_GetObjectItem(input_params, param.name().c_str());
            if (param.required() && input_param == nullptr) {
                throw std::runtime_error("Parameter " + param.name() + " is required");
            }
            if (param.type() == kValueTypeNumber) {
                if (cJSON_IsNumber(input_param)) {
                    param.set_number(input_param->valueint);
                }
            } else if (param.type() == kValueTypeString) {
                if (cJSON_IsString(input_param) || cJSON_IsObject(input_param) || cJSON_IsArray(input_param)) {
                    std::string value_str = input_param->valuestring;
                    param.set_string(value_str);
                }
            } else if (param.type() == kValueTypeBoolean) {
                if (cJSON_IsBool(input_param)) {
                    param.set_boolean(input_param->valueint == 1);
                }
            }
        }

        Application::GetInstance().Schedule([&method]() {
            method.Invoke();
        });
    } catch (const std::runtime_error& e) {
        ESP_LOGE(TAG, "Method not found: %s", method_name->valuestring);
        return;
    }
}
🔄 第六步:状态同步反馈
执行完成后,ESP32会同步设备状态变化:
文件位置: xiaozhi-esp32-main/main/application.cc
void Application::UpdateIotStates() {
#if CONFIG_IOT_PROTOCOL_XIAOZHI
    auto& thing_manager = iot::ThingManager::GetInstance();
    std::string states;
    if (thing_manager.GetStatesJson(states, true)) {
        protocol_->SendIotStates(states);
    }
#endif
}
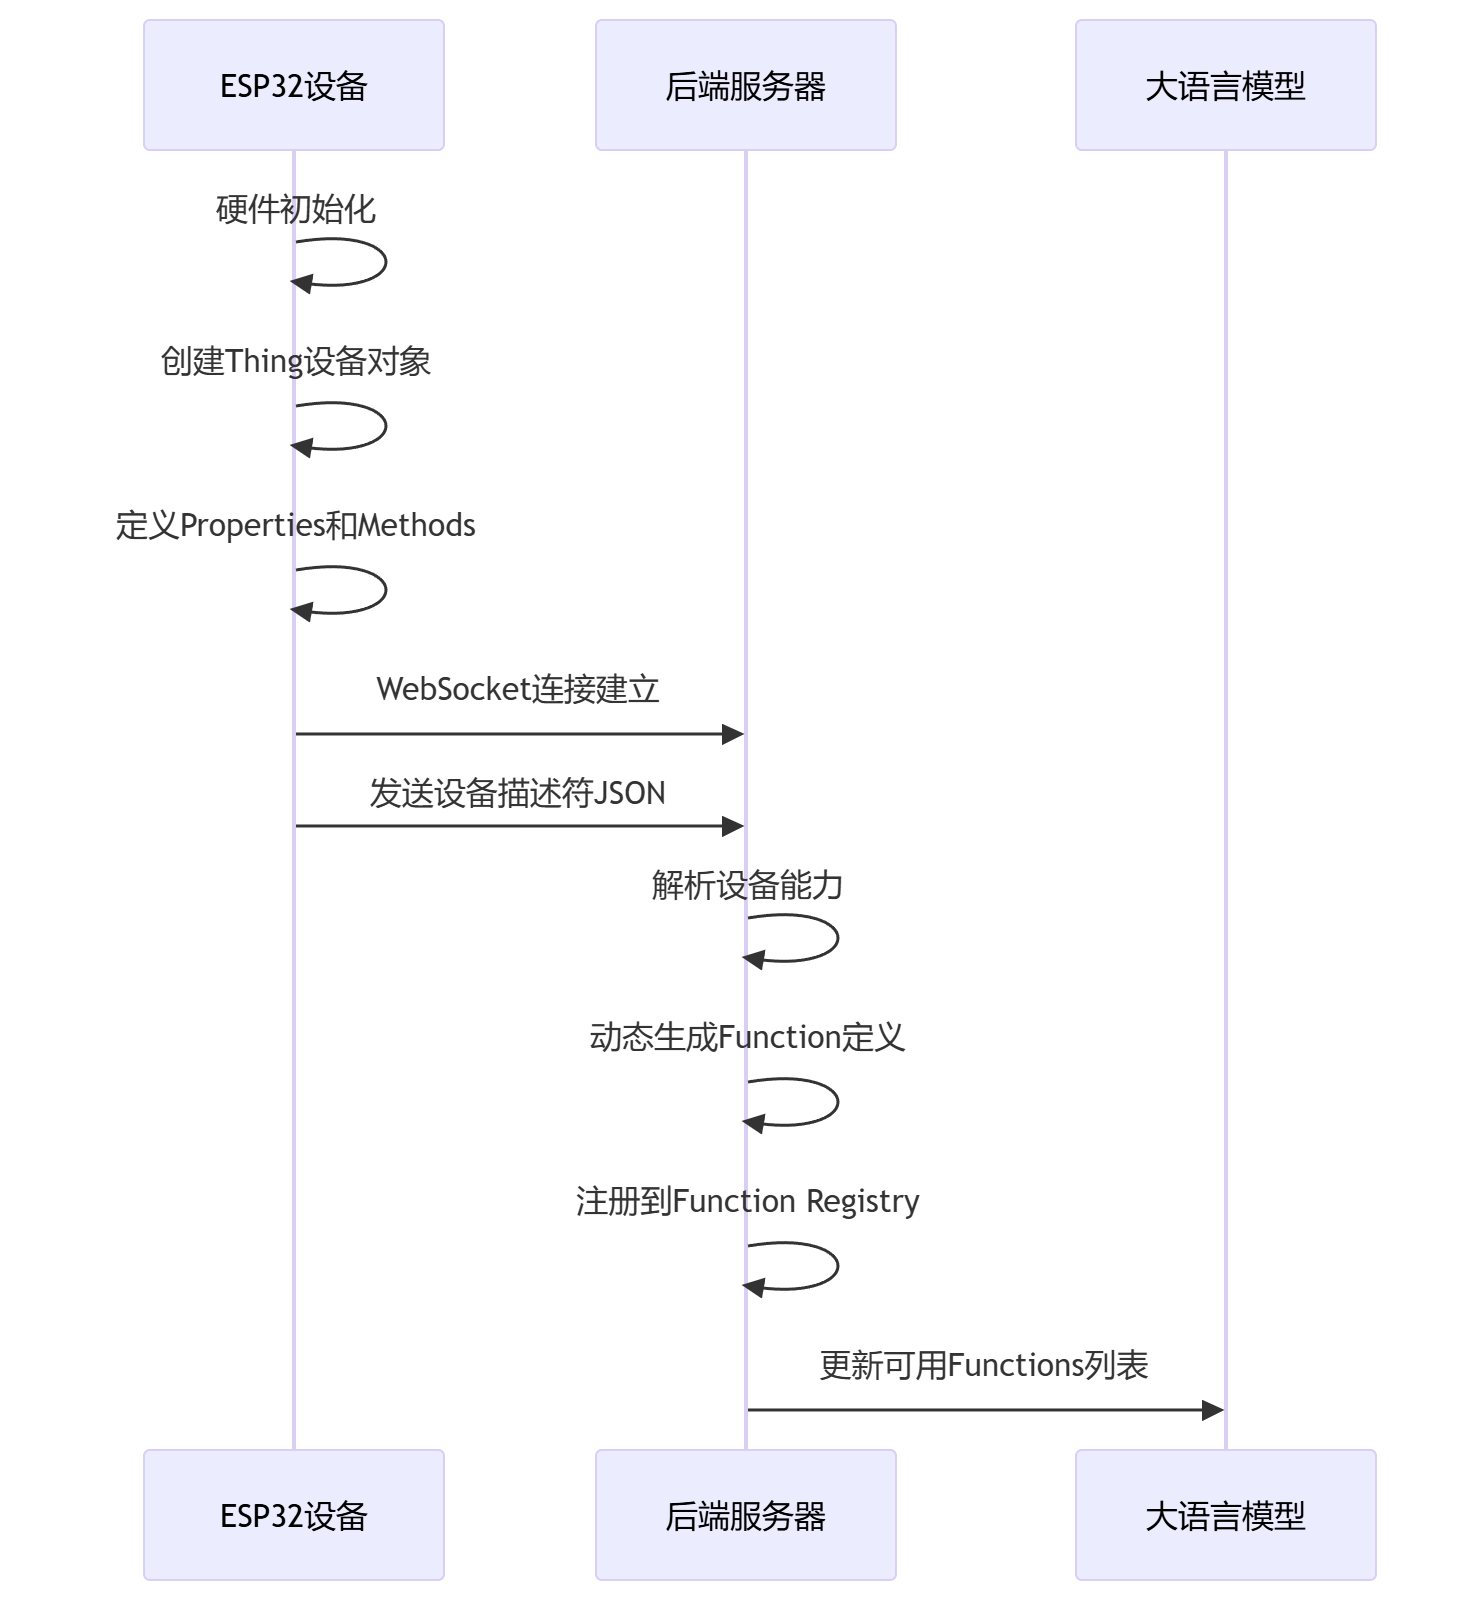
完整时序图
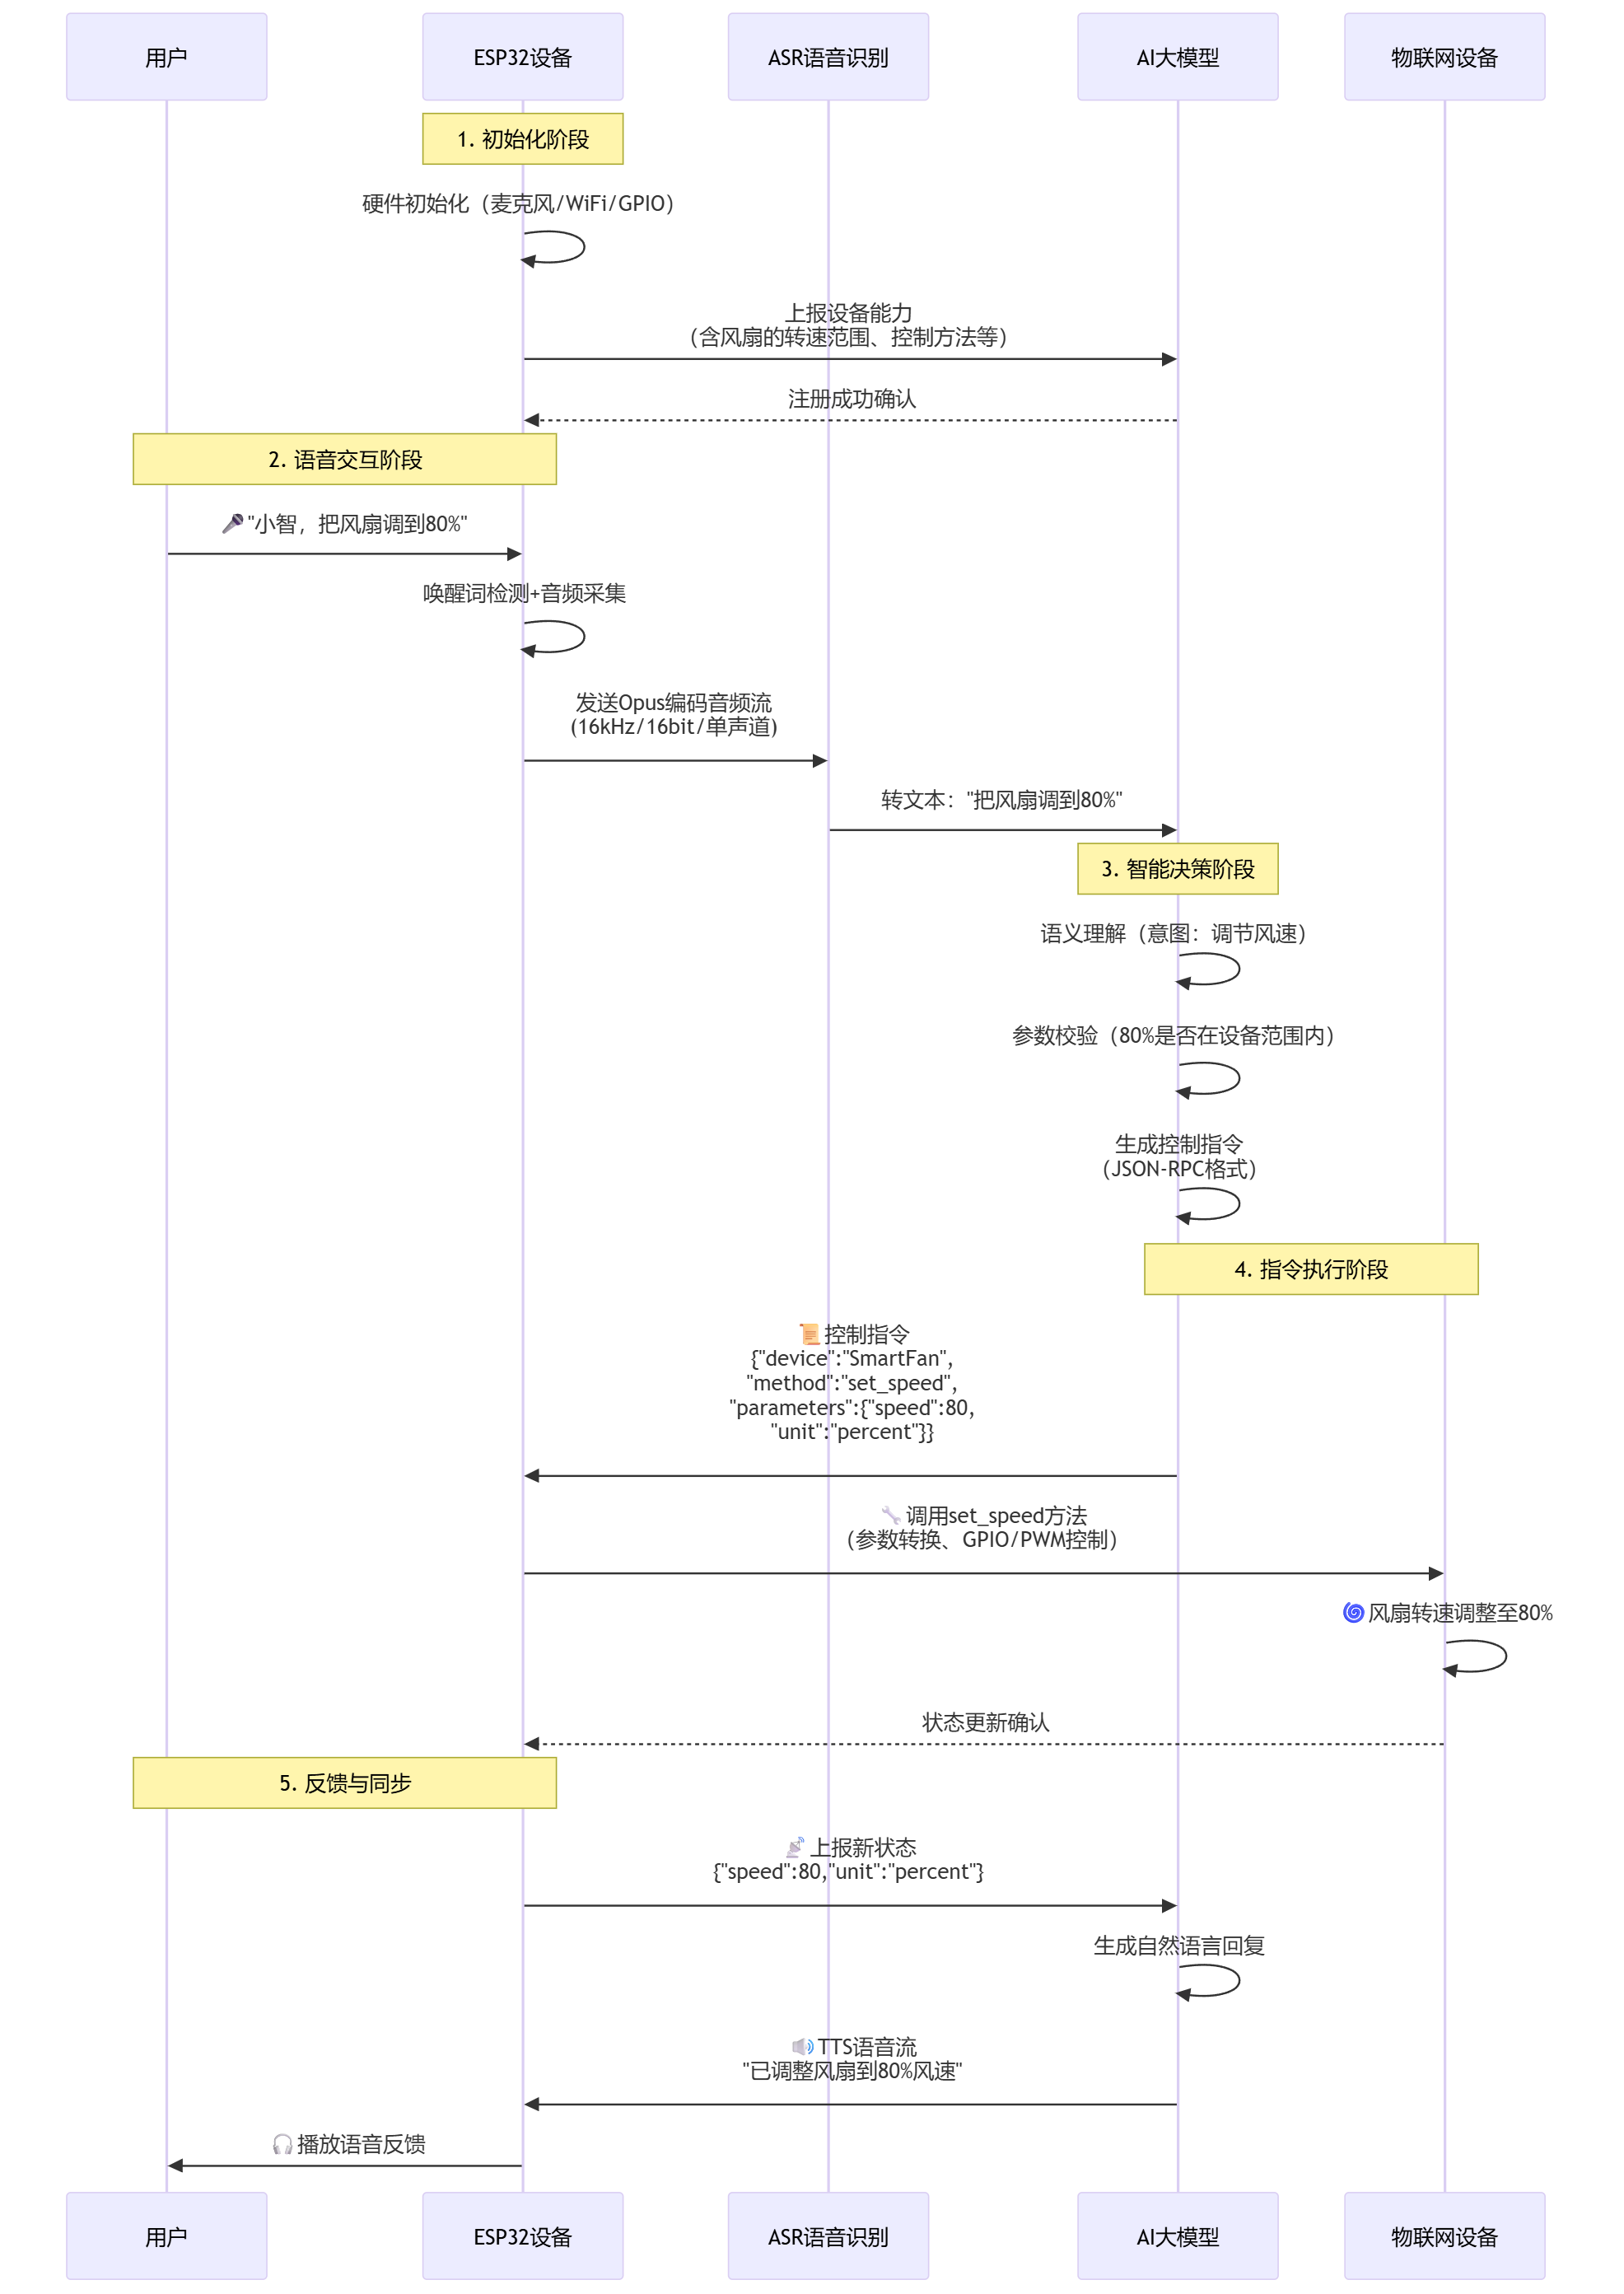
更详细的时序图
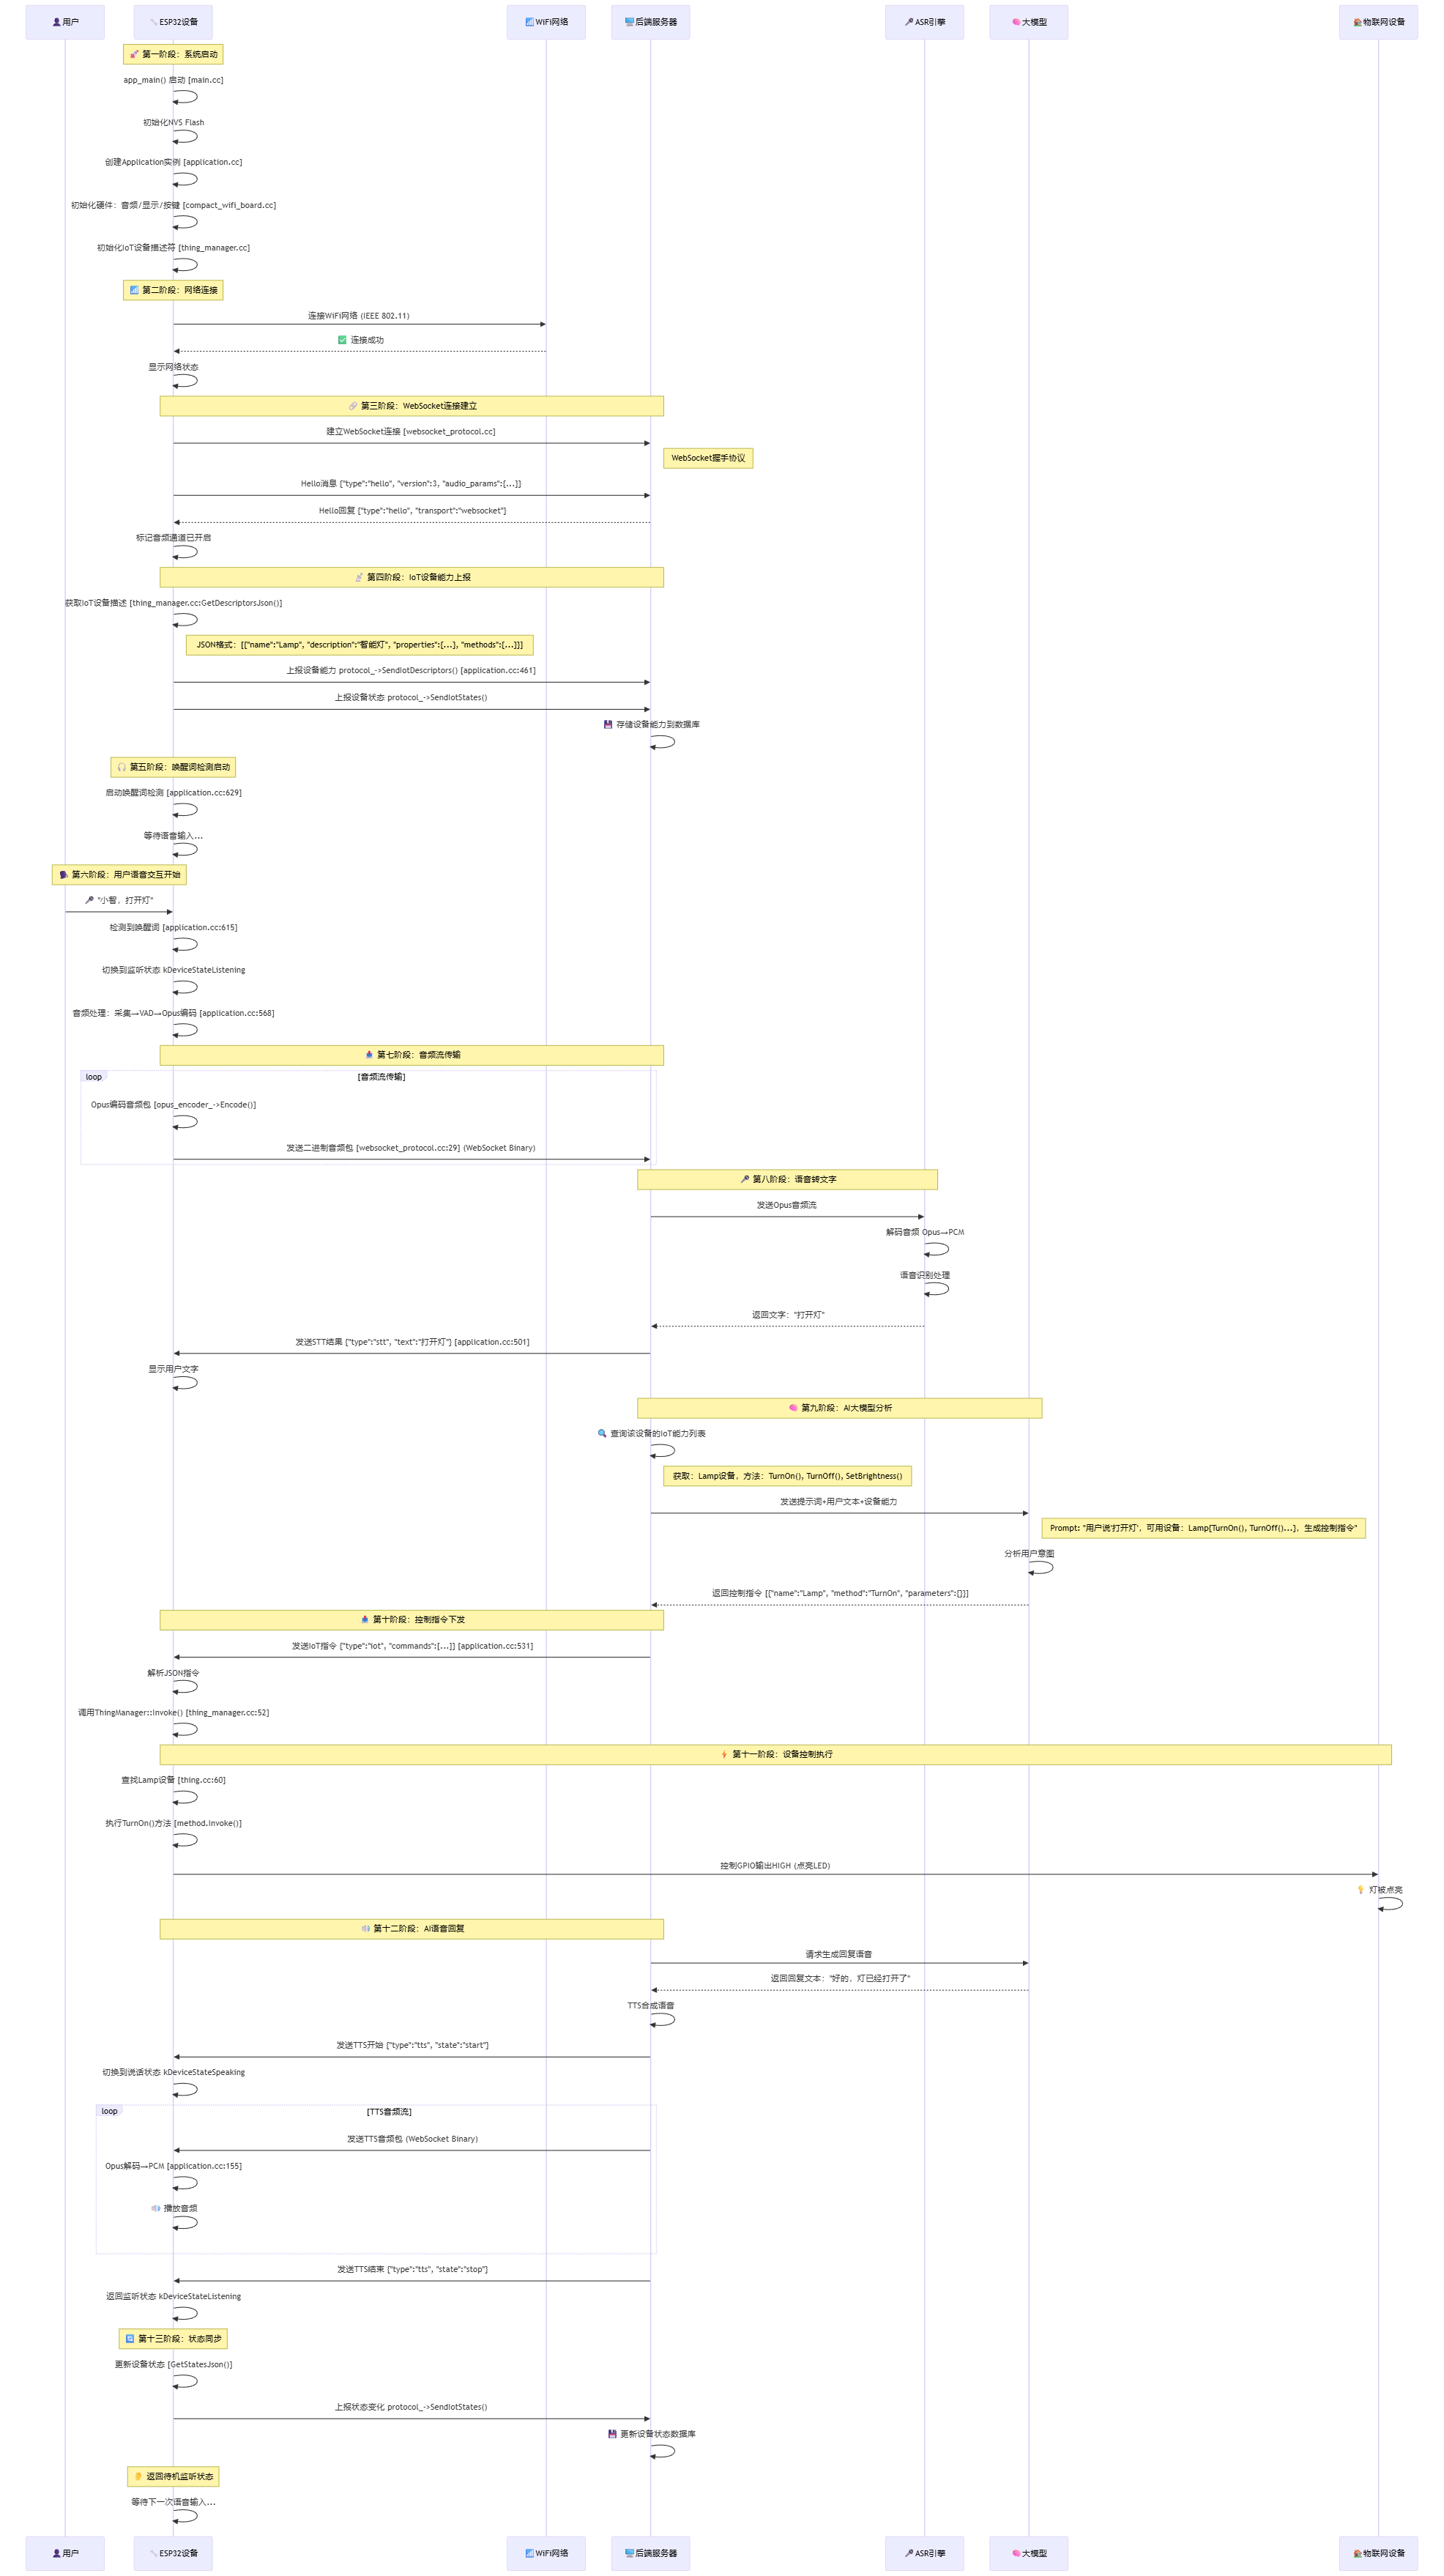
ESP32语音对讲机器人全流程总结
一、核心工作机制
-
ESP32端任务
- 完成硬件初始化与音频处理
- 生成并上报设备能力描述
- 实现语音采集及Opus编码
- 基于WebSocket协议进行通信
- 执行IoT控制指令
-
后端服务器任务
- 通过ASR技术将语音转为文字
- 与AI大模型(如LLM)交互解析语义
- 生成并下发IoT控制指令
- 通过TTS技术合成语音反馈
-
关键映射逻辑
- ESP32启动时向服务器上报设备能力(如支持的传感器、执行器等)
- 服务器将设备能力作为上下文(Context)传递给AI大模型
- 大模型结合用户语音指令与设备能力,生成精准控制指令
- 采用WebSocket JSON协议(非传统MQTT)传输指令
二、技术协议栈
- 物理层:基于WiFi 802.11无线通信
- 传输层:WebSocket协议(遵循RFC 6455标准)
- 音频编码:Opus格式(采样率16kHz,20ms帧长)
- 控制协议:JSON-RPC风格的IoT指令格式


三、自定义功能扩展方法
若需添加新的IoT控制指令,步骤如下:
- 创建设备类:在代码目录
main/iot/things/下定义新设备类 - 注册设备:在
compact_wifi_board.cc文件的InitializeIot()函数中注册新设备 - 更新编译配置:在
CMakeLists.txt中添加新设备类的源文件路径
系统优势:通过JSON描述符实现设备能力的自动发现与AI智能映射,无需手动配置复杂逻辑,开发者仅需关注具体设备控制代码,大幅提升开发效率,是当前先进的语音驱动IoT架构方案。
核心架构:
- ESP32端:承担硬件控制、音频处理以及设备能力上报的工作。
- 后端服务器:负责自动语音识别(ASR)、大语言模型(LLM)分析,同时生成并下发物联网(IoT)指令。
- 智能映射:借助函数调用(Function Calling)机制,实现自然语言到精确控制指令的转换。
整个系统通过WebSocket进行实时通信,既支持音频流传输,也支持JSON控制指令,是一套先进的语音控制物联网解决方案!
🛠️ 自定义IoT控制设备修改指南
1. 创建自定义设备类
创建设备类
📁 文件位置: xiaozhi-esp32-main/main/iot/things/smart_air_conditioner.cc#include "iot/thing.h" #include "board.h" #include <driver/gpio.h> #include <driver/ledc.h> #include <esp_log.h> #define TAG "SmartAirConditioner" namespace iot { class SmartAirConditioner : public Thing { private: // 硬件引脚定义 gpio_num_t power_gpio_ = GPIO_NUM_19; // 电源控制引脚 gpio_num_t mode_gpio_1_ = GPIO_NUM_20; // 模式选择引脚1 gpio_num_t mode_gpio_2_ = GPIO_NUM_21; // 模式选择引脚2 ledc_channel_t fan_speed_channel_ = LEDC_CHANNEL_0; // PWM风速控制 // 设备状态 bool power_ = false; // 电源状态 int temperature_ = 26; // 目标温度 (16-30°C) int fan_speed_ = 1; // 风速等级 (1-5) std::string mode_ = "cool"; // 运行模式:cool, heat, fan, dry bool eco_mode_ = false; // 省电模式 void InitializeHardware() { // 初始化电源控制GPIO gpio_config_t power_config = { .pin_bit_mask = (1ULL << power_gpio_), .mode = GPIO_MODE_OUTPUT, .pull_up_en = GPIO_PULLUP_DISABLE, .pull_down_en = GPIO_PULLDOWN_DISABLE, .intr_type = GPIO_INTR_DISABLE, }; ESP_ERROR_CHECK(gpio_config(&power_config)); // 初始化模式选择GPIO gpio_config_t mode_config = { .pin_bit_mask = (1ULL << mode_gpio_1_) | (1ULL << mode_gpio_2_), .mode = GPIO_MODE_OUTPUT, .pull_up_en = GPIO_PULLUP_DISABLE, .pull_down_en = GPIO_PULLDOWN_DISABLE, .intr_type = GPIO_INTR_DISABLE, }; ESP_ERROR_CHECK(gpio_config(&mode_config)); // 初始化PWM风速控制 ledc_timer_config_t timer_config = { .speed_mode = LEDC_LOW_SPEED_MODE, .duty_resolution = LEDC_TIMER_8_BIT, .timer_num = LEDC_TIMER_0, .freq_hz = 1000, .clk_cfg = LEDC_AUTO_CLK }; ESP_ERROR_CHECK(ledc_timer_config(&timer_config)); ledc_channel_config_t channel_config = { .gpio_num = GPIO_NUM_22, .speed_mode = LEDC_LOW_SPEED_MODE, .channel = fan_speed_channel_, .intr_type = LEDC_INTR_DISABLE, .timer_sel = LEDC_TIMER_0, .duty = 0, .hpoint = 0 }; ESP_ERROR_CHECK(ledc_channel_config(&channel_config)); // 设置初始状态 UpdateHardwareState(); } void UpdateHardwareState() { // 控制电源 gpio_set_level(power_gpio_, power_ ? 1 : 0); if (!power_) { // 如果关机,停止所有输出 gpio_set_level(mode_gpio_1_, 0); gpio_set_level(mode_gpio_2_, 0); ledc_set_duty(LEDC_LOW_SPEED_MODE, fan_speed_channel_, 0); ledc_update_duty(LEDC_LOW_SPEED_MODE, fan_speed_channel_); return; } // 设置模式(通过两个GPIO的组合表示4种模式) if (mode_ == "cool") { gpio_set_level(mode_gpio_1_, 0); gpio_set_level(mode_gpio_2_, 0); } else if (mode_ == "heat") { gpio_set_level(mode_gpio_1_, 1); gpio_set_level(mode_gpio_2_, 0); } else if (mode_ == "fan") { gpio_set_level(mode_gpio_1_, 0); gpio_set_level(mode_gpio_2_, 1); } else if (mode_ == "dry") { gpio_set_level(mode_gpio_1_, 1); gpio_set_level(mode_gpio_2_, 1); } // 设置风速(PWM占空比:20%, 40%, 60%, 80%, 100%) int duty = (fan_speed_ * 255) / 5; ledc_set_duty(LEDC_LOW_SPEED_MODE, fan_speed_channel_, duty); ledc_update_duty(LEDC_LOW_SPEED_MODE, fan_speed_channel_); ESP_LOGI(TAG, "空调状态更新 - 电源:%s 模式:%s 温度:%d°C 风速:%d", power_ ? "开" : "关", mode_.c_str(), temperature_, fan_speed_); } public: SmartAirConditioner() : Thing("SmartAirConditioner", "智能空调,支持制冷制热除湿送风等功能") { InitializeHardware(); // ========== 定义设备属性(可查询状态) ========== properties_.AddBooleanProperty("power", "空调电源状态", [this]() -> bool { return power_; }); properties_.AddNumberProperty("temperature", "目标温度", [this]() -> double { return static_cast<double>(temperature_); }); properties_.AddNumberProperty("fan_speed", "风速等级(1-5)", [this]() -> double { return static_cast<double>(fan_speed_); }); properties_.AddStringProperty("mode", "运行模式", [this]() -> std::string { return mode_; }); properties_.AddBooleanProperty("eco_mode", "省电模式", [this]() -> bool { return eco_mode_; }); // ========== 定义设备方法(可执行指令) ========== // 开机 methods_.AddMethod("turn_on", "打开空调", ParameterList(), [this](const ParameterList& parameters) { power_ = true; UpdateHardwareState(); }); // 关机 methods_.AddMethod("turn_off", "关闭空调", ParameterList(), [this](const ParameterList& parameters) { power_ = false; UpdateHardwareState(); }); // 设置温度 ParameterList temp_params; temp_params.AddNumberParameter("temperature", "目标温度(16-30)", true); methods_.AddMethod("set_temperature", "设置目标温度", temp_params, [this](const ParameterList& parameters) { int temp = static_cast<int>(parameters.GetNumberParameter("temperature")); if (temp >= 16 && temp <= 30) { temperature_ = temp; UpdateHardwareState(); } else { ESP_LOGW(TAG, "温度设置超出范围:%d,应在16-30之间", temp); } }); // 设置风速 ParameterList speed_params; speed_params.AddNumberParameter("speed", "风速等级(1-5)", true); methods_.AddMethod("set_fan_speed", "设置风速", speed_params, [this](const ParameterList& parameters) { int speed = static_cast<int>(parameters.GetNumberParameter("speed")); if (speed >= 1 && speed <= 5) { fan_speed_ = speed; UpdateHardwareState(); } else { ESP_LOGW(TAG, "风速设置超出范围:%d,应在1-5之间", speed); } }); // 设置模式 ParameterList mode_params; mode_params.AddStringParameter("mode", "运行模式(cool/heat/fan/dry)", true); methods_.AddMethod("set_mode", "设置运行模式", mode_params, [this](const ParameterList& parameters) { std::string new_mode = parameters.GetStringParameter("mode"); if (new_mode == "cool" || new_mode == "heat" || new_mode == "fan" || new_mode == "dry") { mode_ = new_mode; UpdateHardwareState(); } else { ESP_LOGW(TAG, "不支持的运行模式:%s", new_mode.c_str()); } }); // 切换省电模式 methods_.AddMethod("toggle_eco_mode", "切换省电模式", ParameterList(), [this](const ParameterList& parameters) { eco_mode_ = !eco_mode_; if (eco_mode_) { // 省电模式:降低风速,调整温度 if (fan_speed_ > 2) fan_speed_ = 2; if (mode_ == "cool" && temperature_ < 26) temperature_ = 26; if (mode_ == "heat" && temperature_ > 22) temperature_ = 22; } UpdateHardwareState(); }); // 快速制冷 methods_.AddMethod("quick_cool", "快速制冷模式", ParameterList(), [this](const ParameterList& parameters) { power_ = true; mode_ = "cool"; temperature_ = 18; fan_speed_ = 5; eco_mode_ = false; UpdateHardwareState(); }); // 快速制热 methods_.AddMethod("quick_heat", "快速制热模式", ParameterList(), [this](const ParameterList& parameters) { power_ = true; mode_ = "heat"; temperature_ = 28; fan_speed_ = 5; eco_mode_ = false; UpdateHardwareState(); }); } ~SmartAirConditioner() { // 析构时关闭设备 power_ = false; UpdateHardwareState(); } }; } // namespace iot DECLARE_THING(SmartAirConditioner);
2. 注册设备到硬件板
📁 文件位置: main/boards/bread-compact-wifi/compact_wifi_board.cc
🔧 修改位置: InitializeIot() 方法
// 在InitializeIot()方法中添加自定义设备
void InitializeIot() {
#if CONFIG_IOT_PROTOCOL_XIAOZHI
    auto& thing_manager = iot::ThingManager::GetInstance();

    // 现有设备
    thing_manager.AddThing(iot::CreateThing("Speaker"));
    thing_manager.AddThing(iot::CreateThing("Lamp"));

    // 添加自定义设备
    thing_manager.AddThing(iot::CreateThing("SmartAirConditioner"));

#elif CONFIG_IOT_PROTOCOL_MCP
    static LampController lamp(LAMP_GPIO);
#endif
}
3. 更新编译配置
📁 文件位置: main/CMakeLists.txt
🔧 修改内容: 添加新设备源文件
# 在SRCS列表中添加新的设备文件
set(SRCS
    # ... 现有文件 ...
    "iot/things/lamp.cc"
    "iot/things/speaker.cc"
    "iot/things/smart_air_conditioner.cc"  # 添加这一行
    # ... 其他文件 ...
)
4. 完整的语音控制示例
添加了智能空调后,用户可以通过以下语音指令控制:
用户语音指令 → AI模型生成的控制指令
用户语音指令 → AI模型生成的控制指令

"小智,打开空调"
→ {"name": "SmartAirConditioner", "method": "turn_on", "parameters": {}}

"小智,把空调温度调到22度"
→ {"name": "SmartAirConditioner", "method": "set_temperature", "parameters": {"temperature": 22}}

"小智,空调开启制热模式"
→ {"name": "SmartAirConditioner", "method": "set_mode", "parameters": {"mode": "heat"}}

"小智,空调风速调到最大"
→ {"name": "SmartAirConditioner", "method": "set_fan_speed", "parameters": {"speed": 5}}

"小智,开启空调省电模式"
→ {"name": "SmartAirConditioner", "method": "toggle_eco_mode", "parameters": {}}

"小智,空调快速制冷"


 浙公网安备 33010602011771号