

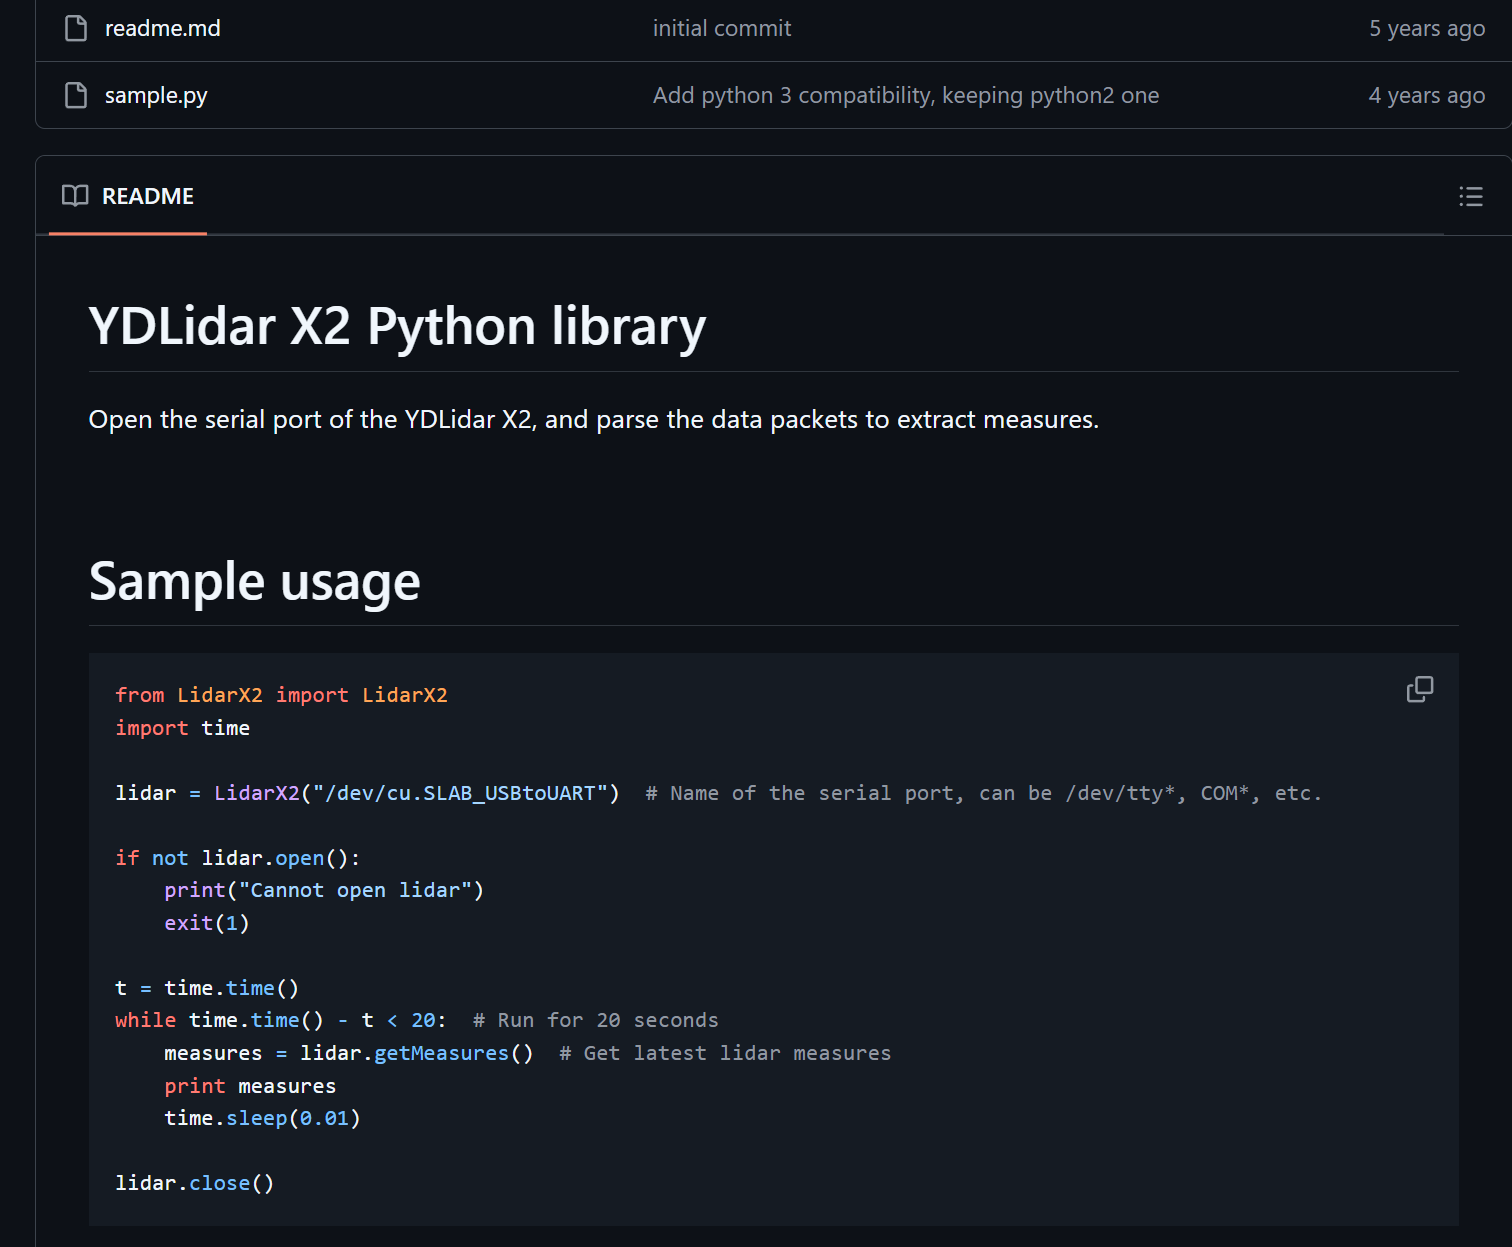
https://github.com/nesnes/YDLidarX2_python/tree/master
https://www.ydlidar.cn/service_support/download.html

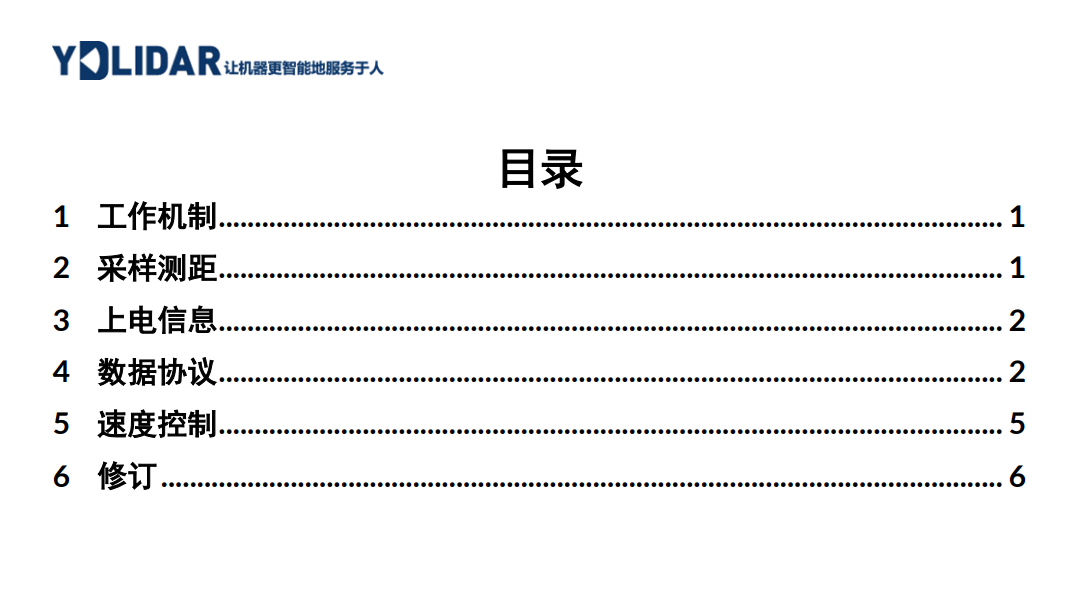
https://www.ydlidar.cn/Public/upload/files/2024-02-01/YDLIDAR%20X2%20%E5%BC%80%E5%8F%91%E6%89%8B%E5%86%8C%20V1.1(240124).pdf
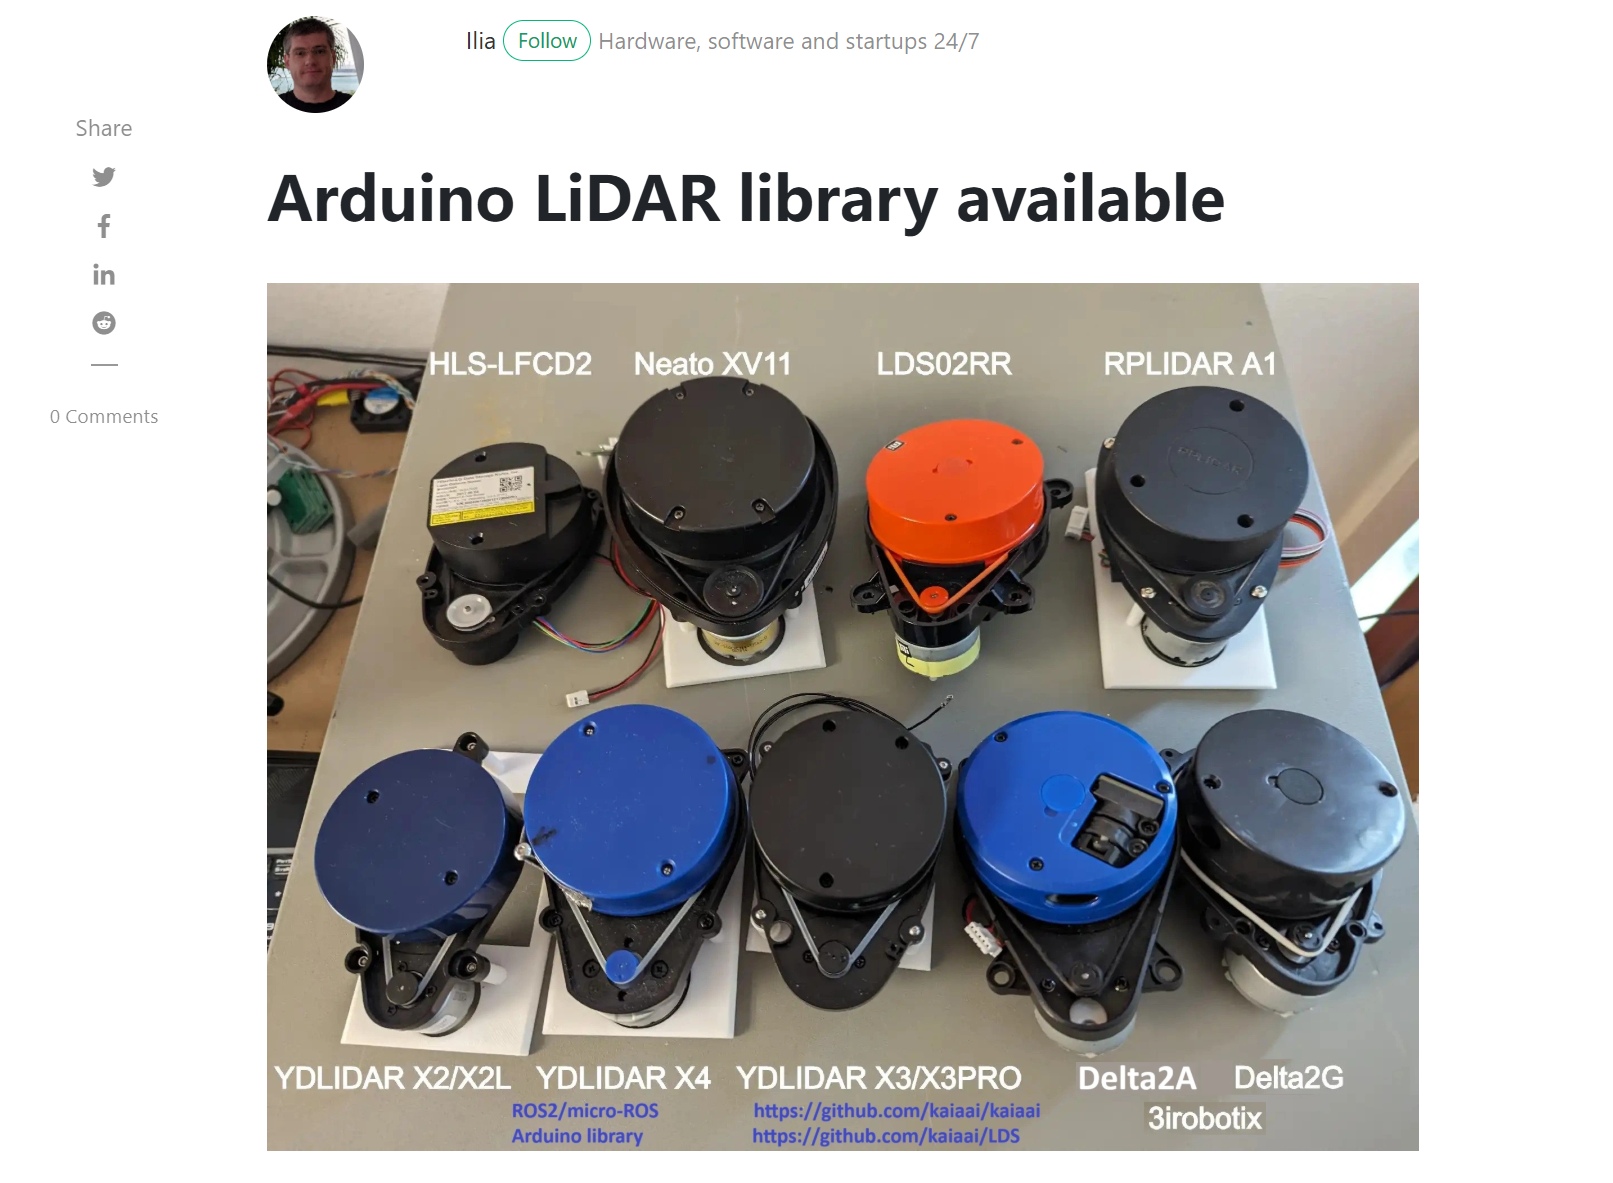
https://kaia.ai/blog/arduino-lidar-library/
http://www.360doc.com/content/24/0605/19/36367108_1125416391.shtml

https://www.ydlidar.cn/Public/upload/files/2024-02-01/YDLIDAR%20X2%20%E4%BD%BF%E7%94%A8%E6%89%8B%E5%86%8C%20V1.3(240124).pdf
https://www.ydlidar.cn/products/view/6.html

https://kaia.ai/blog/tutorial-connect-ld14p-lidar/
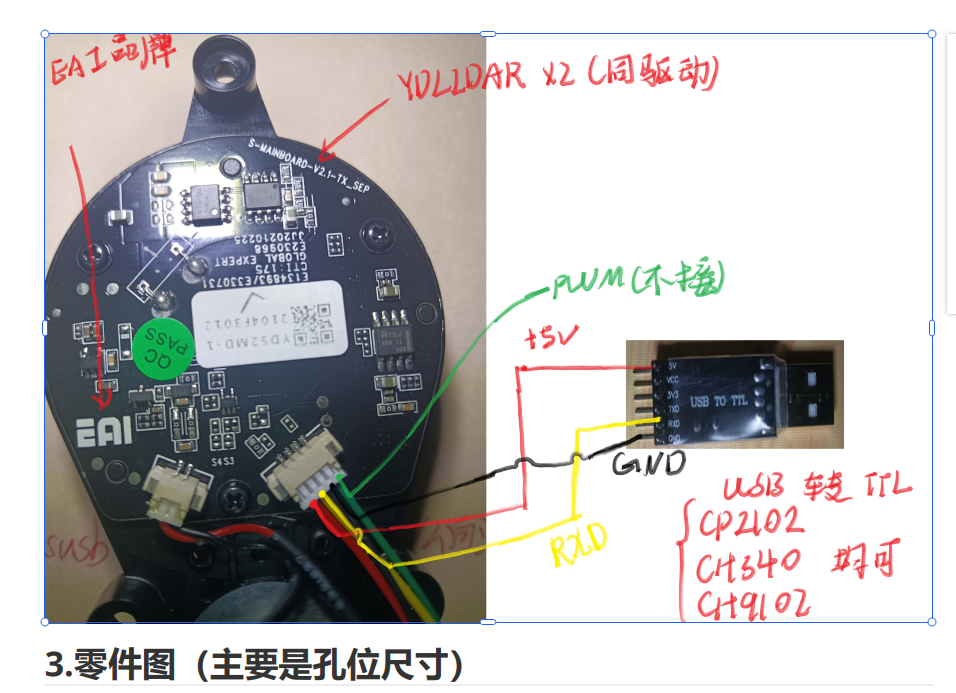
注意实物图的线颜色可能对不上,按照顺序
我手上的地线和RX是反着的
https://www.ydlidar.cn/service_support/download.html?gid=6
烧录时候 需要按着boot按键,结束后松开,按下reset按键
// Copyright 2023-2024 KAIA.AI
//
// Licensed under the Apache License, Version 2.0 (the "License");
// you may not use this file except in compliance with the License.
// You may obtain a copy of the License at
//
// http://www.apache.org/licenses/LICENSE-2.0
//
// Unless required by applicable law or agreed to in writing, software
// distributed under the License is distributed on an "AS IS" BASIS,
// WITHOUT WARRANTIES OR CONDITIONS OF ANY KIND, either express or implied.
// See the License for the specific language governing permissions and
// limitations under the License.
#ifndef ESP32
#error This example runs on ESP32
#endif
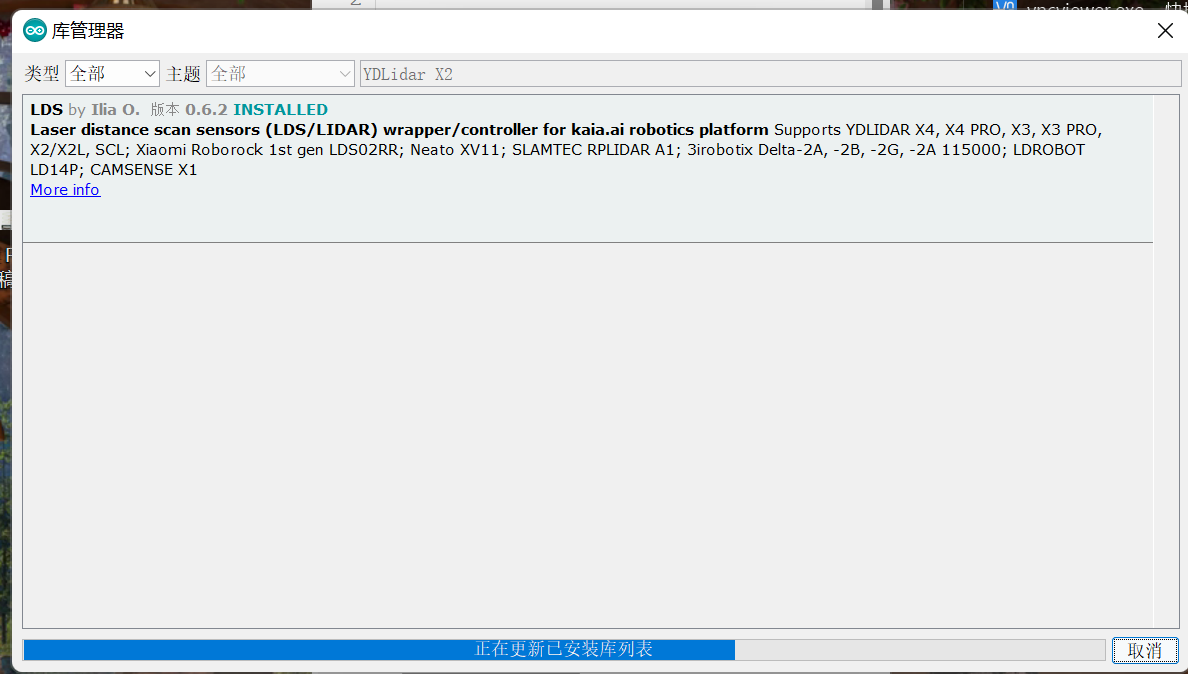
#include <LDS_YDLIDAR_X2_X2L.h>
const uint8_t LIDAR_EN_PIN = 19; // ESP32 Dev Kit LiDAR enable pin
const uint8_t LIDAR_PWM_PIN = 15; // LiDAR motor speed control using PWM
const uint8_t LIDAR_TX_PIN = 17;
const uint8_t LIDAR_RX_PIN = 16;
#define LIDAR_PWM_FREQ 10000
#define LIDAR_PWM_BITS 11
#define LIDAR_PWM_CHANNEL 2 // ESP32 PWM channel for LiDAR motor speed control
HardwareSerial LidarSerial(1);
LDS_YDLIDAR_X2_X2L lidar;
void setup() {
Serial.begin(115200);
Serial.print("LiDAR model ");
Serial.println(lidar.getModelName());
Serial.print("LiDAR RX buffer size "); // default 128 hw + 256 sw
Serial.print(LidarSerial.setRxBufferSize(1024)); // must be before .begin()
uint32_t baud_rate = lidar.getSerialBaudRate();
Serial.print(", baud rate ");
Serial.println(baud_rate);
LidarSerial.begin(baud_rate, SERIAL_8N1, LIDAR_RX_PIN, LIDAR_TX_PIN);
lidar.setScanPointCallback(lidar_scan_point_callback);
lidar.setPacketCallback(lidar_packet_callback);
lidar.setSerialWriteCallback(lidar_serial_write_callback);
lidar.setSerialReadCallback(lidar_serial_read_callback);
lidar.setMotorPinCallback(lidar_motor_pin_callback);
lidar.init();
LDS::result_t result = lidar.start();
Serial.print("LiDAR start() result: ");
Serial.println(lidar.resultCodeToString(result));
if (result < 0)
Serial.println("Is the LiDAR connected to ESP32?");
}
int lidar_serial_read_callback() {
return LidarSerial.read();
// int ch = LidarSerial.read();
// if (ch != -1)
// Serial.println(ch);
// return ch;
}
size_t lidar_serial_write_callback(const uint8_t * buffer, size_t length) {
return LidarSerial.write(buffer, length);
}
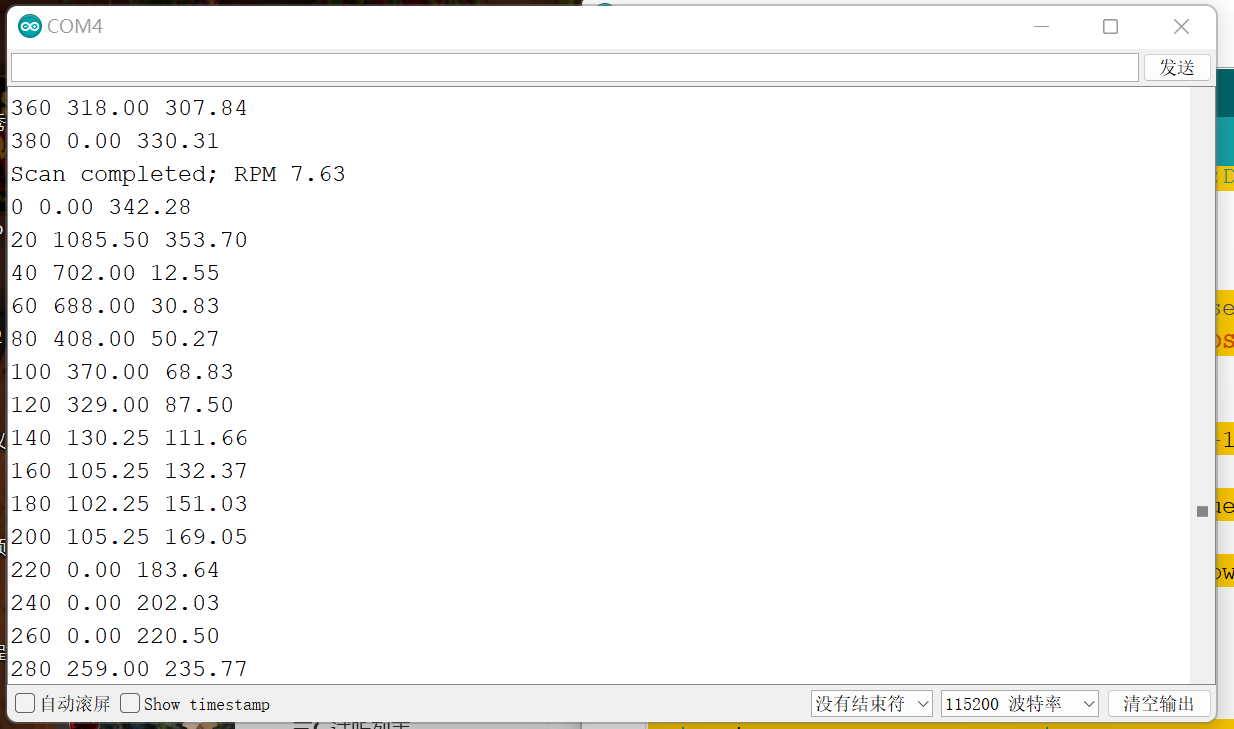
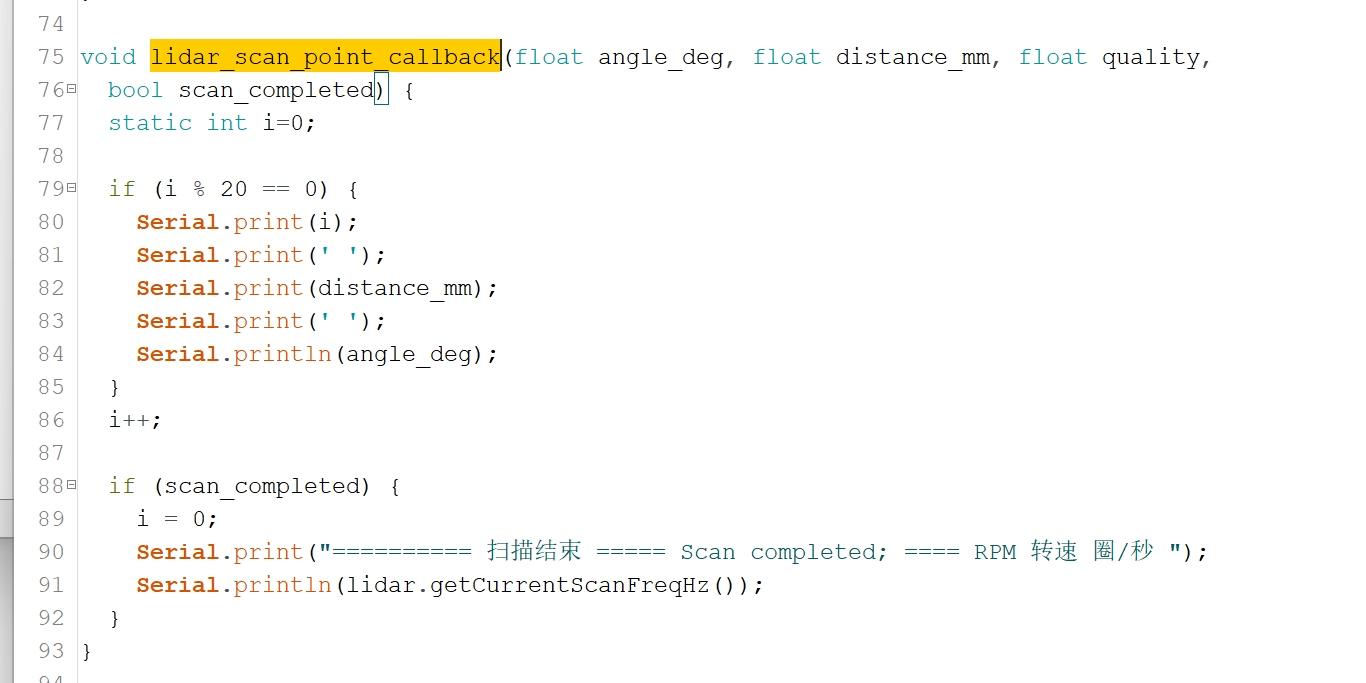
void lidar_scan_point_callback(float angle_deg, float distance_mm, float quality,
bool scan_completed) {
static int i=0;
if (i % 20 == 0) {
Serial.print(i);
Serial.print(' ');
Serial.print(distance_mm);
Serial.print(' ');
Serial.println(angle_deg);
}
i++;
if (scan_completed) {
i = 0;
Serial.print("========== 扫描结束 ===== Scan completed; ==== RPM 转速 圈/秒 ");
Serial.println(lidar.getCurrentScanFreqHz());
}
}
void lidar_info_callback(LDS::info_t code, String info) {
Serial.print("LiDAR info ");
Serial.print(lidar.infoCodeToString(code));
Serial.print(": ");
Serial.println(info);
}
void lidar_error_callback(LDS::result_t code, String aux_info) {
Serial.print("LiDAR error ");
Serial.print(lidar.resultCodeToString(code));
Serial.print(": ");
Serial.println(aux_info);
}
void lidar_motor_pin_callback(float value, LDS::lds_pin_t lidar_pin) {
int pin = (lidar_pin == LDS::LDS_MOTOR_EN_PIN) ?
LIDAR_EN_PIN : LIDAR_PWM_PIN;
if (value <= (float)LDS::DIR_INPUT) {
// Configure pin direction
if (value == (float)LDS::DIR_OUTPUT_PWM) {
#if ESP_IDF_VERSION_MAJOR < 5
ledcSetup(LIDAR_PWM_CHANNEL, LIDAR_PWM_FREQ, LIDAR_PWM_BITS);
ledcAttachPin(pin, LIDAR_PWM_CHANNEL);
#else
ledcAttachChannel(pin, LIDAR_PWM_FREQ, LIDAR_PWM_BITS, LIDAR_PWM_CHANNEL);
#endif
} else
pinMode(pin, (value == (float)LDS::DIR_INPUT) ? INPUT : OUTPUT);
return;
}
if (value < (float)LDS::VALUE_PWM) // set constant output
digitalWrite(pin, (value == (float)LDS::VALUE_HIGH) ? HIGH : LOW);
else {
// Set PWM duty cycle
int pwm_value = ((1<<LIDAR_PWM_BITS)-1)*value;
#if ESP_IDF_VERSION_MAJOR < 5
ledcWrite(LIDAR_PWM_CHANNEL, pwm_value);
#else
ledcWriteChannel(LIDAR_PWM_CHANNEL, pwm_value);
#endif
}
}
void lidar_packet_callback(uint8_t * packet, uint16_t length, bool scan_completed) {
return;
}
void loop() {
lidar.loop();
}
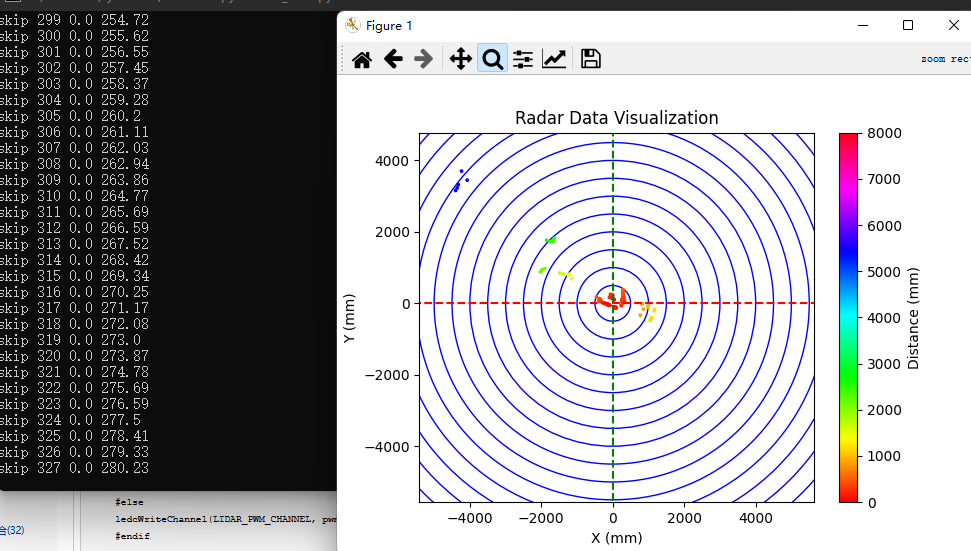
可视化代码
python38
import multiprocessing
from multiprocessing import Process,Manager

import serial
import time
import matplotlib.pyplot as plt
import math
import numpy as np

# 串口解析进程
def serial_parser(queue, port, baudrate):
    ser = serial.Serial(port, baudrate, timeout=1)
    print(f"Connected to {port} at {baudrate} baudrate.")

    while True:
        if ser.in_waiting > 0:
            line = ser.readline().decode('utf-8').strip()
            #line = ser.readline().decode().strip()
            #print(line)
            if line:
                try:
                    #index, distance, angle = map(float, line.split(' '))

                    data = line.split()
                    if len(data) == 3:
                        index = int(data[0])
                        distance = float(data[1])  # 单位:毫米
                        angle = float(data[2])  # 单位:度

                        #distance_cm = distance / 10  # 转化为cm
                        #angle_rad = np.deg2rad(angle)  # 转化为弧度

                        queue.put((index, distance, angle))

                except ValueError:
                    print(f"Invalid data: {line}")
from matplotlib.patches import Circle
# 数据可视化进程
def data_visualizer(queue):
    plt.ion()  # 开启交互模式
    fig, ax = plt.subplots()
    ax.set_xlim(-8000, 8000)
    ax.set_ylim(-8000, 8000)
    ax.set_aspect('equal')  # 保持比例,确保圆是圆形而不是椭圆
    plt.xlabel("X (mm)")
    plt.ylabel("Y (mm)")
    plt.title("Radar Data Visualization")

    # 绘制多个圆,直到最大半径为 8000 毫米
    max_radius_mm = 8000  # 8 米 = 8000 毫米
    radius_increment = 500  # 半径增量,0.5 米 = 500 毫米
    circles = []  # 存储所有的圆形

    for radius in range(radius_increment, max_radius_mm + 1, radius_increment):
        circle = Circle((0, 0), radius, color='b', fill=False)  # 绘制圆形,不填充
        ax.add_patch(circle)
        circles.append(circle)

    # 绘制两条直线,经过(0, 0)
    ax.plot([-max_radius_mm, max_radius_mm], [0, 0], 'r--', label="X-axis")  # 红色水平直线
    ax.plot([0, 0], [-max_radius_mm, max_radius_mm], 'g--', label="Y-axis")  # 绿色垂直直线

    # 初始化空的散点图
    scatter = ax.scatter([], [], s=3, c=[], cmap='hsv', vmin=0, vmax=8000)  # 使用hsv颜色映射
    plt.colorbar(scatter, label="Distance (mm)")  # 添加颜色条

    # 存储数据点
    x_points = []
    y_points = []
    colors = []

    while True:
        if not queue.empty():
            index, distance, angle = queue.get()

            if distance == 0 or distance > 8000:
                print("skip", index, distance, angle)
                continue

            # 如果 index 为 0,表示新的一圈开始,清空上一圈的数据
            if index == 0:
                x_points.clear()
                y_points.clear()
                colors.clear()
                scatter.set_offsets(np.empty((0, 2)))  # 清空散点图
                scatter.set_array(np.empty(0))  # 清空颜色数组

            # 将极坐标转换为笛卡尔坐标
            angle_rad = math.radians(angle)
            x = distance * math.cos(angle_rad)
            y = distance * math.sin(angle_rad)

            # 更新散点图数据
            new_offsets = np.column_stack((x, y))  # 新的点
            new_colors = np.array(distance)  # 新的颜色值

            scatter.set_offsets(np.vstack([scatter.get_offsets(), new_offsets]))
            scatter.set_array(np.hstack([scatter.get_array(), new_colors]))

            # 动态更新画布
            fig.canvas.draw_idle()  # 优化更新画布
            fig.canvas.flush_events()

        else:
            time.sleep(0.01)  # 增加短时间的等待,避免占用过多 CPU 资源


if __name__ == "__main__":
    # 创建进程间通信的队列
    queue = multiprocessing.Queue()

    # 串口配置
    port = 'COM4'  # 根据你的系统修改串口
    baudrate = 115200

    # 创建并启动串口解析进程
    parser_process = multiprocessing.Process(target=serial_parser, args=(queue, port, baudrate))
    parser_process.daemon=True
    parser_process.start()


    # 创建并启动数据可视化进程
    visualizer_process = multiprocessing.Process(target=data_visualizer, args=(queue,))
    visualizer_process.daemon=True
    visualizer_process.start()


    # parser_process.join()
    # visualizer_process.join()

    # 等待进程结束


    while True:
        time.sleep(10)
        print("主函数运行中")
https://www.ydlidar.cn/Public/upload/files/2024-02-01/YDLIDAR%20X2%20%E4%BD%BF%E7%94%A8%E6%89%8B%E5%86%8C%20V1.3(240124).pdf
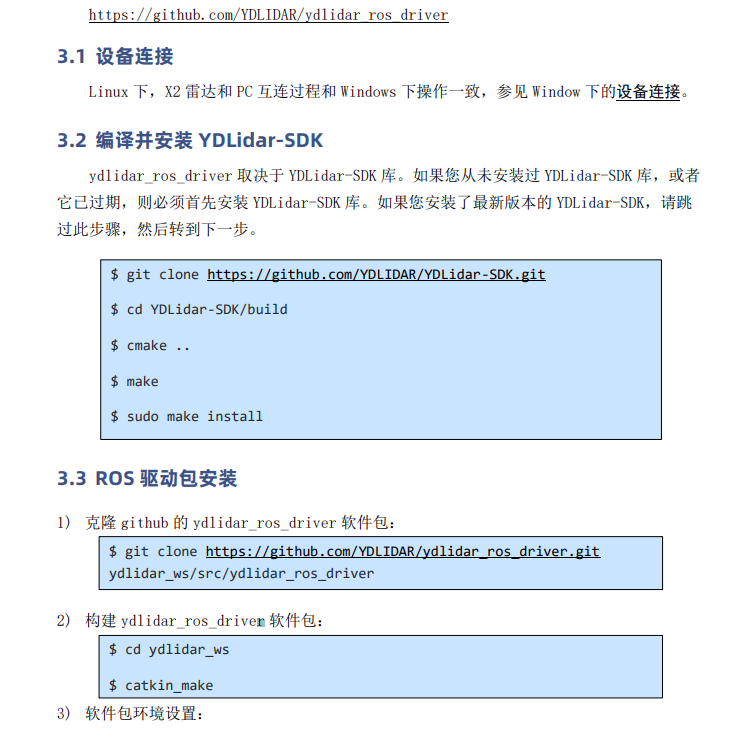
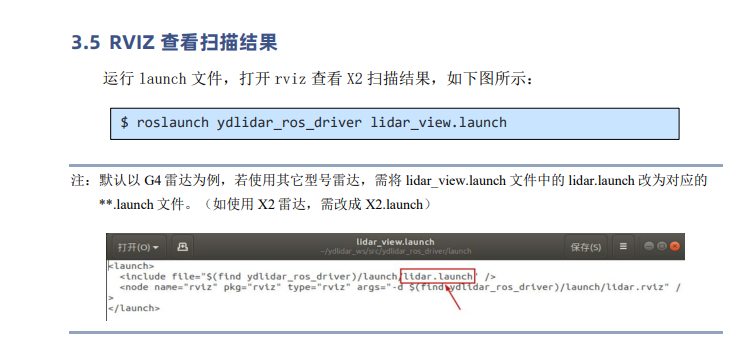
3 LINUX 下基于 ROS 的使用操作 Linux 发行版本有很多,本文仅以 Ubuntu18.04、Melodic 版本 ROS 为例。
SDK 驱动程序地址: https://github.com/YDLIDAR/YDLidar-SDK
ROS 驱动程序地址: https://github.com/YDLIDAR/ydlidar_ros_driver

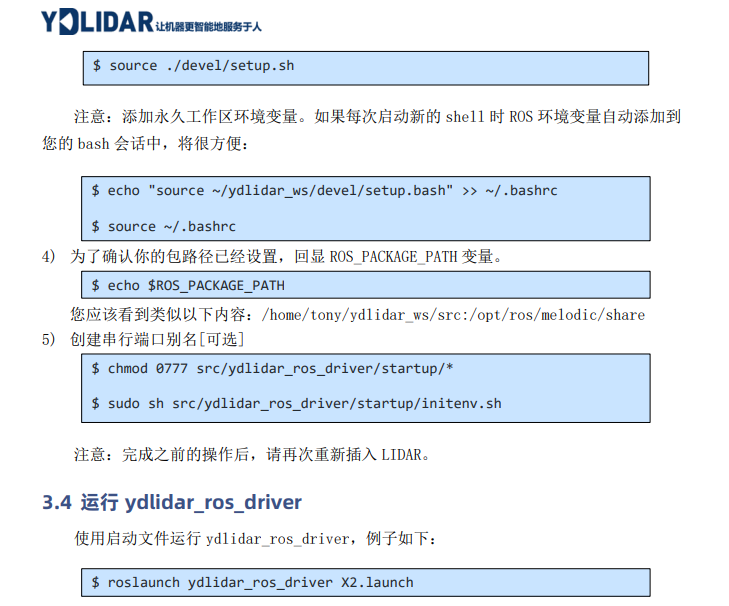
git clone https://github.com/YDLIDAR/YDLidar-SDK.git
3.1 设备连接 Linux 下,X2 雷达和 PC 互连过程和 Windows 下操作一致,参见 Window 下的设备连接。 3.2 编译并安装 YDLidar-SDK ydlidar_ros_driver 取决于 YDLidar-SDK 库。如果您从未安装过 YDLidar-SDK 库,或者 它已过期,则必须首先安装 YDLidar-SDK 库。如果您安装了最新版本的 YDLidar-SDK,请跳 过此步骤,然后转到下一步。 3.3 ROS 驱动包安装 1) 克隆 github 的 ydlidar_ros_driver 软件包: 2) 构建 ydlidar_ros_driver 软件包: 3) 软件包环境设置: &amp;amp;amp;lt;span style="display: inline-block; position: relative; width: 28.036em; height: 0px; font-size: 120%;"&amp;amp;amp;gt;&amp;amp;amp;lt;span style="position: absolute; clip: rect(1.214em, 1028.01em, 2.571em, -1000em); top: -2.143em; left: 0em;"&amp;amp;amp;gt;&amp;amp;amp;lt;span id="MathJax-Span-2" class="mrow"&amp;amp;amp;gt;&amp;amp;amp;lt;span id="MathJax-Span-3" class="mi" style="font-family: MathJax_Math-italic;"&amp;amp;amp;gt;gitclonehttps://github.com/YDLIDAR/YDLidar−SDK.gitgitclonehttps://github.com/YDLIDAR/YDLidar−SDK.git cd YDLidar-SDK/build &amp;amp;amp;lt;span style="display: inline-block; position: relative; width: 3.571em; height: 0px; font-size: 120%;"&amp;amp;amp;gt;&amp;amp;amp;lt;span style="position: absolute; clip: rect(1.27em, 1003.49em, 2.332em, -1000em); top: -2.143em; left: 0em;"&amp;amp;amp;gt;&amp;amp;amp;lt;span id="MathJax-Span-62" class="mrow"&amp;amp;amp;gt;&amp;amp;amp;lt;span id="MathJax-Span-63" class="mi" style="font-family: MathJax_Math-italic;"&amp;amp;amp;gt;cmake..cmake.. make $ sudo make install
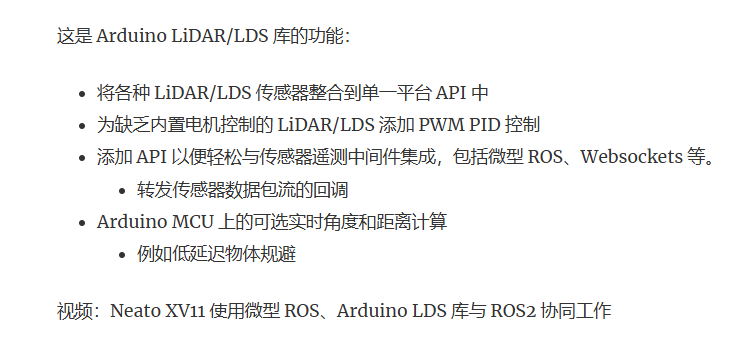
https://github.com/kaiaai/LDS


店内雷达资料 https://pan.baidu.com/s/1OBo9Hb-
p27OedYQgK1U8pQ?pwd=8jme 提取码: 8jme
也欢迎喜欢研究模型diy雷达研究的可以加Q群955245396一起交流学习
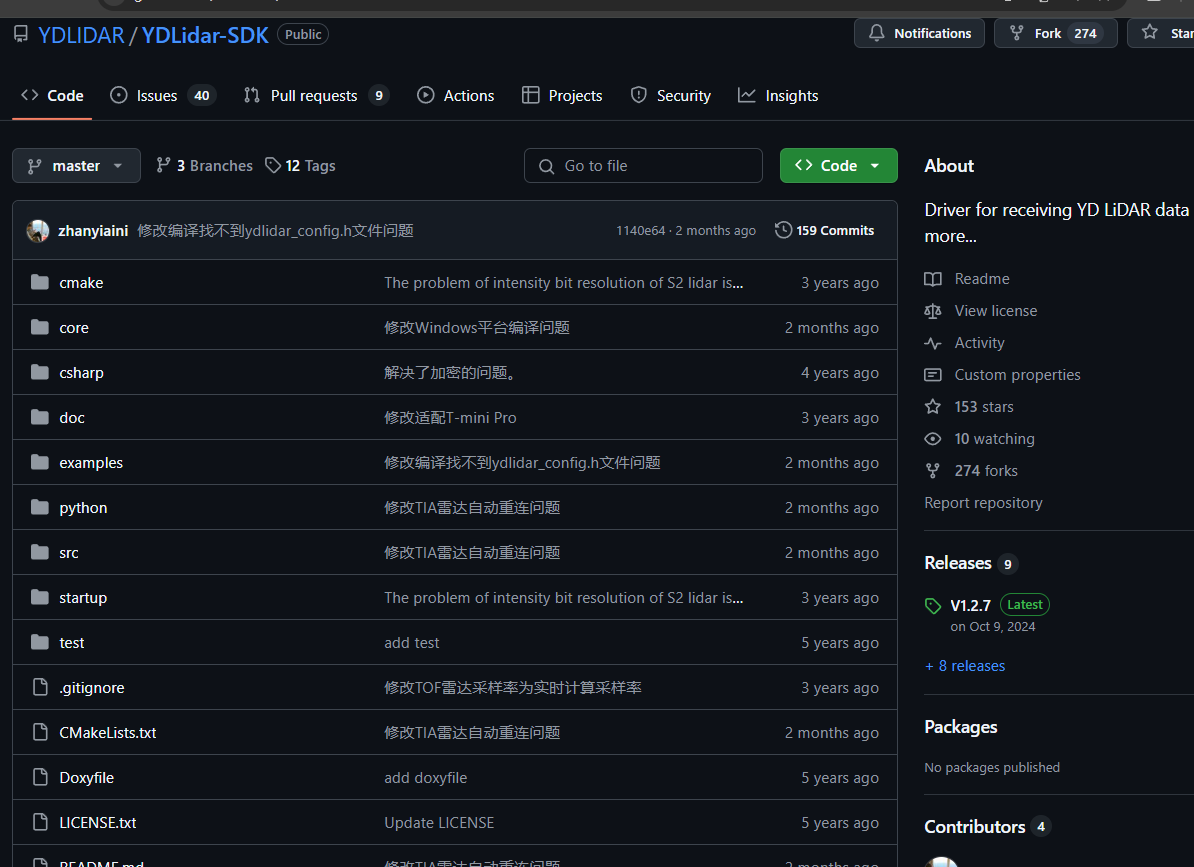
https://github.com/YDLIDAR/YDLidar-SDK
弹出教程 直接关闭
开始

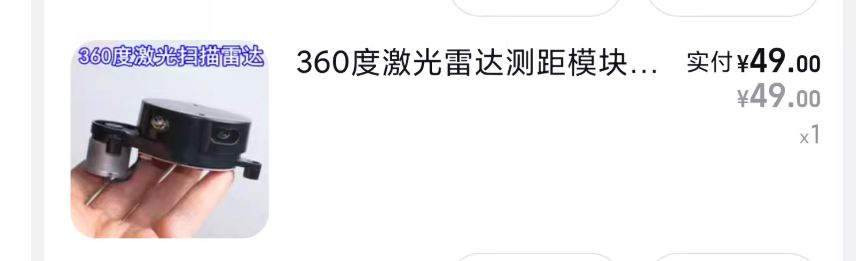
https://item.taobao.com/item.htm?_u=21qf7bf58629&id=757229568067&pisk=gloz68voF3KzPGMZGcqFbjdn6AZ84kR6tDNQKvD3F7VkJ8thYvkgdLdpeqynOjppeuM3TXlbMMwByBIEgbMiPzGIPW23ijD5VWt88Xks6XsB24whYjML-XiEpMynKXp8OLLjeYELxCO_YhM-evmGsliz-ibmHJIhqEalznkWhCO6fH7cXSOe1btqQe60QRq3Ey23oKyUQTq3-8DD3J2CZwjotKk0MR2hZkj3ni28d6qhq8f0oJyPrwj3xZf0MJq3tXqH3oDEcbhd1R4kKKhzmZASxzPiESSZH0wl3WxTGMqjD8UrxAV2hKi4UzPgkLouf0cjK0i8kC5gvxgZT2cp5ZErK4quCYKP0lDolDyjAp_UZbnqn0UVBGEErbu3Wq-OWz4Uaqmuu9jnHouqt2lyaaFoPjzTnrXeX-G_iYnoupCmEfNzq-4Xjdk0-qi8W0Oc4l0tFugn9F_Y4v0u0glA9-j4iD3PtwzuH-P63Koafd7Wzx-zWwQLoP241LUhJwUoX-P6nTbdJzQu359kj&spm=a1z09.2.0.0.a4352e8dpWT2yn

通过百度网盘分享的文件:杉川修改版Del....zip
链接:https://pan.baidu.com/s/1fiRw2BpLhaQ2P0M56bC6uA
提取码:6A6F
复制这段内容打开「百度网盘APP 即可获取」
通过网盘分享的文件:杉川修改版Delta-2A.zip
链接: https://pan.baidu.com/s/1dF-OkTxnxJ1XZw1VRQIQnw?pwd=neku 提取码: neku
--来自百度网盘超级会员v5的分享

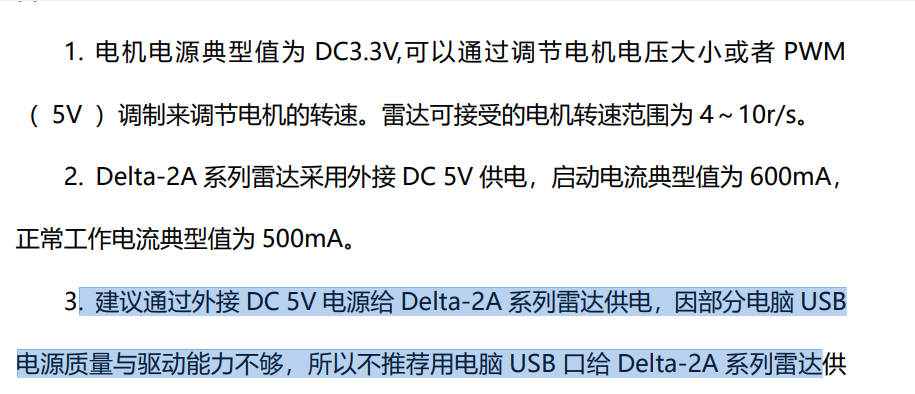
电机和雷达连个电源都要接


 浙公网安备 33010602011771号