
docker 下安装 gitlab EE
此内容综合网络查询,仅供参考
一. docker 安装 gitlab-ee
1. 执行安装脚本
docker run -d --name gitlabee \
--restart always \
--privileged \
-e GITLAB_SKIP_UNMIGRATED_DATA_CHECK=true \
-p 40001:40001 \
-p 40002:40002 \
-p 40003:40003 \
-v /home/$USER/dockerfile/gitlabee/data/etc:/etc/gitlab \
-v /home/$USER/dockerfile/gitlabee/data/logs:/var/log/gitlab \
-v /home/$USER/dockerfile/gitlabee/data/data:/var/opt/gitlab \
gitlab/gitlab-ee
2. 获取root用户密码,桔色部分复制出来登录备用,
docker exec gitlabee grep 'Password:' /etc/gitlab/initial_root_password
得到返回
Password: dwFJvE5IctiBAYiG8jzA0COgEqdu/KDxg8HmSl73rX8=
二、修改配置
修改 /home/$USER/dockfile/gitlabee/data/etc/gitlab.rb 以下为快速修改脚本命令。记得将IP地址192.168.0.100修改为自己服务器的实际IP
以 192.168.0.100 为例
1. 修改http请求地址
sudo sed -i "s|# external_url 'GENERATED_EXTERNAL_URL'|external_url 'http://192.168.0.100:40002'|g" /home/$USER/dockerfile/gitlabee/data/etc/gitlab.rb
2. 修改ssh请求地址
sudo sed -i "s|# gitlab_rails\['gitlab_ssh_host'\] = 'ssh.host_example.com'|gitlab_rails\['gitlab_ssh_host'\] = '192.168.0.100'|g" /home/$USER/dockerfile/gitlabee/data/etc/gitlab.rb

sudo sed -i "s|# gitlab_rails\['gitlab_shell_ssh_port'\] = 'ssh.host_example.com'|gitlab_rails\['gitlab_shell_ssh_port'\] = '40001'|g" /home/$USER/dockerfile/gitlabee/data/etc/gitlab.rb
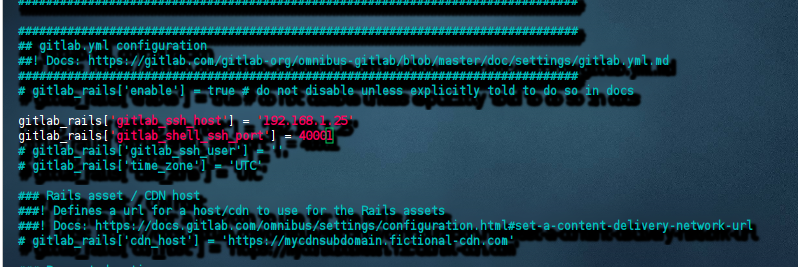
修改后的内容格式为
3. 重载配置
docker exec gitlabee gitlab-ctl reconfigure
三、破解 gitlab-ee
1. 使用docker运行 ruby
docker run -it --rm ruby /bin/bash
或者本地安装ruby,需要2.3及以上
sudo apt-get install ruby
2. 使用ruby生成许可证
gem install gitlab-license
3. 创建证书文件
* 1. 创建license.rb文件,并输入内容
vi license.rb
修改以下内容中的日期时间,然后粘贴之命令行窗口
require "openssl"
require "gitlab/license"
key_pair = OpenSSL::PKey::RSA.generate(2048)
File.open("license_key", "w") { |f| f.write(key_pair.to_pem) }
public_key = key_pair.public_key
File.open("license_key.pub", "w") { |f| f.write(public_key.to_pem) }
private_key = OpenSSL::PKey::RSA.new File.read("license_key")
Gitlab::License.encryption_key = private_key
license = Gitlab::License.new
license.licensee = {
  "Name" => "Your Company",
  "Company" => "Your Company",
  "Email" => "example@test.com",
}
license.starts_at = Date.new(2023, 1, 1) # 开始时间
license.expires_at = Date.new(2053, 1, 1) # 结束时间
license.notify_admins_at = Date.new(2052, 12, 1)
license.notify_users_at = Date.new(2052, 12, 1)
license.block_changes_at = Date.new(2053, 1, 1)
license.restrictions = {
  active_user_count: 10000,
}
puts "License:"
puts license
data = license.export
puts "Exported license:"
puts data
File.open("GitLabBV.gitlab-license", "w") { |f| f.write(data) }
public_key = OpenSSL::PKey::RSA.new File.read("license_key.pub")
Gitlab::License.encryption_key = public_key
data = File.read("GitLabBV.gitlab-license")
$license = Gitlab::License.import(data)
puts "Imported license:"
puts $license
unless $license
  raise "The license is invalid."
end
if $license.restricted?(:active_user_count)
  active_user_count = 10000
  if active_user_count > $license.restrictions[:active_user_count]
    raise "The active user count exceeds the allowed amount!"
  end
end
if $license.notify_admins?
  puts "The license is due to expire on #{$license.expires_at}."
end
if $license.notify_users?
  puts "The license is due to expire on #{$license.expires_at}."
end
module Gitlab
  class GitAccess
    def check(cmd, changes = nil)
      if $license.block_changes?
        return build_status_object(false, "License expired")
      end
    end
  end
end
puts "This instance of GitLab Enterprise Edition is licensed to:"
$license.licensee.each do |key, value|
  puts "#{key}: #{value}"
end
if $license.expired?
  puts "The license expired on #{$license.expires_at}"
elsif $license.will_expire?
  puts "The license will expire on #{$license.expires_at}"
else
  puts "The license will never expire."
end
然后保存退出
* 2. 生成许可证和公钥文件
ruby license.rb
执行命令后在当前目录下生产三个文件 GitLabBV.gitlab-license、 license_key 、 license_key.pub
4. 使用许可证
* 1. 读取许可证
读取公钥
cat license_key.pub
得到一串公钥,复制待用
读取许可证密钥
cat GitLabBV.gitlab-license
得到许可证密钥,复制待用
*2. 替换gitlab-ee 公钥内容
docker exec -it gitlabee bash
使用vi命令打开文件
vi /opt/gitlab/embedded/service/gitlab-rails/.license_encryption_key.pub
vi打开文本后非编辑状态下,先清空旧文本,
清空文本命令
:%d
再将上面的公钥内容粘贴至命令行窗口,然后保存退出
并使用 exit 命令退出当前模式
* 3. 重启 gitlab-ee
docker exec gitlabee gitlab-ctl restart
*4. 更新许可证
打开浏览器,登录root账户
http://192.168.0.100:40002
然后转到许可证上传界面
http://192.168.0.100:40002/admin/application_settings/general
填入许可证,激活订阅。
以后就可以通过 http://192.168.0.100:40002 进行登录,然后进行项目管理了。

 浙公网安备 33010602011771号