【Android】RecycleView学习笔记
RecycleView的学习笔记
本篇内容是学习笔记,不代表是最好的方案,不保证所有方法的理解正确。
欢迎各位大佬指正,优化。
学习假想环境是一个冰箱保存内容的管理App。
数据:食品的名称,放入时间,到期时间。如果已经过期,标记为Bad。
一、创建画面
在activity的xml文件中放入RecycleView控件。
红色框的部分是RecycleView

代码中包括两个部分,TextView是Title,RecycleView有多个版本,此处使用androidx的版本。
<LinearLayout
        android:layout_width="300dp"
        android:layout_height="match_parent"
        android:orientation="vertical">

        <TextView
            android:layout_width="match_parent"
            android:layout_height="wrap_content"
            android:gravity="center"
            android:text="@string/home_things_list_title"
            android:textSize="24sp" />

        <androidx.recyclerview.widget.RecyclerView
            android:id="@+id/home_things_list"
            android:layout_width="match_parent"
            android:layout_height="match_parent" />
    </LinearLayout>
二、创建RecycleView的条目布局
下图中包含五个元素,第1和4元素是image,用于显示图片。第2元素是TextView。第3和5元素是EditText。
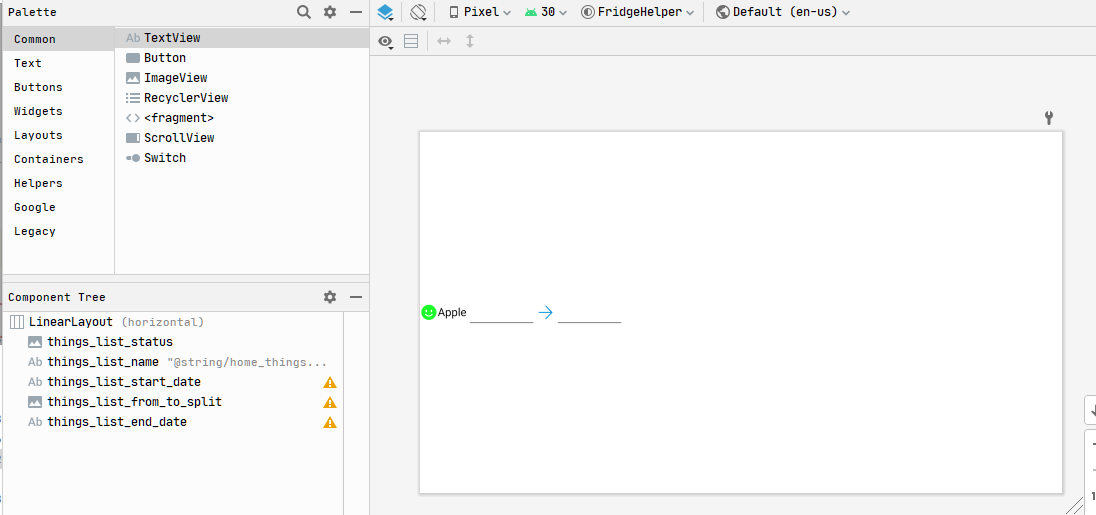
源代码如下:
<?xml version="1.0" encoding="utf-8"?>
<LinearLayout xmlns:android="http://schemas.android.com/apk/res/android"
    xmlns:app="http://schemas.android.com/apk/res-auto"
    android:layout_width="wrap_content"
    android:layout_height="wrap_content"
    android:layout_gravity="center|start">

    <ImageView
        android:id="@+id/things_list_status"
        android:layout_width="@dimen/home_things_list_item_image_height"
        android:layout_height="@dimen/home_things_list_item_height"
        android:contentDescription="@string/home_things_list_item_status"
        app:srcCompat="@mipmap/good" />

    <TextView
        android:id="@+id/things_list_name"
        style="@android:style/Widget.Material.TextView"
        android:layout_width="wrap_content"
        android:layout_height="@dimen/home_things_list_item_height"
        android:text="@string/home_things_list_item_name"
        android:textColor="@android:color/primary_text_light"
        android:textSize="@dimen/home_things_list_item_text_size" />

    <EditText
        android:id="@+id/things_list_start_date"
        style="@android:style/Widget.Material.EditText"
        android:layout_width="@dimen/home_things_list_item_date_width"
        android:layout_height="@dimen/home_things_list_item_height"
        android:cursorVisible="false"
        android:ems="10"
        android:focusable="false"
        android:importantForAutofill="no"
        android:inputType="date"
        android:textAlignment="center"
        android:textSize="@dimen/home_things_list_item_text_size" />

    <ImageView
        android:id="@+id/things_list_from_to_split"
        android:layout_width="@dimen/home_things_list_item_image_height"
        android:layout_height="@dimen/home_things_list_item_height"
        app:srcCompat="@mipmap/direction_right" />

    <EditText
        android:id="@+id/things_list_end_date"
        style="@android:style/Widget.Material.EditText"
        android:layout_width="@dimen/home_things_list_item_date_width"
        android:layout_height="@dimen/home_things_list_item_height"
        android:cursorVisible="false"
        android:ems="10"
        android:focusable="false"
        android:importantForAutofill="no"
        android:inputType="date"
        android:textAlignment="center"
        android:textSize="@dimen/home_things_list_item_text_size" />

</LinearLayout>
注意点:
- 时间输入使用的EditText后期会增加点击事件。实践中发现,EditText需要点击两次才能响应Click事件。原因是第一次点击事件触发的是Focus事件,第二次触发的是Click事件。修改方案,将EditText的focusable属性设定为false。
- 利用dimen.xml将尺寸进行配置化,只需要修改一次,就可以影响所有的List子条目,非常方便。
三、将RecycleView和Adapter进行绑定
此处在画面的onCreate函数中,将RecycleView和Adapter进行绑定,并且设定点击事件。
由于RecycleView的Adapter实现比较复杂,此处使用BaseQuickAdapter替换原Adapter,可以节约部分代码使用。
protected void onCreate(Bundle savedInstanceState) {
super.onCreate(savedInstanceState);
	setContentView(R.layout.activity_home);

	// 创造假数据
	dummyData();

	// 获得RecycleView的对象
	RecyclerView list = findViewById(R.id.home_things_list);

	LinearLayoutManager layoutManager = new LinearLayoutManager(this);
	layoutManager.setOrientation(LinearLayoutManager.VERTICAL);

	// 设定LayoutManager
	list.setLayoutManager(layoutManager);

	// 设定Layout,数据来源
	HomeThingsListAdapter adapter = new HomeThingsListAdapter(this, R.layout.things_list_item, mThings);

	// 设定List的点击事件
	adapter.setOnItemChildClickListener(new BaseQuickAdapter.OnItemChildClickListener() {

		@RequiresApi(api = Build.VERSION_CODES.O)
		@Override
		public void onItemChildClick(BaseQuickAdapter adapter, View view, int position) {
			Log.e(TAG, "Fridge things list item has been clicked. view:" + view.getId() + " position:" + position);

			// 筛选Date的View点击事件
			if (view.getId() == R.id.things_list_start_date || view.getId() == R.id.things_list_end_date) {
				// 显示日期选择对话框。此处利用系统自带的Dialog
				DatePickerDialog datePicker = new DatePickerDialog(HomeActivity.this);

				// 显示日期选择对话框。此处利用系统自带的Dialog
				DatePickerDialog datePicker = new DatePickerDialog(HomeActivity.this);

				// 更新数据
				Calendar oldDate = null;
				if (view.getId() == R.id.things_list_start_date) {
					oldDate = mThings.get(position).getStartDate();
				}
				else {
					oldDate = mThings.get(position).getEndDate();
				}
				datePicker.updateDate(oldDate.get(Calendar.YEAR), oldDate.get(Calendar.MONTH), oldDate.get(Calendar.DAY_OF_MONTH));

				// 设定数据点击事件
				datePicker.setOnDateSetListener(new DatePickerDialog.OnDateSetListener() {
					@Override
					public void onDateSet(DatePicker datePickerView, int year, int month, int dayOfMonth) {

						// 将更新的数据更新到mThings中
						Calendar newDate = Calendar.getInstance();
						newDate.set(year, month, dayOfMonth);
						if (view.getId() == R.id.things_list_start_date) {
							mThings.get(position).setStartDate(newDate);
						}
						else {
							mThings.get(position).setEndDate(newDate);
						}

						// 通知Adapter更新一下数据
						adapter.notifyItemChanged(position);
					}
				});

				// 显示DatePicker
				datePicker.show();
			};
		}
	});

	// 绑定adapter
	list.setAdapter(adapter);
}
四、配置BaseQuickAdapter环境
- 在项目下的build.gradle中增加下面标记的代码
dependencies {

    implementation 'androidx.appcompat:appcompat:1.2.0'
    implementation 'com.google.android.material:material:1.2.1'
    implementation 'androidx.constraintlayout:constraintlayout:2.0.4'
    testImplementation 'junit:junit:4.1'
    androidTestImplementation 'androidx.test.ext:junit:1.1.2'
    androidTestImplementation 'androidx.test.espresso:espresso-core:3.3.0'

    implementation 'com.github.CymChad:BaseRecyclerViewAdapterHelper:2.9.50'     // <---- 这句
}
- 在app下的build.gradle中增加下面标记的代码
allprojects {
    repositories {
        google()
        jcenter()
        maven { url "https://jitpack.io" }  // <---- 这句
    }
}
五、基于BaseQuickAdapter的Adapter
此处是数据bean,用于记录食物的状态。
public class FridgeThings {

	/**
	 * 食物的状态很好
	 */
	public static final int STATUS_GOOD = 0;

	/**
	 * 食物的状态不太好
	 */
	public static final int STATUS_NOT_GOOD = 1;

	/**
	 * 食物已经过了保质期,应当扔掉了
	 */
	public static final int STATUS_BAD = 2;
	private int mStatus;
	private String mName;
	private Calendar mStartDate;
	private Calendar mEndDate;

	public FridgeThings(@Status int status, String name, Calendar startDate, Calendar endData) {
		mStatus = status;
		mName = name;
		mStartDate = startDate;
		mEndDate = endData;
	}

	public String getName() {
		return mName;
	}

	public void setName(String name) {
		mName = name;
	}

	@Status
	public int getStatus() {
		return mStatus;
	}

	public void setStatus(@Status int status) {
		mStatus = status;
	}

	public Calendar getStartDate() {
		return mStartDate;
	}

	public void setStartDate(Calendar startDate) {
		mStartDate = startDate;
	}

	public Calendar getEndDate() {
		return mEndDate;
	}

	public void setEndDate(Calendar endDate) {
		mEndDate = endDate;
	}

	/**
	 * 食物的存储状态
	 */
	@IntDef({STATUS_GOOD, STATUS_NOT_GOOD, STATUS_BAD})
	@Retention(RetentionPolicy.SOURCE)
	public @interface Status {
	}
}
下面是自定义Adapter的实现方法。该方法中进行了List条目显示数据的更新。
public class HomeThingsListAdapter extends BaseQuickAdapter<FridgeThings, BaseViewHolder> {

	private final Context mContext;

	public HomeThingsListAdapter(Context context, int layoutResId, @Nullable List<FridgeThings> data) {
		super(layoutResId, data);
		mContext = context;
	}

	@Override
	protected void convert(BaseViewHolder helper, FridgeThings item) {

		// 条目状态
		switch (item.getStatus()) {
			case FridgeThings.STATUS_GOOD:
				helper.setImageResource(R.id.things_list_status, R.mipmap.good);
				break;
			case FridgeThings.STATUS_NOT_GOOD:
				helper.setImageResource(R.id.things_list_status, R.mipmap.notgood);
				break;
			case FridgeThings.STATUS_BAD:
				helper.setImageResource(R.id.things_list_status, R.mipmap.bad);
				break;
		}

		// 条目名称
		helper.setText(R.id.things_list_name, item.getName());

		// 食品起止时间
		SimpleDateFormat formatter = new SimpleDateFormat("yyyy.MM.dd");
		helper.setText(R.id.things_list_start_date, formatter.format(item.getStartDate().getTime()));
		helper.setText(R.id.things_list_end_date, formatter.format(item.getEndDate().getTime()));

		helper.addOnClickListener(R.id.things_list_start_date);
		helper.addOnClickListener(R.id.things_list_end_date);
	}
}
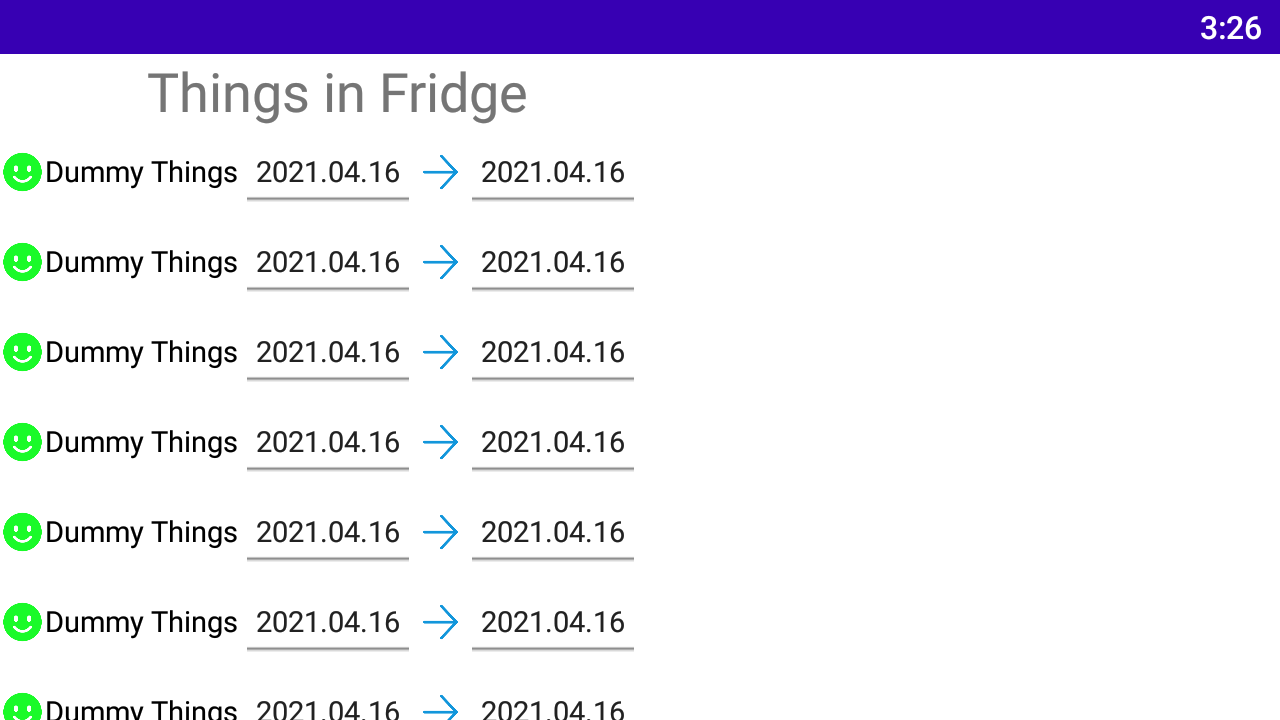
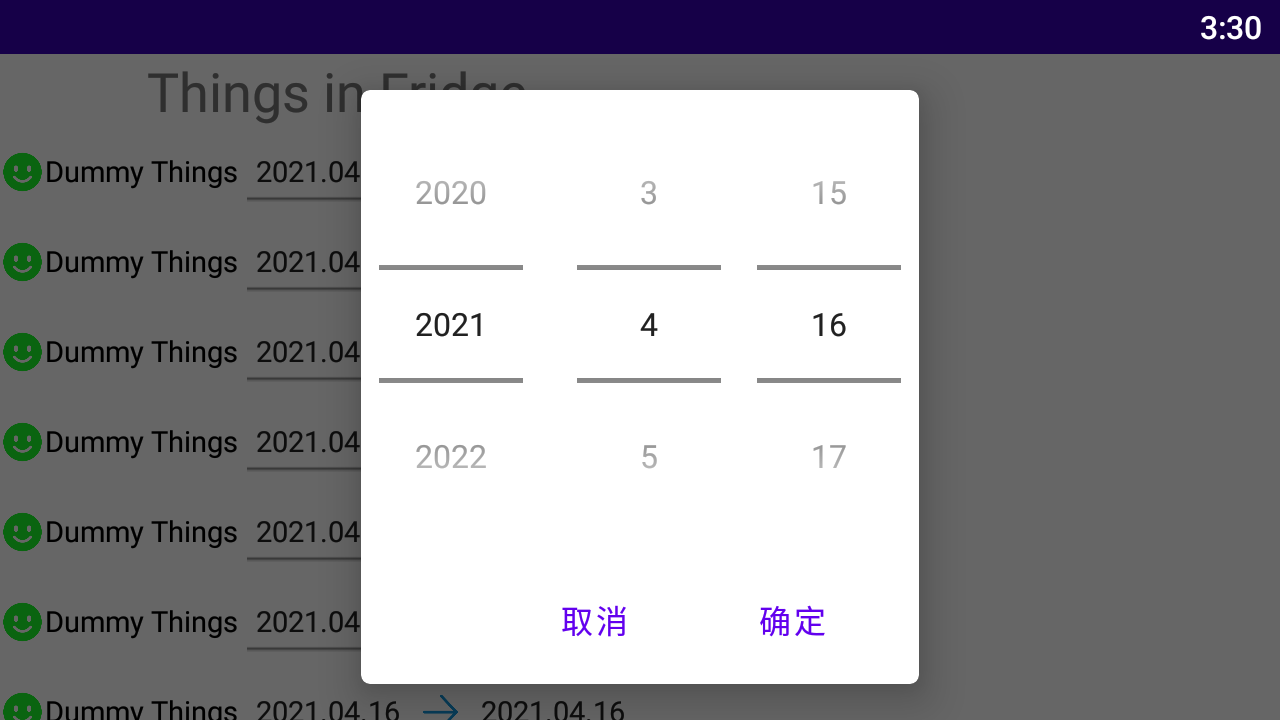
六、实现效果展示
-
List展示画面
![image]()
-
点击EditText的效果
![image]()
|
原创内容,转发请注明出处。 博客园:https://www.cnblogs.com/gikoo 作者:Giraffe & Kangaroo |
|---|


 浙公网安备 33010602011771号