Docker的常用命令
Docker的常用命令
docker version	#显示docker的版本信息
docker info	#显示docker的系统信息,包括镜像和容器的数量
docker --help	#docker帮助命令
镜像命令
docker images	查看所有本地主机上的镜像
docker search mysql	搜索镜像
docker pull mysql	下载镜像
docker pull mysql:5.7	指定版本下载
docker rmi -f ID/name	删除镜像
docker rmi -f 容器id	删除指定的镜像
docker rmi -f 镜像id 镜像id 镜像id 镜像id	删除多个镜像
docker rmi -f $(docker images -aq)	#删除全部镜像
容器命令
说明:有了镜像才可以创建容器,liunx,下载一个centos来测试学习
docker pull centos
新建容器并启动
docker run [可选参数] image

#参数说明
--name="Name"	容器名字	tomcat01 tomcat02 tomcat03,用来区分容器
-d			    后台方式运行
-it				使用交互方式运行,进入容器查看内容
-p				制定容器的端口 -p	8080:8080
	-p	ip:主机端口:容器端口
	-p	主机端口:容器端口
	-p 容器端口
	容器端口

-p	随机指定端口

#测试,启动并进入容器
docker run -it centos /bin/bash
列出所有运行的容器
docker ps 命令
	-a	#列出当前正在运行的容器+带出历史运行中的容器
	-n=?	#显示最近创建的容器
	-q	#只显示容器的编号
删除容器
docker rm 容器id	#删除指定的容器,不能删除在运行的容器,如果要强制删除 rm -f
docker rm -f $(docker ps -aq)	#删除所有的容器
docker ps -a -q|xargs docker rm 	#删除所有的容器
退出容器
exit	#直接容器停止并退出
ctrl + P + Q	#容器不停止退出
启动和停止容器的操作
docker start 容器id	#启动容器
docker restart 容器id	#重启容器
docker stop 容器id	#停止当前正在运行的容器
docker kill 容器id	#停止当前容器
常用其他命令
后台启动容器
命令 docker run -d 镜像名
docker run -d centos
#问题docker ps,发现centos停止了

#常见的坑,docker容器使用后台运行,就必须要有一个前台进程,docker发现没有应用,就会自动停止
#nginx,容器启动后,发现自己没有提供服务,就会立即停止,就没有程序了。
查看日志
docker logs -f -t --tail 容器

#显示日志
-tf	#显示日志
-tail number	#显示日志条数

docker logs -tf --tail 10 容器id
查看容器中的进程信息ps
docker top 容器id
查看镜像的元数据
#命令
docker inspect 容器id
进入当前正在运行的容器
#我们通常都是使用后台的方式运行的,需要进入容器,修改一些配置
#命令
#方法一:
	docker exec -it 容器id bashshell
	eg:docker exec -it 容器id /bin/bash
	ls
	ps -ef
#方法二:
	docker attach 容器id


docker exec	#进入容器后开启一个新的终端,可以在里面操作(常用)
docker attach	#进入容器正在执行的终端,不会启动新的进程
从容器内拷贝文件到主机上
docker cp 容器id:容器内路径	目的主机路径
	docker cp 容器id:/home/test.java /home

#拷贝是一个手动过程,未来我们使用 -v卷的技术,可以实现
作业练习
docker安装nginx

	#1.搜索镜像search 建议大家去docker搜索,可以看到帮助文档
	#2.下载镜像 pull
	#3.运行测试
docker images

	-d 后台运行
	--name 给容器命名
	-p 宿主机端口:容器内部端口
docker run -d --name  nginx01 -p 3344:80 nginx

docker ps

curl localhost:3344
#进入容器
docker exec -it nginx01 /bin/bash
whereis nginx
cd /etc/nginx	ls

docker安装tomcat
docker run -it -rm tomcat:9.0
#我们之前的启动是后台,停止了容器之后,容器还是可以查到
docker run -it --rm,一般用来测试,用完之后就删除

#下载在启动
docker pull tomcat:9.0

#启动运行
docker run -d -p 3355:8080 --name tomcat01 tomcat

#测试访问没有问题

#进入容器

docker exec -it tomcat01 /bin/bash

#发现问题
	1、linux命令少了
	2、没有webapps	阿里云镜像的原因,默认是最小镜像,所有不必要的都剔除掉
#保证最小的可运行环境
思考:如果我们每次都要部署项目,每次进入容器是不是十分麻烦?我要是可以在容器外部提供一个映射路径,webapps,我们在外部部署项目,自动同步就好了!
部署es+kibana
#es暴露的端口很多
#es十分的消耗内存
#es的数据一般需要放置到安全目录,需要挂载
$ docker run -d --name elasticsearch --net somenetwork -p 9200:9200 -p 9300:9300 -e "discovery.type=single-node" elasticsearch:7.6.2

#增加内存的限制,修改配置文件 -e 环境配置修改
$ docker run -d --name elasticsearch -p 9200:9200 -p 9300:9300 -e "discovery.type=single-node" -e ES_JAVA_OPTS="Xms64m -Xmx512m" elasticsearch:7.6.2
可视化
portainer
Rancher(CI/CD再用)
什么是portainer?
Docker图形化界面管理工具,提供一个后台面板供我们操作
docker run -d -p 8088:9000 \
--restart=always -v /var/run/docker.sock:/var/run/docker.sock --privileged=true portainer/portainer
访问测试: http://ip:8088/ ,通过他来访问
commit镜像
docker commit 提交容器成为一个新的副本

#命令和git类似
docker commit -m "提交的描述信息" -a="作者" 容器id 目标镜像名:[tag]
实战测试
#启动一个默认的tomcat
#发现这个默认的webapps是没有webapps应用的	镜像的原因,官方的镜像默认webapps是没有文件的
#自己拷贝进去了基本的文件
#将我们操作后的容器提交为一个镜像!我们以后就使用我们修改过后的镜像即可,这就是我们自己修改的一个镜像
学习方式说明:理解概念,但是一定要实践,最后理论和实践结合一次性搞定这个知识。
如果你想要保存当前容器的状态,就可以通过commit提交,获得一个镜像
就好比我们学习VM时候的快照
到这里才算是入门Docker!
容器数据卷
什么是容器数据卷?
docker理念回顾
将应用和环境打包成一个镜像
数据?如果数据都在容器中,那么我们删除容器,数据就会丢失! 需求:数据可以持久化
MySQL,容器删了,删库跑路 需求:MySQL数据可以存储在本地!
容器之间可以有一个数据共享的技术!Docker容器中产生的数据,同步到本地!
这就是卷技术!目录的挂载,将我们容器里面的目录,挂载到Linux上面
总结一句话:容器的持久化和同步操作!容器间也是可以数据共享的
使用数据卷
方式一:直接用命令来挂载 -v
docker run -it -v 主机目录:容器内端目录
#测试
docker run -it -v /home/ceshi:/home centos /bin/bash
#启动起来之后我们可以通过docker inspect 容器id
1、停止容器
2、宿主机上修改文件
3、启动容器
4、容器内的数据依旧是同步的
好处:我们以后修改只需要在本地修改,容器内会自动同步!
实战:安装MySQL
思考:MySQL的数据持久化问题
#获取镜像
docker pull mysql

#运行容器,需要做数据挂载:	#安装启动mysql,需要配置密码,这是要注意的!
官方测试:docker run --name some-mysql -e MYSQL_ROOT_PASSWORD=my-secret-pw -d mysql:tag

#启动我们的
-d	后台运行
-p	端口映射
-v	卷挂载
-e	环境配置
--name	容器名字
docker run -d -p 3310:3306 -v /home/mysql/conf:/etc/mysql/conf.d -v /home/mysql/data:/var/lib/mysql -e MYSQL_ROOT_PASSWORD=123456 --name mysql01 -d mysql:5.7

假设我们将容器删除
docker rm -f mysql01

发现我们挂载到本地的数据依旧没有丢失,这就实现了容器持久化的功能
具名和匿名挂载
#匿名挂载
-v	容器内路径
docker run -d -P --name nginx01 -v /etc/nginx nginx

#查看所有的volume情况
docker volume ls

#这里发现,这种就是匿名挂载,我们在-v只写了容器内的路径,没有写容器外的路径

#具名挂载
docker run -d -P --name nginx02 -v juming-nginx:/etc/nginx nginx

docker volume ls

#通过	-v	卷名:容器内路径
#查看一下这个卷
docker volume inspect juming-nginx
所有的docker容器内的卷,没有指定目录的情况下都在/var/lib/docker/volumes/xxxx/_data
我们通过具名挂载可以方便的找到我们的一个卷,大多数情况使用具名挂载
如何确定是具名挂载路径,还是指定路径挂载!
-v	容器内路径	#匿名挂载
-v	卷名:容器内路径	#具名挂载
-v	/宿主机路径::容器内路径	#指定路径挂载
拓展:
#通过	-v	容器内路径:ro	rw改变读写权限
ro	readonly	#只读
rw	readwrite	#读写

#一旦设置了容器权限,容器对我们挂在出来的内容就有限定了!
docker run -d -P --name nginx02 -v juming-nginx:/etc/nginx:ro nginx
docker run -d -P --name nginx02 -v juming-nginx:/etc/nginx:rw nginx

ro	只要看到ro就说明这个路径只能通过宿主机来操作,容器内不无法操作
初识Dockerfile
就是用来构建docker镜像的构建文件!命令脚本
通过这个脚本可以生成镜像,镜像是一层一层的,脚本一个个的命令,每个命令都是一层!
#创建一个dockerfile文件,名字可以随机	建议Dockerfile
#文件中的内容	指令大写	参数
FROM centos
VOLUME ["volume01","volume02"]
CMD echo "-----end-----"
CMD /bin/bash

#这里的每个命令,就是镜像的一层
这个卷和外部一定有一个同步的目录!
查看一下卷挂载的路径
测试一下刚才的文件是否同步出去了!
这种方式我们以后用的会十分的多,因为通常我们自己构建镜像
假设构建镜像的时候没有挂载卷,要手动镜像挂载 -v 卷名 容器内路径!
数据卷容器
多个mysql同步数据!
docker run -it --name docker01 kuangshen/centos:1.0
ls
ls -l
docker run -it --name docker02 --volumes-from docker01 kuangshen/centos:1.0
ls -l
结论:
容器之间配置信息的传递,数据卷容器的生命周期一直持续到没有容器使用为止。
但是一旦你持久化到了本地,这个时候,本地的数据是不会删除的!
DockerFile
构建步骤:
1、编写一个dockerfile文件
2、docker build 构建成为一个镜像
3、docker run 运行镜像
4、docker push 发布镜像(DockerHub、阿里云镜像仓库)
DockerFile构建过程
基础知识:
1、每个保留关键字(指令)都必须是大写字母
2、执行从上到下顺序执行
3、#表示注释
4、每一个指令都会创建提交一个新的镜像层,并提交!
dockerfile是面向开发的,我们以后要发布项目,做镜像,就要编写dockerfile文件,这个文件十分简单!
Docker镜像逐渐成为企业交付的标准,必须要掌握!
步骤:开发、部署、运维。。。
DockerFile:构建文件,定义了一切的步骤,源代码
Dockerimages:通过DockerFile构建生成的镜像,最终发布和运行的产品,原来是jar war
Docker容器:容器就是镜像运行起来提供服务的
DockerFile的命令
FROM	#基础镜像,一切从这里开始构建
MAINTAINER	#镜像是谁写的,姓名+邮箱
RUN	#镜像构建时候需要运行的命令
ADD	#步骤,tomcat镜像,这个tomcat压缩包!添加内容
WORKDIR		#镜像的工作目录
VOLUME		#挂载的目录
EXPOSE		#保留端口配置
CMD		    #指定这个容器启动时候运行的命令,只有最后一个会生效,可被代替
ENTRYPOINT	#指定这个容器启动时候运行的命令,可以追加命令
ONBUILD		#当构建一个被继承的Dockerfile 这个时候就会运行ONBUILD的指令,触发指令
COPY	    #将文件拷贝到镜像中
ENV		    #构建的时候设置环境变量
#通过这个文件构建镜像
docker build -f dockerfile文件路径 -t 镜像名:[tag]
可以列出本地进行的变更历史
docker history 容器id
我们平时拿到一个镜像,可以研究一下他是怎么做的了
发布自己的镜像
DockerHub
1、地址https://hub.docker.com/注册自己的账号
2、确定这个账号可以登录
3、在我们自己的服务器上提交镜像
docker login --help
docker login -u xiaowang
4、登陆成功之后就可以提交镜像了
docker images
docker push xiaowang/divtomcat:1.0
阿里云镜像服务
1、登录阿里云
2、找到容器镜像服务
3、创建命名空间
4、创建容器镜像
5、浏览阿里云
1. 登录阿里云Docker Registry
$ sudo docker login --username=郭靖1767164 registry.cn-hangzhou.aliyuncs.com
用于登录的用户名为阿里云账号全名,密码为开通服务时设置的密码。
您可以在访问凭证页面修改凭证密码。
2. 从Registry中拉取镜像
$ sudo docker pull registry.cn-hangzhou.aliyuncs.com/guojingtest/guojingtest:[镜像版本号]
3. 将镜像推送到Registry
$ sudo docker login --username=郭靖1767164 registry.cn-hangzhou.aliyuncs.com$ sudo docker tag [ImageId] registry.cn-hangzhou.aliyuncs.com/guojingtest/guojingtest:[镜像版本号]$ sudo docker push registry.cn-hangzhou.aliyuncs.com/guojingtest/guojingtest:[镜像版本号]
请根据实际镜像信息替换示例中的[ImageId]和[镜像版本号]参数。
4. 选择合适的镜像仓库地址
从ECS推送镜像时,可以选择使用镜像仓库内网地址。推送速度将得到提升并且将不会损耗您的公网流量。
如果您使用的机器位于VPC网络,请使用 registry-vpc.cn-hangzhou.aliyuncs.com 作为Registry的域名登录,并作为镜像命名空间前缀。
5. 示例
使用"docker tag"命令重命名镜像,并将它通过专有网络地址推送至Registry。
$ sudo docker imagesREPOSITORY TAG IMAGE ID CREATED VIRTUAL SIZEregistry.aliyuncs.com/acs/agent 0.7-dfb6816 37bb9c63c8b2 7 days ago 37.89 MB$ sudo docker tag 37bb9c63c8b2 registry-vpc.cn-hangzhou.aliyuncs.com/acs/agent:0.7-dfb6816
使用 "docker push" 命令将该镜像推送至远程。
$ sudo docker push registry-vpc.cn-hangzhou.aliyuncs.com/acs/agent:0.7-dfb6816
Docker网络
理解Docker
--link
自定义网络
网络连通
实战:部署redis集群
SpringBoot微服务打包Docker镜像
1、构建springboot项目
2、打包应用
3、编写dockerfile
4、构建镜像
5、发布运行
以后我们使用了docker之后,给别人交付一个镜像即可!
Docker Compose
简介
docker
dockerfile build run 手动操作,单个容器!
微服务,100个服务器!依赖关系

docker compose管理容器!定义多个容器!
作用:批量容器编排
自己理解
Compose是Docker官方的开源项目,需要安装!
DockerFile可以让程序在任何地方应用
version: '2.0'
services:
  web:
    build: .
    ports:
    - "5000:5000"
    volumes:
    - .:/code
    - logvolume01:/var/log
    links:
    - redis
  redis:
    image: redis
volumes:
  logvolume01: {}
For
Compose:重要概念
服务services, 容器,应用(web, redis, mysql...)
项目project,一组关联的容器,博客,web,mysql,wp
安装
1、下载:
sudo curl -L "https://github.com/docker/compose/releases/download/1.27.1/docker-compose-$(uname -s)-$(uname -m)" -o /usr/local/bin/docker-compose
2、授权
sudo chmod +x /usr/local/bin/docker-compose
3、体验
python应用、计算器、redis!

1、应用app.py
2、DockerFile应用打包为镜像
3、Docker-compose yaml文件,完整的上线服务!
4、启动项目	docker-compose up
流程:
1、创建网络
2、执行docker-compose yaml
3、启动服务
默认的服务名 文件名_服务名__num
开源项目
博客
下载程序、安装数据库、配置...
compose应用 =>一键启动
1、下载项目(docker-compose.yaml)
2、如果需要文件 Dockerfile
3、直接一键启动项目
前台启动
docker -d
docker-compose up -d
直接一键启动
掌握:docker基础、原理、网络、服务、集群、错误排查、日志
Step 1: Setup
Define the application dependencies.
-
Create a directory for the project:
$ mkdir composetest $ cd composetest -
Create a file called
app.pyin your project directory and paste this in:import time import redis from flask import Flask app = Flask(__name__) cache = redis.Redis(host='redis', port=6379) def get_hit_count(): retries = 5 while True: try: return cache.incr('hits') except redis.exceptions.ConnectionError as exc: if retries == 0: raise exc retries -= 1 time.sleep(0.5) @app.route('/') def hello(): count = get_hit_count() return 'Hello World! I have been seen {} times.\n'.format(count)In this example,
redisis the hostname of the redis container on the application’s network. We use the default port for Redis,6379.Handling transient errors
Note the way the
get_hit_countfunction is written. This basic retry loop lets us attempt our request multiple times if the redis service is not available. This is useful at startup while the application comes online, but also makes our application more resilient if the Redis service needs to be restarted anytime during the app’s lifetime. In a cluster, this also helps handling momentary connection drops between nodes. -
Create another file called
requirements.txtin your project directory and paste this in:flask redis
Step 2: Create a Dockerfile
In this step, you write a Dockerfile that builds a Docker image. The image contains all the dependencies the Python application requires, including Python itself.
In your project directory, create a file named Dockerfile and paste the following:
FROM python:3.7-alpine
WORKDIR /code
ENV FLASK_APP app.py
ENV FLASK_RUN_HOST 0.0.0.0
RUN apk add --no-cache gcc musl-dev linux-headers
COPY requirements.txt requirements.txt
RUN pip install -r requirements.txt
EXPOSE 5000
COPY . .
CMD ["flask", "run"]
This tells Docker to:
- Build an image starting with the Python 3.7 image.
- Set the working directory to
/code. - Set environment variables used by the
flaskcommand. - Install gcc and other dependencies
- Copy
requirements.txtand install the Python dependencies. - Add metadata to the image to describe that the container is listening on port 5000
- Copy the current directory
.in the project to the workdir.in the image. - Set the default command for the container to
flask run.
For more information on how to write Dockerfiles, see the Docker user guide and the Dockerfile reference.
Step 3: Define services in a Compose file
Create a file called docker-compose.yml in your project directory and paste the following:
version: '3'
services:
  web:
    build: .
    ports:
      - "5000:5000"
  redis:
    image: "redis:alpine"
This Compose file defines two services: web and redis.
Web service
The web service uses an image that’s built from the Dockerfile in the current directory. It then binds the container and the host machine to the exposed port, 5000. This example service uses the default port for the Flask web server, 5000.
Redis service
The redis service uses a public Redis image pulled from the Docker Hub registry.
Step 4: Build and run your app with Compose
-
From your project directory, start up your application by running
docker-compose up.$ docker-compose up Creating network "composetest_default" with the default driver Creating composetest_web_1 ... Creating composetest_redis_1 ... Creating composetest_web_1 Creating composetest_redis_1 ... done Attaching to composetest_web_1, composetest_redis_1 web_1 | * Running on http://0.0.0.0:5000/ (Press CTRL+C to quit) redis_1 | 1:C 17 Aug 22:11:10.480 # oO0OoO0OoO0Oo Redis is starting oO0OoO0OoO0Oo redis_1 | 1:C 17 Aug 22:11:10.480 # Redis version=4.0.1, bits=64, commit=00000000, modified=0, pid=1, just started redis_1 | 1:C 17 Aug 22:11:10.480 # Warning: no config file specified, using the default config. In order to specify a config file use redis-server /path/to/redis.conf web_1 | * Restarting with stat redis_1 | 1:M 17 Aug 22:11:10.483 * Running mode=standalone, port=6379. redis_1 | 1:M 17 Aug 22:11:10.483 # WARNING: The TCP backlog setting of 511 cannot be enforced because /proc/sys/net/core/somaxconn is set to the lower value of 128. web_1 | * Debugger is active! redis_1 | 1:M 17 Aug 22:11:10.483 # Server initialized redis_1 | 1:M 17 Aug 22:11:10.483 # WARNING you have Transparent Huge Pages (THP) support enabled in your kernel. This will create latency and memory usage issues with Redis. To fix this issue run the command 'echo never > /sys/kernel/mm/transparent_hugepage/enabled' as root, and add it to your /etc/rc.local in order to retain the setting after a reboot. Redis must be restarted after THP is disabled. web_1 | * Debugger PIN: 330-787-903 redis_1 | 1:M 17 Aug 22:11:10.483 * Ready to accept connectionsCompose pulls a Redis image, builds an image for your code, and starts the services you defined. In this case, the code is statically copied into the image at build time.
-
Enter http://localhost:5000/ in a browser to see the application running.
If you’re using Docker natively on Linux, Docker Desktop for Mac, or Docker Desktop for Windows, then the web app should now be listening on port 5000 on your Docker daemon host. Point your web browser to http://localhost:5000 to find the
Hello Worldmessage. If this doesn’t resolve, you can also try http://127.0.0.1:5000.If you’re using Docker Machine on a Mac or Windows, use
docker-machine ip MACHINE_VMto get the IP address of your Docker host. Then, openhttp://MACHINE_VM_IP:5000in a browser.You should see a message in your browser saying:
Hello World! I have been seen 1 times.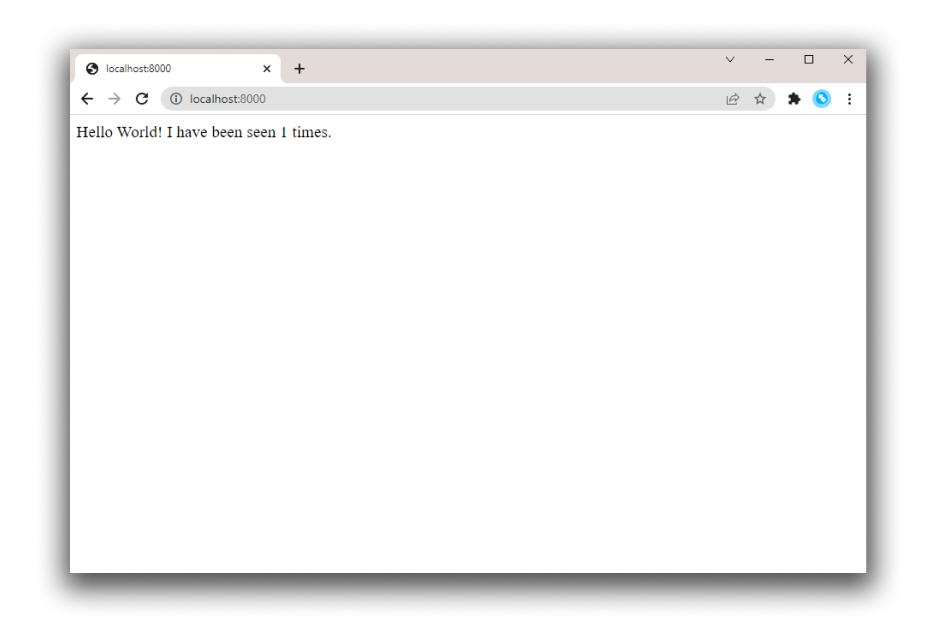
-
Refresh the page.
The number should increment.
Hello World! I have been seen 2 times.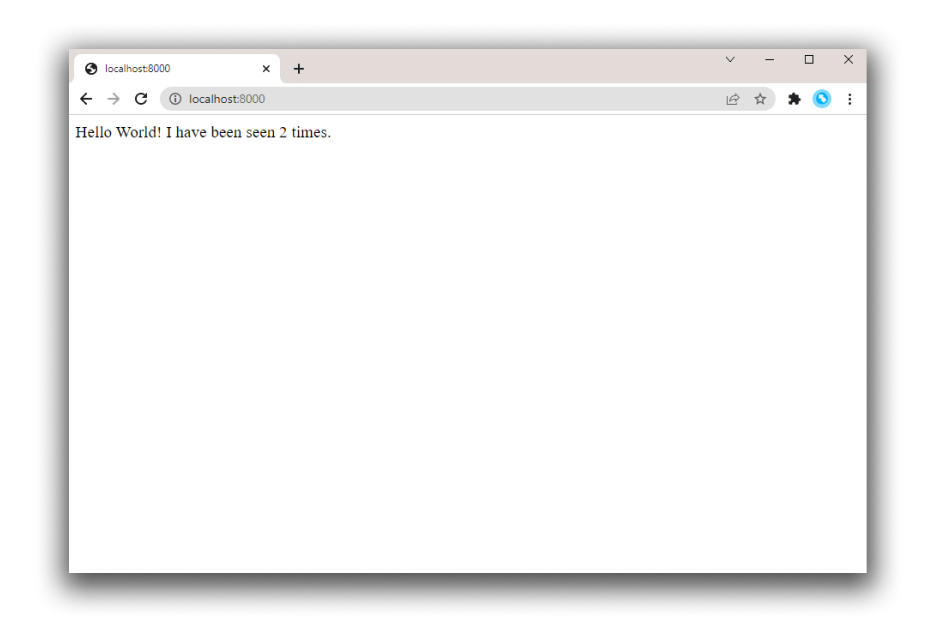
-
Switch to another terminal window, and type
docker image lsto list local images.Listing images at this point should return
redisandweb.$ docker image ls REPOSITORY TAG IMAGE ID CREATED SIZE composetest_web latest e2c21aa48cc1 4 minutes ago 93.8MB python 3.4-alpine 84e6077c7ab6 7 days ago 82.5MB redis alpine 9d8fa9aa0e5b 3 weeks ago 27.5MBYou can inspect images with
docker inspect <tag or id>. -
Stop the application, either by running
docker-compose downfrom within your project directory in the second terminal, or by hitting CTRL+C in the original terminal where you started the app.
Step 5: Edit the Compose file to add a bind mount
Edit docker-compose.yml in your project directory to add a bind mount for the web service:
version: '3'
services:
  web:
    build: .
    ports:
      - "5000:5000"
    volumes:
      - .:/code
    environment:
      FLASK_ENV: development
  redis:
    image: "redis:alpine"
The new volumes key mounts the project directory (current directory) on the host to /code inside the container, allowing you to modify the code on the fly, without having to rebuild the image. The environment key sets the FLASK_ENV environment variable, which tells flask run to run in development mode and reload the code on change. This mode should only be used in development.
Step 6: Re-build and run the app with Compose
From your project directory, type docker-compose up to build the app with the updated Compose file, and run it.
$ docker-compose up
Creating network "composetest_default" with the default driver
Creating composetest_web_1 ...
Creating composetest_redis_1 ...
Creating composetest_web_1
Creating composetest_redis_1 ... done
Attaching to composetest_web_1, composetest_redis_1
web_1    |  * Running on http://0.0.0.0:5000/ (Press CTRL+C to quit)
...
Check the Hello World message in a web browser again, and refresh to see the count increment.
Shared folders, volumes, and bind mounts
- If your project is outside of the
Usersdirectory (cd ~), then you need to share the drive or location of the Dockerfile and volume you are using. If you get runtime errors indicating an application file is not found, a volume mount is denied, or a service cannot start, try enabling file or drive sharing. Volume mounting requires shared drives for projects that live outside ofC:\Users(Windows) or/Users(Mac), and is required for any project on Docker Desktop for Windows that uses Linux containers. For more information, see File sharing on Docker for Mac, and the general examples on how to Manage data in containers.- If you are using Oracle VirtualBox on an older Windows OS, you might encounter an issue with shared folders as described in this VB trouble ticket. Newer Windows systems meet the requirements for Docker Desktop for Windows and do not need VirtualBox.
Step 7: Update the application
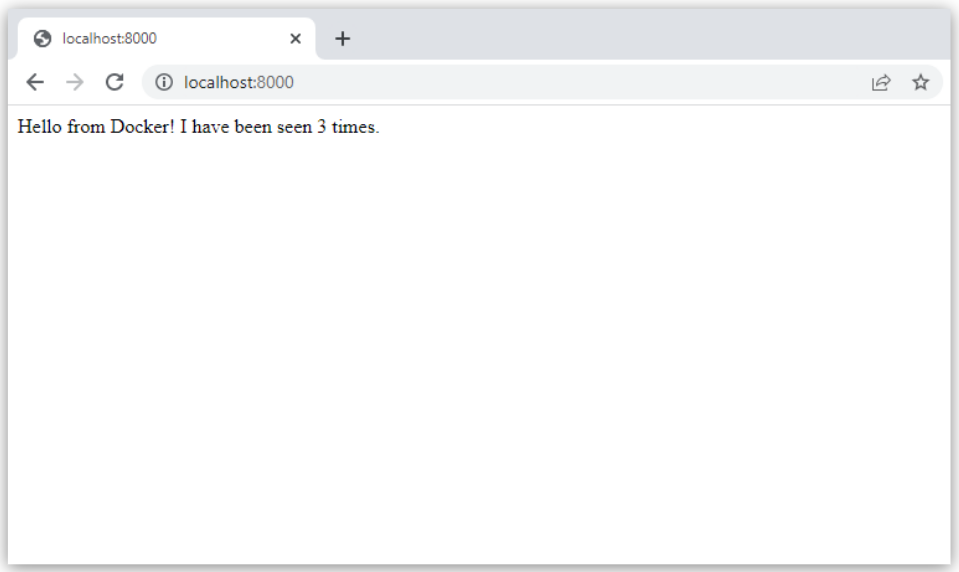
Because the application code is now mounted into the container using a volume, you can make changes to its code and see the changes instantly, without having to rebuild the image.
-
Change the greeting in
app.pyand save it. For example, change theHello World!message toHello from Docker!:return 'Hello from Docker! I have been seen {} times.\n'.format(count) -
Refresh the app in your browser. The greeting should be updated, and the counter should still be incrementing.
Step 8: Experiment with some other commands
If you want to run your services in the background, you can pass the -d flag (for “detached” mode) to docker-compose up and use docker-compose ps to see what is currently running:
$ docker-compose up -d
Starting composetest_redis_1...
Starting composetest_web_1...

$ docker-compose ps
Name                 Command            State       Ports
-------------------------------------------------------------------
composetest_redis_1   /usr/local/bin/run         Up
composetest_web_1     /bin/sh -c python app.py   Up      5000->5000/tcp
The docker-compose run command allows you to run one-off commands for your services. For example, to see what environment variables are available to the web service:
$ docker-compose run web env
See docker-compose --help to see other available commands. You can also install command completion for the bash and zsh shell, which also shows you available commands.
If you started Compose with docker-compose up -d, stop your services once you’ve finished with them:
$ docker-compose stop
You can bring everything down, removing the containers entirely, with the down command. Pass --volumes to also remove the data volume used by the Redis container:
$ docker-compose down --volumes
At this point, you have seen the basics of how Compose works.
假设项目需要重新打包:
docker-compose up --build #重新构建
总结
工程、服务、容器
项目compose:三层
工程
服务 服务
容器 运行实例! docker k8s 容器 pods kubectl apply-f "xxx.ymal"
Docker Swarm
集群方式的部署,4台阿里云服务器,2.4G
docker swarm join加入一个节点
#获取令牌
docker swarm join-token manager
docker swarm join-token worker
把后面的节点都搭建进去
1、生成主节点init
2、加入(管理者、worker)
3、目标:双主双从
raft算法:
十分简单:集群,可用!三个主节点	>1台管理节点存活
raft协议:保证大多数节点存活,才可以使用,高可用!
体会:
弹性、负载、扩缩容、集群!
以后告别docker run!
docker-compose up! 启动一个项目,单机!
集群:swarm docker service
k8s service pods
容器 服务 副本
redis服务 => 10个副本(同时开启10个redis服务)
创建服务、动态扩展服务、动态更新服务
灰度发布、金丝雀发布
1、docker run	容器启动!不具有扩缩容器
2、docker service 服务!	具备扩缩容器,滚动更新!
docker service create -p 8888:80 --name my-nginx nginx

docker service ls

#动态扩缩容
docker service update --replicas 3 my-nginx

2、docker service scale my-nginx=2
#移除
docker swarm其实并不难
只要会搭建集群,启动服务,动态管理容器就可以!
服务,集群中任意节点都可以访问,服务可以有多个副本动态扩缩容,实现高可用!
弹性、扩缩容!
服务器的高可用,任何企业,云!
k8s:云原生应用!
Docker Stack
Docker Secret
Docker Config
容器单独没有什么意义,有意义的是,容器编排!
K8s
概念总结
Node
swarm
Service:核心,用户访问!
Task
逻辑是不变的:
命令 管理 api 调度 工作节点 task任务容器维护创建
kubtectl service api

 浙公网安备 33010602011771号