2 快速入门
2 快速入门
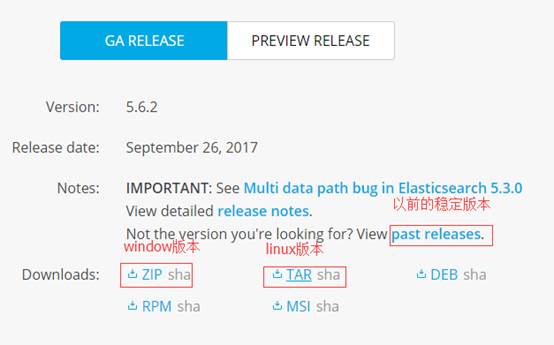
2.1 安装包下载
1)Elasticsearch官网: https://www.elastic.co/products/elasticsearch
2.2 安装Elasticsearch(单节点Linux环境)
1)解压elasticsearch-5.2.2.tar.gz到/opt/module目录下
[atguigu@hadoop102 software]$ tar -zxvf elasticsearch-5.2.2.tar.gz -C /opt/module/
2)在/opt/module/elasticsearch-5.2.2路径下创建data和logs文件夹
[atguigu@hadoop102 elasticsearch-5.2.2]$ mkdir data

[atguigu@hadoop102 elasticsearch-5.2.2]$ mkdir logs
3)修改配置文件/opt/module/elasticsearch-5.2.2/config/elasticsearch.yml
[atguigu@hadoop102 config]$ pwd

/opt/module/elasticsearch-5.2.2/config

[atguigu@hadoop102 config]$ vi elasticsearch.yml
# ---------------------------------- Cluster -----------------------------------
cluster.name: my-application
# ------------------------------------ Node ------------------------------------
node.name: node-102
# ----------------------------------- Paths ------------------------------------
path.data: /opt/module/elasticsearch-5.2.2/data
path.logs: /opt/module/elasticsearch-5.2.2/logs
# ----------------------------------- Memory -----------------------------------
bootstrap.memory_lock: false
bootstrap.system_call_filter: false
# ---------------------------------- Network -----------------------------------
network.host: 192.168.1.102
# --------------------------------- Discovery ----------------------------------
discovery.zen.ping.unicast.hosts: ["hadoop102"]
(1)cluster.name
如果要配置集群需要两个节点上的elasticsearch配置的cluster.name相同,都启动可以自动组成集群,这里如果不改cluster.name则默认是cluster.name=my-application,
(2)nodename随意取但是集群内的各节点不能相同
(3)修改后的每行前面不能有空格,修改后的“:”后面必须有一个空格
5)配置linux系统环境(参考:http://blog.csdn.net/satiling/article/details/59697916)
(1)切换到root用户,编辑limits.conf 添加类似如下内容
[root@hadoop102 elasticsearch-5.2.2]# vi /etc/security/limits.conf
添加如下内容:
\* soft nofile 65536

\* hard nofile 131072

\* soft nproc 2048

\* hard nproc 4096
(2)切换到root用户,进入limits.d目录下修改配置文件。
[root@hadoop102 elasticsearch-5.2.2]# vi /etc/security/limits.d/90-nproc.conf
修改如下内容:
\* soft nproc 1024

\#修改为

\* soft nproc 2048
(3)切换到root用户修改配置sysctl.conf
[root@hadoop102 elasticsearch-5.2.2]# vi /etc/sysctl.conf
添加下面配置:
vm.max_map_count=655360
并执行命令:
[root@hadoop102 elasticsearch-5.2.2]# sysctl -p
然后,重新启动elasticsearch,即可启动成功。
6)启动集群
[atguigu@hadoop102 elasticsearch-5.2.2]$ bin/elasticsearch
7)测试集群
[atguigu@hadoop102 elasticsearch-5.2.2]$ curl http://hadoop102:9200


{

  "name" : "node-102",

  "cluster_name" : "my-application",

  "cluster_uuid" : "v-nwhc7ITsmVHECpNQYzHw",

  "version" : {

    "number" : "5.2.2",

    "build_hash" : "57e20f3",

    "build_date" : "2017-09-23T13:16:45.703Z",

    "build_snapshot" : false,

    "lucene_version" : "6.6.1"

  },

  "tagline" : "You Know, for Search"

}
8)停止集群
kill -9 进程号
2.3 安装Elasticsearch(多节点集群Linux环境)
略
2.4 Elasticsearch head插件安装
1)下载插件
https://github.com/mobz/elasticsearch-head
elasticsearch-head-master.zip
2)nodejs官网下载安装包
node-v6.9.2-linux-x64.tar.xz
3)将elasticsearch-head-master.zip和node-v6.9.2-linux-x64.tar.xz都导入到linux的/opt/software目录。
4)安装nodejs
[atguigu@hadoop102 software]$ tar -zxvf node-v6.9.2-linux-x64.tar.gz -C /opt/module/
5)配置nodejs环境变量
[root@hadoop102 software]# vi /etc/profile

export NODE_HOME=/opt/module/node-v6.9.2-linux-x64

export PATH=$PATH:$NODE_HOME/bin

[root@hadoop102 software]# source /etc/profile
6)查看node和npm版本
[root@hadoop102 software]# node -v

v6.9.2

[root@hadoop102 software]# npm -v

3.10.9
7)解压head插件到/opt/module目录下
[atguigu@hadoop102 software]$ unzip elasticsearch-head-master.zip -d /opt/module/
8)查看当前head插件目录下有无node_modules/grunt目录:
没有:执行命令创建:
[atguigu@hadoop102 elasticsearch-head-master]$ npm install grunt --save
9)安装head插件:
[atguigu@hadoop102 elasticsearch-head-master]$ npm install -g cnpm --registry=https://registry.npm.taobao.org
10)安装grunt:
[atguigu@hadoop102 elasticsearch-head-master]$ npm install -g grunt-cli
11)编辑Gruntfile.js
[atguigu@hadoop102 elasticsearch-head-master]$ vim Gruntfile.js
# 文件93行添加hostname:'0.0.0.0'

options: {

        hostname:'0.0.0.0',

        port: 9100,

        base: '.',

        keepalive: true

      }
12)检查head根目录下是否存在base文件夹
没有:将 _site下的base文件夹及其内容复制到head根目录下
[atguigu@hadoop102 elasticsearch-head-master]$ mkdir base

[atguigu@hadoop102 _site]$ cp base/* ../base/
13)启动grunt server:
[atguigu@hadoop102 elasticsearch-head-master]$ grunt server -d

Running "connect:server" (connect) task

[D] Task source: /opt/module/elasticsearch-head-master/node_modules/grunt-contrib-connect/tasks/connect.js

Waiting forever...

Started connect web server on http://localhost:9100
如果提示grunt的模块没有安装:

Local Npm module “grunt-contrib-clean” not found. Is it installed?

Local Npm module “grunt-contrib-concat” not found. Is it installed?

Local Npm module “grunt-contrib-watch” not found. Is it installed?

Local Npm module “grunt-contrib-connect” not found. Is it installed?

Local Npm module “grunt-contrib-copy” not found. Is it installed?

Local Npm module “grunt-contrib-jasmine” not found. Is it installed?

Warning: Task “connect:server” not found. Use –force to continue.

执行以下命令:

npm install grunt-contrib-clean -registry=[https://registry.npm.taobao.org](https://registry.npm.taobao.org/)

npm install grunt-contrib-concat -registry=[https://registry.npm.taobao.org](https://registry.npm.taobao.org/)

npm install grunt-contrib-watch -registry=[https://registry.npm.taobao.org](https://registry.npm.taobao.org/)

npm install grunt-contrib-connect -registry=[https://registry.npm.taobao.org](https://registry.npm.taobao.org/)

npm install grunt-contrib-copy -registry=[https://registry.npm.taobao.org](https://registry.npm.taobao.org/)

npm install grunt-contrib-jasmine -registry=[https://registry.npm.taobao.org](https://registry.npm.taobao.org/)
最后一个模块可能安装不成功,但是不影响使用。
14)浏览器访问head插件:
http://hadoop102:9100
15)启动集群插件后发现集群未连接
在/opt/module/elasticsearch-5.2.2/config路径下修改配置文件elasticsearch.yml,在文件末尾增加
[atguigu@hadoop102 config]$ pwd
/opt/module/elasticsearch-5.2.2/config
[atguigu@hadoop102 config]$ vi elasticsearch.yml

http.cors.enabled: true
http.cors.allow-origin: "*"
再重新启动elasticsearch。
16)关闭插件服务
ctrl+c
[atguigu@hadoop102 elasticsearch-head-master]$ netstat -lntp | grep 9100
tcp        0      0 192.168.1.102:9100          0.0.0.0:*                   LISTEN      6070/grunt

 浙公网安备 33010602011771号