

完整教程:从已训练模型到推理落地:华为 Atlas 300I Pro 部署 YOLOv5 / v8 / v8-Seg 全流程详解
华为 Atlas 300I Pro 与 YOLOv8-seg 全流程推理实战技术大纲
以下为博主自己实践(Centons7)并总结出来的步骤,小白可以跟着一步一步来
(ps:华为显卡环境配置是博主遇到过最痛苦的环境配置)
提前安装python环境以及一些依赖
- 更新系统并安装 EPEL 源
sudo yum update -y
sudo yum install epel-release -y- 安装编译 Python 所需依赖
sudo yum groupinstall "Development Tools" -y
sudo yum install gcc gcc-c++ make zlib-devel bzip2 bzip2-devel readline-devel sqlite sqlite-devel libffi-devel xz-devel wget curl -y
sudo yum install dkms -y
sudo yum install kernel-headers kernel-devel -y- 下载 Python 3.10 源码
cd /usr/src
sudo wget https://www.python.org/ftp/python/3.10.15/Python-3.10.15.tgz
sudo tar xzf Python-3.10.15.tgz
cd Python-3.10.15- 编译安装 Python 3.10
sudo ./configure --enable-optimizations
sudo make altinstall # 使用 altinstall 避免覆盖系统自带 python- 安装 pip3
python3.10 -m ensurepip
python3.10 -m pip install --upgrade pip- 验证
python3.10 --version
pip3 --version
gcc --version
make --version
dkms status
rpm -q kernel-headers kernel-devel
一、硬件与软件环境配置
- 华为 Atlas 300I Pro 硬件规格:昇腾 AI 处理器性能、内存与存储配置
- 软件依赖:CANN(Kernels算子包+Toolkit开发套件包)、MindSpore 或 PyTorch 框架适配
- 驱动与工具链安装:AscendCL 开发库、ATC 模型转换工具
- 切记安装顺序不能变!
- 下载NPU驱动 地址
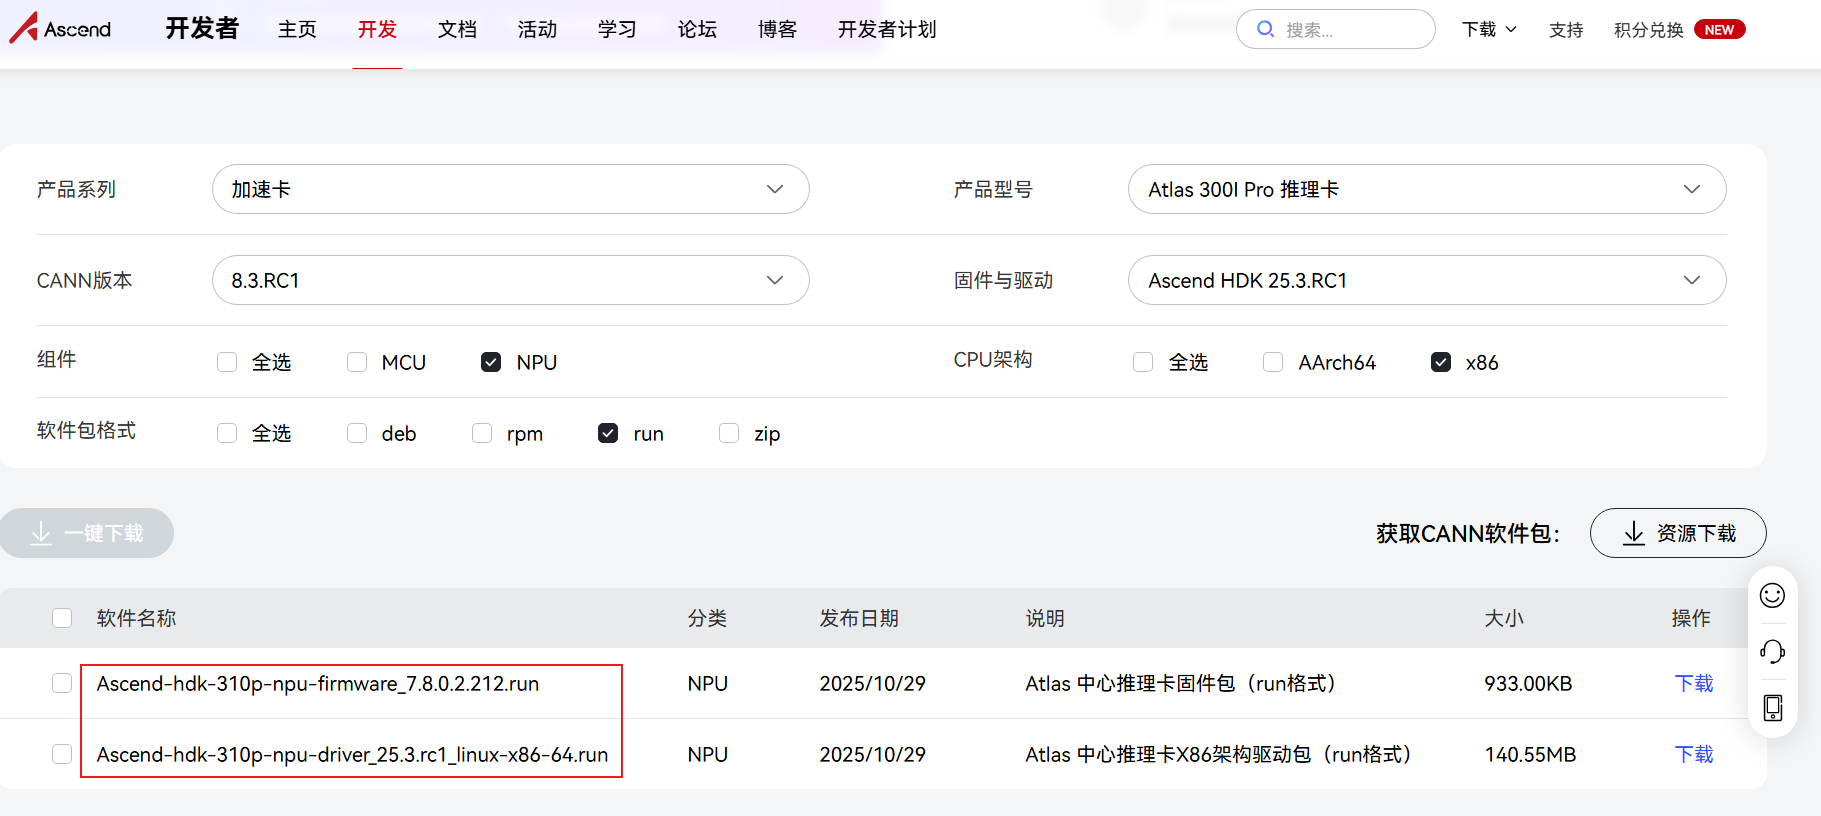
为了方便操作,下载好Ascend-hdk-310p-npu-firmware_7.8.0.2.212.run和
Ascend-hdk-310p-npu-driver_25.3.rc1_linux-x86-64.run并放到寄主机的目录库中,我这里的目录是 /home/wqyy/docker_install ,这两个都需要安装! - 安装驱动命令格式
#赋权
chmod +x Ascend-hdk-<chip_type>-npu-driver_<version>_linux-<arch>.run
  chmod +x Ascend-hdk-<chip_type>-npu-firmware_<version>.run
    #安装
./Ascend-hdk-<chip_type>-npu-driver_<version>_linux-<arch>.run --full --install-for-all- 注意替换文件名称,例如安装驱动
chmod +x Ascend-hdk-310p-npu-driver_25.3.rc1_linux-x86-64.runsudo bash Ascend-hdk-310p-npu-driver_25.3.rc1_linux-x86-64.run --full- 例如安装固件
chmod +x Ascend-hdk-310p-npu-firmware_7.8.0.2.212.runsudo bash ./Ascend-hdk-310p-npu-firmware_7.8.0.2.212.run --full如果出现了Verifying archive integrity... 100% SHA256 checksums are OK. All good.和Driver package installed successfully!、Firmware package installed successfully! Reboot now or after driver installation for the installation/upgrade to take effect则表示驱动安装成功。
- 重启
reboot- 查看驱动加载是否成功
npu-smi info返回驱动相关信息说明加载成功。否则,说明加载失败另寻他法~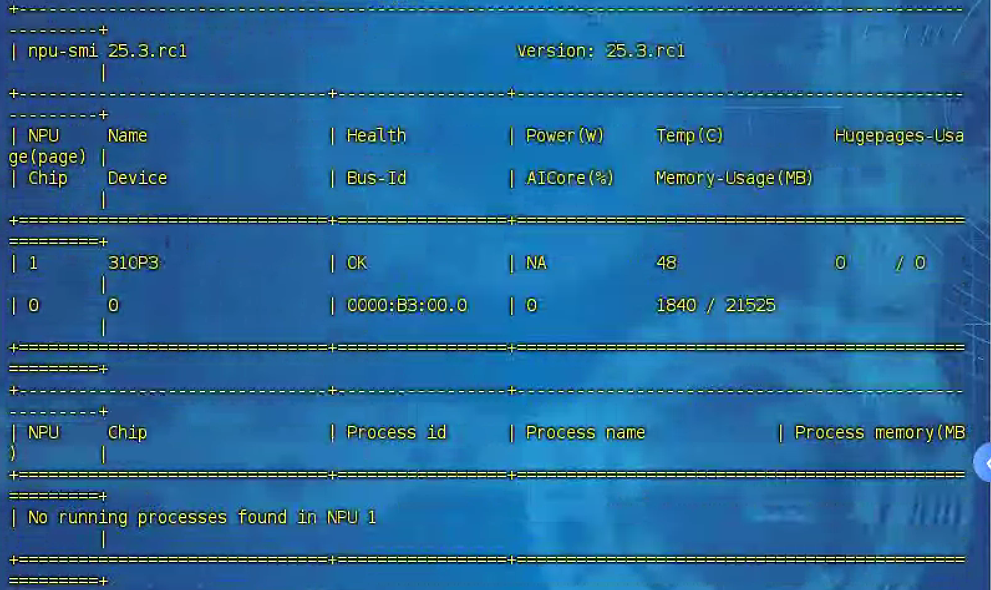
5. 下载CANN地址
安装前需确保已具备Python环境及pip3
#安装 Python 3
sudo yum update -y   # CentOS 7
sudo yum install epel-release -y #安装 EPEL 源
sudo yum install python36 -y  #安装 Python 3
python3 --version #检查安装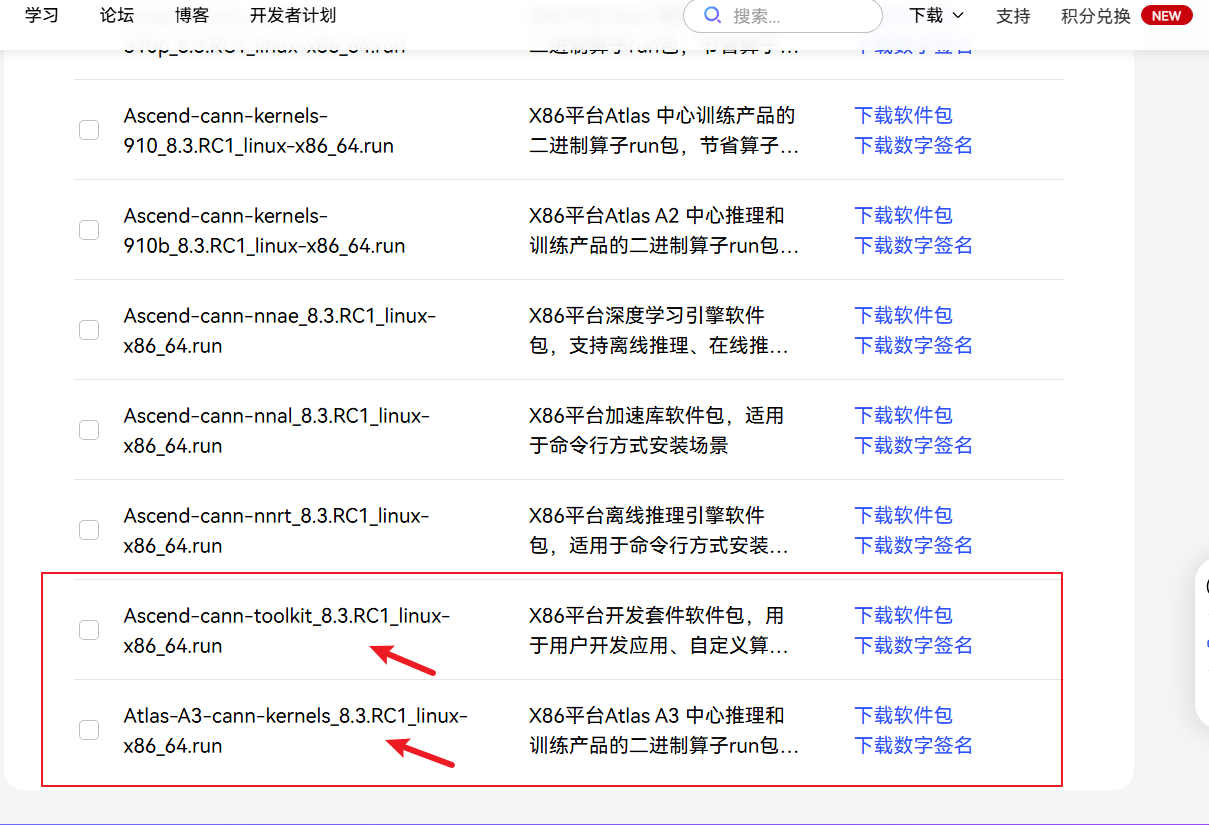
- 安装Toolkit开发套件包
- 安装驱动命令格式
#赋权
chmod +x Ascend-cann-toolkit_8.5.0.alpha001_linux-aarch64.run
#安装
./Ascend-cann-toolkit_8.5.0.alpha001_linux-aarch64.run --install
#配置环境变量
source ./Ascend/ascend-toolkit/set_env.sh- 注意替换文件名称
- 安装Kernels算子包
chmod +x Ascend-cann-kernels-310p_8.5.0.alpha001_linux-x86_64.run
./Ascend-cann-kernels-310p_8.5.0.alpha001_linux-x86_64.run --install- 注意替换文件名称
- 安装后配置
- 配置ais-bench并加入 PATH(后续通过该工具推理)
export PATH=/usr/local/Ascend/ascend-toolkit/latest/tools/ais-bench/ais_infer:$PATH
echo 'export PATH=/usr/local/Ascend/ascend-toolkit/latest/tools/ais-bench/ais_infer:$PATH' >> /etc/profile
source /etc/profile
#测试是否安装成功
python3 -m ais_bench --help- 安装g++
sudo yum install -y gcc-c++- 安装Python第三方库
pip3 install attrs cython 'numpy>=1.19.2,<=1.24.0' decorator sympy cffi pyyaml pathlib2 psutil protobuf==3.20.0 scipy requests absl-py`二、YOLOv8-seg 模型结构与原理
- YOLOv8-seg 的核心改进:分割头设计、动态标签分配策略
- 模型输入输出格式:图像预处理要求、掩膜输出解析
- 关键性能指标:mAP50-95、实时性分析
- 检查目前各个驱动、依赖是否安装
一键快速检查脚本(可直接粘贴至命令行回车)
echo "=== Driver ==="
which npu-smi && npu-smi info
echo "=== Runtime ==="
ls /usr/local/Ascend/runtime 2>/dev/null
ls /usr/local/Ascend/runtime/lib64 | grep libacl 2>/dev/null
echo "=== Toolkit ==="
which atc
cat /usr/local/Ascend/ascend-toolkit/latest/atc/version.info 2>/dev/null
echo "=== Python ACL ==="
python3 -c "import aclruntime" 2>/dev/null && echo "aclruntime OK" || echo "aclruntime MISSING"
echo "=== ais-bench ==="
ls /usr/local/Ascend/ascend-toolkit/latest/tools/ais-bench 2>/dev/null
如有出现未安装的、没有找到目录的问一下ai工具。
- 安装ais_bench所需依赖 下载地址
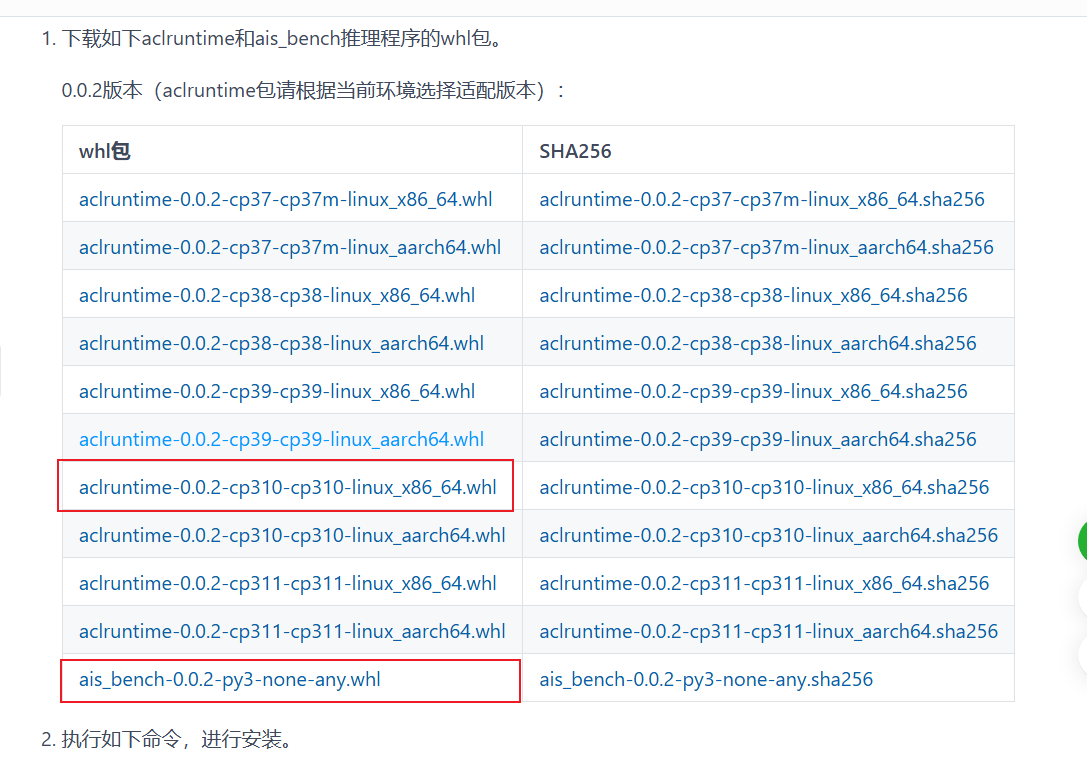
- 安装ais_bench(注意替换版本号)
pip3 install ./ais_bench-{version}-py3-none-any.whl- 安装aclruntime(注意替换版本号)
pip3 install ./aclruntime-{version}-{python_version}-linux_{arch}.whl三、模型转换
- 原始模型格式转换:PyTorch → ONNX → OM(昇腾模型)
- ATC 工具参数配置:动态分档(Dynamic Shape)、算子融合优化
- 精度与速度权衡:FP16/INT8 量化策略及校准数据集准备
- PyTorch → ONNX
在Anaconda训练好的模型导出即为onnx格式
如需教程请看我另外的文章
零基础搞定目标分割!YOLOv8-Seg 全流程实战(含自动标注 iSAT + ROI 推理)
2025最新PyCharm训练YoloV8教程从0到1手把手教你Anaconda跑模型 - ONNX → OM(昇腾模型)
atc --model=best.onnx \
--framework=5 \
--output=best_416 \
--input_format=NCHW \
--input_shape="images:1,3,416,416" \
--soc_version=Ascend310P3 \
--log=info
参数解释
atc
ATC(Ascend Tensor Compiler) 用于将模型(ONNX/TensorFlow/Caffe 等)编译成华为昇腾可执行的
OM 模型。–model=best.onnx
指定输入模型文件。 意思是:
我需要把 best.onnx 转换成 OM 格式。–framework=5
指定输入模型的框架类型。
框架编号:
框架 参数 TensorFlow 3 Caffe 0 MindSpore 1 ONNX 5
所以:
5 表示 输入模型是 ONNX 格式。–output=best_416
输出 OM 模型文件的名称(不带后缀)。 生成的文件将是:
best_416.om–input_format=NCHW
指定输入数据格式:
字母 含义 N 批大小 Batch C 通道数 Channels H 高度 Height W 宽度 Width
NCHW 是图像在 PyTorch 中的常用格式。
意思是:
模型输入采用 NCHW 排布方式。–input_shape=“images:1,3,416,416”
定义模型的输入张量名称和形状。
解释:
输入名称是:images
输入 shape 是:1,3,416,416
就是:
Batch = 1 Channel = 3 Height = 416 Width = 416这和 YOLOv8/YOLOv8-seg 常用输入一致。–soc_version=Ascend310P3
指定生成模型运行的硬件平台。
我用的是:
Ascend 310P3也就是 华为 Atlas300I Pro 所使用的 NPU 芯片型号。 你需要替换为你的型号,使用npu-smi info查看–log=info
设置 ATC 输出日志等级。 常用选项:
error
warning
info(默认)
debug
四、开始推理
使用ais_bench原生推理
- 推理前准备:创建input和output文件夹,还有测试图片
- 将图片转化为.bin文件,以下为转化脚本(python3 文件名.py 执行)
import cv2
import numpy as np
img_path = "/home/wqyy/docker_install/images/IMG_8857.jpeg"
output_bin = "/home/wqyy/docker_install/input/input.bin"
img = cv2.imread(img_path)
img = cv2.resize(img, (416, 416))
img = cv2.cvtColor(img, cv2.COLOR_BGR2RGB)
img = img.astype(np.float32) / 255.0
# NCHW
img = np.transpose(img, (2, 0, 1))
img = np.expand_dims(img, 0)
img.tofile(output_bin)
print("预处理完成,生成:", output_bin)- 执行推理命令
python3 -m ais_bench \
--model ./best_416.om \
--input ./input \
--output /home/wqyy/docker_install/output参数解释详见ais_bench官方文档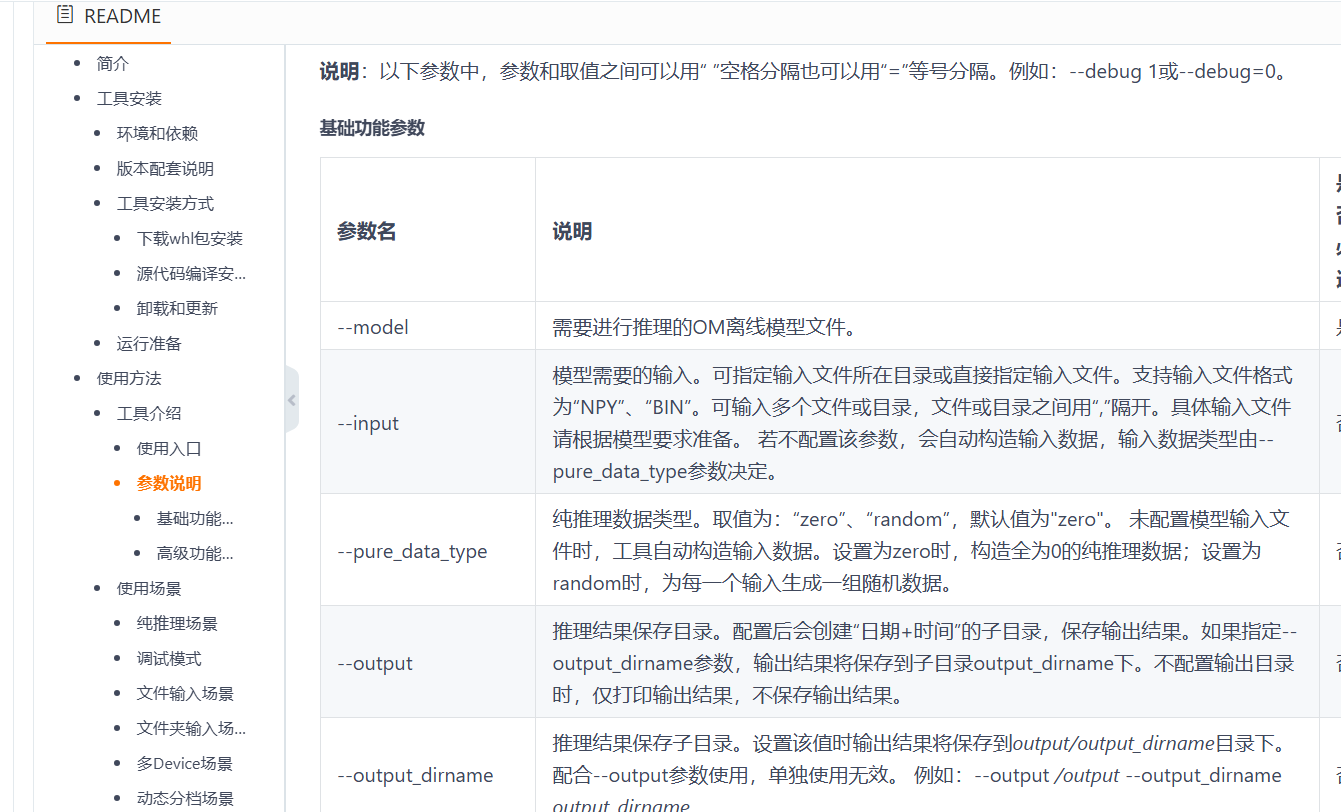
4. 输出结果
会在output文件夹中输出文件
(打不开请先给该文件夹赋权chmod -R 750 output/):
input_0.bin → (num_boxes, 6),包含 bbox (x1,y1,x2,y2) + 类别概率 (2)
input_1.bin → (1, mask_embedding_dim),mask embedding
五、推理后处理
创建一个目录,包含 images 、result 文件夹用来放置测试图片和保存结果,并将用act转化后的om模型放到这个文件夹中*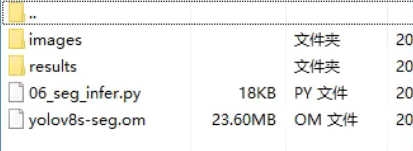
这里提供两个脚本,分别对应Yolov8s和Yolov8s-seg推理
脚本名保存为 06_seg_infer.py
Yolov8s脚本
# -*- coding: utf-8 -*-
import cv2
import numpy as np
from ais_bench.infer.interface import InferSession
# 类别定义
CLASSES = {
0: 'person', 1: 'bicycle', 2: 'car', 3: 'motorcycle', 4: 'airplane', 5: 'bus', 6: 'train', 7: 'truck',
8: 'boat', 9: 'traffic light', 10: 'fire hydrant', 11: 'stop sign', 12: 'parking meter', 13: 'bench',
14: 'bird', 15: 'cat', 16: 'dog', 17: 'horse', 18: 'sheep', 19: 'cow', 20: 'elephant', 21: 'bear',
22: 'zebra', 23: 'giraffe', 24: 'backpack', 25: 'umbrella', 26: 'handbag', 27: 'tie', 28: 'suitcase',
29: 'frisbee', 30: 'skis', 31: 'snowboard', 32: 'sports ball', 33: 'kite', 34: 'baseball bat',
35: 'baseball glove', 36: 'skateboard', 37: 'surfboard', 38: 'tennis racket', 39: 'bottle',
40: 'wine glass', 41: 'cup', 42: 'fork', 43: 'knife', 44: 'spoon', 45: 'bowl', 46: 'banana', 47: 'apple',
48: 'sandwich', 49: 'orange', 50: 'broccoli', 51: 'carrot', 52: 'hot dog', 53: 'pizza', 54: 'donut',
55: 'cake', 56: 'chair', 57: 'couch', 58: 'potted plant', 59: 'bed', 60: 'dining table', 61: 'toilet',
62: 'tv', 63: 'laptop', 64: 'mouse', 65: 'remote', 66: 'keyboard', 67: 'cell phone', 68: 'microwave',
69: 'oven', 70: 'toaster', 71: 'sink', 72: 'refrigerator', 73: 'book', 74: 'clock', 75: 'vase',
76: 'scissors', 77: 'teddy bear', 78: 'hair drier', 79: 'toothbrush'
}
# 置信度阈值
CONFIDENCE = 0.4
# NMS 的 IoU 阈值
IOU = 0.45
# 为每个类别分配随机颜色
colors = np.random.uniform(0, 255, size=(len(CLASSES), 3))
def draw_bounding_box(img, class_id, confidence, x, y, x_plus_w, y_plus_h):
"""
在图像上绘制边界框和类别标签
参数:
img - 原始图像
class_id - 类别ID
confidence - 置信度
x, y - 左上角坐标
x_plus_w, y_plus_h - 右下角坐标
"""
label = "{} {:.2f}".format(CLASSES[class_id], confidence)
color = colors[class_id]
# 画框
cv2.rectangle(img, (x, y), (x_plus_w, y_plus_h), color, 2)
# 获取文本大小
label_size, _ = cv2.getTextSize(label, cv2.FONT_HERSHEY_SIMPLEX, 0.5, 1)
label_width, label_height = label_size
label_x = x
label_y = y - 10 if y - 10 > label_height else y + 10
# 背景框
cv2.rectangle(img, (label_x, label_y - label_height),
(label_x + label_width, label_y + label_height), color, cv2.FILLED)
# 文字
cv2.putText(img, label, (label_x, label_y), cv2.FONT_HERSHEY_SIMPLEX,
0.5, (0, 0, 0), 1, cv2.LINE_AA)
def main(session, original_image):
"""
加载模型,执行推理,绘制检测框并保存结果图像
参数:
session - 模型
original_image - 图片值
返回:
original_image - 画框的图片
detections - 包含每个目标信息的列表
"""
height, width, _ = original_image.shape
# 变为正方形图像用于推理
length = max(height, width)
image = np.zeros((length, length, 3), np.uint8)
image[0:height, 0:width] = original_image
# 缩放因子
scale = length / 640
# 预处理图像
blob = cv2.dnn.blobFromImage(image, scalefactor=1.0 / 255, size=(640, 640), swapRB=True)
# 模型推理
outputs = session.infer(feeds=blob, mode="static")
# 转换输出维度:从 (1, 84, 8400) -> (8400, 84)
outputs = np.array([cv2.transpose(outputs[0][0])])
rows = outputs.shape[1]
boxes = []
scores = []
class_ids = []
# 解析输出
for i in range(rows):
classes_scores = outputs[0][i][4:]
(minScore, maxScore, minClassLoc, (x, maxClassIndex)) = cv2.minMaxLoc(classes_scores)
if maxScore >= CONFIDENCE:
box = [
(outputs[0][i][0] - outputs[0][i][2] / 2) * scale,  # x 左上角
(outputs[0][i][1] - outputs[0][i][3] / 2) * scale,  # y 左上角
outputs[0][i][2] * scale,  # 宽
outputs[0][i][3] * scale   # 高
]
boxes.append(box)
scores.append(maxScore)
class_ids.append(maxClassIndex)
# 非极大值抑制
result_boxes = cv2.dnn.NMSBoxes(boxes, scores, CONFIDENCE, IOU, 0.5)
detections = []
# 绘制边界框
for i in range(len(result_boxes)):
index = result_boxes[i]
box = boxes[index]
detection = {
"class_id": class_ids[index],
"class_name": CLASSES[class_ids[index]],
"confidence": scores[index],
"box": box,
"scale": scale,
}
detections.append(detection)
draw_bounding_box(
original_image,
class_ids[index],
scores[index],
round(box[0]),
round(box[1]),
round(box[0] + box[2]),
round(box[1] + box[3])
)
return original_image, detections
if __name__ == "__main__":
model_path = "yolov8s.om"
# 创建推理会话
session = InferSession(device_id=0, model_path=model_path)
# 图片推理
input_image_path = "street.jpg"
image = cv2.imread(input_image_path)
draw_image, _ = main(session, image)
# cv2.imshow("Image Detection", draw_image)
cv2.imwrite("output_image.jpg", draw_image)
cv2.waitKey(0)
cv2.destroyAllWindows()
这里提供我测试用的yolov8s.onnx(你也可以用官方的),需要使用act转化为.om
百度云分享 提取码: 9ych
如需训练自己的模型请看博主的另外文章
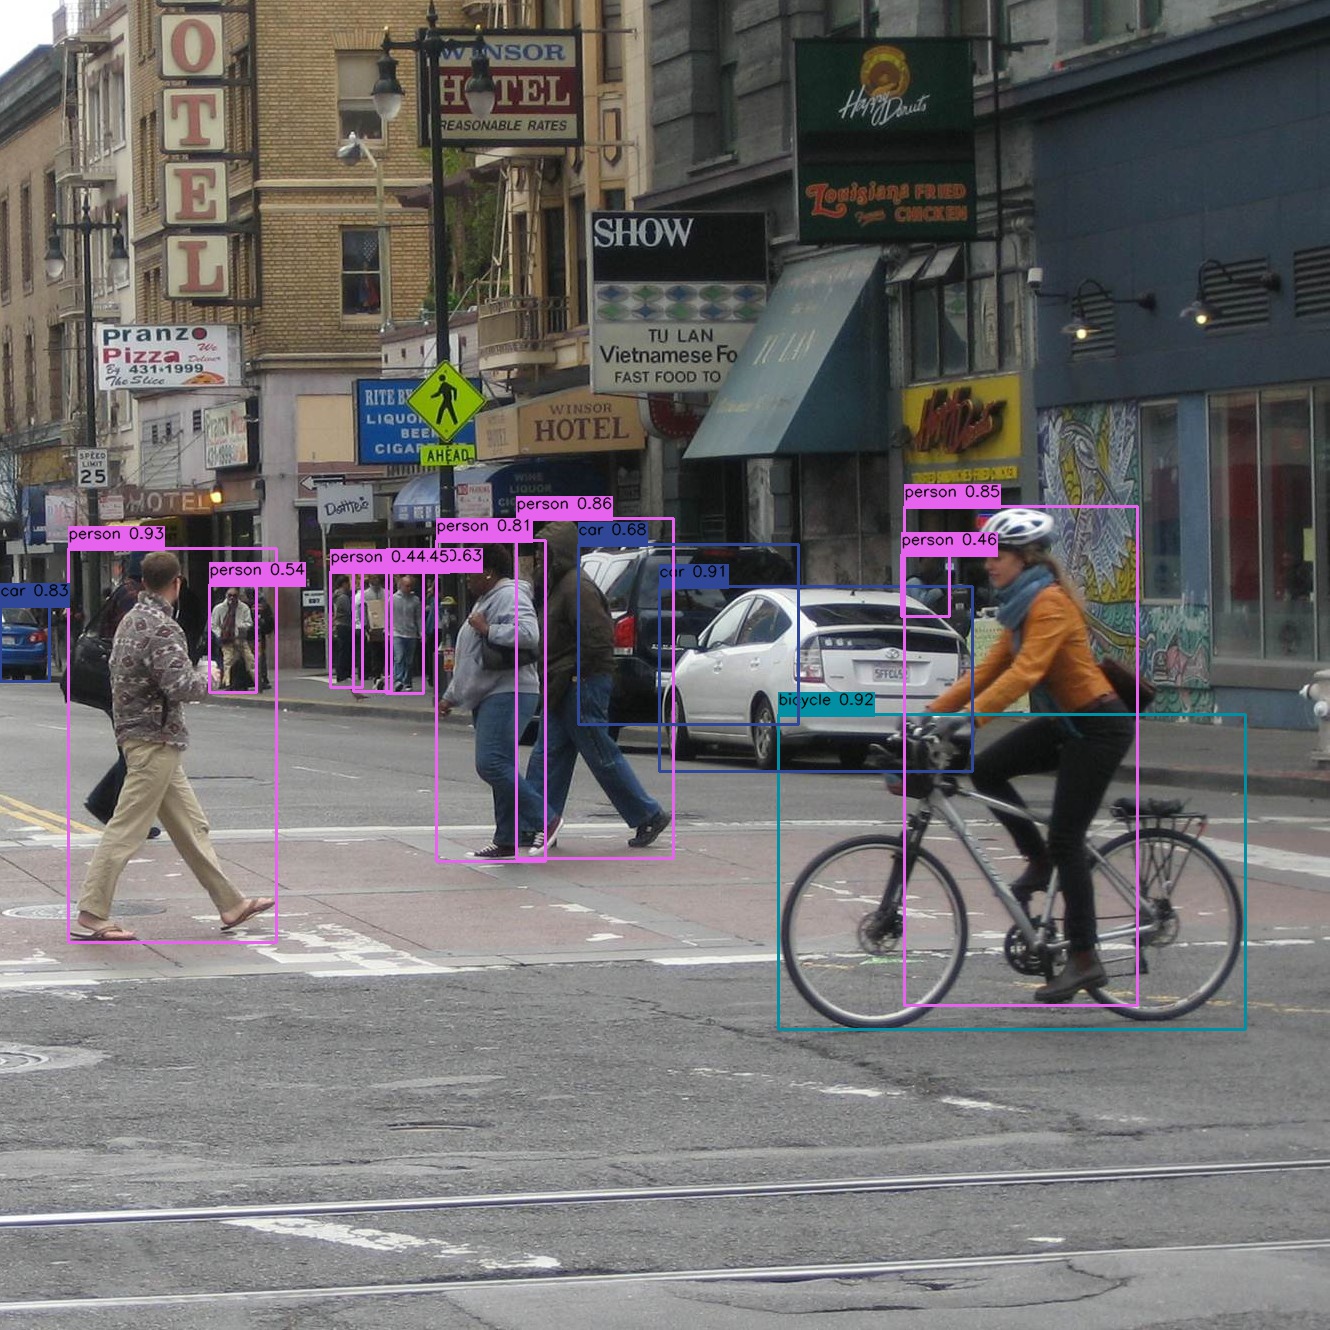
Yolov8s-seg脚本
import argparse
import time
import cv2
import numpy as np
import os
from ais_bench.infer.interface import InferSession
class YOLO:
"""YOLO segmentation model class for handling inference"""
def __init__(self, om_model, imgsz=(416, 416), device_id=0, model_ndtype=np.single, mode="static",
postprocess_type="v8", aipp=False):
"""
Initialization.
Args:
om_model (str): Path to the om model.
"""
# 构建ais_bench推理引擎
self.session = InferSession(device_id=device_id, model_path=om_model)
# Numpy dtype: support both FP32(np.single) and FP16(np.half) om model
self.ndtype = model_ndtype
self.mode = mode
self.postprocess_type = postprocess_type
self.aipp = aipp
self.model_height, self.model_width = imgsz[0], imgsz[1]  # 图像resize大小
def __call__(self, im0, conf_threshold=0.4, iou_threshold=0.45):
"""
The whole pipeline: pre-process -> inference -> post-process.
Args:
im0 (Numpy.ndarray): original input image.
conf_threshold (float): confidence threshold for filtering predictions.
iou_threshold (float): iou threshold for NMS.
Returns:
boxes (List): list of bounding boxes.
"""
# 前处理Pre-process
t1 = time.time()
im, ratio, (pad_w, pad_h) = self.preprocess(im0)
pre_time = round(time.time() - t1, 3)
# 推理 inference
t2 = time.time()
preds = self.session.infer([im], mode=self.mode)  # mode有动态"dymshape"和静态"static"等
det_time = round(time.time() - t2, 3)
# 后处理Post-process
t3 = time.time()
if self.postprocess_type == "v5":
boxes, segments, masks = self.postprocess_v5(preds,
im0=im0,
ratio=ratio,
pad_w=pad_w,
pad_h=pad_h,
conf_threshold=conf_threshold,
iou_threshold=iou_threshold,
)
elif self.postprocess_type == "v8":
boxes, segments, masks = self.postprocess_v8(preds,
im0=im0,
ratio=ratio,
pad_w=pad_w,
pad_h=pad_h,
conf_threshold=conf_threshold,
iou_threshold=iou_threshold,
)
else:
boxes = [], segments = [], masks = []
post_time = round(time.time() - t3, 3)
return boxes, segments, masks, (pre_time, det_time, post_time)
# 前处理,包括:resize, pad, 其中HWC to CHW,BGR to RGB,归一化,增加维度CHW -> BCHW可选择是否开启AIPP加速处理
def preprocess(self, img):
"""
Pre-processes the input image.
Args:
img (Numpy.ndarray): image about to be processed.
Returns:
img_process (Numpy.ndarray): image preprocessed for inference.
ratio (tuple): width, height ratios in letterbox.
pad_w (float): width padding in letterbox.
pad_h (float): height padding in letterbox.
"""
# Resize and pad input image using letterbox() (Borrowed from Ultralytics)
shape = img.shape[:2]  # original image shape
new_shape = (self.model_height, self.model_width)
r = min(new_shape[0] / shape[0], new_shape[1] / shape[1])
ratio = r, r
new_unpad = int(round(shape[1] * r)), int(round(shape[0] * r))
pad_w, pad_h = (new_shape[1] - new_unpad[0]) / 2, (new_shape[0] - new_unpad[1]) / 2  # wh padding
if shape[::-1] != new_unpad:  # resize
img = cv2.resize(img, new_unpad, interpolation=cv2.INTER_LINEAR)
top, bottom = int(round(pad_h - 0.1)), int(round(pad_h + 0.1))
left, right = int(round(pad_w - 0.1)), int(round(pad_w + 0.1))
img = cv2.copyMakeBorder(img, top, bottom, left, right, cv2.BORDER_CONSTANT, value=(114, 114, 114))  # 填充
# 是否开启aipp加速预处理,需atc中完成
if self.aipp:
return img, ratio, (pad_w, pad_h)
# Transforms: HWC to CHW -> BGR to RGB -> div(255) -> contiguous -> add axis(optional)
img = np.ascontiguousarray(np.einsum('HWC->CHW', img)[::-1], dtype=self.ndtype) / 255.0
img_process = img[None] if len(img.shape) == 3 else img
return img_process, ratio, (pad_w, pad_h)
# YOLOv5/6/7通用后处理,包括:阈值过滤与NMS+masks处理
def postprocess_v5(self, preds, im0, ratio, pad_w, pad_h, conf_threshold, iou_threshold, nm=32):
"""
Post-process the prediction.
Args:
preds (Numpy.ndarray): predictions come from ort.session.run().
im0 (Numpy.ndarray): [h, w, c] original input image.
ratio (tuple): width, height ratios in letterbox.
pad_w (float): width padding in letterbox.
pad_h (float): height padding in letterbox.
conf_threshold (float): conf threshold.
iou_threshold (float): iou threshold.
nm (int): the number of masks.
Returns:
boxes (List): list of bounding boxes.
segments (List): list of segments.
masks (np.ndarray): [N, H, W], output masks.
"""
# (Batch_size, Num_anchors, xywh_score_conf_cls), v5和v6_1.0的[..., 4]是置信度分数,v8v9采用类别里面最大的概率作为置信度score
x, protos = preds[0], preds[1]  # 与bbox区别:Two outputs: 检测头的输出(1, 8400*3, 117), 分割头的输出(1, 32, 160, 160)
# Predictions filtering by conf-threshold
x = x[x[..., 4] > conf_threshold]
# Create a new matrix which merge these(box, score, cls, nm) into one
# For more details about `numpy.c_()`: https://numpy.org/doc/1.26/reference/generated/numpy.c_.html
x = np.c_[x[..., :4], x[..., 4], np.argmax(x[..., 5:-nm], axis=-1), x[..., -nm:]]
# NMS filtering
# 经过NMS后的值, np.array([[x, y, w, h, conf, cls, nm], ...]), shape=(-1, 4 + 1 + 1 + 32)
x = x[cv2.dnn.NMSBoxes(x[:, :4], x[:, 4], conf_threshold, iou_threshold)]
# 重新缩放边界框,为画图做准备
if len(x) > 0:
# Bounding boxes format change: cxcywh -> xyxy
x[..., [0, 1]] -= x[..., [2, 3]] / 2
x[..., [2, 3]] += x[..., [0, 1]]
# Rescales bounding boxes from model shape(model_height, model_width) to the shape of original image
x[..., :4] -= [pad_w, pad_h, pad_w, pad_h]
x[..., :4] /= min(ratio)
# Bounding boxes boundary clamp
x[..., [0, 2]] = x[:, [0, 2]].clip(0, im0.shape[1])
x[..., [1, 3]] = x[:, [1, 3]].clip(0, im0.shape[0])
# 与bbox区别:增加masks处理
# Process masks
masks = self.process_mask(protos[0], x[:, 6:], x[:, :4], im0.shape)
# Masks -> Segments(contours)
segments = self.masks2segments(masks)
return x[..., :6], segments, masks  # boxes, segments, masks
else:
return [], [], []
def postprocess_v8(self, preds, im0, ratio, pad_w, pad_h, conf_threshold, iou_threshold):
x, protos = preds[0], preds[1]  # x: (1, 37, 8400), protos: (1, 32, 160, 160)
# 统一为 (8400, 37)
if x.ndim == 3:
if x.shape[1] < x.shape[2]:  # (1, 37, 8400)
x = np.einsum('bcn->bnc', x)[0]  # -> (8400, 37)
else:  # (1, 8400, 37)
x = x[0]
else:
raise ValueError(f'unexpected pred0 shape: {x.shape}')
# 动态确定 nm(此模型就是 32)
nm = protos.shape[1] if (protos.ndim == 4 and protos.shape[1] in (16, 32, 64)) else 32
# 取类别分支并按需做 sigmoid
cls_blob = x[:, 4:-nm]  # 维度应为 (8400, num_classes);你的模型 num_classes=1
if cls_blob.size and (cls_blob.max() > 1 or cls_blob.min() < 0):
cls_scores = 1.0 / (1.0 + np.exp(-cls_blob))
else:
cls_scores = cls_blob
if cls_scores.size == 0:
return [], [], []
scores = cls_scores.max(axis=-1)
clses = cls_scores.argmax(axis=-1)
keep = scores > conf_threshold
if not np.any(keep):
return [], [], []
# 拼接为统一数组
x = np.c_[x[keep, :4], scores[keep], clses[keep], x[keep, -nm:]]  # [cx,cy,w,h,score,cls, 32-vec]
# === NMS 前先把 cx,cy,w,h -> x,y,w,h(左上+宽高)===
tlwh = np.c_[x[:, 0] - x[:, 2] / 2,
x[:, 1] - x[:, 3] / 2,
x[:, 2],
x[:, 3]]
idxs = cv2.dnn.NMSBoxes(tlwh.tolist(), x[:, 4].astype(float).tolist(),
conf_threshold, iou_threshold)
if len(idxs) == 0:
return [], [], []
idxs = np.array(idxs).reshape(-1)
x = x[idxs]
# 转回 xyxy 并映射回原图
x[..., [0, 1]] -= x[..., [2, 3]] / 2
x[..., [2, 3]] += x[..., [0, 1]]
x[:, :4] -= [pad_w, pad_h, pad_w, pad_h]
x[:, :4] /= min(ratio)
x[:, [0, 2]] = x[:, [0, 2]].clip(0, im0.shape[1])
x[:, [1, 3]] = x[:, [1, 3]].clip(0, im0.shape[0])
# 处理 mask
masks = self.process_mask(protos[0], x[:, 6:], x[:, :4], im0.shape)
segments = self.masks2segments(masks)
return x[:, :6], segments, masks
@staticmethod
def masks2segments(masks):
"""
It takes a list of masks(n,h,w) and returns a list of segments(n,xy) (Borrowed from
https://github.com/ultralytics/ultralytics/blob/465df3024f44fa97d4fad9986530d5a13cdabdca/ultralytics/utils/ops.py#L750)
Args:
masks (numpy.ndarray): the output of the model, which is a tensor of shape (batch_size, 160, 160).
Returns:
segments (List): list of segment masks.
"""
segments = []
for x in masks.astype('uint8'):
c = cv2.findContours(x, cv2.RETR_EXTERNAL, cv2.CHAIN_APPROX_NONE)[
0]  # CHAIN_APPROX_SIMPLE  该函数用于查找二值图像中的轮廓。
if c:
# 这段代码的目的是找到图像x中的最外层轮廓,并从中选择最长的轮廓,然后将其转换为NumPy数组的形式。
c = np.array(c[np.array([len(x) for x in c]).argmax()]).reshape(-1, 2)
else:
c = np.zeros((0, 2))  # no segments found
segments.append(c.astype('float32'))
return segments
def process_mask(self, protos, masks_in, bboxes, im0_shape):
c, mh, mw = protos.shape
masks = np.matmul(masks_in, protos.reshape((c, -1))).reshape((-1, mh, mw))  # [n, mh, mw]
# ★ 先 sigmoid,把线性叠加的 logits 转成概率
masks = 1.0 / (1.0 + np.exp(-masks))
masks = np.transpose(masks, (1, 2, 0))  # -> [mh, mw, n]
masks = np.ascontiguousarray(masks)
masks = self.scale_mask(masks, im0_shape)  # -> [H, W, n]
masks = np.einsum('HWN -> NHW', masks)  # -> [n, H, W]
masks = self.crop_mask(masks, bboxes)  # 裁剪到框内
return masks > 0.5
@staticmethod
def scale_mask(masks, im0_shape, ratio_pad=None):
"""
Takes a mask, and resizes it to the original image size. (Borrowed from
https://github.com/ultralytics/ultralytics/blob/465df3024f44fa97d4fad9986530d5a13cdabdca/ultralytics/utils/ops.py#L305)
Args:
masks (np.ndarray): resized and padded masks/images, [h, w, num]/[h, w, 3].
im0_shape (tuple): the original image shape.
ratio_pad (tuple): the ratio of the padding to the original image.
Returns:
masks (np.ndarray): The masks that are being returned.
"""
im1_shape = masks.shape[:2]
if ratio_pad is None:  # calculate from im0_shape
gain = min(im1_shape[0] / im0_shape[0], im1_shape[1] / im0_shape[1])  # gain  = old / new
pad = (im1_shape[1] - im0_shape[1] * gain) / 2, (im1_shape[0] - im0_shape[0] * gain) / 2  # wh padding
else:
pad = ratio_pad[1]
# Calculate tlbr of mask
top, left = int(round(pad[1] - 0.1)), int(round(pad[0] - 0.1))  # y, x
bottom, right = int(round(im1_shape[0] - pad[1] + 0.1)), int(round(im1_shape[1] - pad[0] + 0.1))
if len(masks.shape) < 2:
raise ValueError(f'"len of masks shape" should be 2 or 3, but got {len(masks.shape)}')
masks = masks[top:bottom, left:right]
masks = cv2.resize(masks, (im0_shape[1], im0_shape[0]),
interpolation=cv2.INTER_LINEAR)  # INTER_CUBIC would be better
if len(masks.shape) == 2:
masks = masks[:, :, None]
return masks
@staticmethod
def crop_mask(masks, boxes):
"""
It takes a mask and a bounding box, and returns a mask that is cropped to the bounding box. (Borrowed from
https://github.com/ultralytics/ultralytics/blob/465df3024f44fa97d4fad9986530d5a13cdabdca/ultralytics/utils/ops.py#L599)
Args:
masks (Numpy.ndarray): [n, h, w] tensor of masks.
boxes (Numpy.ndarray): [n, 4] tensor of bbox coordinates in relative point form.
Returns:
(Numpy.ndarray): The masks are being cropped to the bounding box.
"""
n, h, w = masks.shape
x1, y1, x2, y2 = np.split(boxes[:, :, None], 4, 1)
r = np.arange(w, dtype=x1.dtype)[None, None, :]
c = np.arange(h, dtype=x1.dtype)[None, :, None]
return masks * ((r >= x1) * (r < x2) * (c >= y1) * (c < y2))
  if __name__ == '__main__':
  # Create an argument parser to handle command-line arguments
  parser = argparse.ArgumentParser()
  parser.add_argument('--seg_model', type=str, default=r"yolov8s-seg.om", help='Path to OM model')
  parser.add_argument('--source', type=str, default=r'images', help='image文件夹')
  parser.add_argument('--out_path', type=str, default=r'results', help='结果保存文件夹')
  parser.add_argument('--imgsz_seg', type=tuple, default=(416, 416), help='Image input size')
  parser.add_argument('--classes', type=list,default=['potato', 'residue'], help='类别')
  parser.add_argument('--conf', type=float, default=0.7, help='Confidence threshold')
  parser.add_argument('--iou', type=float, default=0.7, help='NMS IoU threshold')
  parser.add_argument('--device_id', type=int, default=0, help='device id')
  parser.add_argument('--mode', default='static', help='om是动态dymshape或静态static')
  parser.add_argument('--model_ndtype', default=np.single, help='om是fp32或fp16')
  parser.add_argument('--postprocess_type', type=str, default='v8', help='后处理方式, 对应v5/v8两种后处理')
  parser.add_argument('--aipp', default=False, action='store_true',
  help='是否开启aipp加速YOLO预处理, 需atc中完成om集成')
  args = parser.parse_args()
  # 创建结果保存文件夹
  if not os.path.exists(args.out_path):
  os.mkdir(args.out_path)
  print('开始运行:')
  # Build model
  seg_model = YOLO(args.seg_model, args.imgsz_seg, args.device_id, args.model_ndtype, args.mode,
  args.postprocess_type, args.aipp)
  color_palette = np.random.uniform(0, 255, size=(len(args.classes), 3))  # 为每个类别生成调色板
  for i, img_name in enumerate(os.listdir(args.source)):
  try:
  t1 = time.time()
  # Read image by OpenCV
  img = cv2.imread(os.path.join(args.source, img_name))
  # 检测Inference
  boxes, segments, _, (pre_time, det_time, post_time) = seg_model(img, conf_threshold=args.conf,
  iou_threshold=args.iou)
  print(
  '{}/{} ==>总耗时间: {:.3f}s, 其中, 预处理: {:.3f}s, 推理: {:.3f}s, 后处理: {:.3f}s, 识别{}个目标'.format(
  i + 1, len(os.listdir(args.source)), time.time() - t1, pre_time, det_time, post_time, len(boxes)))
  # Draw rectangles and polygons
  im_canvas = img.copy()
  # 在绘制循环里加健壮性判断
  for (*box, conf, cls_), segment in zip(boxes, segments):
  # segment 可能为空或很短;也可能是 float,需要转 int32
  if segment is None or len(segment) < 3:
  continue
  seg = np.round(segment).astype(np.int32).reshape(-1, 1, 2)  # -> Nx1x2, int32
  # 先画边,再填充
  cv2.polylines(img, [seg], True, (255, 255, 255), 2)
  cv2.fillPoly(im_canvas, [seg], (255, 0, 0))
  # 画 bbox 和标签
  x1, y1, x2, y2 = map(int, box[:4])
  cls_i = int(cls_)
  cv2.rectangle(img, (x1, y1), (x2, y2), color_palette[cls_i], 1, cv2.LINE_AA)
  label = args.classes[cls_i] if 0 <= cls_i < len(args.classes) else f'cls{cls_i}'
  cv2.putText(img, f'{label}: {conf:.3f}', (x1, max(0, y1 - 9)),
  cv2.FONT_HERSHEY_SIMPLEX, 0.7, color_palette[cls_i], 2, cv2.LINE_AA)
  # Mix image
  img = cv2.addWeighted(im_canvas, 0.3, img, 0.7, 0)
  cv2.imwrite(os.path.join(args.out_path, img_name), img)
  except Exception as e:
  print(e)
百度云分享 提取码: 9ych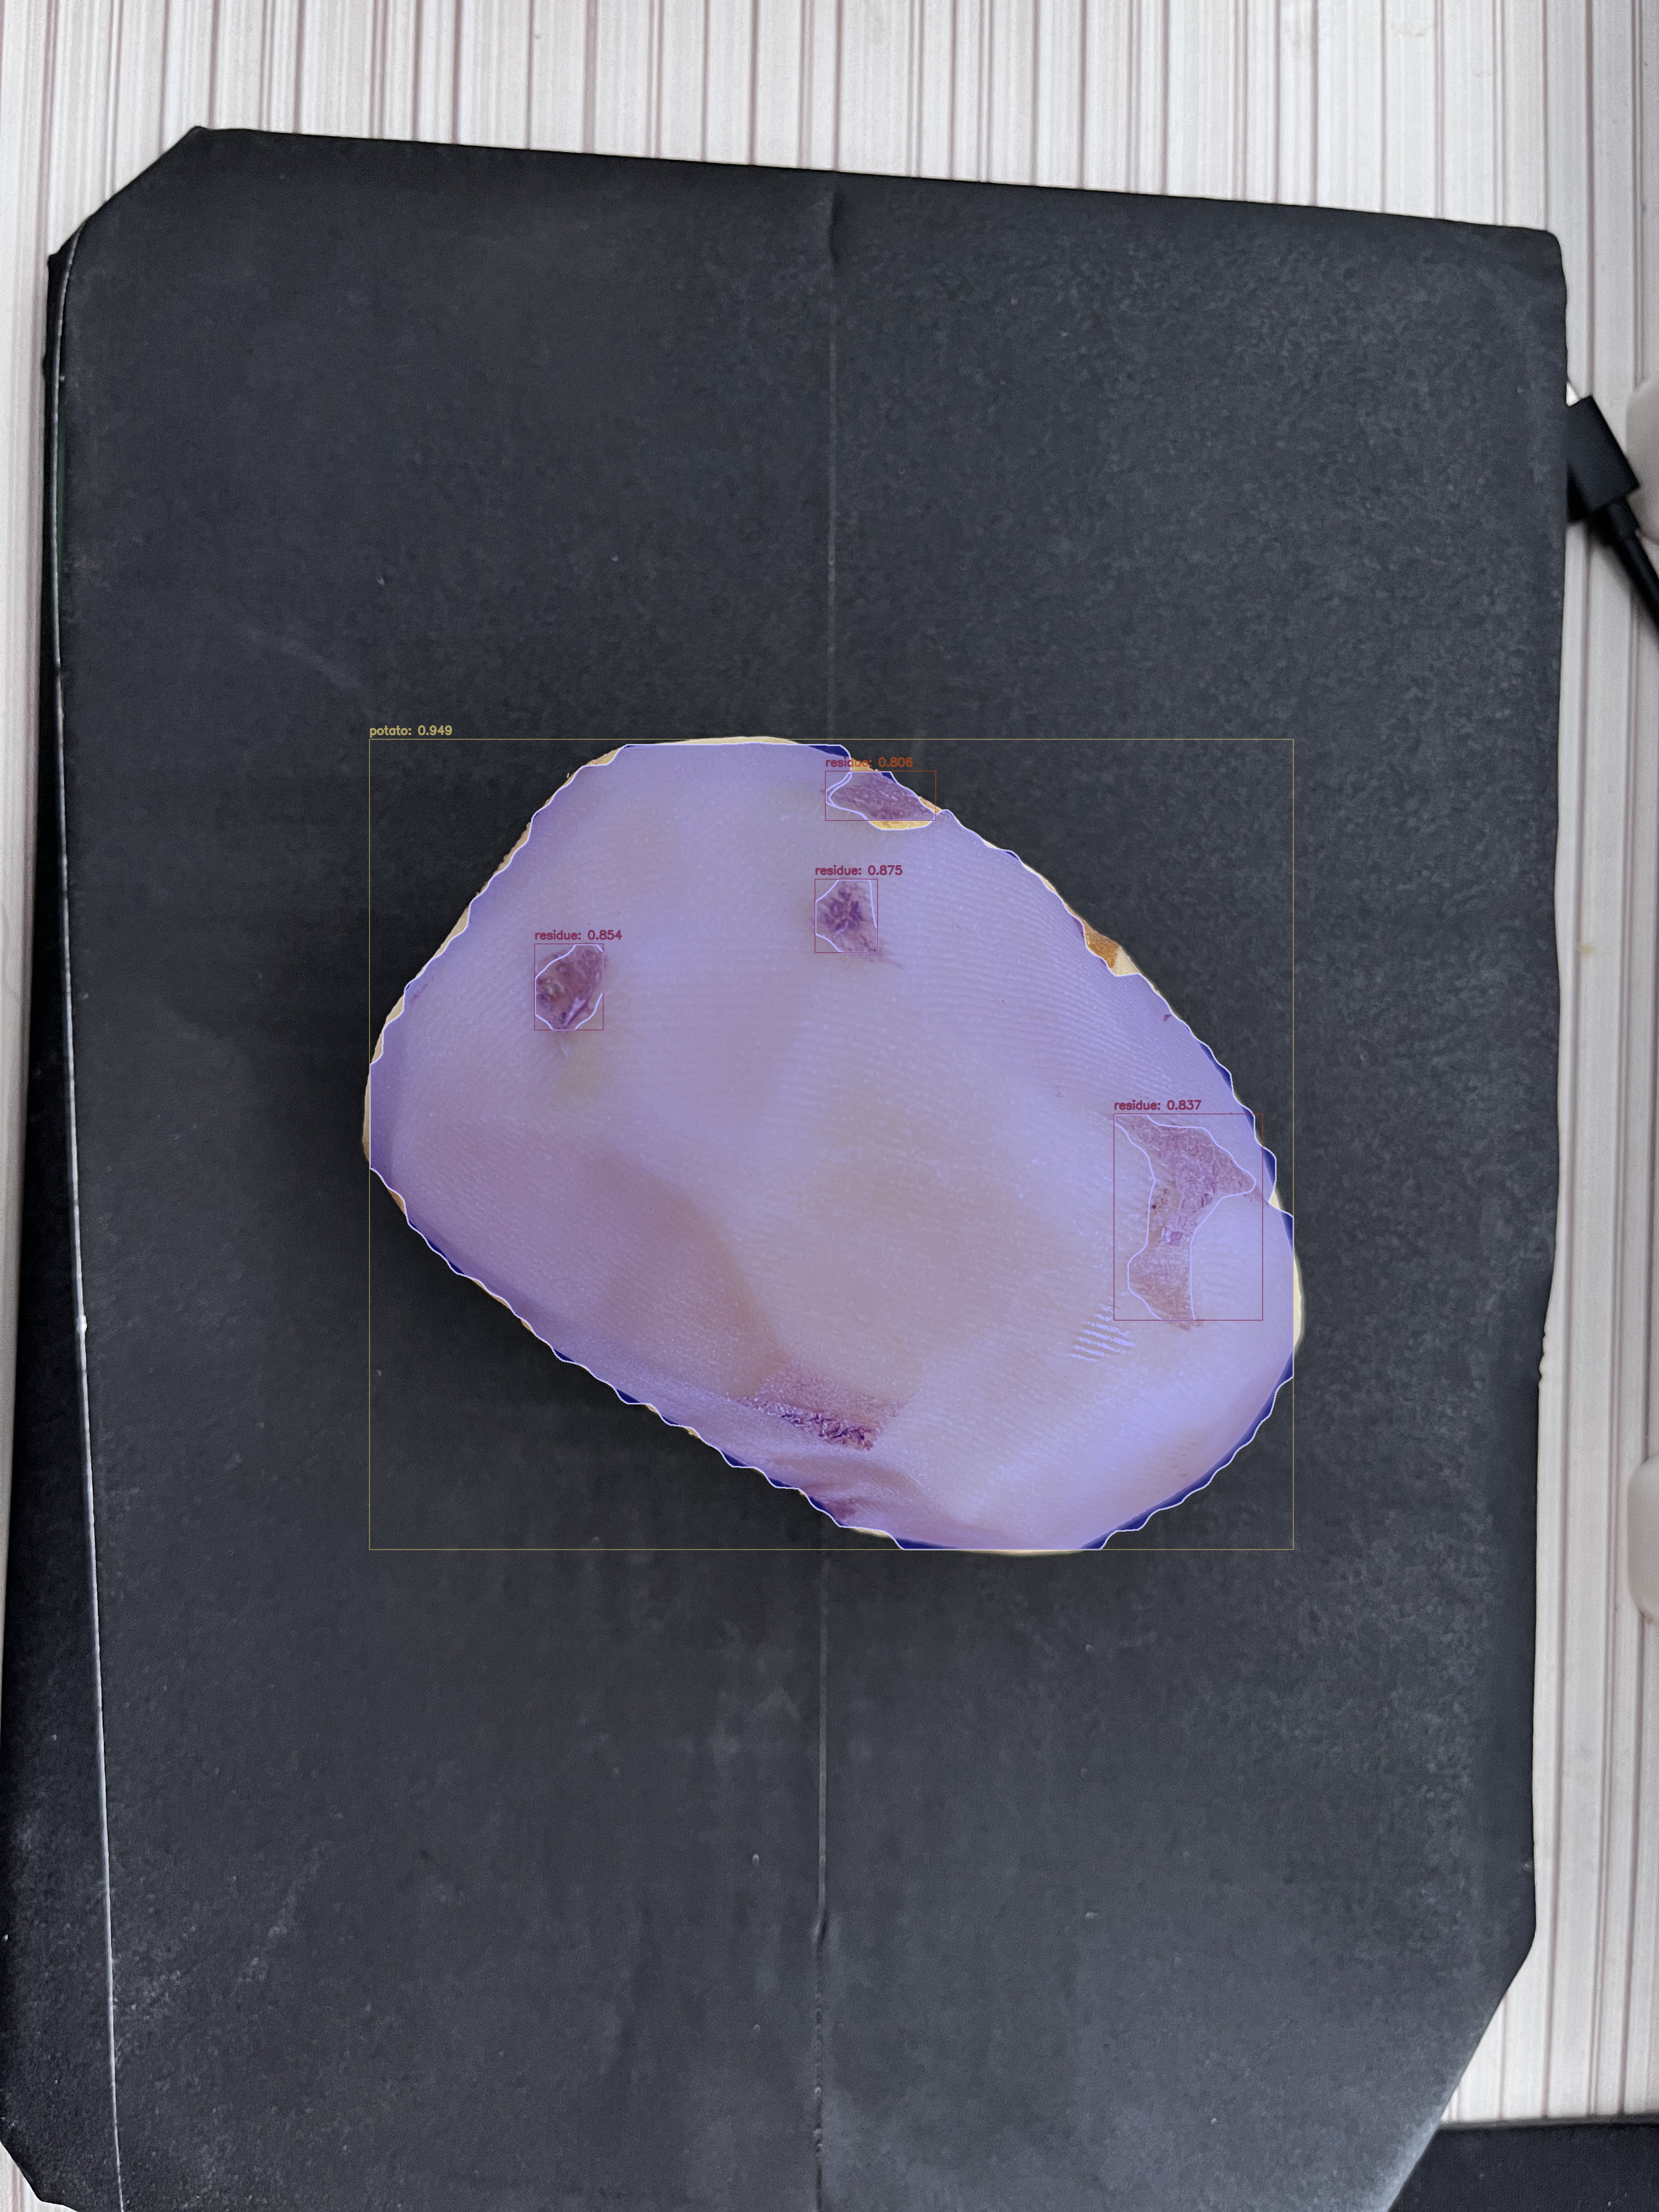
六、后续
yolov8-seg的处理前后代码就得靠自己去写了, 博主闲时也会研究并发在后续的文章中,可能还会融入具体业务中、用Java去调结果、Python转化等等

 浙公网安备 33010602011771号