

Spring AI调用MCP服务 - 指南
在其他地方查看文章:https://blog.liuzijian.com/post/spring-ai/2025/11/08/spring-ai-mcp-client.html
1.MCP概述
MCP(Model Context Protocol),即模型上下文协议,是一种开放标准,使大模型采用统一的标准化的方式与外部的工具和数据等进行通信交互。
之前提到,大模型可以通过Tools(Function calling)来实现一些获取信息和操作数据的功能,如果我们自定义好了一些公共的工具给别人用,例如提供实时日期信息、天气信息,股市交易信息、汇率信息等,想要开放给很多大模型来使用,如果没有标准化的接口,每产生一个大模型应用就要适配一次,MCP协议为解决这一问题而生,现在我们实现的工具只需要面向MCP接口协议进行开发,大模型也遵循MCP规范进行接入使用,这个问题就解决了,我们实现的服务就叫MCP服务端,大模型实现的就是MCP的客户端。
MCP协议产生于2024年,具体协议内容可见:https://modelcontextprotocol.io/docs/getting-started/intro
2.调用MCP
MCP调用方式有三种,SSE,streamable-http和Stdio,SSE和streamable-http以http方式调用部署好的远程MCP服务器上的MCP,Stdio是将MCP的源码下载到本地打成软件包,使用Spring AI驱动npx或uvx命令来本地调用软件包中的MCP,其中TypeScript编写的MCP需要由npx调用,Python编写的MCP需要由uvx调用。
我使用的Spring AI版本好像还不支持streamable-http。
在远程调用modelscope时需要在modelscope上修改接口为SSE模式
以部署在modelscope上面的12306-mcp为例,分别介绍SSE远程调用和Stdio模式本地调用。12306-mcp是一个查询铁路12306平台,返回列车订票信息的MCP应用
- modelscope https://www.modelscope.cn/mcp/servers/@Joooook/12306-mcp
- github https://github.com/drfccv/mcp-server-12306
2.1 SSE调用MCP
pom中引入调用MCP需要的spring-ai-starter-mcp-client依赖
    4.0.0

        org.springframework.boot
        spring-boot-starter-parent
        3.5.7

    org.example
    spring-ai-mcp
    1.0-SNAPSHOT

        21
        21
        UTF-8


                org.springframework.ai
                spring-ai-bom
                1.0.3
                pom
                import


            org.springframework.boot
            spring-boot-starter-web


            org.springframework.boot
            spring-boot-starter-test
            test


            org.springframework.ai
            spring-ai-starter-model-deepseek


            org.springframework.ai
            spring-ai-starter-mcp-client


            org.projectlombok
            lombok
application.yml中配置一个modelscope上面开放的MCP工具12306-mcp
spring:
  ai:
    mcp:
      client:
        enabled: true
        name: spring-ai-agent
        type: async
        sse:
          connections:
            12306-mcp:
              url: https://mcp.api-inference.modelscope.net/
              sse-endpoint: /********/sse
    deepseek:
      base-url: https://api.deepseek.com
      api-key: ${DEEP_SEEK_KEY}
logging:
  level:
    io.modelcontextprotocol: DEBUG
    org.springframework.ai.mcp: DEBUG
配置类中,将外部MCP工具ToolCallbackProvider注入并和ChatClient进行绑定
package org.example.config;
import org.springframework.ai.chat.client.ChatClient;
import org.springframework.ai.chat.client.advisor.MessageChatMemoryAdvisor;
import org.springframework.ai.chat.client.advisor.SimpleLoggerAdvisor;
import org.springframework.ai.chat.memory.ChatMemory;
import org.springframework.ai.deepseek.DeepSeekChatModel;
import org.springframework.ai.tool.ToolCallbackProvider;
import org.springframework.context.annotation.Bean;
import org.springframework.context.annotation.Configuration;
@Configuration
public class AppConfig {
    @Bean
    public ChatClient chatClient(DeepSeekChatModel model, ChatMemory chatMemory, ToolCallbackProvider toolCallbackProvider) {
        return ChatClient.builder(model)
                .defaultAdvisors(
                        SimpleLoggerAdvisor.builder().build(),
                        MessageChatMemoryAdvisor.builder(chatMemory).build()
                )
                .defaultToolCallbacks(toolCallbackProvider)
                .build();
    }
}
对话接口和以往完全一样
package org.example.controller;
import jakarta.annotation.Resource;
import org.springframework.ai.chat.client.ChatClient;
import org.springframework.ai.chat.memory.ChatMemory;
import org.springframework.web.bind.annotation.GetMapping;
import org.springframework.web.bind.annotation.RequestMapping;
import org.springframework.web.bind.annotation.RestController;
import reactor.core.publisher.Flux;
@RestController
@RequestMapping("ai")
public class ChatController {
@Resource
private ChatClient chatClient;
//127.0.0.1:8080/ai/chat-stream?msg=你是谁&chatId=001
@GetMapping(value = "chat-stream", produces = "text/html;charset=utf-8")
public Flux stream(String msg, String chatId) {
return chatClient.prompt()
.user(msg)
.advisors(advisor -> advisor.param(ChatMemory.CONVERSATION_ID, chatId))
.stream()
.content();
}
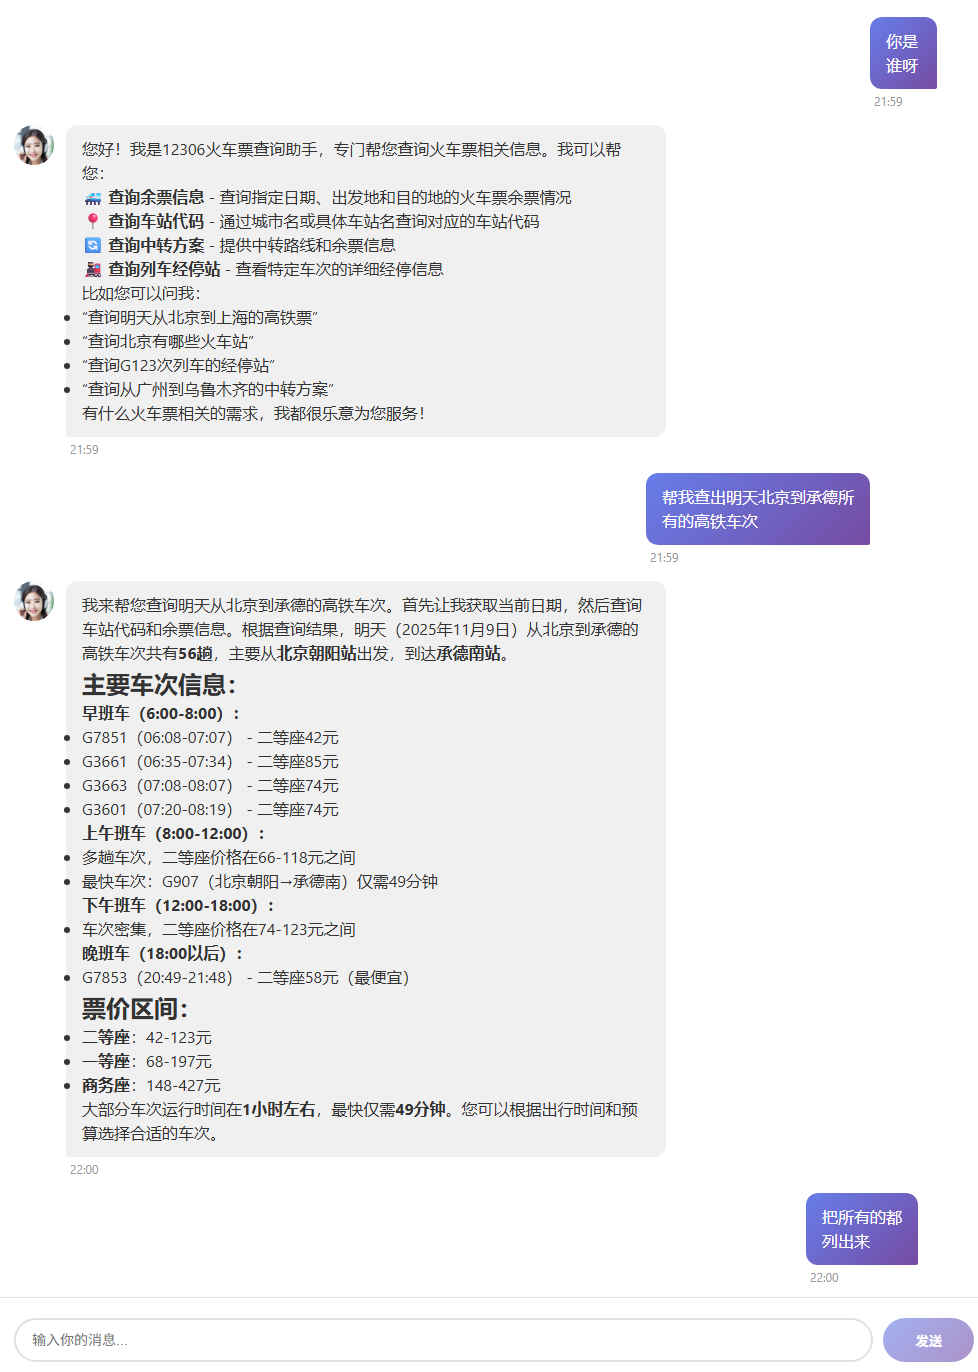
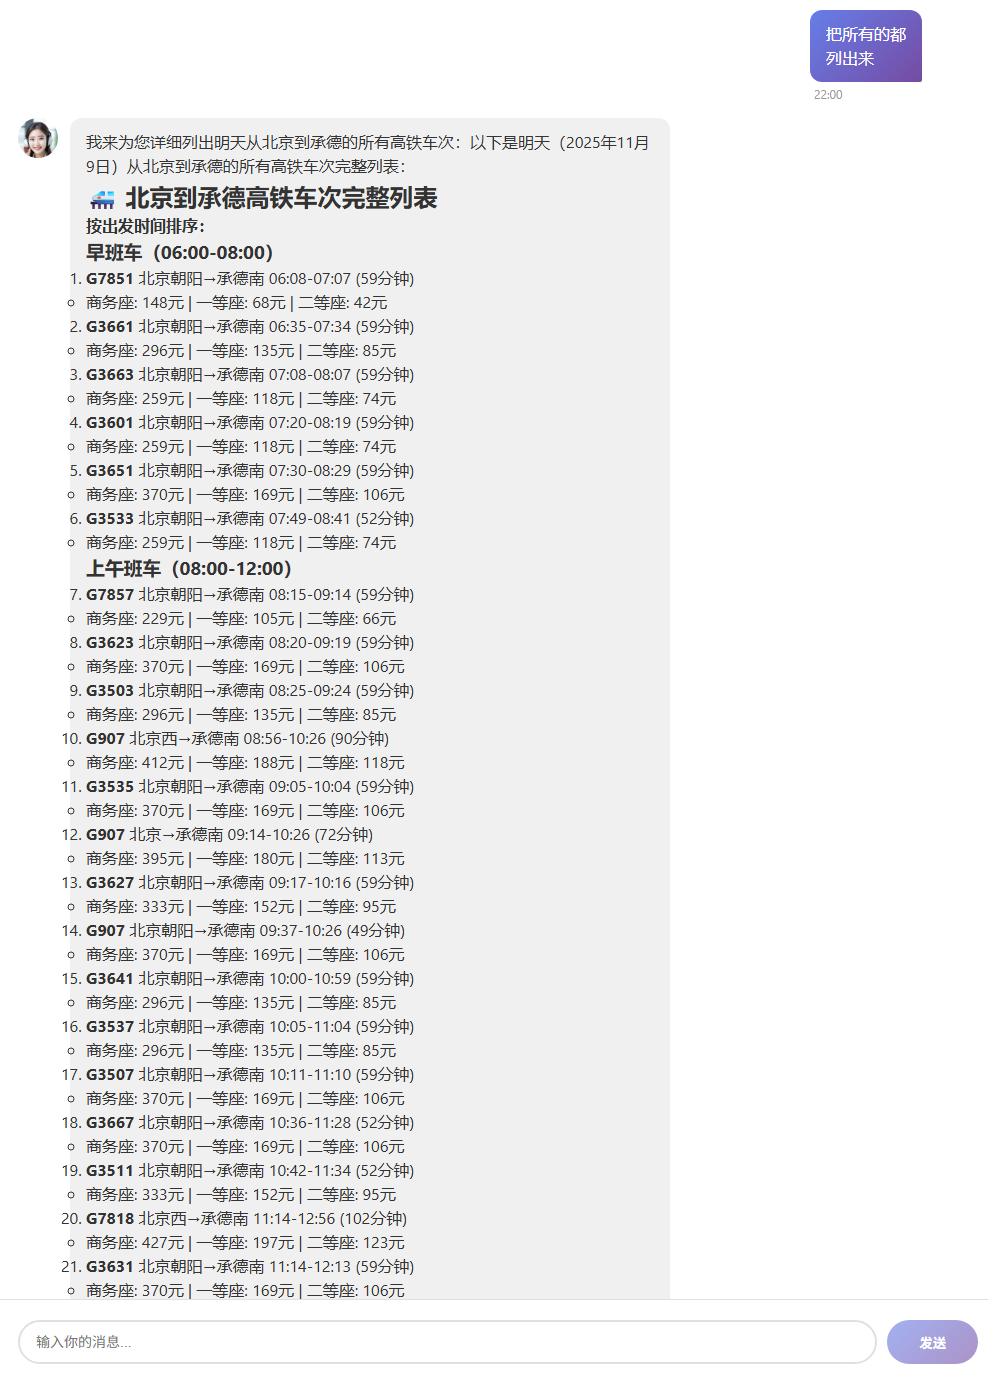
} 大模型已经能在对话中调用MCP了
2.2 Stdio调用MCP
因为是本地调用,所以需要先将这个MCP的源码clone并安装到本地,因为这个MCP是TS语言编写,因此还需要用npm将其安装到本地。
git clone https://github.com/Joooook/12306-mcp.git
cd 12306-mcp
npm i
运行前,如未安装npx,还需要全局安装npx,用于被Spring AI驱动本地运行MCP
npm i -g npx根据MCP的标准,Stdio模式将MCP按一定格式配置到JSON文件中
{
  "mcpServers": {
    "12306-mcp": {
      "args": [
        "-y",
        "12306-mcp"
      ],
      "command": "npx"
    }
  }
}
modelscope上面给出的JSON格式是Mac/Linux的,如果是Windows系统,需要修改:
{
  "mcpServers": {
    "12306-mcp": {
      "command": "cmd",
      "args": [
        "/c",
        "npx",
        "-y",
        "12306-mcp"
      ]
    }
  }
}
将配置文件放入类路径下,同application.yml放在一级,这里将这个json文件命名为mcp-server.json,并将配置放入spring ai
spring:
  ai:
    mcp:
      client:
        enabled: true
        name: spring-ai-agent
        type: sync
        stdio:
          servers-configuration: classpath:mcp-server.json
    deepseek:
      base-url: https://api.deepseek.com
      api-key: ${DEEP_SEEK_KEY}
logging:
  level:
    io.modelcontextprotocol: DEBUG
    org.springframework.ai.mcp: DEBUG
启动后,可见日志
2025-11-09T12:15:07.418+08:00 INFO 39432 --- [pool-5-thread-1] i.m.c.transport.StdioClientTransport : STDERR Message received: 12306 MCP Server running on stdio @Joooook运行起来是相同的效果

 浙公网安备 33010602011771号