

【Linux】基础IO - 指南
前言
在上一篇文章中,我们详细介绍了自定义Shell的内容,内容还是挺多的,希望大家可以多去练习熟悉一下,那么本篇文章将带大家详细讲解基础IO的内容,接下来一起看看吧!
一. 理解文件
狭义理解
- 文件在磁盘里
- 磁盘是永久性存储介质,因此文件在磁盘上的存储是永久性的
- 磁盘是外设(既是输出设备也是输入设备)
- 磁盘上的文件,本质是对文件的所有操作,都是对外设的输入和输出,简称IO
广义理解
- Linux下一切皆文件(键盘、显示器、网卡、磁盘…这些都是抽象化的过程)
文件操作的归类认知
- 对于0KB的空文件是占用磁盘空间的
- 文件是文件属性(元数据)和文件内容的集合(文件 = 属性(元数据)+ 内容)
- 所有的文件操作本质是文件内容操作和文件属性操作
系统角度
- 对文件的操作本质是进程对文件的操作
- 磁盘的管理者是操作系统
- 文件的读写本质不是通过C/C++的库函数来操作的(这些库函数只是为用户提供方便),而是通过文件相关的系统调用接口来实现的
二. 回顾C文件操作
在C语言中,我们使用fopen来打开文件;使用fclose来关闭文件
fopen:打开文件,如果打开成功返回一个FILE*类型的指针;打开失败则返回NULL;fclose:关闭文件,传FILE*类型的指针,关闭指定文件。
打开文件的方式有很多种,最常用的有以下三种:
r:以读方式打开、w以写方式打开、a以追加方式打开。
w方式打开文件,如果没有指定文件。就会创建该文件;如果有指定文件,则每次打开都会清空该文件的内容。
a方式打开文件,如果没有指定文件。就会创建该文件;如果有指定文件,每次打开不会清空该文件的内容,会继续往该文件写内容。
关于C语言文件操作还有很多内容,如果大家忘记的差不多了,可以看一下这个博客:【C语言】文件操作
2.1 写文件
#include <stdio.h>
  #include <string.h>
    int main()
    {
    FILE *fp = fopen("log.txt", "w");
    if(!fp){
    printf("fopen error!\n");
    }
    const char *msg = "hello linux!\n";
    int count = 5;
    while(count--){
    fwrite(msg, strlen(msg), 1, fp);
    }
    fclose(fp);
    return 0;
    }
2.2 读文件
#include <stdio.h>
  #include <string.h>
    int main()
    {
    FILE *fp = fopen("log.txt", "r");
    if(!fp){
    printf("fopen error!\n");
    }
    char buffer[128];
    memset(buffer, 0, sizeof(buffer));
    while(1)
    {
    size_t n = fread(buffer, 1, sizeof(buffer)-1, fp);
    if(n > 0)
    {
    printf("%s\n", buffer);
    }
    if(feof(fp)){
    break;
    }
    }
    fclose(fp);
    return 0;
    }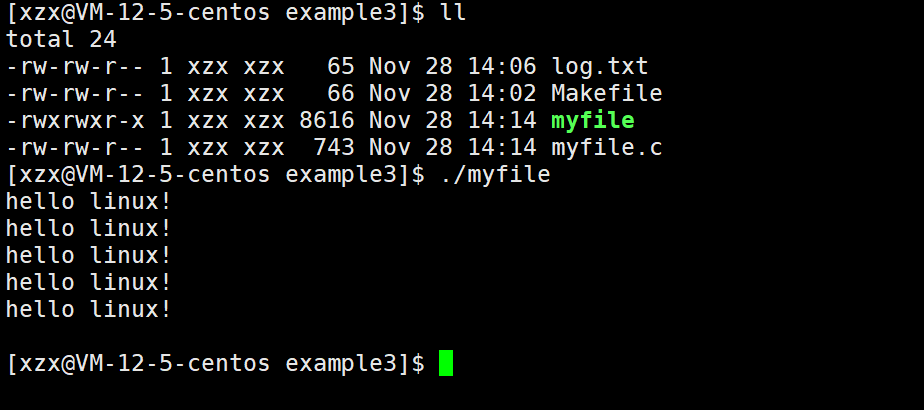
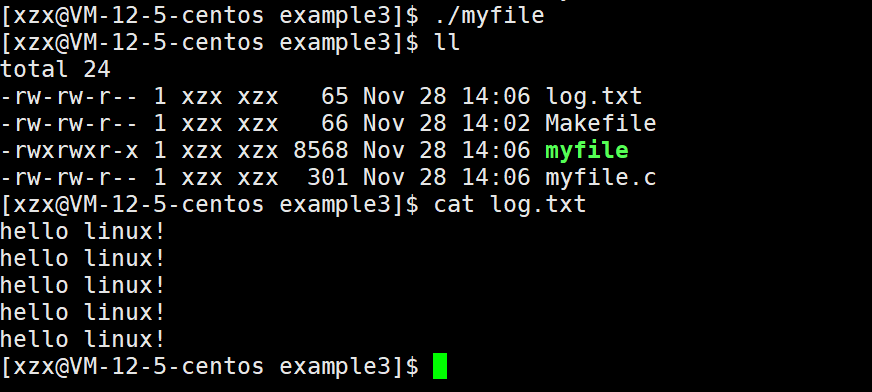
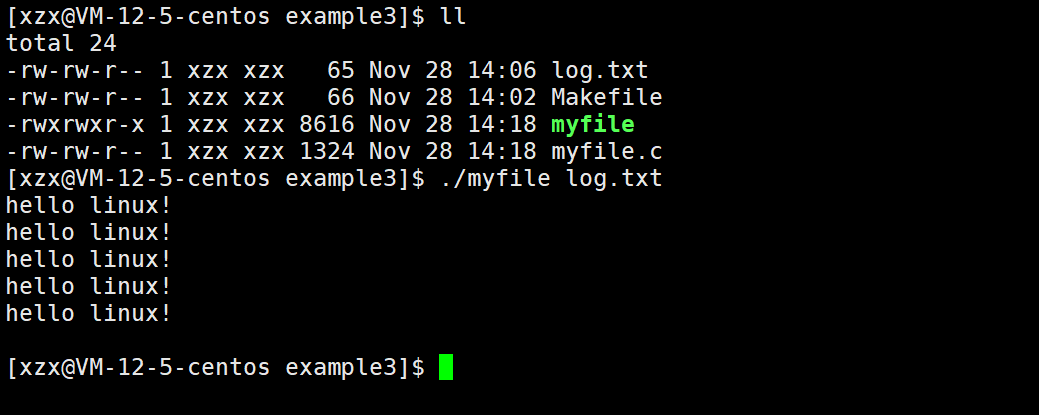
稍作修改,实现简单 cat 命令
#include <stdio.h>
  #include <string.h>
    int main(int argc, char* argv[])
    {
    if(argc != 2)
    {
    printf("argv error!\n");
    return 1;
    }
    FILE *fp = fopen(argv[1], "r");
    if(!fp){
    printf("fopen error!\n");
    return 2;
    }
    char buffer[128];
    memset(buffer, 0, sizeof(buffer));
    while(1)
    {
    size_t n = fread(buffer, 1, sizeof(buffer)-1, fp);
    if(n > 0)
    {
    printf("%s\n", buffer);
    }
    if(feof(fp)){
    break;
    }
    }
    fclose(fp);
    return 0;
    }
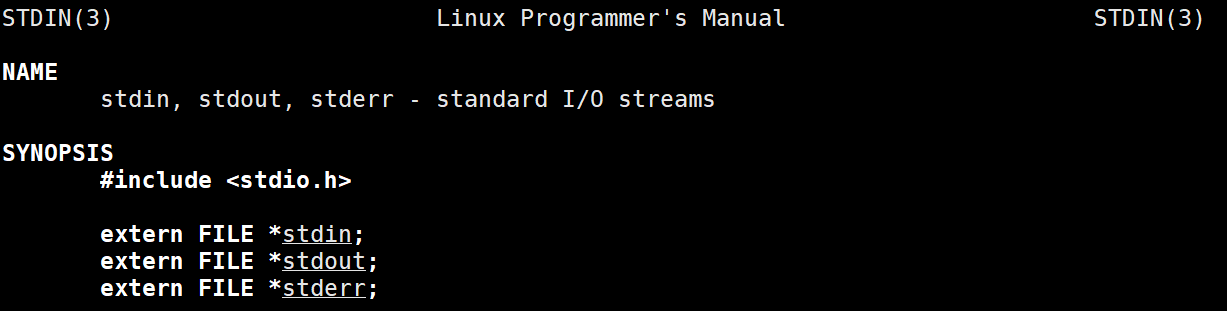
2.3 stdin/stdout/stderr
C默认会打开三个输入输出流,分别是stdin, stdout, stderr
仔细观察发现,这三个流的类型都是FILE*,fopen返回值类型,文件指针
三. 系统文件IO
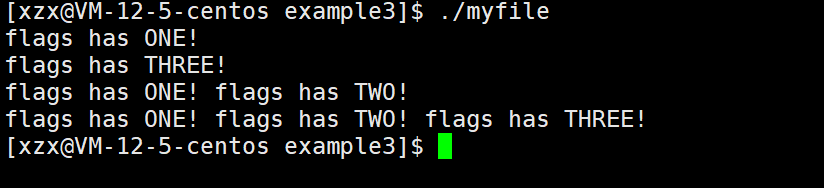
打开文件的方式不仅仅是fopen,ifstream等流式,语言层的方案,其实系统才是打开文件最底层的方案。不过,在学习系统文件IO之前,先要了解下如何给函数传递标志位,该方法在系统文件IO接口中会使用到。
#include <stdio.h>
  #define ONE 0001 //0000 0001
  #define TWO 0002 //0000 0010
  #define THREE 0004 //0000 0100
  void func(int flags) {
  if (flags & ONE) printf("flags has ONE! ");
  if (flags & TWO) printf("flags has TWO! ");
  if (flags & THREE) printf("flags has THREE! ");
  printf("\n");
  }
  int main()
  {
  func(ONE);
  func(THREE);
  func(ONE | TWO);
  func(ONE | THREE | TWO);
  return 0;
  }
3.1 打开文件open
在语言层面,我们使用的fopen,它本质上就是对系统调用open的封装。
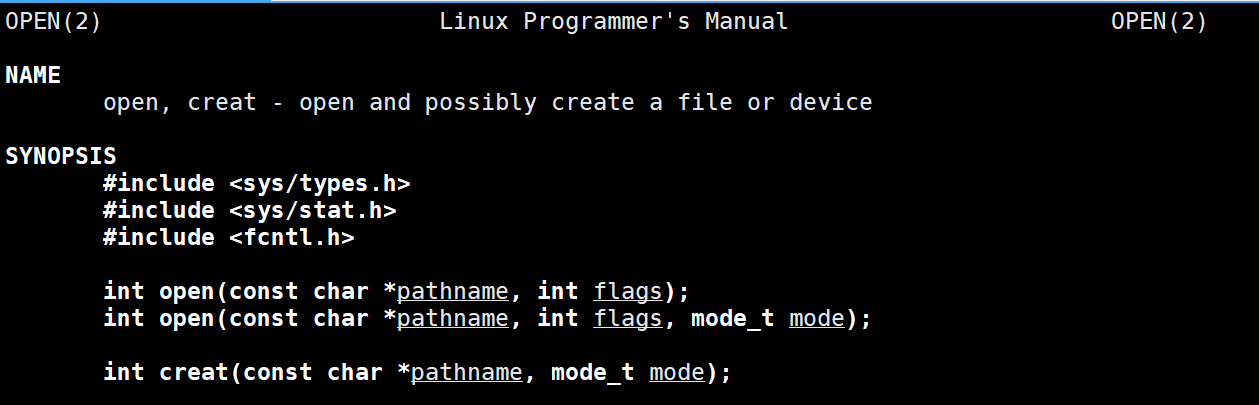
open函数它既存在有两个参数的,也存在三个参数的,构成函数重载。
pathname:表示要打开文件的文件名(不带路径就默认在当前工作路径下)flags:表示文件的打开方式,存在多个标志位。打开文件时,可以传入多个参数选项,用下面的一个或者多个常量进行“或”运算,构成flags。mode:表示新建文件时,文件的默认权限
文件名pathname
表示要打开文件的文件路径。如果只有文件名,没有带路径,则默认在当前路径下打开文件。(进程中存在当前工作路径cwd)
标志位flags
通过查看open函数的说明可以看到,flags存在非常多的标志位,这里重点说明几个常用的标志位:
O_RDONLY:只读O_WRONLY:只写O_RDWR:读写O_CREAT:如果文件不存在就创建文件O_TRUNC:打开文件时,清空文件内容O_APPEND:打开文件时,以追加形式打开。
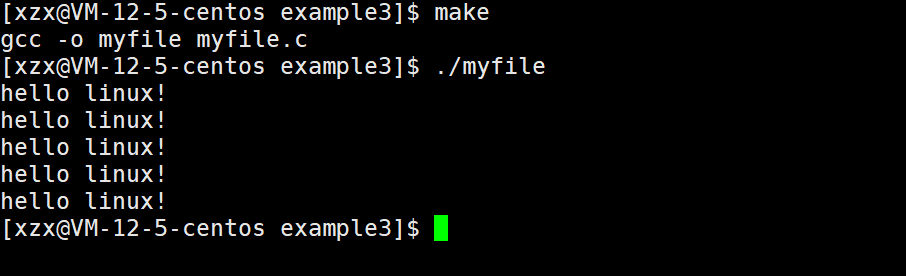
写文件
#include <stdio.h>
  #include <stdlib.h>
    #include <string.h>
      #include <sys/types.h>
        #include <sys/stat.h>
          #include <fcntl.h>
            #include <unistd.h>
              int main()
              {
              int fd = open("log.txt", O_CREAT | O_WRONLY | O_TRUNC, 0666);
              if(fd < 0){
              perror("open");
              return 1;
              }
              int count = 5;
              const char *msg = "hello linux!\n";
              int len = strlen(msg);
              while(count--){
              write(fd, msg, len);
              }
              close(fd);
              return 0;
              }
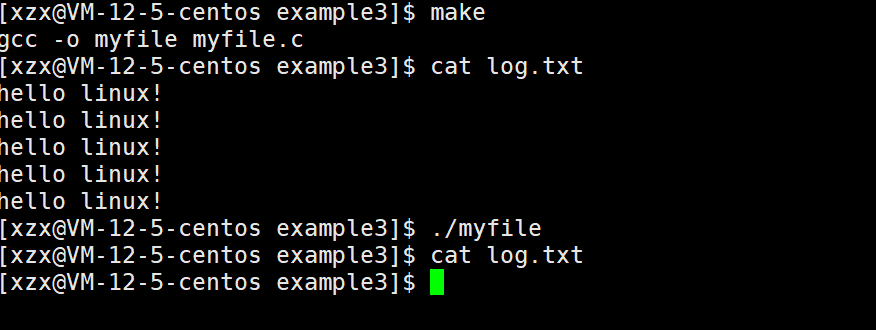
注意:新建文件一定要指明文件的默认权限,否则文件权限就是乱码!

读文件
#include <stdio.h>
  #include <stdlib.h>
    #include <string.h>
      #include <sys/types.h>
        #include <sys/stat.h>
          #include <fcntl.h>
            #include <unistd.h>
              int main()
              {
              int fd = open("log.txt", O_RDONLY);
              if(fd < 0){
              perror("open");
              return 1;
              }
              char buffer[1024];
              memset(buffer,0,sizeof(buffer));
              while(1){
              ssize_t s = read(fd, buffer, sizeof(buffer)-1);
              if(s > 0){
              printf("%s", buffer);
              }else{
              break;
              }
              }
              close(fd);
              return 0;
              }
O_TRUNC具有清理文件内容的作用
#include <stdio.h>
  #include <stdlib.h>
    #include <string.h>
      #include <sys/types.h>
        #include <sys/stat.h>
          #include <fcntl.h>
            #include <unistd.h>
              int main()
              {
              int fd = open("log.txt", O_RDONLY | O_TRUNC);
              if(fd < 0){
              perror("open");
              return 1;
              }
              close(fd);
              return 0;
              }
追加形式写文件
#include <stdio.h>
  #include <stdlib.h>
    #include <string.h>
      #include <sys/types.h>
        #include <sys/stat.h>
          #include <fcntl.h>
            #include <unistd.h>
              int main()
              {
              int fd = open("log.txt", O_CREAT |O_WRONLY | O_APPEND, 0666);
              if(fd < 0){
              perror("open");
              return 1;
              }
              int count = 3;
              const char *msg = "hello C++!\n";
              int len = strlen(msg);
              while(count--){
              write(fd, msg, len);
              }
              close(fd);
              return 0;
              }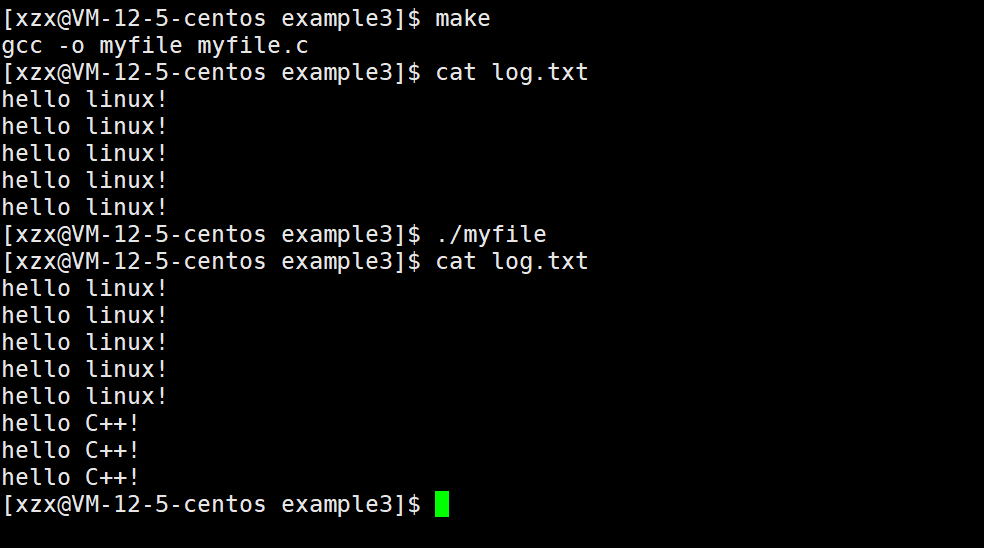
注意:如果没有使用追加形式(O_APPEND)打开文件,那么默认在文件的开头写文件,而不是文件末尾!
#include <stdio.h>
  #include <stdlib.h>
    #include <string.h>
      #include <sys/types.h>
        #include <sys/stat.h>
          #include <fcntl.h>
            #include <unistd.h>
              int main()
              {
              int fd = open("log.txt", O_CREAT |O_WRONLY, 0666);
              if(fd < 0){
              perror("open");
              return 1;
              }
              int count = 3;
              const char *msg = "hello C++!\n";
              int len = strlen(msg);
              while(count--){
              write(fd, msg, len);
              }
              close(fd);
              return 0;
              }
可以看到默认从文件的开头写数据,并且是覆盖写。
文件权限
新建的文件的权限:文件权限 = 默认权限 &(~umask)
umask默认为0002
3.2 关闭文件
fd指的是文件描述符,当打开文件成功时,会返回该文件的文件描述符;
对指定文件的读写操作,以及关闭文件都要使用指定文件的文件描述符。
3.3 文件写入write

write有三个参数,分别是fd、buf、和count
其中
fd指的是文件描述符,表示要向哪一个文件进行写入buf表示要进行写入的内容,它是void*类型的指针,可以写入任何数据count表示要写入的字节个数。
3.4 文件读取read
read也有三个参数
fd表示文件描述符,表示要从哪一个文件读取数据buf表示要将文件中的数据读取到buf中;count表示要读取内容的长度(字节个数)。
四. 文件描述符
在open、write、read、close这些系统调用中,都使用了一个fd来指明一个文件,那这个fd到底是什么呢?
open函数如果成功打开文件则打开该文件的文件描述符,否则返回-1并且设置错误码。

4.1 什么是文件描述符
#include <stdio.h>
  #include <stdlib.h>
    #include <string.h>
      #include <sys/types.h>
        #include <sys/stat.h>
          #include <fcntl.h>
            #include <unistd.h>
              int main()
              {
              int fd = open("log.txt", O_CREAT |O_WRONLY | O_TRUNC, 0666);
              if(fd < 0){
              perror("open");
              return 1;
              }
              printf("fd: %d\n", fd);
              close(fd);
              return 0;
              }
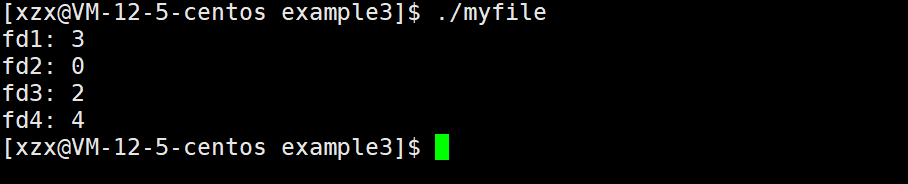
我们打开一个文件默认的文件描述符就是3,如果打开多个文件呢?
#include <stdio.h>
  #include <stdlib.h>
    #include <string.h>
      #include <sys/types.h>
        #include <sys/stat.h>
          #include <fcntl.h>
            #include <unistd.h>
              int main()
              {
              int fd1 = open("log.txt1", O_CREAT |O_WRONLY | O_TRUNC, 0666);
              int fd2 = open("log.txt2", O_CREAT |O_WRONLY | O_TRUNC, 0666);
              int fd3 = open("log.txt3", O_CREAT |O_WRONLY | O_TRUNC, 0666);
              int fd4 = open("log.txt4", O_CREAT |O_WRONLY | O_TRUNC, 0666);
              int fd5 = open("log.txt5", O_CREAT |O_WRONLY | O_TRUNC, 0666);
              if(fd1 < 0){
              perror("open");
              return 1;
              }
              if(fd2 < 0){
              perror("open");
              return 1;
              }
              if(fd3 < 0){
              perror("open");
              return 1;
              }
              if(fd4 < 0){
              perror("open");
              return 1;
              }
              if(fd5 < 0){
              perror("open");
              return 1;
              }
              printf("fd1: %d\n", fd1);
              printf("fd2: %d\n", fd2);
              printf("fd3: %d\n", fd3);
              printf("fd4: %d\n", fd4);
              printf("fd5: %d\n", fd5);
              close(fd1);
              close(fd2);
              close(fd3);
              close(fd4);
              close(fd5);
              return 0;
              }
我们可以看到这些文件的文件描述符是线性递增的。
那我们的0、1、2去哪里了呢?
在程序运行时,C语言会默认给我们打开三个文件stdin、stdout和stderr
在Linux操作系统中,进程默认情况下会有三个缺省的文件描述符(0、1、2),分别对应的就是标准输入、标准输出和标准错误
一般情况下标准输入、标准输出和标准错误对应的物理设备是键盘、显示器、显示器
总结:在进程中每打开一个文件,都会创建有相应的文件描述信息struct file,这个描述信息被添加在pcb的struct files_struct中,以数组的形式进行管理,随即向用户返回数组的下标作为文件描述符,用于操作文件。
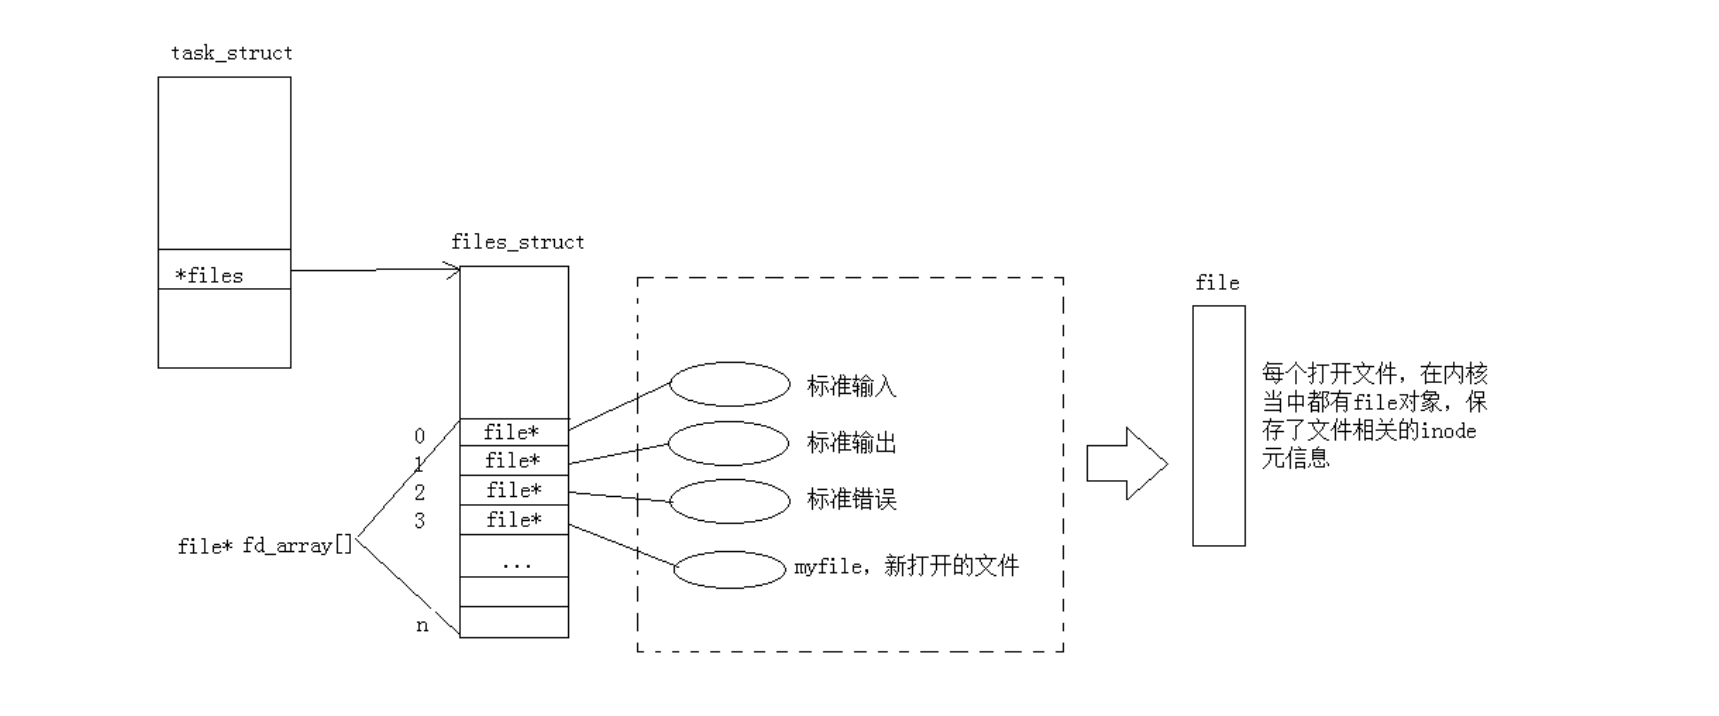
现在知道文件描述符就是从0开始的小整数。当我们打开文件时,操作系统在内存中要创建相应的数据结构来描述目标文件。于是就有了file结构体。表示一个已经打开的文件对象。而进程执行open系统调用,所以必须让进程和文件关联起来。每个进程都有一个指针*files, 指向一张表files_struct,该表最重要的部分就是包含一个指针数组,每个元素都是一个指向打开文件的指针!所以,本质上,文件描述符就是该数组的下标。所以,只要拿着文件描述符,就可以找到对应的文件。
4.2 文件描述符的分配规则
#include <stdio.h>
  #include <stdlib.h>
    #include <string.h>
      #include <sys/types.h>
        #include <sys/stat.h>
          #include <fcntl.h>
            #include <unistd.h>
              int main()
              {
              int fd1 = open("log1.txt", O_CREAT | O_WRONLY | O_TRUNC, 0666);
              if(fd1 < 0){
              perror("open");
              return 1;
              }
              printf("fd1: %d\n", fd1);
              close(0);
              close(2);
              int fd2 = open("log2.txt", O_CREAT | O_WRONLY | O_TRUNC, 0666);
              if(fd2< 0){
              perror("open");
              return 1;
              }
              printf("fd2: %d\n", fd2);
              int fd3 = open("log3.txt", O_CREAT | O_WRONLY | O_TRUNC, 0666);
              if(fd3 < 0){
              perror("open");
              return 1;
              }
              printf("fd3: %d\n", fd3);
              int fd4 = open("log4.txt", O_CREAT | O_WRONLY | O_TRUNC, 0666);
              if(fd4 < 0){
              perror("open");
              return 1;
              }
              printf("fd4: %d\n", fd4);
              return 0;
              }
文件描述符的分配规则:在files_struct数组当中,找到当前没有被使用的最小的一个下标,作为新的文件描述符。
五. 重定向
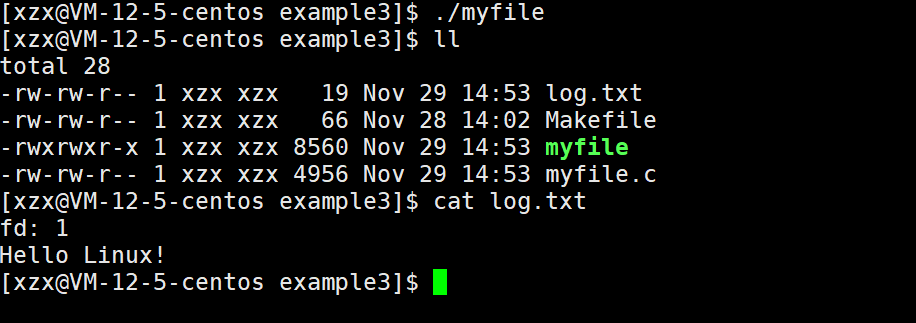
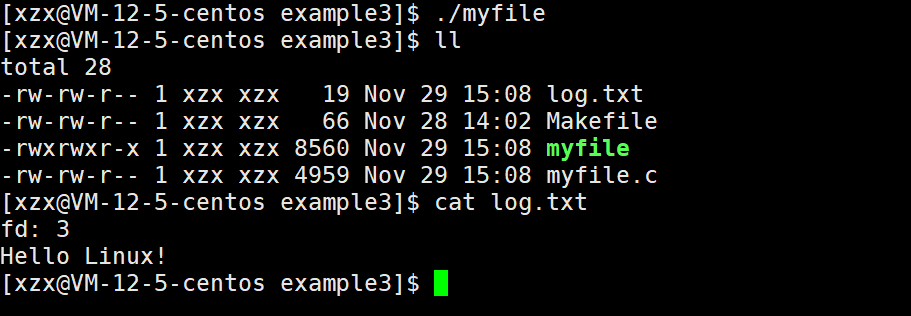
下面来看一段代码,我们关闭了标准输出流文件,然后再打开新文件,发现新文件的文件描述符是1,运行完代码发现printf打印的信息也不再显示在屏幕上了,而是在新文件log.txt中。
所以我们得出一个结论:printf函数默认去找文件描述符为1对应的文件进行打印的,也就是重定向操作了。
#include <stdio.h>
  #include <stdlib.h>
    #include <string.h>
      #include <sys/types.h>
        #include <sys/stat.h>
          #include <fcntl.h>
            #include <unistd.h>
              int main()
              {
              close(1);
              int fd = open("log.txt", O_CREAT | O_WRONLY | O_TRUNC, 0666);
              if(fd < 0){
              perror("open");
              return 1;
              }
              printf("fd: %d\n", fd);
              printf("Hello Linux!\n");
              return 0;
              }
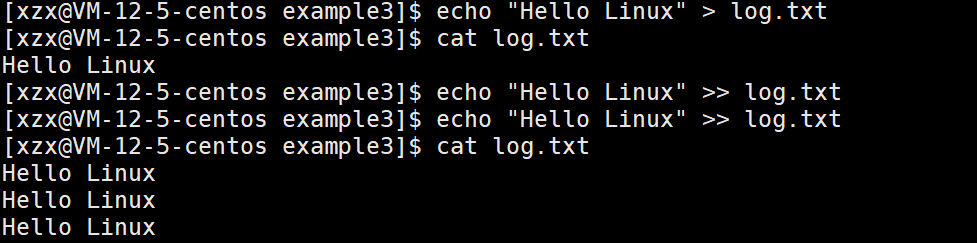
重定向又分为输出重定向>、追加重定向>>和输入重定向<
在 Linux 中,重定向(Redirection) 是指改变命令的默认输入 / 输出来源或目的地的机制。默认情况下:
命令的 标准输入(
stdin) 来自键盘(文件描述符 0);
命令的 标准输出(stdout) 输出到终端(文件描述符 1);
命令的 标准错误(stderr) 也输出到终端(文件描述符 2)。
通过重定向,可将输入 / 输出转向文件、设备或其他命令,是 Linux 中高效处理数据和自动化脚本的核心技巧。
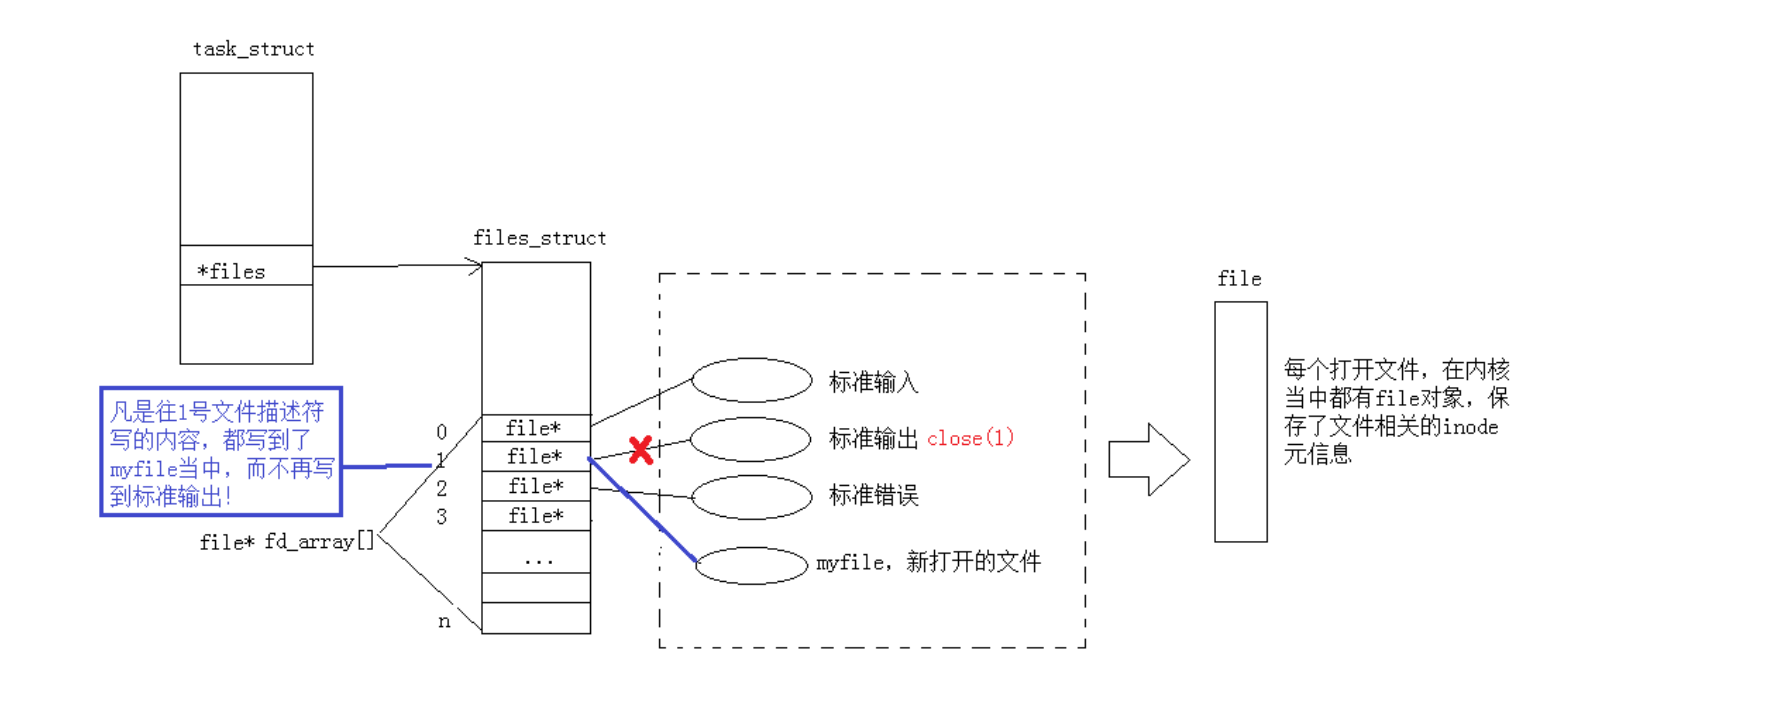
5.1 重定向的原理
每个文件描述符都是一个内核中文件描述信息数组的下标,对应有一个文件的描述信息用于操作文件,而重定向就是在不改变所操作的文件描述符的情况下,通过改变描述符对应的文件描述信息进而实现改变所操作的文件。
那么如何实现重定向?
系统调用dup2
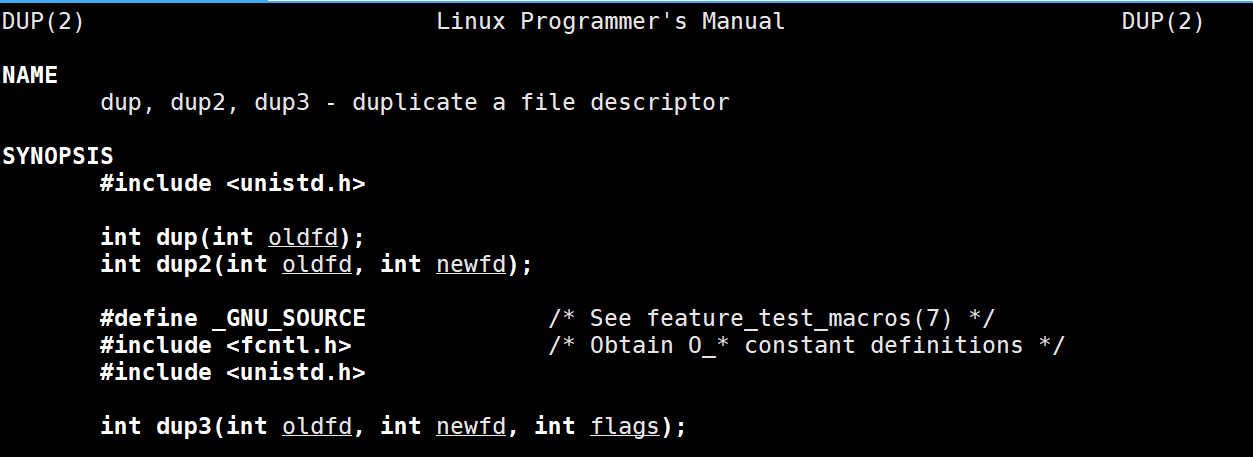
通过查看我们可以发现dup2存在两个参数:oldfd和newfd
dup2的作用就是将oldfd下标对应的文件信息指针值去覆盖newfd对应的值,这样做来达到修改fd_array数组中的指针指向。
通过查看man手册也可以发现:让newfd变成oldfd的拷贝,有必要的话就先关闭newfd指向的文件。

#include <stdio.h>
  #include <stdlib.h>
    #include <string.h>
      #include <sys/types.h>
        #include <sys/stat.h>
          #include <fcntl.h>
            #include <unistd.h>
              int main()
              {
              int fd = open("log.txt", O_CREAT | O_WRONLY | O_TRUNC, 0666);
              if(fd < 0){
              perror("open");
              return 1;
              }
              dup2(fd, 1);
              printf("fd: %d\n", fd);
              printf("Hello Linux!\n");
              return 0;
              }
5.2 重定向的本质
其本质就是将我们新文件的地址,覆盖式的填充到文件描述符1的位置(原本标准输出流文件就被关闭了)。
这样原本要输出到显示器文件的内容,就不再输出到显示器文件了,而是输出到了新文件中。
六. 理解一切皆文件
首先,在windows中是文件的东西,它们在linux中也是文件;其次一些在windows中不是文件的东西,比如进程、磁盘、显示器、键盘这样硬件设备也被抽象成了文件,你可以使用访问文件的方法访问它们获得信息;甚至管道,也是文件。
这样做最明显的好处是,开发者仅需要使用一套 API 和开发工具,即可调取 Linux 系统中绝大部分的资源。举个简单的例子,Linux 中几乎所有读(读文件,读系统状态,读PIPE)的操作都可以用read 函数来进行;几乎所有更改(更改文件,更改系统参数,写 PIPE)的操作都可以用 write 函数来进行。
之前我们讲过,当打开一个文件时,操作系统为了管理所打开的文件,都会为这个文件创建一个file结构体,值得关注的是 struct file 中的 f_op 指针指向了一个 file_operations 结构体,这个结构体中的成员除了struct module* owner 其余都是函数指针。该结构和 struct file 都在fs.h下。
file_operation 就是把系统调用和驱动程序关联起来的关键数据结构,这个结构的每一个成员都
对应着一个系统调用。读取 file_operation 中相应的函数指针,接着把控制权转交给函数,从而
完成了Linux设备驱动程序的工作。
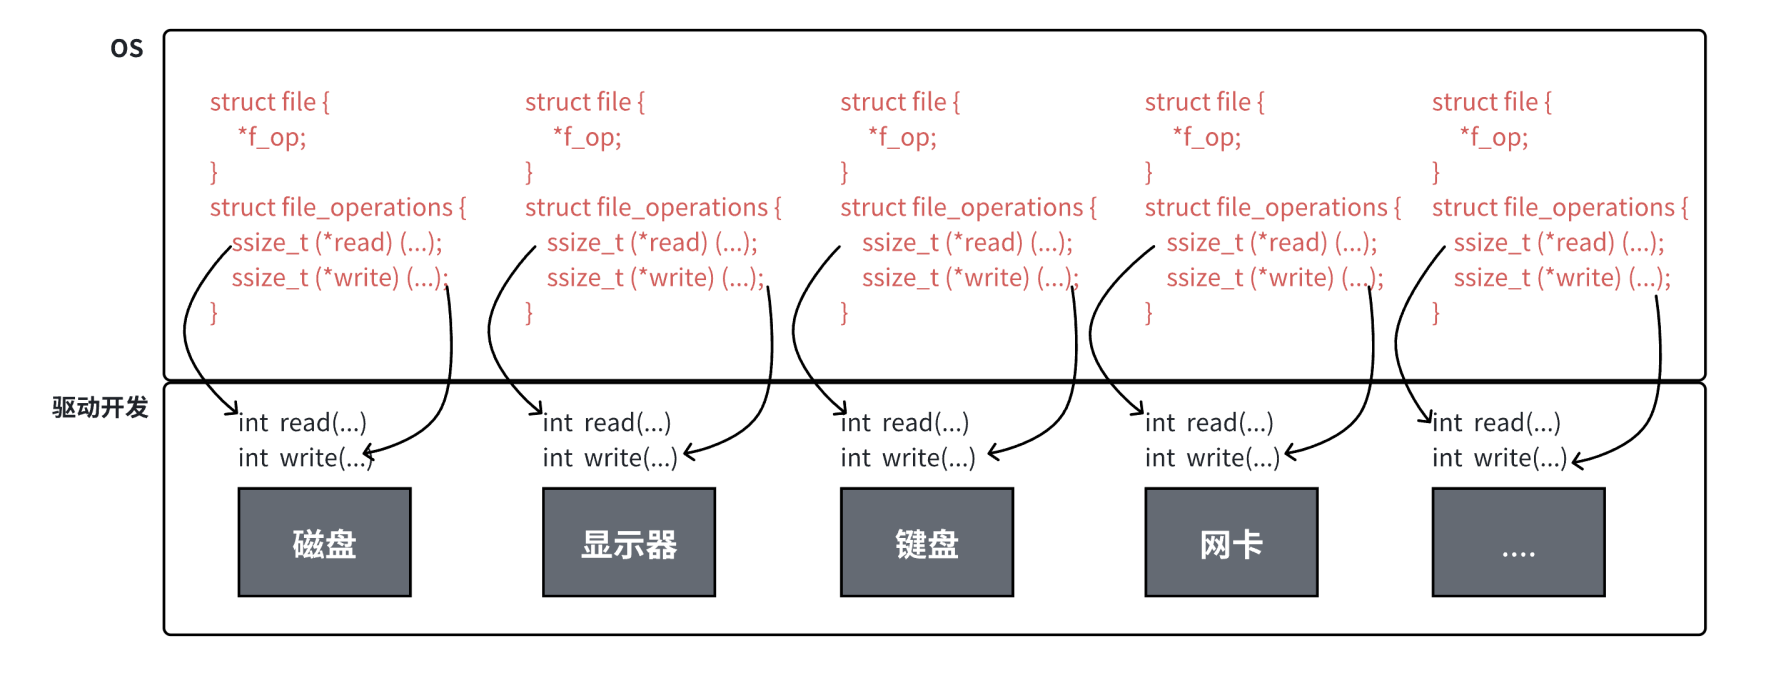
上图中的外设,每个设备都可以有自己的read、write,但一定是对应着不同的操作方法!但通过struct file 下 file_operation 中的各种函数回调,让我们开发者只用file便可调取 Linux 系统中绝大部分的资源!这便是“linux下一切皆文件”的核心理解。
七. 缓冲区
7.1 什么是缓冲区
缓冲区是内存空间的一部分。也就是说,在内存空间中预留了一定的存储空间,这些存储空间用来缓冲输入或输出的数据,这部分预留的空间就叫做缓冲区。缓冲区根据其对应的是输入设备还是输出设备,分为输入缓冲区和输出缓冲区。
7.2 为什么要引入缓冲区机制
读写文件时,如果不会开辟对文件操作的缓冲区,直接通过系统调用对磁盘进行操作(读、写等),那么每次对文件进行一次读写操作时,都需要使用读写系统调用来处理此操作,即需要执行一次系统调用,执行一次系统调用将涉及到CPU状态的切换,即从用户空间切换到内核空间,实现进程上下文的切换,这将损耗一定的CPU时间,频繁的磁盘访问对程序的执行效率造成很大的影响。
为了减少使用系统调用的次数,提高效率,我们就可以采用缓冲机制。比如我们从磁盘里取信息,可以在磁盘文件进行操作时,可以一次从文件中读出大量的数据到缓冲区中,以后对这部分的访问就不需要再使用系统调用了,等缓冲区的数据取完后再去磁盘中读取,这样就可以减少磁盘的读写数,再加上计算机对缓冲区的操作大大快于对磁盘的操作,故应用缓冲区可大大提高计算机的运行速度。
又比如,我们使用打印机打印文档,由于打印机的打印速度相对较慢,我们先把文档输出到打印机相应的缓冲区,打印机再自行逐步打印,这时我们的CPU可以处理别的事情。可以看出,缓冲区就是一块内存区,它用在输入输出设备和CPU之间,用来缓存数据。它使得低速的输入输出设备和高速的CPU能够协调工作,避免低速的输入输出设备占用CPU,解放出CPU,使其能够高效率工作。
7.3 语言级缓冲区和文件缓冲区
我们之前了解的缓冲区,它是语言层提供给我们的缓冲区。
文件缓冲区是操作系统在打开文件时会给被打开的文件分配一块缓冲区,也叫内核文件缓冲区。
我们认为把数据写入文件缓冲区就是把数据写入文件了,因为把文件缓冲区里的数据写入文件中是操作系统要做的事情,后面还会学到一个系统调用就是把文件缓冲区里的数据写入到文件当中。
我们想要把数据写入文件,有两种办法:库函数和系统调用。
库函数不会立即把数据写入文件缓冲区,而是先写到语言层的缓冲区,再通过特殊条件写到文件缓冲区。
系统调用就是把数据直接写到文件缓冲区
#include <stdio.h>
#include <stdlib.h>
#include <string.h>
#include <sys/types.h>
#include <sys/stat.h>
#include <fcntl.h>
#include <unistd.h>
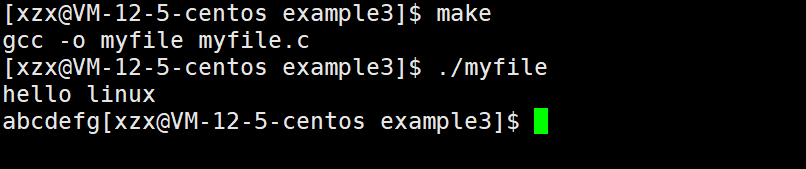
int main()
{
printf("hello linux\n");
const char* msg = "abcdefg";
write(1,msg,strlen(msg));
close(1);
return 0;
}
#include <stdio.h>
  #include <stdlib.h>
    #include <string.h>
      #include <sys/types.h>
        #include <sys/stat.h>
          #include <fcntl.h>
            #include <unistd.h>
              int main()
              {
              printf("hello linux");
              const char* msg = "abcdefg";
              write(1,msg,strlen(msg));
              close(1);
              return 0;
              }
通过上面两个代码的运行结果我们可以知道标准输出流(显示器文件)语言层缓冲区是行缓冲,遇到换行符\n就把数据写入到文件当中了,如果语言层的缓冲区一直没有被刷新,最后使用close关闭文件时,是不会刷新语言层的缓冲区的(因为close是系统调用)。
7.4 缓冲类型
标准I/O提供了3种类型的缓冲区。
- 全缓冲区:这种缓冲方式要求填满整个缓冲区后才进行I/O系统调用操作。对于磁盘文件的操作通常使用全缓冲的方式访问。
- 行缓冲区:在行缓冲情况下,当在输入和输出中遇到换行符时,标准I/O库函数将会执行系统调用操作。当所操作的流涉及一个终端时(例如标准输入和标准输出),使用行缓冲方式。因为标准I/O库每行的缓冲区长度是固定的,所以只要填满了缓冲区,即使还没有遇到换行符,也会执行I/O系统调用操作,默认行缓冲区的大小为1024。
- 无缓冲区:无缓冲区是指标准I/O库不对字符进行缓存,直接调用系统调用。标准错误流stderr通常是不带缓冲区的,这使得出错信息能够尽快地显示出来。
除了上述列举的默认刷新方式,下列特殊情况也会引发缓冲区的刷新:
- 缓冲区满时
- 强制刷新,执行
fflush语句- 进程退出
#include <stdio.h>
  #include <stdlib.h>
    #include <string.h>
      #include <sys/types.h>
        #include <sys/stat.h>
          #include <fcntl.h>
            #include <unistd.h>
              int main()
              {
              printf("hello linux");
              perror("hello world");
              close(1);
              return 0;
              }
可以看到标准错误流是没有缓冲区的,直接将错误信息打印出来了。
再看一段代码:
#include <stdio.h>
  #include <stdlib.h>
    #include <string.h>
      #include <sys/types.h>
        #include <sys/stat.h>
          #include <fcntl.h>
            #include <unistd.h>
              int main()
              {
              const char *msg0="hello printf\n";
              const char *msg1="hello fwrite\n";
              const char *msg2="hello write\n";
              printf("%s", msg0);
              fwrite(msg1, strlen(msg0), 1, stdout);
              write(1, msg2, strlen(msg2));
              fork();
              return 0;
              }
可以看到是没有任何问题的,因为再创建子进程之前就已经把缓冲区里的数据刷新到文件中了(我们向显示器文件写入数据是行缓冲)。
如果我们对标准输出流进行重定向呢?会发生什么?
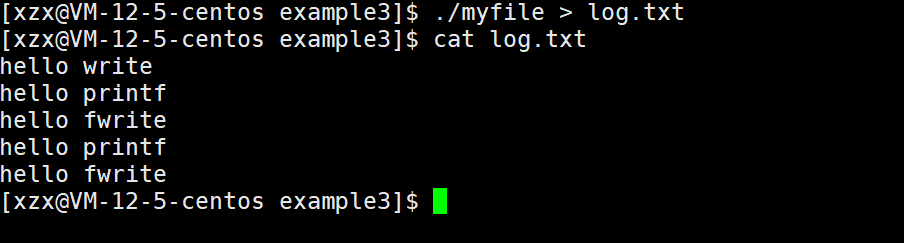
hello printf 和 hello fwrite为什么刷新了两次?
我们向普通文件写入数据是
全缓冲(缓冲区满才刷新),printf和fwrite输出的内容还在缓冲区中,当创建子进程后,父子数据会发生写时拷贝,所以当父进程准备刷新的时候,子进程也就有了同样的一份数据,随即产生两份数据,当父子进程退出时就会刷新两次缓冲区。
7.5 简单设计一下libc库
我们知道在C语言层面,我们文件操作时并不是直接使用文件描述符,而是使用FILE* 文件指针。
FILE其实就是一个结构体,它里面包含了缓冲区大小、缓冲区刷新的方式、文件描述符等等。
C语言库函数底层肯定是封装了系统调用的;而系统调用对于文件的操作只认文件描述符,所以FILE中肯定要包含文件描述符。
我们简单设计一下FILE结构体,模拟实现一下文件操作函数(主要是MyFopen、MyFclose、MyFwrite和MyFFlush):
mystdio.h
#pragma once
#include <stdio.h>
  #define MAX 1024
  #define NONE_FLUSH (1<<0)
  #define LINE_FLUSH (1<<1)
  #define FULL_FLUSH (1<<2)
  typedef struct IO_FILE
  {
  int fileno;
  int flag;
  char outbuffer[MAX];
  int bufferlen;
  int flush_method;
  }MyFile;
  MyFile* MyFopen(const char* path, const char* mode);
  void MyFclose(MyFile*);
  int MyFwrite(MyFile* , void* str, int len);
  ssize_t MyFread(void* str, size_t len, MyFile*);
  void MyFFlush(MyFile*);
mystdio.c
打开文件MyFopen
#include "mystdio.h"
#include <sys/types.h>
  #include <sys/stat.h>
    #include <fcntl.h>
      #include <stdlib.h>
        #include <unistd.h>
          #include <string.h>
            static MyFile* BuyFile(int fd, int flag)
            {
            MyFile* f = (MyFile*)malloc(sizeof(MyFile));
            if(f == NULL) return NULL;
            f->bufferlen = 0;
            f->fileno = fd;
            f->flag = flag;
            f->flush_method = LINE_FLUSH;
            memset(f->outbuffer, 0, sizeof(f->outbuffer));
            return f;
            }
            MyFile* MyFopen(const char* path, const char* mode)
            {
            int fd = -1;
            int flag = 0;
            if(strcmp(mode, "w") == 0)
            {
            flag = O_CREAT | O_WRONLY | O_TRUNC;
            fd = open(path, flag, 0666);
            }
            else if(strcmp(mode, "a") == 0)
            {
            flag = O_CREAT | O_WRONLY | O_APPEND;
            fd = open(path, flag, 0666);
            }
            else if(strcmp(mode, "r") == 0)
            {
            flag = O_RDWR;
            fd = open(path, flag);
            }
            if(fd < 0) return NULL;
            return BuyFile(fd, flag);
            }
刷新缓冲区MyFFlush
我们默认是行缓冲。
这里的缓冲区刷新,不仅可以把缓冲区里的内容写入到文件缓冲区中,还可以使用fsync函数做一下数据同步。
fsync函数的主要作用就是将文件描述符引用的文件的内核文件缓冲区里的数据传输到磁盘设备,这样可以确保即使系统崩溃或者重新启动,所有更改的信息也能保存到磁盘中。
void MyFFlush(MyFile* file)
{
if(file->bufferlen <= 0) return;
// 把数据从用户拷贝到内核文件缓冲区中
int n = write(file->fileno, file->outbuffer, file->bufferlen);
(void)n;
fsync(file->fileno);
file->bufferlen = 0;
}
文件写入MyFwrite
文件写入内容本质上就是将数据拷贝到缓冲区里。
int MyFwrite(MyFile* file, void* str, int len)
{
// 1. 拷贝
memcpy(file->outbuffer+file->bufferlen, str, len);
file->bufferlen+=len;
// 2.尝试判断是否满足刷新条件
if((file->flush_method & LINE_FLUSH) && file->outbuffer[file->bufferlen-1] == '\n')
{
MyFFlush(file);
}
return 0;
}
文件读取MyFread
底层调用read函数进行读取
ssize_t MyFread(void* str, size_t len, MyFile* file)
{
return read(file->fileno, str, len);
}
文件关闭MyFclose
关闭文件前不仅要把缓冲区里的内容刷新一次,还要释放申请的FILE结构体内存,最后使用close将指定文件的内核数据结构释放掉。
void MyFclose(MyFile* file)
{
if(file->fileno < 0) return;
MyFFlush(file);
close(file->fileno);
free(file);
}
usercode.c
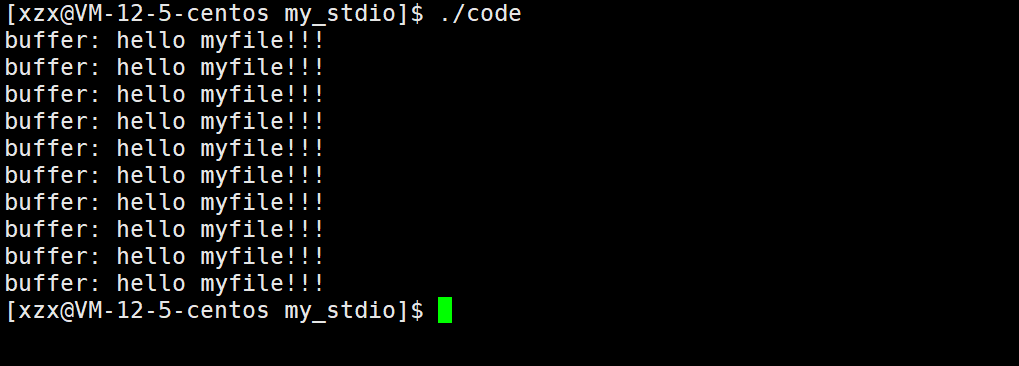
最后测试一下我们写的文件操作函数
#include "mystdio.h"
#include <string.h>
  #include <unistd.h>
    int main()
    {
    MyFile* filep = MyFopen("./log.txt", "a");
    if(!filep)
    {
    printf("fopen error!\n");
    return 1;
    }
    int cnt = 10;
    while(cnt--)
    {
    char* msg = (char*)"hello myfile!!!";
    MyFwrite(filep, msg, strlen(msg));
    MyFFlush(filep);
    printf("buffer: %s\n", filep->outbuffer);
    sleep(1);
    }
    MyFclose(filep);
    return 0;
    }
#include "mystdio.h"
#include <string.h>
  #include <unistd.h>
    int main()
    {
    MyFile* filep = MyFopen("./log.txt", "r");
    if(!filep)
    {
    printf("fopen error!\n");
    return 1;
    }
    while(1)
    {
    char buffer[128];
    memset(buffer, 0, sizeof(buffer));
    ssize_t n = MyFread(buffer, sizeof(buffer)-1, filep);
    if(n > 0) printf("%s", buffer);
    else break;
    }
    MyFclose(filep);
    return 9;
    }
最后
本篇关于基础IO的内容到这里就结束了,其中还有很多细节值得我们去探究,需要我们不断地学习。如果本篇内容对你有帮助的话就给一波三连吧,对以上内容有异议或者需要补充的,欢迎大家来讨论!

 浙公网安备 33010602011771号