

splunk大数据分析 从入门到实践
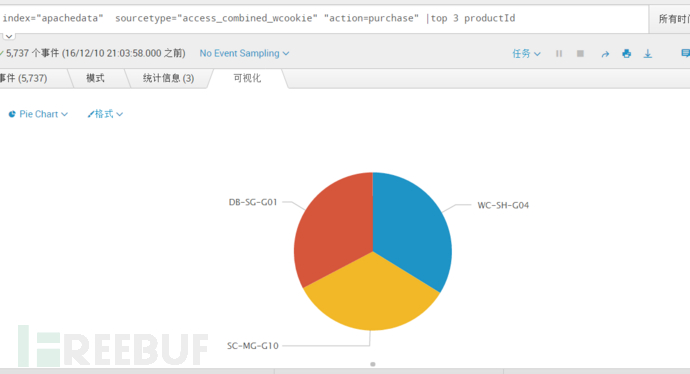
index="apachedata" sourcetype="access_combined_wcookie" "action=purchase" |top 3 productId
[/code]
<img
src="http://image.3001.net/images/20161214/14817251643980.png!small"
alt="图片"></p>
产品的购买趋势图
```code
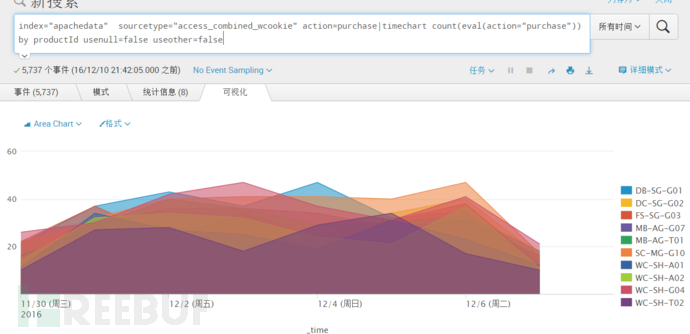
index="apachedata" sourcetype="access_combined_wcookie" action=purchase|timechart count(eval(action="purchase")) by productId
[/code]
解释:查看action=purchase,即购买成功的记录,统计这个成功购买数量的记录,并且通过productId排序显示

<img
src="http://image.3001.net/images/20161214/14817251794684.png!small"
alt="图片"></p>
改进,去除other、NULL的产品:
```code
index="apachedata" sourcetype="access_combined_wcookie" action=purchase|timechart count(eval(action="purchase")) by productId usenull=false useother=false
[/code]
<img
src="http://image.3001.net/images/20161214/14817251883186.png!small"
alt="图片"></p>
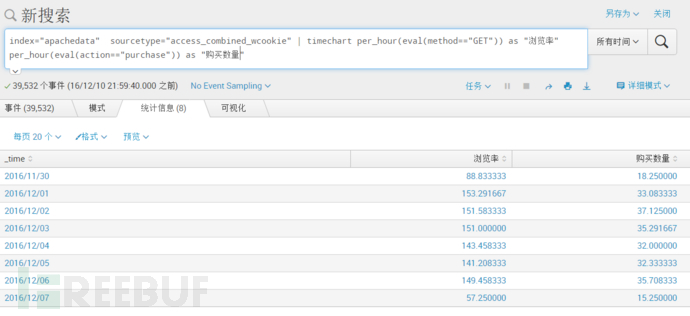
### 三、页面的浏览率与购买数量
页面浏览:method=GET
购买:action=purchase
基于时间线的对比:timechart 命令
per_hour,不同于span,是一个汇总函数,用来获取比例一致的数据
```code
index="apachedata" sourcetype="access_combined_wcookie" | timechart per_hour(eval(method=="GET")) as "浏览率" per_hour(eval(action=="purchase")) as "购买数量"
[/code]
<img
src="http://image.3001.net/images/20161214/14817251968326.png!small"
alt="图片"> </p>
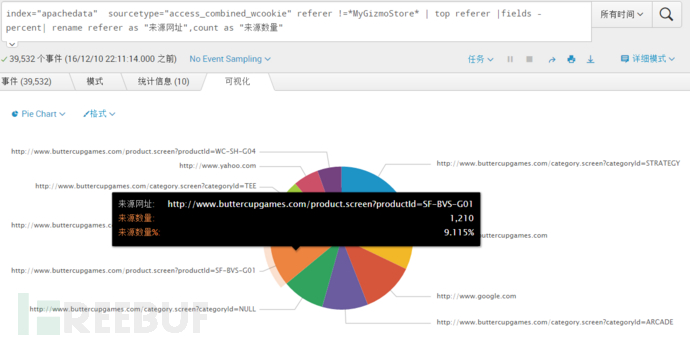
### 四、来源最多的网站
referer 字段表示来源地址,但站内地址应该排除
使用!=不等于排除某些,使用*通配符匹配
```code
index="apachedata" sourcetype="access_combined_wcookie" referer !=MyGizmoStore | top referer |fields - percent| rename referer as "来源网址",count as "来源数量"
[/code]
<img
src="http://image.3001.net/images/20161214/14817252088882.png!small"
alt="图片"></p>
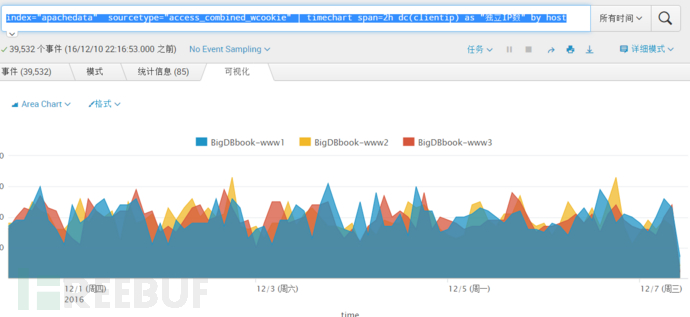
### 五、独立IP数
特定时间范围内的独立IP数
```code
index="apachedata" sourcetype="access_combined_wcookie" | timechart span=2h dc(clientip) as "独立IP数" by host
[/code]
<img
src="http://image.3001.net/images/20161214/14817252187315.png!small"
alt="图片"> </p>
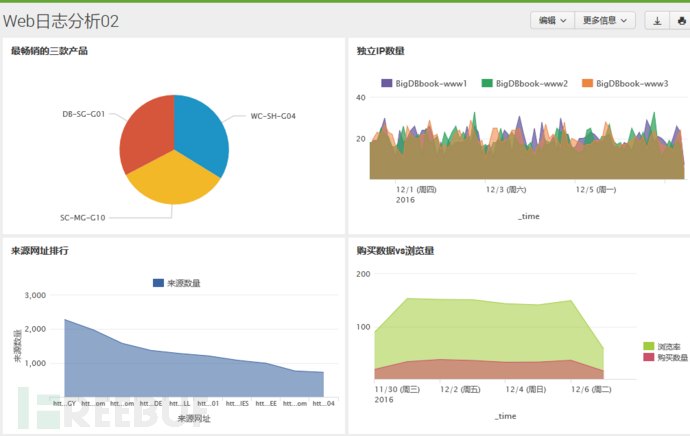
最后查看我们仪表板的布局
<img
src="http://image.3001.net/images/20161214/14817252279118.png!small"
alt="图片"> </p>
## 0×13 配置邮箱服务器
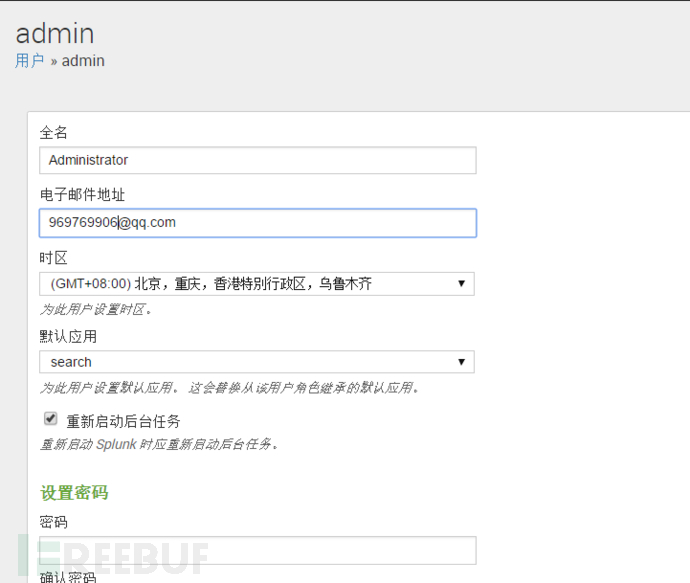
### 一、个人用户邮箱配置
设置用户邮箱:用户名->编辑用户->电子邮件地址
<img
src="http://image.3001.net/images/20161214/14817252355611.png!small"
alt="图片"></p>
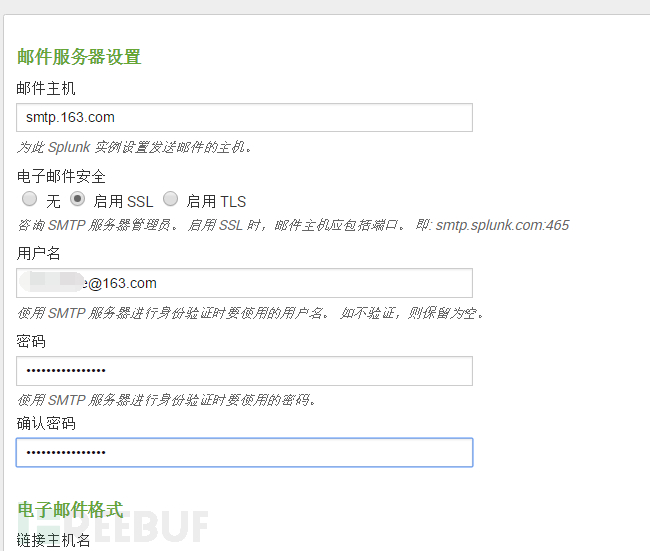
### 二、邮箱服务器配置
设置->服务器设置->电子邮件设置 ,在这里填写你发信邮箱的主机地址、用户名、密码
<img
src="http://image.3001.net/images/20161214/14817252773705.png!small"
alt="图片"></p>
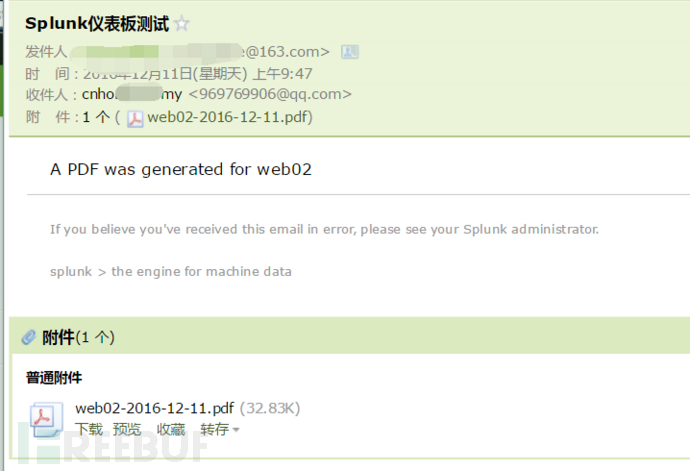
三、验证是否能正常发信
Web界面手工验证
打开Splunk→仪表板→选择某个仪表板→编辑→计划PDF交互→勾选“计划PDF”→发送邮件至“” 填写收件人地址→发送测试电子邮件
<img
src="http://image.3001.net/images/20161214/14817252936600.png!small"
alt="图片"></p>
<img
src="http://image.3001.net/images/20161214/14817253955608.png!small"
alt="图片"></p>
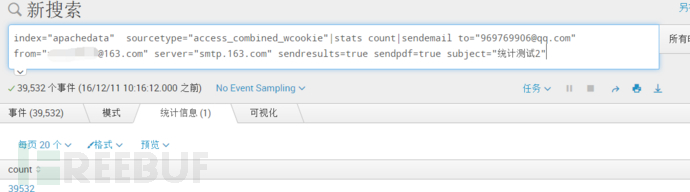
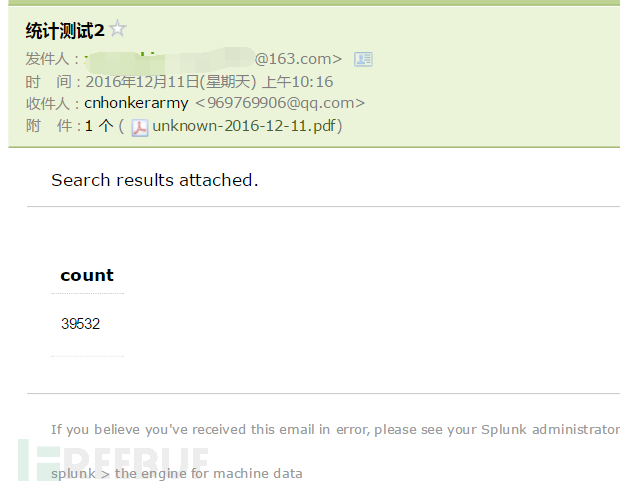
使用sendmail(SPL语言)验证邮件是否能正常发送
```code
Index=_internal | sendemail to=“收件人邮箱地址" from=“发件人邮箱地址" server=“发件服务器" subjectsendresults=true sendpdf=true
[/code]
测试:
```code
index="apachedata" sourcetype="access_combined_wcookie"|stats count|sendemail to="969769906@qq.com" from="xxxxx@163.com" server="smtp.163.com" sendresults=true sendpdf=true subject="统计测试2"
[/code]
<img
src="http://image.3001.net/images/20161214/14817254066910.png!small"
alt="图片"> </p>
<img
src="http://image.3001.net/images/20161214/14817254128221.png!small"
alt="图片"></p>
## 0×14 创建APP
### 一、在Splunk Web 中创建APP
进入Splunk Web页面→应用→管理应用。浏览更多的应用:浏览splunk
APP页面获取更多应用。从文件安装应用:是指的从Splunk的官方网站下载APP以本地文件形式安装。创建应用:则是我们自行创建的应用。

<img
src="http://image.3001.net/images/20161214/14817254225689.png!small"
alt="图片"></p>
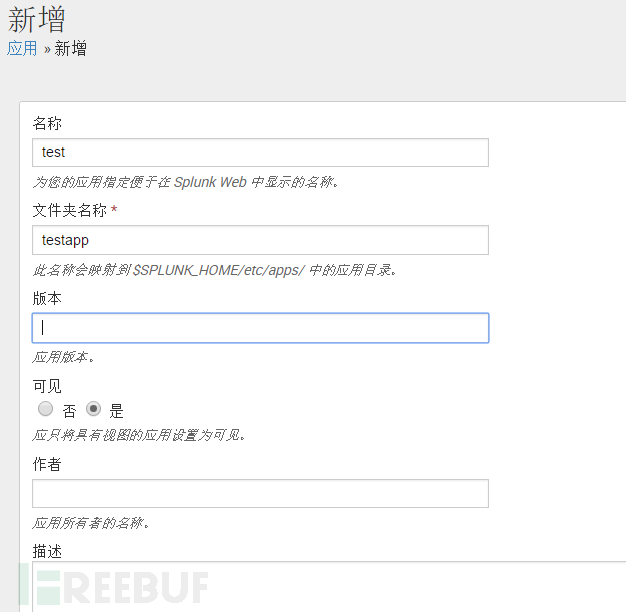
新增APP至少需要填写名称、文件夹名称,建议在创建APP的时候针对不同网络设备创建不同的APP
<img
src="http://image.3001.net/images/20161214/14817254287833.png!small"
alt="图片"></p>
创建的APP在左窗口有显示

<img
src="http://image.3001.net/images/20161214/14817254336637.png!small"
alt="图片"></p>
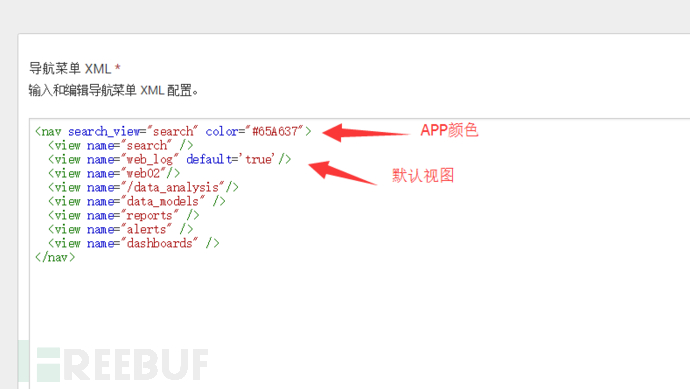
### 二、设置进入splunk首页视图、导航、颜色
选择对应的应用→用户界面→default,编辑XML配置,例如:将之前的仪表板如:web_log(即当时保存为仪表板时的字段)加入视图。
注意:每个视图的顺序配置也决定splunk应用菜单上的顺序
<img
src="http://image.3001.net/images/20161214/14817254405683.png!small"
alt="图片"></p>
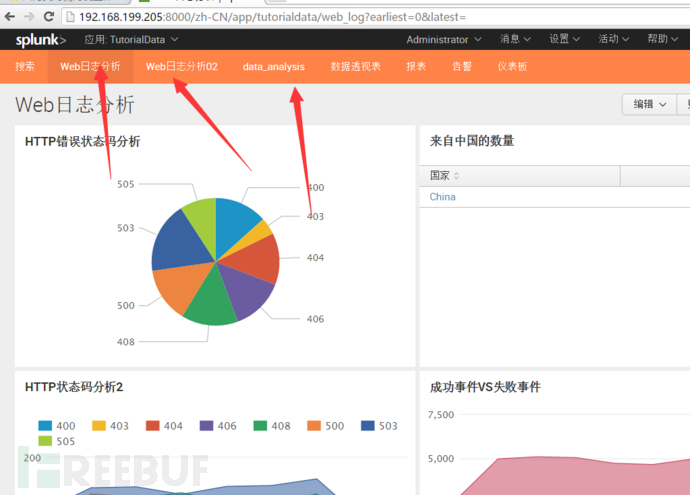
最后查看效果:
<img
src="http://image.3001.net/images/20161214/14817289876129.png!small"
alt="87.png"></font></p>
### 三、更新图标
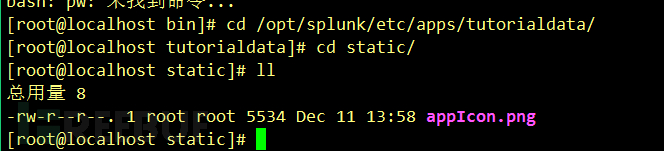
1、上传图标到相应APP的static目录中(如果没有请自行创建),如:/opt/splunk/etc/apps/tutorialdata/static
图标名称必须为:appIcon.png 36x36px
<img alt="2.png"
src="http://image.3001.net/images/20161216/14818738834141.png!small"
width="664" height="151"> </p>
2、重启splunk生效
<img alt="3.png"
src="http://image.3001.net/images/20161216/14818738896679.png!small"
width="228" height="177"> </p>
## 0×15 splunk技巧
### 一、忘记管理员密码怎么办
如果忘记管理员密码,可以重置。需要有服务器的访问权限。
方法
1)将$SPLUNK_HOME/etc/passwd文件重命名为passwd.bak

<img alt="4.png"
src="http://image.3001.net/images/20161216/14818739195477.png!small"
width="470" height="86"> </p>
2)重新启动Splunk,此时登录Splunk Web之后,所使用的密码则为初始账号密码:admin changeme
<img alt="5.png"
src="http://image.3001.net/images/20161216/14818739273065.png!small"
width="690" height="282"> </p>
二、_time时间字段的处理
格式化时间。
方法:
[/code]
```code
| eval my_time=_time | convert timeformat=“%Y-%m-%d %H:%M:%S” ctime(my_time)
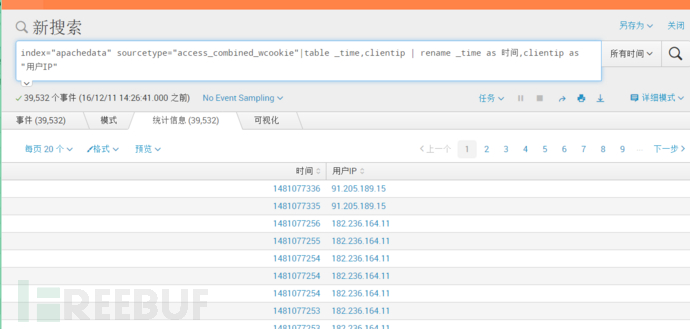
| rename my_time as “时间” index = "apachedata" sourcetype=
"access_combined_wcookie" |table _time,clientip | rename _time as
时间,clientip as "用户IP"
这种类型的搜索,所显示的时间为时间戳,为了更好地展示给用户看,我们可对该时间进行格式化。
<img alt="6.png"
src="http://image.3001.net/images/20161216/1481873974677.png!small"
width="690" height="329"> </p>
```code
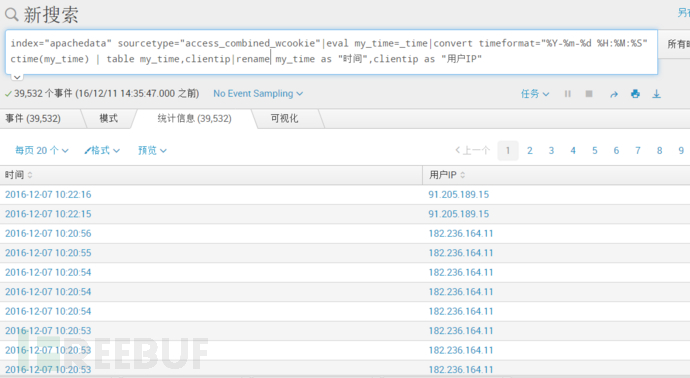
index="apachedata" sourcetype="access_combined_wcookie"|eval my_time=_time|convert timeformat="%Y-%m-%d %H:%M:%S" ctime(my_time) | table my_time,clientip|rename my_time as "时间",clientip as "用户IP"
[/code]
解释:将_time赋值给my_time,最后通过ctime进行格式化,格式为timeformat指定的格式。
<img alt="7.png"
src="http://image.3001.net/images/20161216/14818740044022.png!small"
width="690" height="378"> </p>
### 三、是否可以删除数据
我索引的部分日志事件中包含敏感信息,或日志事件有乱码,是否可以删除这些事件?
Splunk不允许对索引后的数据进行修改。但可以使用delete 命令删除数据,删除后无法检索到这些数据,但其实这些数据并未被从磁盘上删除。
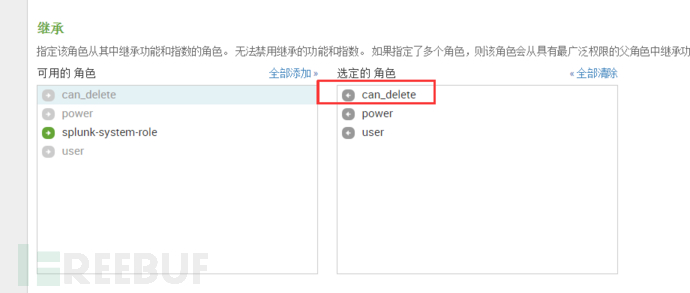
使用delete命令需要开启该角色的can_delete权限
1、 权限设置
打开→设置→访问控制→角色→角色名称:admin继承can_delete角色。
<img alt="8.png"
src="http://image.3001.net/images/20161216/1481874014309.png!small"
width="690" height="293"> </p>
2、测试删除
```code
index="apachedata" sourcetype="access_combined_wcookie" host="bigdbbook-www1"|delete
[/code]
删除bigDBbook-www1主机的日志信息,并打印出详细的删除信息

<img alt="9.png"
src="http://image.3001.net/images/20161216/14818740297091.png!small"
width="690" height="253"> </p>
四、导入后的数据乱码了,是否可以重新再导入?
导入后的数据乱码了,是否可以重新再导入?
可以。在Splunk里,称为“重新索引(reindex)”。
方法:
1)重新索引所有数据:
splunk clean eventdata-index 索引名称
2)选择性重新索引某个文件:
splunk cmdbtprobe-d
$SPLUNK_HOME/var/lib/splunk/fishbucket/splunk_private_db–file $FILE –reset


 浙公网安备 33010602011771号