
Python实现RabbitMQ6种消息模型的示例代码
RabbitMQ是一种比较流行的消息中间件,之前我一直使用redis作为消息中间件,但是生产环境比较推荐RabbitMQ来替代Redis,所以我去查询了一些RabbitMQ的资料。相比于Redis,RabbitMQ优点很多,比如:
-
具有消息消费确认机制
-
队列,消息,都可以选择是否持久化,粒度更小、更灵活。
-
可以实现负载均衡
-
异步处理:比如用户注册时的确认邮件、短信等交由rabbitMQ进行异步处理
-
应用解耦:比如收发消息双方可以使用消息队列,具有一定的缓冲功能
-
流量削峰:一般应用于秒杀活动,可以控制用户人数,也可以降低流量
-
日志处理:将info、warning、error等不同的记录分开存储
RabbitMQ消息模型
这里使用 Python 的 pika 这个库来实现RabbitMQ中常见的6种消息模型。没有的可以先安装:
pip install pika
1.单生产单消费模型:即完成基本的一对一消息转发。

# 生产者代码
import pika
credentials = pika.PlainCredentials('chuan', '123') # mq用户名和密码,没有则需要自己创建
# 虚拟队列需要指定参数 virtual_host,如果是默认的可以不填。
connection = pika.BlockingConnection(pika.ConnectionParameters(host='localhost',
port=5672,
virtual_host='/',
credentials=credentials))
# 建立rabbit协议的通道
channel = connection.channel()
# 声明消息队列,消息将在这个队列传递,如不存在,则创建。durable指定队列是否持久化
channel.queue_declare(queue='python-test', durable=False)
# message不能直接发送给queue,需经exchange到达queue,此处使用以空字符串标识的默认的exchange
# 向队列插入数值 routing_key是队列名
channel.basic_publish(exchange='',
routing_key='python-test',
body='Hello world!2')
# 关闭与rabbitmq server的连接
connection.close()
# 消费者代码
import pika
credentials = pika.PlainCredentials('chuan', '123')
# BlockingConnection:同步模式
connection = pika.BlockingConnection(pika.ConnectionParameters(host='localhost',
port=5672,
virtual_host='/',
credentials=credentials))
channel = connection.channel()
# 申明消息队列。当不确定生产者和消费者哪个先启动时,可以两边重复声明消息队列。
channel.queue_declare(queue='python-test', durable=False)
# 定义一个回调函数来处理消息队列中的消息,这里是打印出来
def callback(ch, method, properties, body):
# 手动发送确认消息
ch.basic_ack(delivery_tag=method.delivery_tag)
print(body.decode())
# 告诉生产者,消费者已收到消息
# 告诉rabbitmq,用callback来接收消息
# 默认情况下是要对消息进行确认的,以防止消息丢失。
# 此处将auto_ack明确指明为True,不对消息进行确认。
channel.basic_consume('python-test',
on_message_callback=callback)
# auto_ack=True) # 自动发送确认消息
# 开始接收信息,并进入阻塞状态,队列里有信息才会调用callback进行处理
channel.start_consuming()
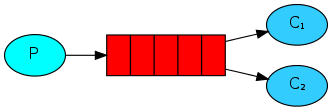
2.消息分发模型:多个收听者监听一个队列。
# 生产者代码
import pika
credentials = pika.PlainCredentials('chuan', '123') # mq用户名和密码
# 虚拟队列需要指定参数 virtual_host,如果是默认的可以不填。
connection = pika.BlockingConnection(pika.ConnectionParameters(host='localhost',
port=5672,
virtual_host='/',
credentials=credentials))
# 建立rabbit协议的通道
channel = connection.channel()
# 声明消息队列,消息将在这个队列传递,如不存在,则创建。durable指定队列是否持久化。确保没有确认的消息不会丢失
channel.queue_declare(queue='rabbitmqtest', durable=True)
# message不能直接发送给queue,需经exchange到达queue,此处使用以空字符串标识的默认的exchange
# 向队列插入数值 routing_key是队列名
# basic_publish的properties参数指定message的属性。此处delivery_mode=2指明message为持久的
for i in range(10):
channel.basic_publish(exchange='',
routing_key='python-test',
body='Hello world!%s' % i,
properties=pika.BasicProperties(delivery_mode=2))
# 关闭与rabbitmq server的连接
connection.close()
# 消费者代码,consume1与consume2
import pika
import time
credentials = pika.PlainCredentials('chuan', '123')
# BlockingConnection:同步模式
connection = pika.BlockingConnection(pika.ConnectionParameters(host='localhost',
port=5672,
virtual_host='/',
credentials=credentials))
channel = connection.channel()
# 申明消息队列。当不确定生产者和消费者哪个先启动时,可以两边重复声明消息队列。
channel.queue_declare(queue='rabbitmqtest', durable=True)
# 定义一个回调函数来处理消息队列中的消息,这里是打印出来
def callback(ch, method, properties, body):
# 手动发送确认消息
time.sleep(10)
print(body.decode())
# 告诉生产者,消费者已收到消息
ch.basic_ack(delivery_tag=method.delivery_tag)
# 如果该消费者的channel上未确认的消息数达到了prefetch_count数,则不向该消费者发送消息
channel.basic_qos(prefetch_count=1)
# 告诉rabbitmq,用callback来接收消息
# 默认情况下是要对消息进行确认的,以防止消息丢失。
# 此处将no_ack明确指明为True,不对消息进行确认。
channel.basic_consume('python-test',
on_message_callback=callback)
# auto_ack=True) # 自动发送确认消息
# 开始接收信息,并进入阻塞状态,队列里有信息才会调用callback进行处理
channel.start_consuming()
3.fanout消息订阅模式:生产者将消息发送到Exchange,Exchange再转发到与之绑定的Queue中,每个消费者再到自己的Queue中取消息。

# 生产者代码
import pika
credentials = pika.PlainCredentials('chuan', '123') # mq用户名和密码
# 虚拟队列需要指定参数 virtual_host,如果是默认的可以不填。
connection = pika.BlockingConnection(pika.ConnectionParameters(host='localhost',
port=5672,
virtual_host='/',
credentials=credentials))
# 建立rabbit协议的通道
channel = connection.channel()
# fanout: 所有绑定到此exchange的queue都可以接收消息(实时广播)
# direct: 通过routingKey和exchange决定的那一组的queue可以接收消息(有选择接受)
# topic: 所有符合routingKey(此时可以是一个表达式)的routingKey所bind的queue可以接收消息(更细致的过滤)
channel.exchange_declare('logs', exchange_type='fanout')
#因为是fanout广播类型的exchange,这里无需指定routing_key
for i in range(10):
channel.basic_publish(exchange='logs',
routing_key='',
body='Hello world!%s' % i)
# 关闭与rabbitmq server的连接
connection.close()
import pika
credentials = pika.PlainCredentials('chuan', '123')
# BlockingConnection:同步模式
connection = pika.BlockingConnection(pika.ConnectionParameters(host='localhost',
port=5672,
virtual_host='/',
credentials=credentials))
channel = connection.channel()
#作为好的习惯,在producer和consumer中分别声明一次以保证所要使用的exchange存在
channel.exchange_declare(exchange='logs',
exchange_type='fanout')
# 随机生成一个新的空的queue,将exclusive置为True,这样在consumer从RabbitMQ断开后会删除该queue
# 是排他的。
result = channel.queue_declare('', exclusive=True)
# 用于获取临时queue的name
queue_name = result.method.queue
# exchange与queue之间的关系成为binding
# binding告诉exchange将message发送该哪些queue
channel.queue_bind(exchange='logs',
queue=queue_name)
# 定义一个回调函数来处理消息队列中的消息,这里是打印出来
def callback(ch, method, properties, body):
# 手动发送确认消息
print(body.decode())
# 告诉生产者,消费者已收到消息
#ch.basic_ack(delivery_tag=method.delivery_tag)
# 如果该消费者的channel上未确认的消息数达到了prefetch_count数,则不向该消费者发送消息
channel.basic_qos(prefetch_count=1)
# 告诉rabbitmq,用callback来接收消息
# 默认情况下是要对消息进行确认的,以防止消息丢失。
# 此处将no_ack明确指明为True,不对消息进行确认。
channel.basic_consume(queue=queue_name,
on_message_callback=callback,
auto_ack=True) # 自动发送确认消息
# 开始接收信息,并进入阻塞状态,队列里有信息才会调用callback进行处理
channel.start_consuming()
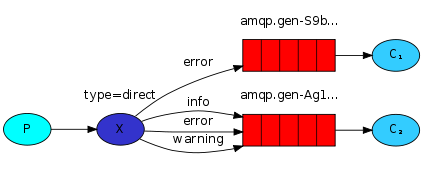
4.direct路由模式:此时生产者发送消息时需要指定RoutingKey,即路由Key,Exchange接收到消息时转发到与RoutingKey相匹配的队列中。
# 生产者代码,测试命令可以使用:python produce.py error 404error
import pika
import sys
connection = pika.BlockingConnection(pika.ConnectionParameters(host='localhost'))
channel = connection.channel()
# 声明一个名为direct_logs的direct类型的exchange
# direct类型的exchange
channel.exchange_declare(exchange='direct_logs',
exchange_type='direct')
# 从命令行获取basic_publish的配置参数
severity = sys.argv[1] if len(sys.argv) > 1 else 'info'
message = ' '.join(sys.argv[2:]) or 'Hello World!'
# 向名为direct_logs的exchage按照设置的routing_key发送message
channel.basic_publish(exchange='direct_logs',
routing_key=severity,
body=message)
print(" [x] Sent %r:%r" % (severity, message))
connection.close()
    # 消费者代码,测试可以使用:python consume.py error
    import pika
    import sys

    connection = pika.BlockingConnection(pika.ConnectionParameters(host='localhost'))
    channel = connection.channel()

    # 声明一个名为direct_logs类型为direct的exchange
    # 同时在producer和consumer中声明exchage或queue是个好习惯,以保证其存在
    channel.exchange_declare(exchange='direct_logs',
                 exchange_type='direct')

    result = channel.queue_declare('', exclusive=True)
    queue_name = result.method.queue

    # 从命令行获取参数:routing_key
    severities = sys.argv[1:]
    if not severities:
      print(sys.stderr, "Usage: %s [info] [warning] [error]" % (sys.argv[0],))
      sys.exit(1)

    for severity in severities:
      # exchange和queue之间的binding可接受routing_key参数
      # fanout类型的exchange直接忽略该参数。direct类型的exchange精确匹配该关键字进行message路由
      # 一个消费者可以绑定多个routing_key
      # Exchange就是根据这个RoutingKey和当前Exchange所有绑定的BindingKey做匹配,
      # 如果满足要求,就往BindingKey所绑定的Queue发送消息
      channel.queue_bind(exchange='direct_logs',
                queue=queue_name,
                routing_key=severity)

    def callback(ch, method, properties, body):
      print(" [x] %r:%r" % (method.routing_key, body,))


    channel.basic_consume(queue=queue_name,
               on_message_callback=callback,
               auto_ack=True)

    channel.start_consuming()
5.topic匹配模式:更细致的分组,允许在RoutingKey中使用匹配符。
-
*:匹配一个单词
-
#:匹配0个或多个单词

    # 生产者代码,基本不变,只需将exchange_type改为topic(测试:python produce.py rabbitmq.red
    # red color is my favorite
    import pika
    import sys

    connection = pika.BlockingConnection(pika.ConnectionParameters(host='localhost'))
    channel = connection.channel()

    # 声明一个名为direct_logs的direct类型的exchange
    # direct类型的exchange
    channel.exchange_declare(exchange='topic_logs',
                 exchange_type='topic')

    # 从命令行获取basic_publish的配置参数
    severity = sys.argv[1] if len(sys.argv) > 1 else 'info'
    message = ' '.join(sys.argv[2:]) or 'Hello World!'

    # 向名为direct_logs的exchange按照设置的routing_key发送message
    channel.basic_publish(exchange='topic_logs',
               routing_key=severity,
               body=message)

    print(" [x] Sent %r:%r" % (severity, message))
    connection.close()
    # 消费者代码,(测试:python consume.py *.red)
    import pika
    import sys

    connection = pika.BlockingConnection(pika.ConnectionParameters(host='localhost'))
    channel = connection.channel()

    # 声明一个名为direct_logs类型为direct的exchange
    # 同时在producer和consumer中声明exchage或queue是个好习惯,以保证其存在
    channel.exchange_declare(exchange='topic_logs',
                 exchange_type='topic')

    result = channel.queue_declare('', exclusive=True)
    queue_name = result.method.queue

    # 从命令行获取参数:routing_key
    severities = sys.argv[1:]
    if not severities:
      print(sys.stderr, "Usage: %s [info] [warning] [error]" % (sys.argv[0],))
      sys.exit(1)

    for severity in severities:
      # exchange和queue之间的binding可接受routing_key参数
      # fanout类型的exchange直接忽略该参数。direct类型的exchange精确匹配该关键字进行message路由
      # 一个消费者可以绑定多个routing_key
      # Exchange就是根据这个RoutingKey和当前Exchange所有绑定的BindingKey做匹配,
      # 如果满足要求,就往BindingKey所绑定的Queue发送消息
      channel.queue_bind(exchange='topic_logs',
                queue=queue_name,
                routing_key=severity)

    def callback(ch, method, properties, body):
      print(" [x] %r:%r" % (method.routing_key, body,))


    channel.basic_consume(queue=queue_name,
               on_message_callback=callback,
               auto_ack=True)

    channel.start_consuming()
6.RPC远程过程调用:客户端与服务器之间是完全解耦的,即两端既是消息的发送者也是接受者。

    # 生产者代码
    import pika
    import uuid


    # 在一个类中封装了connection建立、queue声明、consumer配置、回调函数等
    class FibonacciRpcClient(object):
      def __init__(self):
        # 建立到RabbitMQ Server的connection
        self.connection = pika.BlockingConnection(pika.ConnectionParameters(host='localhost'))

        self.channel = self.connection.channel()

        # 声明一个临时的回调队列
        result = self.channel.queue_declare('', exclusive=True)
        self._queue = result.method.queue

        # 此处client既是producer又是consumer,因此要配置consume参数
        # 这里的指明从client自己创建的临时队列中接收消息
        # 并使用on_response函数处理消息
        # 不对消息进行确认
        self.channel.basic_consume(queue=self._queue,
                      on_message_callback=self.on_response,
                      auto_ack=True)
        self.response = None
        self.corr_id = None

      # 定义回调函数
      # 比较类的corr_id属性与props中corr_id属性的值
      # 若相同则response属性为接收到的message
      def on_response(self, ch, method, props, body):
        if self.corr_id == props.correlation_id:
          self.response = body

      def call(self, n):
        # 初始化response和corr_id属性
        self.corr_id = str(uuid.uuid4())

        # 使用默认exchange向server中定义的rpc_queue发送消息
        # 在properties中指定replay_to属性和correlation_id属性用于告知远程server
        # correlation_id属性用于匹配request和response
        self.channel.basic_publish(exchange='',
                      routing_key='rpc_queue',
                      properties=pika.BasicProperties(
                        reply_to=self._queue,
                        correlation_id=self.corr_id,
                      ),
                      # message需为字符串
                      body=str(n))

        while self.response is None:
          self.connection.process_data_events()

        return int(self.response)


    # 生成类的实例
    fibonacci_rpc = FibonacciRpcClient()

    print(" [x] Requesting fib(30)")
    # 调用实例的call方法
    response = fibonacci_rpc.call(30)
    print(" [.] Got %r" % response)
    # 消费者代码,这里以生成斐波那契数列为例
    import pika

    # 建立到达RabbitMQ Server的connection
    connection = pika.BlockingConnection(pika.ConnectionParameters(host='localhost'))
    channel = connection.channel()

    # 声明一个名为rpc_queue的queue
    channel.queue_declare(queue='rpc_queue')

    # 计算指定数字的斐波那契数
    def fib(n):
      if n == 0:
        return 0
      elif n == 1:
        return 1
      else:
        return fib(n - 1) + fib(n - 2)

    # 回调函数,从queue接收到message后调用该函数进行处理
    def on_request(ch, method, props, body):
      # 由message获取要计算斐波那契数的数字
      n = int(body)
      print(" [.] fib(%s)" % n)
      # 调用fib函数获得计算结果
      response = fib(n)

      # exchage为空字符串则将message发送个到routing_key指定的queue
      # 这里queue为回调函数参数props中reply_ro指定的queue
      # 要发送的message为计算所得的斐波那契数
      # properties中correlation_id指定为回调函数参数props中co的rrelation_id
      # 最后对消息进行确认
      ch.basic_publish(exchange='',
               routing_key=props.reply_to,
               properties=pika.BasicProperties(correlation_id=props.correlation_id),
               body=str(response))
      ch.basic_ack(delivery_tag=method.delivery_tag)


    # 只有consumer已经处理并确认了上一条message时queue才分派新的message给它
    channel.basic_qos(prefetch_count=1)

    # 设置consumeer参数,即从哪个queue获取消息使用哪个函数进行处理,是否对消息进行确认
    channel.basic_consume(queue='rpc_queue', on_message_callback=on_request)

    print(" [x] Awaiting RPC requests")

    # 开始接收并处理消息
    channel.start_consuming()

 浙公网安备 33010602011771号