CSS
一.CSS引入方式


<div>
    <p style="color: green">我是一个段落</p>
</div>
<style type="text/css">
    /*写我们的css代码*/

    span{
    color: yellow;
    }

</style>
<link rel="stylesheet" href="./index.css">
<style type="text/css">
        @import url('./index.css');
</style>
二.CSS选择器
2.1.基本选择器
2.1.1 元素选择器
<!DOCTYPE html>
<html lang="en">
<head>
    <meta charset="UTF-8">
    <title>Title</title>
    <style>
        div{
            border: 1px solid red;
            width: 100px;
            height: 100px;
        }
    </style>
</head>
<body>
<div id="div1"></div>
</body>
</html>
2.1.2 ID选择器
<!DOCTYPE html>
<html lang="en">
<head>
    <meta charset="UTF-8">
    <title>Title</title>
    <style>
        #div1{
            border: 1px solid red;
            width: 100px;
            height: 100px;
        }
    </style>
</head>
<body>
<div id="div1"></div>
</body>
</html>
2.1.3 类选择器
<!DOCTYPE html>
<html lang="en">
<head>
    <meta charset="UTF-8">
    <title>Title</title>
    <style>
        .div1{
            border: 1px solid red;
            width: 100px;
            height: 100px;
        }
    </style>
</head>
<body>
<div class="div1"></div>
<div class="div1"></div>
</body>
</html>
2.2 组合选择器
2.2.1 后代选择器
使用 空格 表示后代选择器。顾名思义,父元素的后代(包括儿子,孙子,重孙子)
<html>
<head>
    <style>
        .div1 span{
            color: red;
        }
    </style>
</head>
<body>
<div class="div1">
    <span>span标签1</span>
    <div>
        <span>span标签2</span>
    </div>
</div>

</body>
</html>
2.2.2 儿子选择器(只找儿子)
<html>
<head>
    <style>
        .div1>span{
            color: red;
        }
    </style>
</head>
<body>
<div class="div1">
    <span>span标签1</span>
    <div>
        <span>span标签2</span>
    </div>
</div>

</body>
</html>
2.2.3 毗邻选择器
/*选择紧接着<div>元素之后的第一个<p>元素*/
div+p {
  margin: 5px;
}
2.2.4 弟弟选择器
/*i1统计后面的所有的兄弟p标签,没有前面的*/
#i1~p {
  border: 2px solid royalblue;
}
2.2.5 过滤选择器(交集选择器)
<!DOCTYPE html>
<html lang="en">
<head>
    <meta charset="UTF-8">
    <title>Title</title>
    <style>
        div.div1{
            color: red;
            width: 200px;
            height: 200px;
            border:1px solid red;
        }
    </style>
</head>
<body>
<div class="div1">
    <div class="div1">fds</div>
</div>
</body>
</html>
2.3 更多选择器
2.3.1 伪类选择器
<!DOCTYPE html>
<html lang="en">
<head>
    <meta charset="UTF-8">
    <title>Title</title>
    <style>
        a:link{    <!-- link表示没访问的a标签的样式 -->
            color: pink;
        }
        a:hover{   <!-- hover表示鼠标悬浮a标签的样式 -->
            color: rebeccapurple;
        }
        a:active{  <!-- active表示鼠标摁住时a标签的样式 -->
            color: green;
        }
        a:visited{ <!-- visited表示访问过的a标签的样式 -->
            color: red;
        }
    </style>
</head>
<body>
<div class="div1">
    <a href="http://www.jd.com">京东一下</a>
</div>
</body>
</html>
2.3.2 伪元素选择器
/*设置第一个首字母的样式*/
     p:first-letter{
            color: red;
            font-size: 30px;

        }

/* 在....之前 添加内容   这个属性使用不是很频繁 了解  使用此伪元素选择器一定要结合content属性*/
        p:before{
            content:'alex';
        }


/*在....之后 添加内容,使用非常频繁 通常与咱们后面要讲到布局 有很大的关联(清除浮动)*/
        p:after{
            content:'&';
            color: red;
            font-size: 40px;
        }
2.3.3 属性选择器
/*查找有title属性的p标签*/
p[title] {
  color: red;
}
/*查找title属性为p2的p标签*/
p[title="p2"] {
  color: green;
}


<body>
<div class="div1">
    <p title="p1">p1p1p1</p>
    <p title="p2">p2p2p2</p>
</div>
</body>
2.4 选择器优先级
一旦遇到要给同一个标签设置多个样式,此时会有重叠项,就要用到选择器的权重
行内样式 1000> id选择器 100 > 类选择器 10 > 标签选择器 1 > 继承样式 0
2.4.1 CSS两大特性:继承性和层叠性
继承性:给父级设置的属性,子类也继承(继承性是针对普通文档流的,浮动、绝对定位、固定定位不继承)
层叠性:权重大的标签覆盖掉了权重小的标签,谁的权重大,浏览器就会显示谁的属性
权重越高,对应选择器的样式会被优先显示
组合选择器,各选择器的权重相加
权重不进位,11类选择器组合到一起,也没有一个id选择器的优先级大,小就是小
默认css样式是可以继承的,继承的权重为0
权重相同的选择器,谁后写的,用谁的
<!DOCTYPE html>
<html lang="en">
<head>
    <meta charset="UTF-8">
    <title>Title</title>
    <style>
        .f2{
            background-color:red!important;
        }
    </style>
</head>
<body>
<div class="f1" style="width:500px;height:100px;background-color: yellow">
    <div class="f2" style="width: 100px;height: 50px;background-color: black"></div>
</div>
</body>
</html>
三.CSS样式
3.1 盒模型
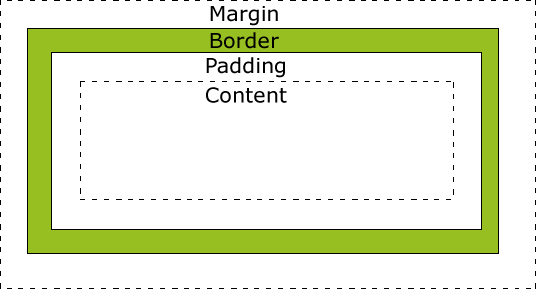
<!--width和height设置的是内容content的宽高、background-color:设置的是content和padding的颜色,盒子的大小为content的宽高+padding的宽高+border的宽高-->
<!DOCTYPE html>
<html lang="en">
<head>
    <meta charset="UTF-8">
    <title>Title</title>
    <style>
        .div1{
            width: 100px;
            height: 100px;
            background-color: rebeccapurple;
            padding: 20px;
            border: #8c222c 10px solid;
        }
    </style>
</head>
<body>
    <div class="div1"></div>
</body>
</html>
<!--宽高设置为0,border设置大一点,颜色设置3个透明-->
<!DOCTYPE html>
<html lang="en">
<head>
    <meta charset="UTF-8">
    <title>Title</title>
    <style>
        div{
            width: 0;
            height: 0;
            border-color: red transparent transparent transparent;
            border-width: 50px;
            border-style: solid;
        }
    </style>
</head>
<body>
<div></div>
</body>
</html>
3.2 块级和行内标签(内联标签)
3.2.1 块级标签
块级标签自动占一行,可设置宽高。例如:div、p标签等
3.2.2 行内标签
行内标签在一行内显示,不可设置宽高。如a、img标签等。
3.2.3 块级标签和行内标签相互转化
display:inline           /*块级--->内联*/
display:block            /*内联--->块级*/
display:inline-block   /*将标签设置为内联和块级标签共有的属性:既可在同行显示,又可设置宽高*/
3.3 浮动
标签一旦设置float,就脱离文档流。float常用的几个值:left、right、none。
3.3.1 清除浮动(解决父元素塌陷问题)
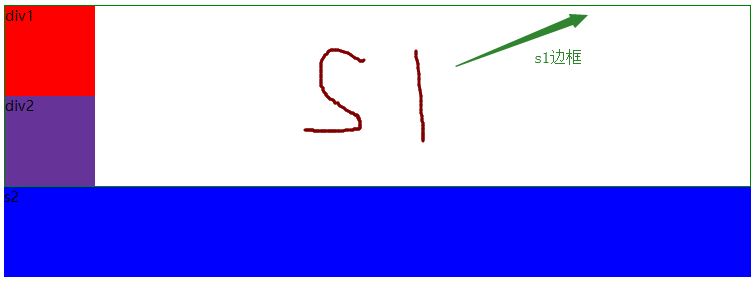
在界面中,我们一般不给父元素设置宽高,而是靠子元素撑起来,而一旦子元素设置了浮动效果,父元素就会塌陷(没有了高度),那么其他的元素就会顶上来,怎么解决这种问题??
图解1:在没有给div1和div2设置浮动前,如图
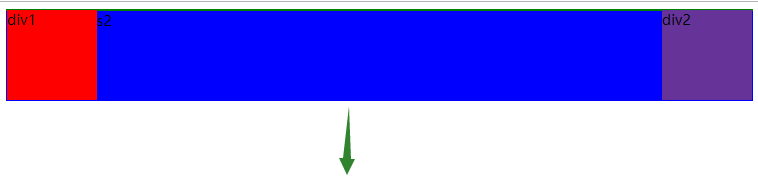
图解2:在div1、div2设置浮动之后,s2会顶上来,现在要解决的就是将s2移动下拉
图解3:设置清除浮动之后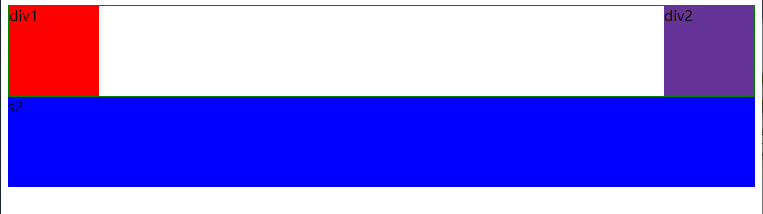
方法一:给父盒子设置高度(太low)
方法二:给顶上来的元素设置clear:both
<!DOCTYPE html>
<html lang="en">
<head>
    <meta charset="UTF-8">
    <title>Title</title>
    <style>
        .div1{
            width: 100px;
            height: 100px;
            background-color: red;
            float: left;
        }
        .div2{
            width: 100px;
            height: 100px;
            background-color: rebeccapurple;
            float: right;
        }
        .s2{
            height: 100px;
            background-color: #0000FF;
            clear: both;  /*通过字面意思知道:.s2清除两边的浮动*/
        }
    </style>
</head>
<body>
    <div class="s1">
        <div class="div1">div1</div>
        <div class="div2">div2</div>
    </div>
    <div class="s2">s2</div>

</body>
</html>
方法三:伪元素清除法(常用)
.clearfix:after{
    /*必须要写这三句话*/
    content: '.';
    clear: both;
    display: block;
}
<!DOCTYPE html>
<html lang="en">
<head>
    <meta charset="UTF-8">
    <title>Title</title>
    <style>
        .div1{
            width: 100px;
            height: 100px;
            background-color: red;
            float: left;
        }
        .div2{
            width: 100px;
            height: 100px;
            background-color: rebeccapurple;
            float: right;
        }
        .s2{
            height: 100px;
            background-color: #0000FF;
        }
        /*在clearfix后添加content:"";display:block独占一行,如果两边有浮动,就向下移动,一直移动到浮动下面为止*/
        .clearfix:after{
            content: "";
            clear: both;
            display: block;
        }
    </style>
</head>
<body>
    <div class="s1 clearfix">
        <div class="div1">div1</div>
        <div class="div2">div2</div>
    </div>
    <div class="s2">s2</div>

</body>
</html>
3.4 overflow
visible    #超出部分照样显示
hidden    #超出部分隐藏
scroll      #一旦有超出就生成滚动条
3.5 字体
<p style="font-family:arial;color:red;font-size:20px;">一个段落。</p>
<!DOCTYPE html>
<html lang="en">
<head>
    <meta charset="UTF-8">
    <title>Title</title>
    <style>
        div{
            width: 200px;
            height: 200px;
            border: 1px solid red;
            text-align: center;
            line-height:200px;
        }
    </style>
</head>
<body>
<div>
    <span>
        xxxxx
    </span>
</div>
</body>
</html>
3.6 a标签
1.超链接(target="_blank"会出现空界面)
<a href="http://www.baidu.com" target="_blank">百度</a>
2.锚
<!DOCTYPE html>
<html lang="en">
<head>
    <meta charset="UTF-8">
    <title>Title</title>
    <style>
        #div1{
        height:300px;
        background:red;
        }
        #div2{
        height:300px;
        background: yellow;
        }
        #div3{
        height:300px;
        background:green;
        }
    </style>
</head>
<body>
<div id="begin">开始</div>
<a href="#div1">第一章</a>
<a href="#div2">第二章</a>
<a href="#div3">第三章</a>
<div id="div1">第一章</div>
<a href="#begin">begin</a>
<div id="div2">第二章</div>
<a href="#begin">begin</a>
<div id="div3">第三章</div>
<a href="#begin">begin</a>
</body>
</html>

去除a标签的下划线
text-decoration: none;
3.7 position定位
1.position:static   无定位
2.position:relative   相对于自己原来的位置进行移动,原来的空间还占着
3.position:absolute  从下往上找,直到有设置了非static属性的定位,相对其进行移动,原来的空间没有了
4.position:fixed  根据浏览器窗口进行定位

#所有元素的定位,都是根据top、left、right、bottom来移动。
3.8 z-index设置层级
3.8.1 z-index
1.z-index值大的压着值小的。
2.只有定位了的元素(相对定位relative、绝对定位absolute、固定定位fixed)才能使用z-index,float元素不能使用。
3.父级设置z-index小,那么子级再牛逼也没用。
3.8.2 应用(模态对话框)
<!DOCTYPE html>
<html lang="en">
<head>
    <meta charset="UTF-8">
    <title>Title</title>
    <style>
        .c1{
            width: 100px;
            height: 100px;
            background-color: rgba(255,0,0,0.3);
        }
        .c2{
            width: 100px;
            height: 100px;
            /*background-color: rgba(255,0,0,0.3);*/
            background-color: rgb(255,0,0);
            opacity: 0.3; /* 0-1之间的数字,这是设置整个标签的透明底 */
        }
    </style>
</head>
<body>
<div class="c1">div1</div>
<hr>
<div class="c2">div2</div>
</body>
</html>
<!DOCTYPE html>
<html lang="en">
<head>
    <meta charset="UTF-8">
    <title>Title</title>
    <style>
        .hide{
            position:fixed;
            top:0;
            left:0;
            right:0;
            bottom:0;
            background-color:pink;
            opacity:0.6;      //透明度
            z-index:99;
        }
        .modal{
            position:fixed;
            top:50%;
            left:50%;
            width:500px;
            height:500px;
            margin-top:-250px;
            margin-left:-250px;
            background-color: red;
            z-index:100;     //优先级大于.hide的,所以显示在.hide上面
        }
    </style>
</head>
<body>
<button onclick="func()" style="width: 100px;height: 10px;"></button>
<div class="hide" style="display: none"></div>
<div class="modal" style="display: none"></div>
<script>
    function func() {
        div1 = document.getElementsByTagName("div")[0];
        div1.removeAttribute("style","display","none");
        div2 = document.getElementsByTagName("div")[1];
        div2.removeAttribute("style","display","none");
    }
</script>
</body>
</html>
五.例子
1.top和margin-top的区别:只有设置了position的元素才能使用top
2.适配:标签宽度尽量不要百分比,要准确值
3.模态对话框:遮罩层设置top、left..都为0,且position设置为fixed,就是为了遮住整个屏幕,此时滚动条还能上下滑动,但整个屏幕是被挡住的。
4.ul中的li标签距离左边还有距离:
ul{
   list-style: none;
   margin:0;
   padding:0;
   -webkit-padding-start:0;
}
5.隐藏标签
display:none   隐藏标签,不占原来的位置
visibility:hidden  原来的位置还占着
6.document.body.contentEditable=true  设置网页可编辑
7.input框text框和submit按钮高度不能对齐:改变字体大小
<!DOCTYPE html>
<html lang="en">
<head>
    <meta charset="UTF-8">
    <title>Title</title>
    <style>
        .hide{
            position:fixed;
            top:0;
            left:0;
            right:0;
            bottom:0;
            background-color:pink;
            opacity:0.6;      //透明度
            z-index:99;
        }
        .modal{
            position:fixed;
            top:50%;
            left:50%;
            width:500px;
            height:500px;
            margin-top:-250px;
            margin-left:-250px;
            background-color: red;
            z-index:100;     //优先级大于.hide的,所以显示在.hide上面
        }
    </style>
</head>
<body>
<button onclick="func()" style="width: 100px;height: 10px;"></button>
<div class="hide" style="display: none"></div>
<div class="modal" style="display: none"></div>
<script>
    function func() {
        div1 = document.getElementsByTagName("div")[0];
        div1.removeAttribute("style","display","none");
        div2 = document.getElementsByTagName("div")[1];
        div2.removeAttribute("style","display","none");
    }
</script>
</body>
</html>

模态对话框
<body>
    <select name="choice" id="choice" multiple>
        <option value="1">属性</option>
        <option value="2">运维</option>
        <option value="3">网络</option>
        <option value="5">电脑</option>
    </select>
    <input type="button" value="提交" id="submit">
    <script>
        $("#submit").click(function(){
            option=$("#choice option:selected");
            //alert(option.text());             //获取当前标签的文本内容
            //alert(option[0].value);           //获取当前标签的value属性值
        });
    </script>
</body>


select标签的DOM对象中有selectedOptions,获取的是已经选中的option标签
var options=$("#xx")[0].selectedOptions;
div{
            position: relative;
            width: 400px;
            height: 400px;
            border: 1px solid #000;
        }
        img{
            position: absolute;
            top:50%;
            left:50%;
            transform: translate(-50%,-50%);
        }

 浙公网安备 33010602011771号