Flask源码剖析
一.了解wsgi
1.1 依赖wsgi Werkzeug反推
在flask中,app.run()启动服务,内部调用的就是werkzeug的run_simple()方法,在此反推如下
from werkzeug.serving import run_simple

def app(environ,response):
    """
    :param environ: 请求体信息
    :param response: 要回应的信息
    :return:
    """
    print("请求来了..")


if __name__ == '__main__':
    run_simple("127.0.0.1",4000,app)
延伸,慢慢向flask发展,定义Flask类,实例化对象app,那么当有请求进来的时候,会执行app.__call__方法
from werkzeug.serving import run_simple

class Flask(object):
    def __call__():
        return "xx"
app = Flask()

if __name__ == '__main__':
    run_simple("127.0.0.1",4000,app)
再次延申,Flask中定义run方法,执行run_simple()方法
from werkzeug.serving import run_simple

class Flask(object):
    def __call__():
        return "xx"
    def run(self):
        run_simple("127.0.0.1",5000,self)
app = Flask()

if __name__ == '__main__':
    app.run()
flask简,至此我们就知道当有请求进来,执行app()就会执行app.__call__()方法
from flask import Flask

app = Flask()

if __name__ == '__main__':
    app.run()
1.3 源码流程
首先,我们知道,当有请求进来时,会执行app的__call__方法,一步一步走
    def __call__(self, environ, start_response):
        """The WSGI server calls the Flask application object as the
        WSGI application. This calls :meth:`wsgi_app` which can be
        wrapped to applying middleware."""
        return self.wsgi_app(environ, start_response)  #1.返回wsgi_app对象
    def wsgi_app(self, environ, start_response):

        ctx = self.request_context(environ)
        error = None
        try:
            try:
                ctx.push()
                response = self.full_dispatch_request() #2.执行对象的full_dispatch_request()
            except Exception as e:
                error = e
                response = self.handle_exception(e)
            except:  # noqa: B001
                error = sys.exc_info()[1]
                raise
            return response(environ, start_response)
        finally:
            if self.should_ignore_error(error):
                error = None
            ctx.auto_pop(error)
    def full_dispatch_request(self):
        """Dispatches the request and on top of that performs request
        pre and postprocessing as well as HTTP exception catching and
        error handling.

        .. versionadded:: 0.7
        """
        self.try_trigger_before_first_request_functions()
        try:
            request_started.send(self)
            rv = self.preprocess_request()
            if rv is None:
                rv = self.dispatch_request()
        except Exception as e:
            rv = self.handle_user_exception(e)
        return self.finalize_request(rv)  #3.返回对象的finalize_request(rv) 注意rv是要返回的response
    def finalize_request(self, rv, from_error_handler=False):

        response = self.make_response(rv)
        try:
            response = self.process_response(response)
            request_finished.send(self, response=response)
        except Exception:
            if not from_error_handler:
                raise
            self.logger.exception(
                "Request finalizing failed with an error while handling an error"
            )
        return response  #4.返回response对象,再往后找会找到Response类,是继承flask.wrappers的
至此,我有个疑问,werkzeug不依赖flask,自己可以实现一个网络请求吗?经过查询,答案得到是肯定的,flask中的response是继承自werkzeug的BaseResponse的
from werkzeug.serving import run_simple
from werkzeug.wrappers import BaseResponse
def fun(environ,start_response):
    print("请求来了")
    response = BaseResponse("你好")
    return response(environ,start_response)
if __name__ == "__main__":
    run_simple("127.0.0.1",5000,fun)
1.3 总结
1.flask框架基于werkaeug的wsgi实现,flask自己没有wsgi
2.用户请求一旦过来,就会执行app.__call__()方法
二.Flask路由
先来一简单例子
from flask import Flask
app = Flask(__name__,template_folder="templates",static_folder="static")

@app.route("/index")  #1.执行f=app.route("/index"),得到@f装饰
def index():
    return render_template("index.html")

@app.route("/login")
def login():
    return render_template("login.html")

if __name__ == "__main__":
    app.run()
2.1 源码流程
第一步:执行app.route(),返回decorator函数
    def route(self, rule, **options):
        def decorator(f):
            endpoint = options.pop("endpoint", None)
            self.add_url_rule(rule, endpoint, f, **options)
            return f
        return decorator
那么原来的视图就变成如下
@decorator
def index():
    return render_template("index.html")
此时又调用decorator,将index传入,执行add_url_rule(rule,endpoint,index,**options)
    def add_url_rule(
        self,
        rule,   #路由
        endpoint=None,
        view_func=None,
        provide_automatic_options=None,
        **options
    ):

        if endpoint is None:
            endpoint = _endpoint_from_view_func(view_func)
        options["endpoint"] = endpoint
        methods = options.pop("methods", None)

        if methods is None:
            methods = getattr(view_func, "methods", None) or ("GET",) #如果method为None,默认get请求
        if isinstance(methods, string_types):
            raise TypeError(
                "Allowed methods have to be iterables of strings, "
                'for example: @app.route(..., methods=["POST"])'
            )
        methods = set(item.upper() for item in methods)

        # Methods that should always be added
        required_methods = set(getattr(view_func, "required_methods", ()))

        if provide_automatic_options is None:
            provide_automatic_options = getattr(
                view_func, "provide_automatic_options", None
            )

        if provide_automatic_options is None:
            if "OPTIONS" not in methods:
                provide_automatic_options = True
                required_methods.add("OPTIONS")
            else:
                provide_automatic_options = False

        # Add the required methods now.
        methods |= required_methods
 	    # 将路由和函数的对应关系放在rule对象中
        rule = self.url_rule_class(rule, methods=methods, **options) #options是函数
        rule.provide_automatic_options = provide_automatic_options

        self.url_map.add(rule) #此处重要:url_map是app对象,将rule对象封装在url_map中
        if view_func is not None:
            old_func = self.view_functions.get(endpoint)
            if old_func is not None and old_func != view_func:
                raise AssertionError(
                    "View function mapping is overwriting an "
                    "existing endpoint function: %s" % endpoint
                )
            self.view_functions[endpoint] = view_func
2.2 总结
1.将url和函数打包成rule对象
2.将rule对象添加到map对象中
3.app.url_map = map对象
当有url请求发来时,会去url_map对象中遍历寻找对应关系,如果找到,会执行对应的函数
三.Flask上下文管理
通过Threading的local实现的本地存储隔离
3.1 自定义threading.local
python内部提供的为每个线程开辟一块空间存储值
"""
storage = {
"线程id1":{"x1",1},
"线程id2":{"x1",2}
"线程id3":{"x1",3}
}
"""
import threading
class Local(object):
    def __init__(self):
        object.__setattr__(self,"storage",{})
    def __setattr__(self, key, value):
        ident = threading.get_ident()  #获取线程id
        if ident not in self.storage:
            self.storage[ident][key] = value
        else:
            self.storage[ident] = {key:value}
    def __getattr__(self, item):
        ident = threading.get_ident()
        if ident not in self.storage:
            return
        return self.storage[ident].get(item)
obj = Local() #执行__init__()方法,obj.storage={}
# print(obj.storage)
def task(i):
    obj.x1 = i    #执行obj.__setattr__()方法
    print(obj.x1)  #执行obj.__getattr__()方法
if __name__ == '__main__':

    for i in range(5):
        t = threading.Thread(target=task,args=(i,))
        t.start()
3.2 加强版threading.local,维护数据结构-栈
"""
storage = {
"线程id1":{"x1",[]},
"线程id2":{"x1",[]}
"线程id3":{"x1",[]}
}
"""
import threading
class Local(object):
    def __init__(self):
        object.__setattr__(self,"storage",{})
    def __setattr__(self, key, value):
        ident = threading.get_ident()  #获取线程id
        if ident not in self.storage:
            self.storage[ident][key].append(value)
        else:
            self.storage[ident] = {key:[value]}
    def __getattr__(self, item):
        ident = threading.get_ident()
        if ident not in self.storage:
            return
        return self.storage[ident][item][-1]
obj = Local() #执行__init__()方法,obj.storage={}
# print(obj.storage)
def task(i):
    obj.x1 = i    #执行obj.__setattr__()方法
    print(obj.x1)  #执行obj.__getattr__()方法
if __name__ == '__main__':

    for i in range(5):
        t = threading.Thread(target=task,args=(i,))
        t.start()
3.3 Flask关于local的源码实现
Local类帮助线程开辟空间并存储值,比threading.local更牛逼,支持协程
from flask import globals
1.进入globals
2._request_ctx_stack = LocalStack()
3.def __init__(self):
   	self._local = Local()
4.class Local(object):
    __slots__ = ("__storage__", "__ident_func__")  #面向对象中只能通过__storage__.__ident_func__方法

    def __init__(self):
        object.__setattr__(self, "__storage__", {})
        object.__setattr__(self, "__ident_func__", get_ident)

    def __iter__(self):
        return iter(self.__storage__.items())

    def __call__(self, proxy):
        """Create a proxy for a name."""
        return LocalProxy(self, proxy)

    def __release_local__(self):
        self.__storage__.pop(self.__ident_func__(), None)

    def __getattr__(self, name):
        try:
            return self.__storage__[self.__ident_func__()][name]
        except KeyError:
            raise AttributeError(name)

    def __setattr__(self, name, value):
        ident = self.__ident_func__()
        storage = self.__storage__
        try:
            storage[ident][name] = value
        except KeyError:
            storage[ident] = {name: value}

    def __delattr__(self, name):
        try:
            del self.__storage__[self.__ident_func__()][name]
        except KeyError:
            raise AttributeError(name)
local = Local()调用Local类,这里可以看出,和我们写的自定义threading.local几乎相同,都是定义数据结构storage={key,value}源码这么low?不可能的,接下来看LocalStack类,定义数据结构storage={key:[value,]}将local对象封装进去,因为LocalStack中我们只需要关注3个方法:push、pop、top,通过操作将值存储在local对象中
3.4 Flask关于LocalStack源码实现
class LocalStack(object):

    def __init__(self):
        self._local = Local()
    def push(self, obj):
        """Pushes a new item to the stack"""
        rv = getattr(self._local, "stack", None)
        if rv is None:
            self._local.stack = rv = []   #此处定义数据结构storage={key:[value]}
        rv.append(obj)
        return rv

    def pop(self):
        """Removes the topmost item from the stack, will return the
        old value or `None` if the stack was already empty.
        """
        stack = getattr(self._local, "stack", None)
        if stack is None:
            return None
        elif len(stack) == 1:
            release_local(self._local)
            return stack[-1]
        else:
            return stack.pop()

    @property
    def top(self):
        """The topmost item on the stack.  If the stack is empty,
        `None` is returned.
        """
        try:
            return self._local.stack[-1]
        except (AttributeError, IndexError):
            return None
此时定义对象local2 = LocalStack(),会初始化__init__,将获取Local类的对象
local2 = LocalStack()
local2.push("xx")   #storage = {"stack":["xx"]}
3.5 源码总结
在flask中有个Local类,和threading.local的功能一样,为每个线程开辟空间进行存储数据,他们两个的内部实现机制相同,都是维护一个字典,以线程id为key,来进行数据的隔离,如:
"""
storage = {
	"线程id1":{"x1",123},
}
"""
obj = Local()
obj.k1 = 123

在flask中有个LocalStack类,内部依赖Local对象,Local对象负责存储数据,而LocalStack对象负责将Local中的值维护成一个栈,如
"""
__storage__={
	1211:{"stack":["k1"]}
}
"""
obj = LocalStack()
obj.push("k1") #生成如上数据结构
还可通过obj.top取出k1值,通过obj.pop取出栈顶值
3.6.Flask源码整体概要
from flask import globals
进入global可看到下面两个实例
每次请求进来,将request和session对象存储在_request_ctx_stack中,将app对象存储在_app_ctx_stack中
_request_ctx_stack = LocalStack()
_app_ctx_stack = LocalStack()
由此可知:上下文管理分为两部分
1.请求上下文管理
2.应用上下文管理
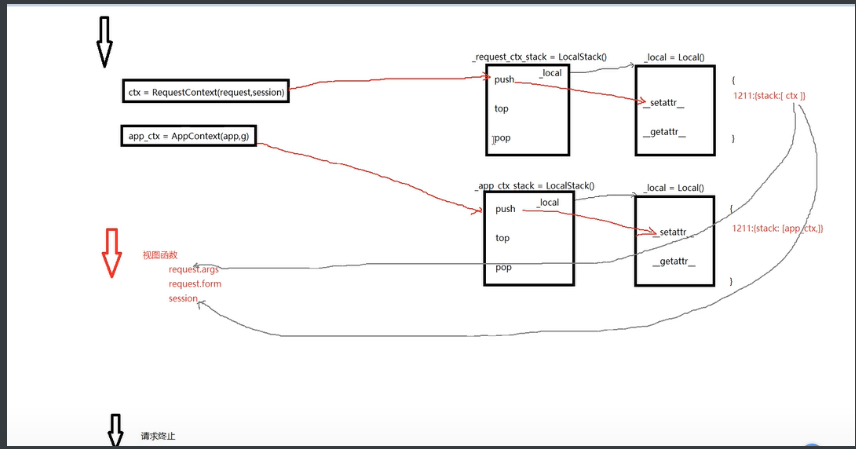
当有请求进来,
1.执行LocalStack中的push方法:将request对象存储在_request_ctx_stack中, 将app对象存储在_app_ctx_stack中
2.到视图时,执行LocalStack中的top方法:获取_request_ctx_stack和_app_ctx_stack对象。
3.视图执行完,会执行pop方法,将内存空间删除
四.Flask源码整体实现
先来例子:
from flask import Flask
app = Flask(__name__)
app.config.from_object("xx.xx")
if __name__ == "__main__":
    app.run()
4.1项目启动
- 实例化对象
app = Flask(__name__)
#执行Flask的__init__方法
1. 对app对象封装一些初始化的值。
	app.static_url_path
	app.static_folder
	app.template_folder
	app.view_functions = {}
2. 添加静态文件的路由
    self.add_url_rule(
        self.static_url_path + "/<path:filename>",
        endpoint="static",
        host=static_host,
        view_func=self.send_static_file,
        )

3. 实例化了url_map的对象,以后在map对象中放 【/index/ 函数的对象应观】
    class Flask(object):
        url_rule_class = Rule
        url_map_class = Map

        def __init__(self...):
            self.static_url_path
            self.static_folder
            self.template_folder
            self.view_functions = {}
            self.url_map = self.url_map_class()
    app = Flask()
    app.view_functions
app.url_rule_class
- 加载配置文件
app.config.from_object("xx.xx")
1.读取配置文件中所有键值对,并将将之对全部放在Config对象(config是一个字典)
2.把包含所有配置文件的Config对啊ing,赋值给app.config
- 添加路由映射
@app.route("/index")
def index():
    return "hello world"
源码简单看:
rule = self.url_rule_class(rule, methods=methods, **options) ###1
rule.provide_automatic_options = provide_automatic_options

self.url_map.add(rule) ###2
if view_func is not None:
    old_func = self.view_functions.get(endpoint)
    if old_func is not None and old_func != view_func:
        raise AssertionError(
            "View function mapping is overwriting an "
            "existing endpoint function: %s" % endpoint
        )
        self.view_functions[endpoint] = view_func ###3
1.将url=/index和method=["GET","POST"]和endpoint="index"封装到Rule对象中
2.将Rule对象添加到app.url_map中
3.把endpoint和函数的对应关系放到app.view_function中

#当有url请求过来,会先从url_map中一一匹配,匹配成功了,返回endpoint,再根据endpoint找视图函数
- 运行flask
app.run()
1.内部调用werkzeug的run_simple,内部创建socket,监听ip和端口,等待请求过来
2.一旦有请求过来,run_simple中self参数+括号,执行app.__call__方法
class Flask:
    def __call__():
        pass
    def run(self):
		run_simple(host,port,self,**options)
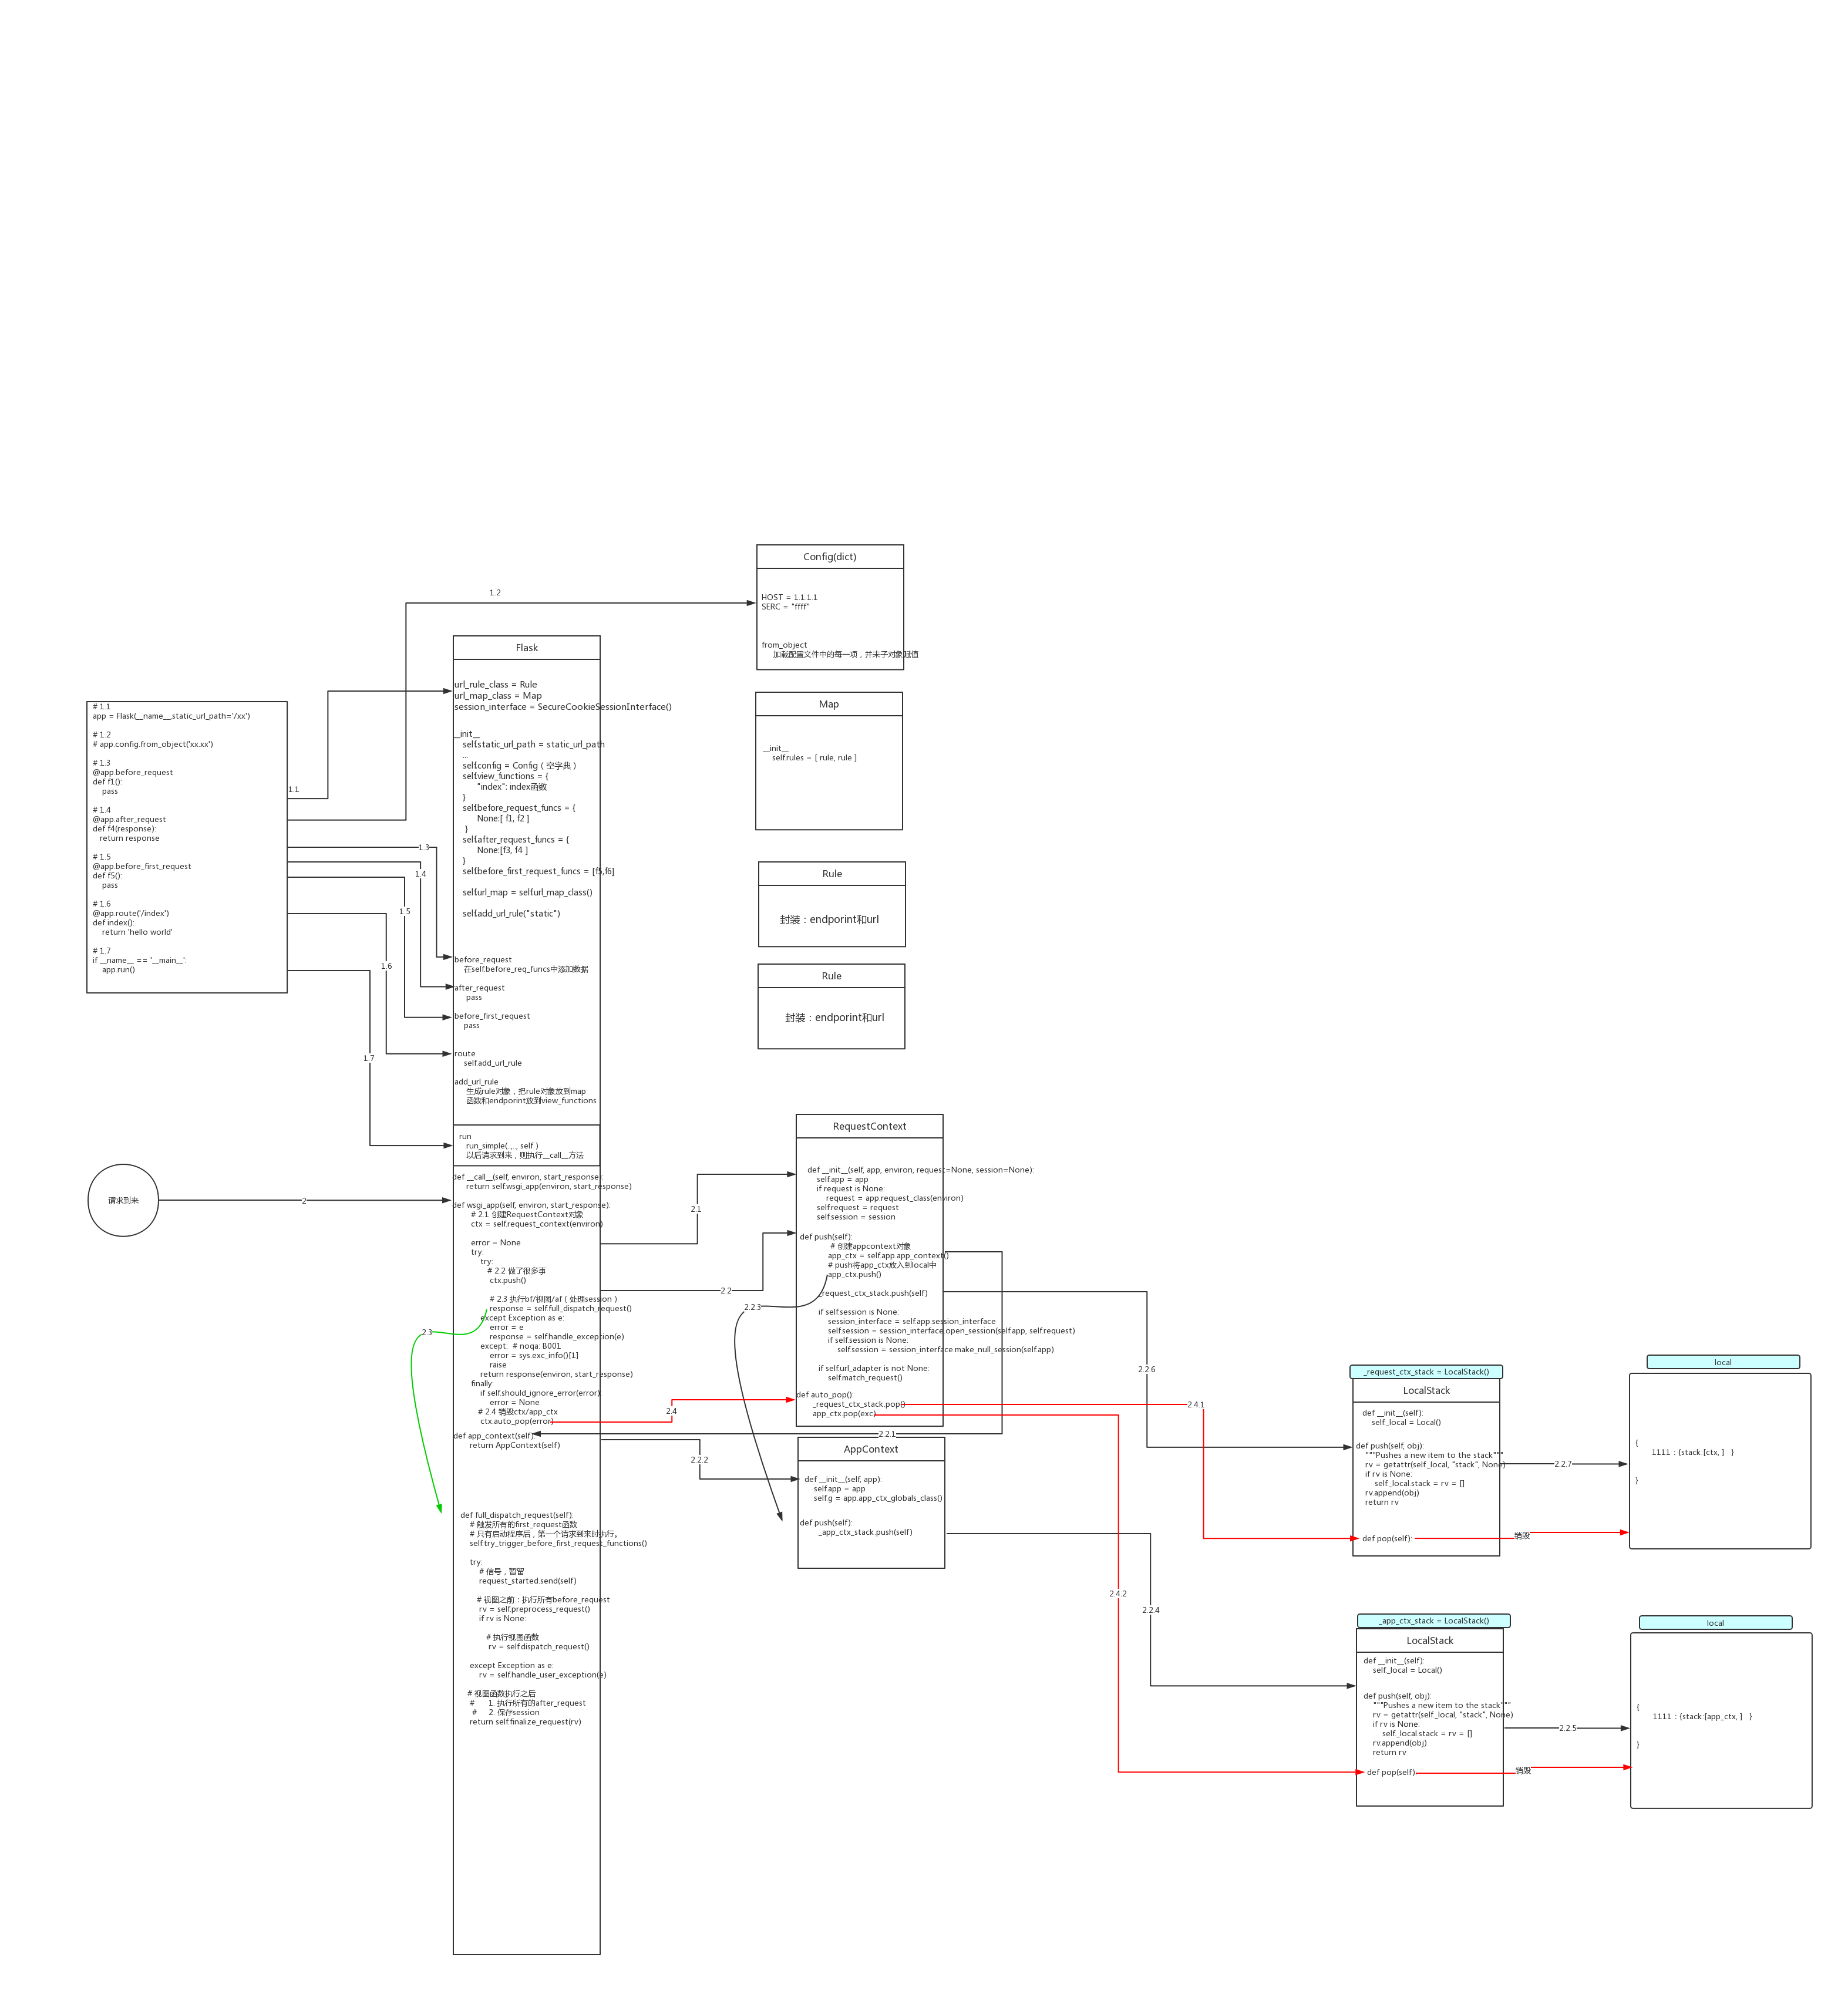
4.2请求到来
当有请求进来,执行run_simple(ip,addr,self)的第三个参数也就是app(),执行app的__call__方法
#app.py中的__call__方法
def __call__(self, environ, start_response):
    return self.wsgi_app(environ, start_response)
#执行wsgi_app,这是主流程
def wsgi_app(self, environ, start_response):
    ctx = self.request_context(environ)  #1.将request和session封装到request_context对象中
    error = None
    try:
        try:
            ctx.push()   #2.将ctx对象添加到_request_ctx_stack栈中,将app_ctx对象添加到
            response = self.full_dispatch_request() #3.得到response对象,可为视图rv
            except Exception as e:
                error = e
                response = self.handle_exception(e)
            except:  # noqa: B001
                error = sys.exc_info()[1]
                raise
            return response(environ, start_response)
    finally:
        if self.should_ignore_error(error):
            error = None
            ctx.auto_pop(error)  #4.删除ctx/app_ctx对象
#1.1 返回RequestContext对象
def request_context(self, environ):
    return RequestContext(self, environ)
#1.2 执行RequestContext的__init__方法,主要做两件事:
#①.request = app.request_class(environ)
#②.self.session = session
def __init__(self, app, environ, request=None, session=None):
    self.app = app
    if request is None:
        request = app.request_class(environ)
        self.request = request
        self.url_adapter = None
    try:
        self.url_adapter = app.create_url_adapter(self.request)
    except HTTPException as e:
        self.session = session
#2.1 执行ctx的push方法,添加request、session对象到_request_ctx_stack栈中
#2.2 创建app_ctx对象,执行app_ctx.push()方法,将其添加进栈
    def push(self):
        top = _request_ctx_stack.top
        if top is not None and top.preserved:
            top.pop(top._preserved_exc)

        app_ctx = _app_ctx_stack.top
        if app_ctx is None or app_ctx.app != self.app:
            app_ctx = self.app.app_context() #2.2.1 此时执行app_context()
            app_ctx.push()  #2.2.2 将app_context添加进栈
            self._implicit_app_ctx_stack.append(app_ctx)
        else:
            self._implicit_app_ctx_stack.append(None)

        if hasattr(sys, "exc_clear"):
            sys.exc_clear()

        _request_ctx_stack.push(self)
	    #添加session
        if self.session is None:
            session_interface = self.app.session_interface
            self.session = session_interface.open_session(self.app, self.request)

            if self.session is None:
                self.session = session_interface.make_null_session(self.app)

        if self.url_adapter is not None:
            self.match_request()


#2.2.1
def app_context(self):
    return AppContext(self)
class AppContext(object):  #将app对象,g对象添加进AppConetxt()对象中
    def __init__(self, app):
        self.app = app
        self.url_adapter = app.create_url_adapter(None)
        self.g = app.app_ctx_globals_class()
        self._refcnt = 0
#2.2.2
def push(self):
    self._refcnt += 1
    if hasattr(sys, "exc_clear"):
       sys.exc_clear()
       _app_ctx_stack.push(self)
       appcontext_pushed.send(self.app)
#3.1
def full_dispatch_request(self):
    return self.finalize_request(rv)
#3.2
def finalize_request(self, rv, from_error_handler=False):
    response = self.make_response(rv)
    return response
#3.3
def make_response(self, rv):
    return rv #rv为视图
至此,源码流程完毕,我们只需要知道App的wsgi_app()中是主流程,完成4个方面:
1.创建ctx = RequestContext对象,内部封装了Request、session对象、创建app_ctx = AppContext对象,内部封装了App和g
2.通过ctx和app_ctx的push方法,将其本身通过LocalStack对象放到Local类的数据结构中
3.执行视图方法
4.执行完毕后通过ctx和app_ctx的pop方法销毁本身
4.3 g是什么?
在一次请求请求的周期,可以在g中设置值,在本次的请求周期中都可以读取或复制。相当于是一次请求周期的全局变量。
from flask import Flask,g

app = Flask(__name__,static_url_path='/xx')

@app.before_request
def f1():
    g.x1 = 123

@app.route('/index')
def index():
    print(g.x1)
    return 'hello world'

if __name__ == '__main__':
    app.run()
4.4 Appcontext和RequestContext为什么分开存储?
通过上述源码可知,当有请求发来时,才调用ctx的push方法,这是对request、session进行封装,在其内部才调用app_ctx的push方法,也就是说先有RequestContext对象才有Appcontext对象的,但这仅仅存在于有请求发来的情况下。如果是离线开发,只需用到AppContext即可,写法:
with Appcontext() as a:
    xxx
这里就会调用Appcontext中的__enter__和__exit__方法

 浙公网安备 33010602011771号