RabbitMQ学习笔记
RabbitMQ学习笔记
学习地址:https://www.bilibili.com/video/BV1dE411K7MG
官网地址:https://www.rabbitmq.com
博客地址:https://www.userwusir.top
Centos7安装
1、准备
Erlang + socat + RabbitMQ,前两个是依赖包,对照官网对应版本下载

下载:链接:https://pan.baidu.com/s/1Cswn7W5XbKvl6mYGvIDwXg 提取码:gf85
2、安装配置
[root@centos ~]# rpm -ivh erlang-22.0.7-1.el7.x86_64.rpm
[root@centos ~]# rpm -ivh socat-1.7.3.2-2.el7.x86_64.rpm
[root@centos ~]# rpm -ivh rabbitmq-server-3.7.18-1.el7.noarch.rpm
开启15672、5672端口,前者http端口,后者tcp端口(java代码中port)
开启rabbitMQ插件(可视化界面)
[root@centos ~]# rabbitmq-plugins enable rabbitmq_management
找到默认配置文件路径,复制一份到/etc目录下
[root@centos ~]# find / -name rabbitmq.config.example
[root@centos ~]# cp /usr/share/doc/rabbitmq-server-3.7.18/rabbitmq.config.example /etc/rabbitmq.config
修改/etc/rabbitmq.config此处
为:
允许在可视化界面以guest用户登录,密码为guest,高版本如果这种方法不行,采取下面的方法添加新用户
[root@centos ~]# rabbitmqctl add_user admin admin
[root@centos ~]# rabbitmqctl set_permissions -p / admin ".*" ".*" ".*"
[root@centos ~]# rabbitmqctl set_user_tags admin administrator
3、启动运行
启动rabbitMQ服务
[root@centos ~]# systemctl start rabbitmq-server
查看状态
[root@centos ~]# systemctl status rabbitmq-server
● rabbitmq-server.service - RabbitMQ broker
   Loaded: loaded (/usr/lib/systemd/system/rabbitmq-server.service; disabled; vendor preset: disabled)
   Active: active (running) since Sun 2021-11-14 10:29:37 CST; 1 day 5h ago
 Main PID: 21270 (beam.smp)
   Status: "Initialized"
   CGroup: /system.slice/rabbitmq-server.service
           ├─21270 /usr/lib64/erlang/erts-10.4.4/bin/beam.smp -W w -A 64 -MBas ageffcbf -MHas ageffcbf -MBlmbcs 512 -...
           ├─21632 erl_child_setup 32768
           ├─21662 inet_gethost 4
           └─21663 inet_gethost 4

Nov 14 10:29:37 centos rabbitmq-server[21270]: ##  ##
Nov 14 10:29:37 centos rabbitmq-server[21270]: ##  ##      RabbitMQ 3.7.18. Copyright (C) 2007-2019 Pivotal Soft... Inc.
Nov 14 10:29:37 centos rabbitmq-server[21270]: ##########  Licensed under the MPL.  See https://www.rabbitmq.com/
Nov 14 10:29:37 centos rabbitmq-server[21270]: ######  ##
Nov 14 10:29:37 centos rabbitmq-server[21270]: ##########  Logs: /var/log/rabbitmq/rabbit@centos.log
Nov 14 10:29:37 centos rabbitmq-server[21270]: /var/log/rabbitmq/rabbit@centos_upgrade.log
Nov 14 10:29:37 centos rabbitmq-server[21270]: Starting broker...
Nov 14 10:29:37 centos rabbitmq-server[21270]: systemd unit for activation check: "rabbitmq-server.service"
Nov 14 10:29:37 centos systemd[1]: Started RabbitMQ broker.
Nov 14 10:29:37 centos rabbitmq-server[21270]: completed with 3 plugins.
Hint: Some lines were ellipsized, use -l to show in full.
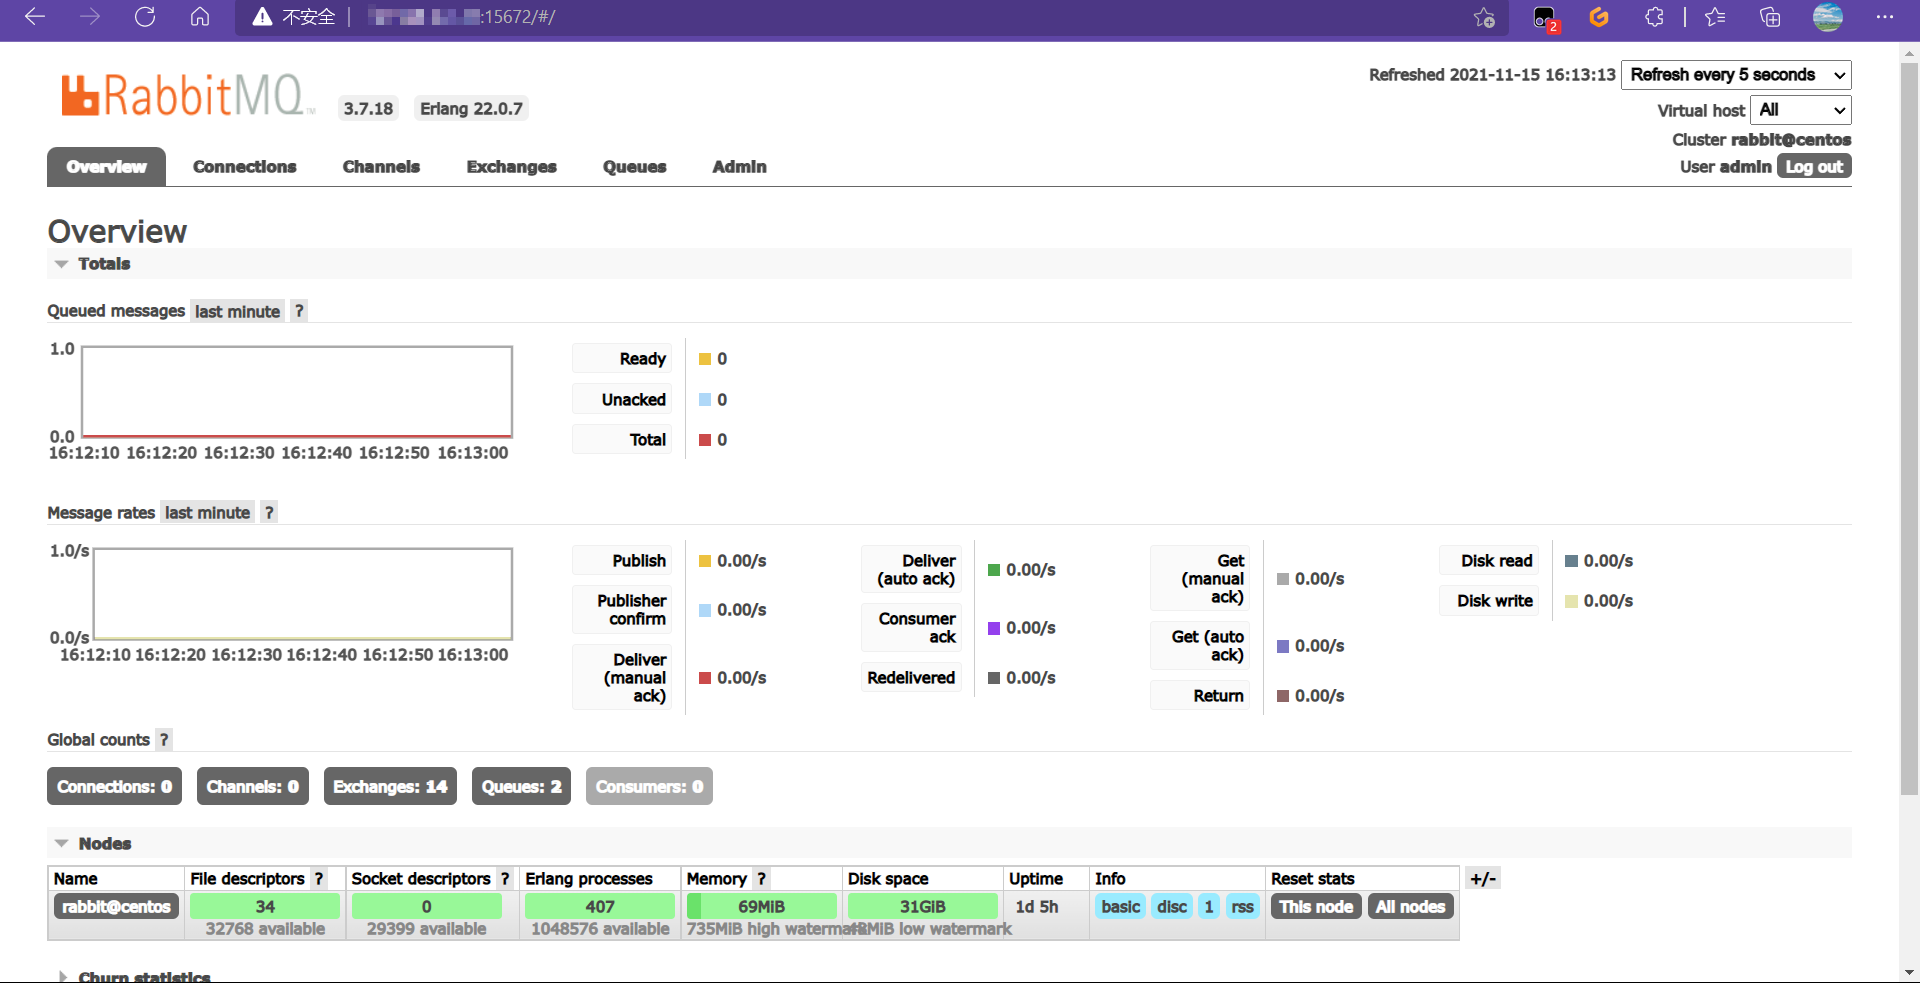
4、查看可视化界面(ip:15672)
RabbitMQ五种常用工作模型学习
准备工作:可视化界面新建虚拟主机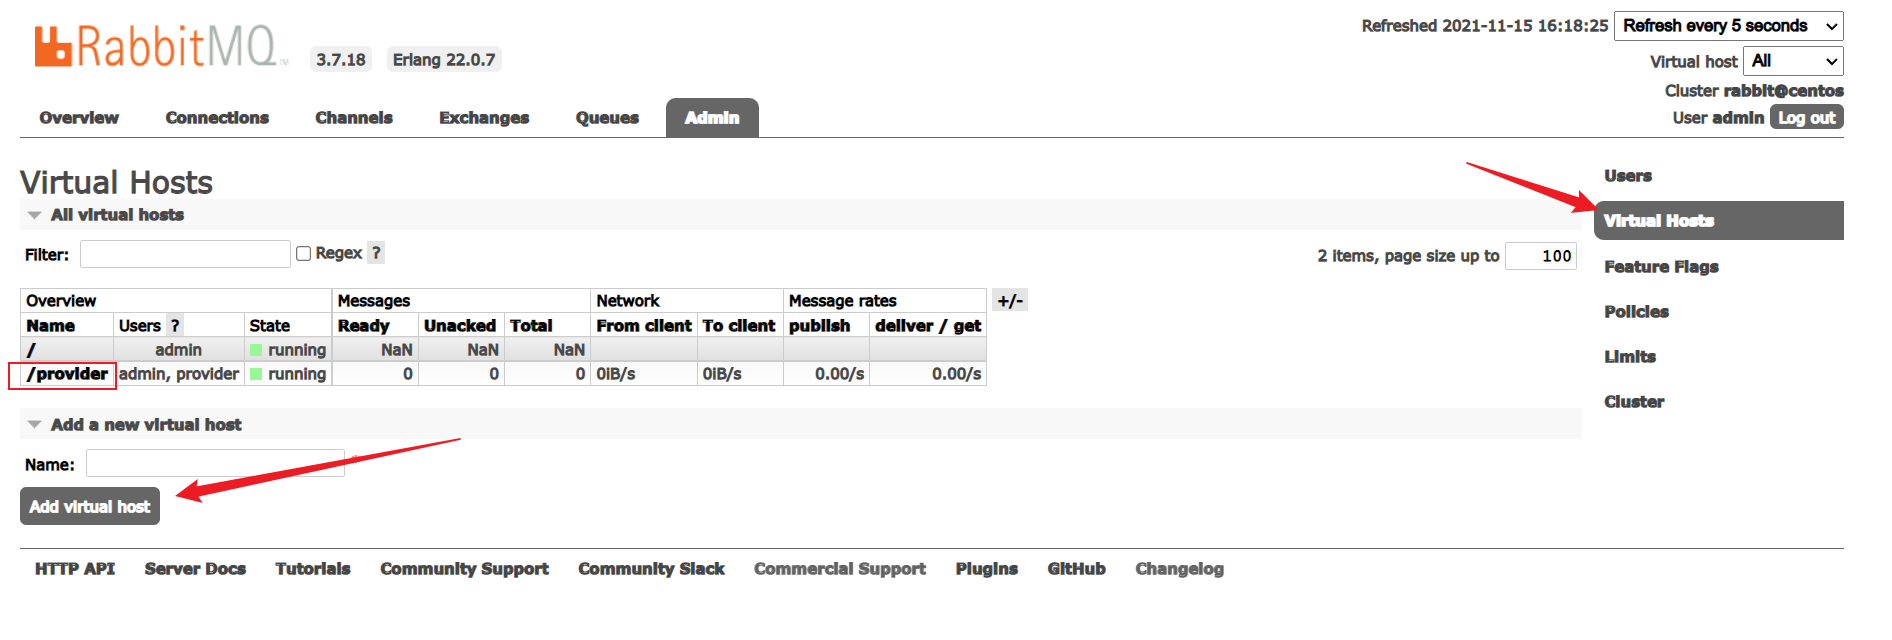
新建用户绑定虚拟主机
通用工具类
/**
 * @author wulele
 */
public class RabbitmqUtils {
    //获取连接
    public static Connection getConnection() {
        try {
            ConnectionFactory connectionFactory = new ConnectionFactory();
            connectionFactory.setHost("ip");
            connectionFactory.setPort(5672);
            //设置虚拟主机、用户、密码,对应上面的设定
            connectionFactory.setVirtualHost("/provider");
            connectionFactory.setUsername("provider");
            connectionFactory.setPassword("123");
            return connectionFactory.newConnection();
        }catch (Exception e){
            e.printStackTrace();
        }
        return null;
    }
	//关闭连接、通道
    public static void closeConnectionAndChanel(Channel channel,Connection connection){
        try {
            if(channel != null){
                channel.close();
            }
            if(connection != null){
                connection.close();
            }
        }catch (Exception e){
            e.printStackTrace();
        }
    }
}
1、Hello World!
/**
 * @author wulele
 * 生产者
 */
public class Provider {
    @Test
    public void test(){
        //获取连接
        Connection connection = RabbitmqUtils.getConnection();
        try {
            //获取通道
            Channel channel = connection.createChannel();
            //绑定消息队列
            /*
                参数1:队列名称
                参数2:是否持久化(重启RabbitMQ服务是否从磁盘加载数据)
                参数3:是否排他(一个队列被设置为排他队列, 该队列仅对首次声明它的连接可见, 并在连接断开时自动删除)
                参数4:自动删除队列(所有消费者全部断开连接)
                参数5:设置一些其他参数
             */
            channel.queueDeclare("hello",false,false,false,null);
            //消息发布
            /*
                参数1:交换机名称
                参数2:路由键(识别队列:队列名称)
                参数3:有许多成员,如消息类型、编码等
                参数4:消息体
             */
            channel.basicPublish("","hello",null,"hello rabbitmq".getBytes());
            channel.close();
            connection.close();
        } catch (Exception e) {
            e.printStackTrace();
        }
    }
}

/**
 * @author wulele
 * 消费者
 */
public class Consumer {
    public static void main(String[] args) {
        Connection connection = RabbitmqUtils.getConnection();
        try {
            Channel channel = connection.createChannel();
            channel.queueDeclare("hello",false,false,false,null);
            //消息消费
            /*
            	参数1:队列名称
            	参数2:是否自动确认(消费者向RabbitMQ自动确认消息消费)
            */
            channel.basicConsume("hello", true,new DefaultConsumer(channel){
                @Override
                public void handleDelivery(String consumerTag, Envelope envelope, AMQP.BasicProperties properties, byte[] body) throws IOException {
                    System.out.println(new String(body));
                }
            });
        } catch (Exception e) {
            e.printStackTrace();
        }
    }
}
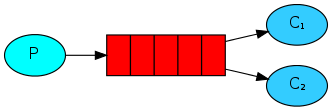
2、Work queues

/**
* @author wulele
* 生产者
*/
public class Provider {
@Test
public void test() throws IOException {
Connection connection = RabbitmqUtils.getConnection();
Channel channel = connection.createChannel();
channel.queueDeclare("work",true,false,false,null);
for (int i = 0; i < 10; i++) {
channel.basicPublish("", "work", null, (i + "hello rabbitmq").getBytes());
}
RabbitmqUtils.closeConnectionAndChanel(channel, connection);
}
}
/**
* @author wulele
* 消费者1
*/
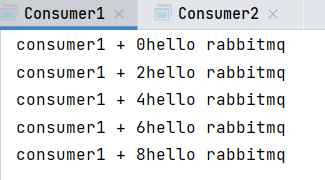
public class Consumer1 {
public static void main(String[] args) throws IOException {
Connection connection = RabbitmqUtils.getConnection();
Channel channel = connection.createChannel();
channel.queueDeclare("work", true, false, false, null);
channel.basicConsume("work", true, new DefaultConsumer(channel){
@Override
public void handleDelivery(String consumerTag, Envelope envelope, AMQP.BasicProperties properties, byte[] body) throws IOException {
System.out.println("consumer1 + " + new String(body));
}
});
}
}
/**
* @author wulele
* 消费者2
*/
public class Consumer2 {
public static void main(String[] args) throws IOException {
Connection connection = RabbitmqUtils.getConnection();
Channel channel = connection.createChannel();
channel.queueDeclare("work", true, false, false, null);
channel.basicConsume("work", true, new DefaultConsumer(channel){
@Override
public void handleDelivery(String consumerTag, Envelope envelope, AMQP.BasicProperties properties, byte[] body) throws IOException {
System.out.println("consumer2 + " + new String(body));
}
});
}
}
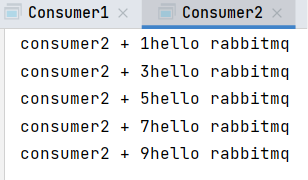
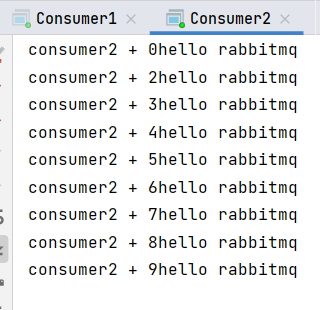
默认情况下,RabbitMQ会将每条消息依次发送给下一个消费者。平均而言,每个消费者将获得相同数量的消息。这种分发消息的方式称为轮询。
2.1、消息自动确认机制+能者多劳
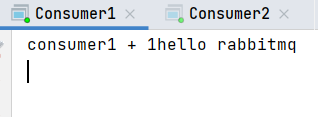
方法basicConsume()的参数2(autoAck)为true时,消费者会自动向RabbitMQ确认消息是否消费。假设此时Consumer1确认消费5条消息,消息队列清除这5条消息,同时Consumer1消费这5条消息,但是消费到第三条消息时出问题,此时就会导致消息的丢失。
改进措施:关闭自动确认,设定消费者每次只能消费一条消息,在消息被消费晚会后向RabbitMQ进行消息消费确认,确保消息不会丢失
/**
 * @author wulele
 * 消费者1
 */
public class Consumer1 {
    public static void main(String[] args) throws IOException {
        Connection connection = RabbitmqUtils.getConnection();
        Channel channel = connection.createChannel();
        //每次只能消费一条消息
        channel.basicQos(1);
        channel.queueDeclare("work", true, false, false, null);
        //关闭消息自动确认
        channel.basicConsume("work", false, new DefaultConsumer(channel){
            @Override
            public void handleDelivery(String consumerTag, Envelope envelope, AMQP.BasicProperties properties, byte[] body) throws IOException {
                try {
                    //模拟Consumer1消费速度比较慢
                    Thread.sleep(1000);
                } catch (InterruptedException e) {
                    e.printStackTrace();
                }
                System.out.println("consumer1 + " + new String(body));
                //参数1:确认队列中的那个具体消息   参数2:是否开启多条消息同时确认
                channel.basicAck(envelope.getDeliveryTag(), false);
            }
        });
    }
}

/**
 * @author wulele
 * 消费者2
 */
public class Consumer2 {
    public static void main(String[] args) throws IOException {
        Connection connection = RabbitmqUtils.getConnection();
        Channel channel = connection.createChannel();
        channel.basicQos(1);
        channel.queueDeclare("work", true, false, false, null);
        channel.basicConsume("work", false, new DefaultConsumer(channel){
            @Override
            public void handleDelivery(String consumerTag, Envelope envelope, AMQP.BasicProperties properties, byte[] body) throws IOException {
                System.out.println("consumer2 + " + new String(body));
                channel.basicAck(envelope.getDeliveryTag(), false);
            }
        });
    }
}
运行结果:
3、Publish/Subscribe(广播)
/**
 * @author wulele
 * 生产者
 */
public class Provider {
    @Test
    public void test() throws IOException {
        Connection connection = RabbitmqUtils.getConnection();
        Channel channel = connection.createChannel();
        //绑定交换机
        /*
            参数1:交换机名称
            参数2:交换机类型
         */
        //channel.exchangeDeclare("publish", "fanout");
        channel.exchangeDeclare("publish", BuiltinExchangeType.FANOUT);
        channel.basicPublish("publish", "", null, "publish/subscribe".getBytes());
        RabbitmqUtils.closeConnectionAndChanel(channel, connection);
    }
}

/**
 * @author wulele
 * 消费者1
 */
public class Consumer1 {
    public static void main(String[] args) throws IOException {
        Connection connection = RabbitmqUtils.getConnection();
        Channel channel = connection.createChannel();
        //获取临时队列名
        String queueName = channel.queueDeclare().getQueue();
        //将队列绑定到交换机
        /*
            参数1:临时队列名称
            参数2:交换机名称
         */
        channel.queueBind(queueName, "publish", "");
        channel.basicConsume(queueName, true, new DefaultConsumer(channel){
            @Override
            public void handleDelivery(String consumerTag, Envelope envelope, AMQP.BasicProperties properties, byte[] body) throws IOException {
                System.out.println("Consumer1 + " + new String(body));
            }
        });
    }
}

/**
 * @author wulele
 * 消费者2
 */
public class Consumer2 {
    public static void main(String[] args) throws IOException {
        Connection connection = RabbitmqUtils.getConnection();
        Channel channel = connection.createChannel();
        String queueName = channel.queueDeclare().getQueue();
        channel.queueBind(queueName, "publish", "");
        channel.basicConsume(queueName, true, new DefaultConsumer(channel){
            @Override
            public void handleDelivery(String consumerTag, Envelope envelope, AMQP.BasicProperties properties, byte[] body) throws IOException {
                System.out.println("Consumer2 + " + new String(body));
            }
        });
    }
}
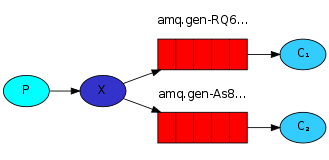
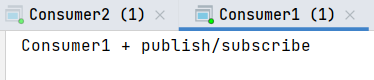
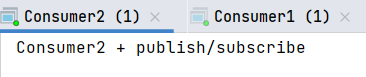
运行结果:消费者1与消费者2都会消费消息
4、Routing(静态匹配连接)

P:生产者,向交换机(exchange)发送消息,发送消息时,会指定一个routingKey
X:交换机(exchange),接收生产者生产的消息,然后把消息交给与routingKey一致的队列
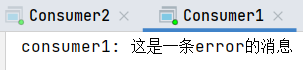
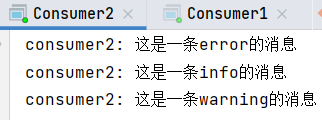
C1:消费者1,所绑定队列需要routingKey为
error的消息C2:消费者2,所绑定队列需要routingKey为
error、info、warning的消息
/**
 * @author wulele
 * P
 */
public class Provider {
    @Test
    public void test() throws IOException {
        Connection connection = RabbitmqUtils.getConnection();
        Channel channel = connection.createChannel();
        String exchangeName = "publish";
        /*
            参数1:交换机名称
            参数2:交换机类型
         */
        channel.exchangeDeclare(exchangeName, BuiltinExchangeType.DIRECT);
        //routingKey
        String[] routingKeys = {"error", "info", "warning"};
        //参数2:绑定到对应的routingKey
        for (int i = 0; i < 3; i++) {
            channel.basicPublish(exchangeName, routingKeys[i], null, ("这是一条" + routingKeys[i] + "的消息").getBytes());
        }
        RabbitmqUtils.closeConnectionAndChanel(channel, connection);
    }
}

/**
 * @author wulele
 * C1
 */
public class Consumer1 {
    public static void main(String[] args) throws IOException {
        Connection connection = RabbitmqUtils.getConnection();
        Channel channel = connection.createChannel();
        //获取临时队列名
        String queueName = channel.queueDeclare().getQueue();
        String exchangeName = "publish";
        //参数3:队列绑定routingKey,所在队列指定需要此routingKey的消息
        channel.queueBind(queueName, exchangeName, "error");
        channel.basicConsume(queueName, true,new DefaultConsumer(channel){
            @Override
            public void handleDelivery(String consumerTag, Envelope envelope, AMQP.BasicProperties properties, byte[] body) throws IOException {
                System.out.println("consumer1: " + new String(body));
            }
        });
    }
}

/**
 * @author wulele
 * C2
 */
public class Consumer2 {
    public static void main(String[] args) throws IOException {
        Connection connection = RabbitmqUtils.getConnection();
        Channel channel = connection.createChannel();
        //获取临时队列名
        String queueName = channel.queueDeclare().getQueue();
        String exchangeName = "publish";
        //参数3:队列绑定routingKey,所在队列指定需要此routingKey的消息
        channel.queueBind(queueName, exchangeName, "error");
        channel.queueBind(queueName, exchangeName, "info");
        channel.queueBind(queueName, exchangeName, "warning");
        channel.basicConsume(queueName, true,new DefaultConsumer(channel){
            @Override
            public void handleDelivery(String consumerTag, Envelope envelope, AMQP.BasicProperties properties, byte[] body) throws IOException {
                System.out.println("consumer2: " + new String(body));
            }
        });
    }
}
运行结果:消费者1与消费者2只会消费自身所在队列指定routingKey的消息
5、Topics(动态匹配连接)
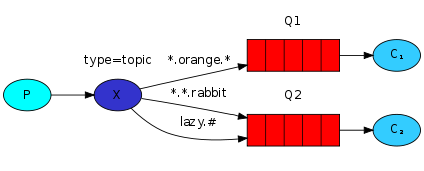
- * (star) can substitute for exactly
one word.- # (hash) can substitute for
zero or more words.
/**
 * @author wulele
 * 生产者
 */
public class Provider {
    @Test
    public void test() throws IOException {
        Connection connection = RabbitmqUtils.getConnection();
        Channel channel = connection.createChannel();
        String exchangeName = "publish";
        /*
            参数1:交换机名称
            参数2:交换机类型
         */
        channel.exchangeDeclare(exchangeName, BuiltinExchangeType.TOPIC);
        //routingKey
        String[] routingKeys = {"user", "user.function", "user.function.search"};
        //参数2:绑定到对应的routingKey
        for (int i = 0; i < 3; i++) {
            channel.basicPublish(exchangeName, routingKeys[i], null, ("这是一条" + routingKeys[i] + "的消息").getBytes());
        }
        RabbitmqUtils.closeConnectionAndChanel(channel, connection);
    }
}

/**
 * @author wulele
 * 消费者1
 */
public class Consumer1 {
    public static void main(String[] args) throws IOException {
        Connection connection = RabbitmqUtils.getConnection();
        Channel channel = connection.createChannel();
        //获取临时队列名
        String queueName = channel.queueDeclare().getQueue();
        String exchangeName = "publish";
        //参数3:通配符(*)匹配user.一个单词
        channel.queueBind(queueName, exchangeName, "user.*");
        channel.basicConsume(queueName, true,new DefaultConsumer(channel){
            @Override
            public void handleDelivery(String consumerTag, Envelope envelope, AMQP.BasicProperties properties, byte[] body) throws IOException {
                System.out.println("consumer1: " + new String(body));
            }
        });
    }
}

/**
 * @author wulele
 * 消费者2
 */
public class Consumer2 {
    public static void main(String[] args) throws IOException {
        Connection connection = RabbitmqUtils.getConnection();
        Channel channel = connection.createChannel();
        //获取临时队列名
        String queueName = channel.queueDeclare().getQueue();
        String exchangeName = "publish";
        //参数3:通配符(#)匹配user.零个或多个单词
        channel.queueBind(queueName, exchangeName, "user.#");
        channel.basicConsume(queueName, true,new DefaultConsumer(channel){
            @Override
            public void handleDelivery(String consumerTag, Envelope envelope, AMQP.BasicProperties properties, byte[] body) throws IOException {
                System.out.println("consumer2: " + new String(body));
            }
        });
    }
}
运行结果:消费者1消费user.一个单词,消费者2消费user.零个个或多个单词


 浙公网安备 33010602011771号