
计算机基础和Linux基础入门
计算机基础和Linux基础入门
一、计算机系统
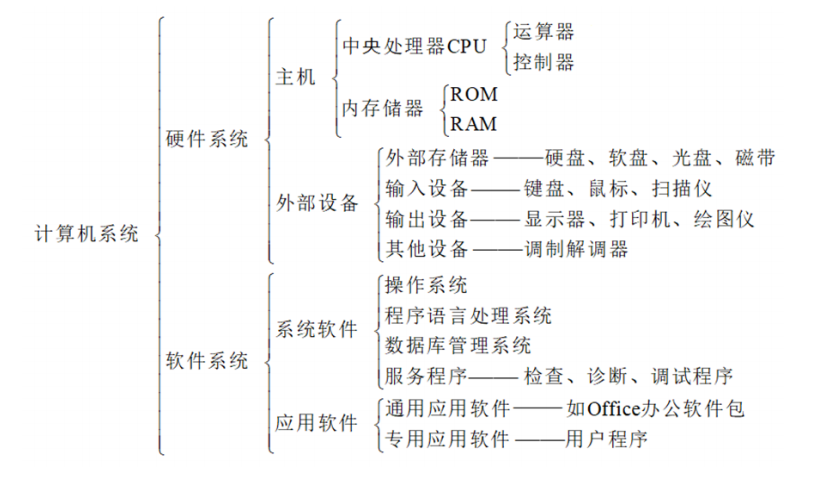
计算机的五大基本构成部分:
二、Linux的哲学思想
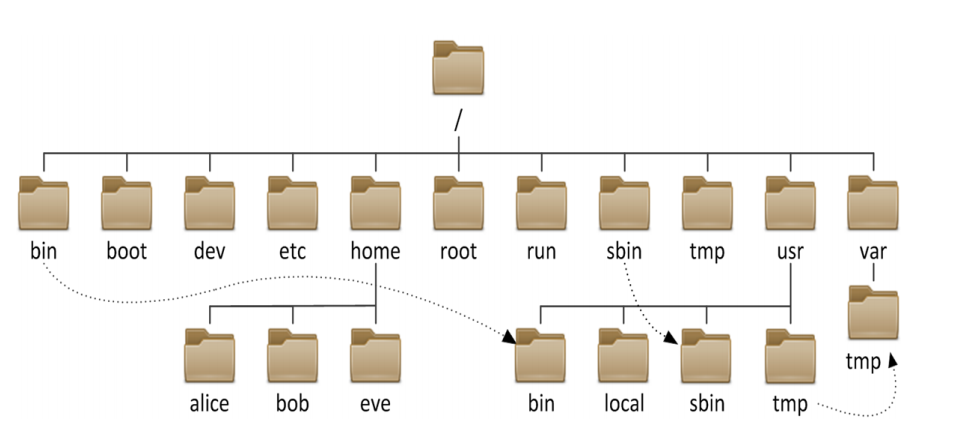
三、Linux的文件系统
|
文件名称 |
作用 |
|
/bin |
所有用户使用的基本命令 |
|
/boot |
引导文件存放目录,内核文件引导加载器 |
|
/dev |
设备文件及特殊文件存储位置 |
|
/etc |
配置文件目录 |
|
/home |
普通用户家目录 |
|
/root |
管理员的家目录 |
|
/sbin |
管理类命令存放的位置 |
|
/tmp |
临时文件存放位置 |
|
/usr |
二级根目录此目录内文件与根下大致相同 |
|
/var |
用来存放可变的数据 |
|
/proc |
用于输出内核与进程信息相关的虚拟文件系统 |
|
/sys |
用于输出当前系统上硬件设备相关信息的虚拟翁建系统 |
|
/selinux |
安全策略信息的存放位置 |
|
/lib |
存放库文件以及内核模块文件 |
|
/lib64 |
存放64位库文件 |
|
/media |
便携式设备的挂载点 |
|
/mnt |
临时文件系统的挂载点 |
|
/opt |
第三方应用程序安装位置 |
|
/srv |
系统上运行服务所用到的数据 |
四、Linux基础命令
1、alias 命令别名
alias[别名]=[指令名称]
示例:
[16:51:06 root@centos8 ~]#alias cdnet='cd /etc/sysconfig/network-scripts'
[16:52:23 root@centos8 ~]#cdnet
[16:52:25 root@centos8 network-scripts]#
[16:57:00 root@centos8 network-scripts]#unalias cdnet             取消cdnet别名
[16:57:09 root@centos8 network-scripts]#cdnet
bash: cdnet: command not found...
Failed to search for file: Cannot update read-only repo
[16:57:12 root@centos8 network-scripts]#
[root@centos7 ~]#nano .bashrc 编辑.bashrc文件
# .bashrc

# User specific aliases and functions

alias rm='rm -i'
alias cp='cp -i'
alias mv='mv -i'
alias cdnet='cd /etc/sysconfig/network-scripts'     写入文件中

# Source global definitions
if [ -f /etc/bashrc ]; then
        . /etc/bashrc
fi
[root@centos7 ~]#.. bashrc
2、bc 计算机
bc 命令是任意精度计算器语言,通常在linux下当计算器用。
它类似基本的计算器, 使用这个计算器可以做基本的数学运算。
[root@centos7 ~]#bc
bc 1.06.95
Copyright 1991-1994, 1997, 1998, 2000, 2004, 2006 Free Software Foundation, Inc.
This is free software with ABSOLUTELY NO WARRANTY.
For details type `warranty'.
obase=2                   输入为二进制
10
1010
3、basename 基名
[root@centos7 ~]#basename /etc/sysconfig/network
network
4、dirname 目录名
[root@centos7 ~]#dirname /etc/sysconfig/network-scripts/ifcfg-ens33
/etc/sysconfig/network-scripts
5、clock date 日期和时钟
Linux clock命令用于调整 RTC 时间。
RTC 是电脑内建的硬件时间,执行这项指令可以显示现在时刻,调整硬件时钟的时间,将系统时间设成与硬件时钟之时间一致,或是把系统时间回存到硬件时钟。
Linux date命令可以用来显示或设定系统的日期与时间,在显示方面,使用者可以设定欲显示的格式,格式设定为一个加号后接数个标记,其中可用的标记列表如下:
时间方面:
- % : 印出 %
- %n : 下一行
- %t : 跳格
- %H : 小时(00..23)
- %I : 小时(01..12)
- %k : 小时(0..23)
- %l : 小时(1..12)
- %M : 分钟(00..59)
- %p : 显示本地 AM 或 PM
- %r : 直接显示时间 (12 小时制,格式为 hh:mm:ss [AP]M)
- %s : 从 1970 年 1 月 1 日 00:00:00 UTC 到目前为止的秒数
- %S : 秒(00..61)
- %T : 直接显示时间 (24 小时制)
- %X : 相当于 %H:%M:%S
- %Z : 显示时区
日期方面:
- %a : 星期几 (Sun..Sat)
- %A : 星期几 (Sunday..Saturday)
- %b : 月份 (Jan..Dec)
- %B : 月份 (January..December)
- %c : 直接显示日期与时间
- %d : 日 (01..31)
- %D : 直接显示日期 (mm/dd/yy)
- %h : 同 %b
- %j : 一年中的第几天 (001..366)
- %m : 月份 (01..12)
- %U : 一年中的第几周 (00..53) (以 Sunday 为一周的第一天的情形)
- %w : 一周中的第几天 (0..6)
- %W : 一年中的第几周 (00..53) (以 Monday 为一周的第一天的情形)
- %x : 直接显示日期 (mm/dd/yy)
- %y : 年份的最后两位数字 (00.99)
- %Y : 完整年份 (0000..9999)
1 [root@centos7 ~]#date +%s
2 1584868998
3 [root@centos7 ~]#date -d @`date +%s`
4 Sun Mar 22 17:25:56 CST 2020
6、cal 日历
 1 [root@centos7 ~]#cal -y
 2                                2020
 3
 4        January               February                 March
 5 Su Mo Tu We Th Fr Sa   Su Mo Tu We Th Fr Sa   Su Mo Tu We Th Fr Sa
 6           1  2  3  4                      1    1  2  3  4  5  6  7
 7  5  6  7  8  9 10 11    2  3  4  5  6  7  8    8  9 10 11 12 13 14
 8 12 13 14 15 16 17 18    9 10 11 12 13 14 15   15 16 17 18 19 20 21
 9 19 20 21 22 23 24 25   16 17 18 19 20 21 22   22 23 24 25 26 27 28
10 26 27 28 29 30 31      23 24 25 26 27 28 29   29 30 31
11
12         April                   May                   June
13 Su Mo Tu We Th Fr Sa   Su Mo Tu We Th Fr Sa   Su Mo Tu We Th Fr Sa
14           1  2  3  4                   1  2       1  2  3  4  5  6
15  5  6  7  8  9 10 11    3  4  5  6  7  8  9    7  8  9 10 11 12 13
16 12 13 14 15 16 17 18   10 11 12 13 14 15 16   14 15 16 17 18 19 20
17 19 20 21 22 23 24 25   17 18 19 20 21 22 23   21 22 23 24 25 26 27
18 26 27 28 29 30         24 25 26 27 28 29 30   28 29 30
19                        31
20         July                  August                September
21 Su Mo Tu We Th Fr Sa   Su Mo Tu We Th Fr Sa   Su Mo Tu We Th Fr Sa
22           1  2  3  4                      1          1  2  3  4  5
23  5  6  7  8  9 10 11    2  3  4  5  6  7  8    6  7  8  9 10 11 12
24 12 13 14 15 16 17 18    9 10 11 12 13 14 15   13 14 15 16 17 18 19
25 19 20 21 22 23 24 25   16 17 18 19 20 21 22   20 21 22 23 24 25 26
26 26 27 28 29 30 31      23 24 25 26 27 28 29   27 28 29 30
27                        30 31
28        October               November               December
29 Su Mo Tu We Th Fr Sa   Su Mo Tu We Th Fr Sa   Su Mo Tu We Th Fr Sa
30              1  2  3    1  2  3  4  5  6  7          1  2  3  4  5
31  4  5  6  7  8  9 10    8  9 10 11 12 13 14    6  7  8  9 10 11 12
32 11 12 13 14 15 16 17   15 16 17 18 19 20 21   13 14 15 16 17 18 19
33 18 19 20 21 22 23 24   22 23 24 25 26 27 28   20 21 22 23 24 25 26
34 25 26 27 28 29 30 31   29 30                  27 28 29 30 31
7、cd 切换文件夹
1 [root@centos7 ~]#cd /usr/bin
2 [root@centos7 bin]#cd -            返回自己的家目录
3 /root
4 [root@centos7 ~]#cd /usr/bin
5 [root@centos7 bin]#cd ..           返回上一级目录
6 [root@centos7 usr]#
8、cat 查看文本文件内容
1 [root@centos7 ~]#cat /etc/issue
2 \S
3 Kernel \r on an \m
4
5 [root@centos7 ~]#
9、clear 清屏
Linux clear命令用于清除屏幕。
10、dnf dnf包管理器
新一代的RPM软件包管理器
补充说明
DNF 是新一代的rpm软件包管理器。他首先出现在 Fedora 18 这个发行版中。而最近,它取代了yum,正式成为 Fedora 22 的包管理器。
DNF包管理器克服了YUM包管理器的一些瓶颈,提升了包括用户体验,内存占用,依赖分析,运行速度等多方面的内容。DNF使用 RPM, libsolv 和 hawkey 库进行包管理操作。尽管它没有预装在 CentOS 和 RHEL 7 中,但你可以在使用 YUM 的同时使用 DNF 。你可以在这里获得关于 DNF 的更多知识:《 DNF 代替 YUM ,你所不知道的缘由》
DNF 的最新稳定发行版版本号是 1.0,发行日期是2015年5月11日。 这一版本的额 DNF 包管理器(包括在他之前的所有版本) 都大部分采用 Python 编写,发行许可为GPL v2.
用处:该命令用于查看安装在您系统中的 DNF 包管理器的版本
# dnf -version
查看系统中可用的 DNF 软件库
用处:该命令用于显示系统中可用的 DNF 软件库
# dnf repolist
查看系统中可用和不可用的所有的 DNF 软件库
用处:该命令用于显示系统中可用和不可用的所有的 DNF 软件库
# dnf repolist all
列出所有 RPM 包
用处:该命令用于列出用户系统上的所有来自软件库的可用软件包和所有已经安装在系统上的软件包
# dnf list
用处:使用该命令,系统将会自动安装对应的软件及其所需的所有依赖(在本例中,我们将用该命令安装nano软件)
# dnf install nano
升级软件包
用处:该命令用于升级制定软件包(在本例中,我们将用命令升级”systemd”这一软件包)
# dnf update systemd
11、echo 输出信息
1 [root@centos7 ~]#echo $SHELL              查看当前使用的shell类型
2 /bin/bash
3 [root@centos7 ~]#echo $PATH               显示外部命令路径
4 /usr/local/sbin:/usr/local/bin:/usr/sbin:/usr/bin:/root/bin
5 [root@centos7 ~]#
12、enable 启用和禁用内部命令
若要执行的文件名称与shell内建指令相同,可用enable -n来关闭shell内建指令。若不加-n参数,enable可重新启动关闭的指令。
1 [root@centos7 ~]#enable -n type       禁用type
2 [root@centos7 ~]#type type
3 bash: type: command not found...      type命令已无法使用
4 [root@centos7 ~]#enable -n            查看被禁用的命令
5 enable -n type
6 [root@centos7 ~]#enable type          启用type
7 [root@centos7 ~]#type type
8 type is a shell builtin
9 [root@centos7 ~]#
13、file 查看文件类型
Linux file命令用于辨识文件类型。
通过file指令,我们得以辨识该文件的类型。
示例:
1 [root@centos7 ~]#file .bashrc
2 .bashrc: ASCII text
3 [root@centos7 ~]#
14、free 显示内存状态
Linux free命令用于显示内存状态。
free指令会显示内存的使用情况,包括实体内存,虚拟的交换文件内存,共享内存区段,以及系统核心使用的缓冲区等。
示例:
 1 [root@centos7 ~]#free
 2               total        used        free      shared  buff/cache   available
 3 Mem:        1863104      275736     1361168       10196      226200     1419704
 4 Swap:       4194300           0     4194300
 5 [root@centos7 ~]#free -h
 6               total        used        free      shared  buff/cache   available
 7 Mem:           1.8G        268M        1.3G          9M        220M        1.4G
 8 Swap:          4.0G          0B        4.0G
 9 [root@centos7 ~]#cat /proc/meminfo
10 MemTotal:        1863104 kB
11 MemFree:         1361540 kB
12 MemAvailable:    1420096 kB
13 Buffers:            2092 kB
14 Cached:           171372 kB
15 SwapCached:            0 kB
16 Active:           146904 kB
17 Inactive:         129072 kB
18 Active(anon):     103156 kB
19 Inactive(anon):     9552 kB
20 Active(file):      43748 kB
21 Inactive(file):   119520 kB
22 Unevictable:           0 kB
23 Mlocked:               0 kB
24 SwapTotal:       4194300 kB
25 SwapFree:        4194300 kB
26 Dirty:                 0 kB
27 Writeback:             0 kB
28 AnonPages:        102552 kB
29 Mapped:            39600 kB
30 Shmem:             10196 kB
31 Slab:             101424 kB
32 SReclaimable:      52756 kB
33 SUnreclaim:        48668 kB
34 KernelStack:        4992 kB
35 PageTables:         8996 kB
36 NFS_Unstable:          0 kB
37 Bounce:                0 kB
38 WritebackTmp:          0 kB
39 CommitLimit:     5125852 kB
40 Committed_AS:     890904 kB
41 VmallocTotal:   34359738367 kB
42 VmallocUsed:      182888 kB
43 VmallocChunk:   34359310332 kB
44 HardwareCorrupted:     0 kB
45 AnonHugePages:     10240 kB
46 CmaTotal:              0 kB
47 CmaFree:               0 kB
48 HugePages_Total:       0
49 HugePages_Free:        0
50 HugePages_Rsvd:        0
51 HugePages_Surp:        0
52 Hugepagesize:       2048 kB
53 DirectMap4k:      112512 kB
54 DirectMap2M:     1984512 kB
55 DirectMap1G:           0 kB
15、hash 显示hash缓存
linux系统下会有一个hash表,每个SHLL独立,当你新开一个SHELL的时候,这个hash表为空,每当你执行过一条命令时,hash表会记录下这条命令的路径,就相当于缓存一样。第一次执行命令shell解释器默认的会从PATH路径下寻找该命令的路径,当你第二次使用该命令时,shell解释器首先会查看hash表,没有该命令才会去PATH路径下寻找。
1 [root@centos7 ~]#hash -l          显示hash缓存
2 builtin hash -p /usr/bin/cat cat
3 [root@centos7 ~]#hash -r          清除hash缓存
4 [root@centos7 ~]#
16、hostname 显示当前主机名
显示和设置系统的主机名
补充说明
hostname命令 用于显示和设置系统的主机名称。环境变量HOSTNAME也保存了当前的主机名。在使用hostname命令设置主机名后,系统并不会永久保存新的主机名,重新启动机器之后还是原来的主机名。如果需要永久修改主机名,需要同时修改/etc/hosts和/etc/sysconfig/network的相关内容。
示例:
1 [root@centos7 ~]#hostname       显示当前主机名
2 centos7.magedu.org
3 [root@centos7 ~]#hostname -I    显示本机IP地址
4 10.0.0.206 192.168.122.1
5 [root@centos7 ~]#hostnamectl set-hostname      直接更改主机名
17、history 命令历史
用于显示历史命令
补充说明
history命令 用于显示指定数目的指令命令,读取历史命令文件中的目录到历史命令缓冲区和将历史命令缓冲区中的目录写入命令文件。
该命令单独使用时,仅显示历史命令,在命令行中,可以使用符号!执行指定序号的历史命令。例如,要执行第2个历史命令,则输入!2。
历史命令是被保存在内存中的,当退出或者登录shell时,会自动保存或读取。在内存中,历史命令仅能够存储1000条历史命令,该数量是由环境变量HISTSIZE进行控制。
-c: 清空命令历史
示例:
 1 [root@centos7 ~]#history                       显示执行命令历史
 2     1  ifconfig
 3     2  poweroff
 4     3  type ls
 5     4  type echo
 6     5  hash
 7     6  cat /etc/issue
 8     7  hash
 9     8  type type
10     9  enable
11 .............
12
13 [root@centos7 ~]#!372                         执行第372条命令
14 hash -l
15 builtin hash -p /usr/bin/hostname hostname
16 builtin hash -p /usr/bin/host host
17
18 [root@centos7 ~]#echo $HISTSIZE               默认记录1000条历史命令
19 1000
20
21 [root@centos7 ~]#nano /etc/profile            编辑profile文件
22
23
24     pathmunge /usr/local/sbin after
25     pathmunge /usr/sbin after
26 fi
27
28 HOSTNAME=`/usr/bin/hostname 2>/dev/null`
29 HISTSIZE=1000                                改为你想要的数字即可更改记录的最大命令数
30 if [ "$HISTCONTROL" = "ignorespace" ] ; then
31     export HISTCONTROL=ignoreboth
32 else
33     export HISTCONTROL=ignoredups
34 fi
35
36 export PATH USER LOGNAME MAIL HOSTNAME HISTSIZE HISTCONTROL
18、help 帮助命令
help命令 用于显示shell内部命令的帮助信息。help命令只能显示shell内部的命令帮助信息。而对于外部命令的帮助信息只能使用man或者info命令查看。
示例:
 1 [root@centos7 ~]#type history            判断是内部命令还是外部命令
 2 history is a shell builtin
 3 [root@centos7 ~]#help history            查看
 4 history: history [-c] [-d offset] [n] or history -anrw [filename] or history -ps arg [arg...]
 5     Display or manipulate the history list.
 6
 7     Display the history list with line numbers, prefixing each modified
 8     entry with a `*'.  An argument of N lists only the last N entries.
 9
10     Options:
11       -c    clear the history list by deleting all of the entries
12       -d offset    delete the history entry at offset OFFSET.
13
14       -a    append history lines from this session to the history file
15       -n    read all history lines not already read from the history file
16       -r    read the history file and append the contents to the history
17         list
18       -w    write the current history to the history file
19         and append them to the history list
20
21       -p    perform history expansion on each ARG and display the result
22         without storing it in the history list
23       -s    append the ARGs to the history list as a single entry
24
25     If FILENAME is given, it is used as the history file.  Otherwise,
26     if $HISTFILE has a value, that is used, else ~/.bash_history.
27
28     If the $HISTTIMEFORMAT variable is set and not null, its value is used
29     as a format string for strftime(3) to print the time stamp associated
30     with each displayed history entry.  No time stamps are printed otherwise.
31
32     Exit Status:
33     Returns success unless an invalid option is given or an error occurs.
34 [root@centos7 ~]#
19、man 帮助命令
man命令 是Linux下的帮助指令,通过man指令可以查看Linux中的指令帮助、配置文件帮助和编程帮助等信息。
示例:
我们输入man ls,它会在最左上角显示“LS(1)”,在这里,“LS”表示手册名称,而“(1)”表示该手册位于第一节章,同样,我们输man ifconfig它会在最左上角显示“IFCONFIG(8)”。也可以这样输入命令:“man [章节号] 手册名称”。
man是按照手册的章节号的顺序进行搜索的,比如:
man sleep
只会显示sleep命令的手册,如果想查看库函数sleep,就要输入:
man 3 sleep
20、lscpu 查看cpu
lscpu命令可以查看cpu信息
cat /proc/cpuinfo也可看查看到
此命令用来显示cpu的相关信息
lscpu从sysfs和/proc/cpuinfo收集cpu体系结构信息,命令的输出比较易读
命令输出的信息包含cpu数量,线程,核数,套接字和Nom-Uniform Memeor Access(NUMA),缓存等
不是所有的列都支持所有的架构,如果指定了不支持的列,那么lscpu将打印列,但不显示数据
 1 [root@centos7 ~]#lscpu
 2 Architecture:          x86_64
 3 CPU op-mode(s):        32-bit, 64-bit
 4 Byte Order:            Little Endian
 5 CPU(s):                2
 6 On-line CPU(s) list:   0,1
 7 Thread(s) per core:    1
 8 Core(s) per socket:    1
 9 Socket(s):             2
10 NUMA node(s):          1
11 Vendor ID:             GenuineIntel
12 CPU family:            6
13 Model:                 94
14 Model name:            Intel(R) Core(TM) i5-6300HQ CPU @ 2.30GHz
15 Stepping:              3
16 CPU MHz:               2304.000
17 BogoMIPS:              4608.00
18 Hypervisor vendor:     VMware
19 Virtualization type:   full
20 L1d cache:             32K
21 L1i cache:             32K
22 L2 cache:              256K
23 L3 cache:              6144K
24 NUMA node0 CPU(s):     0,1
25 Flags:                 fpu vme de pse tsc msr pae mce cx8 apic sep mtrr pge mca cmov pat pse36 clflush mmx fxsr sse sse2 ss syscall nx pdpe1gb rdtscp lm constant_tsc arch_perfmon nopl xtopology tsc_reliable nonstop_tsc eagerfpu pni pclmulqdq ssse3 fma cx16 pcid sse4_1 sse4_2 x2apic movbe popcnt tsc_deadline_timer aes xsave avx f16c rdrand hypervisor lahf_lm abm 3dnowprefetch ssbd ibrs ibpb stibp fsgsbase tsc_adjust bmi1 hle avx2 smep bmi2 invpcid rtm mpx rdseed adx smap clflushopt xsaveopt xsavec arat spec_ctrl intel_stibp flush_l1d arch_capabilities
 1 [root@centos7 ~]#cat /proc/cpuinfo
 2 processor    : 0
 3 vendor_id    : GenuineIntel
 4 cpu family    : 6
 5 model        : 94
 6 model name    : Intel(R) Core(TM) i5-6300HQ CPU @ 2.30GHz
 7 stepping    : 3
 8 microcode    : 0xc6
 9 cpu MHz        : 2304.000
10 cache size    : 6144 KB
11 physical id    : 0
12 siblings    : 1
13 core id        : 0
14 cpu cores    : 1
15 apicid        : 0
16 initial apicid    : 0
17 fpu        : yes
18 fpu_exception    : yes
19 cpuid level    : 22
20 wp        : yes
21 flags        : fpu vme de pse tsc msr pae mce cx8 apic sep mtrr pge mca cmov pat pse36 clflush mmx fxsr sse sse2 ss syscall nx pdpe1gb rdtscp lm constant_tsc arch_perfmon nopl xtopology tsc_reliable nonstop_tsc eagerfpu pni pclmulqdq ssse3 fma cx16 pcid sse4_1 sse4_2 x2apic movbe popcnt tsc_deadline_timer aes xsave avx f16c rdrand hypervisor lahf_lm abm 3dnowprefetch ssbd ibrs ibpb stibp fsgsbase tsc_adjust bmi1 hle avx2 smep bmi2 invpcid rtm mpx rdseed adx smap clflushopt xsaveopt xsavec arat spec_ctrl intel_stibp flush_l1d arch_capabilities
22 bogomips    : 4608.00
23 clflush size    : 64
24 cache_alignment    : 64
25 address sizes    : 43 bits physical, 48 bits virtual
26 power management:
27
28 processor    : 1
29 vendor_id    : GenuineIntel
30 cpu family    : 6
31 model        : 94
32 model name    : Intel(R) Core(TM) i5-6300HQ CPU @ 2.30GHz
33 stepping    : 3
34 microcode    : 0xc6
35 cpu MHz        : 2304.000
36 cache size    : 6144 KB
37 physical id    : 2
38 siblings    : 1
39 core id        : 0
40 cpu cores    : 1
41 apicid        : 2
42 initial apicid    : 2
43 fpu        : yes
44 fpu_exception    : yes
45 cpuid level    : 22
46 wp        : yes
47 flags        : fpu vme de pse tsc msr pae mce cx8 apic sep mtrr pge mca cmov pat pse36 clflush mmx fxsr sse sse2 ss syscall nx pdpe1gb rdtscp lm constant_tsc arch_perfmon nopl xtopology tsc_reliable nonstop_tsc eagerfpu pni pclmulqdq ssse3 fma cx16 pcid sse4_1 sse4_2 x2apic movbe popcnt tsc_deadline_timer aes xsave avx f16c rdrand hypervisor lahf_lm abm 3dnowprefetch ssbd ibrs ibpb stibp fsgsbase tsc_adjust bmi1 hle avx2 smep bmi2 invpcid rtm mpx rdseed adx smap clflushopt xsaveopt xsavec arat spec_ctrl intel_stibp flush_l1d arch_capabilities
48 bogomips    : 4608.00
49 clflush size    : 64
50 cache_alignment    : 64
51 address sizes    : 43 bits physical, 48 bits virtual
52 power management:
Architecture: #架构
CPU(s): #逻辑cpu颗数
Thread(s) per core: #每个核心线程
Core(s) per socket: #每个cpu插槽核数/每颗物理cpu核数
CPU socket(s): #cpu插槽数
Vendor ID: #cpu厂商ID
CPU family: #cpu系列
Model: #型号
Stepping: #步进
CPU MHz: #cpu主频
Virtualization: #cpu支持的虚拟化技术
L1d cache: #一级缓存(google了下,这具体表示表示cpu的L1数据缓存)
L1i cache: #一级缓存(具体为L1指令缓存)
L2 cache: #二级缓存
21、lsblk 列出块设备信息
lsblk命令 用于列出所有可用块设备的信息,而且还能显示他们之间的依赖关系,但是它不会列出RAM盘的信息。块设备有硬盘,闪存盘,cd-ROM等等。lsblk命令包含在util-linux-ng包中,现在该包改名为util-linux。这个包带了几个其它工具,如dmesg。要安装lsblk,请在此处下载util-linux包。Fedora用户可以通过命令sudo yum install util-linux-ng来安装该包。
1 [root@centos7 ~]#lsblk
2 NAME   MAJ:MIN RM  SIZE RO TYPE MOUNTPOINT
3 sda      8:0    0  200G  0 disk
4 ├─sda1   8:1    0    1G  0 part /boot
5 ├─sda2   8:2    0  100G  0 part /
6 ├─sda3   8:3    0    4G  0 part [SWAP]
7 ├─sda4   8:4    0    1K  0 part
8 └─sda5   8:5    0   50G  0 part /data
9 sr0     11:0    1 10.3G  0 rom
-
NAME :这是块设备名。
-
MAJ:MIN :本栏显示主要和次要设备号。
-
RM :本栏显示设备是否可移动设备。注意,在本例中设备sdb和sr0的RM值等于1,这说明他们是可移动设备。
-
SIZE :本栏列出设备的容量大小信息。例如298.1G表明该设备大小为298.1GB,而1K表明该设备大小为1KB。
-
RO :该项表明设备是否为只读。在本案例中,所有设备的RO值为0,表明他们不是只读的。
-
TYPE :本栏显示块设备是否是磁盘或磁盘上的一个分区。在本例中,sda和sdb是磁盘,而sr0是只读存储(rom)。
-
MOUNTPOINT :本栏指出设备挂载的挂载点。
22、screen 会话管理
Linux screen命令用于多重视窗管理程序。
screen为多重视窗管理程序。此处所谓的视窗,是指一个全屏幕的文字模式画面。通常只有在使用telnet登入主机或是使用老式的终端机时,才有可能用到screen程序。
1 [root@centos7 ~]#yum -y install screen      安装screen程序
2
3 [root@centos7 ~]#screen -S help             开启名为help的协同窗口
4
5 [root@centos7 ~]#screen -ls                 查看当前创建的窗口
6
7 [root@centos7 ~]#screen -X help             加入名为help的窗口     剥离会话 ctrl+a,d
23、w
显示当前有哪些用户登录并且在干什么
1 [root@centos7 ~]#w
2  19:40:43 up  6:05,  3 users,  load average: 0.00, 0.01, 0.05
3 USER     TTY      FROM             LOGIN@   IDLE   JCPU   PCPU WHAT
4 root     tty1                      15:08    4:31m  0.07s  0.07s -bash
5 root     pts/0    10.0.0.1         18:36   55:07   0.08s  0.01s nano /etc/profile
6 root     pts/1    10.0.0.1         19:02    3.00s  0.22s  0.03s w
24、which
Linux which命令用于查找文件。
which指令会在环境变量$PATH设置的目录里查找符合条件的文件。
- -n<文件名长度> 指定文件名长度,指定的长度必须大于或等于所有文件中最长的文件名。
- -p<文件名长度> 与-n参数相同,但此处的<文件名长度>包括了文件的路径。
- -w 指定输出时栏位的宽度。
- -V 显示版本信息。
1 [root@centos7 ~]#which man
2 /usr/bin/man
25、whoami
Linux whoami命令用于显示自身用户名称。
1 [root@centos7 ~]#whoami
2 root
26、“ ” ,‘ ’, ``三者区别
单引号:六亲不认,变量和命令都不识别,都当成了普通的字符串
反向单引号:变量和命令都识别,并且会将反向单引号的内容当成命令进行执行后,再交给调用反向单引号的命令继续
双引号:不能识别命令,可以识别变量
1 [root@centos7 ~]#echo "$PATH"
2 /usr/local/sbin:/usr/local/bin:/usr/sbin:/usr/bin:/root/bin
3 [root@centos7 ~]#echo "echo $HOSTNAME"
4 echo centos7.magedu.org
5 [root@centos7 ~]#echo 'echo $HOSTNAME'
6 echo $HOSTNAME
7 [root@centos7 ~]#echo `echo $HOSTNAME`
8 centos7.magedu.org
9 [root@centos7 ~]#
示例:
1 [root@centos7 ~]#echo "This system's name is $(hostname)"
2 This system's name is centos7.magedu.org
3 [root@centos7 ~]#echo "I am `whoami`"
4 I am root
剥离screen会话 ctrl+a,d

 浙公网安备 33010602011771号