iptables防火墙规则介绍与配置
防火墙简单介绍
- 防火墙根据什么对外网的进出数据流进行控制?
- 源IP、目标IP、源端口号、目标端口号、协议、指针位(SYN、FIN、ACK、RST)、状态(NEW、ESTABLISHED、INVIAD)、MAC地址等
防火墙的分类?
1、从软硬角度
- 软件:ISA、windows自带的、iptables
- 硬件:ASA、juniper
工作的层次不同
- 网络防火墙:工作在三层
- 状态防火墙:工作在三层
- 代理防火墙:工作在应用层 反向代理(squid、nginx、varnish、haproxy、lvs)
iptables
# 五链(钩子函数)
INPUT
OUTPUT
FORWARD
PREROUTING
POSTROUTING

# 四表
raw:负责数据的状态跟踪
PREROUTING
OUTPUT

mangle:修改数据的标识
INPUT
OUTPUT
FORWARD
PREROUTING
POSTROUTING

nat:修改源、目标ip或端口
PREROUTING
POSTROUTING
OUTPUT

filter:数据的过滤
INPUT
OUTPUT
FORWARD
书写规则的方法
“堵”:使用画像一个一个比对 白名单
“通”:使用“良民证”,有可以通过,没有拒绝通过 黑名单
规则的匹配方法
自上往下,逐一匹配;匹配即停止(除log外),未匹配则使用默认
注意:
书写规则时一定注意先后顺序
书写规则的建议
越详细越写在规则的前面,越模糊越往后;如模糊包含详细则使用模糊。
表的匹配顺序
raw—–> mangle—–> nat—–> filter
规则链的匹配顺序
- 入站数据:PREROUTING—->INPUT
- 出站数据:OUTPUT—–>POSTROUTING
- 转发数据:PREROUTING—–>FORWARD——>POSTRING
#开启linux的路由转发功能:
1、临时
[root@localhost ~]# echo “1” > /proc/sys/net/ipv4/ip_forward
或
[root@localhost ~]# /sbin/sysctl -w net.ipv4.ip_forward=1
2、永久
[root@localhost ~]# vim /etc/sysctl.conf
net.ipv4.ip_forward = 1 //将原来的0改为1,
[root@localhost ~]# sysctl -p //使对/etc/sysctl.conf的修改的生效
iptables规则的语法
iptables [-t 表名] 管理选项 [链名] [条件匹配] [-j 动作或跳转]
注意事项:
1、中括号内的内容可以省略
2、缺省表,指的是filter表
3、链名、动作或跳转字母必须大写
4、设置链的默认策略/规则,可以不写条件匹配,此外必须都写
5、不指定链名,为该表内的所有链

动作:
ACCEPT 允许
DROP 丢弃,时不时会返回一些信息
LOG 记录日志
REJECT 拒绝
SNAT 修改源IP地址
DNAT 修改目标IP地址
MASQUERADE 地址伪装

管理选项:
编辑规则:
-A:在指定链末尾添加新规则
-I: 在指定链首部或指定位置插入规则
-R: 修改、替换指定链中的某一条规则,按规则的序号或内容确定
-P:设置指定链的默认规则
-N:新建一条用户自定义的规则链
清除规则:
-D:删除指定链中的某一条规则,按规则的序号或内容确定
-F:清空指定链中的所有规则
-X:删除指定表中用户自定义的规则链
查看规则:
-L:列出指定中所有的规则进行查看,若未指定链名,则列出表中所有链的内容
-n:使用数字形式显示输出结果
-v:插卡规则列表时显示详细信息
–line-numbers:查看规则列表时,同时显示规则在链中的序号
-h:查看命令的帮助信息
-V:查看iptables命令工具的版本信息

条件匹配:
通用条件匹配:
-p 协议名称: 常用的有ip、tcp、udp、icmp等 !取反 如:-p !icmp(除了icmp协议)
-s 源IP地址或-s 源网络/子网掩码
-d 目标IP地址或-d 目标网络/子网掩码
-i 接口名称: 如 -i eth0(数据从网卡eth0进入)
-o 接口名称: 如 -o eth2(数据从网卡eth2出去)

隐含条件匹配:
–sport:源端口号 端口号1:端口号2(表示连续的端口)
–dport:目标端口号
–tcp-flags:
格式:–tcp-flags 检查的标志位范围 设置的标志位
说明:
标志位的范围:SYN,RST,ACK,FIN
设置的标志位:该标志位为1,则匹配规则
例如:iptables -A INPUT -s 192.168.100.20 -p tcp –tcp-flags SYN,ACK,RST,FIN SYN -j ACCEPT
或
iptables -A INPUT -s 192.168.100.20 -p tcp –syn -j ACCEPT
! –syn:
–icmp-type: icmp消息的类型
echo-request/8: 请求
echo-reply/0: 回应

显示条件匹配:
-m limit:
–limit 速度:n/s:每秒n个数据包 n/m:每分钟n个数据包 n/h:每小时n个数据包
–limit-burst 峰值: 默认是5
-m connlimit:
–connlimit-above n: 运行建立n个以上的连接
!–connlimit-above n: 只允许连接小于等于n个连接
-m state:
–state:
new(发起连接请求)、established(连接建立成功)、related(连接相关联)、invalid(无效)、none(无)
-m iprange:
–src-range IP地址范围:
–dst-range IP地址范围:使用“-”表示连续
-m multiport:
–sports 源端口范围:
–dports 目标端口范围:使用“:”表示连续;多个不连续的端口使用“,”分割
-m mac:
–source-mac 源MAC:
规则的保存
service iptables save:将编辑的好的规则保存至/etc/sysconfig/iptables中,iptables服务重启时会自动应用保存在该文件中的规则
iptables-save:将编辑好的规则导出至指定位置 例如:iptables-save > /tmp/defaultrule
iptables-restore:导入编辑好的规则 如:iptables-restore < /tmp/defaultrule
防火墙配置
查看
iptables -nvL --line-number
-L 查看当前表的所有规则,默认查看的是filter表,如果要查看NAT表,可以加上-t NAT参数
-n 不对ip地址进行查,加上这个参数显示速度会快很多
-v 输出详细信息,包含通过该规则的数据包数量,总字节数及相应的网络接口
–line-number 显示规则的序列号,这个参数在删除或修改规则时会用到
添加
添加规则有两个参数:-A和-I。其中-A是添加到规则的末尾;-I可以插入到指定位置,没有指定位置的话默认插入到规则的首部
例如当前规则:
[root@test ~]# iptables -nL --line-number
Chain INPUT (policy ACCEPT)
num  target     prot opt source               destination
1    DROP       all  --  192.168.1.1          0.0.0.0/0
2    DROP       all  --  192.168.1.2          0.0.0.0/0
3    DROP       all  --  192.168.1.4          0.0.0.0/0
添加一条规则到尾部:

[root@test ~]# iptables -A INPUT -s 192.168.1.5 -j DROP
再插入一条规则到第三行:

[root@test ~]# iptables -I INPUT 3 -s 192.168.1.3 -j DROP
查看:

[root@test ~]# iptables -nL --line-number
Chain INPUT (policy ACCEPT)
num  target     prot opt source               destination
1    DROP       all  --  192.168.1.1          0.0.0.0/0
2    DROP       all  --  192.168.1.2          0.0.0.0/0
3    DROP       all  --  192.168.1.3          0.0.0.0/0
4    DROP       all  --  192.168.1.4          0.0.0.0/0
5    DROP       all  --  192.168.1.5          0.0.0.0/0
可以看到192.168.1.3插入到第三行,而原来的第三行192.168.1.4变成了第四行。
删除
删除用-D参数
删除之前添加的规则(iptables -A INPUT -s 192.168.1.5 -j DROP):
[root@test ~]# iptables -D INPUT -s 192.168.1.5 -j DROP
有时候有些规则太长,删除时要写一大串,既浪费时间又容易写错,这时我们可以先使用–line-number查看出该条规则的行号,再通过行号删除
[root@test ~]# iptables -nv --line-number
iptables v1.4.7: no command specified
Try `iptables -h' or 'iptables --help' for more information.
[root@test ~]# iptables -nL --line-number
Chain INPUT (policy ACCEPT)
num  target     prot opt source               destination
1    DROP       all  --  192.168.1.1          0.0.0.0/0
2    DROP       all  --  192.168.1.2          0.0.0.0/0
3    DROP       all  --  192.168.1.3          0.0.0.0/0
删除第二行规则
[root@test ~]# iptables -D INPUT 2
修改
修改使用-R参数

将第三行规则改为ACCEPT
先看下当前规则:

[root@test ~]# iptables -nL --line-number
Chain INPUT (policy ACCEPT)
num  target     prot opt source               destination
1    DROP       all  --  192.168.1.1          0.0.0.0/0
2    DROP       all  --  192.168.1.2          0.0.0.0/0
3    DROP       all  --  192.168.1.5          0.0.0.0/0
修改:

[root@test ~]# iptables -R INPUT 3 -j ACCEPT
再查看下:

[root@test ~]# iptables -nL --line-number
Chain INPUT (policy ACCEPT)
num  target     prot opt source               destination
1    DROP       all  --  192.168.1.1          0.0.0.0/0
2    DROP       all  --  192.168.1.2          0.0.0.0/0
3    ACCEPT     all  --  0.0.0.0/0            0.0.0.0/0
IPTABLES 规则(Rules)
牢记以下三点式理解iptables规则的关键:

Rules包括一个条件和一个目标(target)
如果满足条件,就执行目标(target)中的规则或者特定值。
如果不满足条件,就判断下一条Rules。
目标值(Target Values)
下面是你可以在target里指定的特殊值:

ACCEPT – 允许防火墙接收数据包
DROP – 防火墙丢弃包
QUEUE – 防火墙将数据包移交到用户空间
RETURN – 防火墙停止执行当前链中的后续Rules,并返回到调用链(the calling chain)中。
如果你执行iptables --list你将看到防火墙上的可用规则。下例说明当前系统没有定义防火墙,你可以看到,它显示了默认的filter表,以及表内默认的input链, forward链, output链。

查看filter表(默认不加也是查看的filter表):
iptables -t filter --list
Chain INPUT (policy ACCEPT)
target     prot opt source               destination

Chain FORWARD (policy ACCEPT)
target     prot opt source               destination

Chain OUTPUT (policy ACCEPT)
target     prot opt source               destination

查看mangle表:
iptables -t mangle --list

查看NAT表:
iptables -t nat --list

查看RAW表:
iptables -t raw --list
注意:如果不指定-t选项,就只会显示默认的filter表。因此,以下两种命令形式是一个意思:

iptables -t filter --list   (or)   iptables --list

以下例子表明在filter表的input链, forward链, output链中存在规则:
iptables --list
Chain INPUT (policy ACCEPT)
num  target     prot opt source               destination
1    RH-Firewall-1-INPUT  all  --  0.0.0.0/0            0.0.0.0/0

Chain FORWARD (policy ACCEPT)
num  target     prot opt source               destination
1    RH-Firewall-1-INPUT  all  --  0.0.0.0/0            0.0.0.0/0

Chain OUTPUT (policy ACCEPT)
num  target     prot opt source               destination

Chain RH-Firewall-1-INPUT (2 references)
num  target     prot opt source               destination
1    ACCEPT     all  --  0.0.0.0/0            0.0.0.0/0
2    ACCEPT     icmp --  0.0.0.0/0            0.0.0.0/0           icmp type 255
3    ACCEPT     esp  --  0.0.0.0/0            0.0.0.0/0
4    ACCEPT     ah   --  0.0.0.0/0            0.0.0.0/0
5    ACCEPT     udp  --  0.0.0.0/0            224.0.0.251         udp dpt:5353
6    ACCEPT     udp  --  0.0.0.0/0            0.0.0.0/0           udp dpt:631
7    ACCEPT     tcp  --  0.0.0.0/0            0.0.0.0/0           tcp dpt:631
8    ACCEPT     all  --  0.0.0.0/0            0.0.0.0/0           state RELATED,ESTABLISHED
9    ACCEPT     tcp  --  0.0.0.0/0            0.0.0.0/0           state NEW tcp dpt:22
10   REJECT     all  --  0.0.0.0/0            0.0.0.0/0           reject-with icmp-host-prohibited
以上输出包含下列字段:

num – 指定链中的规则编号
target – 指定条件或目标
prot – 协议:tcp, udp, icmp等
source – 数据包的源IP地址
destination – 数据包的目标IP地址

三、清空所有iptables规则
在配置iptables之前,你通常需要用iptables --list命令或者iptables-save命令查看有无现存规则,因为有时需要删除现有的iptables规则:
iptables --flush 或者 iptables -F
这两条命令是等效的。但是并非执行后就万事大吉了。你仍然需要检查规则是不是真的清空了,因为有的linux发行版上这个命令不会清除NAT表中的规则,此时只能手动清除:

iptables -t NAT -F

四、永久生效
当你删除、添加规则后,这些更改并不能永久生效,这些规则很有可能在系统重启后恢复原样。为了让配置永久生效,根据平台的不同,具体操作也不同。下面进行简单介绍:

1.Ubuntu
首先,保存现有的规则:
iptables-save > /etc/iptables.rules
然后新建一个bash脚本,并保存到/etc/network/if-pre-up.d/目录下:

#!/bin/bash
iptables-restore < /etc/iptables.rules
这样,每次系统重启后iptables规则都会被自动加载。
注意:不要尝试在.bashrc或者.profile中执行以上命令,因为用户通常不是root,而且这只能在登录时加载iptables规则。

2.CentOS, RedHat
# 保存iptables规则
service iptables save

# 重启iptables服务
service iptables stop
service iptables start
查看当前规则:

cat  /etc/sysconfig/iptables
追加规则的完整实例:仅允许SSH服务
本例实现的规则将仅允许SSH数据包通过本地计算机,其他一切连接(包括ping)都将被拒绝。
1.清空所有iptables规则
iptables -F

2.接收目标端口为22的数据包
iptables -A INPUT -i eth0 -p tcp --dport 22 -j ACCEPT

3.拒绝所有其他数据包
iptables -A INPUT -j DROP
默认链策略
警告:请勿在远程连接的服务器、虚拟机上测试!
当我们使用-L选项验证当前规则是发现,所有的链旁边都有policy ACCEPT标注,这表明当前链的默认策略为ACCEPT:
iptables -L
Chain INPUT (policy ACCEPT)
target     prot opt source               destination
ACCEPT     tcp  --  anywhere             anywhere            tcp dpt:ssh
DROP       all  --  anywhere             anywhere

Chain FORWARD (policy ACCEPT)
target     prot opt source               destination

Chain OUTPUT (policy ACCEPT)
target     prot opt source               destination
这种情况下,如果没有明确添加DROP规则,那么默认情况下将采用ACCEPT策略进行过滤。除非:
a)为以上三个链单独添加DROP规则:

iptables -A INPUT -j DROP
iptables -A OUTPUT -j DROP
iptables -A FORWARD -j DROP
b)更改默认策略:

iptables -P INPUT DROP
iptables -P OUTPUT DROP
iptables -P FORWARD DROP
糟糕!!如果你严格按照上一节的例子配置了iptables,并且现在使用的是SSH进行连接的,那么会话恐怕已经被迫终止了!
为什么呢?因为我们已经把OUTPUT链策略更改为DROP了。此时虽然服务器能接收数据,但是无法发送数据:

iptables -L
Chain INPUT (policy DROP)
target     prot opt source               destination
ACCEPT     tcp  --  anywhere             anywhere            tcp dpt:ssh
DROP       all  --  anywhere             anywhere

Chain FORWARD (policy DROP)
target     prot opt source               destination

Chain OUTPUT (policy DROP)
target     prot opt source               destination
配置应用程序规则
尽管前面已经介绍了如何初步限制除SSH以外的其他连接,但是那是在链默认策略为ACCEPT的情况下实现的,并且没有对输出数据包进行限制。本节在上一节基础上,以SSH和HTTP所使用的端口为例,教大家如何在默认链策略为DROP的情况下,进行防火墙设置。在这里,我们将引进一种新的参数-m state,并检查数据包的状态字段。
1.SSH
# 允许接收远程主机的SSH请求
iptables -A INPUT -i eth0 -p tcp --dport 22 -m state --state NEW,ESTABLISHED -j ACCEPT

# 允许发送本地主机的SSH响应
iptables -A OUTPUT -o eth0 -p tcp --sport 22 -m state --state ESTABLISHED -j ACCEPT
-m state: 启用状态匹配模块(state matching module)
–-state: 状态匹配模块的参数。当SSH客户端第一个数据包到达服务器时,状态字段为NEW;建立连接后数据包的状态字段都是ESTABLISHED
–sport 22: sshd监听22端口,同时也通过该端口和客户端建立连接、传送数据。因此对于SSH服务器而言,源端口就是22
–dport 22: ssh客户端程序可以从本机的随机端口与SSH服务器的22端口建立连接。因此对于SSH客户端而言,目的端口就是22
如果服务器也需要使用SSH连接其他远程主机,则还需要增加以下配置:

# 送出的数据包目的端口为22
iptables -A OUTPUT -o eth0 -p tcp --dport 22 -m state --state NEW,ESTABLISHED -j ACCEPT

# 接收的数据包源端口为22
iptables -A INPUT -i eth0 -p tcp --sport 22 -m state --state ESTABLISHED -j ACCEPT
2.HTTP
HTTP的配置与SSH类似:

# 允许接收远程主机的HTTP请求
iptables -A INPUT -i eth0 -p tcp --dport 80 -m state --state NEW,ESTABLISHED -j ACCEPT

# 允许发送本地主机的HTTP响应
iptables -A OUTPUT -o eth0 -p tcp --sport 80 -m state --state ESTABLISHED -j ACCEPT

配置默认链策略
iptables -P INPUT DROP
iptables -P FORWARD DROP
iptables -P OUTPUT DROP
3.允许远程主机进行SSH连接
iptables -A INPUT -i eth0 -p tcp --dport 22 -m state --state NEW,ESTABLISHED -j ACCEPT
iptables -A OUTPUT -o eth0 -p tcp --sport 22 -m state --state ESTABLISHED -j ACCEPT
4.允许本地主机进行SSH连接
iptables -A OUTPUT -o eth0 -p tcp --dport 22 -m state --state NEW,ESTABLISHED -j ACCEPT
iptables -A INPUT -i eth0 -p tcp --sport 22 -m state --state ESTABLISHED -j ACCEPT
5.允许HTTP请求
iptables -A INPUT -i eth0 -p tcp --dport 80 -m state --state NEW,ESTABLISHED -j ACCEPT
iptables -A OUTPUT -o eth0 -p tcp --sport 80 -m state --state ESTABLISHED -j ACCEPT
防火墙SNAT、DNAT策略配置
NAT包含DNAT和SNAT
- DNAT:目标地址转换(Destination Network Address Translation)是Linux防火墙的一种地址转换操作,是iptables命令中的一种数据包控制类型,其作用是根据指定条件修改数据包的目标IP和目标端口
- SNAT:源地址转换(Source Network Address Translation)也是Linux防火墙的一种地址转换操作,也是iptables命令中的一种数据包控制类型,其作用是根据指定条件修改数据包的源IP地址
实验测试
1.环境准备
VMware软件
Windows虚拟机作为客户端,IP地址为 12.0.0.12
一台centos7虚拟机作为防火墙,IP地址为12.0.0.1和192.168.10.1
一台centos7虚拟机作为局域网web服务器,IP地址为192.168.10.10
关闭所有主机的Firewalld服务,安装iptables-server,开启iptables防火墙,清空所有规则,内网和外网web服务器安装httpd服务并开启
开启防火墙服务器的路由转发功能
实验过程
2.Windows客户机设置
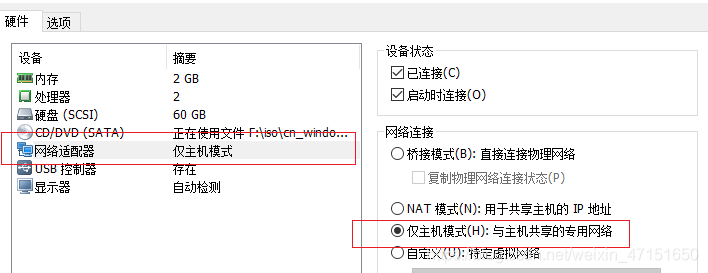
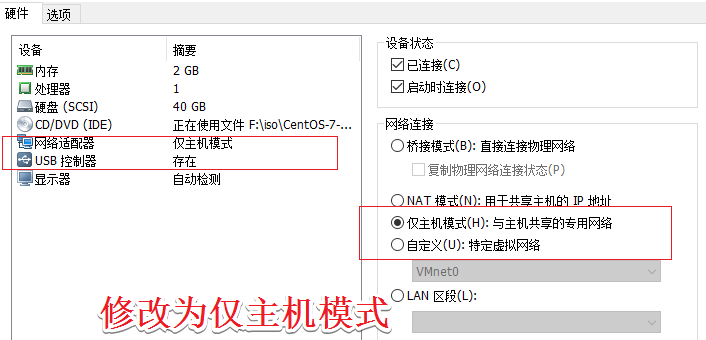
3.web服务器设置
网卡为NAT模式,先安装httpd服务
[root@localhost ~]# yum install httpd -y
[root@localhost ~]# systemctl start httpd
4.修改为仅主机模式
5.编辑网卡,设置IP地址
[root@localhost ~]# vim /etc/sysconfig/network-scripts/ifcfg-ens33
...省略内容
BOOTPROTO="static"	将dhcp修改为static
...省略内容,末尾添加下面内容
IPADDR=192.168.10.10
NETMASK=255.255.255.0
GATEWAY=192.168.10.1
[root@localhost ~]# systemctl restart network
[root@localhost ~]# ifconfig
6.清空防火墙规则
[root@localhost ~]# iptables -F
[root@localhost ~]# iptables -t nat -F
7.防火墙配置网卡
添加一张网卡,两张网卡都改为仅主机模式

[root@firewall ~]# cd /etc/sysconfig/network-scripts/
[root@firewall network-scripts]# cp ifcfg-ens33 ifcfg-ens36
[root@firewall network-scripts]# vim ifcfg-ens33
...省略内容
BOOTPROTO="static"	将dhcp修改为static
...省略内容。添加以下内容
IPADDR=192.168.10.1
NETMASK=255.255.255.0
[root@firewall network-scripts]# vim ifcfg-ens36
...省略内容
BOOTPROTO="static" 将dhcp修改为static
...省略内容
NAME="ens36"	将ens33修改为ens36
    		     删除UUID
DEVICE="ens36"	将ens33修改为ens36
添加以下内容
IPADDR=12.0.0.1
NETMASK=255.255.255.0
[root@firewall network-scripts]# systemctl restart network
[root@firewall network-scripts]# ifconfig
8.关闭Linux虚拟机的防火墙,开启路由转发功能
[root@firewall network-scripts]# iptables -F	   清空防火墙规则
[root@firewall network-scripts]# iptables -t nat -F	  清空DNAT和SNAT规则
[root@firewall network-scripts]# vim /etc/sysctl.conf
..省略内容,末行添加下段内容
net.ipv4.ip_forward=1	  开启路由转发功能
[root@firewall network-scripts]# sysctl -p	  刷新sysctl.conf配置
net.ipv4.ip_forward = 1
9.设置DNAT和SNAT地址映射
[root@firewall ~]# iptables -t nat -I PREROUTING -d 12.0.0.1 -p tcp --dport 80 -i ens36 -j DNAT --to-destination 192.168.10.10
[root@firewall ~]# iptables -t nat -I POSTROUTING -s 192.168.10.10/24 -o ens36 -j SNAT --to-source 12.0.0.1
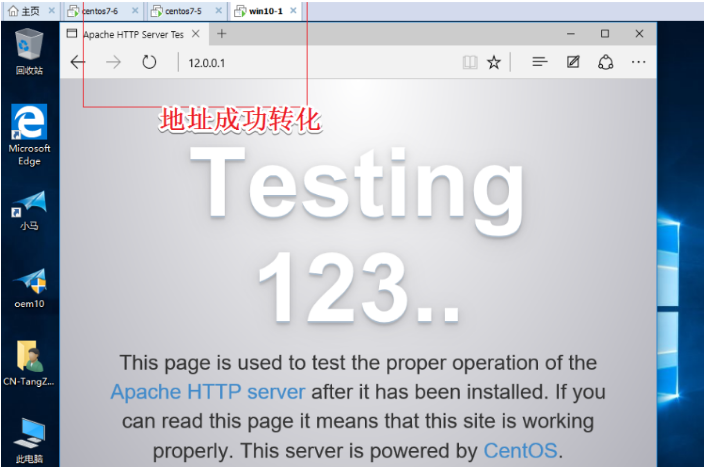
10.实验结果验证
客户端访问

 浙公网安备 33010602011771号