scrapy-基础知识
一个分布式爬虫
https://github.com/gnemoug/distribute_crawler
开源的框架:
scrapy
Cola
https%3A//github.com/chineking/cola
PySpider
portia
spidy
garb
MechanicalSoup
Crawley
scrapy
官方文档 : https://docs.scrapy.org/en/latest/
官方示例 : https://docs.scrapy.org/en/latest/_static/selectors-sample1.html
抓取示例网站:
http://quotes.toscrape.com/
精通 scrap 网络爬虫
示例代码库
https://github.com/fangweiren/Scrapy_Book_Code
scrapy运行原理
旧版原理图:

引擎(Scrapy Engine),用来处理整个系统的数据流处理,触发事务。
调度器(Scheduler),用来接受引擎发过来的请求,压入队列中,并在引擎再次请求的时候返回。
下载器(Downloader),用于下载网页内容,并将网页内容返回给蜘蛛。
蜘蛛(Spiders),蜘蛛是主要干活的,用它来制订特定域名或网页的解析规则。编写用于分析response并提取item(即获取到的item)或额外跟进的URL的类。 每个spider负责处理一个特定(或一些)网站。
项目管道(Item Pipeline),负责处理有蜘蛛从网页中抽取的项目,他的主要任务是清晰、验证和存储数据。当页面被蜘蛛解析后,将被发送到项目管道,并经过几个特定的次序处理数据。
下载器中间件(Downloader Middlewares),位于Scrapy引擎和下载器之间的钩子框架,主要是处理Scrapy引擎与下载器之间的请求及响应。
蜘蛛中间件(Spider Middlewares),介于Scrapy引擎和蜘蛛之间的钩子框架,主要工作是处理蜘蛛的响应输入和请求输出。
调度中间件(Scheduler Middlewares),介于Scrapy引擎和调度之间的中间件,从Scrapy引擎发送到调度的请求和响应。
- Spiders(爬虫):负责处理所有Responses,从中分析提取数据,获取Items字段需要的数据,并将需要跟进的URL提交给引擎,再次进入Scheduler(调度器)。
- Engine(引擎):负责Spider、Item Pipeline、Downloader、Scheduler中间的通讯、信号以及数据传递等。
- Scheduler(调度器):负责接受引擎发送过来的Request请求,并按照一定的方式进行整理排列和入队,当引擎需要时,交还给引擎。
- Downloader(下载器):负责下载引擎发送的所有Requests请求,并将其获取到的Responses交还给引擎,由引擎交给Spider来处理。
- Item Pipeline(管道):负责处理Spider中获取到的Items,并进行后期处理(如详细分析、过滤、存储等)。
- Downloader Middlewares(下载中间件):一个可以自定义下载功能的组件。
- Spider Middlewares(Spider中间件):一个可以自定义引擎和Spider交互的组件。
- 通信的功能组件:如进入Spider的Responses和从Spider出去的Requests。
爬取流程:
上图绿线是数据流向,首先从初始URL开始,Scheduler会将其交给Downloader进行下载,下载之后会交给Spider进行分析,Spider分析出来的结果有两种:一种是需要进一步抓取的链接,例如之前分析的“下一页”的链接,这些东西会被传回Scheduler;另一种是需要保存的数据,它们则被送到Item Pipeline那里,那是对数据进行后期处理(详细分析、过滤、存储等)的地方。另外,在数据流动的通道里还可以安装各种中间件,进行必要的处理。
新版原理图:
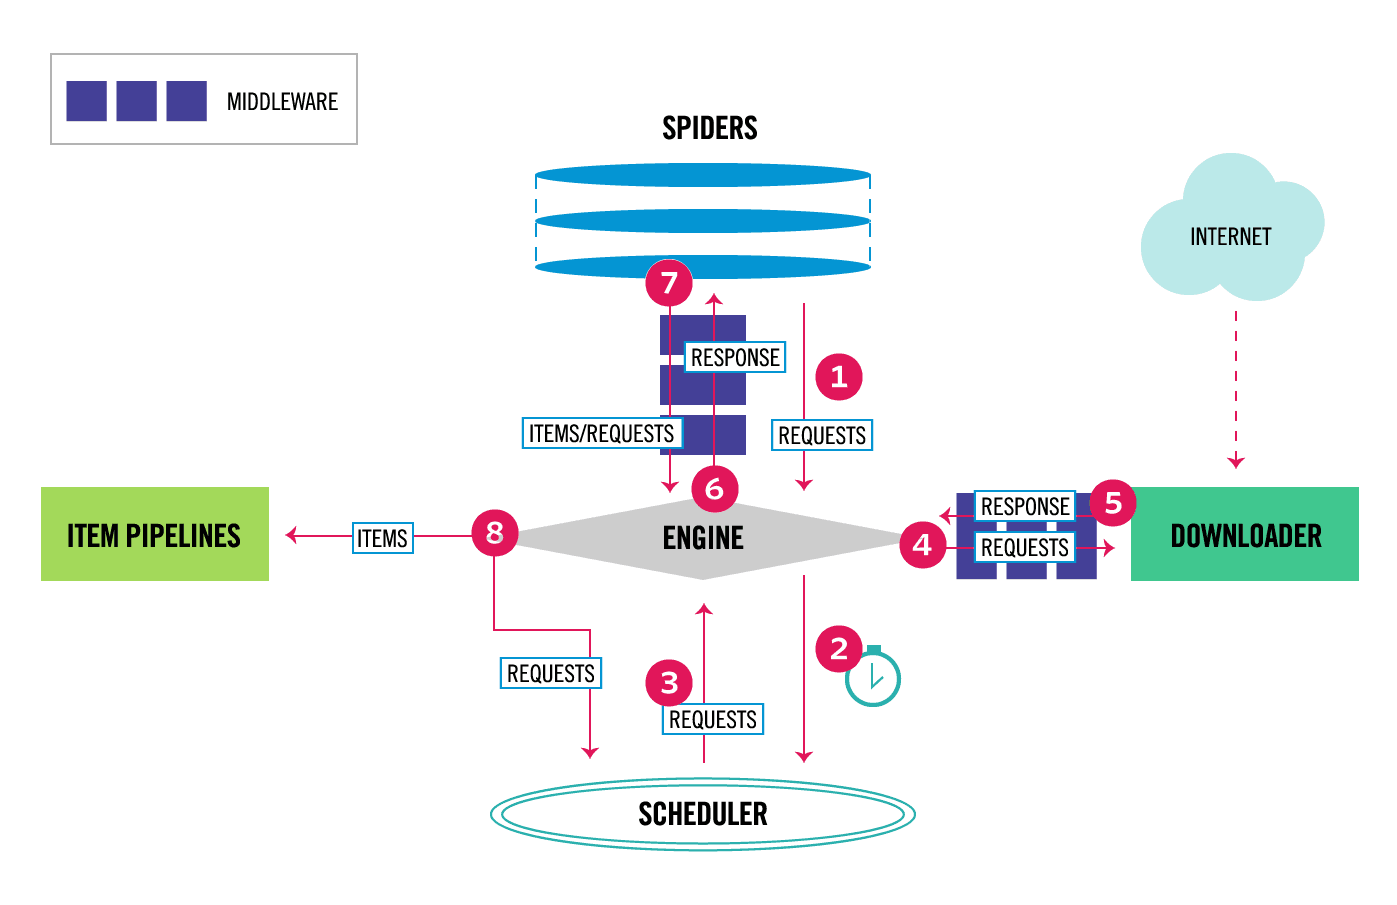
当对象在框架内的流动方式:
1,当Spider 要爬取某URL时,需要使用该URL构造一个Request对象,提交给ENGINE
2,REQUEST 对象随后进入到scheduler按某种算法进行排队,之后的某个时刻schdule 将其出队,送往downloader
3,downloader 根据request对象中的url 地址发送一次请求到目的网站服务器,之后用服务器的返回的http 响应构建一个Response 对象,其中包含了页面的html 文本
4,response 对象最终会送往spider 的页面解析函数,(构造request对象时指定),进行处理,页面解析函数从页面中提取数据,封装成item后提交给engine , item 随后被送往itempiplines 中进行处理, 最终可能由exporter 以某种数据格式写入文件, 另一方面,页面解析函数还可以从页面中提取链接URL ,构造出新的request 对象并提交给engine
数据流:
Scrapy中的数据流由执行引擎控制:
REQUEST RESPONSE ITEM
- 引擎打开一个网站(open a domain),找到处理该网站的Spider并向该spider请求第一个要爬取的URL(s)。
- 引擎从Spider中获取到第一个要爬取的URL并在调度器(Scheduler)以Request调度。
- 引擎向调度器请求下一个要爬取的URL。
- 调度器返回下一个要爬取的URL给引擎,引擎将URL通过下载中间件(请求(request)方向)转发给下载器(Downloader)。
- 一旦页面下载完毕,下载器生成一个该页面的Response,并将其通过下载中间件(返回(response)方向)发送给引擎。
- 引擎从下载器中接收到Response并通过Spider中间件(输入方向)发送给Spider处理。
- Spider处理Response并返回爬取到的Item及(跟进的)新的Request给引擎。
- 引擎将(Spider返回的)爬取到的Item给Item Pipeline,将(Spider返回的)Request给调度器。
- (从第二步)重复直到调度器中没有更多地request,引擎关闭该网站。
组件介绍
- Scrapy Engine(引擎):引擎负责控制数据流在所有组件中的流动,并在相应动作发生时触发事件。 框架的核心,其他所有组件在起控制下协同工作
- Scheduler(调度器):调度器从引擎接受Request并将他们入队,以便之后引擎请求他们时提供给引擎。 负责对spider 提交的下载请求进行调度
- Downloader(下载器):下载器负责获取页面数据并提供给引擎,而后提供给Spiders。 负责下载页面
- Spiders(爬虫):Spiders是用户编写用于分析Response并提取items(即获取到的items)或额外跟进的URL的类。 每个spider负责处理一个特定(或一些)网站。 对新页面产生下载请求
- Item Pipeline(管道):Item Pipeline负责处理被Spider提取出来的items。典型的处理有清理、 验证及持久化(例如存取到数据库中)。 更多内容查看 Item Pipeline 。
- Downloader Middlewares(下载器中间件):下载器中间件是在引擎及下载器之间的特定钩子(specific hook),处理Downloader传递给引擎的Response(也包括引擎传递给下载器的Request),即处理下载请求。 其提供了一个简便的机制,通过插入自定义代码来扩展Scrapy功能。更多内容请看Downloader Middleware 。
- Spider middlewares(爬虫中间件):Spider中间件是在引擎及Spider之间的特定钩子(specific hook),处理Spider的输入(Response)和输出(Items及Requests),即处理解析。 其提供了一个简便的机制,通过插入自定义代码来扩展Scrapy功能。更多内容请看 Spider Middleware 。
形象的数据流程:
1、引擎:怎么样,爬虫老弟,搞起来啊!
2、Spider:好啊,老哥,来来来,开始吧。今天就爬xxx网站怎么样
3、引擎:没问题,入口URL发过来!
4、Spider:呐,入口URL是 https://ww.xxx.com 。
5、引擎:调度器老弟,我这有request请求你帮我排序入队一下吧。
6、调度器:引擎老哥,这是我处理好的request。
7、引擎:下载器老弟,你按照下载中间件的设置帮我下载一下这个request请求。
8、下载器:可以了,这是下载好的东西。(如果失败:sorry,这个request下载失败了。然后引擎告诉调度器,这个request下载失败了,你记录一下,我们待会儿再下载)
9、引擎:爬虫老弟,这是下载好的东西,下载器已经按照下载中间件处理过了,你自己处理一下吧。
10、Spider:引擎老哥,我的数据处理完毕了,这里有两个结果,这个是我需要跟进的URL,还有这个是我获取到的Item数据。
11、引擎:管道老弟,我这儿有个item你帮我处理一下!
12、引擎:调度器老弟,这是需要跟进URL你帮我处理下。(然后从第四步开始循环,直到获取完需要全部信息)
Middlewares中间件
Spider Middlewares: 处理解析Items的相关逻辑修正,比如数据不完整要添加默认,增加其他额外信息等
- process_spider_input(response, spider):当Response通过spider中间件时,该方法被调用,处理该Response。
- process_spider_output(response, result, spider):当Spider处理Response返回result时,该方法被调用。
- process_spider_exception(response, exception, spider):当spider或(其他spider中间件的) process_spider_input()抛出异常时, 该方法被调用。
Downloader Middlewares:处理发出去的请求(Request)和返回结果(Response)的一些回调
- process_request(request, spider):当每个request通过下载中间件时,该方法被调用,这里可以修改UA,代理,Refferer
- process_response(request, response, spider): 这里可以看返回是否是200加入重试机制
- process_exception(request, exception, spider):这里可以处理超时
Request 对象
Request对像用来描述一个http请求, 构造器的方法:
Request(url[, callback, method='GET', headers, body, cookies, meta,
 encoding='utf-8', priority=0, dont_filter=False, errback])
Response 对象
Scrapy的开发流程
项目创建流程
$ scrapy startproject book
- scrapy.cfg
项目的配置文件,带有这个文件的那个目录作为scrapy项目的根目录- items.py
定义你所要抓取的字段- pipelines.py
管道文件,当spider抓取到内容(item)以后,会被送到这里,这些信息(item)在这里会被清洗,去重,保存到文件或者数据库。- middlewares.py
中间件,主要是对功能的拓展,你可以添加一些自定义的功能,比如添加随机user-agent, 添加proxy。- settings.py
设置文件,用来设置爬虫的默认信息,相关功能开启与否,比如是否遵循robots协议,设置默认的headers,设置文件的路径,中间件的执行顺序等等。- spiders/
在这个文件夹下面,编写你自定义的spider。
genspider**
genspider用于生成爬虫,与startproject不同的是,它只是生成爬虫模块文件,而startproject是生成整个scrapy项目。默认使用basic模板,使用-l参数可以查看所有可用的模板
scrapy genspider -l

scrapy genspider taobao taobao.com

创建爬虫模板的, 淘宝是新建爬虫唯一可识别的名称,example.com是start_urls
创建爬虫文件是根据scrapy的母版来创建的
创建一个基础母版爬虫,其他同理
scrapy genspider -t 母版名称 爬虫文件名称 要爬取的域名 创建一个基础母版爬虫,其他同理
如:scrapy genspider -t basic filter baidu.com
注:此处创建的蜘蛛filter 可以不加-t basic,默认使用basic模板
scrapy check 爬虫文件名称 测试一个爬虫文件是否合规
如:scrapy check filter
scrapy crawl 爬虫名称 执行爬虫文件,显示日志
scrapy crawl 爬虫名称 --nolog 执行爬虫文件,不显示日志
https://www.jianshu.com/p/b8739df295f4 xpath
常用命令
## 全局命令
scrapy startproject     <project_name>  #当前目录创建一个项目
scrapy settings [options]               # 获取项目设定值
scrapy runspider <spider_file.py>     #未创建项目的情况下运行一个编写的spider
scrapy shell http://www.baidu.com     #调试用, 一般会加上设置 user_agent
scrapy  shell   'https://book.douban.com/tag/%E5%B0%8F%E8%AF%B4?start=660&type=T'  --set=USER_AGENT='Mozilla/5.0 (Windows NT 6.1; WOW64) AppleWebKit/537.36 (KHTML, like Gecko) Chrome/55.0.2883.87 Safari/537.36'


scrapy fetch <url>    # 使用Scrapy下载器(downloader)下载给定的URL,并将获取到的内容送到标准输出。简单的来说,就是打印url的html代码
scrapy view  <url>    #在你的默认浏览器中打开给定的URL,并以Scrapy spider获取到的形式展现。 有些时候spider获取到的页面和普通用户看到的并不相同,一些动态加载的内容是看不到的, 因此该命令可以用来检查spider所获取到的页面
scrapy version [-v]  # 输出Scrapy版本。配合 -v 运行时,该命令同时输出Python, Twisted以及平台的信息

##项目命令
scrapy crawl <spider_name>  -o file_name    --nolog   # 启动项目 scrapy支持json/csv/xml等格式的文件
crapy check [-l] <spider>    # 运行contract检查,检查你项目中的错误之处
scrapy list					 # 列出当前项目中所有可用的spider。每行输出一个spider
scrapy genspider [-t template] <name> <domain>  # 在当前项目中创建spider。该方法可以使用提前定义好的模板来生成spider。您也可以自己创建spider的源码文件
setting .py配置
ROBOTSTXT_OBEY = False   #不遵循robots协议

#去掉下面的这个注释,以设置请求头信息,伪造浏览器headers,并手动添加一个user-agent
DEFAULT_REQUEST_HEADERS = {
  'Accept': 'text/html,application/xhtml+xml,application/xml;q=0.9,*/*;q=0.8',
  'Accept-Language': 'en',
  #user-agent新添加
  'User-Agent': "Mozilla/5.0 (Windows NT 10.0; Win64; x64) AppleWebKit/537.36 (KHTML, like Gecko) Chrome/58.0.3029.110 Safari/537.36"
}


# Crawl responsibly by identifying yourself (and your website) on the user-agent
USER_AGENT = 'Mozilla/5.0 (Windows NT 6.1; WOW64) AppleWebKit/537.36 (KHTML, like Gecko) Chrome/55.0.2883.87 Safari/537.36'
抓取分析
scrapy框架需要用户在spider子类中的操作:
爬虫从哪些页面开始爬取对一个已经下载的页面,提取其中的那些数据爬取当前页面后,接下来需要爬取哪个或哪些页面
# -*- coding:utf-8 -*-
import scrapy


class BooksSpider(scrapy.Spider):
    # 每一个爬虫的唯一标识
    name = 'books'

    # 定义爬虫爬取的起始点,起始点可以是多个,这里只有一个
    start_urls = ['http://books.toscrape.com/']

    def parse(self, response):
        # 提取数据
        # 每一本书的信息在<article class="product_pod">中,我们使用
        # css()方法找到所有这样的 article 元素,并依次迭代
        for book in response.css('article.product_pod'):
            name = book.xpath('./h3/a/@title').extract_first()
            price = book.css('p.price_color::text').extract_first()
            yield {
                'name': name,
                'price': price,
            }

        # 提取链接
        # 下一页的 url 在 ul.pager > li.next > a 里面
        # 例如:<li class="next"><a href="catelogue/page-2.html">next</a><li>
        next_url = response.css('ul.pager li.next a::attr(href)').extract_first()
        if next_url:
            # 如果找到下一页的 URL,得到绝对路径,构造新的 Request 对象
            next_url = response.urljoin(next_url)
            yield scrapy.Request(next_url, callback=self.parse)
理解:
爬虫会指定初始入口地址,scrapy 根据初始地址请求后的返回调用解析函数, 在解析函数里判断是抓取数据还是再次进行下一层级的爬取,然后调用解析函数 该解析函数的最后获取下一页的地址, 继续循环调用
实现一个spider 需要:
1,继承scrapy.Spider
2,为Spider 取名
3,设定起始的爬取点
4,实现页面解析函数
Spider类实现了:
供Scrapy 引擎调用的接口,,例如用来创建Spider 实例的类方法from_crawler
供用户使用的实用工具函数,例如可以调用log方法将调试信息输出到日志
供用户访问的属性,例如可以通过settings 属性访问配置文件的配置
命名
name = "books"
执行scrap crawl 命令就用到此标识,唯一性设置 ,告诉scrapy 使用哪个Spider 进行爬取
设定起始爬取点
通过start_urls 设定,通常为一个列表,其中放入所有的起始爬取点的url, 执行后,Spider 基类的start_request 函数会自动调用该变量,循环产生http请求,返回执行后的response
class Spider(object_ref):
 ...
 def start_requests(self):
 	for url in self.start_urls:
	     yield self.make_requests_from_url(url)

 def make_requests_from_url(self, url):
 	return Request(url, dont_filter=True)
 def parse(self, response):
	 raise NotImplementedError
 ...
请求原理:
1,对于起始爬取点的下载请求是由Scrapy 引擎调用Spider 对象的start_requests方法提交的,由于BookSpider 类中没有实现start_requests 的方法,因此引擎会调用spider 基类的start_requests 方法,
2,在start_requests 方法中,self.start_urls 是我们定义的起始爬取列表,通过访问实例属性,对其进行迭代, 用迭代出来的每个url 作为参数调用make_requests_from_url方法
3,make_requests_from_url方法中,有真正构造请求的Request对象的代码
4,由于构造Request对象时并没有传递callback参数指定页面的解析,,因此默认将prase 方法作为页面的解析函数, spider子类必须提供praser 方法,否则调用基类的该方法,从而抛出异常
5,起始爬取点可能有多个,start_requests 方法需要返回一个可迭代的对象(列表,生成器)其中每一个元素是一个Request对象,
由于爬取点的下载请求是由引擎调用Spider 对象的start_requests 方法产生的,我们可以在我们自己的Spider 子类中实现这个方法,即覆盖基类的start_request方法,直接构造并提交起始爬取点的Request对象,这样可以在Request 中添加特定的HTTP 请求头部和指定的页面解析函数
class BooksSpider(scrapy.Spider):
 # start_urls = ['http://books.toscrape.com/']
 # 实现start_requests 方法, 替代start_urls类属性
 def start_requests(self):
 	yield scrapy.Request('http://books.toscrape.com/',
 		callback=self.parse_book,
 		headers={'User-Agent': 'Mozilla/5.0'},
 		dont_filter=True)
 # 改用parse_book 作为回调函数
 def parse_book(response):
总结:
为爬虫设定起始爬取点的两种方式:
1,定义start_urls属性
2,实现start_requests 方法
实现页面解析函数
页面解析函数是构造Request对象时通过callback 参数指定的回调函数(或是默认的prase方法), 页面解析函数是实现Spider中最核心的部分,需要完成:
1,使用选择器提取页面中的数据,将数据封装后(Item,或字典)提交给Scrapy 引擎
2,使用选择器或LinkExport提取页面中的链接,用其构造新的Request对象并提交给Scrapy 引擎
使用ITEM 封装数据
注意可能抽取数据失败的情况, 如xpath 或css
class BooksSpider(scrapy.Spider):
 ...
 def parse(self, response):
 for sel in response.css('article.product_pod'):
 name = sel.xpath('./h3/a/@title').extract_first()
 price = sel.css('p.price_color::text').extract_first()
 yield {
 'name': name,
 'price': price,
 }
 ...
使用字典封装数据的缺点:
1,无法一目了然的了解数据中包含那些字段,影响代码可读性
2,缺乏对字段名字的检测,容易出错
3,不便于携带元数据,传递给其他组件的信息
scrapy 提供基类:
Item 基类: 自定义数据类
Field 类: 用来描述自定义数据类包含了哪些字段 (如name, price)
## items.py 文件中
from scrapy import Item, Field
class BookItem(Item):
     name = Field()
     price = Field()

# spider 类中
from ..items import BookItem
class BooksSpider(scrapy.Spider):
     ...
     def parse(self, response):
     for sel in response.css('article.product_pod'):
         book = BookItem()
         book['name'] = sel.xpath('./h3/a/@title').extract_first()  ##注意可能抽取失败的情况
         book['price'] = sel.css('p.price_color::text').extract_first()
     yield book
item 元数据的处理:
item pipline 处理数据
提取数据和封装数据后,需要对获取的数据进行处理 item pipline 是处理数据的组件, 一个Item Pipline 就是一个包含特定接口的类,通常只负责一种数据功能的数据处理,在一个项目中可以同时启用多个Item Pipline , 他们按次序级联起来,形成一条数据处理流水线
Item Pipeline 的几种典型应用:
1,清洗数据
2,验证数据的有效性
3,过滤掉重复的数据
4,将数据存入数据库
示例代码:
# -*- coding: utf-8 -*-

# Define your item pipelines here
#
# Don't forget to add your pipeline to the ITEM_PIPELINES setting
# See: http://doc.scrapy.org/en/latest/topics/item-pipeline.html
from scrapy.exceptions import DropItem
from scrapy.item import Item
import pymongo


class PriceConverterPipeline(object):

    # 英镑兑换人民币汇率
    exchange_rate = 8.8345

    def process_item(self, item, spider):
        # 提取 item 的 price 字段(如£53.74)
        # 去掉前面英镑符号£,转换为 float 类型,乘以汇率
        price = float(item['price'][1:]) * self.exchange_rate

        # 保留 2 位小数,赋值回 item 的 price 字段
        item['price']= '¥%.2f' % price

        return item


class DuplicatesPipeline(object):

    def __init__(self):
        self.book_set = set()

    def process_item(self, item, spider):
        name = item['name']
        if name in self.book_set:
            raise DropItem("Duplicate book found:%s" % item)

        self.book_set.add(name)
        return item


class MongoDBPipeline(object):
    @classmethod
    def from_crawler(cls, crawler):
        cls.DB_URI = crawler.settings.get('MONGO_DB_URI', 'mongodb://localhost:27017/')
        cls.DB_NAME = crawler.settings.get('MONGO_DB_NAME', 'scrapy_data')

        return cls()

    def open_spider(self, spider):
        self.client = pymongo.MongoClient(self.DB_URI)
        self.db = self.client[self.DB_NAME]

    def close_spider(self, spider):
        self.client.close()

    def process_item(self, item, spider):
        collection = self.db[spider.name]
        post = dict(item) if isinstance(item, Item) else item
        collection.insert_one(post)

        return item


# mongodb 配置解释:
# 在Spider 整个爬取过程中,数据库的连接和关闭只需要操作一次, 应在开始处理数据前连接数据库,在处理完所有数据后关闭数据库, 因此实现以下两个方法,open_spider(self, spider):  close_spider(self, spider):
#
# 在processor_item 中实现Mongodb数据库的写入操作, 使用self.db 和spider.name 获取一个集合, 然后将数据插入集合,集合对象的insert_one 方法需要传入一个字典对象(不能传入Item 对象) 因此在调用前先对item 的类型进行判断,如果是Item 对象,就将其转化为字典.


##注意此处获取的 mongodb 的路径地址是根据配置文件中设置获得
代码的解释:
一个pipline 不需要继承特定的基类,只需要实现某些特定方法, 例如 process_item open_sipder , close_spider
一个item pipline 必须实现一个process_item(item,spider)方法,该方法用来处理每一项由Spider爬取到的数据, 其中两个参数:Item 爬取到的每一项数据, item 或字典
Spider 爬取此项数据的Spider 对象
process_item方法是Item Pipeline 的核心, 补充2点:
如果process_item 在处理某项item 时返回了一项数据(item 或字典), 返回的数据会递送给下一级Item pipline (如果有),继续处理
如果process_item 在处理某项item 时抛出DropItem 异常,该项item 就会被抛弃,不再递送给后面的ItemPipline继续处理,也不会导出到文件, 通常在检测到无效数据或是想要过滤的数据时,抛出DropItem 异常
必须实现的process_item 方法外,还有3 个常见的方法
open_spider(self, spider )
Spider 打开时(处理数据前)回调该方法,通常该方法用于在开始处理数据前完成某种初始化工作,如连接数据库close_spider(self, spider )
Spider 关闭时(处理数据后)回调该方法,通常该方法用于在处理完数据后完成某种清理工作,如关闭数据库from_crawler(cls,crawler)
创建ItemPipline 对象时回调该类函数, 通常,在该方法中通过crawler.settings 读取配置,根据配置创建ItemPipline 对象
启用Item Pipline
在Scrapy 中,Itempipline 是可选的组件, 想要启用某个(或某些)ItemPipline需要在配置文件settings.py配置
ITEM_PIPELINES = {
 'example.pipelines.PriceConverterPipeline': 300,
 }

## example 是创建的项目名字, 即是项目根目录下的目录, piplines 指该目录下的文件名字,pipelines.py
# PriceConverterPipeline 指的是创建的item pipline 类
ITEM_PIPELINES 是一个字典,把想要启用的Item Pipline 添加到这个字典中,其中每一项的键是每一个Item Pipline 类的导入路径, 值是一个0~100 的数字, 同时启用多个Item Pipline时,Scrapy 根据这些数值决定Item Pipline 处理数据的先后次序,数值小的在前.
LinkExtractor 链接提取
抽取页面内的链接
示例:
from scrapy.linkextractors import LinkExtractor
 # 提取链接
 # 下一页的url在 ul.pager > li.next >a
 # 例如: <li class="next"><a href="catalogue/page-2.html">next</a></li>
 le = LinkExtractor(restrict_css='ul.pager li.next')
 links = le.extract_links(response)
 if links:
 next_url = links[0].url
 yield scrapy.Request(next_url, callback=self.parse)
创建流程:
导入LinkExtractor,位于scrapy.linkextractor 模块中
创建一个LinkExtractor对象,使用一个或多个构造器参数描述规则,这里传递的restrict_css是一个css选择器,描述了下一页链接所在的区域,
调用LinkExtractor对象的extract_links方法传入一个Response 对象,该方法一句创建对象时所设置的提取规则,在Response对象所包含的页面中提取链接, 最终返回一个列表,其中每一个元素都是一个Link 对象, 即提取到的一个链接
页面中的下一页链接只有一个,因此用links[0]获取LInk对象,该对象的url 属性就是链接页面的绝对url,用其构造Request 对象并提交
LinkExtractor构造器参数
构造器参数指明获取如何获取链接url
-
allow
接收一个正则表达式或一个正则表达式列表,提取绝对url与正则表达式匹配的链接, 如果该参数为空(默认),则提取全部链接pattern = '/intro/.+\.html$' le = LinkExtractor(allow=pattern) links = le.extract_links(response1) [link.url for link in links] -
deny
接收一个正则表达式或一个正则表达式列表, 与allow相反,排除绝对 url 与正则表达式匹配的链接from urllib.parse import urlparse pattern = '^' + urlparse(response1.url).geturl() le = LinkExtractor(deny=pattern) links = le.extract_links(response1) [link.url for link in links] -
allow_domains
接收一个域名或一个域名列表,提取指定域的链接domains = ['github.com', 'stackoverflow.com'] # 提取这两个域名的链接 le = LinkExtractor(allow_domains=domains) links = le.extract_links(response1) [link.url for link in links] -
deny_domains
接收一个域名或一个域名列表,与allow_domains 相反le = LinkExtractor(deny_domains='github.com') links = le.extract_links(response1) [link.url for link in links] -
restrict_xpaths
接收一个Xpath 表达式或者一个xpath表达式列表,提取该表达式选中区域下的链接le = LinkExtractor(restrict_xpaths='//div[@id="top"]') links = le.extract_links(response1) [link.url for link in links] -
restric_css
接收css选择器le = LinkExtractor(restrict_css='div#bottom') # <div id='bottom'>下的链接 links = le.extract_links(response1) [link.url for link in links] -
tags
接收一个标签(字符串)或一个标签列表,提取指定标签内的链接,默认为['a','area'] -
attrs
接收一个属性(字符串)或一个属性列表,提取指定属性内的链接,默认['href']le = LinkExtractor(tags='script', attrs='src') links = le.extract_links(response2) [link.url for link in links]所以,如果一个LinkExtractor对象如果构造时没有传入任何参数,那么默认获取页面内的所有a标签的href 属性值
-
process_value
接收一个形如func(vlaue)回调函数,若果传递了该参数,LinkExtractor 将调用该回调函数对提取的每一个链接(如a的href)进行处理,回调函数正常情况下应该返回一个字符串(即处理结果),如果想要抛弃所处理的链接时,返回Noneimport re def prosess(value): m = re.search("javascript:goToPage\('(.*?)'", value) if m: value = m.group(1) return value le = LinkExtractor(process_value=prosess) links = le.extract_links(response2) [link.url for link in links]
示例操作
body1 = '''
<!-- example1.html -->
<html>
<body>
<div id="top">
<p>下面一些站内的链接</p>
<a class="internal" href="/intro/install.html">Installation guide</a>
<a class="internal" href="/intro/tutorial.html">Tutorial</a>
<a class="internal" href="../examples.html">Examples</a>
</div>
<div id="bottom">
<p>下面一些站外的链接</p>
<a href="http://stackoverflow.com/tags/scrapy/info">StackOverflow</a>
<a href="https://github.com/scrapy/scrapy">Fork on Github</a>
</div>
</body>
</html>
<!-- example2.html -->
<html>
'''
body2 = '''
<html>
<head>
<script type='text/javascript' src='/js/app1.js'/>
<script type='text/javascript' src='/js/app2.js'/>
</head>
<body>
<a href="/home.html">主页</a>
<a href="javascript:goToPage('/doc.html'); return false">᮷ẓ</a>
<a href="javascript:goToPage('/example.html'); return false">Ṹ例</a>
</body>
</html>
'''
from scrapy.linkextractors import LinkExtractor
from scrapy.http import HtmlResponse
response1 = HtmlResponse(url='http://example1.com', body=body1, encoding='utf8')
response2 = HtmlResponse(url='http://example1.com', body=body2, encoding='utf8')
1,默认提取所有的链接
le = LinkExtractor() #创建一个对象,如果构造器没有任何规则,那么就提取页面内的所有链接
links = le.extract_links(response1)
[link.url for link in links]
['http://example1.com/intro/install.html',
'http://example1.com/intro/tutorial.html',
'http://example1.com/examples.html',
'http://stackoverflow.com/tags/scrapy/info',
'https://github.com/scrapy/scrapy']
2,提取匹配的正则表达式
pattern = '/intro/.+\.html$'
le = LinkExtractor(allow=pattern)
links = le.extract_links(response1)
[link.url for link in links]
['http://example1.com/intro/install.html',
'http://example1.com/intro/tutorial.html']
3,正则,拒绝该模式
from urllib.parse import urlparse
pattern = '^' + urlparse(response1.url).geturl()
le = LinkExtractor(deny=pattern)
links = le.extract_links(response1)
[link.url for link in links]
['http://stackoverflow.com/tags/scrapy/info',
'https://github.com/scrapy/scrapy']
4,允许的域匹配
domains = ['github.com', 'stackoverflow.com']
le = LinkExtractor(allow_domains=domains)
links = le.extract_links(response1)
[link.url for link in links]
['http://stackoverflow.com/tags/scrapy/info',
'https://github.com/scrapy/scrapy']
5,域的拒绝匹配
le = LinkExtractor(deny_domains='github.com')
links = le.extract_links(response1)
[link.url for link in links]
['http://example1.com/intro/install.html',
'http://example1.com/intro/tutorial.html',
'http://example1.com/examples.html',
'http://stackoverflow.com/tags/scrapy/info']
6,xpath提取指定标签内链接
le = LinkExtractor(restrict_xpaths='//div[@id="top"]')
links = le.extract_links(response1)
[link.url for link in links]
['http://example1.com/intro/install.html',
'http://example1.com/intro/tutorial.html',
'http://example1.com/examples.html']
7,css 提取指定标签
le = LinkExtractor(restrict_css='div#bottom')   # <div id='bottom'>下的链接
links = le.extract_links(response1)
[link.url for link in links]
['http://stackoverflow.com/tags/scrapy/info',
'https://github.com/scrapy/scrapy']
8,自定义标签内属性的提取
le = LinkExtractor(tags='script', attrs='src')
links = le.extract_links(response2)
[link.url for link in links]
['http://example1.com/js/app1.js', 'http://example1.com/js/app2.js']
le = LinkExtractor()
links = le.extract_links(response1)
[link.url for link in links]
['http://example1.com/intro/install.html',
'http://example1.com/intro/tutorial.html',
'http://example1.com/examples.html',
'http://stackoverflow.com/tags/scrapy/info',
'https://github.com/scrapy/scrapy']
9,自定义函数内抽取
自定义提取是以已经提取的数据的url 链接为参数,对每一个url 进行处理,如果符合处理逻辑就保存,否则抛弃
import re
def prosess(value):
    m = re.search("javascript:goToPage\('(.*?)'", value)
    if m:
        value = m.group(1)
    return value

le = LinkExtractor(process_value=prosess)
links = le.extract_links(response2)
[link.url for link in links]
['http://example1.com/home.html',
 'http://example1.com/doc.html',
 'http://example1.com/example.html']
相对链接的提取
Following links
有些链接写的是相对链接,使用该方法后,不用再对url 进行组合,程序会自动识别并请求
<ul class="pager">
<li class="next">
<a href="/page/2/">Next <span aria-hidden="true">→</span></a>
</li>
</ul>
解析地址
>>> response.css('li.next a').get()
'<a href="/page/2/">Next <span aria-hidden="true">→</span></a>'

>>> response.css('li.next a::attr(href)').get()
'/page/2/'

>>> response.css('li.next a').attrib['href']
'/page/2/'
使用join组合url
import scrapy
class QuotesSpider(scrapy.Spider):
    name = "quotes"
    start_urls = [
        'http://quotes.toscrape.com/page/1/',
    ]

    def parse(self, response):
        for quote in response.css('div.quote'):
            yield {
                'text': quote.css('span.text::text').get(),
                'author': quote.css('small.author::text').get(),
                'tags': quote.css('div.tags a.tag::text').getall(),
            }

        next_page = response.css('li.next a::attr(href)').get()
        if next_page is not None:
            next_page = response.urljoin(next_page)  ##重点
            yield scrapy.Request(next_page, callback=self.parse)
使用response.follow
import scrapy
class QuotesSpider(scrapy.Spider):
    name = "quotes"
    start_urls = [
        'http://quotes.toscrape.com/page/1/',
    ]

    def parse(self, response):
        for quote in response.css('div.quote'):
            yield {
                'text': quote.css('span.text::text').get(),
                'author': quote.css('span small::text').get(),
                'tags': quote.css('div.tags a.tag::text').getall(),
            }

        next_page = response.css('li.next a::attr(href)').get()
        if next_page is not None:
            yield response.follow(next_page, callback=self.parse)   ##重点
通过一个可迭代的url 列表批量构建多个请求
anchors = response.css('ul.pager a')
yield from response.follow_all(anchors, callback=self.parse)

#或者
yield from response.follow_all(css='ul.pager a', callback=self.parse)
更多的示例:
import scrapy
class AuthorSpider(scrapy.Spider):
    name = 'author'

    start_urls = ['http://quotes.toscrape.com/']

    def parse(self, response):
        author_page_links = response.css('.author + a')
        yield from response.follow_all(author_page_links, self.parse_author)

        pagination_links = response.css('li.next a')
        yield from response.follow_all(pagination_links, self.parse)

    def parse_author(self, response):
        def extract_with_css(query):
            return response.css(query).get(default='').strip()   ##如果没有数据则使用默认值

        yield {
            'name': extract_with_css('h3.author-title::text'),
            'birthdate': extract_with_css('.author-born-date::text'),
            'bio': extract_with_css('.author-description::text'),
        }
代码示例
import scrapy


class QuotesSpider(scrapy.Spider):
    name = 'quotes'
    start_urls = [
        'http://quotes.toscrape.com/tag/humor/',
    ]

    def parse(self, response):
        for quote in response.css('div.quote'):
            yield {
                'author': quote.xpath('span/small/text()').get(),
                'text': quote.css('span.text::text').get(),
            }

        next_page = response.css('li.next a::attr("href")').get()
        if next_page is not None:
            yield response.follow(next_page, self.parse)
执行
scrapy runspider quotes_spider.py -o quotes.json
运行机制
scrapy 寻找在内部定义的spider ,并使用crawl engine 运行它
通过对start_urls的 请求,抓取开始了,抓取成功后将请求的响应作为参数,调用当前的解析方法
在解析方法中,还获取下一此需要请求的地址,如果地址部位空,则继续调用请求,请求后发返回继续调用本解析完成
scrapy 还提供的功能:
内置的从 html 获取数据,CSS selectors and XPath expressions
安装
pip install Scrapy
scrapy 由Python 编写,并依靠数个关键的包
- lxml, an efficient XML and HTML parser
- parsel, an HTML/XML data extraction library written on top of lxml,
- w3lib, a multi-purpose helper for dealing with URLs and web page encodings
- twisted, an asynchronous networking framework
- cryptography and pyOpenSSL, to deal with various network-level security needs
Scrapy Tutorial
首先创建一个爬去项目, 进入一个目录
scrapy startproject tutorial

#所创建文件的作用
tutorial/
    scrapy.cfg            # deploy configuration file
    tutorial/             # project's Python module, you'll import your code from here
        __init__.py
        items.py          # project items definition file
        middlewares.py    # project middlewares file
        pipelines.py      # project pipelines file
        settings.py       # project settings file
        spiders/          # a directory where you'll later put your spiders
            __init__.py
第一个抓取Spider
spider 是定义的类,通过它scrapy 从一个站点来抓取信息
在目录spiders/ 下创建抓取文件,quotes_spider.py
import scrapy


class QuotesSpider(scrapy.Spider):
    name = "quotes"  #唯一性的标示了一个抓取蜘蛛,

    def start_requests(self):  #  必须返回可迭代的请求,
        urls = [
            'http://quotes.toscrape.com/page/1/',
            'http://quotes.toscrape.com/page/2/',
        ]
        for url in urls:
            yield scrapy.Request(url=url, callback=self.parse)

    def parse(self, response): #将要被调用的解析方法,用来解析访问后返回的请求,抓取数据,获取新的url,并继续构建新的请求
        page = response.url.split("/")[-2]
        filename = 'quotes-%s.html' % page
        with open(filename, 'wb') as f:
            f.write(response.body)
        self.log('Saved file %s' % filename)
运行方式scrapy crawl quotes #蜘蛛的唯一性名字
背后运行的模式分析:
Scrapy schedules the
scrapy.Requestobjects returned by thestart_requestsmethod of the Spider. Upon receiving a response for each one, it instantiatesResponseobjects and calls the callback method associated with the request (in this case, theparsemethod) passing the response as argument.
这种方式是重写了spider类的方法,另外一种方式是只提供起始需要抓取的URLs 并配置解析函数, start_requests() 函数使用默认spider 类自己的方法
示例如下:
import scrapy


class QuotesSpider(scrapy.Spider):
    name = "quotes"
    start_urls = [
        'http://quotes.toscrape.com/page/1/',
        'http://quotes.toscrape.com/page/2/',
    ]

    def parse(self, response):
        page = response.url.split("/")[-2]
        filename = 'quotes-%s.html' % page
        with open(filename, 'wb') as f:
            f.write(response.body)
scrapy shell 'http://quotes.toscrape.com/page/1/'

>>> response.css('title')
[<Selector xpath='descendant-or-self::title' data='<title>Quotes to Scrape</title>'>]

>>> response.css('title::text').getall()
['Quotes to Scrape']

>>> response.css('title').getall()
['<title>Quotes to Scrape</title>']

>>> response.css('title::text').get()
'Quotes to Scrape'

>>> response.css('title::text')[0].get()
'Quotes to Scrape'


>>> response.css('title::text').re(r'Quotes.*')
['Quotes to Scrape']
>>> response.css('title::text').re(r'Q\w+')
['Quotes']
>>> response.css('title::text').re(r'(\w+) to (\w+)')
['Quotes', 'Scrape']
XPath: a brief intro
>>> response.xpath('//title')
[<Selector xpath='//title' data='<title>Quotes to Scrape</title>'>]
>>> response.xpath('//title/text()').get()
'Quotes to Scrape'
抽取数据示例
Extracting quotes and authors
$ scrapy shell 'http://quotes.toscrape.com'

>>> response.css("div.quote")
[<Selector xpath="descendant-or-self::div[@class and contains(concat(' ', normalize-space(@class), ' '), ' quote ')]" data='<div class="quote" itemscope itemtype...'>,
 <Selector xpath="descendant-or-self::div[@class and contains(concat(' ', normalize-space(@class), ' '), ' quote ')]" data='<div class="quote" itemscope itemtype...'>,
 ...]


>>> quote = response.css("div.quote")[0]

>>> text = quote.css("span.text::text").get()
>>> text
'“The world as we have created it is a process of our thinking. It cannot be changed without changing our thinking.”'
>>> author = quote.css("small.author::text").get()
>>> author
'Albert Einstein'


>>> tags = quote.css("div.tags a.tag::text").getall()
>>> tags
['change', 'deep-thoughts', 'thinking', 'world']


>>> for quote in response.css("div.quote"):
...     text = quote.css("span.text::text").get()
...     author = quote.css("small.author::text").get()
...     tags = quote.css("div.tags a.tag::text").getall()
...     print(dict(text=text, author=author, tags=tags))
{'text': '“The world as we have created it is a process of our thinking. It cannot be changed without changing our thinking.”', 'author': 'Albert Einstein', 'tags': ['change', 'deep-thoughts', 'thinking', 'world']}
{'text': '“It is our choices, Harry, that show what we truly are, far more than our abilities.”', 'author': 'J.K. Rowling', 'tags': ['abilities', 'choices']}
...
Extracting data in our spider
import scrapy


class QuotesSpider(scrapy.Spider):
    name = "quotes"
    start_urls = [
        'http://quotes.toscrape.com/page/1/',
        'http://quotes.toscrape.com/page/2/',
    ]

    def parse(self, response):
        for quote in response.css('div.quote'):
            yield {
                'text': quote.css('span.text::text').get(),
                'author': quote.css('small.author::text').get(),
                'tags': quote.css('div.tags a.tag::text').getall(),
            }
存储数据
scrapy crawl quotes -o quotes.json
Using spider arguments
根据执行时传递的请求来执行程序
scrapy crawl quotes -o quotes-humor.json -a tag=humor
import scrapy


class QuotesSpider(scrapy.Spider):
    name = "quotes"

    def start_requests(self):
        url = 'http://quotes.toscrape.com/'
        tag = getattr(self, 'tag', None)
        if tag is not None:
            url = url + 'tag/' + tag
        yield scrapy.Request(url, self.parse)

    def parse(self, response):
        for quote in response.css('div.quote'):
            yield {
                'text': quote.css('span.text::text').get(),
                'author': quote.css('small.author::text').get(),
            }

        next_page = response.css('li.next a::attr(href)').get()
        if next_page is not None:
            yield response.follow(next_page, self.parse)
If you pass the tag=humor argument to this spider, you’ll notice that it will only visit URLs from the humor tag, such as http://quotes.toscrape.com/tag/humor
spider
蜘蛛是定义如何刮除某个站点(或一组站点)的类,包括如何执行爬网(即跟踪链接)以及如何从其页面中提取结构化数据(即抓取项)。 换句话说,Spider是您定义自定义行为的地方,该行为用于爬网和解析特定站点(或在某些情况下为一组站点)的页面。
对于Spider,抓取周期将经历如下过程:
- 首先,生成初始请求以抓取第一个URL,然后指定要使用从这些请求下载的响应进行调用的回调函数。要执行的第一个请求是通过调用start_requests()方法获得的,该方法(默认情况下)会生成对start_urls中指定的URL的请求,并使用parse方法作为Requests的回调函数。
- 在回调函数中,您解析响应(网页)并返回项目对象,Request对象或这些对象的可迭代对象。这些请求还将包含一个回调(可能相同),然后由Scrapy下载,然后由指定的回调处理响应。
- 在回调函数中,通常使用选择器(但也可以使用BeautifulSoup,lxml或您喜欢的任何机制)来解析页面内容,并使用已解析的数据生成项目。
- 最后,通常将从蜘蛛返回的项目保存到数据库(在某些项目管道中)或使用Feed导出写入文件。即使此周期(或多或少)适用于任何种类的蜘蛛,Scrapy中还是捆绑了不同种类的默认蜘蛛以用于不同目的。我们将在这里讨论这些类型。
Spider类定义了如何爬取某个网站。包括了爬取的动作(例如:是否跟进链接)以及如何从网页的内容中提取结构化数据(爬取item),Spider就是你定义爬取的动作及分析某个网页(或者是有些网页)的地方
常用的类:
- scrapy.spiders.Spider
- scrapy.spiders.CrawlSpider
scrapy.Spider
name
定义spider名字的字符串(string)。spider的名字定义了Scrapy如何定位(并初始化)spider,所以其必须是唯一的。name是spider最重要的属性,而且必须
allowed_domains
可选。包含了spider允许爬取的域名(domain)列表(list)。 当 OffsiteMiddleware 启用时, 域名不在列表中的URL不会被跟进。
start_urls
URL列表。当没有制定特定的URL时,spider将从该列表中开始进行爬取。 因此,第一个被获取到的页面的URL将是该列表之一。 后续的URL将会从获取到的数据中提取
start_requests()
该方法必须返回一个可迭代对象(iterable)。该对象包含了spider用于爬取的第一个Request。该方法仅仅会被Scrapy调用一次,可以将其实现为生成器。
该方法的默认实现是使用 start_urls 的url生成Request。我们可以重写该方法来实现定制
class MySpider(scrapy.Spider):
    name = 'myname'

    def start_requests(self):
        return [scrapy.FormRequest("http://www.example.com/login",
                                   formdata={'user': 'john', 'pass': 'secret'},
                                   callback=self.logged_in)]

    def logged_in(self, response):
        print('登陆成功')
        pass
parse(response)
当response没有指定回调函数时,该方法是Scrapy处理下载的response的默认方法。parse 负责处理response并返回处理的数据以及(/或)跟进的URL。
该方法及其他的Request回调函数必须返回一个包含 Request、dict 或 Item 的可迭代的对象。简单的来说,所谓的回调函数,其实就是告诉spider,在拿到了网站的response以后,交给谁来进行处理后面的页面的解析工作
示例:
import scrapy
from myproject.items import MyItem

class MySpider(scrapy.Spider):
    name = 'cnblog'
    allowed_domains = ['cnblogs.com']

    start_urls = ['http://www.cnblogs.com.com/123.html',
                  'http://www.cnblogs.com.com/234.html',
                  'http://www.cnblogs.com.com/345.html'
                  ]

    def start_requests(self):
        for url in self.start_urls:
            yield scrapy.Request(url=url, callback=self.parse)

    def parse(self, response):
        for h3 in response.xpath('//h3').extract():
            item = MyItem()
            item['title'] = h3
            yield item

        for url in response.xpath('//a/@href').extract():
            yield scrapy.Request(url, callback=self.parse)
scrapy.CrawlSpider
class scrapy.spiders.CrawlSpider
主要处理的是 url 比较一致的情况.
http://www.cnblogs.com/cnkai/p/7397421.html
,http://www.cnblogs.com/cnkai/p/7396835.html比如我们想爬取我的博客内容,会发现,除了最后的几个数字不同,其他的内容是相同的,可以通过这个类来进行自动抓取相似的链接
CrawlSpider类定义了如下的属性和方法。
- rules
一个包含一个(或多个) Rule 对象的集合(list)。 每个 Rule 对爬取网站的动作定义了特定表现。 Rule对象在下边会介绍。 如果多个rule匹配了相同的链接,则根据他们在本属性中被定义的顺序,第一个会被使用。 - parse_start_url(response)
当start_url的请求返回时,该方法被调用。 该方法分析最初的返回值并必须返回一个 Item 对象或者 一个 Request 对象或者 一个可迭代的包含二者对象。
class scrapy.spiders.Rule(link_extractor, callback=None, cb_kwargs=None, follow=None, process_links=None, process_request=None)
- link_extractor
这是一个 Link Extractor 对象。 其定义了如何从爬取到的页面提取链接。 - callback
这是一个callable或string(该spider中同名的函数将会被调用)。 从link_extractor中每获取到链接时将会调用该函数。该回调函数接受一个response作为其第一个参数, 并返回一个包含 Item 以及(或) Request 对象(或者这两者的子类)的列表(list) - cb_kwargs
包含传递给回调函数的参数(keyword argument)的字典。 - follow
是一个布尔(boolean)值,指定了根据该规则从response提取的链接是否需要跟进。 如果 callback 为None, follow 默认设置为 True ,否则默认为 False 。 - process_links
是一个callable或string(该spider中同名的函数将会被调用)。 从link_extractor中获取到链接列表时将会调用该函数。该方法主要用来过滤。 - process_request
是一个callable或string(该spider中同名的函数将会被调用)。 该规则提取到每个request时都会调用该函数。该函数必须返回一个request或者None。 (用来过滤request)
import scrapy
from scrapy.spiders import CrawlSpider, Rule
from scrapy.linkextractors import LinkExtractor

class MySpider(CrawlSpider):
    name = 'cnblog'
    allowed_domains = []
    start_urls = ['http://www.cnblogs.com']

    rules = (
        Rule(LinkExtractor(allow=('http://www.cnblogs.com/\w+/p/\d+.html', )), callback='parse_item', follow=True),
    )

    def parse_item(self, response):
        print(response.url)
Selectors
抓取网页后抽取数据的方式
示例网页代码
<html>
 <head>
  <base href='http://example.com/' />
  <title>Example website</title>
 </head>
 <body>
  <div id='images'>
   <a href='image1.html'>Name: My image 1 <br /><img src='image1_thumb.jpg' /></a>
   <a href='image2.html'>Name: My image 2 <br /><img src='image2_thumb.jpg' /></a>
   <a href='image3.html'>Name: My image 3 <br /><img src='image3_thumb.jpg' /></a>
   <a href='image4.html'>Name: My image 4 <br /><img src='image4_thumb.jpg' /></a>
   <a href='image5.html'>Name: My image 5 <br /><img src='image5_thumb.jpg' /></a>
  </div>
 </body>
</html>
打开shell 执行:
scrapy shell https://docs.scrapy.org/en/latest/_static/selectors-sample1.html
构造一个XPATH来选择内部的文本
文本也算是一个节点, html 标签内如果没有文本, 那么获取的该标签内的文本则为 \n
示例获取:
scrapy 请求后返回的response 结果默认含有抽取数据的xpath 方法和 css 方法
>>> response.xpath('//title/text()')
[<Selector xpath='//title/text()' data='Example website'>]

>>> response.xpath('//title/text()').getall()
['Example website']
>>> response.xpath('//title/text()').get()
'Example website'
selector .get() or .getall() methods get 获取单个元素(列表内的第一个元素), getall 获取所有元素
css 选择器
>>> response.css('title::text').get()
'Example website'

也可以嵌套使用选择器
>>> response.css('img').xpath('@src').getall()
['image1_thumb.jpg',
 'image2_thumb.jpg',
 'image3_thumb.jpg',
 'image4_thumb.jpg',
 'image5_thumb.jpg']


>>> response.xpath('//div[@id="images"]/a/text()').get()
'Name: My image 1 '

##  如果获取的数据不存在
>>> response.xpath('//div[@id="not-exists"]/text()').get() is None
True


>>> response.xpath('//div[@id="not-exists"]/text()').get(default='not-found')
'not-found'


##使用属性获取标签内的属性值
>>> [img.attrib['src'] for img in response.css('img')]
['image1_thumb.jpg',
 'image2_thumb.jpg',
 'image3_thumb.jpg',
 'image4_thumb.jpg',
 'image5_thumb.jpg']

>>> response.css('img').attrib['src']
'image1_thumb.jpg'

>>> response.css('base').attrib['href']
'http://example.com/'

>>> response.xpath('//base/@href').get()
'http://example.com/'

>>> response.css('base::attr(href)').get()
'http://example.com/'


>>> response.css('base').attrib['href']
'http://example.com/'


>>> response.xpath('//a[contains(@href, "image")]/@href').getall()
['image1.html',
 'image2.html',
 'image3.html',
 'image4.html',
 'image5.html']


>>> response.css('a[href*=image]::attr(href)').getall()
['image1.html',
 'image2.html',
 'image3.html',
 'image4.html',
 'image5.html']


>>> response.xpath('//a[contains(@href, "image")]/img/@src').getall()
['image1_thumb.jpg',
 'image2_thumb.jpg',
 'image3_thumb.jpg',
 'image4_thumb.jpg',
 'image5_thumb.jpg']


>>> response.css('a[href*=image] img::attr(src)').getall()
['image1_thumb.jpg',
 'image2_thumb.jpg',
 'image3_thumb.jpg',
 'image4_thumb.jpg',
 'image5_thumb.jpg']
扩展的CSS 选择器
to select text nodes, use ::text
to select attribute values, use ::attr(name) where name is the name of the attribute that you want the value of
示例:
title::text selects children text nodes of a descendant <title> element:
>>> response.css('title::text').get()
'Example website'
*::text selects all descendant text nodes of the current selector context:
>>> response.css('#images *::text').getall()
['\n   ',
 'Name: My image 1 ',
 '\n   ',
 'Name: My image 2 ',
 '\n   ',
 'Name: My image 3 ',
 '\n   ',
 'Name: My image 4 ',
 '\n   ',
 'Name: My image 5 ',
 '\n  ']
foo::text returns no results if foo element exists, but contains no text (i.e. text is empty):
>>> response.css('img::text').getall()
[]

>>> response.css('img::text').get()
>>> response.css('img::text').get(default='')
''
a::attr(href) selects the href attribute value of descendant links:
>>> response.css('a::attr(href)').getall()
['image1.html',
 'image2.html',
 'image3.html',
 'image4.html',
 'image5.html']
嵌套选择器
选择方法(.xpath或.css)返回相同类型的选择器列表,因此您也可以为这些选择器调用选择方法。
>>> links = response.xpath('//a[contains(@href, "image")]')
>>> links.getall()
['<a href="image1.html">Name: My image 1 <br><img src="image1_thumb.jpg"></a>',
 '<a href="image2.html">Name: My image 2 <br><img src="image2_thumb.jpg"></a>',
 '<a href="image3.html">Name: My image 3 <br><img src="image3_thumb.jpg"></a>',
 '<a href="image4.html">Name: My image 4 <br><img src="image4_thumb.jpg"></a>',
 '<a href="image5.html">Name: My image 5 <br><img src="image5_thumb.jpg"></a>']


>>> for index, link in enumerate(links):
...     args = (index, link.xpath('@href').get(), link.xpath('img/@src').get())
...     print('Link number %d points to url %r and image %r' % args)
Link number 0 points to url 'image1.html' and image 'image1_thumb.jpg'
Link number 1 points to url 'image2.html' and image 'image2_thumb.jpg'
Link number 2 points to url 'image3.html' and image 'image3_thumb.jpg'
Link number 3 points to url 'image4.html' and image 'image4_thumb.jpg'
Link number 4 points to url 'image5.html' and image 'image5_thumb.jpg'
获取元素的属性值
使用xpath
>>> response.xpath("//a/@href").getall()
['image1.html', 'image2.html', 'image3.html', 'image4.html', 'image5.html']
使用css
>>> response.css('a::attr(href)').getall()
['image1.html', 'image2.html', 'image3.html', 'image4.html', 'image5.html']


response.css('li.next a::attr(href)').get()
response.css('li.next a').attrib['href']
而且选择器具有attri 属性
>>> [a.attrib['href'] for a in response.css('a')]
['image1.html', 'image2.html', 'image3.html', 'image4.html', 'image5.html']

>>> response.css('base').attrib
{'href': 'http://example.com/'}
>>> response.css('base').attrib['href']
'http://example.com/'

#如果选择器为空
>>> response.css('foo').attrib
{}
带正则的选择器
# 原始的html
 <a href='image1.html'>Name: My image 1 <br /><img src='image1_thumb.jpg' /></a>


>>> response.xpath('//a[contains(@href, "image")]/text()').re(r'Name:\s*(.*)')
['My image 1',
 'My image 2',
 'My image 3',
 'My image 4',
 'My image 5']


如果获取的文本在正则中匹配了指定的模式,那么就会得到指定的匹配项

>>> response.xpath('//a[contains(@href, "image")]/text()').re_first(r'Name:\s*(.*)')
'My image 1'
XPaths
xpath 的语法
| 表达式 | 描述 |
|---|---|
| / | 选中文档的根 |
| . | 选中当前节点 |
| .. | 选中当前节点的父节点 |
| ELEMENT | 选中子节点中所有ELEMENT 元素节点 |
| //ELEMENT | 选中后代节点中所有ELEMENT 元素节点 |
| * | 所有元素节点 |
| text() | 选中所有文本子节点 |
| @ATTR | 选中名为ATTR的属性节点 |
| @* | 选中所有属性节点 |
| [谓语] | 谓语用来查找某个特定特点或者包含某个特定值的节点 |
演示示例:
| 示例模式 | 含义 |
|---|---|
| / 从根路径开始 | .xpath('/html') |
| E1/E2 选中子节点中的所有E2 | xpath('/html/body/div/a') |
| //E 选中文档中的所有E ,无论在什么位置 | xpath('//a') |
| E1//E2: E1后代节点中的所有E2节点, 无论后代节点在什么位置 | xpath('/html/body//img') |
| E/text(): 选中E节点的文本子节点 | xpath('//a/text()') |
| E/*:选中E的所有元素子节点 | xpath('/html/*') |
| */E 孙节点中的所有E | xpath('//div/*/img') |
| E/@ATTR E的ATTR 属性的值 | .xpath('//img/@src') |
| //@ATTR 文档中的所有ATTR 属性 | .xpath('//@href') |
| E/@*' E的所有属性 | .xpath('//a[1]/img/@*') |
| . 当前节点 路径下 | .xpath('.//img') |
| .. 当前节点的父节点 | |
| node[谓语]: 谓语用来查找某个特定的节点或者包含某个特定值的节点 | xpath('//a[last()]') xpath('//a[position()<=3]') |
| xpath('//div[@id]') 所有含id属性的 div | |
| xpath('//div[@id="images"]') 具有 id属性且值为images |
       selector = Selector(response=response)
        title = selector.xpath('//a[@class="titlelnk"]/text()').extract()
        link = selector.xpath('//a[@class="titlelnk"]/@href').extract()
        read = selector.xpath('//span[@class="article_comment"]/a/text()').extract()
        comment = selector.xpath('//span[@class="article_view"]/a/text()').extract()
        = response.xpath('//span[@class="article_view"]/a/text()').re('\d+')
        response.xpath('//span[@class="article_comment"]/a/text()').re('\d+')
css 语法
| 表达式 | 描述 | 示例 |
|---|---|---|
| * | 选中所有元素 | * |
| E | 选中E元素 | p |
| E1,E2 | 选中E1,E2元素 | div,pre |
| E1 E2 | 选中E1后代元素中的E2元素 | div p |
| E1>E2 | 选中E1子元素中的E2元素 | div>p |
| E1+E2 | 选中E1兄弟元素中的E2元素 | p+strong |
| .CLASS | 选中CLASS 属性中包含CLASS 的元素 | .info |
| #ID | 选中id属性为ID 的元素 | #main |
| [ATTR] | 选中包含ATTR属性的元素 | [href] |
| [ATTR=VALUE] | 选中包含ATTR属性且值为VLAUE的元素 | [method=post] |
| [ATTR~=VALUE] | 选中包含ATTR属性且值包含VLAUE的元素 | [method~=post] |
| E:nth-child(n) | 选中E元素,且该元素必须是其父元素的(倒数) 第n个元素 | a:nth-child(1) |
| E:nth-last-child(n) | 选中E元素,且该元素必须是其父元素的(倒数) 第n个元素 | a:nth-last-child(2) |
| E:first-child | 选中E元素,且该元素必须是其父元素的(倒数) 第1个元素 | a:first-child |
| E:last-child | 选中E元素,且该元素必须是其父元素的(倒数) 第1个元素 | a:last-child |
| E:empty | 选中没有子元素的E元素 | div:emp |
| E::text | 选中E元素的文本节点 TEXT NODE | p::text |
示例:
response.css('img')  #选中元素  html 标签
response.css('[style]')
response.css('[id=images-2]')
# 选中每个div的第一个a
response.css('div>a:nth-child(1)')
# 选中第二个div的第一个a
response.css('div:nth-child(2)>a:nth-child(1)')
# 选中第一个div的最后一个a
response.css('div:first-child>a:last-child')
# 选中所有a的文本
sel = response.css('a::text')


#特别的示例
## xpath常用函数
# string(arg): 返回参数的字符串值

text='<a href="#">Click here to go to the <strong>Next Page</strong></a>'
sel = Selector(text=text)
 # 如果想得a 中整个字符串'Click here to go to the Next Page',
 # 使用text()就不行了, 因为Click here to go to the઼和Next Page  不在同一个元素下
 # 以下做法将得两个子串
sel.xpath('/html/body/a//text()').extract()
# 这种情况可以使用string() 函数
sel.xpath('string(/html/body/a)').extract()


## contains(str1, str2): 判断str1 中是否包含str2,返回布尔值
text = '''
<div>
<p class="small info">hello world</p>
<p class="normal info">hello scrapy</p>
</div>
'''

sel.xpath('//p[contains(@class, "small")]') #选择class属性中包含small 的p 元素
sel.xpath('//p[contains(@class, "info")]') # 选择class 属性中包含info"的p元素
slector相对路径
示例:
目的:想要获取div 下的所有p
>>> divs = response.xpath('//div')
>>> for p in divs.xpath('//p'):  # this is wrong - gets all <p> from the whole document
...     print(p.get())

#正确方式
>>> for p in divs.xpath('.//p'):  # extracts all <p> inside
...     print(p.get())

>>> for p in divs.xpath('p'):
...     print(p.get())
以class查询时,使用CSS
>>> from scrapy import Selector
>>> sel = Selector(text='<div class="hero shout"><time datetime="2014-07-23 19:00">Special date</time></div>')
>>> sel.css('.shout').xpath('./time/@datetime').getall()
['2014-07-23 19:00']
//node[1] and (//node)[1]区别
//node[1] selects all the nodes occurring first under their respective parents. 选择所有在其各自父代下首先出现的节点 有多个
(//node)[1] selects all the nodes in the document, and then gets only the first of them. 选择文档中的所有节点,然后仅获取它们中的第一个 只有一个
>>> from scrapy import Selector
>>> sel = Selector(text="""
....:     <ul class="list">
....:         <li>1</li>
....:         <li>2</li>
....:         <li>3</li>
....:     </ul>
....:     <ul class="list">
....:         <li>4</li>
....:         <li>5</li>
....:         <li>6</li>
....:     </ul>""")
>>> xp = lambda x: sel.xpath(x).getall()


>>> xp("//li[1]")
['<li>1</li>', '<li>4</li>']
>>> xp("(//li)[1]")
['<li>1</li>']
获取文本节点
示例:
>>> from scrapy import Selector
>>> sel = Selector(text='<a href="#">Click here to go to the <strong>Next Page</strong></a>')
>>> sel.xpath('//a//text()').getall() # take a peek at the node-set
['Click here to go to the ', 'Next Page']
>>> sel.xpath("string(//a[1]//text())").getall() # convert it to string
['Click here to go to the ']


>>> sel.xpath("//a[1]").getall() # select the first node
['<a href="#">Click here to go to the <strong>Next Page</strong></a>']
>>> sel.xpath("string(//a[1])").getall() # convert it to string
['Click here to go to the Next Page']
Regular expressions
Set operations
数据存储
首先定义item
# vim  item.py
import scrapy
class CnblogItem(scrapy.Item):
    title = scrapy.Field()
    link = scrapy.Field()
编写spider
import scrapy
from cnblog.items import CnblogItem   #新添加

class Cnblog_Spider(scrapy.Spider):
    name = "cnblog"
    allowed_domains = ["cnblogs.com"]
    start_urls = [
     'https://www.cnblogs.com/',
    ]

    def parse(self, response):
        item = CnblogItem()    #新添加
        item['title'] = response.xpath('//a[@class="titlelnk"]/text()').extract()   #修改
        item['link'] = response.xpath('//a[@class="titlelnk"]/@href').extract()     #修改
        yield item   #新添加
修改pipline 实现保存
mport pymongo   #别忘了导入这个模块

class FilePipeline(object):
'''
实现保存到txt文件的类,类名这个地方为了区分,做了修改,
当然这个类名是什么并不重要,你只要能区分就可以,
请注意,这个类名待会是要写到settings.py文件里面的。
'''
    def process_item(self, item, spider):
        with open('cnblog.txt', 'w', encoding='utf-8') as f:
            titles = item['title']
            links = item['link']
            for i,j in zip(titles, links):
                f.wrire(i + ':' + j + '\n')
        return item


class MongoPipeline(object):
'''
实现保存到mongo数据库的类,
'''

    collection = 'cnblog'  #mongo数据库的collection名字,随便

    def __init__(self, mongo_uri, mongo_db):
        self.mongo_uri = mongo_uri
        self.mongo_db = mongo_db

    @classmethod
    def from_crawler(cls, crawler):
    '''
    scrapy为我们访问settings提供了这样的一个方法,这里,
    我们需要从settings.py文件中,取得数据库的URI和数据库名称
    '''
        return cls(
            mongo_uri = crawler.settings.get('MONGO_URI'),
            mongo_db = crawler.settings.get('MONGO_DB')
        )

    def open_spider(self, spider):                  #爬虫一旦开启,就会实现这个方法,连接到数据库
        self.client = pymongo.MongoClient(self.mongo_uri)
        self.db = self.client[self.mongo_db]

    def close_spider(self, spider):            #爬虫一旦关闭,就会实现这个方法,关闭数据库连接
        self.client.close()

    def process_item(self, item, spider):
        '''
        每个实现保存的类里面必须都要有这个方法,且名字固定,用来具体实现怎么保存
        '''

        titles = item['title']
        links = item['link']
        table = self.db[self.collection]
        for i, j in zip(titles, links):
            data = {}
            data['文章:链接'] = i + ':' + j
            table.insert_one(data)
        return item
修改setting.py 启用已经配置好的pipline
ROBOTSTXT_OBEY = False

DEFAULT_REQUEST_HEADERS = {
  'Accept': 'text/html,application/xhtml+xml,application/xml;q=0.9,*/*;q=0.8',
  'Accept-Language': 'en',
  'User-Agent': "Mozilla/5.0 (Windows NT 10.0; Win64; x64) AppleWebKit/537.36 (KHTML, like Gecko) Chrome/58.0.3029.110 Safari/537.36"
}
#新修改
ITEM_PIPELINES = {
    'cnblog.pipelines.FilePipeline': 300,    #实现保存到txt文件
    'cnblog.pipelines.MongoPipeline': 400,     #实现保存到mongo数据库
}
#新添加数据库的URI和DB
MONGO_URI = 'mongodb://localhost:27017'  D
MONGO_DB = "cnblog"
pipline
当Item在Spider中被收集之后,它将会被传递到Item Pipeline,一些组件会按照一定的顺序执行对Item的处理。
每个item pipeline组件(有时称之为“Item Pipeline”)是实现了简单方法的Python类。他们接收到Item并通过它执行一些行为,同时也决定此Item是否继续通过pipeline,或是被丢弃而不再进行处理。
以下是item pipeline的一些典型应用:
- 清理HTML数据
- 验证爬取的数据(检查item包含某些字段)
- 查重(并丢弃)
- 将爬取结果保存到数据库或者文件中
每个item pipeline组件是一个独立的Python类,同时必须实现以下方法:
-
process_item(self, item, spider)
每个item pipeline组件都需要调用该方法,这个方法必须返回一个具有数据的dict,或是 Item (或任何继承类)对象, 或是抛出 DropItem 异常,被丢弃的item将不会被之后的pipeline组件所处理。
参数:
- item (Item 对象或者一个dict) – 被爬取的item
- spider (Spider 对象) – 爬取该item的spider
-
open_spider(self, spider)
当spider被开启时,这个方法被调用。
参数:
- spider (Spider 对象) – 被开启的spider
-
close_spider(self, spider)
当spider被关闭时,这个方法被调用
参数:
- spider (Spider 对象) – 被关闭的spider
-
from_crawler(cls, crawler)
如果给出,这个类方法将会被调用从Crawler创建一个pipeline实例,它必须返回一个pipeline的新的实例,Crawler对象提供了调用scrapy所有的核心组件的权限,比如你可以调用settings里面的设置项
pipline 去重
from scrapy.exceptions import DropItem

class DuplicatesPipeline(object):
    def __init__(self):
        self.ids_seen = set()
    def process_item(self, item, spider):
        if item['id'] in self.ids_seen:
            raise DropItem("Duplicate item found: %s" % item)
        else:
            self.ids_seen.add(item['id'])
            return item
在setting .py 中设置启用pipline
ITEM_PIPELINES = {
    'myproject.pipelines.PricePipeline': 300,
    'myproject.pipelines.JsonWriterPipeline': 800,
}
分配给每个类的整型值,确定了他们运行的顺序,item按数字从低到高的顺序,通过pipeline,通常将这些数字定义在0-1000范围内
settings.py
https://www.cnblogs.com/cnkai/p/7399573.html
调试工具
pysnooper 可以看变量
pdb
pudb
不使用scrapy 执行爬虫
在项目根目录里,即有scrapy .cfg 的目录下新建文件
$ vim   main.py
from scrapy import cmdline
cmdline.execute("scrapy crawl project".split())

################################################################
#!/usr/bin/env python
# -*- coding:utf-8 -*-
from scrapy import cmdline
# 方式一:注意execute的参数类型为一个列表
cmdline.execute('scrapy crawl spidername'.split())
# 方式二:注意execute的参数类型为一个列表
cmdline.execute(['scrapy', 'crawl', 'spidername'])


###########################################
#也可以执行
在终端通过 python   main.py
另外一种运行方式
同样在项目的目录下创建文件
import scrapy
from scrapy.crawler import CrawlerProcess
from baidu_com import BaiduComSpider

# 创建一个CrawlerProcess对象
process = CrawlerProcess() # 括号中可以添加参数

process.crawl(BaiduComSpider)
process.start()

 浙公网安备 33010602011771号