软件定义网络实验七
实验7:基于REST API的SDN北向应用实践
基本实验
实验步骤1
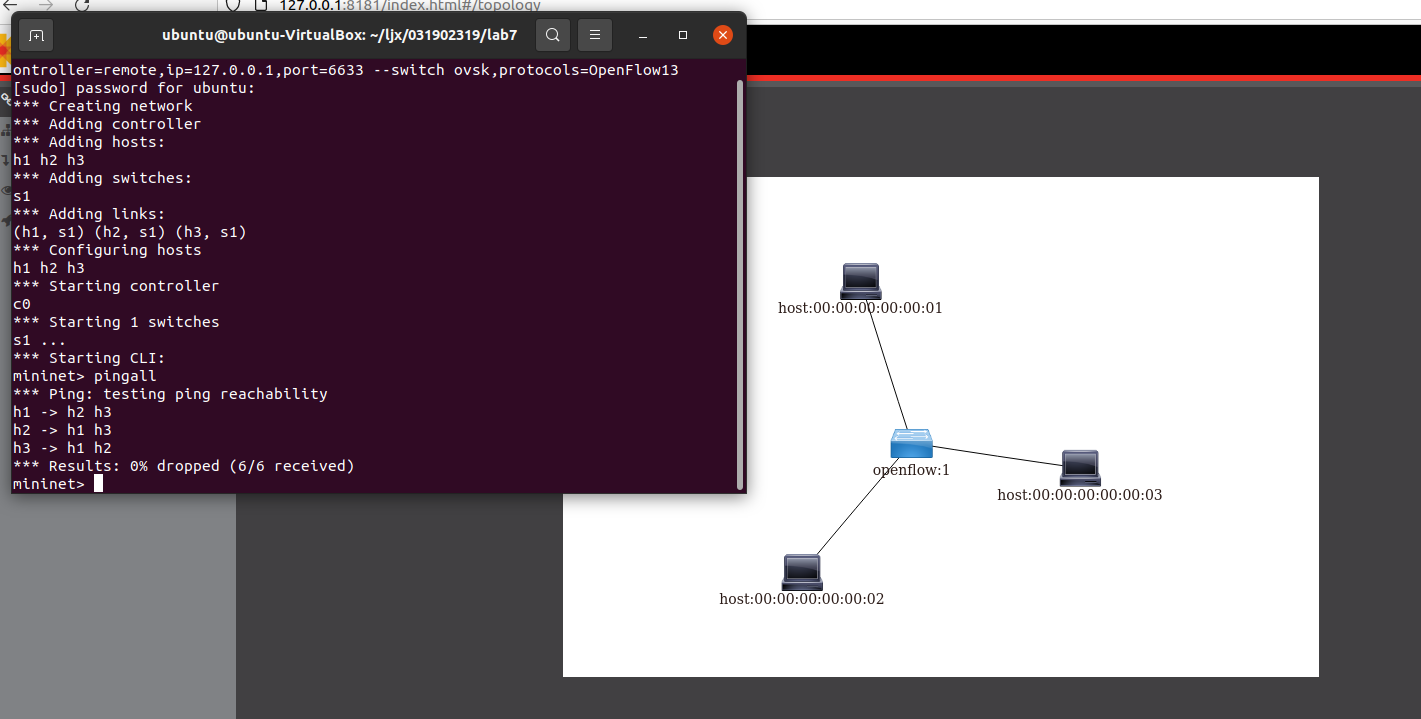
- 利用Mininet平台搭建下图所示网络拓扑,并连接OpenDaylight;
实验步骤2
编写Python程序,调用OpenDaylight的北向接口下发指令删除s1上的流表数据。
import requests
from requests.auth import HTTPBasicAuth
def http_delete(url):
    url= url
    headers = {'Content-Type':'application/json'}
    resp = requests.delete(url,headers=headers,auth=HTTPBasicAuth('admin', 'admin'))
    return resp

if __name__ == "__main__":
    url='http://127.0.0.1:8181/restconf/config/opendaylight-inventory:nodes/node/openflow:1/'
    resp = http_delete(url)
    print (resp.content)
- 执行结果

实验步骤3
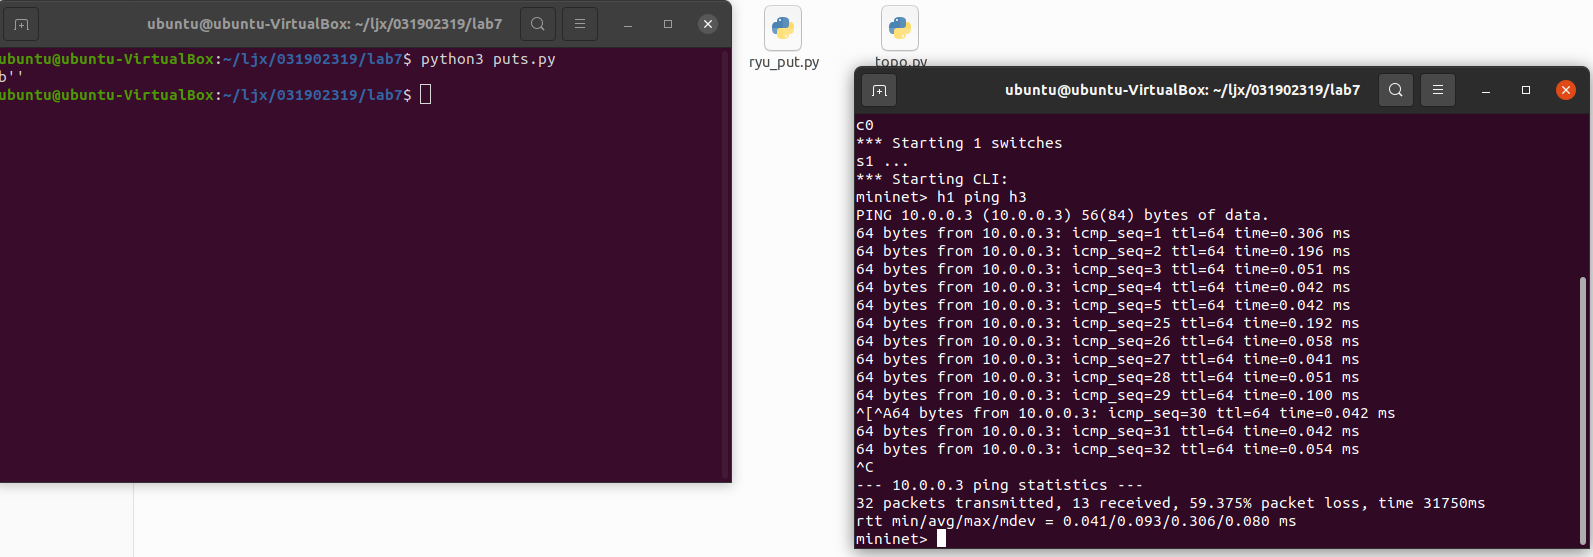
- 编写Python程序,调用OpenDaylight的北向接口下发硬超时流表,实现拓扑内主机h1和h3网络中断20s。
编写代码并命名为puts.py以及ODL_flowtable.json文件
输入h1 ping h3 ,执行该程序
#puts.py
import requests
from requests.auth import HTTPBasicAuth

if __name__ == "__main__":
    url = 'http://127.0.0.1:8181/restconf/config/opendaylight-inventory:nodes/node/openflow:1/flow-node-inventory:table/0/flow/1'
    with open("./ODL_flowtable.json") as f:
        jstr = f.read()
    headers = {'Content-Type': 'application/json'}
    res = requests.put(url, jstr, headers=headers, auth=HTTPBasicAuth('admin', 'admin'))
    print (res.content)
ODL_flowtable.json
{
  "flow": [
    {
      "id": "1",
      "match": {
        "in-port": "1",
        "ethernet-match": {
          "ethernet-type": {
            "type": "0x0800"
          }
        },
        "ipv4-destination": "10.0.0.3/32"
      },
      "instructions": {
        "instruction": [
          {
            "order": "0",
            "apply-actions": {
              "action": [
                {
                  "order": "0",
                  "drop-action": {}
                }
              ]
            }
          }
        ]
      },
      "flow-name": "flow1",
      "priority": "65535",
      "hard-timeout": "20",
      "cookie": "2",
      "table_id": "0"
    }
  ]
}
- 执行结果
实验步骤4
- 编写Python程序,调用OpenDaylight的北向接口获取s1上活动的流表数。
编写代码并命名为get.py
在终端执行
#get.py
import requests
from requests.auth import HTTPBasicAuth

if __name__ == "__main__":
    url = 'http://127.0.0.1:8181/restconf/operational/opendaylight-inventory:nodes/node/openflow:1/flow-node-inventory:table/0/opendaylight-flow-table-statistics:flow-table-statistics'
    headers = {'Content-Type': 'application/json'}
    res = requests.get(url,headers=headers, auth=HTTPBasicAuth('admin', 'admin'))
    print (res.content)
- 执行结果

实验步骤5
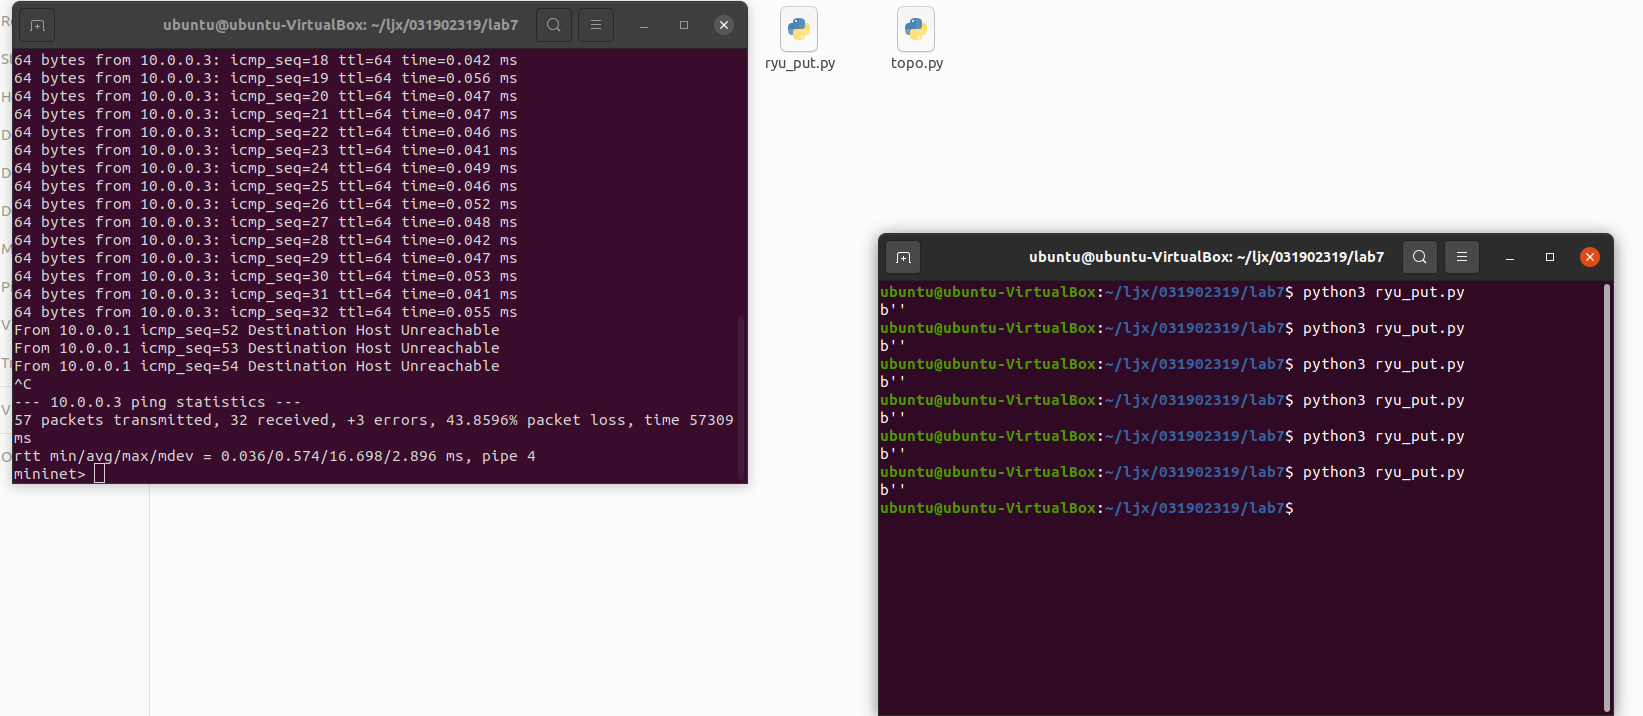
- 编写Python程序,调用Ryu的北向接口,实现上述OpenDaylight实验拓扑上相同的硬超时流表下发。
编写代码并命名为ryu_put.py以及flowtable.json
#ryu_put.py
import requests

if __name__ == "__main__":
    url = 'http://127.0.0.1:8080/stats/flowentry/add'
    with open("./flowtable.json") as f:
        jstr = f.read()
    headers = {'Content-Type': 'application/json'}
    res = requests.post(url, jstr, headers=headers)
    print (res.content)
flowtable.json
{
    "dpid": 1,
    "cookie": 1,
    "cookie_mask": 1,
    "table_id": 0,
    "hard_timeout": 20,
    "priority": 65535,
    "flags": 1,
    "match":{
        "in_port":1
    },
    "actions":[

    ]
 }
- 执行结果
实验步骤6
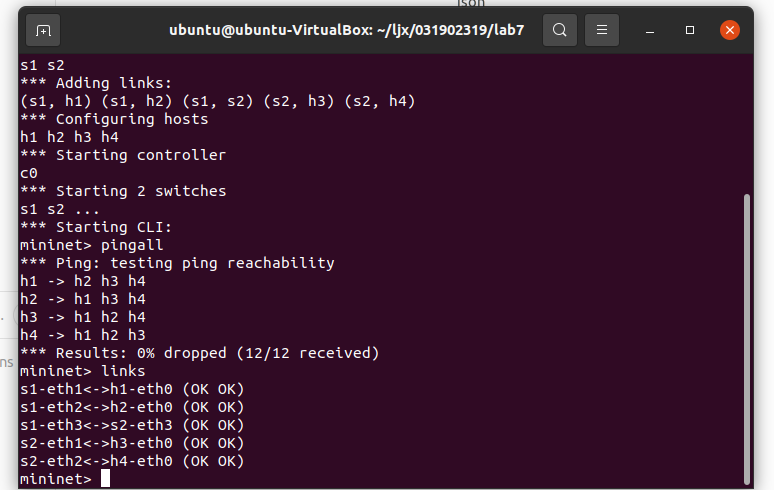
- 利用Mininet平台搭建下图所示网络拓扑,要求支持OpenFlow 1.3协议,主机名、交换机名以及端口对应正确。拓扑生成后需连接Ryu,且Ryu应能够提供REST API服务。
编写以下代码
#topo.py
from mininet.topo import Topo

class MyTopo(Topo):
    def __init__(self):
        # initilaize topology
        Topo.__init__(self)

        self.addSwitch("s1")
        self.addSwitch("s2")

        self.addHost("h1")
        self.addHost("h2")
        self.addHost("h3")
        self.addHost("h4")

        self.addLink("s1", "h1")
        self.addLink("s1", "h2")
        self.addLink("s2", "h3")
        self.addLink("s2", "h4")
        self.addLink("s1", "s2")

topos = {'mytopo': (lambda: MyTopo())}
- 执行结果
实验步骤7
- 整理一个Shell脚本,参考Ryu REST API的文档,利用curl命令,实现和实验2相同的VLAN。
# 将主机1,2发送来的数据包打上vlan标记
curl -X POST -d '{
    "dpid": 1,
    "priority": 1,
    "match":{
        "in_port": 1
    },
    "actions":[
        {
            "type": "PUSH_VLAN",
            "ethertype": 33024
        },
        {
            "type": "SET_FIELD",
            "field": "vlan_vid",
            "value": 4096
        },
        {
            "type": "OUTPUT",
            "port": 3
        }
    ]
 }' http://localhost:8080/stats/flowentry/add

 curl -X POST -d '{
    "dpid": 1,
    "priority": 1,
    "match":{
        "in_port": 2
    },
    "actions":[
        {
            "type": "PUSH_VLAN",
            "ethertype": 33024
        },
        {
            "type": "SET_FIELD",
            "field": "vlan_vid",
            "value": 4097
        },
        {
            "type": "OUTPUT",
            "port": 3
        }
    ]
 }' http://localhost:8080/stats/flowentry/add

# 将主机3,4发送来的数据包取出vlan标记
 curl -X POST -d '{
    "dpid": 1,
    "priority": 1,
    "match":{
        "vlan_vid": 0
    },
    "actions":[
        {
            "type": "POP_VLAN",
            "ethertype": 33024
        },
        {
            "type": "OUTPUT",
            "port": 1
        }
    ]
 }' http://localhost:8080/stats/flowentry/add

 curl -X POST -d '{
    "dpid": 1,
    "priority": 1,
    "match":{
        "vlan_vid": 1
    },
    "actions":[
        {
            "type": "POP_VLAN",
            "ethertype": 33024
        },
        {
            "type": "OUTPUT",
            "port": 2
        }
    ]
 }' http://localhost:8080/stats/flowentry/add

# 将主机3,4发送来的数据包打上vlan标记
 curl -X POST -d '{
    "dpid": 2,
    "priority": 1,
    "match":{
        "in_port": 1
    },
    "actions":[
        {
            "type": "PUSH_VLAN",
            "ethertype": 33024
        },
        {
            "type": "SET_FIELD",
            "field": "vlan_vid",
            "value": 4096
        },
        {
            "type": "OUTPUT",
            "port": 3
        }
    ]
 }' http://localhost:8080/stats/flowentry/add

 curl -X POST -d '{
    "dpid": 2,
    "priority": 1,
    "match":{
        "in_port": 2
    },
    "actions":[
        {
            "type": "PUSH_VLAN",
            "ethertype": 33024
        },
        {
            "type": "SET_FIELD",
            "field": "vlan_vid",
            "value": 4097
        },
        {
            "type": "OUTPUT",
            "port": 3
        }
    ]
 }' http://localhost:8080/stats/flowentry/add

 curl -X POST -d '{
    "dpid": 2,
    "priority": 1,
    "match":{
        "vlan_vid": 0
    },
    "actions":[
        {
            "type": "POP_VLAN",
            "ethertype": 33024
        },
        {
            "type": "OUTPUT",
            "port": 1
        }
    ]
 }' http://localhost:8080/stats/flowentry/add

 curl -X POST -d '{
    "dpid": 2,
    "priority": 1,
    "match":{
        "vlan_vid": 1
    },
    "actions":[
        {
            "type": "POP_VLAN",
            "ethertype": 33024
        },
        {
            "type": "OUTPUT",
            "port": 2
        }
    ]
 }' http://localhost:8080/stats/flowentry/add
运行程序
- 执行结果

个人总结
- 实验难度相较之前的所有实验难度都相较高
- 实验过程遇到的困难及解决办法
-
运行ryu,pingall测试各主机均不连通,类似于上一次的实验,在了同学的帮助和阅读了同学的博客写的困难,看到同样的问题和解决方案,问题得到解决
-
安装curl,在过程中提示需要安装curl,刚开始没能理解报错,弄了很久,后面发现报错提示安装curl,根据提示输入命令安装,问题解决
-
VLAN划分结果没能正确得到由于没有删除之前遗留的流表。
个人感想
- 通过本次实验,以自己编写的程序来调用ODL的北向接口实现部分功能,对基于REST API的SDN北向应用有了更加清晰的认识和理解,也对流表遗留所造成的问题有了了解,对于curl命令有了初步的学习与运用,虚拟机和终端的使用更加的熟悉。

 浙公网安备 33010602011771号