

nagios的原理及server端跟client端安装配置全部过程
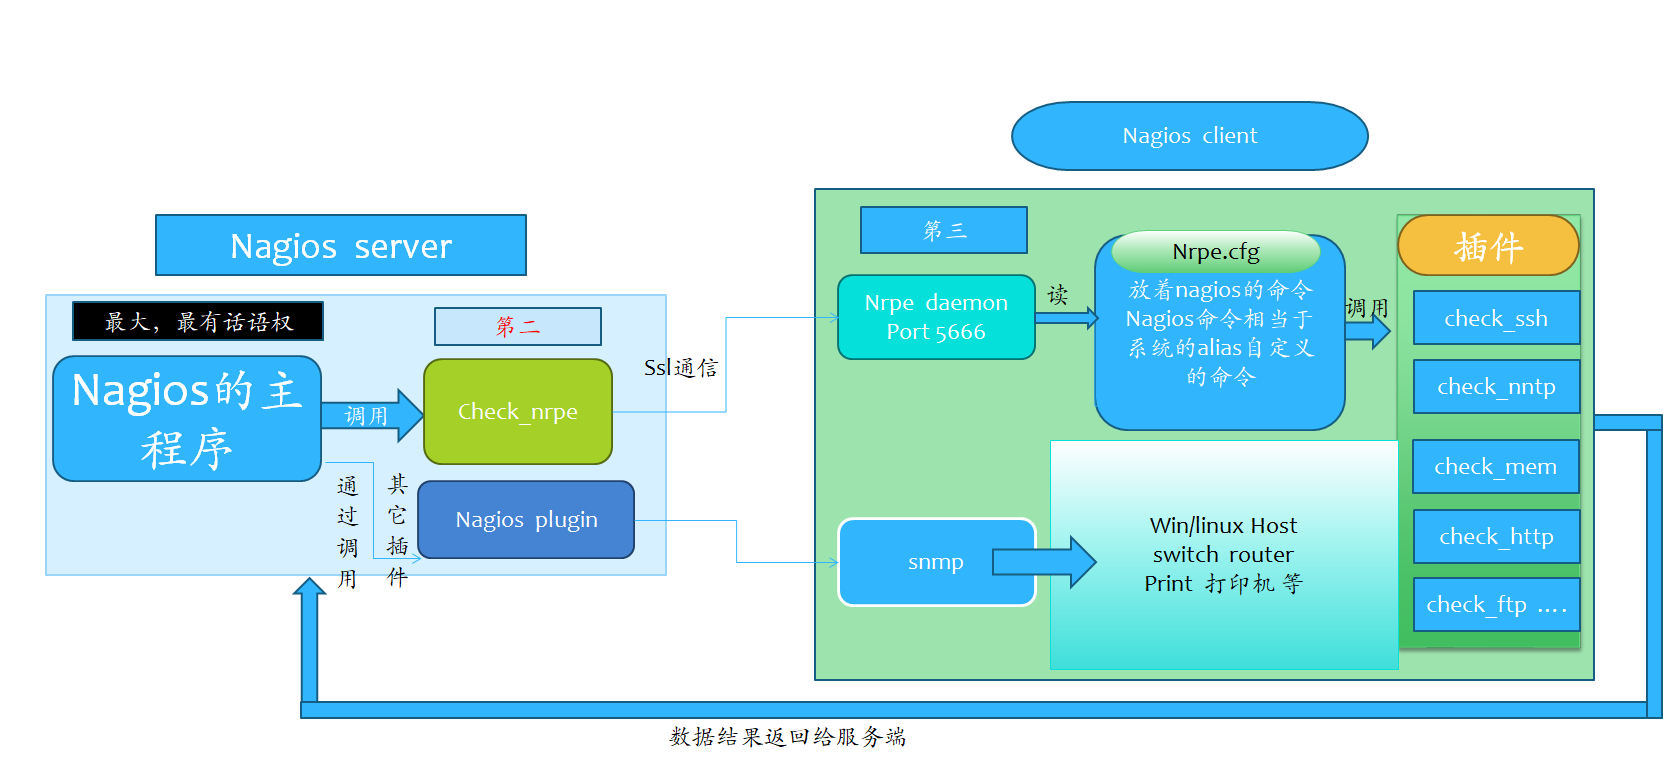
 nagios的主动模式:和client的nrpe daemon无关了,就是利用服务端本地插件直接获取的信息就叫主动模式
nagios的被动模式 : 主程序通过check_nrpe插件,和客户端nrpe进程通信,调用客户端本地插件获取数据
如何选择主动模式和被动模式
1 . 对于客户端的本地资源性能等的监控,一般用被动模式。例如: 对负载,内存,硬盘,虚拟内存,磁盘IO,温度,风扇等的监控,当然也可以用另一个软件来是实现就是smnp。不过没有用过snmp,这里先提及吧
2 . 对于WEB服务,数据库服务这种对外提供服务的监控,一般用主动模式。 例如: http,ssh,mysql,rsync,ftp等的服务
3 . 主动模式和被动模式是相对的,并且是可以互相转换的,也就是说主动模式可以改成被动模式
4 . 如果要查看nagios的报错信息的话,就查看/usr/local/nagios/var/
nagios的服务端的安装 主机IP 192.168.0.11
yum clean all ;yum repolist
  sed -i 's/enforcing/disabled/g' /etc/selinux/config ; nl /etc/selinux/config
  setenforce 0
  service iptables stop
  chkconfig iptables off
  id apache || yum -y install httpd
  useradd  -m nagios -s /sbin/nologin
  groupadd nagcmd
  usermod -a -G nagcmd nagios
  usermod -a -G nagcmd apache
  yum -y install gcc glibc glibc-comon gd  gd-devel httpd php php-gd mysql*
  mkdir /home/fangyy;cd  /home/fangyy
  rz
  oldboy_training_nagios_soft.zip
  unzip oldboy_training_nagios_soft.zip
  tar -xf nagios-3.5.1.tar.gz
  cd  nagios
  ./configure --with-command-group=nagcmd
  make all
  make install
  make install-init
  make install-commandmode
  make install-config
  make install-webconf
  htpasswd -cb /usr/local/nagios/etc/htpasswd.users yonghu mima
  yum -y install perl perl-devel
  ls
  cd ..

  tar -xf nagios-plugins-1.4.16.tar.gz
  cd nagios-plugins-1.4.16
  ./configure --with-nagios-user=nagios --with-nagios-group=nagios --enable-perl-module

  make && make install
  cd ..
  ls /usr/local/nagios/libexec/ | wc -l
  tar -xf nrpe-2.12.tar.gz
  cd nrpe-2.12
  ls
  ./configure
  make all
  make install-plugin
  make install-daemon
  make install-daemon-config
  cd ..
  service httpd start
  lsof -i :80
  /etc/init.d/nagios restart
Fireox http://192.168.0.12/nagios
 输入这条命令的用户名  密码

htpasswd -cb/usr/local/nagios/etc/htpasswd.users    yonghu    123456
                                用户名     密码
进去之后点击host,如果出现下面这样的字样就是我没有权限查看

Last Check Sort by last check time (ascending)Sort by last check time (descending)

Duration Sort by state duration (ascending)Sort by state duration time (descending)

Status Information

It appears as though you do not have permission to view information for any of the hosts you requested...

If you believe this is an error, check the HTTP server authentication requirements for accessing this CGI
and check the authorization options in your CGI configuration file.
那么执行这条命令并重启apache服务
sed -i 's/nagiosadmin/yonghu/g' /usr/local/nagios/etc/cgi.cfg  然后ctrl +F5刷新浏览器  出现下面的画面就是正常的页面

nagios被动模式服务端的配置文件
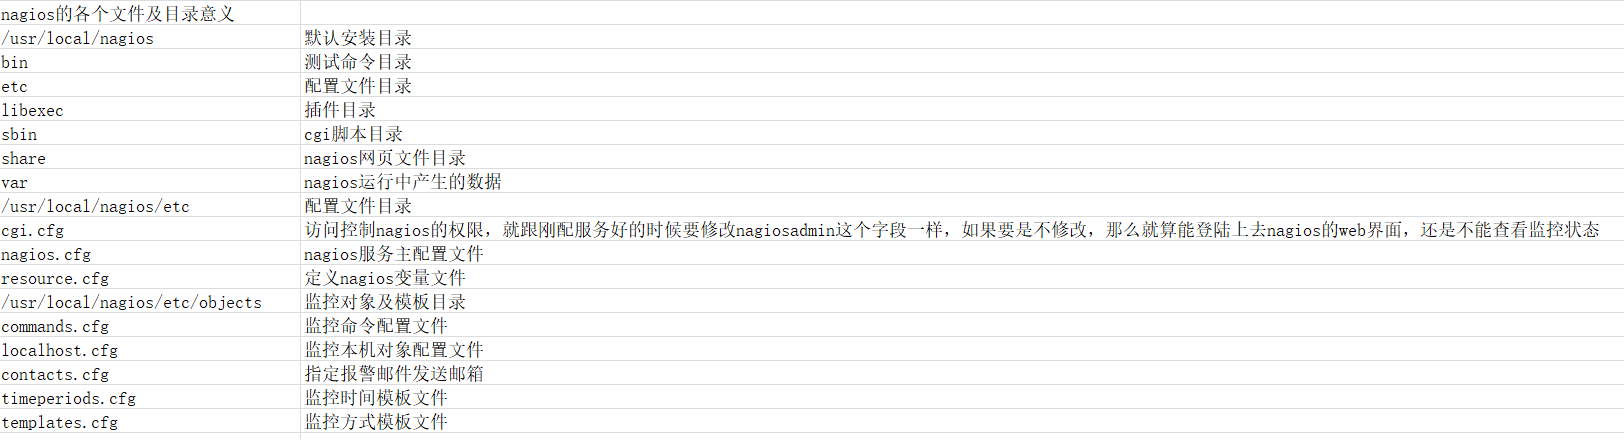
这是/usr/local/nagios/etc/nagios.cfg的配置
/usr/local/nagios/etc/nagios.cfg的主配置文件,就相当于nginx.conf是一样的

第一步
[root@nagios-server ~]#  grep -v '#' /usr/local/nagios/etc/nagios.cfg > jj
[root@nagios-server ~]#  sed -i '/^$/d' jj
[root@nagios-server ~]#  cat  jj     这是所有的有效配置,经过筛选之后,其中要包含的文件有cfg_file是包含文件就相当于nginx的include,cfg_dir是包含目录的意思,注意权限问题
log_file=/usr/local/nagios/var/nagios.log
cfg_file=/usr/local/nagios/etc/objects/commands.cfg 定义命令配置文件,被动模式只要添加check_nrpe ...
cfg_file=/usr/local/nagios/etc/objects/contacts.cfg 定义联系人
cfg_file=/usr/local/nagios/etc/objects/hosts.cfg
cfg_file=/usr/local/nagios/etc/objects/timeperiods.cfg
cfg_file=/usr/local/nagios/etc/objects/services.cfg
cfg_file=/usr/local/nagios/etc/objects/templates.cfg 模板
#cfg_file=/usr/local/nagios/etc/objects/localhost.cfg 默认的配置文件这行是没有注释的,所以有标注颜色的都是修改过的
cfg_dir=/usr/local/nagios/etc/services 默认也是没有的,只想想加个目录,以便更好地管理业务,不同的业务可以用不同的目录名字 下面的这些参数以后有空在慢慢研究
object_cache_file=/usr/local/nagios/var/objects.cache
precached_object_file=/usr/local/nagios/var/objects.precache
resource_file=/usr/local/nagios/etc/resource.cfg
status_file=/usr/local/nagios/var/status.dat
status_update_interval=10
nagios_user=nagios
nagios_group=nagios
check_external_commands=1
command_check_interval=-1
command_file=/usr/local/nagios/var/rw/nagios.cmd
external_command_buffer_slots=4096
lock_file=/usr/local/nagios/var/nagios.lock
temp_file=/usr/local/nagios/var/nagios.tmp
temp_path=/tmp
event_broker_options=-1
log_rotation_method=d
log_archive_path=/usr/local/nagios/var/archives
use_syslog=1
log_notifications=1
log_service_retries=1
log_host_retries=1
log_event_handlers=1
log_initial_states=0
log_external_commands=1
log_passive_checks=1
service_inter_check_delay_method=s
max_service_check_spread=30
service_interleave_factor=s
host_inter_check_delay_method=s
max_host_check_spread=30
max_concurrent_checks=0
check_result_reaper_frequency=10
max_check_result_reaper_time=30
check_result_path=/usr/local/nagios/var/spool/checkresults
max_check_result_file_age=3600
cached_host_check_horizon=15
cached_service_check_horizon=15
enable_predictive_host_dependency_checks=1
enable_predictive_service_dependency_checks=1
soft_state_dependencies=0
auto_reschedule_checks=0
auto_rescheduling_interval=30
auto_rescheduling_window=180
sleep_time=0.25
service_check_timeout=60
host_check_timeout=30
event_handler_timeout=30
notification_timeout=30
ocsp_timeout=5
perfdata_timeout=5
retain_state_information=1
state_retention_file=/usr/local/nagios/var/retention.dat
retention_update_interval=60
use_retained_program_state=1
use_retained_scheduling_info=1
retained_host_attribute_mask=0
retained_service_attribute_mask=0
retained_process_host_attribute_mask=0
retained_process_service_attribute_mask=0
retained_contact_host_attribute_mask=0
retained_contact_service_attribute_mask=0
interval_length=60
check_for_updates=1
bare_update_check=0
use_aggressive_host_checking=0
execute_service_checks=1
accept_passive_service_checks=1
execute_host_checks=1
accept_passive_host_checks=1
enable_notifications=1
enable_event_handlers=1
process_performance_data=0
obsess_over_services=0
obsess_over_hosts=0
translate_passive_host_checks=0
passive_host_checks_are_soft=0
check_for_orphaned_services=1
check_for_orphaned_hosts=1
check_service_freshness=1
service_freshness_check_interval=60
service_check_timeout_state=c
check_host_freshness=0
host_freshness_check_interval=60
additional_freshness_latency=15
enable_flap_detection=1
low_service_flap_threshold=5.0
high_service_flap_threshold=20.0
low_host_flap_threshold=5.0
high_host_flap_threshold=20.0
date_format=us
p1_file=/usr/local/nagios/bin/p1.pl
enable_embedded_perl=1
use_embedded_perl_implicitly=1
illegal_object_name_chars=`~!$%^&*|'"<>?,()=
illegal_macro_output_chars=`~$&|'"<>
use_regexp_matching=0
use_true_regexp_matching=0
admin_email=nagios@localhost
admin_pager=pagenagios@localhost
daemon_dumps_core=0
use_large_installation_tweaks=0
enable_environment_macros=1
debug_level=0
debug_verbosity=1
debug_file=/usr/local/nagios/var/nagios.debug
max_debug_file_size=1000000
既然在配置文件里面包含了文件,又包含了目录,所以至少首先得创建文件跟目录吧,这里把/usr/local/nagios/etc/object/localhost.cfg来当模板了,所以hosts.cfg的文件要借用它的前51行
[root@nagios-server ~]# mkdir /usr/local/nagios/etc/services
[root@nagios-server ~]# head -51 /usr/local/nagios/etc/object/localhost.cfg > /usr/local/nagios/etc/objects/hosts.cfg 监控主机的配置文件
[root@nagios-server ~]# chown nagios.nagios /usr/local/nagios/etc/objects/hosts.cfg
[root@nagios-server ~]# chown -R nagios.nagios /usr/local/nagios/etc/services
[root@nagios-server ~]# sed -i '/^$/d' /etc/init.d/nagios 我这是为了方便查看,在实际中这个操作是不用做的
下面是修改的nagios启动文件
[root@lvs2 ~]# cat /etc/init.d/nagios
#!/bin/sh
#
# chkconfig: 345 99 01
# description: Nagios network monitor
#
# File : nagios
#
# Author : Jorge Sanchez Aymar (jsanchez@lanchile.cl)
#
# Changelog :
#
# 1999-07-09 Karl DeBisschop <kdebisschop@infoplease.com>
# - setup for autoconf
# - add reload function
# 1999-08-06 Ethan Galstad <egalstad@nagios.org>
# - Added configuration info for use with RedHat's chkconfig tool
# per Fran Boon's suggestion
# 1999-08-13 Jim Popovitch <jimpop@rocketship.com>
# - added variable for nagios/var directory
# - cd into nagios/var directory before creating tmp files on startup
# 1999-08-16 Ethan Galstad <egalstad@nagios.org>
# - Added test for rc.d directory as suggested by Karl DeBisschop
# 2000-07-23 Karl DeBisschop <kdebisschop@users.sourceforge.net>
# - Clean out redhat macros and other dependencies
# 2003-01-11 Ethan Galstad <egalstad@nagios.org>
# - Updated su syntax (Gary Miller)
#
# Description: Starts and stops the Nagios monitor
# used to provide network services status.
#
# Load any extra environment variables for Nagios and its plugins
if test -f /etc/sysconfig/nagios; then
. /etc/sysconfig/nagios
fi
status_nagios ()
{
if test -x $NagiosCGI/daemonchk.cgi; then
if $NagiosCGI/daemonchk.cgi -l $NagiosRunFile; then
return 0
else
return 1
fi
else
if ps -p $NagiosPID > /dev/null 2>&1; then
return 0
else
return 1
fi
fi
return 1
}
printstatus_nagios()
{
if status_nagios $1 $2; then
echo "nagios (pid $NagiosPID) is running..."
else
echo "nagios is not running"
fi
}
killproc_nagios ()
{
kill $2 $NagiosPID
}
pid_nagios ()
{
if test ! -f $NagiosRunFile; then
echo "No lock file found in $NagiosRunFile"
exit 1
fi
NagiosPID=`head -n 1 $NagiosRunFile`
}
# Source function library
# Solaris doesn't have an rc.d directory, so do a test first
if [ -f /etc/rc.d/init.d/functions ]; then
. /etc/rc.d/init.d/functions
elif [ -f /etc/init.d/functions ]; then
. /etc/init.d/functions
fi
prefix=/usr/local/nagios
exec_prefix=${prefix}
NagiosBin=${exec_prefix}/bin/nagios
NagiosCfgFile=${prefix}/etc/nagios.cfg
NagiosStatusFile=${prefix}/var/status.dat
NagiosRetentionFile=${prefix}/var/retention.dat
NagiosCommandFile=${prefix}/var/rw/nagios.cmd
NagiosVarDir=${prefix}/var
NagiosRunFile=${prefix}/var/nagios.lock
NagiosLockDir=/var/lock/subsys
NagiosLockFile=nagios
NagiosCGIDir=${exec_prefix}/sbin
NagiosUser=nagios
NagiosGroup=nagios
# Check that nagios exists.
if [ ! -f $NagiosBin ]; then
echo "Executable file $NagiosBin not found. Exiting."
exit 1
fi
# Check that nagios.cfg exists.
if [ ! -f $NagiosCfgFile ]; then
echo "Configuration file $NagiosCfgFile not found. Exiting."
exit 1
fi
# See how we were called.
case "$1" in
start)
echo -n "Starting nagios:"
$NagiosBin -v $NagiosCfgFile > /dev/null 2>&1;
if [ $? -eq 0 ]; then
su - $NagiosUser -c "touch $NagiosVarDir/nagios.log $NagiosRetentionFile"
rm -f $NagiosCommandFile
touch $NagiosRunFile
chown $NagiosUser:$NagiosGroup $NagiosRunFile
$NagiosBin -d $NagiosCfgFile
if [ -d $NagiosLockDir ]; then touch $NagiosLockDir/$NagiosLockFile; fi
echo " done."
exit 0
else
echo "CONFIG ERROR! Start aborted. Check your Nagios configuration."
exit 1
fi
;;
stop)
echo -n "Stopping nagios: "
pid_nagios
killproc_nagios nagios
# now we have to wait for nagios to exit and remove its
# own NagiosRunFile, otherwise a following "start" could
# happen, and then the exiting nagios will remove the
# new NagiosRunFile, allowing multiple nagios daemons
# to (sooner or later) run - John Sellens
#echo -n 'Waiting for nagios to exit .'
for i in 1 2 3 4 5 6 7 8 9 10 ; do
if status_nagios > /dev/null; then
echo -n '.'
sleep 1
else
break
fi
done
if status_nagios > /dev/null; then
echo ''
echo 'Warning - nagios did not exit in a timely manner'
else
echo 'done.'
fi
rm -f $NagiosStatusFile $NagiosRunFile $NagiosLockDir/$NagiosLockFile $NagiosCommandFile
;;
status)
pid_nagios
printstatus_nagios nagios
;;
checkconfig)
printf "Running configuration check..."
$NagiosBin -v $NagiosCfgFile 修改这个地方就是为了方便可以执行这个命令 /etc/init.d/nagios checkconfig 检查语法
if [ $? -eq 0 ]; then
echo " OK."
else
echo " CONFIG ERROR! Check your Nagios configuration."
exit 1
fi
;;
restart)
printf "Running configuration check..."
$NagiosBin -v $NagiosCfgFile > /dev/null 2>&1;
if [ $? -eq 0 ]; then
echo "done."
$0 stop
$0 start
else
echo " CONFIG ERROR! Restart aborted. Check your Nagios configuration."
exit 1
fi
;;
reload|force-reload)
printf "Running configuration check..."
$NagiosBin -v $NagiosCfgFile > /dev/null 2>&1;
if [ $? -eq 0 ]; then
echo "done."
if test ! -f $NagiosRunFile; then
$0 start
else
pid_nagios
if status_nagios > /dev/null; then
printf "Reloading nagios configuration..."
killproc_nagios nagios -HUP
echo "done"
else
$0 stop
$0 start
fi
fi
else
echo " CONFIG ERROR! Reload aborted. Check your Nagios configuration."
exit 1
fi
;;
*)
echo "Usage: nagios {start|stop|restart|reload|force-reload|status|checkconfig}"
exit 1
;;
esac
# End of this script
[root@nagios-server ~]# vim /usr/local/nagios/etc/objects/commands.cfg 把下面这几行加到配置文件里面去,被动模式就是只加这几行,因为被动模式都是用check_nrpe去跟客户端的nrpe来通信的
define command{ 所有的这些都是为了service.cfg这个配置文件准备的,除了hosts.cfg文件是要用来监控主机的
command_name check_nrpe
command_line $USER1$/check_nrpe -H $HOSTADDRESS$ -c $ARG1$
}
[root@nagios-server ~]# cat /usr/local/nagios/etc/objects/hosts.cfg 监控主机的配置文件 下面的内容算是hosts.cfg的内容了
里面的几个重要字段
define host { 监控多个主机就弄多个define
use linux-server模板
host_name lvs1监控的主机名字
alias lvs1监控的主机别名 一般跟host_name是一样的
address 192.168.0.10监控的IP地址
check_command check-host-alive 下面这些是模板上的参数,但是要写在这里这里的优先级就比模板模板的优先级要高,但是一般用模板么。方便。
max_check_attempts 3
normal_check_interval 2
retry_check_interval 2
check_period 24x7
notification_interval 300
notification_period 24x7
notification_options d,u,r
contact_groups admins
process_perf_data 1
}
define hostgroup{
hostgroup_name linux-servers ; The name of the hostgroup 最好默认就可以了
alias Linux Servers ; Long name of the group 这里的字不用管它起什么,最好默认就可以了
members lvs1,lvs2 要添加主机组,反正要把主机加到主机组就可以了
}
service.cfg是定义nagios命令跟系统命令的关系 ,反正就是通过check_nrpe去执行客户端的nrpe.cfg里面command字段定义里面中括号的名字,这个名字就是对应了系统命令
[root@nagios-server ~]# cat /usr/local/nagios/etc/objects/services.cfg
define service { 被动模式
use generic-service
host_name lvs1
service_description Disk Iostat
check_command check_nrpe!check_iostat!5!11 调用了客户端的nrpe.cfg里面定义的插件 反正就是通过check_nrpe去执行客户端的nrpe.cfg里面command字段定义里面中括号的名字,这个名字就是对应了系统命令
max_check_attempts 2
normal_check_interval 4
retry_check_interval 4
check_period 24x7
notification_interval 1440
notification_period 24x7
notification_options w,u,c,r
contact_groups admins
process_perf_data 1
}
define service {
use generic-service
host_name lvs2
service_description Disk Partition
check_command check_nrpe!check_disk
max_check_attempts 8
normal_check_interval 3
retry_check_interval 2
check_period 24x7
notification_interval 360
notification_period 24x7
notification_options w,u,c,r
contact_groups admins
process_perf_data 1
}
nagios-client的安装 192.168.0.1
yum clean all; yum repolist
yum -y install gcc glibc glibc-comon mysql*
mkdir /home/fangyy
cd  /home/fangyy
rz
oldboy_training_nagios_soft.zip
unzip oldboy_training_nagios_soft.zip
tar -xf nagios-plugins-1.4.16.tar.gz
cd nagios-plugins-1.4.16
./configure --prefix=/usr/local/nagios  --enable-perl-modules --enable-redhat-pthread-workaround(是redhat的系统才需要加上这个参数)
make && make install
cd ..
ls /usr/local/nagios/libexec | wc -l
tar -xf nrpe-2.12.tar.gz
cd nrpe-2.12
ls
./configure
make all
make install-plugin
make install-daemon
make install-daemon-config
cd ..
tar -xf Params-Validate-0.91.tar.gz
cd Pa rams-Validate-0.91
ls
perl Makefile.PL
make
make test
make install
cd ..
tar -xf Class-Accessor-0.31.tar.gz
cd Class-Accessor-0.31
perl Makefile.PL
make && make install
cd ..
perl M tar -xf Config-Ti y-2.12.tar.gz
cd Config-Tiny-2.12
perl Makefile.PL
make
make test
make install
cd ..
tar -xf Math-Calc-Units-1.07.tar.gz
cd Math-Calc-Units-1.07
perl Makefile.PL
make
make test
make install
cd ..
tar -xf Regexp-Common-2010010201.tar.gz
cd Regexp-Common-2010010201
ls
perl Makefile.PL
make
make install
cd ..
tar -xf Na s-Plugin-0.34.tar.gz
cd Nagios-Plugin-0.34
perl Makefile.PL
make
make install
cd ..
cp check_memory.pl check_iostat /usr/local/nagios/libexec/
ll /usr/local/nagios/libexec/check_iostat
chmod 755 /usr/local/nagios/libexec/check_iostat
chmod 755 /usr/local/nagios/libexec/check_memory.pl
rpm -ivh ftp://ftp.pbone.net/mirror/ftp.centos.org/6.9/os/x86_64/Packages/dos2unix-3.1-37.el6.x86_64.rpm
dos2unix /usr/local/nagios/libexec/check_memory.pl
dos2unix /usr/local/nagios/libexec/check_iostat

 浙公网安备 33010602011771号