centos7升级openssl、openssh常见问题及解决方法
升级至openssl 1.1.1版本
升级至openssh 8.0版本
openssl version -a 当前查看版本
一、安装telnet (以防升级失败,连不上服务器,建议弄)
查看是否安装telnet服务rpm -qa | grep telnet

rpm -qa | grep xinetd

若无安装,yum安装

yum -y install telnet*
yum -y install xinetd

#将服务开机自启(此处根据自身情况考虑)
systemctl enable xinetd.service
systemctl enable telnet.socket

#开启服务
systemctl start telnet.socket
systemctl start xinetd

 vi /etc/securetty
在最后添加两行
pts/0
pts/1

systemctl restart xinetd
netstat -plnt |grep 23  # 确认下是否启动成功
二、升级OpenSSl
tar zxvf openssl-1.1.1c.tar.gzcd openssl-1.0.1g

cd openssl-1.1.1c

./config --prefix=/usr/local/openssl  #检查环境

./config –t

make     #编译

make install      #编译安装


cd /usr/local

ldd /usr/local/openssl/bin/openssl    #检查函数库

echo "/usr/local/openssl/lib" >> /etc/ld.so.conf    #添加所缺函数库

ldconfig -v        #更新函数库

openssl/bin/openssl version      #查看新安装的版本


which openssl           #查看旧版本openssl命令在哪里

mv /bin/openssl /usr/bin/openssl.old      #将旧版本openssl移除

ln -s /usr/local/openssl/bin/openssl /usr/bin/openssl           #新版本制作软链接

openssl version         最后查看版本,更新完毕
三、升级openssh
1、同样第一步解压,不再赘述
2、移除旧版本
mv /etc/ssh /etc/ssh.old
### 需要注意,移除之后,不能退出当前终端,若退出,只能通过telnet连了
3、编译安装
cd openssh-8.0p1/
./configure --prefix=/usr/local/openssh --sysconfdir=/etc/ssh --with-pam --with-ssl-dir=/usr/local/openssl --with-md5-passwords --mandir=/usr/share/man --with-zlib=/usr/local/zlib --without-hardening
报错1:
在安装的过程中如遇到以下错误,请安装:yum -y install openssl-devel

报错2:configure: error: PAM headers not found
请安装yum -y install pam-devel
我升级的时候只遇到这两个错,如遇到别的错,请自行解决。
然后编译安装
make && make install
4、修改启动脚本
# 拷贝启动脚本
cp ./contrib/redhat/sshd.init /etc/init.d/sshd
# 修改启动脚本
vim /etc/init.d/sshd
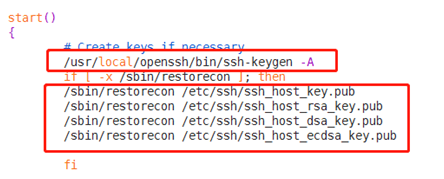
# 按如下图修改,需要注意,此路径是你安装新版本的openssh路径,根据你的实际情况修改
SSHD=/usr/local/openssh/sbin/sshd

### 注意根据自身情况修改路径
/usr/local/openssh/bin/ssh-keygen –A
/sbin/restorecon /etc/ssh/ssh_host_key.pub
/sbin/restorecon /etc/ssh/ssh_host_rsa_key.pub
/sbin/restorecon /etc/ssh/ssh_host_dsa_key.pub
/sbin/restorecon /etc/ssh/ssh_host_ecdsa_key.pub
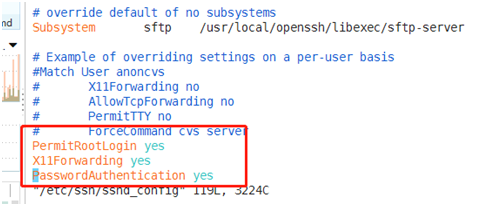
5、修改sshd配置文件/etc/ssh/sshd_config
echo "PermitRootLogin yes" >> /etc/ssh/sshd_config    #直接用root登录终端(此处根据自身情况考虑)

echo 'X11Forwarding yes' >> /etc/ssh/sshd_config   #设置是否允许X11转发

echo "PasswordAuthentication yes" >> /etc/ssh/sshd_config   #是否允许密码验证
6、卸载原有ssh(先安装后卸载,也是怕升级失败,如果有把握,可先卸载)
for i in $(rpm -qa |grep openssh);do rpm -e $i --nodeps ;done
提示警告:

将警告中被修改的文件名字再改回来
mv /etc/ssh/sshd_config.rpmsave /etc/ssh/sshd_config

mv /etc/ssh/ssh_config.rpmsave /etc/ssh/ssh_config

mv /etc/ssh/moduli.rpmsave /etc/ssh/moduli
7、替换相关命令,并重启sshd服务
cp -arp /usr/local/openssh/bin/* /usr/bin/  替换相关命令

service sshd restart   重启sshd服务
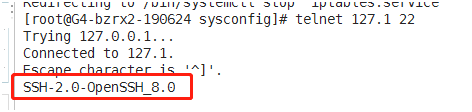
验证升级、让其他人测试连接后再退出
ssh -V 和telnet
8、设置开机自启
chkconfig --add sshd

chkconfig --level 2345 sshd on

chkconfig --list
升级完成后,为了安全起见,建议关闭telnet
#关闭服务(此处根据自身情况考虑)

systemctl stop telnet.socket

systemctl stop xinetd


#关闭服务开机自启(此处根据自身情况考虑)

systemctl disable xinetd.service

systemctl disable telnet.socket

 浙公网安备 33010602011771号