nginx
安装
平台:redhat7.6
官方下载地址http://nginx.org/en/download.html
这边是配置yum源安装,编译安装各种问题,尤其是开机启动脚本我一直搞不定。
参考官网yum源配置https://www.nginx.com/resources/wiki/start/topics/tutorials/install/
新增yum文件内容如下:
[nginx]
name=nginx repo
baseurl=https://nginx.org/packages/centos/7/x86_64/
gpgcheck=0
enabled=1
yum安装:
yum repolist
yum install -y nginx.x86_64
开机启动配置
systemctl enable nginx
添加模块
这里添加limit限流模块和stream模块
首先查看当前安装的nginx版本和已安装的模块:
[root@localhost nginx-1.18.0]#  nginx -V
nginx version: nginx/1.18.0
built by gcc 4.8.5 20150623 (Red Hat 4.8.5-39) (GCC)
built with OpenSSL 1.0.2k-fips  26 Jan 2017
TLS SNI support enabled
configure arguments: --prefix=/etc/nginx --sbin-path=/usr/sbin/nginx --modules-path=/usr/lib64/nginx/modules --conf-path=/etc/nginx/nginx.conf --error-log-path=/var/log/nginx/error.log --http-log-path=/var/log/nginx/access.log --pid-path=/var/run/nginx.pid --lock-path=/var/run/nginx.lock --http-client-body-temp-path=/var/cache/nginx/client_temp --http-proxy-temp-path=/var/cache/nginx/proxy_temp --http-fastcgi-temp-path=/var/cache/nginx/fastcgi_temp --http-uwsgi-temp-path=/var/cache/nginx/uwsgi_temp --http-scgi-temp-path=/var/cache/nginx/scgi_temp --user=nginx --group=nginx --with-compat --with-file-aio --with-threads --with-http_addition_module --with-http_auth_request_module --with-http_dav_module --with-http_flv_module --with-http_gunzip_module --with-http_gzip_static_module --with-http_mp4_module --with-http_random_index_module --with-http_realip_module --with-http_secure_link_module --with-http_slice_module --with-http_ssl_module --with-http_stub_status_module --with-http_sub_module --with-http_v2_module --with-mail --with-mail_ssl_module --with-stream --with-stream_realip_module --with-stream_ssl_module --with-stream_ssl_preread_module --with-cc-opt='-O2 -g -pipe -Wall -Wp,-D_FORTIFY_SOURCE=2 -fexceptions -fstack-protector-strong --param=ssp-buffer-size=4 -grecord-gcc-switches -m64 -mtune=generic -fPIC' --with-ld-opt='-Wl,-z,relro -Wl,-z,now -pie'
复制出来之后要用
停止nginx服务:
systemctl stop nginx
下载对应版本的nginx包
wget http://nginx.org/download/nginx-1.18.0.tar.gz
解压缩并进入该目录
tar -xzvf nginx-1.18.0.tar.gz
cd nginx-1.18.0.tar.gz
备份:
mv /usr/sbin/nginx /usr/sbin/nginx_bak
cp -r /etc/nginx/ /etc/nginx_bak
查看是否支持
./configure --help|grep limit

--without-http_limit_conn_module disable表示已有该模块,编译时无需添加
./configure --help|grep stream
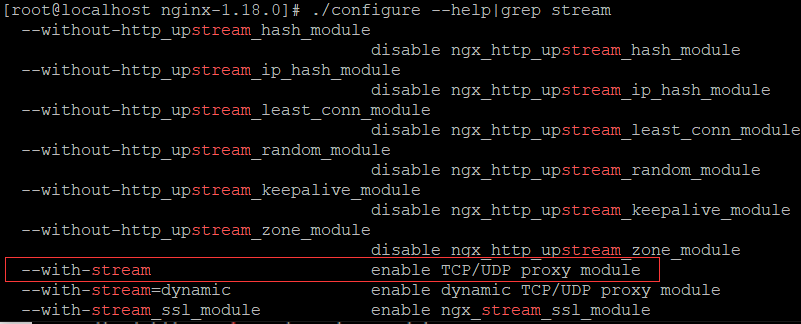
--with-stream enable TCP/UDP proxy module表示不支持,编译时需要手动添加
stream模块需要先安装几个包:
yum -y install openssl openssl-devel pcre-devel
根据上面查看版本所得的模板信息加上需要新增的模块编译:
./configure --prefix=/etc/nginx --sbin-path=/usr/sbin/nginx --modules-path=/usr/lib64/nginx/modules --conf-path=/etc/nginx/nginx.conf --error-log-path=/var/log/nginx/error.log --http-log-path=/var/log/nginx/access.log --pid-path=/var/run/nginx.pid --lock-path=/var/run/nginx.lock --http-client-body-temp-path=/var/cache/nginx/client_temp --http-proxy-temp-path=/var/cache/nginx/proxy_temp --http-fastcgi-temp-path=/var/cache/nginx/fastcgi_temp --http-uwsgi-temp-path=/var/cache/nginx/uwsgi_temp --http-scgi-temp-path=/var/cache/nginx/scgi_temp --user=nginx --group=nginx --with-compat --with-file-aio --with-threads --with-http_addition_module --with-http_auth_request_module --with-http_dav_module --with-http_flv_module --with-http_gunzip_module --with-http_gzip_static_module --with-http_mp4_module --with-http_random_index_module --with-http_realip_module --with-http_secure_link_module --with-http_slice_module --with-http_ssl_module --with-http_stub_status_module --with-http_sub_module --with-http_v2_module --with-mail --with-mail_ssl_module --with-stream --with-stream_realip_module --with-stream_ssl_module --with-stream_ssl_preread_module --with-cc-opt='-O2 -g -pipe -Wall -Wp,-D_FORTIFY_SOURCE=2 -fexceptions -fstack-protector-strong --param=ssp-buffer-size=4 -grecord-gcc-switches -m64 -mtune=generic -fPIC' --with-ld-opt='-Wl,-z,relro -Wl,-z,now -pie' --with-stream --with-stream_ssl_module
再次安装:
make &&make install
简单的反向代理配置
注意这边不涉及负载均衡
niginx的主配置文件是/etc/nginx/nginx.conf,部分内容如下:
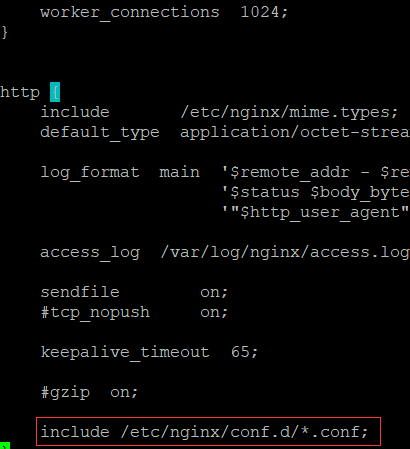
根据include部分可发现改配置内容会包含/etc/nginx/conf.d/*.conf下的文件,进入此目录,发现已经存在default.conf文件,可根据此文件自定义一个新的*.conf配置文件
下面实现的是监听端口来实现反向代理
[root@localhost ~]# cp /etc/nginx/conf.d/default.conf /etc/nginx/conf.d/server2.conf
[root@localhost ~]# vim /etc/nginx/conf.d/server2.conf
server {
listen *:8082; #自定义监听端口,我这是8082,注意防火墙配置
# server_name localhost; #注释掉,我这边监听的是端口
location / {
proxy_pass http://转发服务器IP:端口; #转发的服务器地址
root /usr/share/nginx/html;
index index.html index.htm;
}
error_page 500 502 503 504 /50x.html;
location = /50x.html {
root /usr/share/nginx/html;
}
#配置第二台,把上面复制一份,第三台同理
server {
listen *:8083;
# server_name localhost; #注释掉
location / {
proxy_pass http://转发服务器IP:端口; #转发的服务器地址
root /usr/share/nginx/html;
index index.html index.htm;
}
error_page 500 502 503 504 /50x.html;
location = /50x.html {
root /usr/share/nginx/html;
}
}
二级目录的反向代理
即把nginx的二级目录跳转到不同的服务器上
网上搜了半天都实现不了,最后还是官方文档靠谱https://www.nginx.cn/doc/standard/httpcore.html
配置文件内容如下:
[root@localhost conf.d]# cat server.conf
server {
    listen       *:80;

    location / {
        proxy_pass http://192.168.126.129:8080;
        root   /usr/share/nginx/html;
        index  index.html index.htm;
    }

#../qq转发
    location ^~/qq/ {  #注意格式
        proxy_pass  http://192.168.126.130:8900/; #注意最后有个/,否则转发的域名会把/qq加进去
    }
error_page 500 502 503 504 /50x.html; location = /50x.html { root /usr/share/nginx/html; } }
上面的做法有个问题,会导致http://192.168.126.130:8900/网页中的js、图片、CSS样式无法正常显示,待解决
stream模块
这块未实验,记录下
官方 网站http://nginx.org/en/docs/stream/ngx_stream_core_module.html
在nginx.conf中添加配置,注意与http同级:
stream {
    upstream backend {
        hash $remote_addr consistent;

        server backend1.example.com:12345 weight=5;
        server 127.0.0.1:12345            max_fails=3 fail_timeout=30s;
        server unix:/tmp/backend3;
    }

    upstream dns {
       server 192.168.0.1:53535;
       server dns.example.com:53;
    }

    server {
        listen 12345;
        proxy_connect_timeout 1s;
        proxy_timeout 3s;
        proxy_pass backend;
    }

    server {
        listen 127.0.0.1:53 udp reuseport;
        proxy_timeout 20s;
        proxy_pass dns;
    }

    server {
        listen [::1]:12345;
        proxy_pass unix:/tmp/stream.socket;
    }
}
注意各端口需要在防火墙中添加对应策略
传递IP
nginx实现反向代理时,会改变服务端的请求来源,服务端收到的IP默认是nginx的IP,若想要传递真实IP,就需要做如下配置
proxy_set_header X-Real-IP $remote_addr;
proxy_set_header X-Real-Port $remote_port;
proxy_set_header X-Forwarded-For $proxy_add_x_forwarded_for;
三个header分别表示:
X-Real-IP            客户端ip
X-Real-Port          客户端或上一级端口
X-Forwarded-For      包含了客户端和各级代理ip的完整ip链路
其中X-Real-IP是必需的,后两项选填。当只存在一级nginx代理的时候X-Real-IP和X-Forwarded-For是一致的,而当存在多级代理的时候,X-Forwarded-For 就变成了如下形式
X-Forwarded-For: 客户端ip, 一级代理ip, 二级代理ip...
在获取客户端ip的过程中虽然X-Forwarded-For是选填的,但是个人建议还是保留这,以便出现安全问题的时候,可以根据日志文件回溯来源。

 浙公网安备 33010602011771号