

iOS底层原理(十)架构设计
iOS中的几种常用架构
MVC
MVC架构是以Model、Controller、View三者之间的关系来依赖的
Apple版的MVC
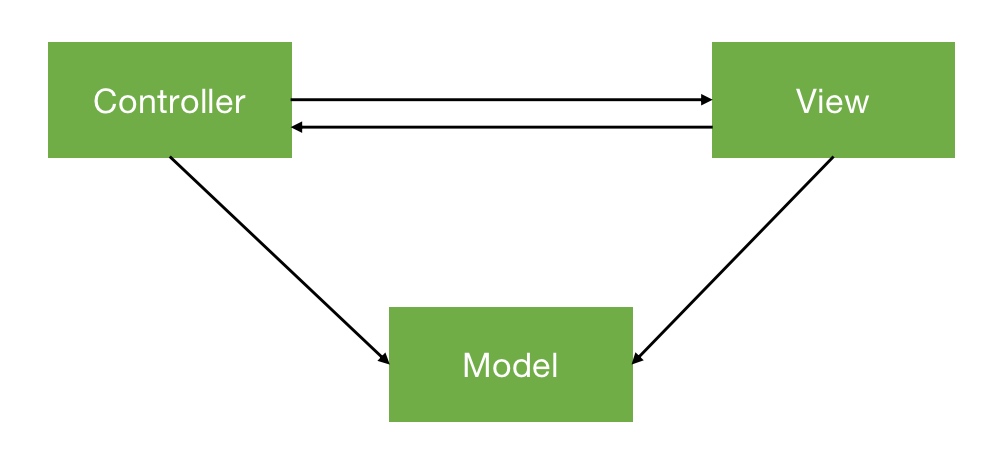
Apple最早的MVC的数据流向是以Controller为中心,在Model和View中间作为桥梁来衔接,而且Controller和Model、View之间的数据流向都是双向的

例如,View上通过按钮的点击传递给Controller,Controller就去获取数据来作为Model;Model的数据有了改变,又要通过展示到Controller展示到View上
三者的交互过程中,View和Model是互相没有直接关联的
在iOS程序中最常见的就是tableview的展示,见示例代码
// LLNews
@interface LLNews : NSObject

@property (copy, nonatomic) NSString *title;
@property (copy, nonatomic) NSString *content;
@end

@implementation LLNews

@end

// LLNewsViewController
@interface LLNewsViewController : UITableViewController

@end

@interface LLNewsViewController ()
@property (strong, nonatomic) NSMutableArray *newsData;
@end

@implementation LLNewsViewController

- (void)viewDidLoad {
    [super viewDidLoad];

    [self loadNewsData];
}

- (void)loadNewsData
{
    self.newsData = [NSMutableArray array];

    for (int i = 0; i < 20; i++) {
        LLNews *news = [[LLNews alloc] init];
        news.title = [NSString stringWithFormat:@"news-title-%d", i];
        news.content = [NSString stringWithFormat:@"news-content-%d", i];
        [self.newsData addObject:news];
    }
}

#pragma mark - Table view data source
- (NSInteger)tableView:(UITableView *)tableView numberOfRowsInSection:(NSInteger)section {
    return self.newsData.count;
}

- (UITableViewCell *)tableView:(UITableView *)tableView cellForRowAtIndexPath:(NSIndexPath *)indexPath {
    UITableViewCell *cell = [tableView dequeueReusableCellWithIdentifier:@"NewsCell" forIndexPath:indexPath];

    LLNews *news = self.newsData[indexPath.row];

    cell.detailTextLabel.text = news.title;
    cell.textLabel.text = news.content;

    return cell;
}

#pragma mark - UITableViewDelegate
- (void)tableView:(UITableView *)tableView didSelectRowAtIndexPath:(NSIndexPath *)indexPath
{
    NSLog(@"1111");
}

@end
优点:tableView和newsData都是相对独立的,可以复用
缺点:大量的赋值代码会写在Controller中,Controller变得过于臃肿
变种的MVC
变种后的MVC的数据流向,Controller和View还是相互作用的,Controller也还是会去获取数据来作为Model;不同的是View也可以直接持有Model了,三者之间互相都有了交互
下面我们用示例代码来说明三者之间的具体关系
// LLApp
@interface LLApp : NSObject
@property (copy, nonatomic) NSString *name;
@property (copy, nonatomic) NSString *image;
@end

@implementation LLApp

@end

// LLAppView
@class LLApp, LLAppView;

@protocol LLAppViewDelegate <NSObject>
@optional
- (void)appViewDidClick:(LLAppView *)appView;
@end

@interface LLAppView : UIView
@property (strong, nonatomic) LLApp *app;
@property (weak, nonatomic) id<LLAppViewDelegate> delegate;
@end

@interface LLAppView()
@property (weak, nonatomic) UIImageView *iconView;
@property (weak, nonatomic) UILabel *nameLabel;
@end

@implementation LLAppView

- (instancetype)initWithFrame:(CGRect)frame
{
    if (self = [super initWithFrame:frame]) {
        UIImageView *iconView = [[UIImageView alloc] init];
        iconView.frame = CGRectMake(0, 0, 100, 100);
        [self addSubview:iconView];
        _iconView = iconView;

        UILabel *nameLabel = [[UILabel alloc] init];
        nameLabel.frame = CGRectMake(0, 100, 100, 30);
        nameLabel.textAlignment = NSTextAlignmentCenter;
        [self addSubview:nameLabel];
        _nameLabel = nameLabel;
    }
    return self;
}

- (void)setApp:(LLApp *)app
{
    _app = app;

    self.iconView.image = [UIImage imageNamed:app.image];
    self.nameLabel.text = app.name;
}

- (void)touchesBegan:(NSSet<UITouch *> *)touches withEvent:(UIEvent *)event
{
    if ([self.delegate respondsToSelector:@selector(appViewDidClick:)]) {
        [self.delegate appViewDidClick:self];
    }
}

@end

// ViewController
@interface ViewController () <LLAppViewDelegate>

@end

@implementation ViewController

- (void)viewDidLoad {
    [super viewDidLoad];

    // 创建view
    LLAppView *appView = [[LLAppView alloc] init];
    appView.frame = CGRectMake(100, 100, 100, 150);
    appView.delegate = self;
    [self.view addSubview:appView];

    // 加载模型数据
    LLApp *app = [[LLApp alloc] init];
    app.name = @"QQ";
    app.image = @"QQ";

    // 设置数据到view上
    appView.app = app;
}

#pragma mark - LLAppViewDelegate
- (void)appViewDidClick:(LLAppView *)appView
{
    NSLog(@"控制器监听到了appView的点击");
}

@end
优点:Controller会相对减负,减少View的数据赋值代码,而且外部不用关心View的属性以及做了什么
缺点:View和Model耦合性太高了,会造成相互依赖,不能再分别单独使用了,复用性降低了
MVP
MVP架构是以Model、Presenter、View三者之间的关系来依赖的
Presenter更像是替代了Controller来作为Model和View之间的桥梁,而Controller只需要管理Presenter就可以了

我们借由上面的示例来做下调整,示例代码如下
LLApp和LLAppView基本不变
// LLApp
@interface LLApp : NSObject
@property (copy, nonatomic) NSString *name;
@property (copy, nonatomic) NSString *image;
@end

@implementation LLApp

@end

// LLAppView
@class LLAppView;

@protocol LLAppViewDelegate <NSObject>
@optional
- (void)appViewDidClick:(LLAppView *)appView;
@end

@interface LLAppView : UIView
- (void)setName:(NSString *)name andImage:(NSString *)image;
@property (weak, nonatomic) id<LLAppViewDelegate> delegate;
@end

@interface LLAppView()
@property (weak, nonatomic) UIImageView *iconView;
@property (weak, nonatomic) UILabel *nameLabel;
@end

@implementation LLAppView

- (instancetype)initWithFrame:(CGRect)frame
{
    if (self = [super initWithFrame:frame]) {
        UIImageView *iconView = [[UIImageView alloc] init];
        iconView.frame = CGRectMake(0, 0, 100, 100);
        [self addSubview:iconView];
        _iconView = iconView;

        UILabel *nameLabel = [[UILabel alloc] init];
        nameLabel.frame = CGRectMake(0, 100, 100, 30);
        nameLabel.textAlignment = NSTextAlignmentCenter;
        [self addSubview:nameLabel];
        _nameLabel = nameLabel;
    }
    return self;
}

- (void)setName:(NSString *)name andImage:(NSString *)image
{
    _iconView.image = [UIImage imageNamed:image];
    _nameLabel.text = name;
}

- (void)touchesBegan:(NSSet<UITouch *> *)touches withEvent:(UIEvent *)event
{
    if ([self.delegate respondsToSelector:@selector(appViewDidClick:)]) {
        [self.delegate appViewDidClick:self];
    }
}

@end
多出来的Presenter和抽取后的Controller代码如下
// LLAppPresenter
@interface LLAppPresenter : NSObject

- (instancetype)initWithController:(UIViewController *)controller;
@end

@interface LLAppPresenter() <LLAppViewDelegate>

@property (weak, nonatomic) UIViewController *controller;
@end

@implementation LLAppPresenter

- (instancetype)initWithController:(UIViewController *)controller
{
    if (self = [super init]) {
        self.controller = controller;

        // 创建View
        LLAppView *appView = [[LLAppView alloc] init];
        appView.frame = CGRectMake(100, 100, 100, 150);
        appView.delegate = self;
        [controller.view addSubview:appView];

        // 加载模型数据
        LLApp *app = [[LLApp alloc] init];
        app.name = @"QQ";
        app.image = @"QQ";

        // 赋值数据
        [appView setName:app.name andImage:app.image];
    }
    return self;
}

#pragma mark - MJAppViewDelegate
- (void)appViewDidClick:(LLAppView *)appView
{
    NSLog(@"presenter 监听了 appView 的点击");
}

@end

// ViewController
@interface ViewController ()

@property (strong, nonatomic) LLAppPresenter *presenter;
@end

@implementation ViewController

- (void)viewDidLoad {
    [super viewDidLoad];

    self.presenter = [[LLAppPresenter alloc] initWithController:self];
}

@end
优点:
- 每个
Presenter对应着各自的Model和View Model和View也更加的独立性、可复用Controller里变得更简洁,只需要管理不同的Presenter就可以
MVVM
MVVM架构是以Model、ViewModel、View三者之间的关系来依赖的,其中的View包括了View和Controller
ViewModel的作用是将Controller的业务逻辑抽取出来,并且把Model和View做一个绑定关系

我们将MVC的tableview的示例做了更改后,代码如下
// LLNews
@interface LLNews : NSObject
@property (copy, nonatomic) NSString *title;
@property (copy, nonatomic) NSString *content;
@end

@implementation LLNews

@end

// LLNewsViewModel
@interface LLNewsViewModel : NSObject

- (void)loadNewsData:(void (^)(NSArray *newsData))completion;
@end

@implementation LLNewsViewModel

- (void)loadNewsData:(void (^)(NSArray *))completion
{
    if (!completion) return;

    NSMutableArray *newsData = [NSMutableArray array];
    for (int i = 0; i < 20; i++) {
        // 发送网络请求、字典转模型
        LLNews *news = [[LLNews alloc] init];
        news.title = [NSString stringWithFormat:@"news-title-%d", i];
        news.content = [NSString stringWithFormat:@"news-content-%d", i];
        [newsData addObject:news];
    }

    completion(newsData);
}

@end

// LLNewsViewController
@interface LLNewsViewController ()
@property (nonatomic, strong) LLNewsViewModel *newsVM;
@property (nonatomic, assign) NSArray *newsData;
@end

@implementation LLNewsViewController

- (void)viewDidLoad {
    [super viewDidLoad];

    self.newsVM = [[LLNewsViewModel alloc] init];
    [self.newsVM loadNewsData:^(NSArray *newsData) {
        self.newsData = newsData;
    }];
}

#pragma mark - Table view data source
- (NSInteger)tableView:(UITableView *)tableView numberOfRowsInSection:(NSInteger)section {
    return self.newsData.count;
}

- (UITableViewCell *)tableView:(UITableView *)tableView cellForRowAtIndexPath:(NSIndexPath *)indexPath {
    UITableViewCell *cell = [tableView dequeueReusableCellWithIdentifier:@"NewsCell" forIndexPath:indexPath];

    LLNews *news = self.newsData[indexPath.row];

    cell.detailTextLabel.text = news.title;
    cell.textLabel.text = news.content;

    return cell;
}

#pragma mark - UITableViewDelegate
- (void)tableView:(UITableView *)tableView didSelectRowAtIndexPath:(NSIndexPath *)indexPath
{
    NSLog(@"1111");
}

@end
优点:Controller可以不用写逻辑代码,相对减轻负担,MVVM可以结合一些响应式框架来更简便使用
架构分层
一般我们经常会分为三层架构,分别是界面层、业务层、数据层
MVC、MVP、MVVM这几种架构都是建立于界面层来讨论的
架构分层的目的就是为了降低耦合性,易于维护和开发
设计模式
什么是设计模式
设计模式(Design Pattern)是一套被反复使用、代码设计经验的总结
使用设计模式的好处是:可重用代码、让代码更容易被他人理解、保证代码可靠性
一般与编程语言无关,是一套比较成熟的编程思想### 设计模式的几大类设计模式可以分为三大类- 创建型模式:对象实例化的模式,用于解耦对象的实例化过程 - 单例模式、工厂方法模式,等等- 结构型模式:把类或对象结合在一起形成一个更大的结构 - 代理模式、适配器模式、组合模式、装饰模式,等等- 行为型模式:类或对象之间如何交互,及划分责任和算法 - 观察者模式、命令模式、责任链模式,等等具体概述之后再详细讨论

 浙公网安备 33010602011771号