
SpringBoot项目部署
Java项目打包部署
一、Spring Boot项目打Jar包发布(项目直接创建(IDEA同理):https://start.spring.io/)
1:java -jar XXX.jar 特点:当前ssh窗口被锁定,可按CTRL + C打断程序运行,或直接关闭窗口,程序退出
2:java -jar XXX.jar & &代表在后台运行。特定:当前ssh窗口不被锁定,但是当窗口关闭时,程序中止运行。
3:nohup java -jar XXX.jar & nohup 意思是不挂断运行命令,当账户退出或终端关闭时,程序仍然运行
4:nohup java -jar XXX.jar >temp.txt &(或 nohup java -jar XXX.jar >temp.txt 2>1 &) 即输出内容不打印到屏幕上,而是输出到temp.txt文件中。可以使用 top 命令查看运行中的进程,也可以用 ps -aux 查看进程 kill -9 pid删除
- 发布:nohup java -jar .jar &
- 日志查看:tail -f nohup.out
- 查看执行jar进程:ps -ef| grep .jar 或者使用jobs命令查看后台运行任务
- 杀死进程:kill -9 pid
二、Spring Boot项目打war包部署到外部Tomcat
1、修改POM文件
<packaging>war</packaging>
2、添加spring-boot-starter-tomcat依赖,scope设置为provided
<dependency>
<groupId>org.springframework.boot</groupId>
<artifactId>spring-boot-starter-tomcat</artifactId>
<scope>provided</scope>
</dependency>
3、注册启动类,创建ServletInitializer.java,继承SpringBootServletInitializer ,覆盖configure(),把启动类Application注册进去。外部web应用服务器构建Web Application Context的时候,会把启动类添加进去。
public class ServletInitializer extends SpringBootServletInitializer {
  @Override
  protected SpringApplicationBuilder configure(SpringApplicationBuilder application) {
    return application.sources(Application.class); //(项目名称)Application(根据自己的项目名称来定)
  }
}
4、通过IDEA的Maven工具生成,点击run as ---maven install,生成war,可以直接拷到tomcat的webapps目录下,启动Tomcat即可。
5、注意事项
1) 注意同一端口号的多个项目部署时,在tomcat/config/server.xml中添加,如:
<Context path="/project" reloadable="true" docBase="/home/develop/tomcat-8.5/webapps"/>
<Context path="/project2" reloadable="true" docBase="/home/develop/tomcat-8.5/webapps"/>
通过访问:http://127.0.0.1:8080/project http://127.0.0.1:8080/project 对应各子的项目
2) 跳转找不到项目名称或者是想直接访问ip地址就能访问项目地址的操作如下:
进入的Tomcat / conf/ server.xml的文件,修改Tomcat的端口号。
(1)端口号
<Connector port="8080" protocol="HTTP/1.1"
connectionTimeout="20000"
redirectPort="8443" />
(2)修改ip和docBase
<Engine name="Catalina" defaultHost="127.0.0.1">

<Host name="127.0.0.1" appBase="webapps"
unpackWARs="true" autoDeploy="true">
<Context path="" docBase="/usr/local/apache-tomcat-8.5/webapps/war包名称" debug="0" reloadable="true"/>
autoDeploy: 如果此项设为true,表示Tomcat服务处于运行状态时,能够监测appBase下的文件,如果有新有web应用加入进来,会自运发布这个WEB应用。
三、Docker 部署优化:配置可视化,解放双手迈出一小步
1、项目打包pom.依赖build修改


    <build>
        <!-- 打包名称 -->
        <finalName>${project.artifactId}</finalName>
        <plugins>
            <plugin>
                <groupId>org.springframework.boot</groupId>
                <artifactId>spring-boot-maven-plugin</artifactId>
                <configuration>
                    <includeSystemScope>true</includeSystemScope>
                </configuration>
            </plugin>
            <!-- 打jar包时忽略配置文件 -->
            <plugin>
                <groupId>org.apache.maven.plugins</groupId>
                <artifactId>maven-jar-plugin</artifactId>
                <configuration>
                    <excludes>
                        <exclude>**/application.yml</exclude>
<!--                        <exclude>**/application*.properties</exclude>-->
<!--                        <exclude>**/logback*.xml</exclude>-->
<!--                        <exclude>**/bootstrap.yml</exclude>-->
<!--                        <exclude>**/setting.properties</exclude>-->
                    </excludes>
                </configuration>
            </plugin>
        </plugins>
    </build>
2、启动jar包时候需要指定外部的启动文件
- a、指定的是目录: java -jar -Dspring.config.location=/opt/java/config/ fdemo.jar
- b、指定的是文件: java -jar -Dspring.config.location=/opt/java/config/application.yml fdemo.jar
- c、配置文件放在jar包同级,或者新建config文件夹放入,spring默认会去./config目录中查询
3、配置实现可视化:/opt/java/config/application.yml
a、可视化工具 pom依赖
<dependency>
       <groupId>org.yaml</groupId>
       <artifactId>snakeyaml</artifactId>
</dependency>
b、工具类
public class YamlUtils {

    private final static DumperOptions OPTIONS = new DumperOptions();

    private static File file;

    private static InputStream ymlInputSteam;

    private static Object CONFIG_MAP;

    private static Yaml yaml;

    static {
        //将默认读取的方式设置为块状读取
        OPTIONS.setDefaultFlowStyle(DumperOptions.FlowStyle.BLOCK);
    }

    /**
     * 使用其他方法之前必须调用一次 设置yml的输出文件,当没有设置输入流时可以不设置输入流,默认以此文件读入
     *
     * @param file 输出的文件
     */
    public static void setYmlFile(File file) throws FileNotFoundException {
        YamlUtils.file = file;
        if (ymlInputSteam == null) {
            setYmlInputSteam(new FileInputStream(file));
        }
    }


    /**
     * 使用其他方法之前必须调用一次 设置yml的输入流
     *
     * @param inputSteam 输入流
     */
    public static void setYmlInputSteam(InputStream inputSteam) {
        ymlInputSteam = inputSteam;
        yaml = new Yaml(OPTIONS);
        CONFIG_MAP = yaml.load(ymlInputSteam);
    }

    /**
     * 根据键获取值
     *
     * @param key 键
     * @return 查询到的值
     */
    @SuppressWarnings("unchecked")
    public static Object getByKey(String key) {
        if (ymlInputSteam == null) {
            return null;
        }
        String[] keys = key.split("\\.");
        Object configMap = CONFIG_MAP;
        for (String s : keys) {
            if (configMap instanceof Map) {
                configMap = ((Map<String, Object>) configMap).get(s);
            } else {
                break;
            }
        }
        return configMap == null ? "" : configMap;
    }

    public static void saveOrUpdateByKey(String key, Object value) throws IOException {
        KeyAndMap keyAndMap = new KeyAndMap(key).invoke();
        key = keyAndMap.getKey();
        Map<String, Object> map = keyAndMap.getMap();
        map.put(key, value);
        //将数据重新写回文件
        yaml.dump(CONFIG_MAP, new FileWriter(file));
    }

    public static void removeByKey(String key) throws Exception {
        KeyAndMap keyAndMap = new KeyAndMap(key).invoke();
        key = keyAndMap.getKey();
        Map<String, Object> map = keyAndMap.getMap();
        Map<String, Object> fatherMap = keyAndMap.getFatherMap();
        map.remove(key);
        if (map.size() == 0) {
            Set<Map.Entry<String, Object>> entries = fatherMap.entrySet();
            for (Map.Entry<String, Object> entry : entries) {
                if (entry.getValue() == map) {
                    fatherMap.remove(entry.getKey());
                }
            }
        }
        yaml.dump(CONFIG_MAP, new FileWriter(file));
    }

    private static class KeyAndMap {
        private String key;
        private Map<String, Object> map;
        private Map<String, Object> fatherMap;

        public KeyAndMap(String key) {
            this.key = key;
        }

        public String getKey() {
            return key;
        }

        public Map<String, Object> getMap() {
            return map;
        }

        public Map<String, Object> getFatherMap() {
            return fatherMap;
        }

        @SuppressWarnings("unchecked")
        public KeyAndMap invoke() {
            if (file == null) {
                System.err.println("请设置文件路径");
            }
            if (null == CONFIG_MAP) {
                CONFIG_MAP = new LinkedHashMap<>();
            }
            String[] keys = key.split("\\.");
            key = keys[keys.length - 1];
            map = (Map<String, Object>) CONFIG_MAP;
            for (int i = 0; i < keys.length - 1; i++) {
                String s = keys[i];
                if (map.get(s) == null || !(map.get(s) instanceof Map)) {
                    map.put(s, new HashMap<>(4));
                }
                fatherMap = map;
                map = (Map<String, Object>) map.get(s);
            }
            return this;
        }
    }
}
c、测试使用
    public static void main(String[] args) throws Exception {
        String pathName = "..\\config\\application.yml";
        File yml = new File(pathName);
        YamlUtils.setYmlFile(yml);
        YamlUtils.getByKey("spring.datasource.username");
        YamlUtils.saveOrUpdateByKey("spring.datasource.password", "123456");
        YamlUtils.removeByKey("server.port");
    }
4、使用Dockerfile 构建镜像发布
- 构建镜像:docker build -t javaweb .
-
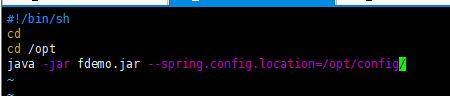
挂载宿主机配置启动:docker run -dit --name testweb -p 80:80 -v /opt/java/config:/opt/config javaweb
-
View Code
#镜像支持 直接java:8需要600多M,这样只需要140M
FROM java:8-jdk-alpine
#配置jdk
ENV JAVA_OPTS="$JAVA_OPTS -Dfile.encoding=UTF8 -Duser.timezone=GMT+08"
RUN sed -i 's/dl-cdn.alpinelinux.org/mirrors.aliyun.com/g' /etc/apk/repositories && \
    apk add -U tzdata && \
    ln -sf /usr/share/zoneinfo/Asia/Shanghai /etc/localtime
#拷贝当前文件至容器
COPY *.jar /opt/
COPY start.sh /
#设置RUN CMD ENTRYPOINT COPY ADD指令的工作目录
WORKDIR /
#编译镜像时运行的脚本
RUN chmod +x start.sh
#设置容器的自动命令
CMD ["/start.sh"]
Dockerfile内容
-
- 使用start.sh脚本启动(ENTRYPOINT指令运行同理)

 浙公网安备 33010602011771号