Ubuntu 16.04安装qbittorrent web ui
- 添加qBittorrent 仓库
# apt install software-properties-common
add-apt-repository ppa:qbittorrent-team/qbittorrent-stable
- 安装qBittorrent Webui
apt-get update
apt-get install qbittorrent-nox
如果想需要图形界面的qBittorent软件,命令和 qbittorrent-box一起
apt-get update
sudo apt-get install qbittorrent qbittorrent-nox
- 启动 qbittorrent
如果你安装了图形界面的qBittorrent,可以从启动菜单中进行启动。如果你禁用了GUI或者你只安装了qBittorrent webui,接下来你可以以下的命令进行启动
#qbittorrent-nox
vagrant@localhost:/home/vagrant# sudo qbittorrent-nox

*** Legal Notice ***
qBittorrent is a file sharing program. When you run a torrent, its data will be made available to others by means of upload. Any content you share is your sole responsibility.

No further notices will be issued.

Press 'y' key to accept and continue...
y

******** Information ********
To control qBittorrent, access the Web UI at http://localhost:8080
The Web UI administrator user name is: admin
The Web UI administrator password is still the default one: adminadmin
This is a security risk, please consider changing your password from program preferences.
在你安装了qBittorrent webui,你可以通过浏览器访问(8080端口是默认监听端口)
http://localhost:8080
如果你的 qBittorrent 是在你的局域网并且没有屏蔽掉8080端口,当然你可以通过网络ip进行访问(案例如下):
http://192.168.xxx.xxx:8080
如果你有端口衍射在你的路由器上并且你有一个域名指向你运行qBittorrent webui的服务器,你或许也可以通过在浏览器输入你的域名来访问qBittorrent web ui,如
http://domain.com:8080
选择你能接受的访问方式,默认的用户名和密码:
username: admin
password: adminadmin
qbittorrent webui
我推荐你在安装完qBittorrent webui做的第一件事情就是修改默认提供的用户名和密码。你可以在登录成功之后的qBittorrent webui 中的Options(工具) -> Preferences(选项) -> Web ui(Web 用户界面) 的验证中进行修改 用户名和密码。
如果你的服务器已经有其它端口是运行在8080端口,你可以通过以下命令来指定端口进行运行:
qbittorrent-nox --webui-port=XXXX
以上的命令中,XXXX是你指定的一个唯一的数字端口。如果你没有其它服务运行在8080端口,从安全角度看,还是建议你运行qBittorrent在一个不同的随机端口中。
- qBittorrent webui 随机启动
通过命令的形式启动qBittorrent 有点繁琐或者麻烦,在开机启动之后自动启动qbittorrent-nox服务,创建一个/etc/init.d/qbittorrent-nox-daemon文件并填入以下内容:
#! /bin/sh
### BEGIN INIT INFO
# Provides:          qbittorrent-nox
# Required-Start:    $remote_fs $syslog
# Required-Stop:     $remote_fs $syslog
# Default-Start:     2 3 4 5
# Default-Stop:      0 1 6
# Short-Description: Starts QBittorrent
# Description:       Start qbittorrent-nox on start. Change USER= before running
### END INIT INFO

# Author: wakasann
#

# Do NOT "set -e"

# PATH should only include /usr/* if it runs after the mountnfs.sh script
PATH=/sbin:/usr/sbin:/bin:/usr/bin
DESC="QBittorrent"
NAME=qbittorrent-nox
DAEMON=/usr/bin/$NAME
DAEMON_ARGS=""
PIDFILE=/var/run/$NAME.pid
SCRIPTNAME=/etc/init.d/qbittorrent-nox-daemon
USER=USERNAME

# Exit if the package is not installed
[ -x "$DAEMON" ] || exit 0


case "$1" in
     start)
          echo "string $NAME"
          su - $USER -c "nohup $DAEMON $DAEMON_ARGS >/dev/null 2&1 &"
        ;;
     stop)
        echo "Stopping $NAME"
        su - $USER -c "kill -9 $(ps aux | grep -m 1 'qbittorrent-nox' | awk '{ print $2 }')"
        ;;
     *)
         echo "Usage: $NAME start|stop"
         exit 1
        ;;
esac
exit 0
你通过这个链接Click here to see the full code进行下载以上的代码
Change USER=MyUserName to the name of the user whom you want to run qBittorrent daemon as. Also, change DAEMON_ARGS="--webui-port=XXXX" to the port number to which you want qBittorrent to listen. Save and exit. Set correct permissions for the file:
修改 USER=MyUserName的名字是你想在后台运行qBittorrent的用户名,当然,修改 DAEMON_ARGS="--webui-port=XXXX"的端口号为你想qBittorrent运行的数字端口,保存并退出. 为这个文件赋予正确的权限:
chmod 755 /etc/init.d/qbittorrent-nox-daemon
然后使用下面的命令更新启动命令:
update-rc.d qbittorrent-nox-daemon defaults #添加到开机启动
update-rc.d qbittorrent-nox-daemon remove #从开机启动中移除
在你下次重启,qBittorrent webui应该会自动启动。你也可以通过以下的start,stop命令来管理 qBittorrent-box服务
sudo service qbittorrent-nox-daemon start
sudo service qbittorrent-nox-daemon stop
为了快捷访问,你可以参考这篇文章来创建一个 bash aliases(命令别名),举例: qbitstart能够执行sudo service qbittorrent-nox-daemon start。在你的/home/user/.bash_aliases中添加以下bash aliases:
alias qbitstop='sudo service qbittorrent-nox-daemon stop'
alias qbitstart='sudo service qbittorrent-nox-daemon start'
alias qbitrestart='sudo service qbittorrent-nox-daemon reload'
- 配置 qBittorrent
如果你决定安装图形界面的qBittorrent,通过桌面的形式进行配置很简单。如果你决定安装qBittorrent webui,你只能通过web界面修改一些设置(不是所有的配置项可以在webui中找到)。配置存放在~/.config/qBittorrent/路径下的qBittorrent.conf文件。你可以手动配置这个文件来配置 qBittorrent。将这个文件复制为不同的文件来做备份。你可以通过以下的命令来进行编辑这个文件
vi ~/.config/qBittorrent/qBittorrent.conf
不是所有的配置项(如:Share Ratio)是可获取的。你可以通过类似下面行的内容来手动添加share ratio到这个文件中:
BittorrentMaxRatio=2.5
保存,退出,并重启qBittorrent。一些推荐的qBittorrent 配置信息你可以通过 github qBittorrent wiki 和 Optimizing qBittorrent For Speed 来获取。
- 启动安全的Https 访问呢
一个SSL链接提供加密和更多的隐私。首先确认你的Ubuntu 服务器安装了openssl服务。如果没有安装请安装它。接下来 创建一个证书文件如下展示:
mkdir -p ~/.config/qBittorrent/ssl
cd ~/.config/qBittorrent/ssl
openssl genrsa -des3 -out qbittorrent.cert 1024
openssl req -new -key qbittorrent-key -out qbittorrent-cert
跟着在屏幕中显示的指示,只需要回车来选择默认的或者你的自定义,在最后,保持challenge password为空,qbittorrent.cert和qbittorrent.key文件将自动生成在 ~/.config/qBittorrent/ssl/文件夹中。
然后打开qBittorrent webui设定,启用 Https 访问并复制qbittorrent.key和qbittorrent.cert文件的内容到Key和Certificate字段
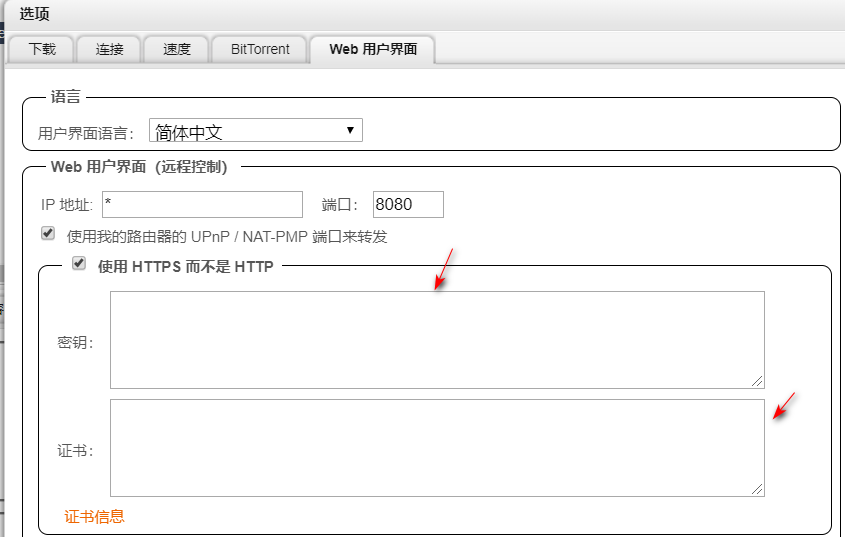
你应该不被允许通过Https的方式访问qBittorrent web界面,你可能会收到一个来自浏览器的警告 这个证书是自签名的,忽略这个警告。
- 可选
如果你想在外网中可以访问到qBittorrent webui,启动一个动态DNS 服务将会变得很简单。当前支持DynDNS 和 NO-IP。
其它:
- 目前我从 oneprovider seedbox rutorrent中下载好的文件,直接用我自己的电脑通过ftp的方式进行下载,很慢。需要从阿里云服务器中转一次。
如从远程中复制一个文件到本地:
# scp -r 远程用户名@远程ip:远程文件 本地的绝对路径
scp -r vagrant@localhost:/home/vagrant/test_file.txt /home/vagrant
然后再从阿里云服务器中转。
因为阿里云自己买的是轻应用服务器(之前是因为公司网络访问Paypal访问太慢,所以自己购买了一台阿里云的香港服务器,做远程桌面,测试自己程序对接paypal的效果),是配置最低的,把阿里云服务器当作torrent下载担心是违法的,所以不敢在阿里云服务器做个人的torrent下载工具。两个服务器合起来一个月大概100元左右,还是觉得有点高,也只会尝试1个月,1个月之后就不续了。
另外一种方法加速下载的,使用http方式.
oneprovider seedbox系统是默认安装了Apache,阿里云的服务器中也安装Apache,
- 将oneprovider中的一个文件复制到 apache 默认的
/var/www/html文件夹下
#FROM oneprovider主机
#cd 待下载文件的目录
cd ~/Downloads
#cp 源文件名称 /var/www/html
cp 1.jpg /var/www/html
#FROM 阿里云主机
cd /var/www/html
#wget http://oneproviderip/源文件名称
wget http://xxx.xxx.xxx.xxx/1.jpg
然后本地使用idm,先在下载中,设置连接的最大连接数为8。然后在任务中,新建任务,地址填入阿里云服务器ip/+文件名词,如: http://127.0.0.1/1.jpg
-
(PT(Private Tracker)是一种改良自BitTorrent协议的P2P下载方式).Private Tracker”指私有种子服务器
看完一些回答之后,自己唯一担心的是: 当自己的帐号以后进行共享资源了,帐号被PT站给删除掉了,不清楚以后是否可以再次注册。因为PT圈子原因,发现PT站的开放注册是关闭的,部分也是需要邀请的方式进行注册。我也是因为BT下载太慢,才知道PT和去了解PT是什么。
- 在什么值得买网站,知道
All in One主机,DJI MANIFOLD2-C,MSI Cubi N主机等名词,Nas主机也是,太多想买,因为穷,也只能看看和了解,有点浪费时间呀。
Ubuntu 16.04开启BBR
Ubuntu开启BBR的前提是内核必须等于高于4.9,需要先看看你使用的Ubuntu系统的内核是否是4.9或者以上。
查看命令:uname -a
如果是4.9或者以上,升级内核这一步你就可以跳过了,如果在4.9以下,那就需要更新一下内核了;
- Ubuntu内核升级
升级过程中其实比较简单,先确定你的系统是32位还是64位的,可以用下面的命令查看
查看命令:getconf LONG_BIT
确定系统之后,需要到以下的链接进行下载必要的升级程序包
http://kernel.ubuntu.com/~kernel-ppa/mainline/
这个网站可以找到最新的程序包,根据自己的需要使用wget命令来下载到服务器;
比如我的服务器是64位,安装4.10.2的内核:sudo wget http://kernel.ubuntu.com/~kernel-ppa/mainline/v4.10.2/linux-image-4.10.2-041002-generic_4.10.2-041002.201703120131_amd64.deb(拥有root权限的话可以去掉命令前面的“sudo”)
然后切换到你的文件下载目录,执行下列命令来升级
sudo dpkg -i linux-image-4.10.2-041002-generic_4.10.2-041002.201703120131_amd64.deb最后,执行命令
sudo update-grub,更新grub引导装入程序。
一旦各方面都已完成,重启机器,你就可以准备使用了。系统重启后,打开终端窗口,可再次执行命令
uname -a来查看你实际上是否是在运行你更新之后的内核。
- 开启TCP BBR
修改系统变量:
sudo bash -c 'echo "net.core.default_qdisc=fq" >> /etc/sysctl.conf'
sudo bash -c 'echo "net.ipv4.tcp_congestion_control=bbr" >> /etc/sysctl.conf'
保存生效
sysctl -p
执行以下命令查看是否开启成功
sysctl net.ipv4.tcp_available_congestion_control
如果显示的结果是:
net.ipv4.tcp_available_congestion_control = bbr cubic reno
这样BBR就开启成功了。
也可以执行 lsmod | grep bbr 来检测 BBR 是否真的开启成功
- 关闭BBR
修改配置文件
sudo vi /etc/sysctl.conf
进入配置文件,刚才开启添加的内容在最后,可按G直接调到文件末尾,然后按i键或Insert键开启编辑模式,使用#注释或删除内容后,按ESC键退出编辑,键入:wq 进行 保存并退出
#net.core.default_qdisc=fq
#net.ipv4.tcp_congestion_control=bbr
然后保存配置
sysctl -p
然后重启机器,重启完之后,登录机器系统的ssh,执行 lsmod | grep bbr 命令来检测 BBR 是否已关闭
References
- Ubuntu安装 qBittorrent + webui
- How to install qBittorrent with webui on Ubuntu?
- Linux指定用户运行程序
su - username -c "command" - Seedbox 搭建及 PT 刷子经验
- 家庭影音之路 篇一:#原创新人#服务器安装Rutorrent(PT盒子)Seedbox教程 知道一个oneprovider 法国的服务器,我使用的时候,支持支付宝支付,49元左右,128GB存储的,刚了解,所以选的便宜的(网站使用的jquery是google的cdn链接,挂**或者使用浏览器插件gooreplacer)
- Debian 9 / Debian 10 / Ubuntu 18.04 / Ubuntu 18.10快速开启BBR加速 或 关闭BBR加速
- Ubuntu内核升级以及如何开启BBR加速

 浙公网安备 33010602011771号