ActiveMQ 入门
一 ActiveMQ简介
ActiveMQ 是Apache出品,最流行的,能力强劲的开源消息总线。ActiveMQ 是一个完全支持JMS1.1和J2EE 1.4规范的 JMS Provider实现,尽管JMS规范出台已经是很久的事情了,但是JMS在当今的J2EE应用中间仍然扮演着特殊的地位。
二 ActiveMQ特性
⒈ 多种语言和协议编写客户端。语言: Java,C,C++,C#,Ruby,Perl,Python,PHP。应用协议: OpenWire,Stomp REST,WS Notification,XMPP,AMQP
⒊ 对Spring的支持,ActiveMQ可以很容易内嵌到使用Spring的系统里面去,而且也支持Spring2.0的特性
⒋ 通过了常见J2EE服务器(如 Geronimo,JBoss 4,GlassFish,WebLogic)的测试,其中通过JCA 1.5 resource adaptors的配置,可以让ActiveMQ可以自动的部署到任何兼容J2EE 1.4 商业服务器上
⒌ 支持多种传送协议:in-VM,TCP,SSL,NIO,UDP,JGroups,JXTA
⒍ 支持通过JDBC和journal提供高速的消息持久化
⒎ 从设计上保证了高性能的集群,客户端-服务器,点对点
⒏ 支持Ajax
⒐ 支持与Axis的整合
⒑ 可以很容易的调用内嵌JMS provider,进行测试
三 ActiveMQ安装
ActiveMQ在windows服务上安装操作如下:
1.在官网下载activemq安装文件。地址:http://activemq.apache.org/download.html
2.下载的tar.gz安装文件到windows服务器上,并解压到指定目录
3.运行activemq,进入到解压的 apache-activemq-5.15.2/,根据你的电脑的位数,进入win32或者win64,执行activemq.bat
4.开放端口8161,61616,保证端口可访问。
运行activemq截图如下:

本机访问启动成功的activemq截图如下:

四 ActivemQ 开发
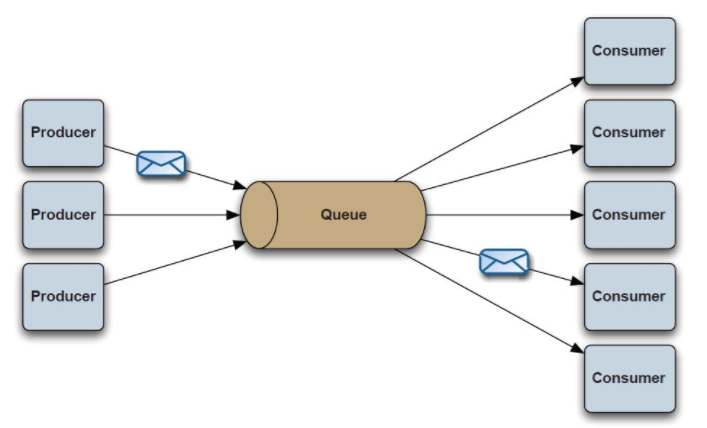
1 Point-to-Point (点对点)消息模式
1)原理图
2)代码 下面的样例代码是在SpringBoot项目中的,不明白的同学可以先去看看SpringBoot
message生产者
package com.bTest.demo;

import java.io.Serializable;
import java.util.Date;

import javax.jms.Connection;
import javax.jms.DeliveryMode;
import javax.jms.Destination;
import javax.jms.JMSException;
import javax.jms.Message;
import javax.jms.MessageConsumer;
import javax.jms.MessageListener;
import javax.jms.MessageProducer;
import javax.jms.Queue;
import javax.jms.Session;
import javax.jms.TextMessage;

import org.apache.activemq.ActiveMQConnection;
import org.apache.activemq.ActiveMQConnectionFactory;
import org.springframework.boot.SpringApplication;
import org.springframework.boot.autoconfigure.EnableAutoConfiguration;
import org.springframework.boot.autoconfigure.SpringBootApplication;
import org.springframework.web.bind.annotation.RequestMapping;
import org.springframework.web.bind.annotation.RestController;

import redis.clients.jedis.Jedis;

@RestController
@SpringBootApplication
@EnableAutoConfiguration
public class Demo4Application {

	public static void main(String[] args) {
		SpringApplication.run(Demo4Application.class, args);
	}

	@RequestMapping("/hello")
	public String sysoHello() {
		return new Date().toString();
	}

	@RequestMapping("/redis")
	public String redis() {
		Jedis jedis = new Jedis("192.168.1.100");
		jedis.auth("cy");
		System.out.println("连接成功");
		// 查看服务是否运行
		System.out.println("服务正在运行: " + jedis.ping());
		return "服务正在运行: " + jedis.ping();
	}

	// activeMQ
	@RequestMapping("/sendMq")
	public void sendMq() throws JMSException {
		ActiveMQConnectionFactory mqConnection = new ActiveMQConnectionFactory("admin1", "admin", "tcp://127.0.0.1:61616");
		Connection connection = mqConnection.createConnection();
		connection.start();
		Session session = connection.createSession(false, Session.CLIENT_ACKNOWLEDGE);
		Destination mqRequest = session.createQueue("request-queue");
		Destination mqResponse = session.createQueue("response-queue");
		MessageProducer producer = session.createProducer(mqRequest);
		producer.setDeliveryMode(DeliveryMode.NON_PERSISTENT);
		MessageConsumer consumer = session.createConsumer(mqResponse);
		TestMqBean bean = new TestMqBean();
		bean.setName("小姑娘");
		for (int i = 0; i < 10; i++) {
			//bean.setAge("18"+i);
			//producer.send(session.createObjectMessage(bean));
			producer.send(session.createTextMessage("第"+i+"次 :这只是个MQ的测试!"));
		}
		producer.close();
		System.out.println("MQ消息发送成功!");
		consumer.setMessageListener(new MessageListener() {

			@Override
			public void onMessage(Message message) {
				// TODO Auto-generated method stub
				if(null != message){
					TextMessage textMsg = (TextMessage) message;
					try {
						System.out.println("收到反馈消息:"+textMsg.getText());
					} catch (JMSException e) {
						// TODO Auto-generated catch block
						e.printStackTrace();
					}
				}
			}

		});
	}
}
message消费者
package com.bTest.demo;

import java.util.Date;

import javax.jms.Connection;
import javax.jms.DeliveryMode;
import javax.jms.Destination;
import javax.jms.JMSException;
import javax.jms.Message;
import javax.jms.MessageConsumer;
import javax.jms.MessageListener;
import javax.jms.MessageProducer;
import javax.jms.ObjectMessage;
import javax.jms.Session;
import javax.jms.TextMessage;

import org.apache.activemq.ActiveMQConnectionFactory;
import org.springframework.beans.factory.annotation.Autowired;
import org.springframework.boot.SpringApplication;
import org.springframework.boot.autoconfigure.EnableAutoConfiguration;
import org.springframework.boot.autoconfigure.SpringBootApplication;
import org.springframework.web.bind.annotation.RequestMapping;
import org.springframework.web.bind.annotation.RestController;
@RestController
@SpringBootApplication
@EnableAutoConfiguration
public class Demo3Application {

	public static void main(String[] args) {
		SpringApplication.run(Demo3Application.class, args);
	}
	@RequestMapping("/hello")
	public String sysoHello(){
		return new Date().toString();
	}
	//接收消息
	@RequestMapping("/receiveMq")
	public void receiveMqMessage() throws JMSException{
		ActiveMQConnectionFactory mqConnection = new ActiveMQConnectionFactory("admin1", "admin", "tcp://127.0.0.1:61616");
		Connection connection = mqConnection.createConnection();
		connection.start();
		Session session = connection.createSession(Boolean.FALSE,Session.AUTO_ACKNOWLEDGE);
		Destination mqRequest = session.createQueue("request-queue");
		Destination meResponse = session.createQueue("response-queue");
		MessageProducer producer = session.createProducer(meResponse);
		MessageConsumer consumer = session.createConsumer(mqRequest);

		producer= session.createProducer(meResponse);
		producer.setDeliveryMode(DeliveryMode.NON_PERSISTENT);
		consumer.setMessageListener(new MessageListener() {

			@Override
			public void onMessage(Message message) {
				// TODO Auto-generated method stub
			TextMessage textMsg = (TextMessage) message;
			try {
				System.out.println("接收到的消息是:"+textMsg.getText());
			} catch (JMSException e) {
				// TODO Auto-generated catch block
				e.printStackTrace();
			}
			}
		});
		producer.send(session.createTextMessage("成功接收到MQ消息!"));
	}
}
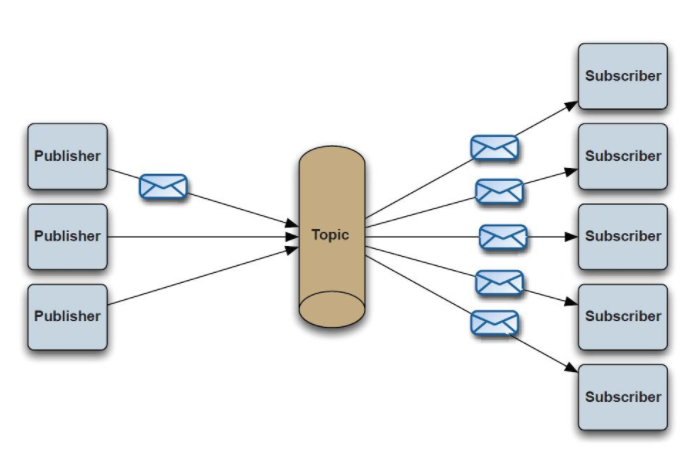
2 Publisher/Subscriber(发布/订阅者)消息模式开发流程
1)原理图
2)代码 稍后会持续更新。。。

 浙公网安备 33010602011771号