
CentOS7.5搭建ELK6.2.4集群及插件安装
一 简介
Elasticsearch是一个高度可扩展的开源全文搜索和分析引擎。它允许您快速,近实时地存储,搜索和分析大量数据。它通常用作支持具有复杂搜索功能和需求的应用程序的底层引擎/技术。
下载地址:https://www.elastic.co/cn/downloads 版本:elasticsearch-6.2.4.tar.gz logstash-6.2.4.tar.gz kibana-6.2.4-x86_64.rpm filebeat-6.2.4-x86_64.rpm
1 基本概念
接近实时(NRT)
- Elasticsearch 是一个接近实时的搜索平台。这意味着,从索引一个文档直到这个文档能够被搜索到有一个很小的延迟(通常是 1 秒)。
集群(cluster)
- 代表一个集群,集群中有多个节点(node),其中有一个为主节点,这个主节点是可以通过选举产生的,主从节点是对于集群内部来说的。es的一个概念就是去中心化,字面上理解就是无中心节点,这是对于集群外部来说的,因为从外部来看es集群,在逻辑上是个整体,你与任何一个节点的通信和与整个es集群通信是等价的。
索引(index)
- ElasticSearch将它的数据存储在一个或多个索引(index)中。用SQL领域的术语来类比,索引就像数据库,可以向索引写入文档或者从索引中读取文档,并通过ElasticSearch内部使用Lucene将数据写入索引或从索引中检索数据。
文档(document)
- 文档(document)是ElasticSearch中的主要实体。对所有使用ElasticSearch的案例来说,他们最终都可以归结为对文档的搜索。文档由字段构成。
映射(mapping)
- 所有文档写进索引之前都会先进行分析,如何将输入的文本分割为词条、哪些词条又会被过滤,这种行为叫做映射(mapping)。一般由用户自己定义规则。
类型(type)
- 每个文档都有与之对应的类型(type)定义。这允许用户在一个索引中存储多种文档类型,并为不同文档提供类型提供不同的映射。
分片(shards)
- 代表索引分片,es可以把一个完整的索引分成多个分片,这样的好处是可以把一个大的索引拆分成多个,分布到不同的节点上。构成分布式搜索。分片的数量只能在索引创建前指定,并且索引创建后不能更改。5.X默认不能通过配置文件定义分片
副本(replicas)
- 代表索引副本,es可以设置多个索引的副本,副本的作用一是提高系统的容错性,当个某个节点某个分片损坏或丢失时可以从副本中恢复。二是提高es的查询效率,es会自动对搜索请求进行负载均衡。
数据恢复(recovery)
- 代表数据恢复或叫数据重新分布,es在有节点加入或退出时会根据机器的负载对索引分片进行重新分配,挂掉的节点重新启动时也会进行数据恢复。
- GET /_cat/health?v #可以看到集群状态
数据源(River)
- 代表es的一个数据源,也是其它存储方式(如:数据库)同步数据到es的一个方法。它是以插件方式存在的一个es服务,通过读取river中的数据并把它索引到es中,官方的river有couchDB的,RabbitMQ的,Twitter的,Wikipedia的,river这个功能将会在后面的文件中重点说到。
网关(gateway)
- 代表es索引的持久化存储方式,es默认是先把索引存放到内存中,当内存满了时再持久化到硬盘。当这个es集群关闭再重新启动时就会从gateway中读取索引数据。es支持多种类型的gateway,有本地文件系统(默认),分布式文件系统,Hadoop的HDFS和amazon的s3云存储服务。
自动发现(discovery.zen)
- 代表es的自动发现节点机制,es是一个基于p2p的系统,它先通过广播寻找存在的节点,再通过多播协议来进行节点之间的通信,同时也支持点对点的交互。
- 5.X关闭广播,需要自定义
通信(Transport)
- 代表es内部节点或集群与客户端的交互方式,默认内部是使用tcp协议进行交互,同时它支持http协议(json格式)、thrift、servlet、memcached、zeroMQ等的传输协议(通过插件方式集成)。
- 节点间通信端口默认:9300-9400
分片和复制(shards and replicas)
一个索引可以存储超出单个结点硬件限制的大量数据。比如,一个具有10亿文档的索引占据1TB的磁盘空间,而任一节点可能没有这样大的磁盘空间来存储或者单个节点处理搜索请求,响应会太慢。
为了解决这个问题,Elasticsearch提供了将索引划分成多片的能力,这些片叫做分片。当你创建一个索引的时候,你可以指定你想要的分片的数量。每个分片本身也是一个功能完善并且独立的“索引”,这个“索引” 可以被放置到集群中的任何节点上。
分片之所以重要,主要有两方面的原因:
- 允许你水平分割/扩展你的内容容量
- 允许你在分片(位于多个节点上)之上进行分布式的、并行的操作,进而提高性能/吞吐量
至于一个分片怎样分布,它的文档怎样聚合回搜索请求,是完全由Elasticsearch管理的,对于作为用户的你来说,这些都是透明的。
在一个网络/云的环境里,失败随时都可能发生。在某个分片/节点因为某些原因处于离线状态或者消失的情况下,故障转移机制是非常有用且强烈推荐的。为此, Elasticsearch允许你创建分片的一份或多份拷贝,这些拷贝叫做复制分片,或者直接叫复制。
复制之所以重要,有两个主要原因:
- 在分片/节点失败的情况下,复制提供了高可用性。复制分片不与原/主要分片置于同一节点上是非常重要的。因为搜索可以在所有的复制上并行运行,复制可以扩展你的搜索量/吞吐量
- 总之,每个索引可以被分成多个分片。一个索引也可以被复制0次(即没有复制) 或多次。一旦复制了,每个索引就有了主分片(作为复制源的分片)和复制分片(主分片的拷贝)。
- 分片和复制的数量可以在索引创建的时候指定。在索引创建之后,你可以在任何时候动态地改变复制的数量,但是你不能再改变分片的数量。
- 5.X默认5:1 5个主分片,1个复制分片
默认情况下,Elasticsearch中的每个索引分配5个主分片和1个复制。这意味着,如果你的集群中至少有两个节点,你的索引将会有5个主分片和另外5个复制分片(1个完全拷贝),这样每个索引总共就有10个分片。
2elasticsearch . yml 明细
# ======================== Elasticsearch Configuration =========================
# NOTE: Elasticsearch comes with reasonable defaults for most settings.
#       Before you set out to tweak and tune the configuration, make sure you
#       understand what are you trying to accomplish and the consequences.
#
# The primary way of configuring a node is via this file. This template lists
# the most important settings you may want to configure for a production cluster.
#
# Please consult the documentation for further information on configuration options:
# https://www.elastic.co/guide/en/elasticsearch/reference/index.html
#
# ---------------------------------- Cluster -----------------------------------
#
# Use a descriptive name for your cluster:
#cluster.name: my-application
#
# ------------------------------------ Node ------------------------------------
#
# Use a descriptive name for the node:
#
#node.name: node-1
#
# Add custom attributes to the node:
#
#node.attr.rack: r1
#
# ----------------------------------- Paths ------------------------------------
#
# Path to directory where to store the data (separate multiple locations by comma):
#
#path.data: /path/to/data
#
# Path to log files:
#
#path.logs: /path/to/logs
#
# ----------------------------------- Memory -----------------------------------
#
# Lock the memory on startup:
#
#bootstrap.memory_lock: true
#
# Make sure that the heap size is set to about half the memory available
# on the system and that the owner of the process is allowed to use this
# limit.
#
# Elasticsearch performs poorly when the system is swapping the memory.
#
# ---------------------------------- Network -----------------------------------
#
# Set the bind address to a specific IP (IPv4 or IPv6):
#
#network.host: 192.168.0.1
#
# Set a custom port for HTTP:
#
#http.port: 9200
#
# For more information, consult the network module documentation.
#
# --------------------------------- Discovery ----------------------------------
#
# Pass an initial list of hosts to perform discovery when new node is started:
# The default list of hosts is ["127.0.0.1", "[::1]"]
#
#discovery.zen.ping.unicast.hosts: ["host1", "host2"]
#
# Prevent the "split brain" by configuring the majority of nodes (total number of master-eligible nodes / 2 + 1):
#
#discovery.zen.minimum_master_nodes:
#
# For more information, consult the zen discovery module documentation.
#
# ---------------------------------- Gateway -----------------------------------
#
# Block initial recovery after a full cluster restart until N nodes are started:
#
#gateway.recover_after_nodes: 3
#
# For more information, consult the gateway module documentation.
#
# ---------------------------------- Various -----------------------------------
#
# Require explicit names when deleting indices:
#
#action.destructive_requires_name: true
二 安装
1 集群部署
| 系统 | 节点名称 | IP |
Filebeat |
Logstash |
Elasticsearch |
kibana |
|---|---|---|---|---|---|---|
| CentOS7.5 | node21 | 192.168.100.21 | √ | √ | √ | √ |
| CentOS7.5 | node22 | 192.168.100.22 | √ | √ | ||
| CentOS7.5 | node23 | 192.168.100.23 | √ |
Elasticsearch的目录结构
| 文件夹 | 作用 |
| bin | 运行ElasticSearch实例和管理插件的一些脚本 |
| config | 放的是配置文件:elasticsearch.yml,jvm.options,log4j2.properties |
| lib | ElasticSearch使用的库 |
| logs | 日志的文件夹 |
| modules | |
| plugins |
config/elasticsearch.yml 主配置文件
config/jvm.options jvm参数配置文件
cofnig/log4j2.properties 日志配置文件
2 elasticsearch安装
2.1 准备环境
1)jdk安装:官方建议java -version 1.8_131以上,我这里安装的jdk1.8_171
2)出于系统安全考虑,ElasticSearch不允许以root用户模式运行,我这里已创建用户admin
2.2 解压安装
创建文件夹elk,解压到elk文件
[admin@node21 software]$ tar zxvf elasticsearch-6.2.4.tar.gz -C /opt/module/elk
2.3 集群配置
cluster.name: myescluster         #自定义修改一个集群名称
node.name: node21                 #节点名称
network.host: 192.168.100.21      #节点IP(或者解析的主机名)
bootstrap.memory_lock: true          #设置elasticsearch的进程锁住内存
discovery.zen.ping.unicast.hosts: ["192.168.100.21", "192.168.100.22","192.168.100.23"]  #集群个节点IP地址
discovery.zen.minimum_master_nodes: 2      #为了避免脑裂,集群节点数最少为 半数+1
2.4 JVM配置
vi elasticsearch/config/jvm.options
-Xms1g                                                  # JVM最大、最小使用内存-Xmx1g
2.5 分发es安装包
[admin@node21 elk]$ scp -r elasticsearch-6.2.4 admin@node22:/opt/module/elk
[admin@node21 elk]$ scp -r elasticsearch-6.2.4 admin@node23:/opt/module/elk
修改node22,node23节点配置文件elasticsearch.yml中的主机名和ip
2.6 启动集群
前台启动:进入到elasticsearch-6.2.4安装目录的bin目录下
[admin@node21 bin]$ ./elasticsearch
此时会有一个初始化的过程,内容如下


[2018-06-07T04:43:02,506][INFO ][o.e.n.Node               ] [node21] initializing ...
[2018-06-07T04:43:02,830][INFO ][o.e.e.NodeEnvironment    ] [node21] using [1] data paths, mounts [[/ (rootfs)]], net usable_space [91.2gb], net total_space [97.6gb],
types [rootfs][2018-06-07T04:43:02,831][INFO ][o.e.e.NodeEnvironment    ] [node21] heap size [1015.6mb], compressed ordinary object pointers [true]
[2018-06-07T04:43:02,869][INFO ][o.e.n.Node               ] [node21] node name [node21], node ID [z14A4EeXSOqvqdp4J1htzQ]
[2018-06-07T04:43:02,870][INFO ][o.e.n.Node               ] [node21] version[6.2.4], pid[2265], build[ccec39f/2018-04-12T20:37:28.497551Z], OS[Linux/3.10.0-862.el7.x86
_64/amd64], JVM[Oracle Corporation/Java HotSpot(TM) 64-Bit Server VM/1.8.0_171/25.171-b11][2018-06-07T04:43:02,870][INFO ][o.e.n.Node               ] [node21] JVM arguments [-Xms1g, -Xmx1g, -XX:+UseConcMarkSweepGC, -XX:CMSInitiatingOccupancyFraction=75, -XX
:+UseCMSInitiatingOccupancyOnly, -XX:+AlwaysPreTouch, -Xss1m, -Djava.awt.headless=true, -Dfile.encoding=UTF-8, -Djna.nosys=true, -XX:-OmitStackTraceInFastThrow, -Dio.netty.noUnsafe=true, -Dio.netty.noKeySetOptimization=true, -Dio.netty.recycler.maxCapacityPerThread=0, -Dlog4j.shutdownHookEnabled=false, -Dlog4j2.disable.jmx=true, -Djava.io.tmpdir=/tmp/elasticsearch.56PUO1hY, -XX:+HeapDumpOnOutOfMemoryError, -XX:+PrintGCDetails, -XX:+PrintGCDateStamps, -XX:+PrintTenuringDistribution, -XX:+PrintGCApplicationStoppedTime, -Xloggc:logs/gc.log, -XX:+UseGCLogFileRotation, -XX:NumberOfGCLogFiles=32, -XX:GCLogFileSize=64m, -Des.path.home=/opt/module/elk/elasticsearch-6.2.4, -Des.path.conf=/opt/module/elk/elasticsearch-6.2.4/config][2018-06-07T04:43:06,699][INFO ][o.e.p.PluginsService     ] [node21] loaded module [aggs-matrix-stats]
[2018-06-07T04:43:06,699][INFO ][o.e.p.PluginsService     ] [node21] loaded module [analysis-common]
[2018-06-07T04:43:06,699][INFO ][o.e.p.PluginsService     ] [node21] loaded module [ingest-common]
[2018-06-07T04:43:06,699][INFO ][o.e.p.PluginsService     ] [node21] loaded module [lang-expression]
[2018-06-07T04:43:06,700][INFO ][o.e.p.PluginsService     ] [node21] loaded module [lang-mustache]
[2018-06-07T04:43:06,700][INFO ][o.e.p.PluginsService     ] [node21] loaded module [lang-painless]
[2018-06-07T04:43:06,700][INFO ][o.e.p.PluginsService     ] [node21] loaded module [mapper-extras]
[2018-06-07T04:43:06,700][INFO ][o.e.p.PluginsService     ] [node21] loaded module [parent-join]
[2018-06-07T04:43:06,700][INFO ][o.e.p.PluginsService     ] [node21] loaded module [percolator]
[2018-06-07T04:43:06,700][INFO ][o.e.p.PluginsService     ] [node21] loaded module [rank-eval]
[2018-06-07T04:43:06,701][INFO ][o.e.p.PluginsService     ] [node21] loaded module [reindex]
[2018-06-07T04:43:06,701][INFO ][o.e.p.PluginsService     ] [node21] loaded module [repository-url]
[2018-06-07T04:43:06,701][INFO ][o.e.p.PluginsService     ] [node21] loaded module [transport-netty4]
[2018-06-07T04:43:06,701][INFO ][o.e.p.PluginsService     ] [node21] loaded module [tribe]
[2018-06-07T04:43:06,702][INFO ][o.e.p.PluginsService     ] [node21] no plugins loaded
[2018-06-07T04:43:18,463][INFO ][o.e.d.DiscoveryModule    ] [node21] using discovery type [zen]
[2018-06-07T04:43:21,505][INFO ][o.e.n.Node               ] [node21] initialized
[2018-06-07T04:43:21,505][INFO ][o.e.n.Node               ] [node21] starting ...
后台启动
nohup./bin/elasticsearch&
或者 /bin/elasticsearch -d
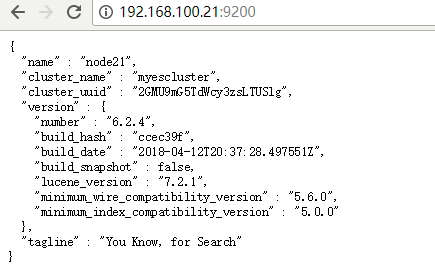
页面查看,默认端口 9200
http://node21:9200/
3 插件安装
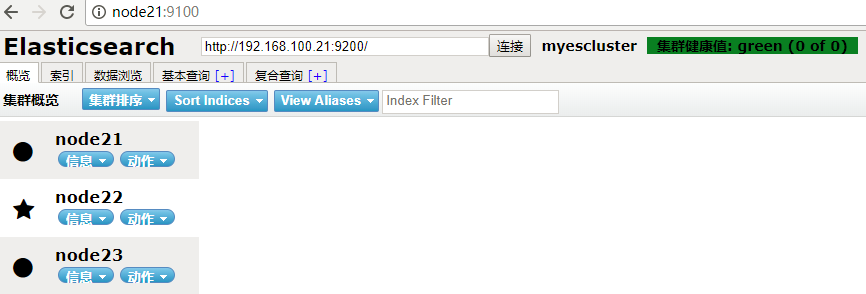
1 head插件
下载地址:https://github.com/mobz/elasticsearch-head
介绍:head插件是ES的一个可视化插件,类似于navicat和mysql的关系。head插件是一个用来浏览、与ES数据进行交互的web前端展示插件,是一个用来监视ES状态的客户端插件。
由于head插件本质上还是一个nodejs的工程,因此需要安装node,使用npm来安装依赖的包。(npm其实是Node.js的包管理工具,可以理解为maven)
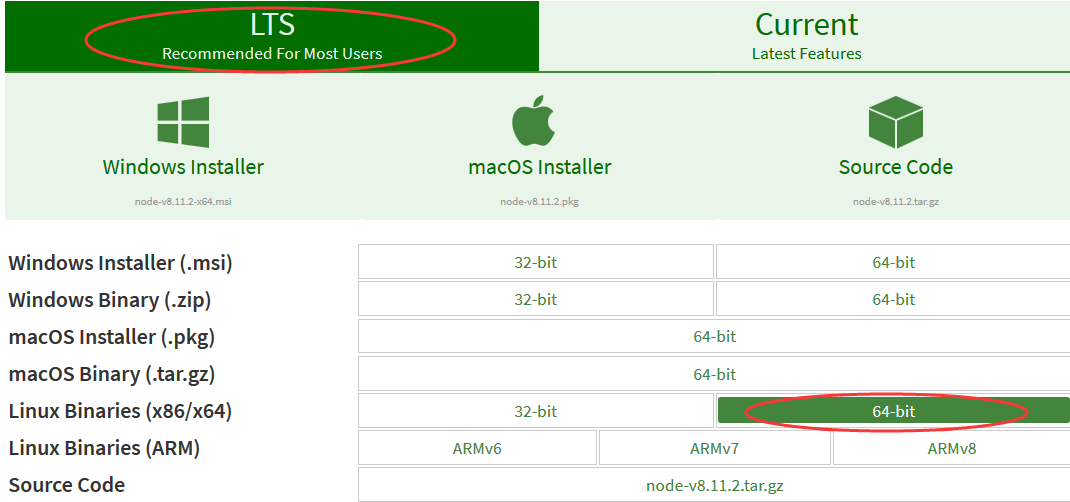
(1)下载NodeJS
1 下载地址:https://nodejs.org/en/download/
2 安装nodejs
由于下载下来的是xz文件,node-v8.11.2-linux-x64.tar.xz,Linux上大部分情况下不能直接解压tar.xz的文件。需要用xz -d xxx.tar.xz 将 xxx.tar.xz解压成 xxx.tar 然后,再用 tar xvf xxx.tar来解包(报错先安装xz,执行yum -y install xz)
[admin@node21 software]$ xz -d node-v8.11.2-linux-x64.tar.xz
[admin@node21 software]$ tar  xvf node-v8.11.2-linux-x64.tar -C /opt/module/elk
配置环境变量 vi /etc/profile
export NODE_HOME=/opt/module/elk/node-v8.11.2-linux-x64
export PATH=$NODE_HOME/bin:$PATH
source /etc/profile 环境变量生效
3 下载head插件头
[admin@node21 elk]$ wget https://github.com/mobz/elasticsearch-head/archive/master.zip
解压,会出现一个elasticsearch-head-master文件
[admin@node21 elk]$ unzip master.zip
4 使用npm安装grunt
设置npm的代理镜像,由于国外的下载较慢,所以设置为国内的,进入到elasticsearch-head-master内执行以下命令
[admin@node21 elasticsearch-head-master]$ npm config set registry https://registry.npm.taobao.org
执行npm install,grunt是基于Node.js的项目构建工具,可以进行打包压缩,测试,执行等等的工作,head插件就是通过grunt启动。
[admin@node21 elasticsearch-head-master]$ npm install -g grunt
[admin@node21 elasticsearch-head-master]$ npm install
版本确认:
[admin@node21 software]$ node -v
v8.11.2
[admin@node21 software]$ npm -v
6.1.0
[admin@node21 software]$ grunt -version
grunt-cli v1.2.0
grunt v1.0.1
5 修改Head源码
由于head的代码直接执行有很多限制,比如无法跨机器访问。因此需要用户修改两个地方:
1)修改 elasticsearch-head-master/Gruntfile.js 文件,红色部分为添加的,原来没有,设置hostname属性,设置为0.0.0.0
[admin@node21 elasticsearch-head-master]$ vi Gruntfile.js
             connect: {
                        server: {
                                options: {
                                        hostname: '0.0.0.0',
                                        port: 9100,
                                        base: '.',
                                        keepalive: true
                                }
                        }
                }
2)修改跨域请求配置
不修改连接的状态如下,修改之后才能连上,这样head插件才可以访问elasticsearch。

修改文件为elasticsearch-6.2.4/config/elasticsearch.yml,添加如下两行
http.cors.enabled: true
http.cors.allow-origin: "*"
上述连接需要手动更改http://localhost:9200/中的localhost为自己的ip才能连接得上。这里修改配置文件,改为自己的ip。修改head的连接地址,进入到elasticsearch-head-master/_site里,修改app.js(提示:指定内容查找 如果是用vi打开文件后,在命令行下输入“/关键字”; 如果是在没有打开文件的前提就用"cat 文件名 | grep "关键字""。)
[admin@node21 _site]$ vi app.js
this.base_uri = this.config.base_uri || this.prefs.get("app-base_uri") || "http://localhost:9200";
把localhost修改成你es的服务器地址,如:
this.base_uri = this.config.base_uri || this.prefs.get("app-base_uri") || "http://192.168.100.21:9200";
6 启动elasticsearch
1、启动ES(因为上述配置修改了elasticsearch-yml,重启才能生效。)
如果已经启动,先停止(/elasticsearch-6.2.4/bin)
[admin@node21 bin]$ ./elasticsearch
2、启动head
[admin@node21 elasticsearch-head-master]$ grunt server &
页面访问,默认端口9100,绿色为健康,黄色为警告
3、如果出现端口被占用,可以用如下命令查找被占用端口,然后在kill掉。 netstat -nap | grep 9100

2 bigdesk插件
1. 下载解压,出现一个bigdesk-master的文件
[admin@node21 elk]$ wget https://github.com/hlstudio/bigdesk/archive/master.zip
[admin@node21 elk]$ unzip master.zip
2. 配置elasticsearch.yml
因为es5.x后不支持内嵌plugin,所以把下面参数打开,安装head插件也类似
添加:
http.cors.enabled: true
http.cors.allow-origin: "*"
3. 安装httpd服务
我这里直接通过httpd服务跑bigdesk插件
yum install -y httpd
systemctl start httpd
systemctl status httpd
4. 把bigdesk放到httpd服务目录里
httpd服务目录默认为:/var/www/html
我们把下载好的bigdesk-master.zip 解压,然后放到/var/www/html即可
[admin@node21 elk]$ sudo mv bigdesk-master/ /var/www/html/
5. 访问bigdesk
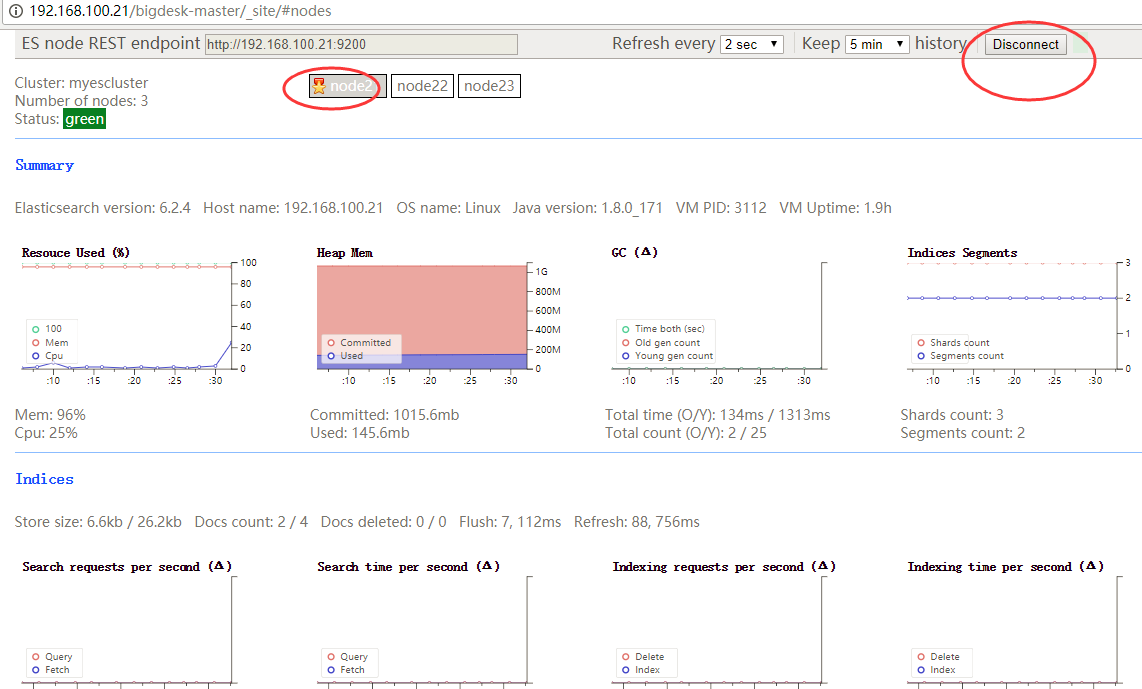
浏览器打开 http://192.168.100.21/bigdesk-master/_site/#nodes ,点击右侧连接即可访问!
3 IK分词器插件
安装文档参考:https://github.com/medcl/elasticsearch-analysis-ik/blob/master/README.md
1.下载ik分词器
[admin@node21 elasticsearch-6.2.4]$ ./bin/elasticsearch-plugin install https://github.com/medcl/elasticsearch-analysis-ik/releases/download/v6.2.4/elasticsearch-analysis-ik-6.2.4.zip
2. 重启elasticsearch
3. 测试IK分词器
创建索引
[admin@node21 bin]$ curl -XPUT http://192.168.100.21:9200/index

创建映射
curl -XPOST http://192.168.100.21:9200/index/fulltext/_mapping -H 'Content-Type:application/json' -d'
{
        "properties": {
            "content": {
                "type": "text",
                "analyzer": "ik_max_word",
                "search_analyzer": "ik_max_word"
            }
        }

}'
索引文档
curl -XPOST http://192.168.100.21:9200/index/fulltext/1 -H 'Content-Type:application/json' -d'
{"content":"美国留给伊拉克的是个烂摊子吗"}'

curl -XPOST http://192.168.100.21:9200/index/fulltext/2 -H 'Content-Type:application/json' -d'
{"content":"公安部:各地校车将享最高路权"}'

curl -XPOST http://192.168.100.21:9200/index/fulltext/3 -H 'Content-Type:application/json' -d'
{"content":"中韩渔警冲突调查:韩警平均每天扣1艘中国渔船"}'

curl -XPOST http://192.168.100.21:9200/index/fulltext/4 -H 'Content-Type:application/json' -d'
{"content":"中国驻洛杉矶领事馆遭亚裔男子枪击 嫌犯已自首"}'
高亮查询
curl -XPOST http://192.168.100.21:9200/index/fulltext/_search  -H 'Content-Type:application/json' -d'
{
    "query" : { "match" : { "content" : "中国" }},
    "highlight" : {
        "pre_tags" : ["<tag1>", "<tag2>"],
        "post_tags" : ["</tag1>", "</tag2>"],
        "fields" : {
            "content" : {}
        }
    }
}'
此时会显示两条数据,或者页面查询context带有中国

Dictionary Configuration
IKAnalyzer.cfg.xml can be located at {conf}/analysis-ik/config/IKAnalyzer.cfg.xml or {plugins}/elasticsearch-analysis-ik-*/config/IKAnalyzer.cfg.xml
<?xml version="1.0" encoding="UTF-8"?>
<!DOCTYPE properties SYSTEM "http://java.sun.com/dtd/properties.dtd">
<properties>
	<comment>IK Analyzer 扩展配置</comment>
	<!--用户可以在这里配置自己的扩展字典 -->
	<entry key="ext_dict">custom/mydict.dic;custom/single_word_low_freq.dic</entry>
	 <!--用户可以在这里配置自己的扩展停止词字典-->
	<entry key="ext_stopwords">custom/ext_stopword.dic</entry>
 	<!--用户可以在这里配置远程扩展字典 -->
	<entry key="remote_ext_dict">location</entry>
 	<!--用户可以在这里配置远程扩展停止词字典-->
	<entry key="remote_ext_stopwords">http://xxx.com/xxx.dic</entry>
</properties>
热更新 IK 分词使用方法
目前该插件支持热更新 IK 分词,通过上文在 IK 配置文件中提到的如下配置
 	<!--用户可以在这里配置远程扩展字典 -->
	<entry key="remote_ext_dict">location</entry>
 	<!--用户可以在这里配置远程扩展停止词字典-->
	<entry key="remote_ext_stopwords">location</entry>
其中 location 是指一个 url,比如 http://yoursite.com/getCustomDict,该请求只需满足以下两点即可完成分词热更新。
-
该 http 请求需要返回两个头部(header),一个是
Last-Modified,一个是ETag,这两者都是字符串类型,只要有一个发生变化,该插件就会去抓取新的分词进而更新词库。 -
该 http 请求返回的内容格式是一行一个分词,换行符用
\n即可。
满足上面两点要求就可以实现热更新分词了,不需要重启 ES 实例。
可以将需自动更新的热词放在一个 UTF-8 编码的 .txt 文件里,放在 nginx 或其他简易 http server 下,当 .txt 文件修改时,http server 会在客户端请求该文件时自动返回相应的 Last-Modified 和 ETag。可以另外做一个工具来从业务系统提取相关词汇,并更新这个 .txt 文件。
4 marvel插件
Marvel能够让你通过Kibana非常容易的监视ES。你能实时的观察集群(your cluster)的健康和表现也能分析过去的集群、索引和节点指标。
Marvel由两部分组成:Marvel代理:在你的集群中安装在每一个节点上;Marvel应用:安装在Kibana。
三 filebeat安装
官方文档:https://www.elastic.co/guide/en/beats/filebeat/current/filebeat-getting-started.html
Filebeat入门
- 第1步:安装Filebeat
- 第2步:配置Filebeat
- 步骤3:配置Filebeat以使用Logstash
- 第4步:在Elasticsearch中加载索引模板
- 第5步:设置Kibana仪表板
- 第6步:启动Filebeat
- 第7步:查看示例Kibana仪表板
3.1 下载安装
[admin@node21 elk]$ curl -L -O https://artifacts.elastic.co/downloads/beats/filebeat/filebeat-6.2.4-x86_64.rpm
[admin@node21 elk]$ sudo rpm -vi filebeat-6.2.4-x86_64.rpm
3.2 编辑filebeat.yml
rpm安装的filebeat,配置文件在/etc/filebeat/filebeat.yml,这里做默认日志的测试,简单的修改如下
filebeat.prospectors:
- type: log
  enabled: true
  paths:
    - /var/log/*.log
3.3 运行启动守护进程
sudo ./filebeat -e -c filebeat.yml
四 logstash安装
Logstash参考
- Logstash参考:
- Logstash介绍
- Logstash入门
- Logstash如何工作
- 设置并运行Logstash
- 设置X-Pack
- 打破变化
- X-Pack突破性改变
- 升级Logstash
- 配置Logstash
- 管理Logstash
- 使用Logstash模块
- 使用Filebeat模块
- 数据弹性
- 转换数据
- 部署和扩展Logstash
- 性能调整
- 监视Logstash
- 监视API
- 使用插件
- 输入插件
- 输出插件
- 过滤插件
- 编解码器插件
- 为Logstash做出贡献
- 专业术语
- 发行说明
- X-Pack发行说明
4.1 下载解压缩
[admin@node21 elk]$ wget https://artifacts.elastic.co/downloads/logstash/logstash-6.2.4.tar.gz
[admin@node21 elk]$ tar zxvf logstash-6.2.4.tar.gz
4.2 创建配置文件
一个Logstash的pipeline由3部分组成:input, filter, output。
[admin@node21 datas]$ pwd
/opt/datas
[admin@node21 datas]$ vi logstash-simple.conf
logstash-simple.conf内容如下
input { stdin { } }
output {
  elasticsearch { hosts => ["192.168.100.21:9200"] }
  stdout { codec => rubydebug }
}
4.3 运行logstash
[admin@node21 bin]$ pwd
/opt/module/elk/logstash-6.2.4/bin
[admin@node21 bin]$ ./logstash -f /opt/datas/logstash-simple.conf
这个pipeline例子从标准输入获取数据 stdin,并把结构化数据输出到标准输出stdout。在启动后,看到日志Pipeline main started后,在终端中输入hello world,可以在终端中看到对应输出:
View Code在企业架构中,一般Logstash的input是beat,output是ES,需要对应的插件。
安装beat input插件:
构建离线插件包: bin/logstash-plugin prepare-offline-pack logstash-input-beats
安装离线插件包: bin/logstash-plugin install file:///path/to/logstash-offline-plugins-6.2.4.zip
[admin@node21 bin]$ ./logstash-plugin prepare-offline-pack logstash-input-beats
Offline package created at: /opt/module/elk/logstash-6.2.4/logstash-offline-plugins-6.2.4.zip
You can install it with this command `bin/logstash-plugin install file:///opt/module/elk/logstash-6.2.4/logstash-offline-plugins-6.2.4.zip`
[admin@node21 bin]$ ./logstash-plugin install file:///opt/module/elk/logstash-6.2.4/logstash-offline-plugins-6.2.4.zip
配置 5044 端口作为 Filebeat 的连接和创建 ES 索引。新建 logstash.conf 配置文件,
input {
  beats {
    port => 5044
  }
}

output {
  elasticsearch {
    hosts => "192.168.100.21:9200"
    manage_template => false
    index => "%{[@metadata][beat]}-%{+YYYY.MM.dd}"
    document_type => "%{[@metadata][type]}"
  }
}
Logstash 使用该配置使用 ES 的索引,和 Filebeat 做的事情是一样的,不过拥有了额外的缓存以及强大丰富的插件库。
启动 logstash :
./bin/logstash -f config/logstash.conf &
五 kibana安装
Kibana用户指南
Kibana是一个开源的分析和可视化平台,旨在与 Elasticsearch 合作。Kibana 提供搜索、查看和与存储在 Elasticsearch 索引中的数据进行交互的功能。开发者或运维人员可以轻松地执行高级数据分析,并在各种图表、表格和地图中可视化数据
5.1 下载解压缩
[admin@node21 elk]$ wget https://artifacts.elastic.co/downloads/kibana/kibana-6.2.4-linux-x86_64.tar.gz
[admin@node21 elk]$ tar -xzf kibana-6.2.4-linux-x86_64.tar.gz
5.2 修改config/kibana.yml
[admin@node21 elk]$ vi kibana-6.2.4-linux-x86_64/config/kibana.yml
#server.host: "localhost"
server.host: "192.168.100.21"   #设置自己机器的IP
#elasticsearch.url: "http://localhost:9200"
elasticsearch.url: "http://192.168.100.21:9200"
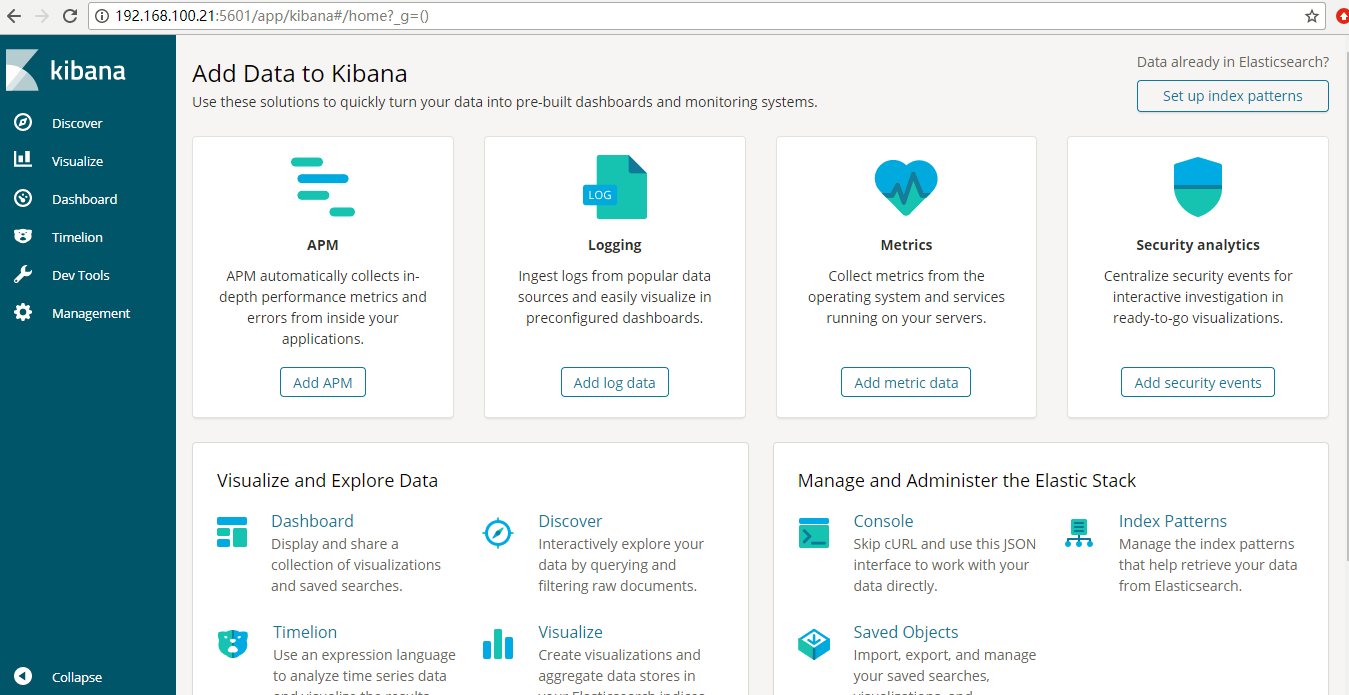
5.3 启动Kibana
进入kibana/bin/目录
[admin@node21 bin]$ ./kibana &
页面访问:192.168.100.21:5601
六 安装故障问题
1 bootstrap checks failed
ERROR: bootstrap checks failed
max file descriptors [4096] for elasticsearch process is too low, increase to at least [65536]
max virtual memory areas vm.max_map_count [65530] is too low, increase to at least [262144]
max number of threads [3812] for user [admin] is too low, increase to at least [4096]
解决办法:
1)针对 max file descriptors [4096] for elasticsearch process is too low, increase to at least [65536]
切换root用户,修改/etc/security/limits.conf文件,配置系统搜索最大文件数,添加如下两行,此文件修改后需要重新登录用户,才会生效,验证是否设置成功 ulimit -Hn
*  hard  nofile  65536
*  soft  nofile  65536
2)针对 max virtual memory areas vm.max_map_count [65530] is too low, increase to at least [262144]
切换root用户,修改/etc/sysctl.conf 文件,添加如下信息,设置后保存退出,执行右边命令 sysctl -p
vm.max_map_count=262144
3)针对 max number of threads [3812] for user [admin] is too low, increase to at least [4096]
修改 vi /etc/security/limits.d/20-nproc.conf,修改用户最大线程数,
*      soft   nproc   4096
root   soft   nproc   unlimited
同时修改/etc/security/limits.conf,添加如下两行,修改完了验证 ulimit -u
*    soft   nproc    4096
*    hard   nproc    4096
2 head头安装警告问题
npm WARN elasticsearch-head@0.0.0 license should be a valid SPDX license expression
npm WARN optional SKIPPING OPTIONAL DEPENDENCY: fsevents@1.2.4 (node_modules/fsevents):
npm WARN notsup SKIPPING OPTIONAL DEPENDENCY: Unsupported platform for fsevents@1.2.4: wanted {"os":"darwin","arch":"any"} (current: {"os":"linux","arch":"x64"})
npm ERR! code ELIFECYCLE
npm ERR! errno 1
npm ERR! phantomjs-prebuilt@2.1.16 install: `node install.js`
npm ERR! Exit status 1
npm ERR!
npm ERR! Failed at the phantomjs-prebuilt@2.1.16 install script.
npm ERR! This is probably not a problem with npm. There is likely additional logging output above.
npm ERR! A complete log of this run can be found in:
npm ERR!     /home/admin/.npm/_logs/2018-06-06T11_41_22_784Z-debug.log
第一个警告:解决方式:打开elasticsearch-head目录下的package.json文件,找到license位置,修改为上面这个网站上存在Identifier,我的修改如下,将Apache内容修改为Apache-2.0。
{
  "name": "elasticsearch-head",
  "version": "0.0.0",
  "description": "Front end for an elasticsearch cluster",
  "main": "_site/index.html",
  "directories": {
    "test": "test"
  },
  "scripts": {
    "start": "grunt server",
    "test": "grunt jasmine",
    "proxy": "node proxy/index.js"
  },
  "repository": {
    "type": "git",
    "url": "https://github.com/mobz/elasticsearch-head.git"
  },
  "author": "",
  "license": "Apache-2.0",
  "gitHead": "0c2ac0b5723b493e4454baa7398f386ecb829412",
  "readmeFilename": "README.textile",
  "devDependencies": {
    "grunt": "1.0.1",
    "grunt-contrib-concat": "1.0.1",
    "grunt-contrib-watch": "1.0.0",
    "grunt-contrib-connect": "1.0.2",
    "grunt-contrib-copy": "1.0.0",
    "grunt-contrib-clean": "1.0.0",
    "grunt-contrib-jasmine": "1.0.3",
    "karma": "1.3.0",
    "grunt-karma": "2.0.0",
    "http-proxy": "1.16.x"
  }
然后重新执行npm install ,该提示已消除。
3 head安装后启动问题
[2018-06-06T08:24:28,869][WARN ][o.e.b.ElasticsearchUncaughtExceptionHandler] [node21] uncaught exception in thread [main]
org.elasticsearch.bootstrap.StartupException: java.lang.IllegalArgumentException: property [elasticsearch.version] is missing for plugin [head]
    at org.elasticsearch.bootstrap.Elasticsearch.init(Elasticsearch.java:125) ~[elasticsearch-6.2.4.jar:6.2.4]
    at org.elasticsearch.bootstrap.Elasticsearch.execute(Elasticsearch.java:112) ~[elasticsearch-6.2.4.jar:6.2.4]
    at org.elasticsearch.cli.EnvironmentAwareCommand.execute(EnvironmentAwareCommand.java:86) ~[elasticsearch-6.2.4.jar:6.2.4]
    at org.elasticsearch.cli.Command.mainWithoutErrorHandling(Command.java:124) ~[elasticsearch-cli-6.2.4.jar:6.2.4]
    at org.elasticsearch.cli.Command.main(Command.java:90) ~[elasticsearch-cli-6.2.4.jar:6.2.4]
    at org.elasticsearch.bootstrap.Elasticsearch.main(Elasticsearch.java:92) ~[elasticsearch-6.2.4.jar:6.2.4]
    at org.elasticsearch.bootstrap.Elasticsearch.main(Elasticsearch.java:85) ~[elasticsearch-6.2.4.jar:6.2.4]
Caused by: java.lang.IllegalArgumentException: property [elasticsearch.version] is missing for plugin [head]
    at org.elasticsearch.plugins.PluginInfo.readFromProperties(PluginInfo.java:226) ~[elasticsearch-6.2.4.jar:6.2.4]
    at org.elasticsearch.plugins.PluginInfo.readFromProperties(PluginInfo.java:184) ~[elasticsearch-6.2.4.jar:6.2.4]
    at org.elasticsearch.bootstrap.Spawner.spawnNativePluginControllers(Spawner.java:75) ~[elasticsearch-6.2.4.jar:6.2.4]
    at org.elasticsearch.bootstrap.Bootstrap.setup(Bootstrap.java:167) ~[elasticsearch-6.2.4.jar:6.2.4]
    at org.elasticsearch.bootstrap.Bootstrap.init(Bootstrap.java:323) ~[elasticsearch-6.2.4.jar:6.2.4]
    at org.elasticsearch.bootstrap.Elasticsearch.init(Elasticsearch.java:121) ~[elasticsearch-6.2.4.jar:6.2.4]
    ... 6 more
解决分析:elasticsearch-head自5.1之后不支持直接放在elasticsearch的 plugins、modules 目录下,也不能使用 elasticsearch-plugin install。
安装 elasticsearch-head
-
修改
elasticsearch/config/elasticsearch.yml,添加如下内容
http.cors.enabled: true
http.cors.allow-origin: "*"
-
下载 elasticsearch-head 或者 git clone 到随便一个文件夹
-
安装
nodejs -
cd /path/to/elasticsearch-head -
npm install -g grunt-cli -
npm install -
grunt server -
http://localhost:9100/
4 设置锁内存故障
1)elasticsearch官网建议生产环境需要设置bootstrap.memory_lock: true,导致Elasticsearch启动失败问题
[admin@node21 bin]$ ./elasticsearch
[2018-06-07T23:50:12,370][WARN ][o.e.b.JNANatives         ] Unable to lock JVM Memory: error=12, reason=Cannot allocate memory
[2018-06-07T23:50:12,374][WARN ][o.e.b.JNANatives         ] This can result in part of the JVM being swapped out.
[2018-06-07T23:50:12,374][WARN ][o.e.b.JNANatives         ] Increase RLIMIT_MEMLOCK, soft limit: 65536, hard limit: 65536
[2018-06-07T23:50:12,374][WARN ][o.e.b.JNANatives         ] These can be adjusted by modifying /etc/security/limits.conf, for example:
    # allow user 'admin' mlockall
    admin soft memlock unlimited
    admin hard memlock unlimited
[2018-06-07T23:50:12,375][WARN ][o.e.b.JNANatives         ] If you are logged in interactively, you will have to re-login for the new limits to take effect.
[2018-06-07T23:50:12,875][INFO ][o.e.n.Node               ] [node21] initializing ...
[2018-06-07T23:50:13,033][INFO ][o.e.e.NodeEnvironment    ] [node21] using [1] data paths, mounts [[/ (rootfs)]], net usable_space [90.7gb], net total_space [97.6gb],
types [rootfs][2018-06-07T23:50:13,034][INFO ][o.e.e.NodeEnvironment    ] [node21] heap size [1015.6mb], compressed ordinary object pointers [true]
[2018-06-07T23:50:13,036][INFO ][o.e.n.Node               ] [node21] node name [node21], node ID [sM6bNfHmT7CknreP2b9RHw]
[2018-06-07T23:50:13,037][INFO ][o.e.n.Node               ] [node21] version[6.2.4], pid[2164], build[ccec39f/2018-04-12T20:37:28.497551Z], OS[Linux/3.10.0-862.el7.x86
_64/amd64], JVM[Oracle Corporation/Java HotSpot(TM) 64-Bit Server VM/1.8.0_171/25.171-b11][2018-06-07T23:50:13,037][INFO ][o.e.n.Node               ] [node21] JVM arguments [-Xms1g, -Xmx1g, -XX:+UseConcMarkSweepGC, -XX:CMSInitiatingOccupancyFraction=75, -XX
:+UseCMSInitiatingOccupancyOnly, -XX:+AlwaysPreTouch, -Xss1m, -Djava.awt.headless=true, -Dfile.encoding=UTF-8, -Djna.nosys=true, -XX:-OmitStackTraceInFastThrow, -Dio.netty.noUnsafe=true, -Dio.netty.noKeySetOptimization=true, -Dio.netty.recycler.maxCapacityPerThread=0, -Dlog4j.shutdownHookEnabled=false, -Dlog4j2.disable.jmx=true, -Djava.io.tmpdir=/tmp/elasticsearch.OUkgncgb, -XX:+HeapDumpOnOutOfMemoryError, -XX:+PrintGCDetails, -XX:+PrintGCDateStamps, -XX:+PrintTenuringDistribution, -XX:+PrintGCApplicationStoppedTime, -Xloggc:logs/gc.log, -XX:+UseGCLogFileRotation, -XX:NumberOfGCLogFiles=32, -XX:GCLogFileSize=64m, -Des.path.home=/opt/module/elk/elasticsearch-6.2.4, -Des.path.conf=/opt/module/elk/elasticsearch-6.2.4/config][2018-06-07T23:50:15,004][INFO ][o.e.p.PluginsService     ] [node21] loaded module [aggs-matrix-stats]
[2018-06-07T23:50:15,004][INFO ][o.e.p.PluginsService     ] [node21] loaded module [analysis-common]
[2018-06-07T23:50:15,004][INFO ][o.e.p.PluginsService     ] [node21] loaded module [ingest-common]
[2018-06-07T23:50:15,005][INFO ][o.e.p.PluginsService     ] [node21] loaded module [lang-expression]
[2018-06-07T23:50:15,005][INFO ][o.e.p.PluginsService     ] [node21] loaded module [lang-mustache]
[2018-06-07T23:50:15,005][INFO ][o.e.p.PluginsService     ] [node21] loaded module [lang-painless]
[2018-06-07T23:50:15,005][INFO ][o.e.p.PluginsService     ] [node21] loaded module [mapper-extras]
[2018-06-07T23:50:15,005][INFO ][o.e.p.PluginsService     ] [node21] loaded module [parent-join]
[2018-06-07T23:50:15,005][INFO ][o.e.p.PluginsService     ] [node21] loaded module [percolator]
[2018-06-07T23:50:15,005][INFO ][o.e.p.PluginsService     ] [node21] loaded module [rank-eval]
[2018-06-07T23:50:15,006][INFO ][o.e.p.PluginsService     ] [node21] loaded module [reindex]
[2018-06-07T23:50:15,006][INFO ][o.e.p.PluginsService     ] [node21] loaded module [repository-url]
[2018-06-07T23:50:15,006][INFO ][o.e.p.PluginsService     ] [node21] loaded module [transport-netty4]
[2018-06-07T23:50:15,006][INFO ][o.e.p.PluginsService     ] [node21] loaded module [tribe]
[2018-06-07T23:50:15,007][INFO ][o.e.p.PluginsService     ] [node21] no plugins loaded
[2018-06-07T23:50:22,618][INFO ][o.e.d.DiscoveryModule    ] [node21] using discovery type [zen]
[2018-06-07T23:50:24,023][INFO ][o.e.n.Node               ] [node21] initialized
[2018-06-07T23:50:24,024][INFO ][o.e.n.Node               ] [node21] starting ...
[2018-06-07T23:50:24,561][INFO ][o.e.t.TransportService   ] [node21] publish_address {192.168.100.21:9300}, bound_addresses {192.168.100.21:9300}
[2018-06-07T23:50:24,609][INFO ][o.e.b.BootstrapChecks    ] [node21] bound or publishing to a non-loopback address, enforcing bootstrap checks
ERROR: [1] bootstrap checks failed
[1]: memory locking requested for elasticsearch process but memory is not locked
[2018-06-07T23:50:24,684][INFO ][o.e.n.Node               ] [node21] stopping ...
[2018-06-07T23:50:24,811][INFO ][o.e.n.Node               ] [node21] stopped
[2018-06-07T23:50:24,812][INFO ][o.e.n.Node               ] [node21] closing ...
[2018-06-07T23:50:24,851][INFO ][o.e.n.Node               ] [node21] closed
修改/etc/sysctl.conf和/etc/security/limits.conf
vi /etc/sysctl.conf
vm.swappiness=0
vi /etc/security/limits.conf
admin soft memlock unlimited
admin hard memlock unlimited
修改完重新登录生效
2)改完之后有可能启动失败
[admin@node22 bin]$ ./elasticsearch
Killed
这里一般是由于内存不足导致的,需要设置es的虚拟机参数。修改es_home/bin/elasticsearch。如下所示:ES_JAVA_OPTS="-Xms1g -Xmx1g"
5 IK分词器问题
{"error":{"root_cause":[{"type":"mapper_parsing_exception","reason":"analyzer [ik_max_word] not found for field [content]"}],"type":"mapper_parsing_exception","reason"
:"analyzer [ik_max_word] not found for field [content]"},"status":400}
解决:如果出现上述报错,可能是单节点安装了ik分词器造成的,如果集群是多节点的,需要集群中每个节点上都要安装Ik。
6 Kibana问题
log [16:11:15.912] [error][timelion] Error: in cell #1: Elasticsearch index not found: _all: Error: in cell #1: Elasticsearch index not found: _all

 浙公网安备 33010602011771号