spring快速入门
1.spring概述
1.1 spring是什么
spring是一个分层的一站式轻量级开源框架,官网 : https://spring.io/
1.2 spring的优点:
- 方便解耦,简化开发
Spring就是一个大工厂,可以将所有对象创建和依赖关系维护,交给Spring管理
- AOP编程的支持
Spring提供面向切面编程,可以方便的实现对程序进行权限拦截、运行监控等功能
- 声明式事务的支持
只需要通过配置就可以完成对事务的管理,而无需手动编程
- 方便程序的测试
Spring对Junit4支持,可以通过注解方便的测试Spring程序
- 方便集成各种优秀框架
Spring不排斥各种优秀的开源框架,其内部提供了对各种优秀框架(如:Struts、Hibernate、MyBatis、Quartz等)的直接支持
- 降低JavaEE API的使用难度
Spring 对JavaEE开发中非常难用的一些API(JDBC、JavaMail、远程调用等),都提供了封装,使这些API应用难度大大降低
2.spring的用法
2.1 创建项目
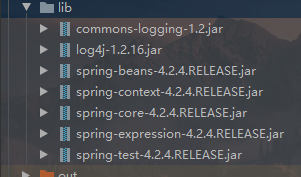
创建java项目,导入spring相关的jar包

2.2 编写配置文件
新建spring核心配置文件applicationContext.xml
<?xml version="1.0" encoding="UTF-8"?>
<beans xmlns="http://www.springframework.org/schema/beans"
    xmlns:xsi="http://www.w3.org/2001/XMLSchema-instance"     xmlns:p="http://www.springframework.org/schema/p"
    xmlns:c="http://www.springframework.org/schema/c"
    xsi:schemaLocation="http://www.springframework.org/schema/beans     http://www.springframework.org/schema/beans/spring-beans.xsd">
</beans>
新建一个类交给spring管理
这里创建一个demo类
package com.gh;

/**
 * @Author Eric
 * @Date 2021/7/3 10:05
 * @Version 1.0
 */
public class Demo {
    public void sayHello(){
        System.out.println("hello");
    }
}
在applicationContext.xml声明被spring管理
<bean id="demo" class="com.gh.Demo"/>
编写单元测试方法,从spring容器中去获取
    @Test
    public void test1(){
        ApplicationContext applicationContext = new ClassPathXmlApplicationContext("applicationContext.xml");
        Demo demo = (Demo) applicationContext.getBean("demo");
        demo.sayHello();
    }
3.依赖注入
3.1 通过属性注入
通过属性注入必须要提供set方法,这里新建一个user类
package com.gh;

/**
 * @Author Eric
 * @Date 2021/7/3 10:25
 * @Version 1.0
 */
public class User {
    private String name;

    public void setName(String name) {
        this.name = name;
    }

    public String getName() {
        return name;
    }
}
配置文件添加属性注入
    <bean class="com.gh.User" id="user">
        <property name="name" value="zhangsan"/>
    </bean>
测试方法可以获取到name为zhangsan
    @Test
    public void test2(){
        ApplicationContext applicationContext = new ClassPathXmlApplicationContext("applicationContext.xml");
        User user = (User) applicationContext.getBean("user");
        String name = user.getName();
        System.out.println(name);
    }
3.2 通过构造方法注入
这里需要给user实体提供构造方法
    public User(String name) {
        this.name = name;
    }
配置文件如下
    <bean class="com.gh.User" id="user">
        <constructor-arg name="name" value="zhangsan"/>
    </bean>
通过运行测试类同样可以获取到name的值为zhangsan
3.3 通过p标签和c标签注入
使用c标签必须要提供带参构造
<bean class="com.gh.User" id="user" c:name="zhangsan"/>
使用p标签必须要提供空参构造和set方法
<bean class="com.gh.User" id="user" p:name="zhangsan"/>
3.4 集合注入属性
新建一个Coll类提供get和set方法并提供toString方法

package com.gh;

import java.util.List;
import java.util.Map;
import java.util.Set;

/**
 * @Author Eric
 * @Date 2021/7/3 10:52
 * @Version 1.0
 */
public class Coll {
    private List<String> list;
    private Set<String> set;
    private Map<String,String> map;

    public List<String> getList() {
        return list;
    }

    public void setList(List<String> list) {
        this.list = list;
    }

    public Set<String> getSet() {
        return set;
    }

    public void setSet(Set<String> set) {
        this.set = set;
    }

    public Map<String, String> getMap() {
        return map;
    }

    public void setMap(Map<String, String> map) {
        this.map = map;
    }

    @Override
    public String toString() {
        return "Coll{" +
                "list=" + list +
                ", set=" + set +
                ", map=" + map +
                '}';
    }
}
list注入
    <bean class="com.gh.Coll" id="coll">
        <property name="list">
            <list>
                <value>张三</value>
                <value>李四</value>
            </list>
        </property>
    </bean>
set注入
    <bean class="com.gh.Coll" id="coll">
        <property name="set">
            <set>
                <value>张三</value>
                <value>李四</value>
            </set>
        </property>
    </bean>
map注入
    <bean class="com.gh.Coll" id="coll">
        <property name="map">
            <map key-type="java.lang.String" value-type="java.lang.String">
                <entry key="name" value="zhangsan"></entry>
                <entry key="age" value="23"/>
            </map>
        </property>
    </bean>
4.注解的使用
4.1 修改配置
在applicationContext.xml中修改头文件
xmlns:context="http://www.springframework.org/schema/context"
http://www.springframework.org/schema/context http://www.springframework.org/schema/context/spring-context.xsd
开启注解,并配置包扫描
<context:annotation-config/>
<context:component-scan base-package="需要被扫描的包的路径"/>
4.2 注解说明
@Component
该注解用来标记一个类,代表这个类被Spring管理。相当于xml中配置一个<bean>标签
@Autowired @Value
该注解用来标记想要被注入的对象,使用这个注解可以给类中的成员变量赋值。属性依赖注入
@Autowired默认是按照类型来注入的
如果与@Qualifier一起使用,就可以根据名称来进行注入。

我们也可以使用@Resource注解来代替这两个注解

@Repository 用于DAO层
@Service 用于service层
@Controller 用于表现层
4.3 spring测试类
需要配置如下内容

5.springAOP简介
5.1 AOP概述
在软件业,AOP为Aspect Oriented Programming的缩写,意为:面向切面编程,通过预编译方式和运行期动态代理实现程序功能的统一维护的一种技术。AOP是OOP的延续,是软件开发中的一个热点,也是Spring框架中的一个重要内容,是函数式编程的一种衍生范型。利用AOP可以对业务逻辑的各个部分进行隔离,从而使得业务逻辑各部分之间的耦合度降低,提高程序的可重用性,同时提高了开发的效率。
AOP是一个概念,并没有设定具体语言的实现,它能克服那些只有单继承特性语言的缺点,spring2.0之后整合AspectJ第三方AOP技术。
AspectJ是一个面向切面的框架,它扩展了Java语言。AspectJ定义了AOP语法所以它有一个专门的编译器用来生成遵守Java字节编码规范的Class文件。
5.2 主要功能
日志记录,性能统计,安全控制,事务处理,异常处理等等
5.3 主要意图
将日志记录,性能统计,安全控制,事务处理,异常处理等代码从业务逻辑代码中划分出来,通过对这些行为的分离,我们希望可以将它们独立到非指导业务逻辑的方法中,进而改变这些行为的时候不影响业务逻辑的代码。
6.AOP的使用
6.1 配置
导入相关的jar包
添加命名空间
xmlns:aop="http://www.springframework.org/schema/aop"
http://www.springframework.org/schema/aop http://www.springframework.org/schema/aop/spring-aop.xsd
6.2 xml方式
编写目标类
package com.gh;

/**
 * @Author Eric
 * @Date 2021/7/3 15:05
 * @Version 1.0
 */
public class UserDao {
    public void add(){
        System.out.println("dao中add方法被调用了");
    }
}
编写增强类
package com.gh;

import org.springframework.aop.MethodBeforeAdvice;

import java.lang.reflect.Method;

/**
 * @Author Eric
 * @Date 2021/7/3 15:06
 * @Version 1.0
 */
public class UserDaoHelper implements MethodBeforeAdvice {
    @Override
    public void before(Method method, Object[] objects, Object o) throws Throwable {
        System.out.println("before方法被调用了");
    }
}
xml配置:
配置spring容器
<bean class="com.gh.UserDao" id="userDao"/>
<bean class="com.gh.UserDaoHelper" id="userDaoHelper"/>
配置aop
    <aop:config>
        <!--expression切点表达式
        execution指定切入的方法路径
        第一个*代表 返回值类型,任意返回值
        第二个*代表 当前包下面任意类
        .. 任意参数
        -->
        <aop:pointcut id="addCut" expression="execution(* com.gh.*.add(..))"/>
        <!--通知-->
        <aop:advisor advice-ref="userDaoHelper" pointcut-ref="addCut"/>
    </aop:config>
使用aspectj:
(1)创建helper类
package com.gh;

/**
 * @Author Eric
 * @Date 2021/7/3 15:34
 * @Version 1.0
 */
public class Helper {

    public void before(){
        System.out.println("before方法执行了");
    }

    public void after(){
        System.out.println("after方法执行了");
    }
}
配置切点表达式
    <bean class="com.gh.Helper" id="helper"/>
    <aop:config>
        <aop:aspect ref="helper">
            <aop:pointcut id="addCut" expression="execution(* com.gh.*.add(..))"/>
            <aop:before method="before" pointcut-ref="addCut"/>
            <aop:after method="after" pointcut-ref="addCut"/>
        </aop:aspect>
    </aop:config>
6.3 注解方式
开启aop注解
<aop:aspectj-autoproxy/>
编写增强类
package com.gh.dao;

import org.aspectj.lang.annotation.Aspect;
import org.aspectj.lang.annotation.Before;
import org.springframework.stereotype.Component;

/**
 * @Author Eric
 * @Date 2021/7/3 15:46
 * @Version 1.0
 */
@Component
@Aspect
public class DaoHelper {

    @Before("execution(* com.gh.dao.UserDao.add(..))")
    public void before(){
        System.out.println("before");
    }

    @After("execution(* com.gh.dao.UserDao.add(..))")
    public void after(){
        System.out.println("after");
    }
}
编写接口和实现类
public interface UserDao {
    void add();
}
实现类
@Service
public class UserDaoImpl implements UserDao {
    @Override
    public void add() {
        System.out.println("add");
    }
}
测试通过注入userDao就可以对add方法进行增强
6.4 aop原理
动态代理模式
AOP分为静态AOP和动态AOP。静态AOP是指AspectJ实现的AOP,他是将切面代码直接编译到Java类文件中。动态AOP是指将切面代码进行动态织入实现的AOP。Spring的AOP为动态AOP,实现的技术为: JDK提供的动态代理技术 和 CGLIB(动态字节码增强技术)
代理概念:代理模式的主要作用是为其他对象提供一种代理以控制对这个对象的访问。
例如:小红想找小明拿一个苹果吃,但是小红和小明关系不好,这时候就可以找一个代理对象小王,小红让小王找小明拿一个苹果。这是小王就是小红的代理对象。
代理对象不仅仅可以完成某些功能,还可以在完成的功能前后做拓展,AOP中有对方法的加强,例如before、after等增强,这些都是由代理对象完成的。
Spring中使用的代理模式有2种:
JDK代理:Jdk动态代理只针对于接口操作
CGLIb:可以为没有实现接口的类去做代理,也可以为实现接口的类去做代理。
spring采用的是哪一种动态机制:
如果目标对象,有接口,优先使用jdk动态代理。
如果目标对象,无接口,使用cglib动态代理。
7.@Scope注解
@Scope它以描述bean的作用域。
一般取值有2个:
Singleton:单例模式,内存中只会有一个该对象
Prototype:多例模式,每次使用都初始化一个新的对象。
一点点学习,一丝丝进步。不懈怠,才不会被时代所淘汰!


 浙公网安备 33010602011771号