
springboot学习之十(spring security)
1. spring security的介绍
spring security是一个安全管理框架,源自 Spring 家族,可以和 Spring 框架无缝整合。其主要功能有:
- 认证
也就是你进行访问一些网站的时候需要进行登陆之后才能够访问,不登陆的话是无法访问的,认证这块的解决方案很多,主流的有CAS、SAML2、OAUTH2等,我们常说的单点登录方案(SSO)说的就是这块 - 授权
也就是当前登陆的角色具有访问哪些功能的权限,只有你有相关的权限才能够进行某些操作,不具有这些权限则禁止操作 - 攻击防护
也就是其能够防止csrf、cors、xss的攻击
其中spring security的实现原理主要就是通过一个个拦截器组成的拦截器链来进行实现的。其中用户在访问网站的时候进入一个个拦截器中,在拦截器中进行相关的操作。
2. spring security主要拦截器链的介绍
在引入spring security之后,通过debug我们可以看到其默认的过滤器链是由下面的十六个过滤器组成的:
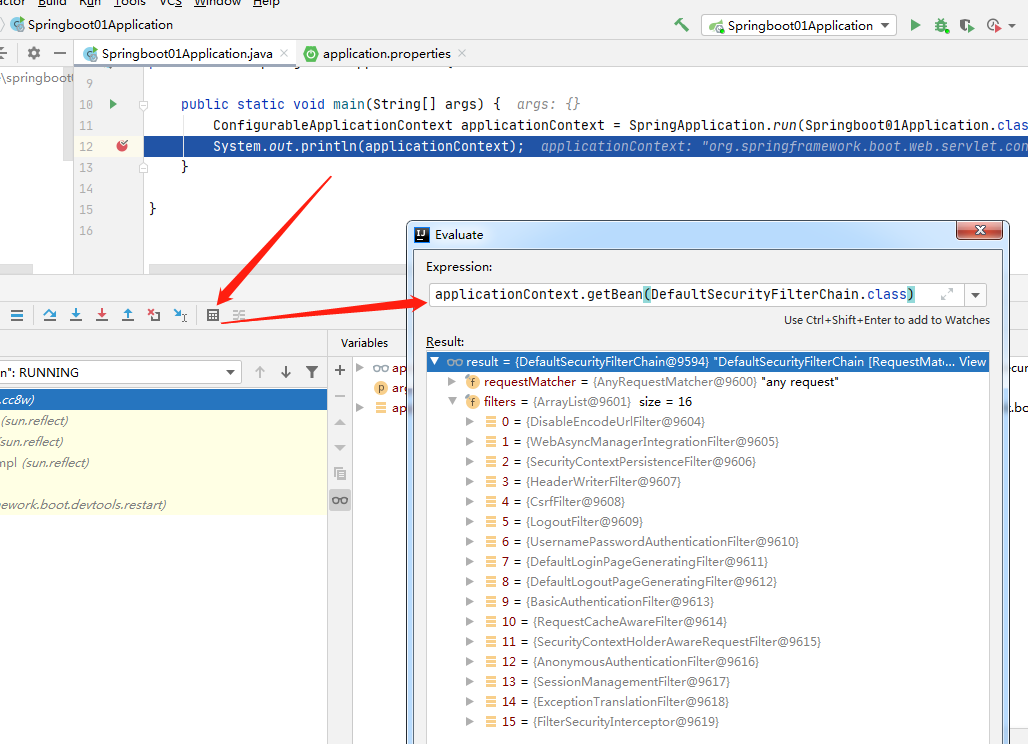
这里主要学的是如何使用spring security及逆行认证和授权,所以其最主要的是过滤器链中的UsernamePasswordAuthenticationFilter,ExceptionTranslationFilter,FilterSecurityInterceptor这三个过滤器。
UsernamePasswordAuthenticationFilter:这个过滤器从名字就可以看出来其主要是处理用户名和密码的过滤器,就是用户输入用户名和密码在这个过滤器中进行逻辑比对。默认是通过获取本地的用户名和密码。其与spring Security的认证功能有关。
ExceptionTranslationFilter:这个过滤器主要是处理异常过滤器,就是在运行过程中有什么异常都会到这个过滤器中,由这个过滤器进行处理
FilterSecurityInterceptor:这个过滤器主要是一些权限认证的过滤器,与spring security的授权功能有关。
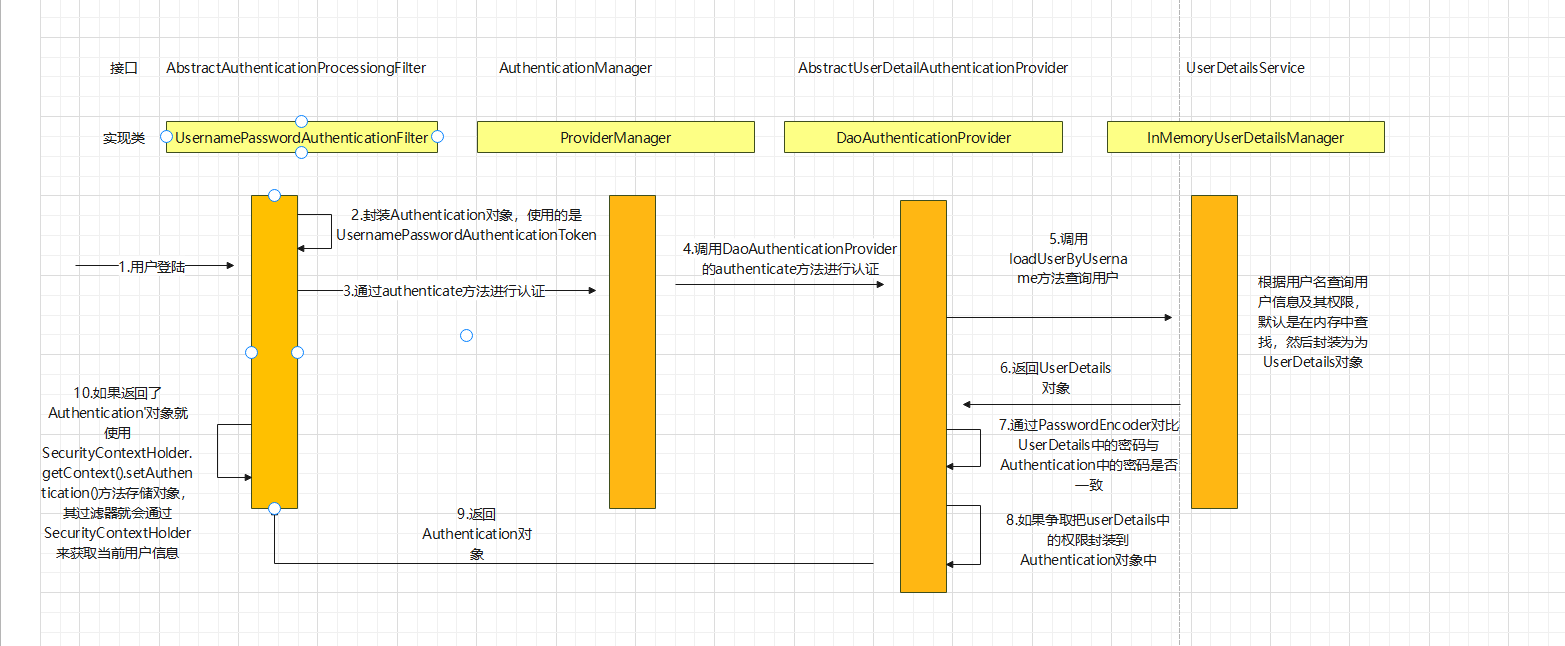
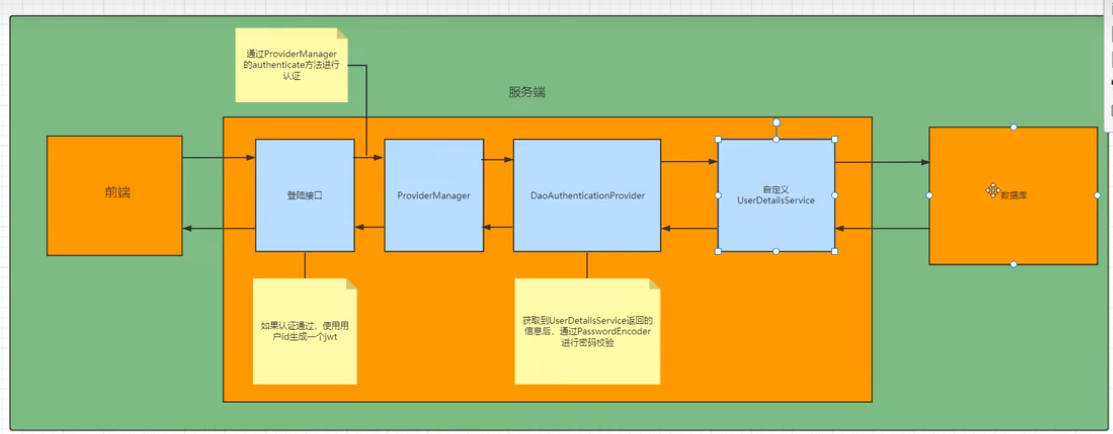
认证的主要流程(看下源码)
通过看UsernamePasswordAuthenticationFilter的源码可以得到用户认证过程中的流程图如下所示:
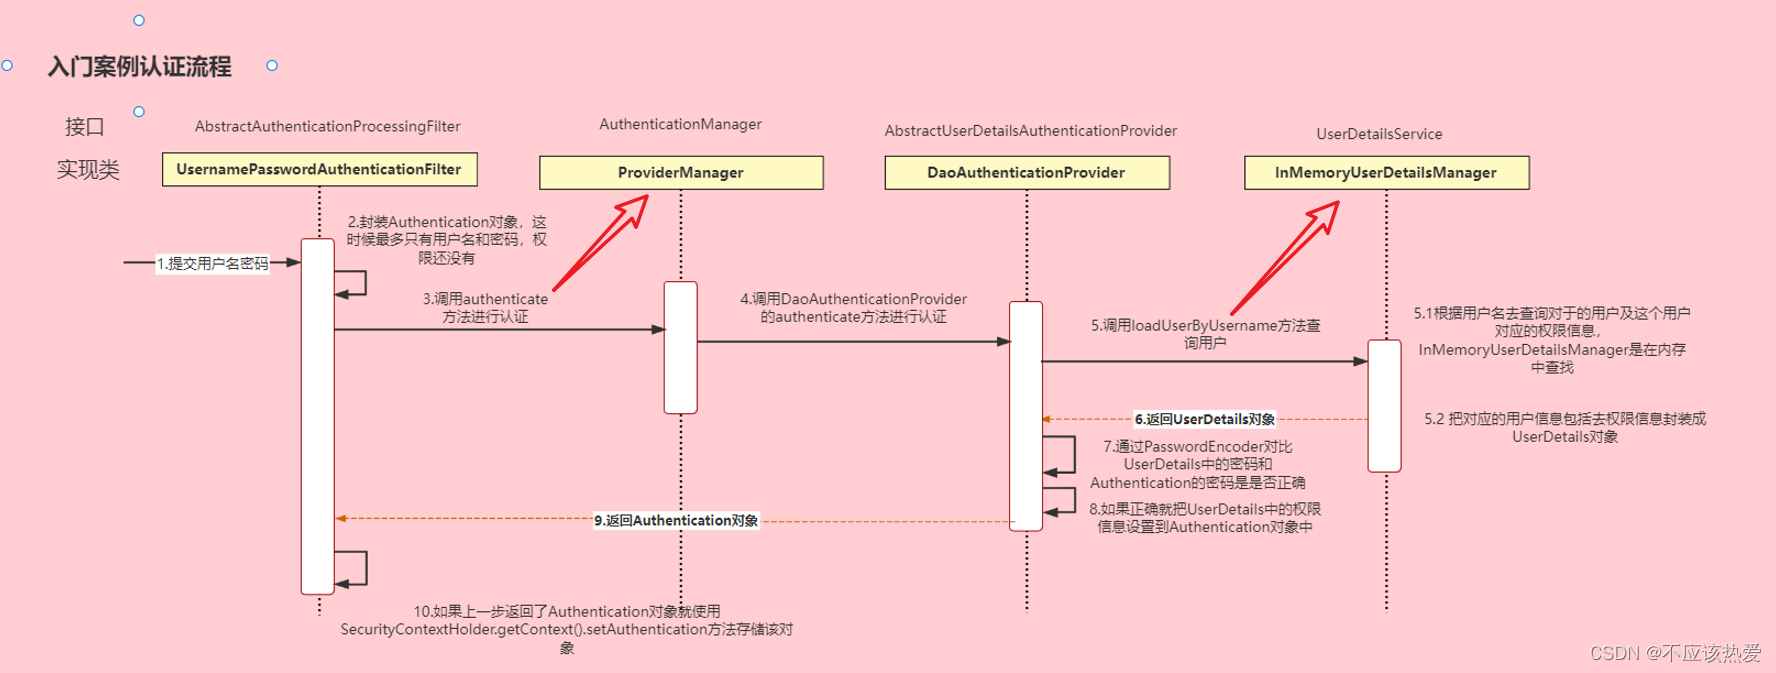
1.我们可以看到UsernamePasswordAuthenticationFilter的主要执行方法如下:
@Override
public Authentication attemptAuthentication(HttpServletRequest request, HttpServletResponse response)
        throws AuthenticationException {
    if (this.postOnly && !request.getMethod().equals("POST")) {
        throw new AuthenticationServiceException("Authentication method not supported: " + request.getMethod());
    }
    String username = obtainUsername(request);
    username = (username != null) ? username.trim() : "";
    String password = obtainPassword(request);
    password = (password != null) ? password : "";
    UsernamePasswordAuthenticationToken authRequest = UsernamePasswordAuthenticationToken.unauthenticated(username,
            password);
    // Allow subclasses to set the "details" property
    setDetails(request, authRequest);
    return this.getAuthenticationManager().authenticate(authRequest);
}
可以从上面看出其将用户名和密码封装成了UsernamePasswordAuthenticationToken,其父类的父类是Authentication对象,然后调用了AuthenticationManager的authenticate()方法。
2.接着往下面看可以看到在AuthenticationManager的authenticate()方法中接着调用了一个AuthenticationProvider的authenticate()的方法:
@Override
public Authentication authenticate(Authentication authentication) throws AuthenticationException {
    Class<? extends Authentication> toTest = authentication.getClass();
    AuthenticationException lastException = null;
    AuthenticationException parentException = null;
    Authentication result = null;
    Authentication parentResult = null;
    int currentPosition = 0;
    int size = this.providers.size();
    for (AuthenticationProvider provider : getProviders()) {
        // 此处省略了一些逻辑
        ...
        try {
            result = provider.authenticate(authentication);
            if (result != null) {
                copyDetails(authentication, result);
                break;
            }
        }
        catch (AccountStatusException | InternalAuthenticationServiceException ex) {
            prepareException(ex, authentication);
            // SEC-546: Avoid polling additional providers if auth failure is due to
            // invalid account status
            throw ex;
        }
        catch (AuthenticationException ex) {
            lastException = ex;
        }
    }
    // 此处也省略了一些逻辑
    ...
}
3.在下面就到AbstractUserDetailsAuthenticationProvider中的authenticate方法了,在这个方法中主要是调用了UserDetailService的loadUserByUserName方法:
@Override
public Authentication authenticate(Authentication authentication) throws AuthenticationException {
    Assert.isInstanceOf(UsernamePasswordAuthenticationToken.class, authentication,
            () -> this.messages.getMessage("AbstractUserDetailsAuthenticationProvider.onlySupports",
                    "Only UsernamePasswordAuthenticationToken is supported"));
    String username = determineUsername(authentication);
    boolean cacheWasUsed = true;
    UserDetails user = this.userCache.getUserFromCache(username);
    if (user == null) {
        cacheWasUsed = false;
        try {
            user = retrieveUser(username, (UsernamePasswordAuthenticationToken) authentication);
        }
        catch (UsernameNotFoundException ex) {
            this.logger.debug("Failed to find user '" + username + "'");
            if (!this.hideUserNotFoundExceptions) {
                throw ex;
            }
            throw new BadCredentialsException(this.messages
                    .getMessage("AbstractUserDetailsAuthenticationProvider.badCredentials", "Bad credentials"));
        }
        Assert.notNull(user, "retrieveUser returned null - a violation of the interface contract");
    }
    // 此处省略了一些代码
    ...
}

retrieveUser方法:

@Override
protected final UserDetails retrieveUser(String username, UsernamePasswordAuthenticationToken authentication)
        throws AuthenticationException {
    prepareTimingAttackProtection();
    try {
        UserDetails loadedUser = this.getUserDetailsService().loadUserByUsername(username);
        if (loadedUser == null) {
            throw new InternalAuthenticationServiceException(
                    "UserDetailsService returned null, which is an interface contract violation");
        }
        return loadedUser;
    }
    catch (UsernameNotFoundException ex) {
        mitigateAgainstTimingAttack(authentication);
        throw ex;
    }
    catch (InternalAuthenticationServiceException ex) {
        throw ex;
    }
    catch (Exception ex) {
        throw new InternalAuthenticationServiceException(ex.getMessage(), ex);
    }
}
可以从上面的retrieveUser方法中看到其主要是通过调用UserDetailsService的loadUserByUsername方法来获得用户信息
4.而UserDetailsService的loadUserByUsername方法默认是从本地获取到用户的一些信息,然后封装成UserDetails对象进行返回,这里可以在配置文件中配置你自己的用户名或密码
@Override
public UserDetails loadUserByUsername(String username) throws UsernameNotFoundException {
    UserDetails user = this.users.get(username.toLowerCase());
    if (user == null) {
        throw new UsernameNotFoundException(username);
    }
    return new User(user.getUsername(), user.getPassword(), user.isEnabled(), user.isAccountNonExpired(),
            user.isCredentialsNonExpired(), user.isAccountNonLocked(), user.getAuthorities());
}
5.获取到用户的信息之后再重新到第三步的AbstractUserDetailsAuthenticationProvider中执行后面的操作,进行一些密码的比较等操作。
@Override
public Authentication authenticate(Authentication authentication) throws AuthenticationException {
    // 此处省略了一些代码
    ...
    try {
        this.preAuthenticationChecks.check(user);
        additionalAuthenticationChecks(user, (UsernamePasswordAuthenticationToken) authentication);
    }
    catch (AuthenticationException ex) {
        if (!cacheWasUsed) {
            throw ex;
        }
        // There was a problem, so try again after checking
        // we're using latest data (i.e. not from the cache)
        cacheWasUsed = false;
        user = retrieveUser(username, (UsernamePasswordAuthenticationToken) authentication);
        this.preAuthenticationChecks.check(user);
        additionalAuthenticationChecks(user, (UsernamePasswordAuthenticationToken) authentication);
    }
    // 此处省略了一些代码
    ...
}

additionalAuthenticationChecks方法:

@Override
@SuppressWarnings("deprecation")
protected void additionalAuthenticationChecks(UserDetails userDetails,
        UsernamePasswordAuthenticationToken authentication) throws AuthenticationException {
    if (authentication.getCredentials() == null) {
        this.logger.debug("Failed to authenticate since no credentials provided");
        throw new BadCredentialsException(this.messages
                .getMessage("AbstractUserDetailsAuthenticationProvider.badCredentials", "Bad credentials"));
    }
    String presentedPassword = authentication.getCredentials().toString();
    if (!this.passwordEncoder.matches(presentedPassword, userDetails.getPassword())) {
        this.logger.debug("Failed to authenticate since password does not match stored value");
        throw new BadCredentialsException(this.messages
                .getMessage("AbstractUserDetailsAuthenticationProvider.badCredentials", "Bad credentials"));
    }
}
6.如果比较通过之后则会返回一个Authentication对象,其实也就是Authentication对象的子类UsernamePasswordAuthenticationToken对象
@Override
public Authentication authenticate(Authentication authentication) throws AuthenticationException {
    // 此处省略了代码
    ...
    return createSuccessAuthentication(principalToReturn, authentication, user);
}


createSuccessAuthentication方法:

protected Authentication createSuccessAuthentication(Object principal, Authentication authentication,
        UserDetails user) {
    // Ensure we return the original credentials the user supplied,
    // so subsequent attempts are successful even with encoded passwords.
    // Also ensure we return the original getDetails(), so that future
    // authentication events after cache expiry contain the details
    UsernamePasswordAuthenticationToken result = UsernamePasswordAuthenticationToken.authenticated(principal,
            authentication.getCredentials(), this.authoritiesMapper.mapAuthorities(user.getAuthorities()));
    result.setDetails(authentication.getDetails());
    this.logger.debug("Authenticated user");
    return result;
}
通过上面的分析可以看出来,spring security默认的认证是通过读取本地的用户名和密码来进行登陆的,与我们想要实现的功能不符,我们需要的是通过读取数据库中的用户名和密码来进行登陆。所以这边需要我们自己来实现上面流程中的获取用户信息服务的UserDetailService接口从其中获取用户的信息。
--------------------------
自定义认证的两个重要接口UserDetailService和PasswordEncoder
UserDetailService接口:查数据库中用户名和密码的过程.
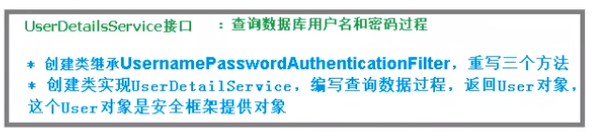
PasswordEncoder接口:

3.web权限方案
3.1 认证
1.配置文件认证和配置类认证(了解)
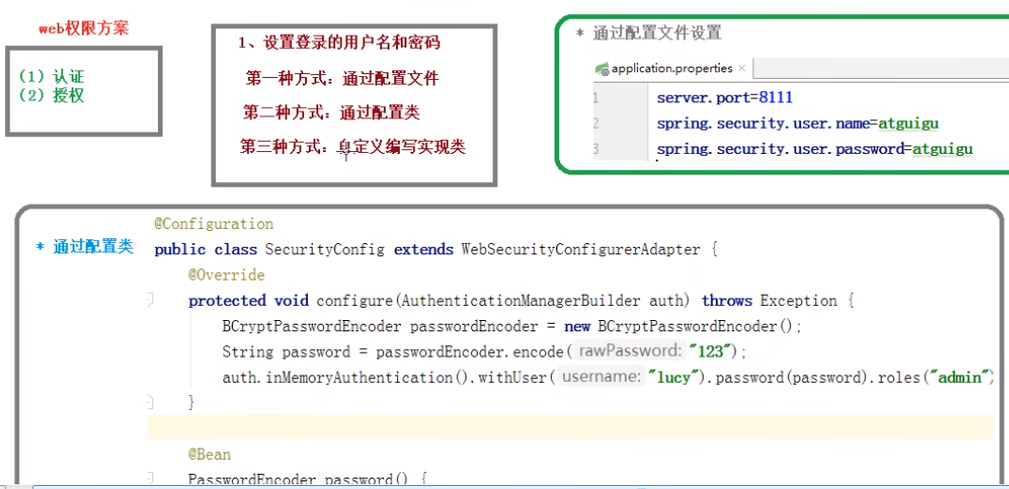
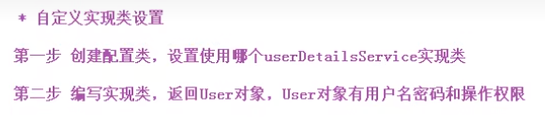
2. 自定义实现类的认证(从数据库中比对用户名和密码)
Sceurity在认证过程中,首先找配置文件和配置类中设置的用户名和密码,如果都没有就会找UserDetailService接口,所以编写UserDetailService的实现类。
自定义实现第一种: 从userDetailsService接口自定义
@Configuration
public class SpringSecurityConfig extends WebSecurityConfigurerAdapter {
    @Autowired
    private UserDetailsService userDetailsService;

    @Override
    protected void configure(AuthenticationManagerBuilder auth) throws Exception {
        //改变认证从自定义的userDetailsService类中,进行
        auth.userDetailsService(userDetailsService).passwordEncoder(password());
    }
    @Bean
    public PasswordEncoder password(){
        return  new BCryptPasswordEncoder();
    }
}

//SpringSecurity5.7后 WebSecurityConfigurerAdapter 被划横线(不建议使用),之后不用这样配置,转向更方便的过滤器链的HttpSecurity设置
//https://blog.csdn.net/qq_41340258/article/details/125138902
自定义的userDetailsService,进行查库验证。
@Service("UserDetailsService")
public class MyUserDetailsService implements UserDetailsService {
    @Override
    public UserDetails loadUserByUsername(String username) throws UsernameNotFoundException {
        //返回UserDetails接口,我们必须写一个UserDetails的实现类返回,或者用框架已经写好的User类
        //1.从数据库中查询用户名信息及权限 2.封装成UserDetails数据返回

        //1)模拟权限(这里也可以把角色一同放上,但是角色必须是ROLE_role1,这样模板通过hasRole('role1')能识别出)
        List<GrantedAuthority> auths = AuthorityUtils.commaSeparatedStringToAuthorityList("admin");
        //2)模拟用户信息
        //org.springframework.security.core.userdetails.User;
        User user = new User("用户名",new BCryptPasswordEncoder().encode("密码"),auths);
        return user;
    }
}
上面的例子,没有真正的去查数据库,但是大家应该都能看懂,只要在MyUserDetailsService类中引入查询数据库的XXXMapper,传入username即可查询数据库。
自定义实现第二种: 从这个AuthenticationProvider接口就开始自定义
@Configuration
@EnableWebSecurity
@EnableGlobalMethodSecurity(prePostEnabled = true, securedEnabled = true)
public class WebSecurityConfig extends WebSecurityConfigurerAdapter {

    @Override
    protected void configure(AuthenticationManagerBuilder auth) {
        auth.authenticationProvider(new CustomAuthenticationProvider(new UserDetailServiceImpl()));
    }

}
然后,实现CustomAuthenticationProvider类。
/**
 * 自定义验证
 */
@Component
public class CustomAuthenticationProvider implements AuthenticationProvider {

    private UserDetailServiceImpl userDetailsService;

    public CustomAuthenticationProvider(UserDetailServiceImpl userDetailsService) {
        this.userDetailsService = userDetailsService;
    }

    @Override
    public Authentication authenticate(Authentication authentication) throws AuthenticationException {
        String name = authentication.getPrincipal().toString();
        String password = authentication.getCredentials().toString();

        //以下自定义方法,判断是否登录成功
        LoginUserVo userDetails = (LoginUserVo) userDetailsService.loadUserByUsername(name);
        if (ObjectUtil.isNull(userDetails)) {
            throw new CrmebException("用户名不存在");
        }
        // base64加密获取真正密码
        String encryptPassword = CrmebUtil.encryptPassword(password, name);
        if (!userDetails.getUser().getPwd().equals(encryptPassword)) {
            throw new CrmebException("账号或者密码不正确");
        }
        return new UsernamePasswordAuthenticationToken(userDetails, password, userDetails.getAuthorities());
    }

    @Override
    public boolean supports(Class<?> authentication) {
        //确保authentication能转成该类
        return authentication.equals(UsernamePasswordAuthenticationToken.class);
    }

}
之后的操作又和上面自定义实现第一种方式一致。
现在可以查数据库了,我们再讨论下一个问题:
我们不想使用SpringSecrity提供的登录页面,自己定义登录页:还是在WebSecurityConfigurerAdapter 接口的配置类中,重写另一个configure方法配置。
    @Override
    protected void configure(HttpSecurity http) throws Exception {
        http.formLogin() //自定义自己编写的登录页
        .loginPage("login.html")  //登录页设置
        .loginProcessingUrl("/user/login") //登录处理路径(不用真正写)
                .defaultSuccessUrl("/welcome").permitAll() //登录成功跳转路径
                .and().authorizeHttpRequests().antMatchers("/","/user/login").permitAll() //直接访问,无需认证
                .anyRequest().authenticated() //其余任何请求需要认证
                .and().csrf().disable();//关闭csrf防护
    }
3.2授权
1.在WebSecurityConfigurerAdapter 接口的配置类中configure方法配置。
    @Override
    protected void configure(HttpSecurity http) throws Exception {
        http.formLogin() //自定义自己编写的登录页
        .loginPage("login.html")  //登录页设置
        .loginProcessingUrl("/user/login") //登录处理路径(不用真正写)
                .defaultSuccessUrl("/welcome").permitAll() //登录成功跳转路径
                .and().authorizeHttpRequests()
                    .antMatchers("/","/user/login").permitAll() //直接访问,无需认证
                    .antMatchers("/test/index").hasAnyAuthority("admin,manage")//权限访问路径
                    .antMatchers("test/sale").hasAnyRole("sale")//角色访问路径
                    .anyRequest().authenticated() //其余任何请求需要认证
                .and().csrf().disable();//关闭csrf防护
    }
2.数据库查找用户权限角色的时候的设置
@Service("UserDetailsService")
public class MyUserDetailsService implements UserDetailsService {
    @Override
    public UserDetails loadUserByUsername(String username) throws UsernameNotFoundException {
        //返回UserDetails接口,我们必须写一个UserDetails的实现类返回,或者用框架已经写好的User类
        //1.从数据库中查询用户名信息及权限 2.封装成UserDetails数据返回

        //1)模拟权限
        List<GrantedAuthority> auths = AuthorityUtils.commaSeparatedStringToAuthorityList("admin,manage,ROLE_sale");
        //2)模拟用户信息
        //org.springframework.security.core.userdetails.User;
        User user = new User("用户名",new BCryptPasswordEncoder().encode("密码"),auths);

        return user;
    }
}
4.JWT登录实现
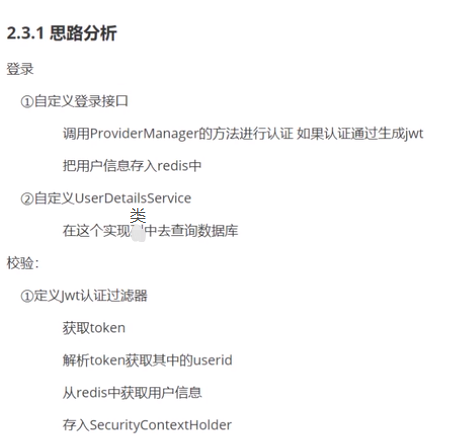
登录接口
接下来需要自定义登录接口,然后让SpringSecurity对这个接口放行,让用户
访问这个接口的时候不用登录也能访问,
在接口中我们通过AuthenticationManager的authenticate方法来进行用户认证
所以需要在SecurityConfig中配置把AuthenticationManager注入容器。
认证成功的话要生成一个jwt,放入响应中返回,并且为了用户下回请求是能通过
jwt识别出具体是哪位用户,我们需要把用户信息存入redis,可以把用户id作为key
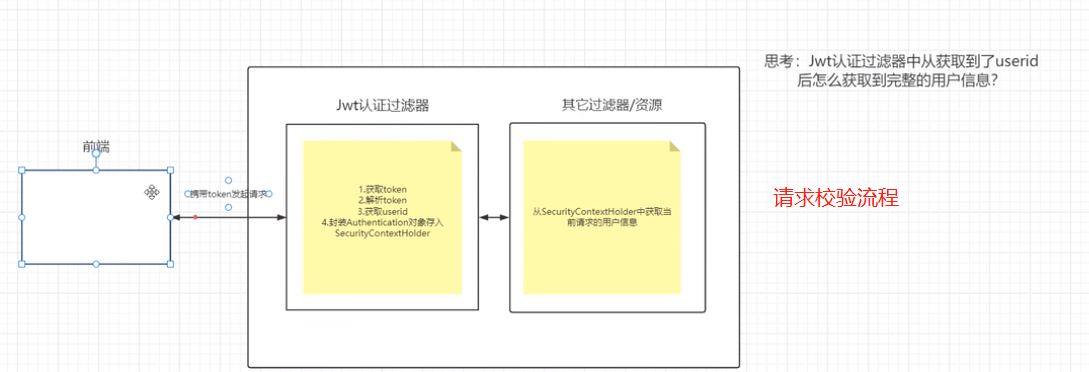
注意:过滤器链,如果jwt异常的话就放行,让springSecruity后面的过滤去处理判断,最后加一个return,因为这个有点像递归,返回的时候接着执行,所以return,让请求返回的时候不往下执行.
登录代码:
   /**
     * 自定义登录验证
     *
     * @param username 用户名
     * @param password 密码
     * @param code 验证码
     * @param uuid 唯一标识
     * @return 结果
     */
    public String login(String username, String password, String code, String uuid)
    {
        // 验证码校验
        validateCaptcha(username, code, uuid);
        // 登录前置校验
        loginPreCheck(username, password);
        // 用户验证
        Authentication authentication = null;
        try
        {
            UsernamePasswordAuthenticationToken authenticationToken = new UsernamePasswordAuthenticationToken(username, password);
            AuthenticationContextHolder.setContext(authenticationToken); //把认证信息存入ThreadLocal
            // 该方法会去调用UserDetailsServiceImpl.loadUserByUsername
            authentication = authenticationManager.authenticate(authenticationToken);
        }
        catch (Exception e)
        {
            if (e instanceof BadCredentialsException)
            {
                AsyncManager.me().execute(AsyncFactory.recordLogininfor(username, Constants.LOGIN_FAIL, MessageUtils.message("user.password.not.match")));
                throw new UserPasswordNotMatchException();
            }
            else
            {
                AsyncManager.me().execute(AsyncFactory.recordLogininfor(username, Constants.LOGIN_FAIL, e.getMessage()));
                throw new ServiceException(e.getMessage());
            }
        }
        finally
        {
            AuthenticationContextHolder.clearContext(); //请求完,请求没注销,要收回线程池是,删除原来存的认证信息,防止下一个请求携带旧值
        }
        AsyncManager.me().execute(AsyncFactory.recordLogininfor(username, Constants.LOGIN_SUCCESS, MessageUtils.message("user.login.success")));
        LoginUser loginUser = (LoginUser) authentication.getPrincipal();
        recordLoginInfo(loginUser.getUserId());
        // 生成token
        return tokenService.createToken(loginUser);
    }
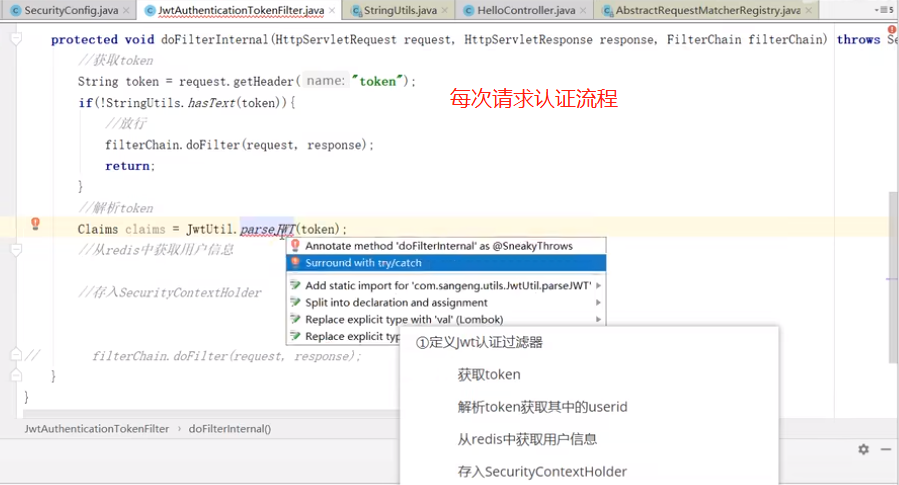
jwt校验代码:
/**
 * token过滤器 验证token有效性
 * 如果解析了token,并正确了把authenticationToken存到SecurityContextHolder进入下一个过滤器,
 * 如果没验证对,直接进入下一个过滤器,由最后的过滤器去验证SecurityContextHolder是否有认证信息。
 * @author ruoyi
 */
@Component
public class JwtAuthenticationTokenFilter extends OncePerRequestFilter
{
    @Autowired
    private TokenService tokenService;

    @Override
    protected void doFilterInternal(HttpServletRequest request, HttpServletResponse response, FilterChain chain)
            throws ServletException, IOException
    {
        LoginUser loginUser = tokenService.getLoginUser(request);
        if (StringUtils.isNotNull(loginUser) && StringUtils.isNull(SecurityUtils.getAuthentication()))
        {
            tokenService.verifyToken(loginUser);
            UsernamePasswordAuthenticationToken authenticationToken = new UsernamePasswordAuthenticationToken(loginUser, null, loginUser.getAuthorities());
            authenticationToken.setDetails(new WebAuthenticationDetailsSource().buildDetails(request));
            SecurityContextHolder.getContext().setAuthentication(authenticationToken);
        }
        chain.doFilter(request, response);
    }
}
新的配置(WebSecurityConfigurerAdapter已废弃):https://www.cnblogs.com/fps2tao/p/17409309.html
转:
https://www.cnblogs.com/mcj123/p/16913515.html
https://www.cnblogs.com/crazymakercircle/p/14488160.html
https://www.cnblogs.com/mcj123/p/16913515.html
spring security的xml配置: https://www.w3cschool.cn/springsecurity/fyc61ii5.html
jwt 登录: https://blog.csdn.net/weixin_46073538/article/details/125547484

 浙公网安备 33010602011771号