【Java系列-2】多线程的实现及源码深入
一、多线程的实现方式
多线程的3种启动方式相信都有听说过:
1.继承Thread类: 重写run()方法,直接threadClass.start()方法启动。
2.实现Runnable接口:重写run()方法,new Thead(runnableClass).start()方法启动。
3.实现Callable接口:重写call方法,new Thread(new FutureTask<T>(callableClass)).start()方法启动。
简单总结如下:
1.3种实现如上。
2.推荐使用Runnable接口的方法实现,可以避免继承Thread类的单继承局限,也可以避免callable接口的复杂。
3.虽然有多种方法,但是启动多线程的方法只有一个,通过thread类的start()方法,因为start()方法本质是实现原生操作系统的start0()方法。
4.Runnable接口实现比Thread类实现可以更好的体现数据共享的概念。
下面是详细的总结:
1.1 多线程实现
范例1-1:定义一个线程操作:继承Thread类
since JDK1.0
java.lang.Thread类的定义如下:public class Thread implements Runnable{}
|
class MyThread extends Thread { // 这就是一个多线程的操作类 private String name ; // 定义类中的属性 public MyThread(String name) { // 定义构造方法 this.name = name ; } @Override public void run() { // 覆写run()方法,作为线程的主操作方法 for (int x = 0 ; x < 200 ; x ++) { System.out.println(this.name + " --> " + x); } } } |
范例1-2:启动多线程:thread.start()
|
public class TestDemo { // 主类 public static void main(String[] args) { MyThread mt1 = new MyThread("线程A") ; // 实例化多线程类对象 MyThread mt2 = new MyThread("线程B") ; // 实例化多线程类对象 MyThread mt3 = new MyThread("线程C") ; // 实例化多线程类对象 mt1.start(); // 启动多线程 mt2.start(); // 启动多线程 mt3.start(); // 启动多线程 } } |
范例1-3:start()方法的源代码。
观察源码可以发现:
1.start方法会抛出异常:Runtime异常--IllegalThreadStateException();一个线程已经调用start方法后,再次调用就会抛出这个异常。
2.start0()方法:start()方法实际调用的是start0()方法,而start0()方法是原生的操作系统方法。由于线程的启动需要牵扯到系统的资源分配问题,所以具体的线程的实现在不同的操作系统上实际是不同的,但是JVM可以通过start0()方法可以实现在不同操作系统上进行资源的分配。
结论:只有Thread类的start()方法才能够进行操作系统的资源分配,所以启动多线程的方式永远都是调用thread类的start()方法。
|
public synchronized void start() {//start方法是同步的 if (threadStatus != 0) throw new IllegalThreadStateException(); group.add(this); boolean started = false; try { start0(); started = true; } finally { try { if (!started) { group.threadStartFailed(this); } } catch (Throwable ignore) { } } } private native void start0();//操作系统原生的方法 关于native关键字的解释查看如下文章: https://www.cnblogs.com/b3051/p/7484501.html |
范例1-4:使用Runnable实现多线程:实现Runnable接口
Runnable接口的源码:@FunctionalInterface标记在接口上,“函数式接口”是指仅仅只包含一个抽象方法的接口。
@FunctionalInterface
public interface Runnable {
public abstract void run();
}
|
class MyThread implements Runnable { // 定义线程主体类 private String name; // 定义类中的属性 public MyThread(String name) { // 定义构造方法 this.name = name; } @Override public void run() { // 覆写run()方法 for (int x = 0; x < 200; x++) { System.out.println(this.name + " --> " + x); } } } |
范例1-5:利用Thread类启动多线程:由1.3可以知道,启动多线程只能通过Thread类的start()方法。
Thead类的构造方法,参数是Runnable类型:public Thread(Runnable target) { init(null, target, "Thread-" + nextThreadNum(), 0);}
因此可以通过匿名函数启动多线程(继承Runnable接口):
new Thread(new Runnable() {
public void run() {
System.out.println("Good");}
}).start(); // 利用Thread启动多线程
|
public class TestDemo { public static void main(String[] args) { MyThread mt1 = new MyThread("线程A") ; // 实例化多线程类对象 MyThread mt2 = new MyThread("线程B") ; // 实例化多线程类对象 MyThread mt3 = new MyThread("线程C") ; // 实例化多线程类对象 new Thread(mt1).start(); // 利用Thread启动多线程 new Thread(mt2).start(); // 利用Thread启动多线程 new Thread(mt3).start(); // 利用Thread启动多线程 } } |
范例1-6:使用Lamda表达式实现多线程:函数式接口的特性
|
public class TestDemo { public static void main(String[] args) { String name = "线程对象" ; new Thread(() -> { for (int x = 0; x < 200; x++) { System.out.println(name + " --> " + x); } }).start();; } } |
面试题:多线程的实现2种(先不说Callable接口)的实现和区别
1.继承Thread类:public class Thread implements Runnable{public synchronized void start() }
2.实现Runnable接口:public interface Runnable {public abstract void run();}
3.Runnable实现的多线程比Thread类实现的多线程更好的体现数据共享的概念(卖票程序体现)
4.推荐一定使用Runnable接口实现,可以避免多继承。
范例1-7:通过继承Thread类实现卖票程序。
|
package com.yootk.demo; class MyThread extends Thread { // 线程的主体类 private int ticket = 5; // 一共5张票 @Override public void run() { // 线程的主方法 for (int x = 0; x < 50; x++) { // 循环50次 if (this.ticket > 0) { System.out.println("卖票,ticket = " + this.ticket --); } } } } public class TestDemo { public static void main(String[] args) throws Exception { MyThread mt1 = new MyThread() ; // 创建线程对象 MyThread mt2 = new MyThread() ; // 创建线程对象 MyThread mt3 = new MyThread() ; // 创建线程对象 mt1.start() ; // 启动线程 mt2.start() ; // 启动线程 mt3.start() ; // 启动线程 } } //3个线程各自都有ticket=5的引用 卖票,ticket = 1 |
范例1-8:利用Runnable接口来实现多线程。
|
package com.yootk.demo; class MyThread implements Runnable { // 线程的主体类 private int ticket = 5; // 一共5张票 @Override public void run() { // 线程的主方法 for (int x = 0; x < 50; x++) { // 循环50次 if (this.ticket > 0) { System.out.println("卖票,ticket = " + this.ticket --); } } } } public class TestDemo { public static void main(String[] args) throws Exception { MyThread mt = new MyThread(); // 创建线程对象 new Thread(mt).start() ; // 启动线程 new Thread(mt).start() ; // 启动线程 new Thread(mt).start() ; // 启动线程 } } 输出: 卖票,ticket = 5 |
范例1-9:使用Thread类实现数据共享的概念。
|
package com.yootk.demo; class MyThread extends Thread { // 线程的主体类 private int ticket = 5; // 一共5张票 @Override public void run() { // 线程的主方法 for (int x = 0; x < 50; x++) { // 循环50次 if (this.ticket > 0) { System.out.println("卖票,ticket = " + this.ticket --); } } } } public class TestDemo { public static void main(String[] args) throws Exception { MyThread mt = new MyThread(); // 创建线程对象 new Thread(mt).start() ; // 启动线程 new Thread(mt).start() ; // 启动线程 new Thread(mt).start() ; // 启动线程 } } //3个线程对象占据一个mt对象(指向一个ticket) |
范例1-10:启动多线程:实现callable接口,先定义一个线程主体类。
|
import java.util.concurrent.Callable; class MyThread implements Callable<String> { // 多线程主体类 private int ticket = 10; // 卖票 @Override public String call() throws Exception { for (int x = 0; x < 100; x++) { if (this.ticket > 0) { // 还有票可以出售 System.out.println("卖票,ticket = " + this.ticket--); } } return "票已卖光!"; // 返回结果 } } |
范例1-11:启动多线程:实现callable接口
Since JDK1.5: java.util.concurrent.Callable接口---函数式接口,只有一个call方法
@FunctionalInterface
public interface Callable<V> {
V call() throws Exception;
}
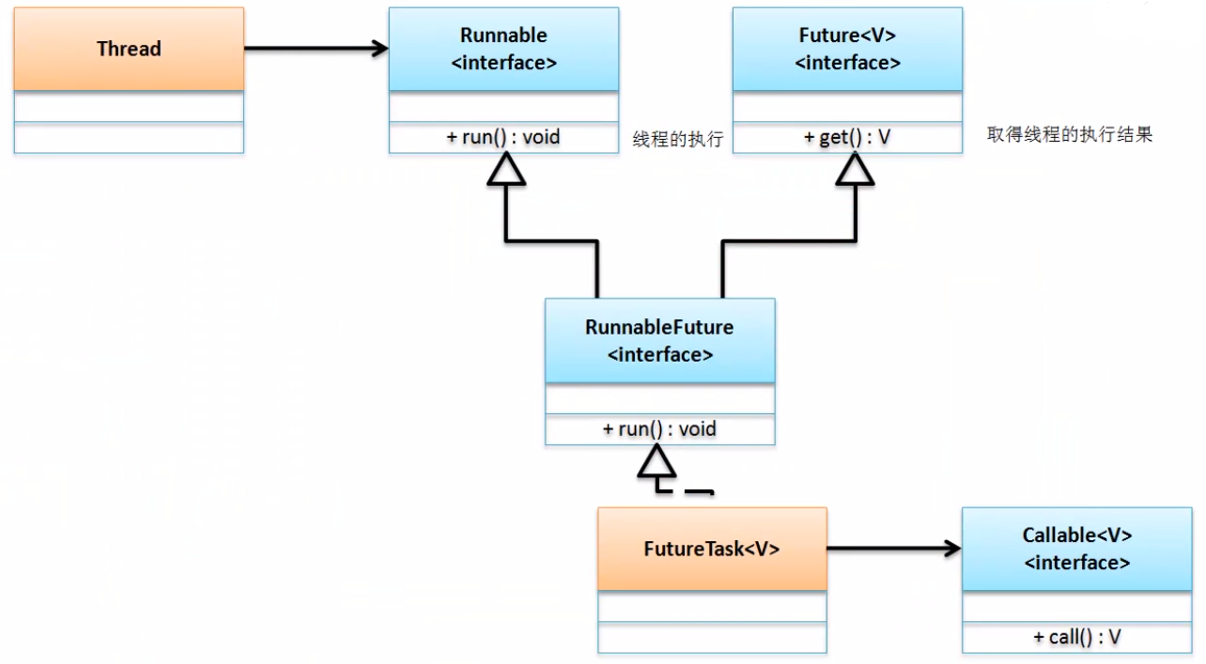
但是Thread类中并没有定义接受callable的构造函数,实现runnable接口的多线程的启动方式是通过FutureTask如下:new Thread(new FutureTask<String>(mt1)).start();
public interface Runnable {public abstract void run();}
public interface Future<V> {V get() throws InterruptedException, ExecutionException;}
public interface RunnableFuture<V> extends Runnable, Future<V> {void run();}
public interface Callable<V> {V call() throws Exception;}
public class FutureTask<V> implements RunnableFuture<V>{}
public FutureTask(Callable<V> callable)
public FutureTask(Runnable runnable, V result) {}
|
public class TestDemo { public static void main(String[] args) throws Exception { MyThread mt1 = new MyThread(); // 实例化多线程对象 MyThread mt2 = new MyThread(); // 实例化多线程对象 FutureTask<String> task1 = new FutureTask<String>(mt1) ; FutureTask<String> task2 = new FutureTask<String>(mt2) ; // FutureTask是Runnable接口子类,所以可以使用Thread类的构造来接收task对象 new Thread(task1).start(); // 启动第一个线程 new Thread(task2).start(); // 启动第二个线程 // 多线程执行完毕后可以取得内容,依靠FutureTask的父接口Future中的get()方法实现 System.out.println("A线程的返回结果:" + task1.get()); System.out.println("B线程的返回结果:" + task2.get()); } } |
1.2 多线程常用操作方法
范例1-12:观察线程的命名:public Thread(Runnable target, String Threadname) {}
|
package com.yootk.demo; class MyThread implements Runnable { @Override public void run() { System.out.println(Thread.currentThread().getName()); } } public class TestDemo { public static void main(String[] args) throws Exception { MyThread mt = new MyThread(); new Thread(mt, "自己的线程A").start(); new Thread(mt).start(); new Thread(mt, "自己的线程B").start(); new Thread(mt).start(); new Thread(mt).start(); } } |
范例1-13:取得线程名字:Thread.currentThread().getName()
|
package com.yootk.demo; class MyThread implements Runnable { @Override public void run() { System.out.println(Thread.currentThread().getName()); } } public class TestDemo { public static void main(String[] args) throws Exception { MyThread mt = new MyThread(); new Thread(mt, "自己的线程对象").start(); mt.run(); // 直接调用run()方法,main } } |
范例1-14:观察休眠特点。
|
package com.yootk.demo; class MyThread implements Runnable { @Override public void run() { for (int x = 0; x < 10000; x++) { try { Thread.sleep(1000); // 每次执行休眠1s } catch (InterruptedException e) { e.printStackTrace(); } System.out.println(Thread.currentThread().getName() + ",x = " + x); } } } public class TestDemo { public static void main(String[] args) throws Exception { MyThread mt = new MyThread(); new Thread(mt, "自己的线程对象A").start(); } } |
范例1-15:设置线程优先级:public final void setPriority(int newPriority) MAX_PRIORITY=10 |MIN_PRIORITY=1|NORM_PRIORITY =5
|
package com.yootk.demo; class MyThread implements Runnable { @Override public void run() { for (int x = 0; x < 20; x++) { try { Thread.sleep(100); } catch (InterruptedException e) { e.printStackTrace(); } System.out.println(Thread.currentThread().getName() + ",x = " + x); } } } public class TestDemo { public static void main(String[] args) throws Exception { MyThread mt = new MyThread(); Thread t1 = new Thread(mt, "自己的线程对象A"); Thread t2 = new Thread(mt, "自己的线程对象B"); Thread t3 = new Thread(mt, "自己的线程对象C"); T3.setPriority(Thread.MAX_PRIORITY); // 修改一个线程对象的优先级 t1.start(); t2.start(); t3.start(); } } |
范例1-16:主方法优先级:5
|
public class TestDemo { public static void main(String[] args) throws Exception { System.out.println(Thread.currentThread().getPriority()); } } //5 |
范例1-17:观察非同步情况下的操作。
|
package com.yootk.demo; class MyThread implements Runnable { private int ticket = 5; // 一共有5张票 @Override public void run() { for (int x = 0; x < 20; x++) { if (this.ticket > 0) { // 判断当前是否还有剩余票 try { Thread.sleep(100); // 休眠1s,模拟延迟 } catch (InterruptedException e) { e.printStackTrace(); } System.out.println(Thread.currentThread().getName() + " 卖票,ticket = " + this.ticket--); } } } } public class TestDemo { public static void main(String[] args) throws Exception { MyThread mt = new MyThread(); new Thread(mt, "票贩子A").start(); // 启动多线程 new Thread(mt, "票贩子B").start(); // 启动多线程 new Thread(mt, "票贩子C").start(); // 启动多线程 new Thread(mt, "票贩子D").start(); // 启动多线程 } } |
范例1-18:观察同步块:synchronized
|
package com.yootk.demo; class MyThread implements Runnable { private int ticket = 5; // 一共有5张票 @Override public void run() { for (int x = 0; x < 20; x++) { synchronized(this) { // 定义同步代码块 if (this.ticket > 0) { // 判断当前是否还有剩余票 try { Thread.sleep(100); // 休眠1s,模拟延迟 } catch (InterruptedException e) { e.printStackTrace(); } System.out.println(Thread.currentThread().getName() + " 卖票,ticket = " + this.ticket--); } } } } } public class TestDemo { public static void main(String[] args) throws Exception { MyThread mt = new MyThread(); new Thread(mt, "票贩子A").start(); // 启动多线程 new Thread(mt, "票贩子B").start(); // 启动多线程 new Thread(mt, "票贩子C").start(); // 启动多线程 new Thread(mt, "票贩子D").start(); // 启动多线程 } } |
范例1-19:使用同步方法解决问题。
|
package com.yootk.demo; class MyThread implements Runnable { private int ticket = 5; // 一共有5张票 @Override public void run() { for (int x = 0; x < 20; x++) { this.sale(); // 卖票操作 } } public synchronized void sale() { // 同步方法 if (this.ticket > 0) { // 判断当前是否还有剩余票 try { Thread.sleep(100); // 休眠1s,模拟延迟 } catch (InterruptedException e) { e.printStackTrace(); } System.out.println(Thread.currentThread().getName() + " 卖票,ticket = " + this.ticket--); } } } public class TestDemo { public static void main(String[] args) throws Exception { MyThread mt = new MyThread(); new Thread(mt, "票贩子A").start(); // 启动多线程 new Thread(mt, "票贩子B").start(); // 启动多线程 new Thread(mt, "票贩子C").start(); // 启动多线程 new Thread(mt, "票贩子D").start(); // 启动多线程 } } |
范例1-20:程序死锁操作。
|
package com.yootk.demo; class A { public synchronized void say(B b) { System.out.println("A先生说:把你的本给我,我给你笔,否则不给!"); b.get(); } public synchronized void get() { System.out.println("A先生:得到了本,付出了笔,还是什么都干不了!"); } } class B { public synchronized void say(A a) { System.out.println("B先生说:把你的笔给我,我给你本,否则不给!"); a.get(); } public synchronized void get() { System.out.println("B先生:得到了笔,付出了本,还是什么都干不了!"); } } public class TestDemo implements Runnable { private static A a = new A(); // 定义类对象 private static B b = new B(); // 定义类对象 public static void main(String[] args) throws Exception { new TestDemo(); // 实例化本类对象 } public TestDemo() { // 构造方法 new Thread(this).start(); // 启动线程 b.say(a); // 互相引用 } @Override public void run() { a.say(b); // 互相引用 } } |
1.4 线程间的经典操作案例——生产者与消费者案例
范例1-21:程序基本模型。
|
package com.yootk.demo; class Message { private String title ; // 保存信息的标题 private String content ; // 保存信息的内容 public void setTitle(String title) { this.title = title; } public void setContent(String content) { this.content = content; } public String getTitle() { return title; } public String getContent() { return content; } } class Producer implements Runnable { // 定义生产者 private Message msg = null ; public Producer(Message msg) { this.msg = msg ; } @Override public void run() { for (int x = 0; x < 50; x++) { // 生产50次数据 if (x % 2 == 0) { this.msg.setTitle("李兴华") ; // 设置title属性 try { Thread.sleep(100) ; // 延迟操作 } catch (InterruptedException e) { e.printStackTrace(); } this.msg.setContent("Java讲师") ; // 设置content属性 } else { this.msg.setTitle("mldn") ; // 设置title属性 try { Thread.sleep(100) ; } catch (InterruptedException e) { e.printStackTrace(); } this.msg.setContent("www.mldnjava.cn") ; // 设置content属性 } } } } class Consumer implements Runnable { // 定义消费者 private Message msg = null ; public Consumer (Message msg) { this.msg = msg ; } @Override public void run() { for (int x = 0; x < 50; x++) { // 取走50次数据 try { Thread.sleep(100) ; // 延迟 } catch (InterruptedException e) { e.printStackTrace(); } System.out.println(this.msg.getTitle() + " --> " + this.msg.getContent()); } } } public class TestDemo { public static void main(String[] args) throws Exception { Message msg = new Message() ; // 定义Message对象,用于保存和取出数据 new Thread(new Producer(msg)).start() ; // 启动生产者线程 new Thread(new Consumer(msg)).start() ; // 取得消费者线程 } } |
范例1-22:加入同步,解决数据错乱问题。
|
package com.yootk.demo; class Message { private String title ; // 保存信息的标题 private String content ; // 保存信息的内容 public synchronized void set(String title, String content) { this.title = title; try { Thread.sleep(200); } catch (InterruptedException e) { e.printStackTrace(); } this.content = content; } public synchronized void get() { try { Thread.sleep(100); } catch (InterruptedException e) { e.printStackTrace(); } System.out.println(this.title + " --> " + this.content); } // setter、getter略 } class Producer implements Runnable { // 定义生产者 private Message msg = null ; public Producer(Message msg) { this.msg = msg ; } @Override public void run() { for (int x = 0; x < 50; x++) { // 生产50次数据 if (x % 2 == 0) { this.msg.set("李兴华","Java讲师") ; // 设置属性 } else { this.msg.set("mldn","www.mldnjava.cn") ; // 设置属性 } } } } class Consumer implements Runnable { // 定义消费者 private Message msg = null ; public Consumer (Message msg) { this.msg = msg ; } @Override public void run() { for (int x = 0; x < 50; x++) { // 取走50次数据 this.msg.get() ; // 取得属性 } } } public class TestDemo { public static void main(String[] args) throws Exception { Message msg = new Message() ; // 定义Message对象,用于保存和取出数据 new Thread(new Producer(msg)).start() ; // 启动生产者线程 new Thread(new Consumer(msg)).start() ; // 取得消费者线程 } } |
范例1-23:解决程序问题。
|
class Message { private String title; private String content; private boolean flag = true; // flag == true:表示可以生产,但是不能取走 // flag == false:表示可以取走,但是不能生产 public synchronized void set(String title, String content) { if (this.flag == false) { // 已经生产过了,不能生产 try { super.wait(); // 等待 } catch (InterruptedException e) { e.printStackTrace(); } } this.title = title; try { Thread.sleep(200); } catch (InterruptedException e) { e.printStackTrace(); } this.content = content; this.flag = false; // 已经生产完成,修改标志位 super.notify(); // 唤醒等待线程 } public synchronized void get() { if (this.flag == true) { // 未生产,不能取走 try { super.wait(); // 等待 } catch (InterruptedException e) { e.printStackTrace(); } } try { Thread.sleep(100); } catch (InterruptedException e) { e.printStackTrace(); } System.out.println(this.title + " --> " + this.content); this.flag = true; // 已经取走了,可以继续生产 super.notify(); // 唤醒等待线程 } // setter、getter略 } |
1.5 线程的生命周期
范例1-24:停止线程运行。
|
package com.yootk.demo; class MyThread implements Runnable { private boolean flag = true; // 定义标志位属性 public void run() { // 覆写run()方法 int i = 0; while (this.flag) { // 循环输出 while (true) { System.out.println(Thread.currentThread().getName() + "运行,i = " + (i++)); // 输出当前线程名称 } } } public void stop() { // 编写停止方法 this.flag = false; // 修改标志位 } } public class StopDemo { public static void main(String[] args) { MyThread my = new MyThread(); // 实例化Runnable接口对象 Thread t = new Thread(my, "线程"); // 建立线程对象 t.start() ; // 启动线程 my.stop() ; // 线程停止,修改标志位 } } |

 浙公网安备 33010602011771号