SpringCloud案例准备+SCN第一代组件
1. 案例说明
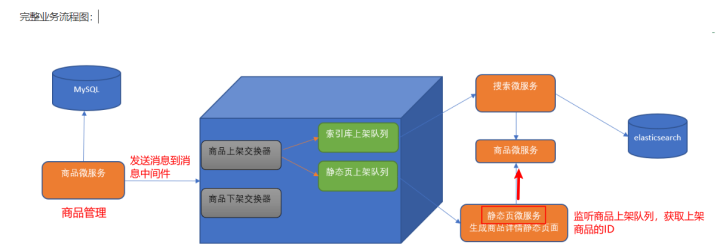
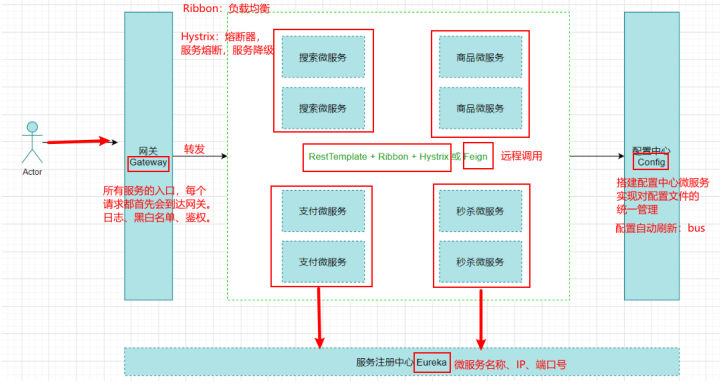
- 建立一个商品上架的微服务项目,当服务提供者上架新商品,返回商品ID给服务消费者
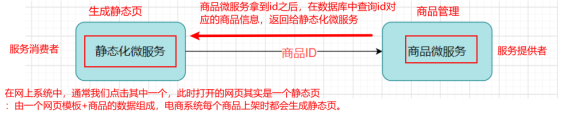
- 完整业务流程图:
1.1 案例数据库环境准备(使用Mysql 5.7.x)
CREATE TABLE products(
id INT PRIMARY KEY AUTO_INCREMENT,
NAME VARCHAR(50), #商品名称
price DOUBLE,
flag VARCHAR(2), #上架状态
goods_desc VARCHAR(100), #商品描述
images VARCHAR(400), #商品图片
goods_stock INT, #商品库存
goods_type VARCHAR(20) #商品类型
);

1.2 工程搭建

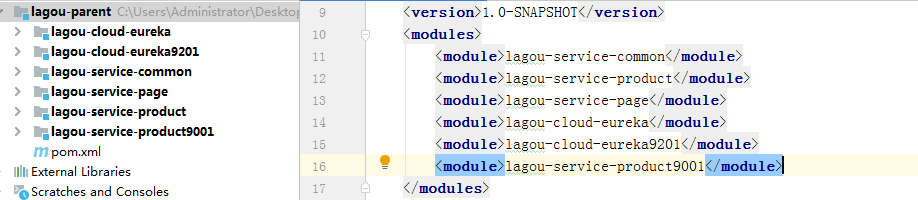
1.2.1 父工程 lagou-parent
- pom.xml
<?xml version="1.0" encoding="UTF-8"?>
<project xmlns="http://maven.apache.org/POM/4.0.0"
         xmlns:xsi="http://www.w3.org/2001/XMLSchema-instance"
         xsi:schemaLocation="http://maven.apache.org/POM/4.0.0 http://maven.apache.org/xsd/maven-4.0.0.xsd">
    <modelVersion>4.0.0</modelVersion>

    <groupId>org.example</groupId>
    <artifactId>lagou-parent</artifactId>
    <version>1.0-SNAPSHOT</version>
    <!--父工程打包方式-->
    <packaging>pom</packaging>
    <!--spring boot 父启动器依赖-->
    <parent>
        <groupId>org.springframework.boot</groupId>
        <artifactId>spring-boot-starter-parent</artifactId>
        <version>2.1.6.RELEASE</version>
    </parent>
    <dependencies>
        <!--web依赖-->
        <dependency>
            <groupId>org.springframework.boot</groupId>
            <artifactId>spring-boot-starter-web</artifactId>
        </dependency>
        <!--日志依赖-->
        <dependency>
            <groupId>org.springframework.boot</groupId>
            <artifactId>spring-boot-starter-logging</artifactId>
        </dependency>
        <!--测试依赖-->
        <dependency>
            <groupId>org.springframework.boot</groupId>
            <artifactId>spring-boot-starter-test</artifactId>
            <scope>test</scope>
        </dependency>
        <!--lombok工具-->
        <dependency>
            <groupId>org.projectlombok</groupId>
            <artifactId>lombok</artifactId>
            <version>1.18.4</version>
            <scope>provided</scope>
        </dependency>
        <!-- Actuator可以帮助你监控和管理Spring Boot应用-->
        <dependency>
            <groupId>org.springframework.boot</groupId>
            <artifactId>spring-boot-starter-actuator</artifactId>
        </dependency>
        <!--热部署-->
        <dependency>
            <groupId>org.springframework.boot</groupId>
            <artifactId>spring-boot-devtools</artifactId>
            <optional>true</optional>
        </dependency>
    </dependencies>
    <build>
        <plugins>
            <!--编译插件-->
            <plugin>
                <groupId>org.apache.maven.plugins</groupId>
                <artifactId>maven-compiler-plugin</artifactId>
                <configuration>
                    <source>11</source>
                    <target>11</target>
                    <encoding>utf-8</encoding>
                </configuration>
            </plugin>
            <!--打包插件-->
            <plugin>
                <groupId>org.springframework.boot</groupId>
                <artifactId>spring-boot-maven-plugin</artifactId>
                <executions>
                    <execution>
                        <goals>
                            <goal>repackage</goal>
                        </goals>
                    </execution>
                </executions>
            </plugin>
        </plugins>
    </build>

</project>
1.2.2 公共组件微服务
- pom.xml
<?xml version="1.0" encoding="UTF-8"?>
<project xmlns="http://maven.apache.org/POM/4.0.0"
         xmlns:xsi="http://www.w3.org/2001/XMLSchema-instance"
         xsi:schemaLocation="http://maven.apache.org/POM/4.0.0 http://maven.apache.org/xsd/maven-4.0.0.xsd">
    <parent>
        <artifactId>lagou-parent</artifactId>
        <groupId>org.example</groupId>
        <version>1.0-SNAPSHOT</version>
    </parent>
    <modelVersion>4.0.0</modelVersion>

    <artifactId>lagou-service-common</artifactId>
    <dependencies>
        <!-- 加强版的mybatis,让具体的Mapper接口继承BaseMapper即可完成相应功能-->
        <dependency>
            <groupId>com.baomidou</groupId>
            <artifactId>mybatis-plus-boot-starter</artifactId>
            <version>3.3.2</version>
        </dependency>
        <!--pojo持久化使用-->
        <dependency>
            <groupId>javax.persistence</groupId>
            <artifactId>javax.persistence-api</artifactId>
            <version>2.2</version>
        </dependency>
        <dependency>
            <groupId>mysql</groupId>
            <artifactId>mysql-connector-java</artifactId>
            <scope>runtime</scope>
        </dependency>
    </dependencies>

</project>
- 实体类
package entity;


import lombok.Data;

import javax.persistence.Id;
import javax.persistence.Table;

@Data //自动生成getSet方法
@Table(name = "products")//对应数据表名称
public class Products {

  @Id //标识主键
  private long id;
  private String name;
  private double price;
  private String flag;
  private String goodsDesc;
  private String images;
  private long goodsStock;
  private String goodsType;


}
1.2.3 商品微服务
- pom.xml
<?xml version="1.0" encoding="UTF-8"?>
<project xmlns="http://maven.apache.org/POM/4.0.0"
         xmlns:xsi="http://www.w3.org/2001/XMLSchema-instance"
         xsi:schemaLocation="http://maven.apache.org/POM/4.0.0 http://maven.apache.org/xsd/maven-4.0.0.xsd">
    <parent>
        <artifactId>lagou-parent</artifactId>
        <groupId>org.example</groupId>
        <version>1.0-SNAPSHOT</version>
    </parent>
    <modelVersion>4.0.0</modelVersion>

    <artifactId>lagou-service-product</artifactId>

    <dependencies>
        <dependency>
            <groupId>org.example</groupId>
            <artifactId>lagou-service-common</artifactId>
            <version>1.0-SNAPSHOT</version>
        </dependency>
    </dependencies>

</project>
- yml文件配置信息
server:
  port: 9000  # 后期该微服务多实例,9000(10个以内)
spring:
  application:
    name: lagou-service-product
  datasource:
    driver-class-name: com.mysql.jdbc.Driver
    url: jdbc:mysql://localhost:3306/smd?useUnicode=true&characterEncoding=utf8&serverTimezone=UTC
    username: root
    password: 123456
- mapper接口
package com.rf.mapper;

import com.baomidou.mybatisplus.core.mapper.BaseMapper;
import entity.Products;

/**
 * 现在使用的Mybatis-plus组件是Mybatis的加强版
 * 能够与SpringBoot进行非常友好的整合,对比Mybatis框架只有使用便捷的改变
 * 没有具体功能的改变
 * 具体使用:让具体的Mapper接口继承BaseMapper即可
 */
public interface ProductMapper extends BaseMapper<Products> {
}
- service开发
package com.rf.service;

import entity.Products;

public interface ProductService {
    /**
     * 根据ID查找商品
     * @param id
     * @return
     */
    public Products queryById(Integer id);
}


package com.rf.service.impl;

import com.rf.mapper.ProductMapper;
import com.rf.service.ProductService;
import entity.Products;
import org.springframework.beans.factory.annotation.Autowired;
import org.springframework.stereotype.Service;

@Service
public class ProductServiceImpl implements ProductService {
    @Autowired
    private ProductMapper productMapper;
    @Override
    public Products queryById(Integer id) {
        return productMapper.selectById(id);
    }
}
- controller开发
package com.rf.controller;

import com.rf.service.ProductService;
import entity.Products;
import org.springframework.beans.factory.annotation.Autowired;
import org.springframework.web.bind.annotation.GetMapping;
import org.springframework.web.bind.annotation.PathVariable;
import org.springframework.web.bind.annotation.RequestMapping;
import org.springframework.web.bind.annotation.RestController;

@RestController
@RequestMapping("/product")
public class ProductController {
    @Autowired
    private ProductService productService;
    @GetMapping("/query/{id}")
    public Products queryByID(@PathVariable Integer id){
        return productService.queryById(id);
    }
}
- 启动类
package com.rf;

import org.mybatis.spring.annotation.MapperScan;
import org.springframework.boot.SpringApplication;
import org.springframework.boot.autoconfigure.SpringBootApplication;

@SpringBootApplication
@MapperScan("com.rf.mapper")
public class ProductApplication {
    public static void main(String[] args) {
        SpringApplication.run(ProductApplication.class,args);
    }
}
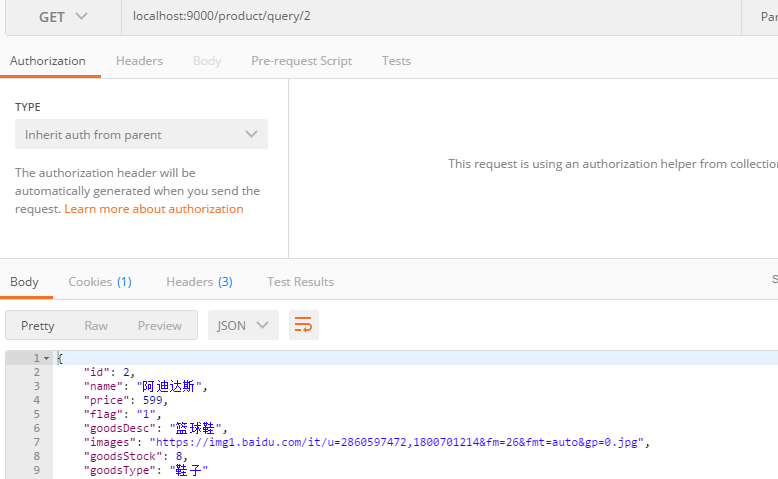
- 测试
1.2.4 页面静态微服务
- pom.xml
<?xml version="1.0" encoding="UTF-8"?>
<project xmlns="http://maven.apache.org/POM/4.0.0"
         xmlns:xsi="http://www.w3.org/2001/XMLSchema-instance"
         xsi:schemaLocation="http://maven.apache.org/POM/4.0.0 http://maven.apache.org/xsd/maven-4.0.0.xsd">
    <parent>
        <artifactId>lagou-parent</artifactId>
        <groupId>org.example</groupId>
        <version>1.0-SNAPSHOT</version>
    </parent>
    <modelVersion>4.0.0</modelVersion>

    <artifactId>lagou-service-page</artifactId>

    <dependencies>
        <dependency>
            <groupId>org.example</groupId>
            <artifactId>lagou-service-common</artifactId>
            <version>1.0-SNAPSHOT</version>
        </dependency>
    </dependencies>
</project>
- yml文件配置信息
server:
  port: 9100 # 后期该微服务多实例,端口从9100递增(10个以内)
spring:
  application:
    name: lagou-service-page
  datasource:
    driver-class-name: com.mysql.cj.jdbc.Driver
    url: jdbc:mysql://localhost:3306/smd?useUnicode=true&characterEncoding=utf8&serverTimezone=UTC
    username: root
    password: 123456
- 编写PageController,在PageController中调用商品微服务对应的URL
package com.rf.controller;

import entity.Products;
import org.springframework.beans.factory.annotation.Autowired;
import org.springframework.web.bind.annotation.PathVariable;
import org.springframework.web.bind.annotation.RequestMapping;
import org.springframework.web.bind.annotation.RestController;
import org.springframework.web.client.RestTemplate;

@RestController
@RequestMapping("/page")
public class PageController {
    @Autowired  //封装httpClient对象,执行HTTP请求
    private RestTemplate restTemplate;
    @RequestMapping("/getProduct/{id}")
    public Products getProduct(@PathVariable Integer id){
        String url ="http://localhost:9000/product/query/"; //URL地址硬编码
        Products products = restTemplate.getForObject(url + id, Products.class);
        return products;
    }

}
- 编写启动类,注入RestTemplate
package com;

import org.springframework.boot.SpringApplication;
import org.springframework.boot.autoconfigure.SpringBootApplication;
import org.springframework.context.annotation.Bean;
import org.springframework.web.client.RestTemplate;

@SpringBootApplication
public class PageApplication {
    @Bean  //封装httpClient对象,执行HTTP请求
    public RestTemplate restTemplate(){
        return new RestTemplate();
    }

    public static void main(String[] args) {
        SpringApplication.run(PageApplication.class,args);
    }
}
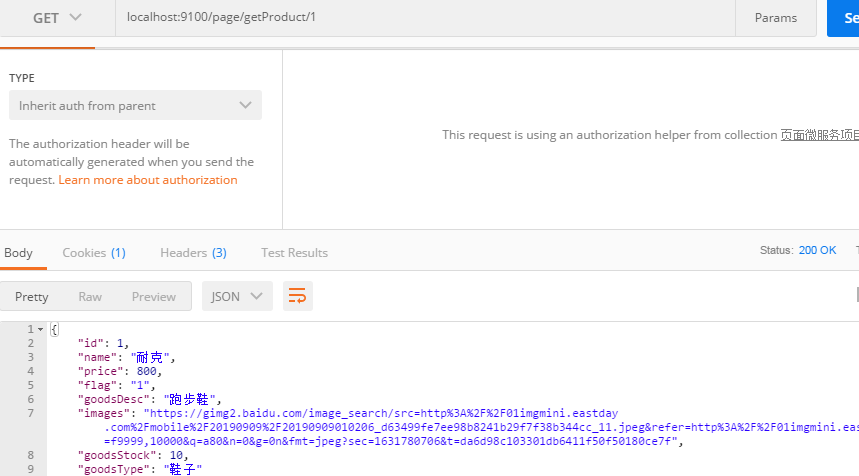
- 测试
1.3 存在问题与解决方案
- 在服务消费者中,我们把url地址硬编码到代码中,不方便后期维护===》服务管理:自动注册与发现、状态监管
- 服务提供者只有一个服务,即便服务提供者形成集群,服务消费者还需要自己实现负载均衡===》服务负载均衡
- 在服务消费者中,不清楚服务提供者的状态===》熔断机制
- 服务消费者调用服务提供者时候,如果出现故障能否及时发现不向用户抛出异常页面?===》远程过程调用
- RestTemplate这种请求调用方式是否还有优化空间?能不能类似于Dubbo那样玩?==-》网关拦截、路由转发
- 这么多的微服务统一认证如何实现?===》网关拦截、路由转发、统一认证
- 配置文件每次都修改好多个很麻烦!?===》集中式配置管理,配置信息实时自动更新
2. 第一代 Spring Cloud 核心组件
网关组件Zuul性能一般,未来将退出Spring Cloud 生态圈,把GateWay划分到第一代Spring Cloud 核心组件进行讲解
一个Feign=RestTemplate+Ribbon+Hystrix三个起到的作用
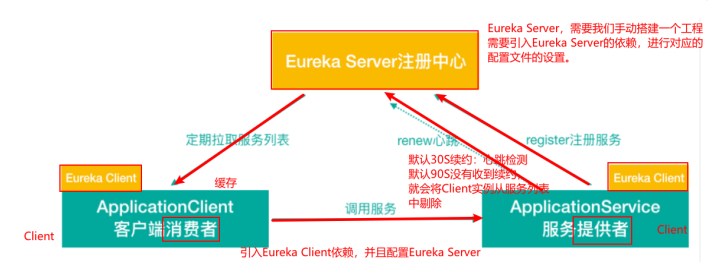
2.1 Eureka服务注册中心
- 服务注册中心
常见的服务注册中心包括Eureka、Nacos、Zookeeper、Consul
任何一个微服务原则上存在或支持多个服务提供者,为了支持弹性扩、缩容特性,服务提供者的数量和分布往往是动态变化的,需要引入服务注册中心管理微服务提供者的注册与发现
分布式微服务架构中,服务注册中心用于存储服务提供者地址信息、服务发布相关的属性信息,消费者通过主动查询和被动通知的方式获取服务提供者的地址信息,而不再需要通过硬编码方式得到提供者的地址信息。
消费者只需要知道当前系统发布了那些服务,而不需要知道服务具体存在于什么位置,这就是透明化路由。
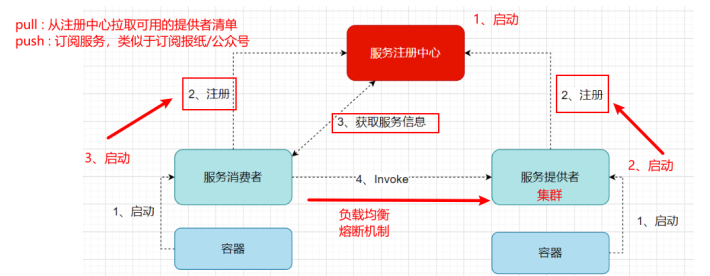
- 步骤:
- 服务注册中心启动,开启注册与发现功能
- 服务提供者启动,将相关服务信息主动注册到服务注册中心
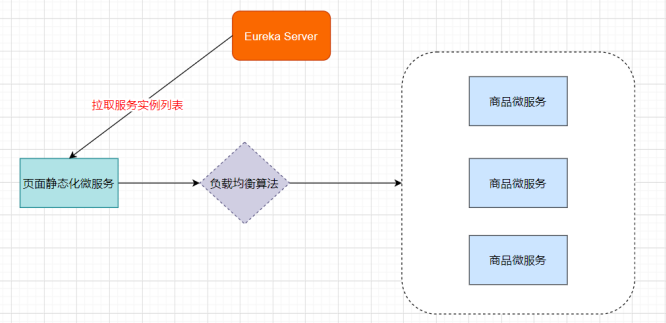
- 服务消费者启动,获取服务注册列表信息
- pull模式:服务消费者主动拉取可用的服务提供者清单
- push模式:服务消费者订阅服务,当服务提供者有变化时,服务注册中心主动推送更新后的服务清单给消费者
- 服务消费者直接调用服务提供者
- 服务注册中心每个30s进行心跳监测,完成服务提供者的健康监控,每隔90s进行剔除检测,当发现服务提供者失效时进行及时剔除
- 主流服务中心对比
- Zookeeper是一个分布式服务框架,是Apache Hadoop 的一个子项目,它主要是用来解决分布式应用中经常遇到的一些数据管理问题,如:统一命名服务、状态同步服务、集群管理、分布式应用配置项的管理等。
- 简单来说zookeeper本质 = 存储 + 监听通知。
- Zookeeper 用来做服务注册中心,主要是因为它具有节点变更通知功能,只要客户端监听相关服务节点,服务节点的所有变更,都能及时的通知到监听客户端,这样作为调用方只要使用
Zookeeper 的客户端就能实现服务节点的订阅和变更通知功能了,非常方便。 - 另外,Zookeeper可用性也可以,因为只要半数以上的选举节点存活,整个集群就是可用的,最少节点数为3。
- Eureka由Netflix开源,并被Pivatal集成到SpringCloud体系中,它是基于 RestfulAPI 风格开发的服务注册与发现组件。
- Consul是由HashiCorp基于Go语言开发的支持多数据中心分布式高可用的服务发布和注册服务软件, 采用Raft算法保证服务的一致性,且支持健康检查。
- Nacos是一个更易于构建云原生应用的动态服务发现、配置管理和服务管理平台。
- 简单来说Nacos 就是 注册中心 + 配置中心的组合,帮助我们解决微服务开发必会涉及到的服务注册与发现,服务配置,服务管理等问题。
- Nacos 是 Spring Cloud Alibaba 核心组件之一,负责服务注册与发现,还有配置
- Zookeeper是一个分布式服务框架,是Apache Hadoop 的一个子项目,它主要是用来解决分布式应用中经常遇到的一些数据管理问题,如:统一命名服务、状态同步服务、集群管理、分布式应用配置项的管理等。
| 组件名 | 语言 | CAP | 对外暴露接口 |
| Eureka | Java | AP(自我保护机制,保证可用) | HTTP |
| Consul | Go | CP | HTTP/DNS |
| Zookeeper | Java | CP | 客户端 |
| Nacos | Java | 支持AP/CP切换 | HTTP |
- CAP定理又称CAP原则,指的是在一个分布式系统中,Consistency(一致性)、 Availability(可用性)、Partition tolerance(分区容错性),最多只能同时三个特性中的两个,三者不可兼得。
- P:分区容错性:分布式系统在遇到某节点或网络分区故障的时候,仍然能够对外提供满足一致性或可用性的服务(一定的要满足的)
- C:数据一致性:all nodes see the same data at the same time
- A:高可用:Reads and writes always succeed
- Eureka架构
- Eureka交互流程
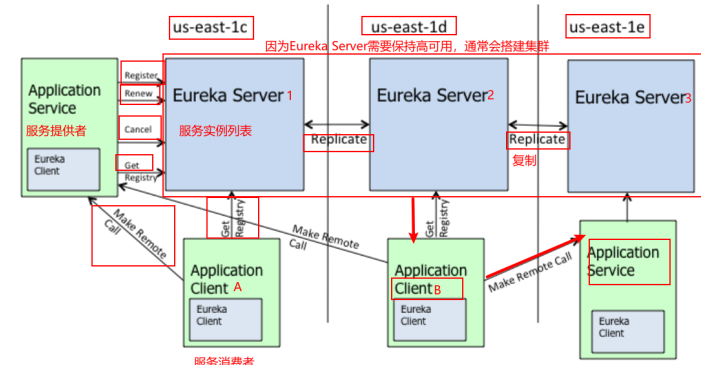
Eureka 包含两个组件:Eureka Server 和 Eureka Client,Eureka Client是一个Java客户端,用于简化与Eureka Server的交互;Eureka Server提供服务发现的能力,各个微服务启动时,会通过Eureka Client向Eureka Server 进行注册自己的信息(例如网络信息),Eureka Server会存储该服务的信息;
- 图中us-east-1c、us-east-1d,us-east-1e代表不同的区也就是不同的机房
- 图中每一个Eureka Server都是一个集群
- 图中Application Service作为服务提供者向Eureka Server中注册服务,Eureka Server接受到注册事件会在集群和分区中进行数据同步,Application Client作为消费端(服务消费者)可以从Eureka
Server中获取到服务注册信息,进行服务调用 - 微服务启动后,会周期性地向Eureka Server发送心跳(默认周期为30秒,默认Eureka Server90S会将还没有续约的给剔除)以续约自己的信息
- Eureka Server在一定时间内没有接收到某个微服务节点的心跳,Eureka Server将会注销该微服务节点(默认90秒)
- 每个Eureka Server同时也是Eureka Client,多个Eureka Server之间通过复制的方式完成服务注册列表的同步
- Eureka Client会缓存Eureka Server中的信息。即使所有的Eureka Server节点都宕掉,服务消费者依然可以使用缓存中的信息找到服务提供者(自我保护机制)
- Eureka通过心跳检测、健康检查和客户端缓存等机制,提高系统的灵活性、可伸缩性和高可用性。
- 搭建Eureka Server服务注册中心
- 搭建Eureka Server服务 lagou-cloud-eureka ,lagou-parent中引入Spring Cloud 依赖
<!--lagou-parent中引入Spring Cloud 依赖-->
    <dependencyManagement>
        <dependencies>
            <dependency>
                <groupId>org.springframework.cloud</groupId>
                <artifactId>spring-cloud-dependencies</artifactId>
                <version>Greenwich.RELEASE</version>
                <type>pom</type>
                <scope>import</scope>
            </dependency>
        </dependencies>
    </dependencyManagement>
- lagou-cloud-eureka工程pom.xml中引入依赖
<!--在父工程的pom文件中手动引入jaxb的jar,因为Jdk9之后默认没有加载该模块,Eureka Server使用到,所以需要手动导入,否则EurekaServer服务无法启动-->
        <!--引入Jaxb,开始-->
        <dependency>
            <groupId>com.sun.xml.bind</groupId>
            <artifactId>jaxb-core</artifactId>
            <version>2.2.11</version>
        </dependency>
        <dependency>
            <groupId>javax.xml.bind</groupId>
            <artifactId>jaxb-api</artifactId>
        </dependency>
        <dependency>
            <groupId>com.sun.xml.bind</groupId>
            <artifactId>jaxb-impl</artifactId>
            <version>2.2.11</version>
        </dependency>
        <dependency>
            <groupId>org.glassfish.jaxb</groupId>
            <artifactId>jaxb-runtime</artifactId>
            <version>2.2.10-b140310.1920</version>
        </dependency>
        <dependency>
            <groupId>javax.activation</groupId>
            <artifactId>activation</artifactId>
            <version>1.1.1</version>
        </dependency>
<dependencies>
        <!--Eureka server依赖-->
        <dependency>
            <groupId>org.springframework.cloud</groupId>
            <artifactId>spring-cloud-starter-netflix-eureka-server</artifactId>
        </dependency>
    </dependencies>
- 在yml文件中配置Eureka server服务端口,服务名等信息
#Eureka server服务端口 server: port: 9200 spring: application: name: lagou-cloud-eureka-server # 应用名称,会在Eureka中作为服务的id标识 (serviceId) eureka: instance: hostname: localhost client: service-url: # 客户端与EurekaServer交互的地址,如果是集群,也需要写其它Server的地址 defaultZone: http://${eureka.instance.hostname}:${server.port}/eureka/ register-with-eureka: false # 自己就是服务不需要注册自己,默认为true fetch-registry: false #自己就是服务不需要从Eureka Server获取服务信息,默认为true,置为false- 编写启动类,声明当前服务为Eureka注册中心
package com.rf;

import org.springframework.boot.SpringApplication;
import org.springframework.boot.autoconfigure.SpringBootApplication;
import org.springframework.cloud.netflix.eureka.server.EnableEurekaServer;

@SpringBootApplication
@EnableEurekaServer  //服务注册中心,是一个EurekaServer
public class EurekaApplication {
    public static void main(String[] args) {
        SpringApplication.run(EurekaApplication.class,args);
    }
}
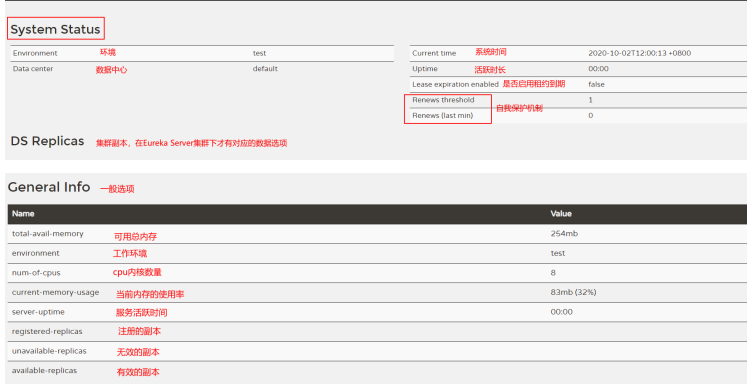
- 访问http://127.0.0.1:9200,如果看到如下页面(Eureka注册中心后台),则表明EurekaServer发布成功
![]()
- 商品微服务和页面静态化微服务注册到Eureka
- pom文件中添加Eureka Client依赖
<!--Eureka client-->
<dependency>
<groupId>org.springframework.cloud</groupId>
<artifactId>spring-cloud-starter-netflix-eureka-client</artifactId>
</dependency>
-
-
- yml配置Eureka服务端信息
-
server:
  port: 9100 # 后期该微服务多实例,端口从9100递增(10个以内)
spring:
  application:
    name: lagou-service-page
  datasource:
    driver-class-name: com.mysql.cj.jdbc.Driver
    url: jdbc:mysql://localhost:3306/smd?useUnicode=true&characterEncoding=utf8&serverTimezone=UTC
    username: root
    password: 123456

eureka:
  instance:
    #使用ip注册,否则会使用主机名注册了(此处考虑到对老版本的兼容,新版本经过实验都是ip)
    prefer-ip-address: true
    #自定义实例显示格式,加上版本号,便于多版本管理,注意是ip-address,早期版本是ipAddress
    instance-id: ${sping.cloud.client.ip-address}:${spring.application.name}:${server.port}:@project.version@
  client:
    service-url: # eureka server的路径
      defaultZone: http://localhost:9200/eureka/
    fetch-registry: true
    register-with-eureka: true
-
-
- 修改启动类
-
package com.rf;

import org.mybatis.spring.annotation.MapperScan;
import org.springframework.boot.SpringApplication;
import org.springframework.boot.autoconfigure.SpringBootApplication;
import org.springframework.cloud.client.discovery.EnableDiscoveryClient;

@SpringBootApplication
@MapperScan("com.rf.mapper")
@EnableDiscoveryClient
public class ProductApplication {
    public static void main(String[] args) {
        SpringApplication.run(ProductApplication.class,args);
    }
}
- 搭建Eureka Server 高可用集群
在生产环境中,我们会配置Eureka Server集群实现高可用。Eureka Server集群之中的节点通过点对点(P2P)通信的方式共享服务注册表。
我们开启两台 Eureka Server 以搭建集群,Eureka配置server集群时需要执行host地址,需要修改个人电脑中host地址:
127.0.0.1 LagouCloudEurekaServerA
127.0.0.1 LagouCloudEurekaServerB
将lagou-cloud-eureka复制一份为lagou-cloud-eureka9201,修改 lagou-cloud-eureka-server 工程中的yml配置文件
#Eureka server服务端口
server:
  port: 9200
spring:
  application:
    name: lagou-cloud-eureka-server # 应用名称,会在Eureka中作为服务的id标识 (serviceId)
eureka:
  instance:
    hostname: LagouCloudEurekaServerA
  client:
    service-url:  # 客户端与EurekaServer交互的地址,如果是集群,也需要写其它Server的地址
      defaultZone: http://LagouCloudEurekaServerB/9201/eureka/
    fetch-registry: false  #自己就是服务不需要从Eureka Server获取服务信息,默认为true,置为false
    register-with-eureka: false # 自己就是服务不需要注册自己,默认为true
9201
#Eureka server服务端口
server:
port: 9201
spring:
application:
name: lagou-cloud-eureka-server # 应用名称,会在Eureka中作为服务的id标识
(serviceId)
eureka:
instance:
hostname: LagouCloudEurekaServerB
client:
register-with-eureka: true
fetch-registry: true
serviceUrl:
defaultZone: http://LagouCloudEurekaServerA:9200/eureka
商品微服务和页面静态微服务
server:
  port: 9100 # 后期该微服务多实例,端口从9100递增(10个以内)
spring:
  application:
    name: lagou-service-page
  datasource:
    driver-class-name: com.mysql.cj.jdbc.Driver
    url: jdbc:mysql://localhost:3306/smd?useUnicode=true&characterEncoding=utf8&serverTimezone=UTC
    username: root
    password: 123456

eureka:
  instance:
    #使用ip注册,否则会使用主机名注册了(此处考虑到对老版本的兼容,新版本经过实验都是ip)
    prefer-ip-address: true
    #自定义实例显示格式,加上版本号,便于多版本管理,注意是ip-address,早期版本是ipAddress
    instance-id: ${spring.cloud.client.ip-address}:${spring.application.name}:${server.port}:@project.version@
  client:
    service-url: # eureka server的路径
      #把 eureka 集群中的所有 url 都填写了进来,也可以只写一台,因为各个 eureka server  可以同步注册表
      defaultZone: http://LagouCloudEurekaServerA:9200/eureka/,http://LagouCloudEurekaServerB:9201/eureka/
    fetch-registry: true
    register-with-eureka: true
改造页面静态化微服务:之前是直接通过RestTemplate写死URL进行调用,现在通过Eureka方式进行调用
package com;

import org.springframework.boot.SpringApplication;
import org.springframework.boot.autoconfigure.SpringBootApplication;
import org.springframework.cloud.client.discovery.EnableDiscoveryClient;
import org.springframework.context.annotation.Bean;
import org.springframework.web.client.RestTemplate;

@SpringBootApplication
//@EnableEurekaClient  说明是EurekaClient,不能支持其他的服务注册中心
@EnableDiscoveryClient  //说明是服务注册中心的客户端,可以支持不同的服务注册中心
public class PageApplication {
    @Bean  //封装httpClient对象,执行HTTP请求
    public RestTemplate restTemplate(){
        return new RestTemplate();
    }

    public static void main(String[] args) {
        SpringApplication.run(PageApplication.class,args);
    }
}
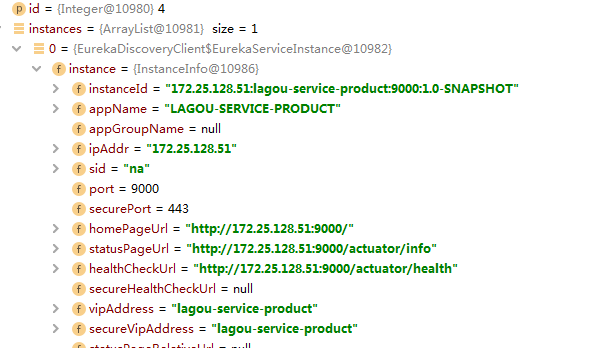
- Eureka元数据有两种:标准元数据和自定义元数据。
- 标准元数据:主机名、IP地址、端口号等信息,这些信息都会被发布在服务注册表中,用于服务之间的调用。
-
- 自定义元数据:可以使用eureka.instance.metadata-map配置,符合KEY/VALUE的存储格式。这些元数据可以在远程客户端中访问。
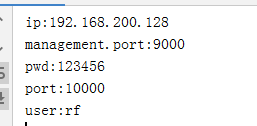
package com.rf.controller;


import entity.Products;
import org.springframework.beans.factory.annotation.Autowired;
import org.springframework.cloud.client.ServiceInstance;
import org.springframework.cloud.client.discovery.DiscoveryClient;
import org.springframework.web.bind.annotation.GetMapping;
import org.springframework.web.bind.annotation.PathVariable;
import org.springframework.web.bind.annotation.RequestMapping;
import org.springframework.web.bind.annotation.RestController;
import org.springframework.web.client.RestTemplate;

import java.util.List;
import java.util.Map;
import java.util.Set;

@RestController
@RequestMapping("/page")
public class PageController {
    @Autowired  //封装httpClient对象,执行HTTP请求
    private RestTemplate restTemplate;

    @Autowired
    private DiscoveryClient discoveryClient;

    @GetMapping("/getProduct/{id}")
    public Products getProduct(@PathVariable Integer id){
        List<ServiceInstance> instances = discoveryClient.getInstances("lagou-service-product");  //集群中服务会有多个
        ServiceInstance serviceInstance = instances.get(0);
        String host = serviceInstance.getHost();
        int port = serviceInstance.getPort();
        String url="http://"+host+":"+port+"/product/query/";
        // String url ="http://localhost:9000/product/query/";  //URL地址硬编码
        Products products = restTemplate.getForObject(url + id, Products.class);
        Map<String, String> metadata = serviceInstance.getMetadata();
        Set<Map.Entry<String, String>> entries = metadata.entrySet();
        for (Map.Entry<String, String> entry : entries) {
            System.out.println(entry.getKey()+":"+entry.getValue());
        }
        return products;
    }

}
server:
  port: 9000  # 后期该微服务多实例,9000(10个以内)
spring:
  application:
    name: lagou-service-product
  datasource:
    driver-class-name: com.mysql.cj.jdbc.Driver
    url: jdbc:mysql://localhost:3306/smd?useUnicode=true&characterEncoding=utf8&serverTimezone=UTC
    username: root
    password: 123456
eureka:
  instance:
    #使用ip注册,否则会使用主机名注册了(此处考虑到对老版本的兼容,新版本经过实验都是ip)
    prefer-ip-address: true
    #自定义实例显示格式,加上版本号,便于多版本管理,注意是ip-address,早期版本是ipAddress
    instance-id: ${spring.cloud.client.ip-address}:${spring.application.name}:${server.port}:@project.version@
    metadata-map:
      ip: 192.168.200.128
      port: 10000
      user: rf
      pwd: 123456
  client:
    service-url: # eureka server的路径
      #把 eureka 集群中的所有 url 都填写了进来,也可以只写一台,因为各个 eureka server  可以同步注册表
      defaultZone: http://LagouCloudEurekaServerA:9200/eureka/,http://LagouCloudEurekaServerB:9201/eureka/
    fetch-registry: true
    register-with-eureka: true
2.2 Ribbon负载均衡
- 负载均衡一般分为服务端负载均衡和客户端负载均衡
- 服务端负载均衡:比如Nginx、F5这些,请求到达服务器之后由这些负载均衡器根据一定的算法将请求路由到目标服务器处理
- 客户端负载均衡:比如Ribbon,服务消费者客户端会有一个服务器地址列表,调用方在请求前通过一定的负载均衡算法选择一个服务器进行访问,负载均衡算法的执行是在请求客户端进行
![]()
- Ribbon:Netflix发布的负载均衡器,Eureka一般配合Ribbon进行使用,Ribbon利用从Eureka中读取到服务信息,在调用服务提供者提供的服务时,会根据一定的算法进行负载
- 复制商品微服务9001,在9000和9001编写Controller,返回服务实例端口,Page微服务中通过负载均衡策略调用lagou-service-product的controller
![]()
- 在微服务中使用Ribbon不需要额外导入依赖坐标,微服务中引入过eureka-client相关依赖,会自动引入Ribbon相关依赖坐标,可以直接在RestTemplate上添加对应注解
package com;

import org.springframework.boot.SpringApplication;
import org.springframework.boot.autoconfigure.SpringBootApplication;
import org.springframework.cloud.client.discovery.EnableDiscoveryClient;
import org.springframework.cloud.client.loadbalancer.LoadBalanced;
import org.springframework.context.annotation.Bean;
import org.springframework.web.client.RestTemplate;

@SpringBootApplication
//@EnableEurekaClient  说明是EurekaClient,不能支持其他的服务注册中心
@EnableDiscoveryClient  //说明是服务注册中心的客户端,可以支持不同的服务注册中心

public class PageApplication {
    @Bean  //封装httpClient对象,执行HTTP请求
    @LoadBalanced  //开启Ribbon负载均衡
    public RestTemplate restTemplate(){
        return new RestTemplate();
    }

    public static void main(String[] args) {
        SpringApplication.run(PageApplication.class,args);
    }
}