

SpringBoot快速入门
1. springboot
Spring Boot是所有基于Spring 开发的项目的起点,尽可能减少配置文件。
- 约定优于配置的软件设计范式:系统、类库或框架应该假定合理的默认值,而非要求提供不必要的配置,遵循某种约定进行开发
- Spring优缺点
- 优点: 是java企业版J2EE的轻量级代替品,无须开发重量级的Enterprise Java Bean(EJB),通过依赖注入和面向切面编程用简单的java对象实现了EJB的功能
- 缺点:组件轻量级,配置重量级,需要许多xml文件配置,虽然有了注解配置,但是在项目的依赖版本管理上仍存在着版本兼容问题,引入的依赖多,存在版本冲突
- springboot优点
- 起步依赖: 基于约定优于配置的思想,起步依赖本质上是一个maven项目对象模型pom,定义了对其他库的传递依赖,将具备某种功能的依赖坐标打包,提供默认功能
- 自动配置: 自动将一些配置类的bean注入IOC容器,在需要的地方使用@autowired或者@resource等注解进行注入
- 简单快速方便的搭建项目,对主流开发框架的无配置继承,支持热部署,提高开发部署效率
2. springboot快速入门与构建
案例需求:请求Controller中的方法,并将返回值响应到页面
- 依赖管理
<?xml version="1.0" encoding="UTF-8"?>
<project xmlns="http://maven.apache.org/POM/4.0.0"
         xmlns:xsi="http://www.w3.org/2001/XMLSchema-instance"
         xsi:schemaLocation="http://maven.apache.org/POM/4.0.0 http://maven.apache.org/xsd/maven-4.0.0.xsd">
    <modelVersion>4.0.0</modelVersion>

    <groupId>org.example</groupId>
    <artifactId>springbootdemo1</artifactId>
    <version>1.0-SNAPSHOT</version>
<!--  所用的springBoot项目都会直接或者间接的继承spring-boot-starter-parent
        1.指定项目的编码格式为UTF-8
        2.指定JDK版本为1.8
        3.对项目依赖的版本进行管理,当前项目再引入其他常用的依赖时就需要再指定版本号,避免版本
        冲突的问题
        4.默认的资源过滤和插件管理 -->
    <parent>
        <groupId>org.springframework.boot</groupId>
        <artifactId>spring-boot-starter-parent</artifactId>
        <version>2.3.4.RELEASE</version>
    </parent>
    <dependencies>
        <!--引入Spring Web及Spring MVC相关的依赖-->
        <dependency>
            <groupId>org.springframework.boot</groupId>
            <artifactId>spring-boot-starter-web</artifactId>
        </dependency>
    </dependencies>
    <!--可以将project打包为一个可以执行的jar-->
    <build>
        <plugins>
            <plugin>
                <groupId>org.springframework.boot</groupId>
                <artifactId>spring-boot-maven-plugin</artifactId>
            </plugin>
        </plugins>
    </build>
</project>
- controller
package com.rf.controller;

import org.springframework.web.bind.annotation.RequestMapping;
import org.springframework.web.bind.annotation.RestController;

@RestController
@RequestMapping("/hello")
public class HelloController {
    @RequestMapping("/boot")
    public String hello(){
        return "hello,spring boot!!!";
    }
}
- 启动类,一般放置在二级包下,会扫描启动类和二级包下的所有包、类
package com.rf;


import org.springframework.boot.SpringApplication;
import org.springframework.boot.autoconfigure.SpringBootApplication;

/**
 * SpringBoot的启动类通常放在二级包中,比如:com.lagou.SpringBootDemo1Application
 * 因为SpringBoot项目在做包扫描,会扫描启动类所在的包及其子包下的所有内容。
 */
//标识当前类为SpringBoot项目的启动类

@SpringBootApplication
public class SpringBootDemo1Application {

    public static void main(String[] args) {
        SpringApplication.run(SpringBootDemo1Application.class,args);
    }


}
- idea快速构建springboot(必须联网)
- 使用Spring Initializr方式构建Spring Boot项目
- 创建一个用于Web访问的Controller
- 项目结构:使用Spring Initializr方式构建的Spring Boot项目会默认生成项目启动类、存放前端静态资源和页面的文件夹、编写项目配置的配置文件以及进行项目单元测试的测试类
![]()
- 使用Spring Initializr方式构建Spring Boot项目
- 单元测试
- 添加spring-boot-starter-test测试依赖启动器
<dependency>
<groupId>org.springframework.boot</groupId>
<artifactId>spring-boot-starter-test</artifactId>
<scope>test</scope>
</dependency>
- 编写单元测试类和测试方法:先使用@Autowired注解注入了DemoController实例对象,然后在contextLoads()方法中调用了DemoController类中对应的请求控制方法contextLoads(),并输出打印结果
- 添加spring-boot-starter-test测试依赖启动器

package com.rf;

import com.rf.controller.HelloController;
import org.junit.Test;
import org.junit.runner.RunWith;
import org.springframework.beans.factory.annotation.Autowired;
import org.springframework.boot.test.context.SpringBootTest;
import org.springframework.test.context.junit4.SpringRunner;
/**
* SpringJUnit4ClassRunner.class:Spring运行环境
* JUnit4.class:JUnit运行环境
* SpringRunner.class:Spring Boot运行环境
*/
@RunWith(SpringRunner.class)
@SpringBootTest //标记为当前类为SpringBoot测试类,加载项目的ApplicationContext上下文环境
public class Springbootdemo1ApplicationTests {
/**
* 需求:调用HelloController的hello方法
*/
    @Autowired
    private HelloController helloController;
    @Test
    public void contextLoads(){
        String res = helloController.hello();
        System.out.println("res = " + res);
    }
}
- 热部署,在不重启服务器的情况下实现业务更新
- 添加springboot的热部署依赖启动器
<!-- 引入热部署依赖 -->
<dependency>
<groupId>org.springframework.boot</groupId>
<artifactId>spring-boot-devtools</artifactId>
</dependency>
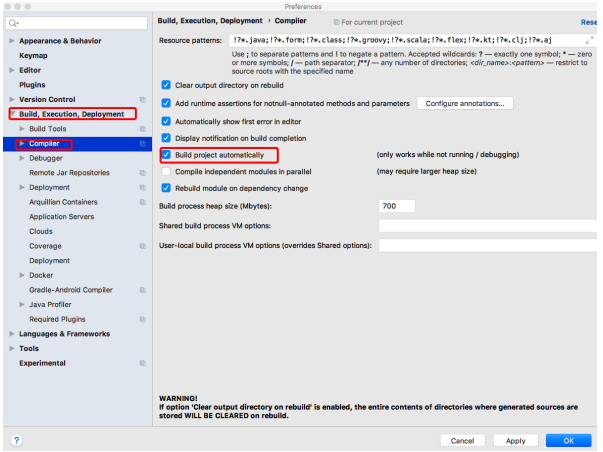
- 开启idea的自动编译:选择Build下的Compiler选项,在右侧勾选“Build project automatically”选项将项目设置为自动编译,单击【Apply】→【OK】按钮保存设置
![]()
- 开启idea的在项目运行中自动编译功能:在项目任意页面中使用组合快捷键“Ctrl+Shift+Alt+/”打开Maintenance选项框,列表中找到“compiler.automake.allow.when.app.running”,将该选项后的Value值勾选,用于指定IDEA工具在程序运行过程中自动编译,最后单击【Close】按钮完成设置
- 添加springboot的热部署依赖启动器
3. 配置文件
- 全局配置文件能够对一些默认配置值进行修改,Spring Boot使用一个application.properties或者application.yaml的文件作为全局配置文件,该文件存放在src/main/resource目录或者类路径
的/config,一般会选择resource目录 - application.properties:使用Spring Initializr方式构建Spring Boot项目时,会在resource目录下自动生成一个空的application.properties文件,Spring Boot项目启动时会自动加载application.properties文件。
- 相关属性可以是系统属性、环境变量、命令参数等信息,也可以是自定义配置文件名称和位置
#解决中文乱码
server.tomcat.uri-encoding=UTF-8
spring.http.encoding.force=true
spring.http.encoding.charset=UTF-8
spring.http.encoding.enabled=true

#服务器端口号
server.port=8888
#自定义配置jdbcTemplate连接数据库驱动
spring.datasource.driver-class-name=com.mysql.cj.jdbc.Driver
spring.datasource.url=jdbc:mysql://localhost:3306
spring.datasource.username=root
spring.datasource.password=123456

# person属性
person.id=1000
person.name=于谦
person.hobby=抽烟,喝酒,烫头
person.family=妻子,儿女
person.map.k1=v1
person.map.k2=v2
person.pet.type=dog
person.pet.name=旺财
@ConfigurationProperties(prefix = "person")注解的作用是将配置文件中以person开头的属性值通过setXX()方法注入到实体类对应属性中
@Component注解的作用是将当前注入属性值的Person类对象作为Bean组件放到Spring容器中,只有这样才能被@ConfigurationProperties注解进行赋值
![]()
- application.yaml或application.yml:是springboot支持的一种json格式,更为直观,配置文件更简洁
server:
  port: 8088
  servlet:
    context-path: /hello
person:
  id: 1001
  name: 郭德纲
  hobby:
    - 抽烟
    - 喝酒
    - 烫头
#hobby: [抽烟,喝酒,洗头]

#hobby:
  #抽烟,
  #喝酒,
  #烫头


#map: {k1: v11, k2: v22}
  map:
    k1: vv1
    k2: vv2
  family:
    妻子
    儿女
4. 配置文件属性值
- 配置文件的优先级从低到高
<includes>
<include>**/application*.yml</include>
<include>**/application*.yaml</include>
<include>**/application*.properties</include>
</includes>
- 如果配置属性是Spring Boot已有属性,例如服务端口server.port,那么Spring Boot内部会自动扫描并读取这些配置文件中的属性值并覆盖默认属性
- 如果配置的属性是用户自定义属性,例如刚刚自定义的Person实体类属性,还必须在程序中注入这些配置属性方可生效
- Spring Boot支持多种注入配置文件属性的方式
- 使用@ConfigurationProperties注入属性
@Component
//将配置文件中所有以person开头的配置信息注入当前类中
//前提1:必须保证配置文件中person.xx与当前Person类的属性名一致
//前提2:必须保证当前Person中的属性都具有set方法
@ConfigurationProperties(prefix = "person")
public class Person {
private int id; //id
private String name; //名称
private List hobby; //爱好
private String[] family; //家庭成员
private Map map;
private Pet pet; //宠物
}
-
- 使用@Value注入属性:@Value注解用来读取配置文件中的属性值并逐个注入到Bean对象的对应属性中,Spring Boot框架从Spring框架中对@Value注解进行了默认继承,可以使用该注解读取和注入配置文件属性值。
@Component
public class Person {
@Value("${person.id}")
private int id;
}
- @Value不仅可以将配置文件的属性注入Person的id属性,还可以直接给id属性赋值,这点是@ConfigurationProperties不支持的