

微信登录
1.微信开放平台
- 网站应用微信登录是基于OAuth2.0协议标准构建的微信OAuth2.0授权登录系统。
- 在进行微信OAuth2.0授权登录接入之前,在微信开放平台注册开发者帐号,并拥有一个已审核通过的网站应用,并获得相应的AppID和AppSecret,申请微信登录且通过审核后,可开始接入流程。
- 注册帐号和申请应用都是免费的,必须要有一个线上的网站,才能审核通过使用微信登录
- 如果想使用微信支付的功能,就必须认证开发者资质(认证一次300块人民币)
2. 授权流程说明
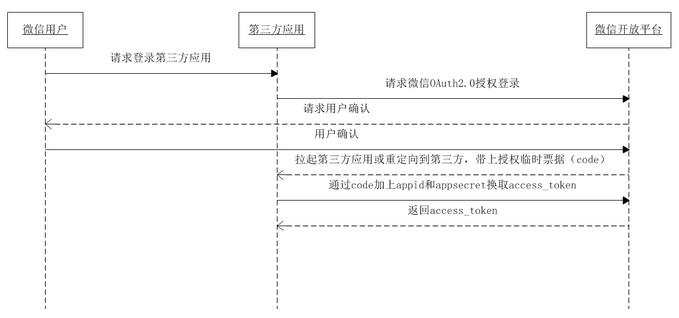
- 微信OAuth2.0授权登录让微信用户使用微信身份安全登录第三方应用或网站,在微信用户授权登录已接入微信OAuth2.0的第三方应用后,第三方可以获取到用户的接口调用凭证(access_token)
- 通过access_token可以进行微信开放平台授权关系接口调用,从而可实现获取微信用户基本开放信息和帮助用户实现基础开放功能等。
- 微信OAuth2.0授权登录目前支持authorization_code模式,适用于拥有server端的应用授权。该模式整体流程为:
- 第三方发起微信授权登录请求,微信用户允许授权第三方应用后,微信会拉起应用或重定向到第三方网站,并且带上授权临时票据code参数
- 通过code参数加上AppID和AppSecret等,通过API换取access_token
- 通过access_token进行接口调用,获取用户基本数据资源或帮助用户实现基本操作
![]()
3. 名词解释
- OAuth2.0协议:OAuth(Open Authorization)协议就是为用户资源的授权提供了一个安全、开放、简易的标准。
- OAuth在第三方应用与服务提供商之间设置了一个授权层,第三方应用通过授权层获取令牌,再通过令牌获取信息。
- 令牌与密码的区别:令牌有作用范围,权限范围,有生命周期,是短期的,可以被数据拥有者撤销,一般只读令牌比读写令牌安全性更高,而密码一般是完整权限
- 授权模式:授权码模式(功能最完整、流程最严密的授权模式)、密码模式 、简化模式 、客户端模式
- AppID:应用的ID,是唯一标识
- AppSecret:应用的密钥
- code:授权的临时凭证
- access_token:接口调用凭证(例如:真正的身份证,虎符,令牌)
4. 实现微信登录
- vue项目安装
- 微信官方提供的生成二维码的js:
npm install vue-wxlogin
- 微信官方提供的生成二维码的js:
- 页面引入
- 第三方使授权的用网站应用授权登录前请注意已获取相应网页授权作用域(scope=snsapi_login),则可以通过在PC端打开以下链接:
https://open.weixin.qq.com/connect/qrconnect?appid=APPID&redirect_uri=REDIRECT_URI&response_type=code&scope=SCOPE&state=STATE#wechat_redirect - 若提示“该链接无法访问”,请检查参数是否填写错误,如redirect_uri的域名与审核时填写的授权域名不一致或scope不为snsapi_login。
参数 是否必须 说明 appid 是 应用唯一标识 redirect_uri 是 请使用urlEncode对链接进行处理 response_type 是 填code scope 是 应用授权作用域,拥有多个作用域用逗号(,)分隔,网页应用目前仅填写snsapi_login state 否 用于保持请求和回调的状态,授权请求后原样带回给第三方。该参数可用于防止csrf攻击(跨站请求伪造攻击),建议第三方带上该参数,可设置为简单的随机数加session进行校验
- 第三方使授权的用网站应用授权登录前请注意已获取相应网页授权作用域(scope=snsapi_login),则可以通过在PC端打开以下链接:
 <el-dialog
      style="width:800px;margin:0px auto;"
      title=""
      :visible.sync="dialogFormVisible"
    >
      <!-- 登录框 开始-->
      <div id="loginForm">
        <el-form>
          <el-form-item>
            <h1 >拉勾</h1>
          </el-form-item>
          <el-form-item>
            <el-input
              v-model="phone"
              placeholder="请输入常用手机号..."
            ></el-input>
          </el-form-item>
          <el-form-item>
            <el-input v-model="password" placeholder="请输入密码..."></el-input>
          </el-form-item>
        </el-form>
        <el-button
          style="width:100%;margin:0px auto;background-color: #00B38A;font-size:20px"
          type="primary"
          @click="login"
          >确 定</el-button
        >
        <p></p>
        <!-- 微信登录图标 -->
        <!-- goToLoginWX 跳转到微信登录 -->
        <img
          @click="goToLoginWX"
          src="http://www.lgstatic.com/lg-passport-fed/static/pc/modules/common/img/icon-wechat@2x_68c86d1.png"
          alt=""
        />
      </div>
      <!-- 登录框 结束-->

      <!-- 微信登录 -->
      <wxlogin
        id="wxLoginForm"
        style="display:none"
        :appid="appid"
        :scope="scope"
        :redirect_uri="redirect_uri"
      >
      </wxlogin>
      <!-- 微信登录框 结束-->
    </el-dialog>
- 修改host文件
- 文件位置:C:\Windows\System32\drivers\etc\hosts
- 回调默认指定的是80端口,别忘记将tomcat的8003端口修改成80
127.0.0.1 www.pinzhi365.com
- 引入依赖
<!-- 需要使用HttpServletRequest获得参数 --> <dependency> <groupId>javax.servlet</groupId> <artifactId>servlet-api</artifactId> <version>2.4</version> <scope>provided</scope> </dependency> <!-- 需要使用HttpClient发出请求 --> <dependency> <groupId>org.apache.httpcomponents</groupId> <artifactId>httpclient</artifactId> <version>4.5.12</version> </dependency> - 封装HttpClient
package wxLoginAndPay;

import org.apache.http.client.methods.CloseableHttpResponse;
import org.apache.http.client.methods.HttpGet;
import org.apache.http.client.utils.URIBuilder;
import org.apache.http.impl.client.CloseableHttpClient;
import org.apache.http.impl.client.HttpClients;
import org.apache.http.util.EntityUtils;
import java.io.IOException;
import java.net.URI;
import java.util.Map;

/**
 * 封装HttpClient执行get请求
 */
public class HttpClientUtils {
    public  static String doGet(String url){
           return doGet(url,null);
    }

    /**
     *  get请求,支持request请求方式,不支持restfull方式
     * @param url 请求地址
     * @param params 参数
     * @return 响应的字符串
     */
    public  static String doGet(String url, Map<String,String> params) {
        // 创建httpclient对象
        CloseableHttpClient httpClient = HttpClients.createDefault();
        String res = "";
        CloseableHttpResponse response = null;

        try {
            // 创建url
            URIBuilder builder = new URIBuilder(url);
            // 在url后面拼接请求参数
            if (params != null) {
                for (String s : params.keySet()) {
                    builder.addParameter("s", params.get(s));
                }
            }
            URI uri = builder.build();
            // 创建http get请求
            HttpGet get = new HttpGet(uri);
            // 执行请求
            httpClient.execute(get);
            // 从响应对象中获取状态码(成功或失败的状态)
            int statusCode = response.getStatusLine().getStatusCode();
            System.out.println("statusCode = " + statusCode);
            // 200表示响应成功
            if (statusCode == 200) {
                // 响应的内容字符串
                res = EntityUtils.toString(response.getEntity(), "UTF-8");
            }

        } catch (Exception e) {
            e.printStackTrace();
        } finally {
            // 释放资源
            try {
                if (response != null) {
                    response.close();
                }
                httpClient.close();
            } catch (IOException ex) {
                ex.printStackTrace();
            }
        }
        return res;
    }

}
- 定义从微信返回的数据对象
- token对象
package wxLoginAndPay;

/**
 * 返回的token对象
 */
public class Token {
    private String access_token;//    接口调用凭证
    private String expires_in;//        access_token接口调用凭证超时时间,单位(秒)
    private String refresh_token;//        用户刷新access_token
    private String openid;//        授权用户唯一标识
    private String scope;//        用户授权的作用域,使用逗号(,)分隔
    private String unionid;//    当且仅当该网站应用已获得该用户的userinfo授权时,才会出现该字段。

    public Token() {
    }

    public Token(String access_token, String expires_in, String refresh_token, String openid, String scope, String unionid) {
        this.access_token = access_token;
        this.expires_in = expires_in;
        this.refresh_token = refresh_token;
        this.openid = openid;
        this.scope = scope;
        this.unionid = unionid;
    }

    public String getAccess_token() {
        return access_token;
    }

    public void setAccess_token(String access_token) {
        this.access_token = access_token;
    }

    public String getExpires_in() {
        return expires_in;
    }

    public void setExpires_in(String expires_in) {
        this.expires_in = expires_in;
    }

    public String getRefresh_token() {
        return refresh_token;
    }

    public void setRefresh_token(String refresh_token) {
        this.refresh_token = refresh_token;
    }

    public String getOpenid() {
        return openid;
    }

    public void setOpenid(String openid) {
        this.openid = openid;
    }

    public String getScope() {
        return scope;
    }

    public void setScope(String scope) {
        this.scope = scope;
    }

    public String getUnionid() {
        return unionid;
    }

    public void setUnionid(String unionid) {
        this.unionid = unionid;
    }
}
-
- 通过code获取access_token
https://api.weixin.qq.com/sns/oauth2/access_token?appid=APPID&secret=SECRET&code=CODE&grant_type=authorization_code
-
-
- 参数说明
-
| 参数 | 是否必须 | 说明 |
|---|---|---|
| appid | 是 | 应用唯一标识,在微信开放平台提交应用审核通过后获得 |
| secret | 是 | 应用密钥AppSecret,在微信开放平台提交应用审核通过后获得 |
| code | 是 | 填写第一步获取的code参数 |
| grant_type | 是 | 填authorization_code |
-
-
- 返回说明
-
正确的返回:

{
"access_token":"ACCESS_TOKEN",
"expires_in":7200,
"refresh_token":"REFRESH_TOKEN",
"openid":"OPENID",
"scope":"SCOPE",
"unionid": "o6_bmasdasdsad6_2sgVt7hMZOPfL"
}
-
-
- 返回参数说明
-
| 参数 | 说明 |
|---|---|
| access_token | 接口调用凭证 |
| expires_in | access_token接口调用凭证超时时间,单位(秒) |
| refresh_token | 用户刷新access_token |
| openid | 授权用户唯一标识 |
| scope | 用户授权的作用域,使用逗号(,)分隔 |
| unionid | 当且仅当该网站应用已获得该用户的userinfo授权时,才会出现该字段。 |
-
- 用户信息对象wxUser
package wxLoginAndPay;

/**
 * 微信用户封装
 */

public class WxUser {
   private String openid;//    普通用户的标识,对当前开发者帐号唯一
    private String   nickname;//        普通用户昵称
    private String  sex;//        普通用户性别,1为男性,2为女性
    private String province;//        普通用户个人资料填写的省份
    private String  city    ;//    普通用户个人资料填写的城市
    private String  country    ;//    国家,如中国为CN
    private String  headimgurl    ;//    用户头像,最后一个数值代表正方形头像大小(有0、46、64、96、132数值可选,0代表640*640正方形头像),用户没有头像时该项为空
    private String  privilege;//        用户特权信息,json数组,如微信沃卡用户为(chinaunicom)
    private String  unionid    ;//    用户统一标识。针对一个微信开放平台帐号下的应用,同一用户的unionid是唯一的。

    public WxUser() {
    }

    public WxUser(String openid, String nickname, String sex, String province, String city, String country, String headimgurl, String privilege, String unionid) {
        this.openid = openid;
        this.nickname = nickname;
        this.sex = sex;
        this.province = province;
        this.city = city;
        this.country = country;
        this.headimgurl = headimgurl;
        this.privilege = privilege;
        this.unionid = unionid;
    }

    public String getOpenid() {
        return openid;
    }

    public void setOpenid(String openid) {
        this.openid = openid;
    }

    public String getNickname() {
        return nickname;
    }

    public void setNickname(String nickname) {
        this.nickname = nickname;
    }

    public String getSex() {
        return sex;
    }

    public void setSex(String sex) {
        this.sex = sex;
    }

    public String getProvince() {
        return province;
    }

    public void setProvince(String province) {
        this.province = province;
    }

    public String getCity() {
        return city;
    }

    public void setCity(String city) {
        this.city = city;
    }

    public String getCountry() {
        return country;
    }

    public void setCountry(String country) {
        this.country = country;
    }

    public String getHeadimgurl() {
        return headimgurl;
    }

    public void setHeadimgurl(String headimgurl) {
        this.headimgurl = headimgurl;
    }

    public String getPrivilege() {
        return privilege;
    }

    public void setPrivilege(String privilege) {
        this.privilege = privilege;
    }

    public String getUnionid() {
        return unionid;
    }

    public void setUnionid(String unionid) {
        this.unionid = unionid;
    }
}
-
-
-
获取用户个人信息(UnionID机制): 此接口用于获取用户个人信息。开发者可通过OpenID来获取和保存用户基本信息。
-
同一用户,对同一个微信开放平台下的不同应用,unionid是相同且唯一的。
-
在用户修改微信头像后,旧的微信头像URL将会失效,因此开发者应该自己在获取用户信息后,将头像图片保存下来,避免微信头像URL失效后的异常情况。
- 请求说明
-
-
http请求方式: GET
https://api.weixin.qq.com/sns/userinfo?access_token=ACCESS_TOKEN&openid=OPENID
-
-
- 参数说明
-
| 参数 | 是否必须 | 说明 |
|---|---|---|
| access_token | 是 | 调用凭证 |
| openid | 是 | 普通用户的标识,对当前开发者帐号唯一 |
| lang | 否 | 国家地区语言版本,zh_CN 简体,zh_TW 繁体,en 英语,默认为en |
-
-
- 返回说明
-
正确的Json返回结果:
{
"openid":"OPENID",
"nickname":"NICKNAME",
"sex":1,
"province":"PROVINCE",
"city":"CITY",
"country":"COUNTRY",
"headimgurl": "https://thirdwx.qlogo.cn/mmopen/g3MonUZtNHkdmzicIlibx6iaFqAc56vxLSUfpb6n5WKSYVY0ChQKkiaJSgQ1dZuTOgvLLrhJbERQQ4eMsv84eavHiaiceqxibJxCfHe/0",
"privilege":[
"PRIVILEGE1",
"PRIVILEGE2"
],
"unionid": " o6_bmasdasdsad6_2sgVt7hMZOPfL"

}
错误的Json返回示例:
{
"errcode":40003,"errmsg":"invalid openid"
}
-
-
- 返回参数说明
-
| 参数 | 说明 |
|---|---|
| openid | 普通用户的标识,对当前开发者帐号唯一 |
| nickname | 普通用户昵称 |
| sex | 普通用户性别,1为男性,2为女性 |
| province | 普通用户个人资料填写的省份 |
| city | 普通用户个人资料填写的城市 |
| country | 国家,如中国为CN |
| headimgurl | 用户头像,最后一个数值代表正方形头像大小(有0、46、64、96、132数值可选,0代表640*640正方形头像),用户没有头像时该项为空 |
| privilege | 用户特权信息,json数组,如微信沃卡用户为(chinaunicom) |
| unionid | 用户统一标识。针对一个微信开放平台帐号下的应用,同一用户的unionid是唯一的。 |
- 回调函数controller ,这里一定不要使用FQ软件,不然映射调不到本机地址
package controller;

import com.alibaba.fastjson.JSON;
import org.springframework.web.bind.annotation.*;
import wxLoginAndPay.HttpClientUtils;
import wxLoginAndPay.Token;
import wxLoginAndPay.WxUser;

import javax.servlet.http.HttpServletRequest;
import java.io.IOException;

@RestController
@CrossOrigin(origins = "*")
//@RequestMapping("/user")
public class WxLoginController {
    @RequestMapping("/wxlogin")
    public Object wxlogin(HttpServletRequest request)throws IOException {
        // 1.通过扫码去微信服务器请求,返回的code值
        String code=request.getParameter("code");
        System.out.println("code = " + code);
          // 2.通过code获取access_token,定义获取access_token的url
        String getTokenUrl = "https://api.weixin.qq.com/sns/oauth2/access_token?appid=wxd99431bbff8305a0&secret=60f78681d063590a469f1b297feff3c4&code="+code+"&grant_type=authorization_code";
        // 3.发请求并获得access_token
        String access_token = HttpClientUtils.doGet(getTokenUrl);
        System.out.println("access_token = " + access_token);

        // 4.将返回的json格式字符串转换成对象
        Token token = JSON.parseObject(access_token, Token.class);
        // 5.通过access_token获取openid,发送请求获取微信用户个人信息
        String getUsernfoURL="https://api.weixin.qq.com/sns/userinfo?access_token="+token.getAccess_token()+"&openid="+token.getOpenid();
        // 6.发请求并获取用户信息
        String userInfo = HttpClientUtils.doGet(getUsernfoURL);
        // 7.将返回的json格式字符串转换成对象
        WxUser wxUser = JSON.parseObject(userInfo, WxUser.class);
        System.out.println("wxUser = " + wxUser.getNickname());
        return wxUser;

        // 8.自定义网页逻辑

    }
}
- 应用业务逻辑
<template>
  <div class="header-pc-wrap">
    <el-dialog
      style="width:800px;margin:0px auto;"
      title=""
      :visible.sync="dialogFormVisible"
    >
      <!-- 登录框 开始-->
      <div id="loginForm">
        <el-form>
          <el-form-item>
            <h1 >拉勾</h1>
          </el-form-item>
          <el-form-item>
            <el-input
              v-model="phone"
              placeholder="请输入常用手机号..."
            ></el-input>
          </el-form-item>
          <el-form-item>
            <el-input v-model="password" placeholder="请输入密码..."></el-input>
          </el-form-item>
        </el-form>
        <el-button
          style="width:100%;margin:0px auto;background-color: #00B38A;font-size:20px"
          type="primary"
          @click="login"
          >确 定</el-button
        >
        <p></p>
        <!-- 微信登录图标 -->
        <!-- goToLoginWX 跳转到微信登录 -->
        <img
          @click="goToLoginWX"
          src="http://www.lgstatic.com/lg-passport-fed/static/pc/modules/common/img/icon-wechat@2x_68c86d1.png"
          alt=""
        />
      </div>
      <!-- 登录框 结束-->

      <!-- 微信登录 -->
      <wxlogin
        id="wxLoginForm"
        style="display:none"
        :appid="appid"
        :scope="scope"
        :redirect_uri="redirect_uri"
      >
      </wxlogin>
      <!-- 微信登录框 结束-->
    </el-dialog>

    <!-- 顶部登录条 -->
    <div class="wrap-box">
      <div @click="toToIndex" class="edu-icon"></div>
      <div @click="toToIndex" class="text">拉勾教育</div>
      <div class="right-var-wrap" v-if="!isLogin">
        <div class="login-handler" @click="goToLogin">登录 | 注册</div>
      </div>
      <div class="right-var-wrap" v-if="isLogin">
        <div
          :class="{ 'tip-icon': true, 'has-new-message': isHasNewMessage }"
          @click="toToNotic"
        >
          <i class="el-icon-bell"></i>
        </div>
        <img :src="userDTO.content.portrait" class="avatar-wrap" />
        <div class="bar-wrap">
          <ul class="account-bar">
            <li class="user_dropdown" data-lg-tj-track-code="index_user">
              <span class="unick">{{ userDTO.content.name }}</span>
              <i />
              <ul >
                <li @click="goToSetting">
                  账号设置
                </li>
                <li @click="logout">
                  退出
                </li>
              </ul>
            </li>
          </ul>
        </div>
      </div>
    </div>
  </div>
</template>

<script>
import wxlogin from "vue-wxlogin";
export default {
  name: "Header",
  components: {
    wxlogin, //引入微信组件
  },

  props: {},
  data() {
    return {
      isLogin: false, // 登录状态,true:已登录,false:未登录
      userDTO: null, // 用来保存登录的用户信息
      isHasNewMessage: false, // 是否有新的推送消息
      dialogFormVisible: false, // 是否显示登录框,true:显示,false:隐藏
      phone: "", // 双向绑定表单 手机号
      password: "", // 双向绑定表单 密码

      //微信登录参数
      appid: "wxd99431bbff8305a0", // 应用唯一标识,在微信开放平台提交应用审核通过后获得
      scope: "snsapi_login", // 应用授权作用域,网页应用目前仅填写snsapi_login即可
      redirect_uri: "http://www.pinzhi365.com/user/wxlogin", //重定向地址,(回调地址)
    };
  },
  computed: {},
  watch: {},
  mounted() {},
  created() {
    // 当刷新页面,组件创建成功之后,立刻检测本地储存中是否存在用户对象
    this.userDTO = JSON.parse(localStorage.getItem("user"));
    if (this.userDTO != null) {
      this.isLogin = true; // 普通用户已登录
    } else {
      // 去检测微信是否登录过
      this.axios
        .get("http://localhost:80/user/checkWxStatus")
        .then((res) => {
          this.userDTO = res.data;
          this.phone = this.userDTO.content.phone;
          this.password = this.userDTO.content.password;
          this.login(); // 走普通登录
        })
        .catch((error) => {
          this.$message.error("登录失败!");
        });
    }
  },
  methods: {
    goToSetting() {
      this.$router.push("/setting"); // 跳转个人设置页面
    },
    goToLogin() {
      this.dialogFormVisible = true; // 显示登录框
    },
    //实现微信登录
    goToLoginWX() {
      //隐藏普通用户登录框
      document.getElementById("loginForm").style.display = "none";
      // 显示微信登录二维码
      document.getElementById("wxLoginForm").style.display = "block";
    },
    toToIndex() {
      this.$router.push("/"); //回到首页
    },
    toToNotic() {},
    login() {
      return this.axios
        .get("http://localhost:80/user/login", {
          params: {
            phone: this.phone,
            password: this.password,
          },
        })
        .then((res) => {
          console.log(res.data);
          this.dialogFormVisible = false; //关闭登录框
          this.userDTO = res.data; // 保存返回数据中的用户对象信息
          this.isLogin = true; // 更新登录状态
          localStorage.setItem("user", JSON.stringify(this.userDTO)); // 将登录成功的对象信息保存到本地储存中
        })
        .catch((err) => {
          this.$message.error("登录失败");
        });
    },
    logout() {
      // 登出
      localStorage.setItem("user", null); // 将登录成功的对象信息保存到本地储存中
      this.isLogin = false; // 更新登录状态
      alert("谢谢使用,再见!");
      // 去检测微信是否登录过
      this.axios
        .get("http://localhost:80/user/logout")
        .then((result) => {})
        .catch((error) => {
          //this.$message.error("登录失败!");
        });
    },
  },
};
</script>

<style lang="less" scoped>
.header-pc-wrap {
  width: 100%;
  height: 40px;
  background: rgba(35, 39, 43, 1);
}
.wrap-box {
  width: 1200px;
  height: 100%;
  margin: 0 auto;
}
.edu-icon {
  float: left;
  width: 24px;
  height: 24px;
  background: url("./static/img/Icon@2x.png") no-repeat;
  background-size: 100% 100%;
  margin-top: 8px;
}
.text {
  font-size: 16px;
  font-weight: 500;
  color: rgba(255, 255, 255, 1);
  line-height: 40px;
  float: left;
  margin-left: 6px;
}
.login-handler {
  font-size: 12px;
  font-weight: 500;
  color: rgba(255, 255, 255, 1);
  line-height: 40px;
  float: left;
  cursor: pointer;
}
.right-var-wrap {
  float: right;
  font-size: 0;
  text-align: right;
}
.tip-icon,
.avatar-wrap,
.bar-wrap {
  display: inline-block;
  vertical-align: top;
}
.tip-icon {
  font-size: 16px;
  line-height: 40px;
  margin-right: 26px;
  color: #818895;
  cursor: pointer;
  &:hover {
    color: #fff;
  }
  &.has-new-message {
    position: relative;
    &:after {
      content: " ";
      display: inline-block;
      position: absolute;
      top: 50%;
      width: 6px;
      height: 6px;
      border-radius: 3px;
      background: red;
      right: 0;
      margin-top: -7px;
    }
  }
}
.user_dropdown {
  position: relative;
  cursor: pointer;
  font-size: 14px;
  text-align: center;
  &:hover {
    .unick {
      color: #fff;
    }
    i {
      -webkit-transform: rotate(180deg);
      -moz-transform: rotate(180deg);
      -ms-transform: rotate(180deg);
      -o-transform: rotate(180deg);
      transform: rotate(180deg);
      animation-fill-mode: forwards;
      border-color: #fff transparent transparent;
    }
    > ul {
      display: block;
      position: absolute;
      top: 40px;
      width: 100%;
      min-width: 80px;
      line-height: 30px;
      background-color: #32373e;
      z-index: 1000;
      list-style: none;
      margin: 0px;
      padding: 0px;
      > li {
        width: 100%;
        height: 30px;
        &:hover {
          background-color: #25282d;
          color: #fff;
        }
      }
    }
  }
  .unick {
    display: block;
    height: 40px;
    line-height: 40px;
    font-size: 14px;
    color: #afb5c0;
    max-width: 96px;
    margin: 0