

RabbitMQ
1. RabbitMQ简介
1.1 MQ(Message Queue)消息队列
- 消息队列中间件是分布式系统中的重要组件,消息队列主要解决异步处理、应用解耦、流量削峰等问题,从而实现了高性能高可用,可伸缩和最终一致性的架构。
- 主要的消息队列产品有RabbitMQ,RocketMQ,ActiveMQ,ZeroMQ,Kafka等,按综合性来说RabbitMQ最佳,kafka性能爆炸,可能会丢失部分数据,RocketMQ稳定性最好
- 异步处理
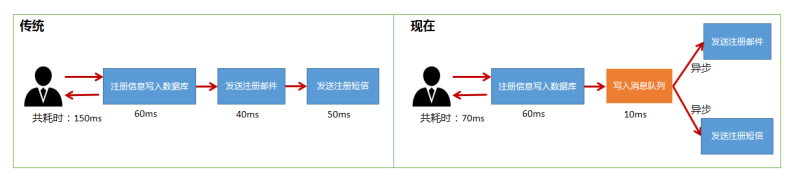
- 应用解耦

-
- 库存系统与订单系统应用解耦,用户下单后,订单系统完成持久化处理,将消息写入消息队列,返回用户,下单成功,库存系统订阅下单消息,根据下单消息进行库存操作
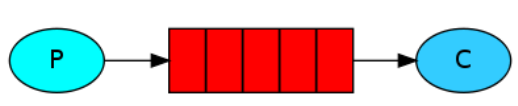
- 消息队列是典型的生产者消费者模型,生产者不断的向消息队列中生产消息,消费者不断的从队列中获取消息,消息的生产和消费是异步的,没有业务逻辑的入侵,只关心消息的发送和接收,实现了生产者与消费者的解耦
- 流量削峰,针对高并发的场景,在前端加入消息队列,设置队列长度,如果超如队列长度就抛弃该消息
![]()

1.2 RabbitMQ背景
- AMQP高级消息队列协议Advanced Message Queuing Protocol
- 一个提供统一消息服务的应用层标准高级消息队列协议,在第七层
- 基于此协议的客户端可以与消息中间件进行消息的传递
- 不收产品、开发语言等条件的限制
- JMS即Java Message Server
- 是java消息服务应用程序接口,与AMQP对接的规范
- 是一个java平台中关于面向消息中间件的API,用于在两个应用程序之间或分布式系统中发送消息,进行异步通信
- 联系
- JMS定义了统一接口,统一消息操作,是java语言
- AMQP通过协议统一数据交互格式,是一种协议
- Erlang语言
- 是一种通用的面向并发的编程余元,创造一种可以应对大规模并发活动的编程语言和运行环境的实施软并行计算系统
- Erlang运行时环境是一个虚拟机,代码一经编译随处运行
1.3 为什么选择RabbitMQ
- Erlang开发,AMQP的最佳搭档,安装部署简单,上手门槛低
- 企业级消息队列,有强大的web管理页面,强大的社区支持
- 支持消息持久化、消息确认机制、灵活的任务分发机制,功能丰富
- 易进行集群扩展,可以通过增加节点实现成倍的性能提升
1.4 各组件功能
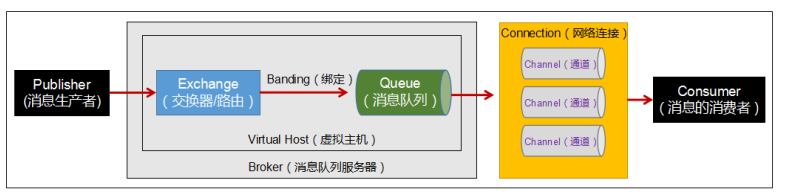
- Broker:消息队列服务器实体
- Virtual Host:虚拟的主机,RabbitMQ默认的vhost是 /,必须在链接时指定,标识一批交换机、消息队列和相关对象而形成的整体,虚拟主机共享相同的身份认证和加密环境的独立服务器域,每个虚拟主机本质上是一个迷你版的RabbitMQ服务器,拥有自己的队列、交换器、绑定和权限机制
- Exchange:交换机,路由,用来接收生产者发送的消息并将这些消息路由给服务器中的队列
- Queue:用来保存消息知道发送给消费者,一个消息可以投递给多个队列,是消息的容器和终点,消息一直在队列里面,等待消费者连接到这个队列将其取走
- Banding:绑定,用于消息队列和交换机之间的关联
- Channel:通道,多路复用连接中的一条独立的双向数据流通道,AMQP通过信道发出,消息操作在信道完成,可以减小TCP连接的开销
- Connection:网络连接
- Publisher:生产者,一个向交换机发布消息的客户端应用程序
- Consumer:消费者,一个从消息队列中取得消息的客户端应用程序
- Message:消息,由消息头和消息体组成,消息体不透明,消息头由一系列可选属性组成,包括路由键routing-key,优先级priority,(持久性存储)消息的路由模式delivery-mode
2. RabbitMQ使用
- RabbitMQ的安装需要先安装erlang语言环境,有版本的匹配要求https://www.rabbitmq.com/which-erlang.ht
- 安装前先下载erlang(https://dl.bintray.com/rabbitmq-erlang/rpm/erlang)、socat(http://repo.iotti.biz/CentOS/7/x86_64/socat-1.7.3.2-5.el7.lux.x86_64.rpm)和RabbitMQ(https://www.rabbitmq.com/install-rpm.html#downloads )
2.1 安装
- 安装
[root@localhost opt]# rpm -ivh erlang-21.3.8.16-1.el7.x86_64.rpm
[root@localhost opt]# rpm -ivh socat-1.7.3.2-5.el7.lux.x86_64.rpm
[root@localhost opt]# rpm -ivh rabbitmq-server-3.8.6-1.el7.noarch.rpm
- 启动后台管理插件
[root@localhost opt]# rabbitmq-plugins enable rabbitmq_management
- 启动RabbitMQ
[root@localhost opt]# systemctl start rabbitmq-server.service
[root@localhost opt]# systemctl status rabbitmq-server.service
[root@localhost opt]# systemctl restart rabbitmq-server.service
[root@localhost opt]# systemctl stop rabbitmq-server.service
- 查看进程
[root@localhost opt]# ps -ef | grep rabbitmq
- 关闭防火墙测试
 systemctl stop firewalld
http://192.168.80.128:15672
- 创建账号,设置用户角色、权限(默认guest,guest用户默认不允许远程连接)
#创建账号
[root@localhost opt]# rabbitmqctl add_user rf 123456
#设置用户角色
[root@localhost opt]# rabbitmqctl set_user_tags rf administrator
#设置用户权限
[root@localhost opt]# rabbitmqctl set_permissions -p "/" rf ".*" ".*" ".*"
#查看当前用户和角色
[root@localhost opt]# rabbitmqctl list_users
#修改密码
[root@localhost opt]# rabbitmqctl change_password rf 123123
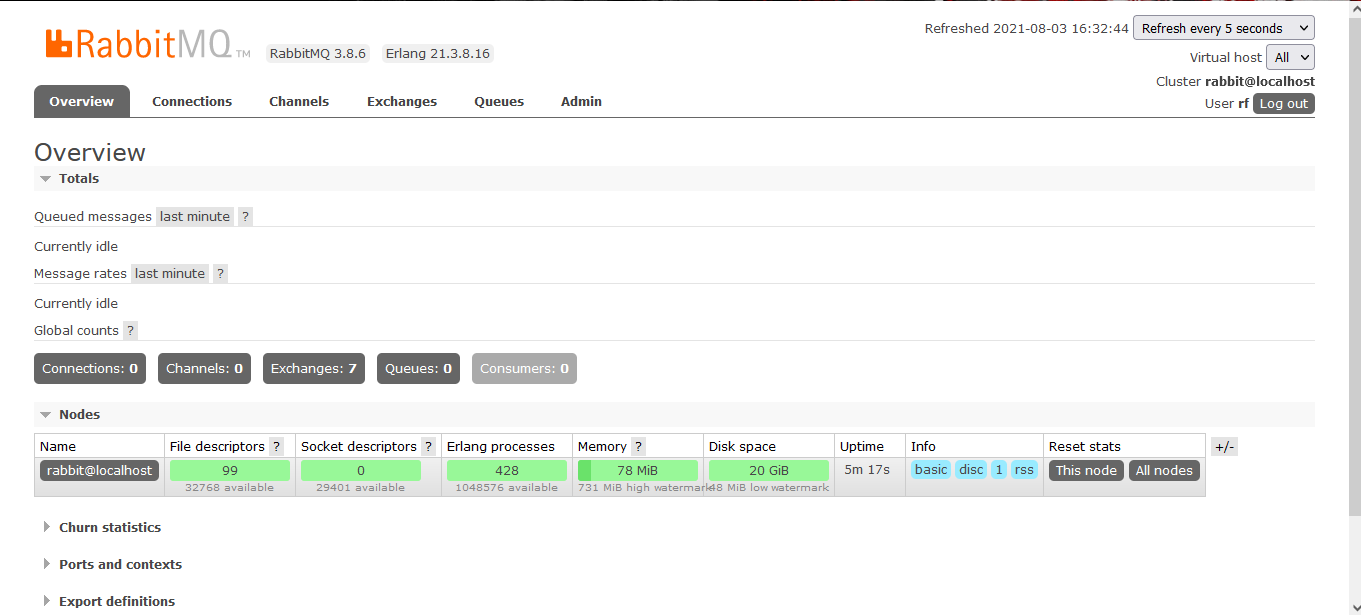
- 进入浏览器查看管理界面
![]()
- overview:概览
- connections:连接情况
- channels:信道或通道情况
- Exchanges:交换机、路由
- Queues:消息队列
- Admin:用户,管理员列表
- 端口:
- 5672:RabbitMQ提供给编程语言客户端链接的端口,java端口
- 15672:RabbitMQ管理界面的端口
- 25672:RabbitMQ集群的端口
2.2 RabbitMQ快速入门
-
依赖
<?xml version="1.0" encoding="UTF-8"?>
<project xmlns="http://maven.apache.org/POM/4.0.0"
         xmlns:xsi="http://www.w3.org/2001/XMLSchema-instance"
         xsi:schemaLocation="http://maven.apache.org/POM/4.0.0 http://maven.apache.org/xsd/maven-4.0.0.xsd">
    <modelVersion>4.0.0</modelVersion>

    <groupId>org.example</groupId>
    <artifactId>rabbit-quick</artifactId>
    <version>1.0-SNAPSHOT</version>

    <dependencies>
    <!-- AMQP协议-->
    <dependency>
        <groupId>com.rabbitmq</groupId>
        <artifactId>amqp-client</artifactId>
        <version>5.7.3</version>
    </dependency>
    <!-- log4j-->
    <dependency>
        <groupId>org.slf4j</groupId>
        <artifactId>slf4j-log4j12</artifactId>
        <version>1.7.25</version>
        <scope>compile</scope>
    </dependency>
    <!--     lang3   -->
    <dependency>
        <groupId>org.apache.commons</groupId>
        <artifactId>commons-lang3</artifactId>
        <version>3.9</version>
    </dependency>
    </dependencies>
</project>
-
日志依赖
log4j.appender.stdout=org.apache.log4j.ConsoleAppender
log4j.appender.stdout.Target=System.out
log4j.appender.stdout.layout=org.apache.log4j.PatternLayout
log4j.appender.stdout.layout.ConversionPattern=%d{yyyy-MM-dd HH:mm:ss} %m%n
log4j.appender.file=org.apache.log4j.FileAppender
log4j.appender.file.File=rebbitmq.log
log4j.appender.file.layout=org.apache.log4j.PatternLayout
log4j.appender.file.layout.ConversionPattern=%d{yyyy-MM-dd HH:mm:ss} %l %m%n
log4j.rootLogger=debug, stdout,file
-
创建虚拟主机,连接
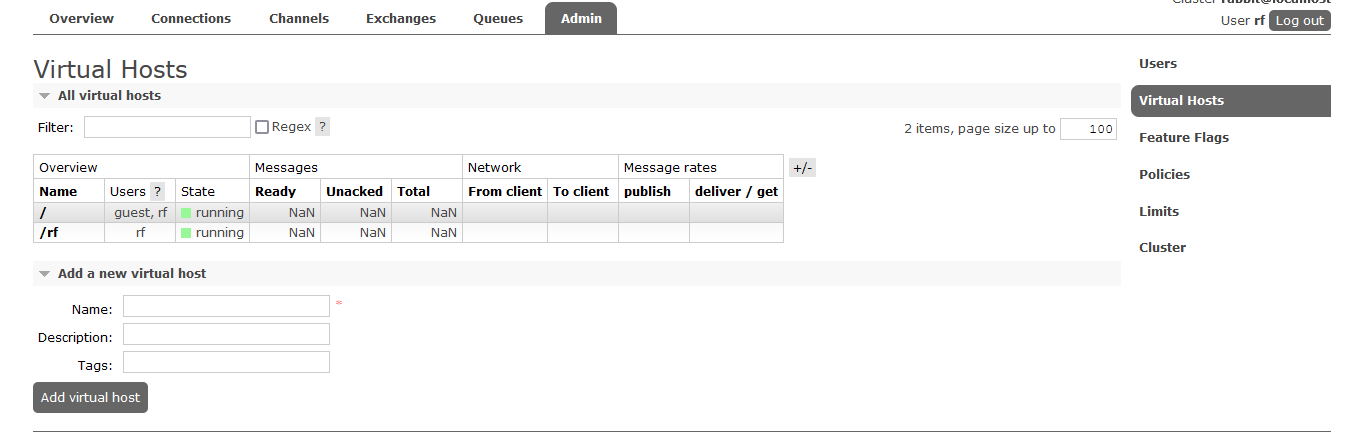
package utils;


import com.rabbitmq.client.Connection;
import com.rabbitmq.client.ConnectionFactory;

import java.io.IOException;
import java.util.concurrent.TimeoutException;

public class ConnectionUtil {
    public static Connection getConnection() throws Exception {
        //1.创建连接工厂
        ConnectionFactory connectionFactory = new ConnectionFactory();
        //2.在工厂对象中设置MQ的连接信息(ip,port,vhost,username,password)
        connectionFactory.setHost("192.168.80.128");
        connectionFactory.setPort(5672);
        connectionFactory.setVirtualHost("/rf");
        connectionFactory.setUsername("rf");
        connectionFactory.setPassword("123456");
        //3.通过工厂获得与MQ的连接
        Connection connection = connectionFactory.newConnection();
        return connection;
    }

    public static void main(String[] args) throws Exception {
        Connection connection = ConnectionUtil.getConnection();
        //mqp://rf@192.168.80.128:5672//rf
        System.out.println("connection = " + connection);
        connection.close();
    }

}
2.3 RabbitMQ模式
RabbitMQ提供了6中消息模型,第6种是RPC,不是消息队列,以下五种大致分为两类:点对点和发布订阅,RabbitMQ本身只是接收,存储和转发消息,并不会对信息进行处理
- 点对点: p2p模式,包含消息队列,发送者和接受者,每个消息发送到一个特定队列中,接受者从中获得消息,队列中保留这些消息,直到它们被消费或超时
- 普通模式和工作队列模式属于点对点模式
- 每个消息只有一个消费者,一旦消费,消息就不在队列中
- 发送者和接受者之间没有依赖性,发送者发送完成,不管接受者是否运行,都不会影响消息发送到队列中
- 接受者成功接受到消息之后需要向对象发送确认,发送的每个消息都会被成功处理
- 发布订阅模式:publish(Pub)/subscribe(Sub),包含发布者、订阅者和交换机
- 发布订阅模式、路由模式和通配符模式属于发布订阅类型
- 多个发布者将消息发送给交换机,系统将这些消息传递给多个订阅者
- 每个消息可以有多个订阅者
- 发布者和订阅者在时间上有依赖,对于某个交换机的订阅者,必须创建一个订阅后,才能消费发布者发布的消息
- 为了消费消息,订阅者必须保持运行状态
- 适用于发送的消息被福讴歌消费者进行处理
2.3.1 简单模式
- 生产者
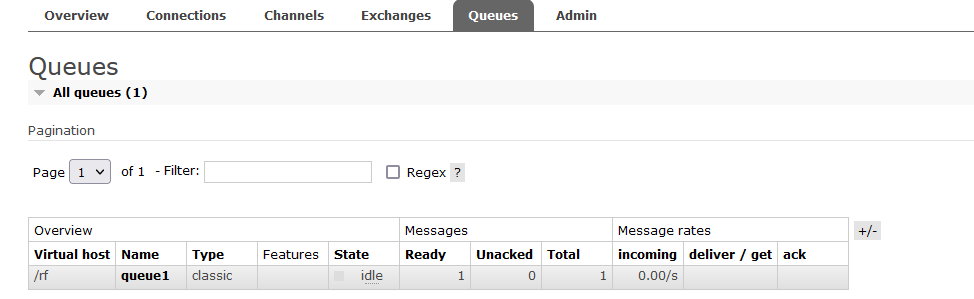
package common;

import com.rabbitmq.client.Channel;
import com.rabbitmq.client.Connection;
import utils.ConnectionUtil;

//消息的生产者
public class Sender {

    public static void main(String[] args) throws Exception {
        //生产的消息
        String msg="hello,rabbit!我是rf";

        // 1.获得连接
        Connection connection = ConnectionUtil.getConnection();

        // 2.在连接中创建通道(信道)
        Channel channel = connection.createChannel();

        // 3.创建消息队列(1,2,3,4,5)启动生产者,即可前往管理端查看队列中的信息,会有一条信息没有处理和确认
        /*
        参数1:队列的名称
        参数2:队列中的数据是否持久化
        参数3:是否排外(是否支持扩展,当前队列只能自己用,不能给别人用)
        参数4:是否自动删除(当队列的连接数为0时,队列会销毁,不管队列是否还存保存数据)
        参数5:队列参数(没有参数为null)
        */
           channel.queueDeclare("queue1",false,false,false,null);

        // 4.向指定的队列发送消息(1,2,3,4)
        /*
        参数1:交换机名称,当前是简单模式,也就是P2P模式,没有交换机,所以名称为""
        参数2:目标队列的名称
        参数3:设置消息的属性(没有属性则为null)
        参数4:消息的内容(只接收字节数组)
        */
        channel.basicPublish("","queue1",null,msg.getBytes());
        System.out.println("发送:" + msg+"成功");
        // 5.释放资源
        channel.close();
        connection.close();

    }


}
- 消费者
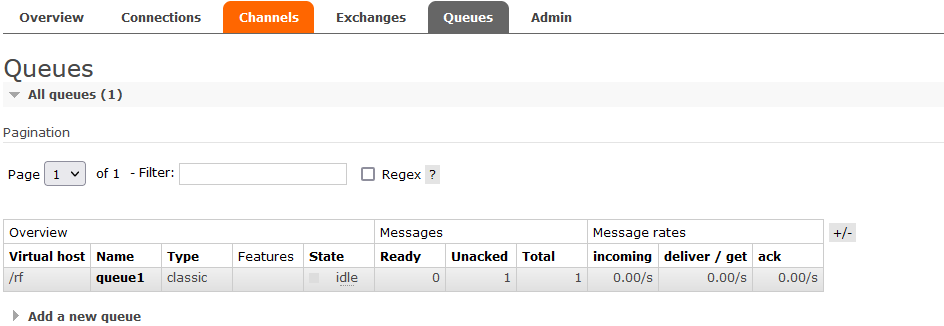
package common;

import com.rabbitmq.client.*;
import utils.ConnectionUtil;

import java.io.IOException;

public class Receiver {
    public static void main(String[] args) throws Exception{

        // 1.获得连接
        Connection connection = ConnectionUtil.getConnection();
        // 2.获得通道(信道)
        Channel channel = connection.createChannel();
        // 3.从信道中获得消息
        DefaultConsumer defaultConsumer = new DefaultConsumer(channel){
            @Override //交付处理(收件人信息,包裹上的快递标签,协议的配置,消息)
            public void handleDelivery(String consumerTag, Envelope envelope, AMQP.BasicProperties properties, byte[] body) throws IOException {
                // body就是从队列中获取的消息
                String s=new String(body);
                System.out.println("接收 = " + s);
            }
        };

        // 4.监听队列 true:自动消息确认
      channel.basicConsume("queue1", false,defaultConsumer); //若将监听队列改为true则进行消息确认,false则结束消费者,未确认的消息返回队列中
    }

}
- 加入消息确认机制
- 消息一旦被消费,就会立刻从队列中移除
- 若消费者接收消息后还未执行操作就出现异常导致消费失败,而RabbitMQ无从得知,消息就会丢失
- 通过RabbitMQ的确认ACK机制,当消费者获取消息后,回想RabbitMQ发送回执确认,确认消息已经被接受
- 如果消息不太重要,丢失也没有影响,选择自动确认机制
- 如果消息非常重要,最好使用手动确认,否则当自动确认消费后,RabbitMQ就会删除消息,若此时消费者异常宕机,则消息永久丢失
- 手动消息确认
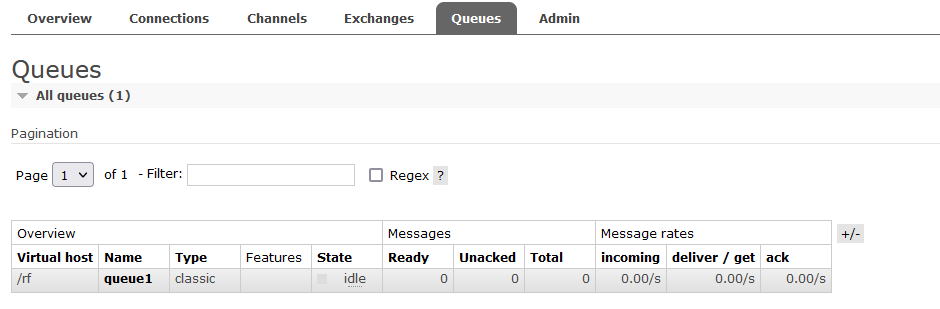
package common;

import com.rabbitmq.client.*;
import utils.ConnectionUtil;

import java.io.IOException;

public class Receiver {
    public static void main(String[] args) throws Exception{

        // 1.获得连接
        Connection connection = ConnectionUtil.getConnection();
        // 2.获得通道(信道)
        Channel channel = connection.createChannel();
        // 3.从信道中获得消息
        DefaultConsumer defaultConsumer = new DefaultConsumer(channel){
            @Override //交付处理(收件人信息,包裹上的快递标签,协议的配置,消息)
            public void handleDelivery(String consumerTag, Envelope envelope, AMQP.BasicProperties properties, byte[] body) throws IOException {
                // body就是从队列中获取的消息
                String s=new String(body);
                System.out.println("接收 = " + s);
                //来一个确认一个
                // 手动确认(参数1:收件人信息,确认机制:是否同时确认多个消息)
                channel.basicAck(envelope.getDeliveryTag(),false);
            }
        };

        // 4.监听队列 true:自动消息确认
      channel.basicConsume("queue1", false,defaultConsumer);
    }

}
2.3.2 工作队列模式
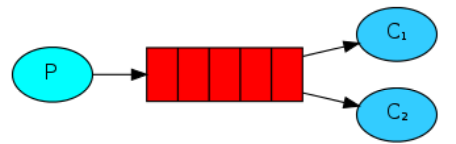
- 如果生产者生产消息过快多,消费者能力有限,就会产生消息在队列中堆积
- 使用多个消费者对消息进行处理,RabbitMQ采用的是公平分配机制,第n条消息发送给第N个消费者进行处理
- 生产者
package workqueue;

import com.rabbitmq.client.Channel;
import com.rabbitmq.client.Connection;
import utils.ConnectionUtil;

public class Sender {
    public static void main(String[] args) throws Exception {

        Connection connection = ConnectionUtil.getConnection();
        Channel channel = connection.createChannel();
         /*
        参数1:队列的名称
        参数2:队列中的数据是否持久化
        参数3:是否排外(是否支持扩展,当前队列只能自己用,不能给别人用)
        参数4:是否自动删除(当队列的连接数为0时,队列会销毁,不管队列是否还存保存数据)
        参数5:队列参数(没有参数为null)
        */
        channel.queueDeclare("work_queue",false,false,false,null);

        for(int i=0;i<100;i++) {
            String msg = "羊肉串 --> "+i;
            /*
        参数1:交换机名称,当前是简单模式,也就是P2P模式,没有交换机,所以名称为""
        参数2:目标队列的名称
        参数3:设置消息的属性(没有属性则为null)
        参数4:消息的内容(只接收字节数组)
        */
            channel.basicPublish("", "work_queue", null,msg.getBytes() );
            System.out.println("师傅烤好:" + msg);
        }
        System.out.println("师傅烤好了" );
        channel.close();
        connection.close();
    }
}
- 消费者1,2 内容类似
package workqueue;

import com.rabbitmq.client.*;
import utils.ConnectionUtil;

import java.io.IOException;

public class Receiver1 {
    private static Integer i=1;
    public static void main(String[] args) throws Exception {
        Connection connection = ConnectionUtil.getConnection();
      final   Channel channel = connection.createChannel();
        // 声明队列(此处为消费者,不是声明创建队列,获取队列)
        channel.queueDeclare("work_queue",false,false,false,null);
        DefaultConsumer consumer = new DefaultConsumer(channel) {
            @Override
            public void handleDelivery(String consumerTag, Envelope envelope, AMQP.BasicProperties properties, byte[] body) throws IOException {
                String msg = new String(body);
                System.out.println("【顾客1】吃掉 " + msg+" ! 共吃【"+i++ +"】串");
                try {
                    Thread.sleep(200);
                } catch (InterruptedException e) {
                    e.printStackTrace();
                }
                channel.basicAck(envelope.getDeliveryTag(), false);
            }
        };

        channel.basicConsume("work_queue",false,consumer);
    }
}
- 先启动消费者,在启动生产者,两个消费者公平消费
- 使用prefetchCount = 1的basicQos方法可以实现对消费的分配处理,在消费者处理并确认一个消息前,不会有新消息发送给当前消费者,而分派给其他空闲的消费者
package workqueue;

import com.rabbitmq.client.*;
import utils.ConnectionUtil;

import java.io.IOException;

public class Receiver1 {
    private static Integer i=1;
    public static void main(String[] args) throws Exception {
        Connection connection = ConnectionUtil.getConnection();
      final   Channel channel = connection.createChannel();

        // 声明队列(此处为消费者,不是声明创建队列,获取队列)
        channel.queueDeclare("work_queue",false,false,false,null);
        // 避免消息堆积,谁速度快谁消费多
        channel.basicQos(1);
        DefaultConsumer consumer = new DefaultConsumer(channel) {
            @Override
            public void handleDelivery(String consumerTag, Envelope envelope, AMQP.BasicProperties properties, byte[] body) throws IOException {
                String msg = new String(body);
                System.out.println("【顾客1】吃掉 " + msg+" ! 共吃【"+i++ +"】串");
                try {
                    Thread.sleep(200);
                } catch (InterruptedException e) {
                    e.printStackTrace();
                }
                channel.basicAck(envelope.getDeliveryTag(), false);
            }
        };

        channel.basicConsume("work_queue",false,consumer);
    }
}
- 必须结合手动确认机制
- 如何避免消息堆积
- 采用工作队列模式,多个消费者监听同一个队列
- 当接收到消息后,通过线程池,进行异步消费,当前线程非空闲时,其它线程可以消费消息
- 采用工作队列模式,多个消费者监听同一个队列
2.3.3 发布订阅模式
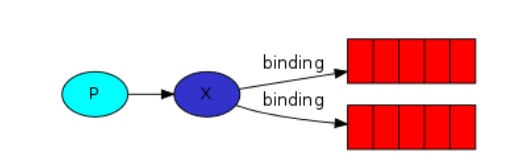
- 一个发布消息,多个消费者接受发布的消息,x为路由,p生产者发送消息给x路由,x将消息转发给绑定x的队列
- 必须想创建路由,路由在生产者中创建,由于路由没有存储信息的能力,当生产者将消息发送给路由时,消费者还未运行,此时没有消息队列
- 先运行生产者,产生路由,在运行消费者,最后再运行生产者
- 生产者
package subpub;

import com.rabbitmq.client.Channel;
import com.rabbitmq.client.Connection;
import utils.ConnectionUtil;

public class Publisher {
    public static void main(String[] args)throws Exception {
        Connection connection = ConnectionUtil.getConnection();
        Channel channel = connection.createChannel();
        // 声明路由(路由名,路由类型)
// fanout:不处理路由键(只需要将队列绑定到路由上,发送到路由的消息都会被转发到与该路由绑定的所有队列上)
        channel.exchangeDeclare("test_exchange_fanout","fanout");
        String msg = "hello,大家好!";
        channel.basicPublish("test_exchange_fanout", "", null, msg.getBytes());
        System.out.println("生产者:" + msg);
        channel.close();
        connection.close();
    }
}
- 消费者
package subpub;

import com.rabbitmq.client.*;
import utils.ConnectionUtil;

import java.io.IOException;

public class Consumer1 {
    public static void main(String[] args)  throws Exception{
        Connection connection = ConnectionUtil.getConnection();
        Channel channel = connection.createChannel();
        channel.queueDeclare("test_exchange_fanout_queue_1",false,false,false,null);
        //        绑定路由
        /*
        参数1:队列名
        参数2:交换器名称
        参数3:路由key(暂时无用,""即可)
        */
        channel.queueBind("test_exchange_fanout_queue_1","test_exchange_fanout","");
        DefaultConsumer consumer = new DefaultConsumer(channel) {
            @Override
            public void handleDelivery(String consumerTag, Envelope envelope, AMQP.BasicProperties properties, byte[] body) throws IOException {
                String s = new String(body);
                System.out.println("【消费者1】 = " + s);
            }
        };

        channel.basicConsume("test_exchange_fanout_queue_1",true,consumer);
    }
}
2.3.4 路由模式
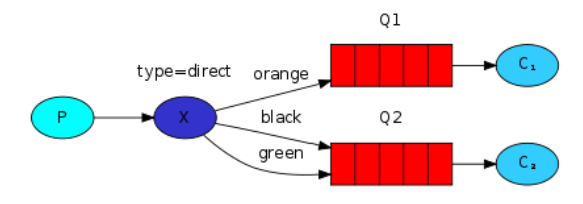
- 路由会根据类型进行定向分发
- 生产者
package router;

import com.rabbitmq.client.Channel;
import com.rabbitmq.client.Connection;
import utils.ConnectionUtil;

public class Sender {
        public static void main(String[] args) throws Exception {
            Connection connection = ConnectionUtil.getConnection();
            Channel channel = connection.createChannel();
             // 声明路由(路由名,路由类型)
             // direct:根据路由键进行定向分发消息
            channel.exchangeDeclare("test_exchange_direct", "direct");
            String msg = "用户注册,【userid=S101】";
            channel.basicPublish("test_exchange_direct", "select", null,
                    msg.getBytes());
            System.out.println("[用户系统]:" + msg);
            channel.close();
            connection.close();
        }

}
- 消费者
package router;

import com.rabbitmq.client.*;
import utils.ConnectionUtil;

import java.io.IOException;

public class Receiver1 {

    public static void main(String[] args) throws Exception {
        Connection connection = ConnectionUtil.getConnection();
        Channel channel = connection.createChannel();
// 声明队列
        channel.queueDeclare("test_exchange_direct_queue_1", false, false, false, null);
// 绑定路由(如果路由键的类型是 添加,删除,修改 的话,绑定到这个队列1上)
        channel.queueBind("test_exchange_direct_queue_1", "test_exchange_direct", "insert");
        channel.queueBind("test_exchange_direct_queue_1",
                "test_exchange_direct", "update");
        channel.queueBind("test_exchange_direct_queue_1",
                "test_exchange_direct", "delete");

        DefaultConsumer consumer = new DefaultConsumer(channel) {
            @Override
            public void handleDelivery(String consumerTag, Envelope envelope, AMQP.BasicProperties properties, byte[] body) throws IOException {
                String s = new String(body);
                System.out.println("【消费者1】 = " + s);
            }
        };
// 4.监听队列 true:自动消息确认
        channel.basicConsume("test_exchange_direct_queue_1", true, consumer);
    }
}
2.3.5 通配符模式
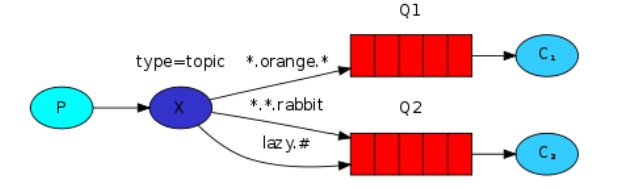
- 路由键支持模糊匹配
- * 只能匹配一个单词
- #匹配0个或更多个单词
- 生产者
package fuzzy;

import com.rabbitmq.client.Channel;
import com.rabbitmq.client.Connection;
import utils.ConnectionUtil;

public class Sender {
    public static void main(String[] args) throws Exception {
        Connection connection = ConnectionUtil.getConnection();
        Channel channel = connection.createChannel();
      // 声明路由(路由名,路由类型)
        // topic:模糊匹配的定向分发
        channel.exchangeDeclare("test_exchange_topic", "topic");
        String msg = "商品降价";
        channel.basicPublish("test_exchange_topic", "product.price", null, msg.getBytes());
        System.out.println("[用户系统]:" + msg);
        channel.close();
        connection.close();
    }
}
- 消费者
package fuzzy;

import com.rabbitmq.client.*;
import utils.ConnectionUtil;

import java.io.IOException;

public class Receiver1 {
    public static void main(String[] args) throws Exception {
        Connection connection = ConnectionUtil.getConnection();
        Channel channel = connection.createChannel();
// 声明队列
        channel.queueDeclare("test_exchange_topic_queue_1",false,false,false,null);
// 绑定路由(绑定 用户相关 的消息)
        channel.queueBind("test_exchange_topic_queue_1", "test_exchange_topic",
                "user.#");
        DefaultConsumer consumer = new DefaultConsumer(channel){
            @Override
            public void handleDelivery(String consumerTag, Envelope envelope,
                                       AMQP.BasicProperties properties, byte[] body) throws IOException {
                String s = new String(body);
                System.out.println("【消费者1】 = " + s);
            }
        };
// 4.监听队列 true:自动消息确认
        channel.basicConsume("test_exchange_topic_queue_1", true,consumer);
    }
}
package fuzzy;

import com.rabbitmq.client.*;
import utils.ConnectionUtil;

import java.io.IOException;

public class Receiver2 {
    public static void main(String[] args) throws Exception {
        Connection connection = ConnectionUtil.getConnection();
        Channel channel = connection.createChannel();
         // 声明队列
        channel.queueDeclare("test_exchange_topic_queue_2",false,false,false,null);
         // 绑定路由(绑定 用户相关 的消息)
        channel.queueBind("test_exchange_topic_queue_2", "test_exchange_topic",
                "price.#");
        DefaultConsumer consumer = new DefaultConsumer(channel){
            @Override
            public void handleDelivery(String consumerTag, Envelope envelope,
                                       AMQP.BasicProperties properties, byte[] body) throws IOException {
                String s = new String(body);
                System.out.println("【消费者2】 = " + s);
            }
        };
        // 4.监听队列 true:自动消息确认
        channel.basicConsume("test_exchange_topic_queue_2", true,consumer);
    }
}