

FastDFS
1.分布式文件系统
- 文件数据存放在硬盘中,通过驱动程序,由文件系统读取
- 分布式: 不同的业务模块部署在不同的服务器上,或者同一个业务模块拆分成多个子业务,部署不同的服务器上,用于解决高并发
- 集群: 同一个业务模块部署在多态服务器上,提高系统的复用性
- 主流的分布式系统
- HFDS (Hadoop Distributed File System) Hadoop 分布式文件系统
- 是一种高容错的系统,适合部署到廉价的机器上,能提供高吞吐量的数据访问,适合大规模的数据应用,如大文件音视频
- 采用主从结构,一个HDFS是由一个name节点和N个data接待组成,name节点存储元数据,一个文件被分割成N份存储在不同的data节点上
- GFS(Goolgle File System)
- 是一种可扩展式的分布式文件系统,用于大型分布式,对大量数据进行访问的应用
- 原理与HFDS类似,运行与廉价的普通硬件上,可以提供容错功能
- 采用主从结构,一个GFS集群由一个master和多个chunkserver分块服务器组成,一个文件被分割成若干块,储存在多个分块服务器中
- FastDFS
- 由淘宝余庆编写,开源,专为互联网量身定制,充分考虑了冗余备份、负载均衡、线性扩容等机制,并注重高可用、高性能等指标
- 易搭建一套高性能的文件服务器集群提供文件上传、下载等服务,使用与图片、小视频等小文件,对文件不分割,没有文件合并的开销
- 网络通信使用socket,速度快
- HDFS、GFS作为通用的文件系统,开发体验骄傲,复杂度高
- HFDS (Hadoop Distributed File System) Hadoop 分布式文件系统
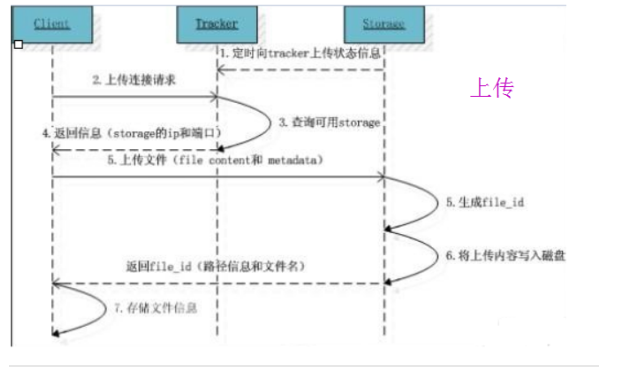
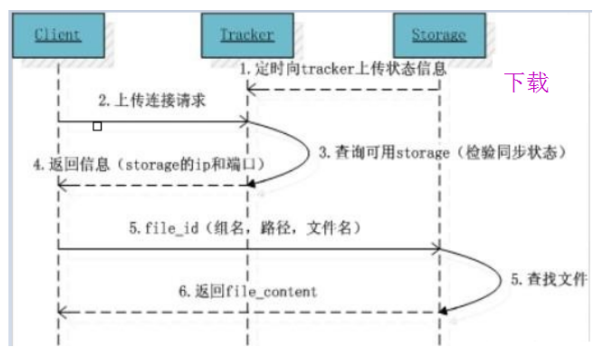
- FastDFS 工作原理
- FastDFS 包含Tracker Server和Storage Server
- 步骤:
- 客户端请求Tracker Server进行文件的上传与下载
- Tracker Server调度Storage Serve进行文件的上传与下载
- Tracker :负载均衡和调度,管理则存储服务Storage Server,调度员,可以集群,实现高可用,采用轮询策略
- Storage:文件存储,客户端上传的文件最终存储到Storage服务器上,Storage集群采用分组的方式,同组内的每台服务器是平等关系,数据同步,实现数据备份,从而高可用,不同组的服务器不通信,同组内的服务器存储量不一致时,遵循最小原则
- Storage Server:会连接集群中的所有Tracker Server,定时向他们汇报自己的状态,包括剩余空间,文件同步情况,文件上传下载次数等信息
![]()
-
- 客户端上传文件后,storage会将文件ID返回给客户端,如group1/M00/02/11/aJxAeF21O5wAAAAAAAAGaEIOA12345.sh
- 组名:文件上传后,group1在storage组的名称,文件上传成功后,由storage返回,需要客户端自行保存
- 虚拟磁盘路径:M00/02,storage配置的虚拟路径,分为两级目录,在磁盘选项storage_path对应,storage_path0对应M00,storage_path1对应M01。storage在虚拟磁盘下自行创建的目录是两级数据目录
- 文件名:由storage根据特定信息生成,包含storage服务器的IP,创建时间戳,文件大小,后缀名等信息
- 客户端上传文件后,storage会将文件ID返回给客户端,如group1/M00/02/11/aJxAeF21O5wAAAAAAAAGaEIOA12345.sh
- 文件上传下载原理
![]()
![]()

2.FastDFS的上传与下载
- 安装
- 安装gcc编译环境
[root@localhost usr]# yum install -y gcc gcc-c++
Loaded plugins: fastestmirror, langpacks
base                                                  | 3.6 kB     00:00
extras                                                | 2.9 kB     00:00
mysql-connectors-community                            | 2.6 kB     00:00
mysql-tools-community                                 | 2.6 kB     00:00
mysql57-community                                     | 2.6 kB     00:00
updates                                               | 2.9 kB     00:00
updates/7/x86_64/primary_db                             | 9.5 MB   00:04
Loading mirror speeds from cached hostfile
 * base: mirrors.aliyun.com
 * extras: mirrors.aliyun.com
 * updates: mirrors.aliyun.com
Package gcc-4.8.5-44.el7.x86_64 already installed and latest version
Package gcc-c++-4.8.5-44.el7.x86_64 already installed and latest version
Nothing to do
- 安装libevent(运行时需求)
[root@localhost usr]# yum -y install libevent
Loaded plugins: fastestmirror, langpacks
Loading mirror speeds from cached hostfile
 * base: mirrors.aliyun.com
 * extras: mirrors.aliyun.com
 * updates: mirrors.aliyun.com
Package libevent-2.0.21-4.el7.x86_64 already installed and latest version
Nothing to do
- 安装 libfastcommon ,FastDFS官方提供,包含了FastDFS运行所需要的一些基础库
[root@localhost rf494969]# yum install -y unzip
Loaded plugins: fastestmirror, langpacks
Loading mirror speeds from cached hostfile
 * base: mirrors.aliyun.com
 * extras: mirrors.aliyun.com
 * updates: mirrors.aliyun.com
Resolving Dependencies
--> Running transaction check
---> Package unzip.x86_64 0:6.0-13.el7 will be updated
---> Package unzip.x86_64 0:6.0-22.el7_9 will be an update
--> Finished Dependency Resolution

Dependencies Resolved

=============================================================================
 Package        Arch            Version               Repository        Size
=============================================================================
Updating:
 unzip          x86_64          6.0-22.el7_9          updates          171 k

Transaction Summary
=============================================================================
Upgrade  1 Package

Total size: 171 k
Downloading packages:
Running transaction check
Running transaction test
Transaction test succeeded
Running transaction
  Updating   : unzip-6.0-22.el7_9.x86_64                                 1/2
  Cleanup    : unzip-6.0-13.el7.x86_64                                   2/2
  Verifying  : unzip-6.0-22.el7_9.x86_64                                 1/2
  Verifying  : unzip-6.0-13.el7.x86_64                                   2/2

Updated:
  unzip.x86_64 0:6.0-22.el7_9

Complete!
拷贝libfastcommon-master.zip
[root@localhost rf494969]# unzip libfastcommon.zip
[root@localhost rf494969]# mv libfastcommon-master/ /usr/opt/
[root@localhost rf494969]# cd /usr/opt/libfastcommon-master/
[root@localhost libfastcommon-master]# ./make.sh
bash: ./make.sh: Permission denied
[root@localhost libfastcommon-master]# chmod 777 make.sh
[root@localhost libfastcommon-master]# ./make.sh
[root@localhost libfastcommon-master]# ./make.sh install
- 安装Tracker
下载 FastDFS_v5.05.tar.gz,并上传到 /opttar -zxvf FastDFS_v5.05.tar.gz cd FastDFS ./make.sh ./make.sh install
安装成功将安装目录下的conf下的文件拷贝到/etc/fdfs/下 - 安装gcc编译环境
cp /opt/FastDFS/conf/* /etc/fdfs/
-
[root@localhost etc]# cd fdfs/
[root@localhost fdfs]# ll
total 84
-rw-r--r--. 1 root root 23981 Aug  2 05:26 anti-steal.jpg
-rw-r--r--. 1 root root  1461 Aug  2 05:26 client.conf
-rw-r--r--. 1 root root   858 Aug  2 05:26 http.conf
-rw-r--r--. 1 root root 31172 Aug  2 05:26 mime.types
-rw-r--r--. 1 root root  7829 Aug  2 05:26 storage.conf
-rw-r--r--. 1 root root   105 Aug  2 05:26 storage_ids.conf
-rw-r--r--. 1 root root  7102 Aug  2 05:26 tracker.conf
- 配置
- Tracker配置
vim /etc/fdfs/tracker.conf
#端口号
port=22122
#基础目录(Tracker运行时会向此目录存储storage的管理数据)(基础目录不存在的话,需要自行创建mkdir /home/fastdfs)
base_path=/home/fastdfs
- Storage配置
vim /etc/fdfs/storage.conf

#配置组名
group_name=group1
#端口
port=23000
#向tracker心跳间隔(秒)
heart_beat_interval=30
#storage基础目录
#目录不存在,需要自行创建
base_path=/home/fastdfs
#store存放文件的位置(store_path)
#可以理解一个磁盘一个path,多个磁盘,多个store_path
#fdfs_storage目录不存在,需要自行创建
#mkdir /home/fastdfs/fdfs_storage
store_path0=/home/fastdfs/fdfs_storage
#如果有多个挂载磁盘则定义多个store_path,如下
#store_path1=..... (M01)
#store_path2=..... (M02)
#配置tracker服务器:IP
tracker_server=10.1.220.247:22122
#如果有多个则配置多个tracker
#tracker_server=10.1.220.x:22122
- 启动服务
- 启动tracker
/usr/bin/fdfs_trackerd /etc/fdfs/tracker.conf restart
- 启动storage
/usr/bin/fdfs_storaged /etc/fdfs/storage.conf restart
- 查看所有运行的端口
netstat -ntlp
- 搭建java工程
- pom.xml
<!--fastdfs的java客户端-->
<dependency>
<groupId>net.oschina.zcx7878</groupId>
<artifactId>fastdfs-client-java</artifactId>
<version>1.27.0.0</version>
</dependency>
<dependency>
<groupId>org.apache.commons</groupId>
<artifactId>commons-io</artifactId>
<version>1.3.2</version>
</dependency>
-
- 创建配置文件,在resources下创建config目录,在config目录下创建 fastdfs-client.properties
##fastdfs-client.properties fastdfs.connect_timeout_in_seconds = 5 fastdfs.network_timeout_in_seconds = 30 fastdfs.charset = UTF-8 fastdfs.http_anti_steal_token = false fastdfs.http_secret_key = FastDFS1234567890 fastdfs.http_tracker_http_port = 80 fastdfs.tracker_servers = 192.168.80.128:22122- 文件上传
- 创建配置文件,在resources下创建config目录,在config目录下创建 fastdfs-client.properties
package test;

import org.csource.common.MyException;
import org.csource.common.NameValuePair;
import org.csource.fastdfs.*;


public class TestUpload {
    public static void main(String[] args) {

        // 加载配置文件
        try {
            ClientGlobal.initByProperties("config/fastdfs-client.properties");
            // 创建tracker客户端
            TrackerClient trackerClient = new TrackerClient();
            // 通过tracker客户端获取tracker的连接服务并返回
            TrackerServer trackerServer = trackerClient.getConnection();
            // 声明storage服务
            StorageServer storageServer=null;
            // 定义storage客户端
            StorageClient1 storageClient=new StorageClient1(trackerServer,storageServer);
            // 定义文件元信息
            NameValuePair[] list=new NameValuePair[1];
            list[0]=new NameValuePair("filename","1.jpg");
            //参数: 源文件地址,文件后缀类型,目标文件,返回的是存储在文件系统的文件ID
            String FileId=storageClient.upload_file1("D:\\rf.jpg","jpg",list);
            System.out.println(FileId);
            // group1/M00/00/00/CgHc918f8l6AFYp0AAWICfQnHuk889.jpg
            /*
            group1:一台服务器,就是一个组
            M00: store_path0 ----> /home/fastdfs/fdfs_storage/data
            00/00:两级数据目录
            */
            trackerServer.close();
        }

        catch (Exception e) {
            e.printStackTrace();
        }
    }


}
-
- 文件查询
package test;

import org.csource.fastdfs.*;


public class TestQuery {
    public static void main(String[] args) throws Exception {
        // 加载配置文件
        ClientGlobal.initByProperties("config/fastdfs-client.properties");

        // 创建tracker客户端
        TrackerClient trackerClient=new TrackerClient();
        // 通过tracker客户端获取tracker的连接服务并返回
        TrackerServer trackerServer = trackerClient.getConnection();
        // 声明storage服务
        StorageServer storageServer=null;
        // 定义storage客户端
        StorageClient1 storageClient1=new StorageClient1(trackerServer,storageServer);
       //fileInfo = source_ip_addr = 192.168.80.128, file_size = 57923, create_timestamp = 2021-08-02 21:37:32, crc32 = -230082837
        FileInfo fileInfo=storageClient1.get_file_info1("group1/M00/00/00/wKhQgGEH9RyAOcZUAADiQ_JJNus223.jpg");
        if(fileInfo!=null){
            System.out.println("fileInfo = " +fileInfo);
        }else System.out.println("查无此文件!");
        trackerServer.close();


    }


}
-
- 文件下载
package test;

import org.csource.fastdfs.*;

import java.io.File;
import java.io.FileInputStream;
import java.io.FileOutputStream;

public class TestDownload {
    public static void main(String[] args) throws Exception {
         // 加载配置文件
        ClientGlobal.initByProperties("config/fastdfs-client.properties");

        // 创建tracker客户端
        TrackerClient trackerClient = new TrackerClient();
        // 通过tracker客户端获取tracker的连接服务并返回
        TrackerServer trackerServer = trackerClient.getConnection();
        // 声明storage服务
        StorageServer storageServer=null;
        // 定义storage客户端
        StorageClient1 storageClient1=new StorageClient1(trackerServer,storageServer);

        byte[] bytes = storageClient1.download_file1("group1/M00/00/00/wKhQgGEH9RyAOcZUAADiQ_JJNus223.jpg");
        // 通过io将字节数组,转换成一个文件
        FileOutputStream fos=new FileOutputStream(new File("D:/1.jpg"));
        fos.write(bytes);
        fos.close();
        trackerServer.close();
        System.out.println("下载完毕!");
    }
}
- 文件下载
3. 项目实战
- Nginx模块安装 (Storage)
- 上传 fastdfs-nginx-module_v1.16.tar.gz 到 /opt
- 解压nginx模块
tar -zxvf fastdfs-nginx-module_v1.16.tar.gz
- 修改 config 文件,将文件中的 /usr/local/ 路径改为 /usr/
[root@localhost src]# vim config
[root@localhost src]# cat config
ngx_addon_name=ngx_http_fastdfs_module
HTTP_MODULES="$HTTP_MODULES ngx_http_fastdfs_module"
NGX_ADDON_SRCS="$NGX_ADDON_SRCS $ngx_addon_dir/ngx_http_fastdfs_module.c"
CORE_INCS="$CORE_INCS /usr/include/fastdfs /usr/include/fastcommon/"
CORE_LIBS="$CORE_LIBS -L/usr/lib -lfastcommon -lfdfsclient"
CFLAGS="$CFLAGS -D_FILE_OFFSET_BITS=64 -DFDFS_OUTPUT_CHUNK_SIZE='256*1024' -DFDFS_MOD_CONF_FILENAME='\"/etc/fdfs/mod_fastdfs.conf\"'"
- 将 fastdfs-nginx-module/src下的 mod_fastdfs.conf 拷贝至 /etc/fdfs 下
cp mod_fastdfs.conf /usr/etc/fdfs/- 修改 /etc/fdfs/mod_fastdfs.conf
base_path=/home/fastdfs
#(n个tracker配置n行)
#tracker_server=10.1.220.x:22122
#url中包含group名称
tracker_server=192.168.80.128:22122
url_have_group_name = true
#指定文件存储路径(上面配置的store路径)
store_path0=/home/fastdfs/fdfs_storage
- 将 libfdfsclient.so 拷贝至 /usr/lib 下
[root@localhost lib64]# cp libfdfsclient.so /usr/lib- 创建nginx/client目录
mkdir -p /var/temp/nginx/client - Nginx安装 (Tracker)
- 进入nginx解压的目录下 cd /opt/nginx-1.14.0
- 安装,将临时文件目录指定为 /var/temp/nginx,需要在 /var 下创建 temp 及 nginx 目录:mkdir /var/temp/nginx
./configure \
--prefix=/usr/local/nginx \
--pid-path=/var/run/nginx/nginx.pid \
--lock-path=/var/lock/nginx.lock \
--error-log-path=/var/log/nginx/error.log \
--http-log-path=/var/log/nginx/access.log \
--with-http_gzip_static_module \
--http-client-body-temp-path=/var/temp/nginx/client \
--http-proxy-temp-path=/var/tep/nginx/proxy \
--http-fastcgi-temp-path=/var/temp/nginx/fastcgi \
--http-uwsgi-temp-path=/var/temp/nginx/uwsgi \
--http-scgi-temp-path=/var/temp/nginx/scgi \
--add-module=opt/fastdfs-nginx-module/src
- 编译:make
- 安装:make install
- 拷贝配置文件
cd /opt/FastDFS/conf
cp http.conf mime.types /etc/fdfs/
是否覆盖:yes
- 修改nginx配置文件
cd /usr/local/nginx/conf/
vim nginx.conf


server {
listen 80;
server_name 192.168.80.128;
#charset koi8-r;
#access_log logs/host.access.log main;
location /group1/M00 {
root /home/fastdfs/fdfs_storage/data;
ngx_fastdfs_module;
}
- 关闭nginx,并启动nginx
pkill -9 nginx
/usr/local/nginx/sbin/nginx -c /usr/local/nginx/conf/nginx.conf
- 访问nginx并查看图片
http://192.168.80.128/group1/M00/00/00/wKhQgGEI4GSAF-X2AADiQ_JJNus326.jpg
- 进入nginx解压的目录下 cd /opt/nginx-1.14.0
- 创建前端页面
<%@ page contentType="text/html;charset=UTF-8" language="java" %>
<html>
<head>
    <title>上传文件</title>
</head>
<body>
<form action="/upload" method="post" enctype="multipart/form-data">
    上传文件<input type="file" name="filename">
    <br>
    <button>提交</button>
</form>
</body>
</html>
- 搭建web服务
- pom.xml
<?xml version="1.0" encoding="UTF-8"?>
<project xmlns="http://maven.apache.org/POM/4.0.0"
         xmlns:xsi="http://www.w3.org/2001/XMLSchema-instance"
         xsi:schemaLocation="http://maven.apache.org/POM/4.0.0 http://maven.apache.org/xsd/maven-4.0.0.xsd">
    <modelVersion>4.0.0</modelVersion>

    <groupId>org.example</groupId>
    <artifactId>fastPro</artifactId>
    <version>1.0-SNAPSHOT</version>

    <packaging>war</packaging>
    <properties>
        <maven.compiler.source>11</maven.compiler.source>
        <maven.compiler.target>11</maven.compiler.target>
    </properties>

    <dependencies>
        <!-- 因为有jsp页面,所以引用servlet依赖-->
        <dependency>
            <groupId>javax.servlet</groupId>
            <artifactId>servlet-api</artifactId>
            <scope>provided</scope>
            <version>2.5</version>
        </dependency>
        <!-- 页面提交过来的请求,使用springmvc来处理-->
        <dependency>
            <groupId>org.springframework</groupId>
            <artifactId>spring-webmvc</artifactId>
            <version>5.2.7.RELEASE</version>
        </dependency>
        <!-- java连接fastDFS的客户端工具-->
        <dependency>
            <groupId>net.oschina.zcx7878</groupId>
            <artifactId>fastdfs-client-java</artifactId>
            <version>1.27.0.0</version>
        </dependency>
        <!-- 图片上传到FastDFS需要用的到IO工具-->
        <dependency>
            <groupId>org.apache.commons</groupId>
            <artifactId>commons-io</artifactId>
            <version>1.3.2</version>
        </dependency>
        <!-- 图片保存到web服务器需要用到的IO工具-->
        <dependency>
            <groupId>commons-fileupload</groupId>
            <artifactId>commons-fileupload</artifactId>
            <version>1.3.1</version>
        </dependency>
        <!--用来转换java对象和json字符串,注意,2.7以上版本必须搭配spring5.0以上-->
        <dependency>
            <groupId>com.fasterxml.jackson.core</groupId>
            <artifactId>jackson-databind</artifactId>
            <version>2.9.8</version>
        </dependency>
    </dependencies>
    <build>
        <plugins>
            <plugin>
                <groupId>org.apache.tomcat.maven</groupId>
                <artifactId>tomcat7-maven-plugin</artifactId>
                <configuration>
                    <port>8001</port>
                    <path>/</path>
                </configuration>
                <executions>
                    <execution>
                        <phase>package</phase>
                        <goals>
                            <goal>run</goal>
                        </goals>
                    </execution>
                </executions>
            </plugin>
        </plugins>
    </build>

</project>
- web.xml
<?xml version="1.0" encoding="UTF-8"?>
<web-app xmlns="http://xmlns.jcp.org/xml/ns/javaee"
         xmlns:xsi="http://www.w3.org/2001/XMLSchema-instance"
         xsi:schemaLocation="http://xmlns.jcp.org/xml/ns/javaee http://xmlns.jcp.org/xml/ns/javaee/web-app_4_0.xsd"
         version="4.0">

    <servlet>
        <servlet-name>DispatcherServlet</servlet-name>
        <servlet-class>org.springframework.web.servlet.DispatcherServlet</servlet-class>
        <init-param>
            <param-name>contextConfigLocation</param-name>
            <param-value>classpath:springmvc.xml</param-value>
        </init-param>
    </servlet>
    <servlet-mapping>
        <servlet-name>DispatcherServlet</servlet-name>
        <url-pattern>/</url-pattern>
    </servlet-mapping>


</web-app>
- spring-mvc.xml
<?xml version="1.0" encoding="UTF-8"?>
<beans xmlns="http://www.springframework.org/schema/beans"
       xmlns:xsi="http://www.w3.org/2001/XMLSchema-instance"
       xmlns:context="http://www.springframework.org/schema/context"
       xmlns:mvc="http://www.springframework.org/schema/mvc"
       xsi:schemaLocation="http://www.springframework.org/schema/mvc http://www.springframework.org/schema/mvc/spring-mvc-3.1.xsd
        http://www.springframework.org/schema/beans http://www.springframework.org/schema/beans/spring-beans-3.0.xsd
        http://www.springframework.org/schema/context http://www.springframework.org/schema/context/spring-context-3.1.xsd">

<!--配置扫描-->
<context:component-scan base-package="controller"/>
    <!--扫描控制器中的注解:@Response-->
    <mvc:annotation-driven/>
    <mvc:default-servlet-handler/>
    <!--上传文件的解析器(规定上传文件的大小限制)-->
<bean id="multipartResolver" class="org.springframework.web.multipart.commons.CommonsMultipartResolver">
    <!-- 上传文件最大限制:2GB-->
   <property name="maxUploadSize"  value="2048000000"/>
</bean>
</beans>
- 文件实体类
package entity;

import java.io.Serializable;

public class FileSystem implements Serializable {
    private String filename;
    private String fileId;
    private String filepath;

    public String getFilename() {
        return filename;
    }

    public void setFilename(String filename) {
        this.filename = filename;
    }

    public String getFileId() {
        return fileId;
    }

    public void setFileId(String fileId) {
        this.fileId = fileId;
    }

    public String getFilepath() {
        return filepath;
    }

    public void setFilepath(String filepath) {
        this.filepath = filepath;
    }

    @Override
    public String toString() {
        return "FileSystem{" +
                "filename='" + filename + '\'' +
                ", fileId='" + fileId + '\'' +
                ", filepath='" + filepath + '\'' +
                '}';
    }
}
- 控制层
package controller;

import entity.FileSystem;
import org.csource.common.NameValuePair;
import org.csource.fastdfs.*;
import org.springframework.stereotype.Controller;
import org.springframework.web.bind.annotation.RequestMapping;
import org.springframework.web.bind.annotation.ResponseBody;
import org.springframework.web.multipart.MultipartFile;
import org.springframework.web.multipart.MultipartHttpServletRequest;

import java.io.File;
import java.util.UUID;

@Controller
public class FileAction {

    @RequestMapping("/upload")
    @ResponseBody
    public FileSystem upload(MultipartHttpServletRequest request) throws  Exception{
        FileSystem fileSystem = new FileSystem();

        /* 1、把文件保存到web服务器*/
        // 从页面请求中,获取上传的文件对象
        MultipartFile oldfile = request.getFile("filename");
        // 从文件对象中获取 文件的原始名称
        String originalFilename = oldfile.getOriginalFilename();

        // 通过字符串截取的方式,从文件原始名中获取文件的后缀 1.jpg
        String suffix = originalFilename.substring(originalFilename.lastIndexOf(".") + 1);

        // 为了避免文件因为同名而覆盖,生成全新的文件名
        String newname= UUID.randomUUID().toString()+"."+suffix;

        // 创建web服务器保存文件的目录(预先创建好D:/upload目录,否则系统找不到路径,会抛异常)
        File newfile = new File("D:/upload/" + newname);
        // 将路径转换成文件
        oldfile.transferTo(newfile);

        // 获取服务器的绝对路径
        String newfilepath=newfile.getAbsolutePath();
       /* 2、把文件从web服务器上传到FastDFS*/
        ClientGlobal.initByProperties("fastdfs/fastdfs-client.properties");

        TrackerClient trackerClient = new TrackerClient();
        TrackerServer trackerServer = trackerClient.getConnection();
        StorageServer storageServer=null;
        StorageClient1 storageClient1 = new StorageClient1(trackerServer, storageServer);
        NameValuePair[] list=new NameValuePair[1];
        list[0] = new NameValuePair("filename",originalFilename);

        String fileId = storageClient1.upload_file1(newfilepath, suffix, list);
        trackerServer.close();

        // 封装fileSystem数据对象
        fileSystem.setFileId(fileId);  //已经上传到FastDFS上,通过fileId来访问图片,所以fileId即为文件路径
        fileSystem.setFilepath(newfilepath);
        fileSystem.setFilename(originalFilename);
        return fileSystem;


    }
}
- 添加fastDFS的配置文件
##fastdfs-client.properties
fastdfs.connect_timeout_in_seconds = 5
fastdfs.network_timeout_in_seconds = 30
fastdfs.charset = UTF-8
fastdfs.http_anti_steal_token = false
fastdfs.http_secret_key = FastDFS1234567890
fastdfs.http_tracker_http_port = 80
fastdfs.tracker_servers = 192.168.80.128:22122
- 启动fastDFS服务,测试开始
[root@localhost /]# /usr/bin/fdfs_trackerd /etc/fdfs/tracker.conf restart
[root@localhost /]# /usr/bin/fdfs_storaged /etc/fdfs/storage.conf restart
[root@localhost /]# /usr/local/nginx/sbin/nginx -c
/usr/local/nginx/conf/nginx.conf
[root@localhost /]# netstat -ntlp
[root@localhost /]# systemctl stop firewalld.service
[root@localhost /]# cd /home/fastdfs/fdfs_storage/data/
[root@localhost /]# ls
- pom.xml
- 典型错误
- 重启linux服务器,可能会到nginx启动失败
[root@localhost logs]# /usr/local/nginx/sbin/nginx -c /usr/local/nginx/conf/nginx.conf
[root@localhost /]# nginx: [emerg] open() "/var/run/nginx/nginx.pid" failed (2:
No such file or directory)
- 导致本次错误的原因,是没有修改pid文件的路径,编辑nginx的配置文件
vim /usr/local/nginx/conf/nginx.conf
pid /usr/local/nginx/logs/nginx.pid;
/usr/local/nginx/sbin/nginx -c /usr/local/nginx/conf/nginx.conf

 浙公网安备 33010602011771号