

Vue基础
Vue是一套用于构建用户界面的渐进式框架,自底向上逐层应用。
1.使用
- 在HTML页面引入vue.js包,可以远程也可以本地引入
远程CDN
<script src="https://cdn.jsdelivr.net/npm/vue@2.5.16/dist/vue.js"></script>
本地
<script src="vue.min.js"></script>
- Vue-CLI脚手架:使用vue.js官方提供的CLI脚本架很方便去创建vue.js工程雏形
<!DOCTYPE html>
<html lang="en">

<head>
    <meta charset="UTF-8">
    <meta name="viewport" content="width=device-width, initial-scale=1.0">
    <title>Document</title>
    <!--远程导入 -->
    <!--<script src="https://cdn.jsdelivr.net/npm/vue@2.5.16/dist/vue.js"></script> -->
    <!--本地导入 -->
    <script src="js/vue.min.js"></script>
</head>

<body>
    <div id="app">
        {{name}}
    </div>
</body>

<script>
    var VM = new Vue({
        el: '#app',
        data: {
            name: "hellp vue"
        }
    });
</script>

</html>
- {{}}: 插值表达式用来获取Vue实例中定义的数据(data),属性节点中 不能够使用插值表达式
- el: 挂载点定义 Vue实例挂载的元素节点,表示vue接管该区域,建议使用ID选择器作为挂载点,可以设置其他的DOM元素进行关联,建议选择DIV, 不能使用HTML和Body标签
<!DOCTYPE html>
<html lang="en">

<head>
    <meta charset="UTF-8">
    <meta name="viewport" content="width=device-width, initial-scale=1.0">
    <title>Document</title>
</head>

<script src="js/vue.min.js"></script>

<body>
    <div id="app">
        <h1>{{name}}
        </h1>
    </div>

</body>
<!--需要追加HTML页面
        <script src="js/jquery-1.8.3.min.js"></script>
<script>
    $(document).ready(function() {
        $('#app').append("<h1>hello world ! </h1>")
    })
</script> -->

<!-- 实现了数据与HTML页面的动态绑定,一个 Vue 应用会将其挂载到一个 DOM 元素上-->
<script>
    var VM = new Vue({
        el: '#app',
        data: {
            name: "helloworld"
        }
    });
</script>


</html>
2. vue常见指令
- v-text获取data的数据,设置标签内容,对外部标签有覆盖作用,而插值表达式不会覆盖
- v-html设置元素的innerHTML,向元素中写入标签
<!DOCTYPE html>
<html lang="en">

<head>
    <meta charset="UTF-8">
    <meta name="viewport" content="width=device-width, initial-scale=1.0">
    <title>Document</title>
</head>
<script src="js/vue.min.js"></script>

<body>
    <div id="app">
        {{name}}
        <!-- 取的都是name的值 -->
        <h1 v-text="name"></h1>
        <h1 v-html="name"></h1>
        <!-- <a href = "http://www.baidu.com" > 百度一下 </a> -->
        <h1 v-text="url"></h1>
        <!-- 百度一下  -->
        <h1 v-html="url"></h1>
    </div>

</body>
<script>
    var VM = new Vue({
        el: '#app',
        data: {
            name: "hello",
            url: '<a href = "http://www.baidu.com" > 百度一下 </a>'
        }
    });
</script>

</html>
- v-on:为元素绑定事件, 比如: v-on:click,可以简写为 @click="方法" ,绑定的方法定义在 VUE实例的, method属性中,可以传递自定义参数 : 函数调用传参,也可以用事件修饰符.对事件触发方式进行限定
<!DOCTYPE html>
<html lang="en">

<head>
    <meta charset="UTF-8">
    <meta name="viewport" content="width=device-width, initial-scale=1.0">
    <title>Document</title>
    <link rel="stylesheet" href="./css/inputNum.css">
</head>

<body>

    <div id="app">
        <input type="button" class="btn btn_plus" v-on:click="plus() "> {{num}}
        <input type="button " class="btn btn_minus" @click="sub() ">
    </div>
</body>
<script src="js/vue.min.js "></script>
<script>
    var VM = new Vue({
        el: "#app ",
        data: {
            num: 1
        },
        methods: {
            plus: function() {
                if (this.num < 10) {
                    this.num++;
                } else {
                    alert
                        ("别点了!最大了! ");
                }
            },
            sub: function() {
                if (this.num > 0) {
                    this.num--;
                } else {
                    alert("别点了!最小了 ")
                }
            }
        }
    })
</script>

</html>
<!DOCTYPE html>
<html lang="en">

<head>
    <meta charset="UTF-8">
    <meta name="viewport" content="width=device-width, initial-scale=1.0">
    <title>Document</title>
</head>

<body>
    <div id="app">
        {{name}}
        <input type="button" value="刷礼物" v-on:click="show(666,'太赞了!')">
        <input type="text" @keyup.enter='add'></div>

</body>
<script src="js/vue.min.js"></script>
<script>
    var VM = new Vue({
        el: "#app",
        data: {
            name: "hello"
        },
        methods: {
            show: function(p1, p2) {
                console.log(p1 + p2);
            },
            add: function() {
                alert("按回车了 ");
            }
        }
    })
</script>

</html>
- v-show: 对样式进行显示和隐藏的切换,修改的是style的display属性
- v-if: 对dom进行显示和隐藏的切换,直接对该语句进行显示或删除
<!DOCTYPE html>
<html lang="en">

<head>
    <meta charset="UTF-8">
    <meta name="viewport" content="width=device-width, initial-scale=1.0">
    <title>Document</title>
    <script src="js/vue.min.js"></script>
</head>

<body>
    <div id="app">
        <input type="button" value="切换" @click="change()">
        <!-- 对样式display属性的修改,实现显示或隐藏 -->
        <img v-show="flag" src="img/loading.gif"> <br>
        <!-- 对dom的修改实现显示或隐藏 -->
        <img v-if="flag" src="img/loading.gif" alt="">
    </div>

</body>
<script>
    var vm = new Vue({
        el: "#app",
        data: {
            flag: true
        },
        methods: {
            change: function() {
                this.flag = !this.flag;
            }
        }
    })
</script>

</html>
- v-bind:设置属性
<!DOCTYPE html>
<html lang="en">

<head>
    <meta charset="UTF-8">
    <meta name="viewport" content="width=device-width, initial-scale=1.0">
    <title>Document</title>
</head>
<script src="js/vue.min.js"></script>

<body>
    <div id="app">
        <img src="img/loading.gif" alt=""> <br>
        <img v-bind:src="src" alt=""> <br>
        <img :src="src" alt="" :title="title">
        <div :style="{fontsize:size+'px'}">v-bind指令</div>
    </div>
</body>
<script>
    var vm = new Vue({
        el: "#app",
        data: {
            src: "img/loading.gif",
            title: "加载中",
            size: 100
        }
    })
</script>

</html>
- v-for:与数组类型使用,用于遍历
<!DOCTYPE html>
<html lang="en">

<head>
    <meta charset="UTF-8">
    <meta name="viewport" content="width=device-width, initial-scale=1.0">
    <title>Document</title>
</head>
<script src="js/vue.min.js"></script>

<body>
    <div id="app">
        <input type="button" value="增加" @click="add">
        <input type="button" value="减少" v-on:click="del">
        <ul>
            <li v-for="(item,index) in nums">{{index}}{{item}}</li>
        </ul>
        <ul>
            <li v-for="item in persons">{{item.name}}{{item.age}}</li>
        </ul>
    </div>
</body>
<script>
    var vm = new Vue({
        el: "#app",
        data: {
            nums: ["hello", "moto", "how", "are", "you"],
            persons: [{
                name: "lucy",
                age: 18
            }, {
                name: "lulu",
                age: 14
            }, {
                name: "amy",
                age: 29
            }]
        },
        methods: {
            add: function() {
                this.persons.push({
                    name: "daming",
                    age: 19
                })
            },
            del: function() {
                this.persons.shift();
            }
        }
    })
</script>

</html>
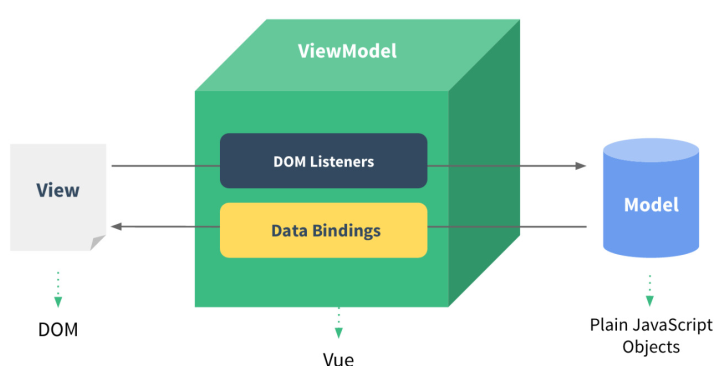
3.MVVM模式
- Model: 负责数据存储,即实例中的data模块
- View: 负责页面展示,在HTML绑定的div部件
- View Model: 负责业务逻辑处理(比如Ajax请求等),对数据进行加工后交给视图展示,即创建的vue实例
- 双向绑定v-model:
- 从View侧看,ViewModel中的DOM Listeners工具会帮我们监测页面上DOM元素的变化,如果有变化,则更改Model中的数据
- 从Model侧看,当我们更新Model中的数据时,Data Bindings工具会帮我们更新页面中的DOM元素
![]()
<html>

<head>
    <meta http-equiv="content-type" content="text/html; charset=UTF-8" />
    <title>小黑记事本</title>
    <meta http-equiv="content-type" content="text/html; charset=UTF-8" />
    <meta name="robots" content="noindex, nofollow" />
    <meta name="googlebot" content="noindex, nofollow" />
    <meta name="viewport" content="width=device-width, initial-scale=1" />
    <link rel="stylesheet" type="text/css" href="../css/index.css" />
</head>

<body>
    <!-- VUE示例接管区域 -->
    <section id="app">

        <!-- 输入框 -->
        <header class="header">
            <h1>VUE记事本</h1>
            <!-- 双向绑定,添加事件 -->
            <input autofocus="autofocus" autocomplete="off" placeholder="输入日程" class="new-todo" v-model="inner" @keyup.enter="add" />
        </header>

        <!-- 列表区域 -->
        <section class="main">
            <ul class="listview">
                <!-- v-for实现列表展示 -->
                <li class="todo" v-for="(item,index) in list">
                    <div class="view">
                        <span class="index">{{index+1}}.</span> <label>{{item}}</label>
                        <!-- 绑定删除事件 -->
                        <button class="destroy" v-on:click="del(index)"></button>
                    </div>
                </li>

            </ul>
        </section>
        <!-- 统计和清空 -->
        <footer class="footer">
            <span class="todo-count"> <strong>{{list.length}}</strong> items left </span>
            <button class="clear-completed" @click="clear">
          Clear
        </button>
        </footer>
    </section>

    <!-- 开发环境版本,包含了有帮助的命令行警告 -->
    <script src="https://cdn.jsdelivr.net/npm/vue/dist/vue.js"></script>

</body>
<script>
    var vm = new Vue({
        el: "#app",
        data: {
            list: ["吃饭", "睡觉", "打豆豆", "写代码"],
            inner: "996还是997"
        },
        methods: {
            add: function() {
                this.list.push(this.inner);
            },
            del: function(p1) {
                console.log(p1);
                // splice 用于删除一个p1索引的数组元素
                this.list.splice(p1, 1);
            },
            clear: function() {
                this.list = [];
            }
        }
    })
</script>

</html>
4.axios
ajax是一个一种创建交互式网页应用的开发技术,是异步JavaScript和xml,可以使网页实现异步更新,在不重新加载整个网页的情况下实现局部刷新
- axios 使用
- 导包
<script src="https://unpkg.com/axios/dist/axios.min.js"></script>
- 导包
- 使用格式

<!-- get-->
axios.get(地址?key=value&key2=value2).then(function(response){},function(error)
{});
<!--post -->
axios.post(地址,{key:value,key2:value2}).then(function(response)
{},function(error){})
<!DOCTYPE html>
<html lang="en">

<head>
    <meta charset="UTF-8">
    <meta name="viewport" content="width=device-width, initial-scale=1.0">
    <title>Document</title>
</head>
<script src="https://unpkg.com/axios/dist/axios.min.js"></script>
<script src="js/vue.min.js"></script>

<body>
    <!--
        请求地址:https://autumnfish.cn/api/joke/list
        请求方法:get
        请求参数:num(笑话条数,数字)
        响应内容:随机笑话 -->
    <input type="button" id="get" value="get 请求">
    <!--
        请求地址:https://autumnfish.cn/api/user/reg
        请求方法:post
        请求参数:username(用户名,字符串)
        响应内容:注册成功或失败 -->
    <input type="button" value="post请求" id="post">

    <div id="app">
        <!--
        请求地址:https://autumnfish.cn/api/joke
        请求方法:get
        请求参数:无
        响应内容:随机笑话 -->
        <input type="button" value="随机笑话" id="ran" @click="getJoke"> {{joke}}
    </div>
</body>
<script>
    var vm = new Vue({
        el: "#app",
        data: {
            joke: "随机笑话"
        },
        methods: {
            getJoke: function() {
                var that = this;
                axios.get("https://autumnfish.cn/api/joke").then(function(resp) {
                    console.log(resp.data);
                    console.log(this.joke);
                    console.log(that);
                    that.joke = resp.data;
                }, function(error) {
                    console.log(error);
                })
            }
        }
    })
    document.getElementById("get").onclick = function() {
        axios.get("https://autumnfish.cn/api/joke/list?num=1").
        then(function(resp) {
            console.log(resp)
        }, function(error) {
            console.log(error);
        })
    }
    document.getElementById("post").onclick = function() {
        axios.post("https://autumnfish.cn/api/user/reg", {
            username: "daming"
        }).then(function(resp) {
            console.log(resp)
        }, function(error) {
            console.log(error);
        })
    }
</script>

</html>
- 天气查询
<!DOCTYPE html>
<html lang="en">

<head>
    <meta charset="UTF-8" />
    <meta name="viewport" content="width=device-width, initial-scale=1.0" />
    <meta http-equiv="X-UA-Compatible" content="ie=edge" />
    <title>天气查询</title>
    <link rel="stylesheet" href="css/reset.css" />
    <link rel="stylesheet" href="css/index.css" />
    <style>
        [v-cloak] {
            display: none
        }
    </style>

</head>

<body>
    <!-- 解决页面刷新的闪烁问题 -->
    <div class="wrap" id="app" v-cloak>
        <div class="search_form">
            <div class="logo">天气查询</div>
            <div class="form_group">
                <input type="text" class="input_txt" placeholder="请输入要查询的城市" v-model="city" @keyup.enter="getWeather" />
                <button class="input_sub">回车查询</button>
            </div>

        </div>
        <ul class="weather_list">
            <li v-for=" item in weatherList">
                <div class="info_type"><span class="iconfont">{{item.type}}</span></div>
                <div class="info_temp">
                    <b>{{item.low}}</b> ~
                    <b>{{item.high}}</b>
                </div>
                <div class="info_date"><span>{{item.date}}</span></div>
            </li>

        </ul>
    </div>
    <!-- 开发环境版本,包含了有帮助的命令行警告 -->
    <script src="https://cdn.jsdelivr.net/npm/vue/dist/vue.js"></script>
    <!-- 官网提供的 axios 在线地址 -->
    <script src="https://unpkg.com/axios/dist/axios.min.js"></script>
    <!-- 自己的js -->
    <script src="js/main.js"></script>
</body>

</html>
// 请求地址:http://wthrcdn.etouch.cn/weather_mini
// 请求方法:get
// 请求参数:city (要查询的城市名称)
// 响应内容:天气信息

var vm = new Vue({
    el: "#app",
    data: {
        city: "",
        weatherList: []
    },
    methods: {
        getWeather: function() {
            var that = this;
            axios.get("http://wthrcdn.etouch.cn/weather_mini?city=" + this.city).then(function(resp) {
                console.log(that.city);
                console.log(resp.data);
                that.weatherList = resp.data.data.forecast;
            }, function(error) {
                console.log(error);
            })
        }
    }
})
5.computed 计算属性
减少运算次数, 缓存运算结果. 运用于重复相同的计算.
<!DOCTYPE html>
<html lang="en">

<head>
    <meta charset="UTF-8">
    <meta name="viewport" content="width=device-width, initial-scale=1.0">
    <title>Document</title>
    <script src="js/vue.min.js"></script>
</head>

<body>
    <div id="app">
        {{a*b}} <br> {{a*b}} <br> {{mul()}} <br> {{mul()}} <br> {{mul2}} <br>{{mul2}} <br>

    </div>
</body>

<script>
    var vm = new Vue({
        el: "#app",
        data: {
            a: 10,
            b: 3
        },
        methods: {
            mul: function() {
                // 出现了2次
                console.log("进行了乘法");
                return this.a * this.b;
            }
        },
        computed: {
            mul2: function() {
                // 只出现1次
                console.log("进行了乘法计算");
                return this.a * this.b;
            }
        }

    })
</script>

</html>
6.filter过滤器
过滤器是对即将显示的数据做进一步的筛选处理,然后进行显示,值得注意的是过滤器并没有改变原来的数据,只是在原数据的基础上产生新的数据。
- 使用位置:双括号插值内或者v-bind绑定的标签内
{{ msg | filterA }} msg是需要处理的数据, filterA是过滤器, | 这个竖线是管道,通过这个管道将数据传输给过滤器进行过滤 加工操作

<h1 v-bind:id=" msg | filterA"> {{ msg }} </h1>
- 局部过滤器实例
<!DOCTYPE html>
<html lang="en">

<head>
    <meta charset="UTF-8">
    <meta name="viewport" content="width=device-width, initial-scale=1.0">
    <title>Document</title>
    <script src="js/vue.min.js"></script>
</head>

<body>
    <!-- 通过过滤器给电脑价格前面 添加一个符号¥ -->
    <div id="app">
        <h1>电脑价格为{{price | add(price)}}</h1>
        <h1>电脑价格为{{price}}</h1>
    </div>
</body>
<script>
    var vm = new Vue({
        el: "#app",
        data: {
            price: 100
        },
        methods: {},
        computed: {},
        filters: {
            add(value) {
                return "$" + value;
            }
        }
    })
</script>

</html>
- 全局过滤器实例
<!DOCTYPE html>
<html lang="en">

<head>
    <meta charset="UTF-8">
    <meta name="viewport" content="width=device-width, initial-scale=1.0">
    <title>Document</title>
    <script src="js/vue.min.js"></script>
</head>

<body>
    <!-- 将用户名开头字母大写 -->
    <div id="app">
        {{username | change}}
    </div>
</body>
<script>
    Vue.filter('change', function(value) {
        return value.charAt(0).toUpperCase() + value.slice(1);
    });

    var vm = new Vue({
        el: "#app",
        data: {
            username: "admin"
        },
        methods: {},
        computed: {},
    })
</script>

</html>
7.watch监听器
- 用于观察Vue实例上的数据变动
<!DOCTYPE html>
<html lang="en">

<head>
    <meta charset="UTF-8">
    <meta name="viewport" content="width=device-width, initial-scale=1.0">
    <title>Document</title>
    <script src="js/vue.min.js"></script>
</head>

<body>
    <div id="app">
        {{count}}
        <input type="button" value="点我+1" @click="count++">
    </div>
</body>
<script>
    var vm = new Vue({
        el: "#app",
        data: {
            count: 1
        },
        methods: {},
        watch: {
            count: function(newval, oldval) {
                alert("计数器的值由" + oldval + "变为" + newval);
            }
        }
    })
</script>

</html>
8.component组件
组件(Component)是自定义封装的功能。将相同的功能进行抽取,封装为组件,只需要书写一次代码,随处引入即可使用
- 组件名以小写开头,采用短横线分割命名: 例如 hello-Word
- 组件中的data 必须是一个函数,注意与Vue实例中的data区分
- 在template模板中, 只能有一个根元素
- 全局组件
Vue.component("组件名称", {
template: "html代码", // 组件的HTML结构代码
data(){ //组件数据
return {}
},
methods: { // 组件的相关的js方法
方法名(){
// 逻辑代码
}
}
})
- 局部组件写在vue实例里,component有s
new Vue({
el: "#app",
components: {
组件名: {
// 组件结构
template: "HTML代码",
// data数据
data() { return { msg:"xxxx" };},
},
},
});
<!DOCTYPE html>
<html lang="en">

<head>
    <meta charset="UTF-8">
    <meta name="viewport" content="width=device-width, initial-scale=1.0">
    <title>Document</title>
</head>
<script src="js/vue.min.js"></script>

<body>
    <div id="app">
        <local></local>
        <local></local>
        <local></local>
    </div>

</body>

<script>
    Vue.component("local", {
        template: "<h1 @click='show'>{{msg}}</h1>",
        data() {
            return {
                msg: '这是全局组件',
            };
        },
        methods: {
            show() {
                alert("hello");
            }
        }

    })
    var vm = new Vue({
        el: "#app",
        data: {},
        methods: {},
    })
</script>

</html>
<!DOCTYPE html>
<html lang="en">

<head>
    <meta charset="UTF-8">
    <meta name="viewport" content="width=device-width, initial-scale=1.0">
    <title>Document</title>
</head>
<script src="js/vue.min.js"></script>


<body>

    <div id="app">
        <section1></section1>
    </div>
    <template id="tem">
        <h1 @click="show">{{msg}}</h1>
    </template>
</body>
<script>
    var vm = new Vue({
        el: '#app',
        components: {
            "section1": {
                template: "#tem",
                data() {
                    return {
                        msg: "这是局部变量"
                    };
                },
                methods: {
                    show() {
                        alert("hey");
                    }
                }

            },
            "section2": {

            }
        },

    })
</script>

</html>
9. vue生命周期
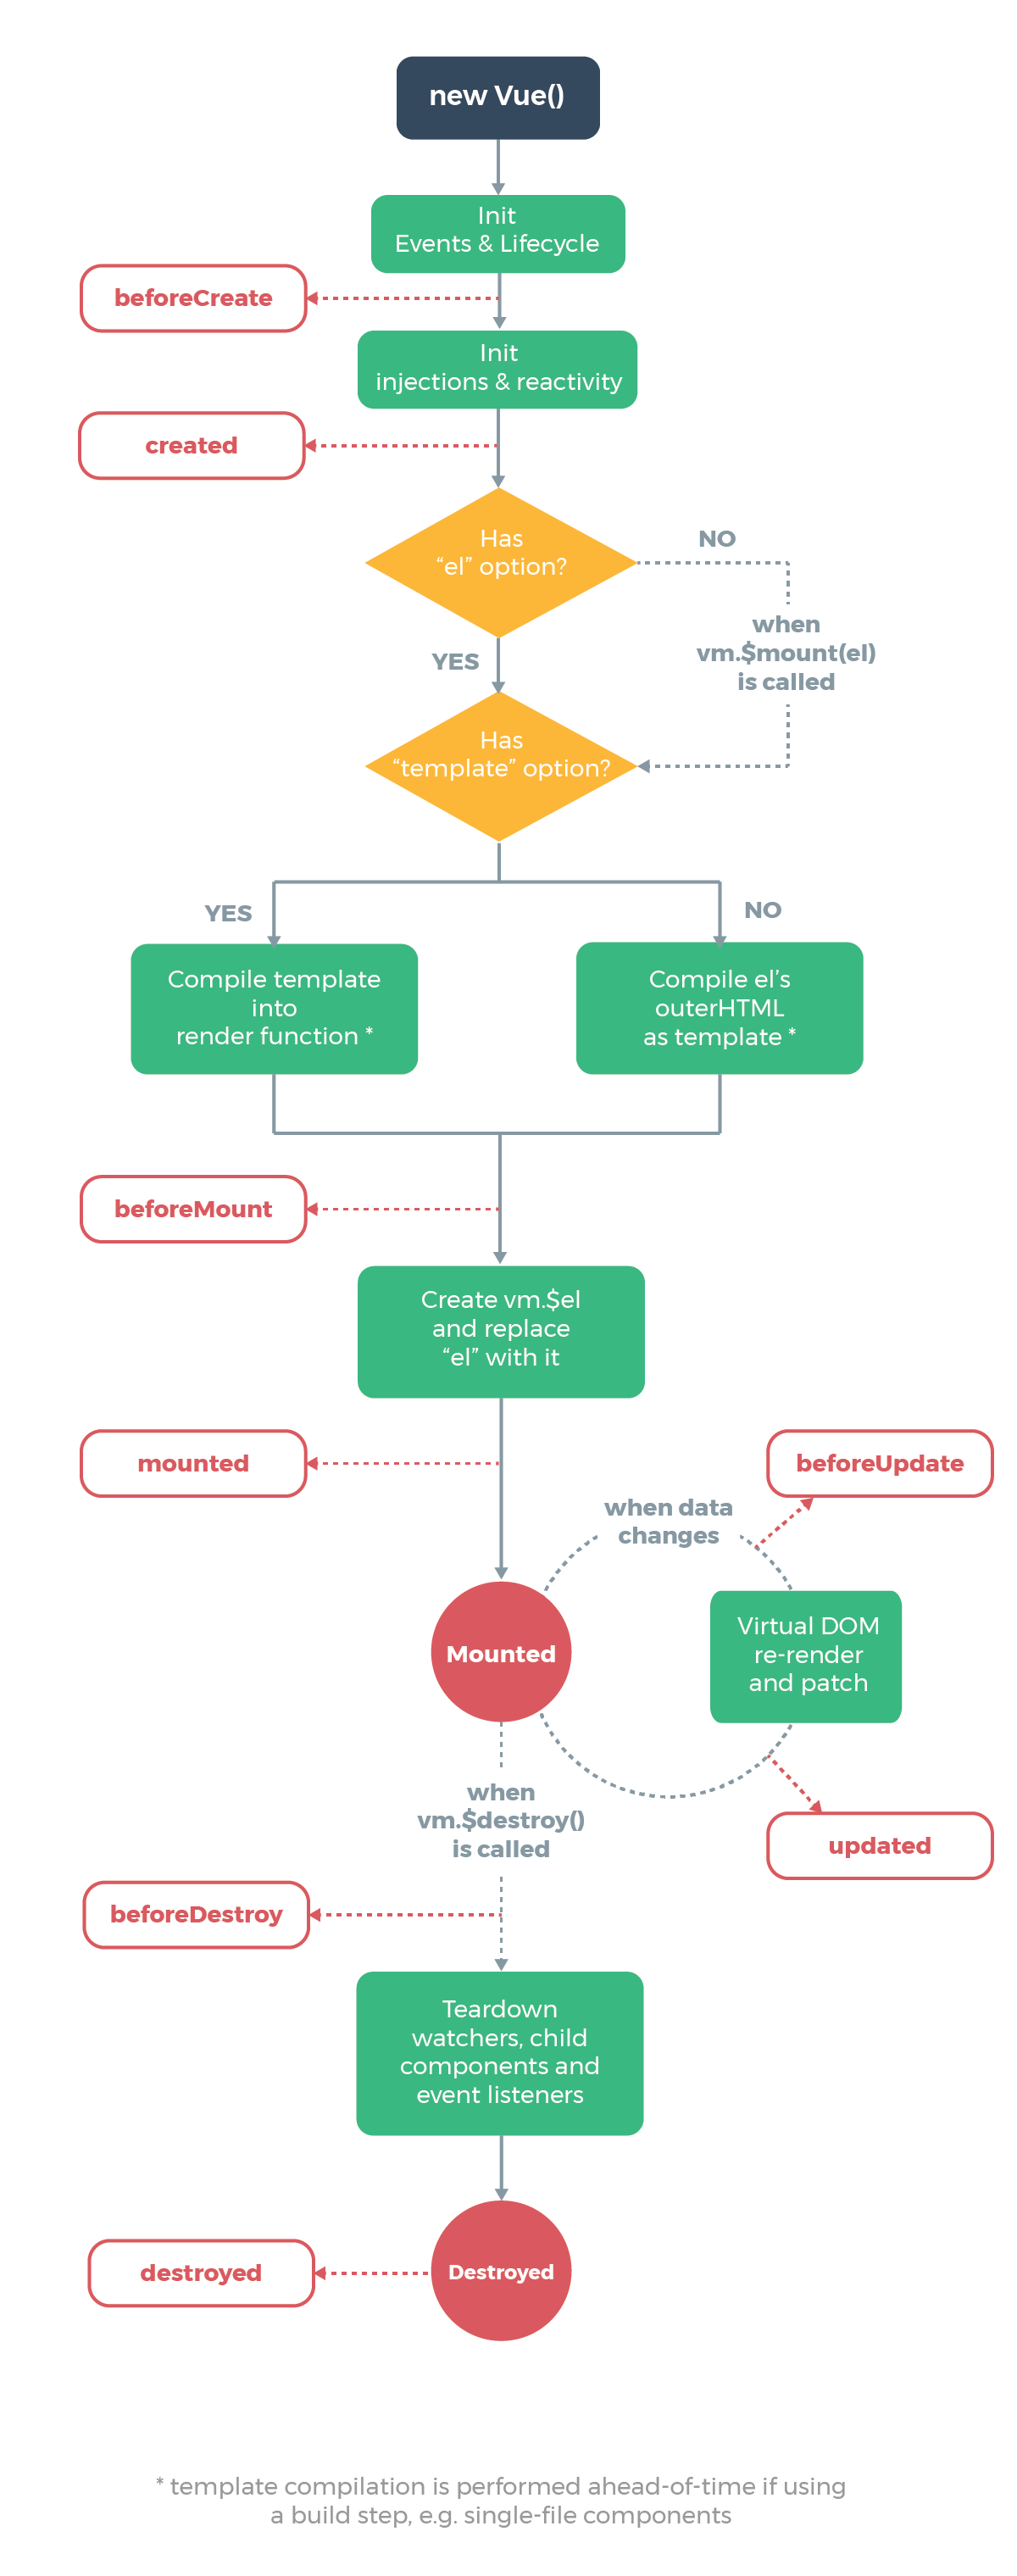
- 钩子函数是在一个事件触发的时候,在系统级捕获到了他,然后做一些操作
-
函数 说明 beforeCreate() 在创建Vue实例之前,可以执行这个方法. 例如 加载动画操作 created() 实例创建完成,属性绑定好了,但是DOM还没有生成. beforeMount() 模板已经在内存中编辑完成了,尚未被渲染到页面中. mounted() 内存中的模板已经渲染到页面,用户已经可以看见内容. beforeUpdate() 数据更新的前一刻 , 组件在发生更新之前,调用的函数 updated() updated执行时,内存中的数据已更新,并且页面已经被渲染 beforeDestroy () 钩子函数在实例销毁之前调用 destroyed () 钩子函数在Vue 实例销毁后调用 <!DOCTYPE html> <html lang="en"> <head> <meta charset="UTF-8"> <meta name="viewport" content="width=device-width, initial-scale=1.0"> <title>Document</title> </head> <script src="js/vue.min.js"></script> <body> <div id="app"> <button @click="show" id="m">{{msg}}</button> </div> </body> <script> var vm = new Vue({ el: "#app", data: { msg: "hello" }, methods: { show: function() { alert("show"); this.msg = "world" } }, // beforeCreate() { // alert("1.beforeCreate函数在组件实例化之前执行"); // alert(this.msg); //undefined // this.show(); // this.show is not a function // }, // created() { // alert("2.created函数执行时,组件实例化完成,但是DOM(页面)还未生成"); // alert(this.msg); //hello // this.show(); //show弹窗,说明已经实例化show方法,而后msg=world // } // beforeMount() { // alert( // "3.beforeMount函数执行时,模板已经在内存中编辑完成了,尚未被渲染到页面中" // ); // alert(this.msg); //hello // this.show();//show弹窗,说明已经实例化show方法,而后msg=world // alert(document.getElementById("m").innerText); //{{msg}} // }, // mounted() { // alert("4.mounted函数执行时,模板已经渲染到页面,执行完页面显示"); // alert(document.getElementById("m").innerText); //hello // }, // beforeUpdate() { // //点击按钮,先调用show,出现show弹窗,接着出现before // alert("5.beforeUpdate执行时,内存中的数据已更新,但是页面尚未被渲染"); // //页面还未更新显示的内容为hello // alert("页面显示的内容:" + document.getElementById("m").innerText); // //但实例已经更新为world // alert("data中的message数据是: " + this.msg); // }, updated() { //点击按钮,先调用show,出现show弹窗,接着出现 //全部更新完毕 alert("6.updated执行时,内存中的数据已更新,此方法执行完显示页面!"); alert("页面显示的内容:" + document.getElementById("m").innerText); //world alert("data中的message数据是: " + this.msg); //world }, }) </script> </html>
10.vue路由器
- 路由是指根据URL分配到对应的处理程序, 路由允许我们通过不同的 URL 访问不同的内容。
- 单页面Web应用(single page web application,SPA),就是只有一张Web页面的应用,是加载单个HTML 页面并在用户与应用程序交互时动态更新该页面的Web应用程序
- 用户操作体验好,用户不用刷新页面,整个交互过程都是通过Ajax来操作。
- 适合前后端分离开发,服务端提供http接口,前端请求http接口获取数据,使用JS进行客户端渲染。
- router是路由管理器,管理所有路由器
- route是路由器,指向一条路径,有path和component信息
- routes是路由器的集合,存放了很多路径
- router-link用于设置一个导航链接,to指向路径信息,是对a标签的封装
- router-view是指路由导航到指定页面后渲染页面信息
- 使用方法
- 导入vur-router库
- 定义路由所需的组件
- 定义路由每个路由都由两部分 path (路径) 和component (组件)
- 创建router路由器实例 ,管理路由
- 创建Vue实例, 注入路由对象, 使用$mount() 指定挂载点
<!DOCTYPE html>
<html lang="en">

<head>
    <meta charset="UTF-8">
    <meta name="viewport" content="width=device-width, initial-scale=1.0">
    <title>Document</title>
    <script src="js/vue.min.js"></script>
    <script src="js/vue-router.min.js"></script>
</head>


<body>
    <div id="app">
        <h1>rf.com</h1>
        <p>
            <!-- 使用 router-link 组件来导航,to属性指定链接  -->
            <router-link to="/home">home</router-link> <br>
            <router-link to="/news">go to news</router-link>
        </p>
        <!-- 渲染页面位置 -->
        <router-view></router-view>
    </div>
</body>

<script>
    // 必须放在vue实例下面,在寻由时寻找
    // 定义路由所需的组件
    const home = {
        template: "<h1>首页</h1>"
    };
    const news = {
        template: "<h1>新闻</h1>"
    };
    // 定义路由每个路由都由两部分 path (路径) 和component (组件)
    const routes = [{
        path: '/home',
        component: home
    }, {
        path: '/news',
        component: news
    }, ];
    // 创建router路由器实例 ,管理路由
    const router = new VueRouter({
        routes: routes,
    });
    // 创建Vue实例, 注入路由对象, 使用$mount() 指定挂载点
    var vm = new Vue({
        router,
    }).$mount('#app');
</script>

</html>
| 局部组件要写在Vue实例里面 |

 浙公网安备 33010602011771号