django 快速实现完整登录系统(cookie)
2014-05-24 23:19 虫师 阅读(74402) 评论(17) 收藏 举报
经过前面几节的练习,我们已经熟悉了django 的套路,这里来实现一个比较完整的登陆系统,其中包括注册、登陆、以及cookie的使用。
本操作的环境:
===================
deepin linux 2013(基于ubuntu)
python 2.7
Django 1.6.2
===================
创建项目与应用
#创建项目
fnngj@fnngj-H24X:~/djpy$ django-admin.py startproject mysite5
fnngj@fnngj-H24X:~/djpy$ cd mysite5
#在项目下创建一个online应用
fnngj@fnngj-H24X:~/djpy/mysite5$ python manage.py startapp online
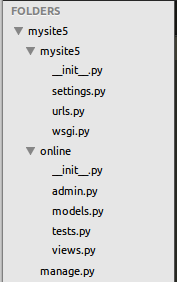
目录结构如下:
打开mysite5/mysite5/settings.py文件,将应用添加进去:
# Application definition

INSTALLED_APPS = (
    'django.contrib.admin',
    'django.contrib.auth',
    'django.contrib.contenttypes',
    'django.contrib.sessions',
    'django.contrib.messages',
    'django.contrib.staticfiles',
    'online',
)
设计数据库
打开mysite5/online/models.py文件,添加如下内容:
from django.db import models

# Create your models here.
class User(models.Model):
    username = models.CharField(max_length=50)
    password = models.CharField(max_length=50)

    def __unicode__(self):
        return self.username
创建数据库,创建User表,用户名和密码两个字段。
下面进行数据库的同步:
fnngj@fnngj-H24X:~/djpy/mysite5$ python manage.py syncdb
Creating tables ...
Creating table django_admin_log
Creating table auth_permission
Creating table auth_group_permissions
Creating table auth_group
Creating table auth_user_groups
Creating table auth_user_user_permissions
Creating table auth_user
Creating table django_content_type
Creating table django_session
Creating table online_user
You just installed Django's auth system, which means you don't have any superusers defined.
Would you like to create one now? (yes/no): yes   输入yes/no

Username (leave blank to use 'fnngj'):     用户名(默认当前系统用户名)
Email address: fnngj@126.com     邮箱地址
Password:    密码
Password (again):    确认密码
Superuser created successfully.
Installing custom SQL ...
Installing indexes ...
Installed 0 object(s) from 0 fixture(s)
最后生成的 online_user 表就是我们models.py 中所创建的User类。
配置URL
打开mysite5/mysite5/urls.py:
from django.conf.urls import patterns, include, url

from django.contrib import admin
admin.autodiscover()

urlpatterns = patterns('',
    # Examples:
    # url(r'^$', 'mysite5.views.home', name='home'),

    url(r'^admin/', include(admin.site.urls)),
    url(r'^online/', include('online.urls')),
)
在mysite5/online/目录下创建urls.py文件:
from django.conf.urls import patterns, url
from online import views


urlpatterns = patterns('',
    url(r'^$', views.login, name='login'),
    url(r'^login/$',views.login,name = 'login'),
    url(r'^regist/$',views.regist,name = 'regist'),
    url(r'^index/$',views.index,name = 'index'),
    url(r'^logout/$',views.logout,name = 'logout'),
)
http://127.0.0.1:8000/online/ 登陆页
http://127.0.0.1:8000/online/login/ 登陆页
http://127.0.0.1:8000/online/regist/ 注册页
http://127.0.0.1:8000/online/index/ 登陆成功页
http://127.0.0.1:8000/online/logout/ 注销
创建视图
打开mysite5/online/views.py 文件:
#coding=utf-8
from django.shortcuts import render,render_to_response
from django.http import HttpResponse,HttpResponseRedirect
from django.template import RequestContext
from django import forms
from models import User

#表单
class UserForm(forms.Form):
    username = forms.CharField(label='用户名',max_length=100)
    password = forms.CharField(label='密码',widget=forms.PasswordInput())


#注册
def regist(req):
    if req.method == 'POST':
        uf = UserForm(req.POST)
        if uf.is_valid():
            #获得表单数据
            username = uf.cleaned_data['username']
            password = uf.cleaned_data['password']
            #添加到数据库
            User.objects.create(username= username,password=password)
            return HttpResponse('regist success!!')
    else:
        uf = UserForm()
    return render_to_response('regist.html',{'uf':uf}, context_instance=RequestContext(req))

#登陆
def login(req):
    if req.method == 'POST':
        uf = UserForm(req.POST)
        if uf.is_valid():
            #获取表单用户密码
            username = uf.cleaned_data['username']
            password = uf.cleaned_data['password']
            #获取的表单数据与数据库进行比较
            user = User.objects.filter(username__exact = username,password__exact = password)
            if user:
                #比较成功,跳转index
                response = HttpResponseRedirect('/online/index/')
                #将username写入浏览器cookie,失效时间为3600
                response.set_cookie('username',username,3600)
                return response
            else:
                #比较失败,还在login
                return HttpResponseRedirect('/online/login/')
    else:
        uf = UserForm()
    return render_to_response('login.html',{'uf':uf},context_instance=RequestContext(req))

#登陆成功
def index(req):
    username = req.COOKIES.get('username','')
    return render_to_response('index.html' ,{'username':username})

#退出
def logout(req):
    response = HttpResponse('logout !!')
    #清理cookie里保存username
    response.delete_cookie('username')
    return response
这里实现了所有注册,登陆逻辑,中间用到cookie创建,读取,删除操作等。
创建模板
先在mysite5/online/目录下创建templates目录,接着在mysite5/online/templates/目录下创建regist.html 文件:
<?xml version="1.0" encoding="UTF-8"?>
<!DOCTYPE html PUBLIC "-//W3C//DTD XHTML 1.0 Strict//EN" "http://www.w3.org/TR/xhtml1/DTD/xhtml1-strict.dtd">
<html xmlns="http://www.w3.org/1999/xhtml" xml:lang="en" lang="en">
<head>
    <meta http-equiv="Content-Type" content="text/html; charset=UTF-8" />
    <title>注册</title>
</head>

<body>
<h1>注册页面:</h1>
<form method = 'post' enctype="multipart/form-data">
    {% csrf_token %}
    {{uf.as_p}}
    <input type="submit" value = "ok" />
</form>
<br>
<a href="http://127.0.0.1:8000/online/login/">登陆</a>
</body>
</html>
mysite5/online/templates/目录下创建login.html 文件:
<?xml version="1.0" encoding="UTF-8"?>
<!DOCTYPE html PUBLIC "-//W3C//DTD XHTML 1.0 Strict//EN" "http://www.w3.org/TR/xhtml1/DTD/xhtml1-strict.dtd">
<html xmlns="http://www.w3.org/1999/xhtml" xml:lang="en" lang="en">
<head>
    <meta http-equiv="Content-Type" content="text/html; charset=UTF-8" />
    <title>登陆</title>
</head>

<body>
<h1>登陆页面:</h1>
<form method = 'post' enctype="multipart/form-data">
    {% csrf_token %}
    {{uf.as_p}}
    <input type="submit" value = "ok" />
</form>
<br>
<a href="http://127.0.0.1:8000/online/regist/">注册</a>
</body>
</html>
mysite5/online/templates/目录下创建index.html 文件:
<?xml version="1.0" encoding="UTF-8"?>
<!DOCTYPE html PUBLIC "-//W3C//DTD XHTML 1.0 Strict//EN" "http://www.w3.org/TR/xhtml1/DTD/xhtml1-strict.dtd">
<html xmlns="http://www.w3.org/1999/xhtml" xml:lang="en" lang="en">
<head>
    <meta http-equiv="Content-Type" content="text/html; charset=UTF-8" />
    <title></title>
</head>

<body>
<h1>welcome {{username}} !</h1>
<br>
<a href="http://127.0.0.1:8000/online/logout/">退出</a>
</body>
</html>
设置模板路径
打开mysite5/mysite5/settings.py文件,在底部添加:
#template
TEMPLATE_DIRS=(
    '/home/fnngj/djpy/mysite5/online/templates'
)
使用功能
注册
先注册用户:
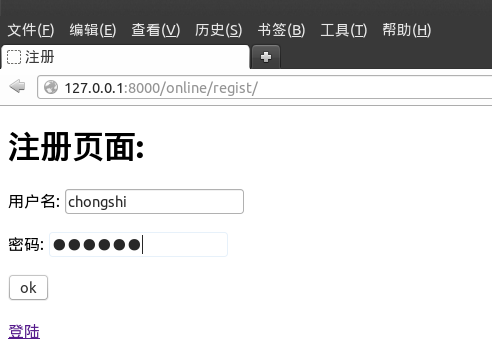
注册成功,提示“regist success!!”
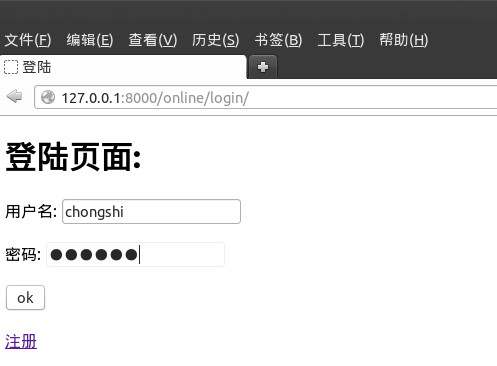
登陆
执行登陆操作,通过读取浏览器cookie 来获取用户名
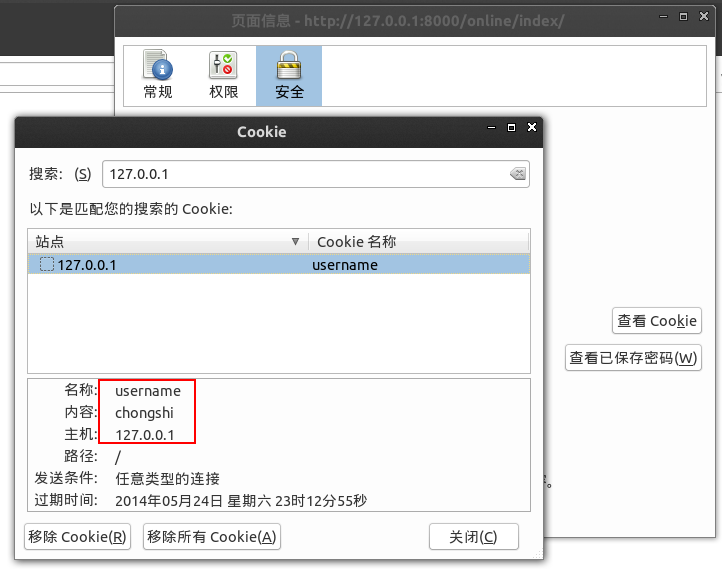
查看cookie
登陆成功

通过点击“退出”链接退出,再次访问http://127.0.0.1:8000/online/index/ 将不会显示用户名信息。

 浙公网安备 33010602011771号