Sprite Sheet
|
TexturePacker
TexturePacker3D
SpriteIlluminator
PhysicsEditor
BabelEdit
Tutorial: Using sprite sheet animations in cocos2d-x V3   This tutorial is for cocos2d-x V3. We recently wanted to upgrade it to cocos2d-x V4 but found out, that the framework is not supported anymore. The company behind cocos2d sets more and more focus on Cocos Creator and totally neglects the c++ community. While researching options for our readers, we found a cocos2d-x fork called Axmol Engine that gets regular updates and fixed. If you want to get started with game development in c++, this is the right place: Using sprite sheet animations in Axmol Engine What you are going to learn from this tutorialIn this tutorial you are going to learn:
In short: Develop once, make money on all platforms. The source code for this tutorial is available on GitHub. Basic ProjectI'll describe how to set up Cocos2d-x for a build and create a basic project in this section. If you are already familiar with Cocos2d-x, you can skip ahead to the next chapter. This section describes how you can get cocos2d-x running on a Mac with Xcode. Instruction for other operating systems are available from the cocos2d-x homepage. Start by downloading Cocos2d-x from https://github.com/cocos2d/cocos2d-x/tree/v3. The tutorial is created using 3.16 - all parts except for the polygon packing should also work with older releases, too. Unzip the downloaded file and move in a location where you want to keep your installation. Open a command line interface and change the directory to the Cocos2d-x installation and run the setup The command asks you about the locations of your different build environments. Enter the paths if you want to build for Android. You can press Enter if you are on a Mac and just want to build for macOS or iOS. Note: Cocos2D-x requires Python 2.7 which is outdated. macOS ships with Python 3 - and for that does not work. You have to download the old Python interpreter from here, both on macOS and Windows: Python 2.7 Download Finally close and re-open the command line. You now have a new command available: You'll use this command to create new projects. Creating your first gameEnter the following command to create a new empty project: Note : If you see the following error: This line creates a new cocos2d-x project in a subfolder of your home directory called cocos2d-x-games . Inside the folder, a project is created called Cocos2dx-SpriteSheetTutorial . The selected language is c++ (cpp). You could also create games using Lua or Javascript - this tutorial's focus is on c++. You find a bunch of folders, all starting with the prefix "proj." These folders contain files for the different supported development environments - which includes Visual Studio and XCode - and some platform specific code required to start the App. It does not matter which platform you choose for development. Choose the environment you like most. Just build on the other platforms you want to support from time to time. The important thing is that you stay away from platform-specific code and libraries. Cocos2d-x should give you a good base for all kinds of games. I am writing this tutorial on a Mac, using XCode, with the focus on keeping things portable. It should be easy for you to follow the tutorial on other systems. The only difference is how you add the files to the project and how you start the simulator. Running the project on a Mac opens the iOS Simulator. What you see is the standard Hello World application. The application contains 2 classes: The Why you should use sprite sheetsYou want to use different sprites and animations in your game. The naive approach is to add them all to your project and create a loop that loads them one after the other. That's a bad idea for several reasons:
Take a look at this sprite. I've taken it from a walk animation of the character you are going to use later in this tutorial. The transparency around the sprite is required to align the animation phases: 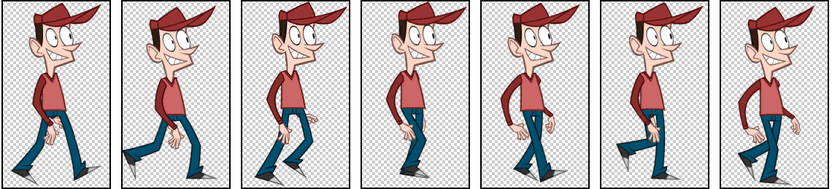 Transparency seems to consist of nothing but that's not the case for the graphics processor (GPU). It has to do the blending for each pixel — no matter if it's visible or not. Take a look at the checkered regions. The total overhead coming from the transparency for this animation is 68%. The trick is preventing the GPU from working on these transparent pixels. A simple way is to reduce the area to the rectangle containing all non-transparent pixels. This reduces the amount of transparency by 24%. The even better solution is to create polygons matching the sprite's non-transparent areas. The good news is: You don't have to care about it when you are using TexturePacker — it can create rectangular and polygon trimmed shapes for your sprites in a format that cocos2d-x can read out of the box.  Designing for different resolutionscocos2d-x is a highly portable game development framework - which takes a lot of work from you when you want to support different devices. The same code should run on all of them. But you have to be careful about the design. Some of the devices will come with a 4:3 aspect ratio (like iPad), some come with 16:9 like several mobile phones and some come with strange sizes in between. Mobile phone statsNewer phones come with a higher screen resolution — but there are still many old phones in use. Take a look at this chart: It shows screen resolutions from mobile phones and tablets, start of 2023.  Screen view port sizes: Desktop, January 2023 Screen view port sizes: Desktop, January 2023 Screen view port sizes: Tablet, January 2023 Screen view port sizes: Tablet, January 2023 Screen view port sizes: Mobile, January 2023 Screen view port sizes: Mobile, January 2023These numbers might seem low in some cases. This is because the values in the charts do not take the device pixel ration in account. E.g. an iPhone 13 reports the view port size as 390 x 844 with a 3x density. That means that the "real" resolution of the screen is 1170 x 2532. Different resolutionsDifferent resolutions is not a problem as long as your games does not require many detailed objects and small fonts. You can simply design your game at the highest resolution and scale the images down for the smaller devices. Memory is an issue on smaller devices combined with low performance. For these devices it's a good idea to create scaled down versions of your sprite sheets and only load the sheets with the appropriate resolutions. A true color 2048x2048 sprite sheet requires 16MB of RAM — scaled down to 50% it's just 4MB. TexturePacker can create scaled versions of the sprite sheets on the fly. Different aspect ratiosAspect ratio is a bit more trouble since it has an effect on game play. You have 3 choices:
 Using black bars - score moved outside of the game scene Using black bars - score moved outside of the game scene Extending the scene - the tablet has more sky and ground Extending the scene - the tablet has more sky and groundThe first option might be the best - but it's the one with the most work on your side. It also changes the game - e.g. more enemies are visible. The second one feels a bit like in the 90ies. I prefer the third - it gives all players the same gameplay. The assets for this tutorial are created for 4:3 but the main content will be focused on 16:9. Creating sprite sheets with TexturePackerStart by downloading and installing TexturePacker if you've not already done it. Download TexturePacker 7.7.0
for Windows
Drag & drop the cityscene folder onto the left panel. TexturePacker adds all contained sprites to your sheet. This preserves the file name structure inside the folder. It also updates the sprite sheet when you add or remove files from the folder. Select cocos2d-x as Data Format . Don't use the cocos2d format — it does not contain polygon packing. 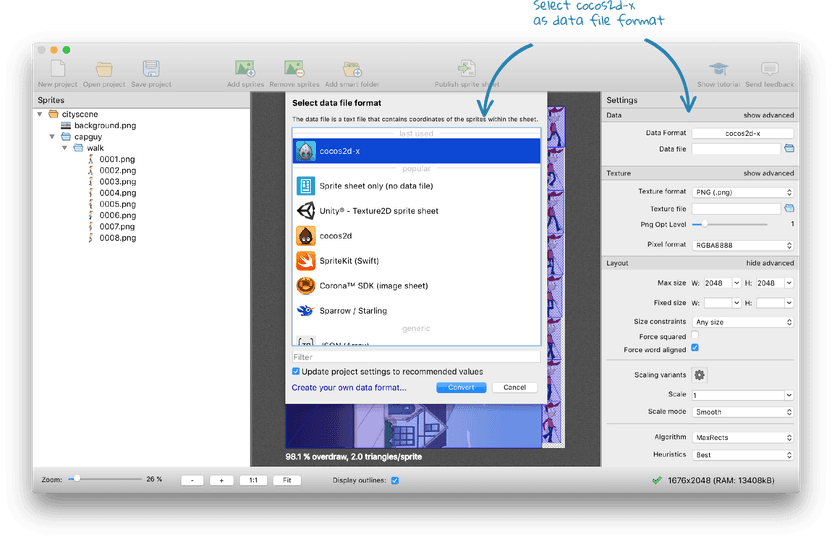 Enable the polygon mode: Change the Trim mode to polygon . This also enables polygon packing. You can adjust the Tracer tolerance to change the amount of vertices created for the sprites. Tighter fitting polygons create less overdraw but have a higher vertex count. Try to keep the vertex count low because each vertex required CPU time for calculating its position. The sprite sheet here comes still with high overdraw of 95% — this is because of the background image. It's rectangular and has no transparency to trim. Add scaling variants for the different device sizes. Click on Scaling variants in the right panel. Select cocos2d-x HDR/HD/SD from the drop-down menu in the dialog. Press Apply . You see 3 scaling variants: /HDR/ with a scaling factor of 1, /HD/ with a factor of 0.5 and /SD/ with 0.25. You can add or remove scaling variants if you don't want them. Press Close to return to the sprite sheet. You should now see 3 tabs in the center screen. Each one is a preview of the sprite sheet created for that scaling variant. 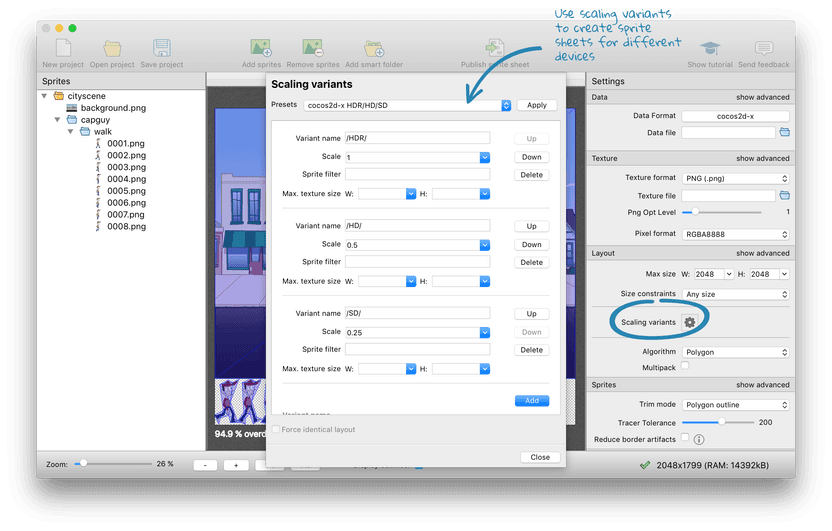 Click the small folder next to Data file and set it to save a file names cityscene.png inside your project's res folder. This will give you an error, informing you that you have to add a placeholder {v} as part of your file name. Edit the file name and change it from .../res/cityscene.plist to .../res/{v}/cityscene.plist . The placeholder is replaced with the scaling variant name when writing the sprite sheets. Press Publish sprite sheet in the toolbar. You should now see 6 files in your project folder:
That's it for now in TexturePacker. Application startup and device resolutionsLet's now start with the code. Before you can use the sprite sheets you now have to lay the foundation for a solid game. Your game code should be free of resolution dependent code if you get the setup right in the AppDelegate. Replace the content of AppDelegate.h with this code block: #ifndef _APP_DELEGATE_H_
#define _APP_DELEGATE_H_
#include "cocos2d.h"
class AppDelegate : private cocos2d::Application
{
public:
virtual void initGLContextAttrs();
virtual bool applicationDidFinishLaunching();
virtual void applicationDidEnterBackground();
virtual void applicationWillEnterForeground();
private:
void initOpenGL();
void initMultiResolution();
void initDirector();
void createAndRunScene();
};
#endif
The public virtual methods will be called on different occasions during the application's runtime. You have to implement them because they are declared pure virtual in the Clear the code in AppDelegate.cpp and start with this code: #include "AppDelegate.h"
#include "HelloWorldScene.h"
USING_NS_CC;
static cocos2d::Size designResolutionSize = cocos2d::Size(2048, 1536);
static cocos2d::Size smallResolutionSize = cocos2d::Size(512, 384);
static cocos2d::Size mediumResolutionSize = cocos2d::Size(1024, 768);
static cocos2d::Size largeResolutionSize = cocos2d::Size(2048, 1536);
The
Getting pixel perfect designs working with cocos2d-x is hard — simply because you'll have to deal with a bunch of different target sizes — especially if you want to run your game on Android devices. But even the iOS devices come with all different sizes and screen ratios. I personally prefer using the higher resolution as The following 3 values Add the following method, it is responsible for loading the pre-scaled versions of the graphics: The first part of this code
Finish
The code also sets the search path for the resources. This is a big help because the application can now always load the cityscene.plist — the decision which one is loaded is handled by cocos2d itself. Some mode code is required to implement the application. Simply copy this code block — it's required to create the OpenGL view: Additional code required in the AppDelegateThese code blocks are also required in the The following code block initialises the The following method creates your game scene and activates it in the This method calls all the previous methods when the application is ready to run. The following 2 functions are called when your application goes into background or re-gains focus. Use it to stop all animations and the music. You can also use it in your game to pause all other calculations etc. The final method required is the Using the sprite sheetsAfter the less interesting tasks of initializing the app you'll now get the sprite sheets to work. Start with HelloWorldScene.h using the following code block: It contains 4 method declarations:
Now switch to HelloWorldScene.cpp . As already mentioned above: This method wraps the Adding a static backgroundThe next method you have to add is The first block is required to get the You have to load the sprite sheet before you can use it. The Note that this code does not contain anything that is resolution dependent. The code in The next 2 lines return the bottom left corner of the screen as Call The calculation performed for The final line in this block adds the Compile and run, you should now see the following scene  Playing animationsYou have to tell cocos2d-x which sprite frames should be used in an animation. The easiest way for this is to create a helper method that creates a list: This method retrieves the animation frames from the sprite sheet that follow a given format. You can call it in the following way: The format string The call returns a list of 8 sprite frames: capguy/walk/0001.png ,... capguy/walk/0008.png Add the following code block to the bottom of the The first line is the one you already know from above — to create the animation frames. The second creates a sprite using the first frame from the list. You add the sprite as child of the background, not as child of the scene. This ensures that the sprite is always positioned in the right spot on the background. The second block creates an The last line of the block chains 3 function calls:
Compile and run - you should now see Capguy walking in place. 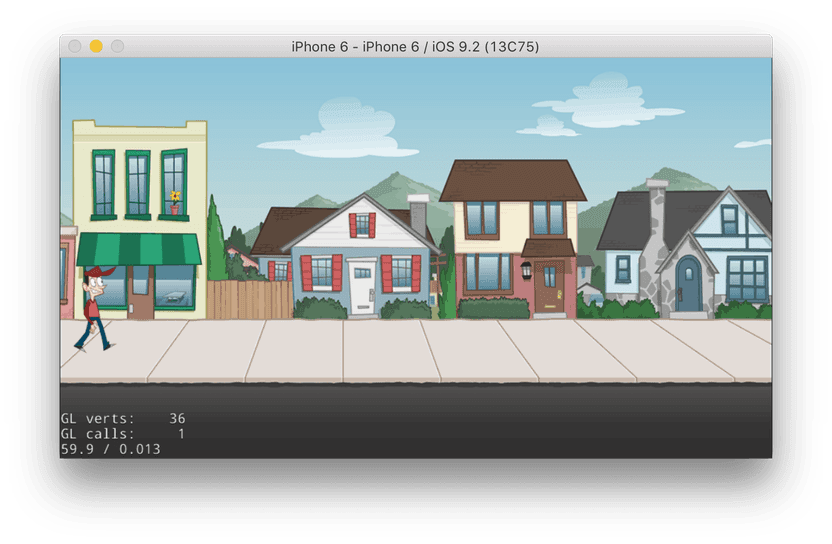 Moving the spriteLet's now make Capguy move from left to right. cocos2d-x comes with a Add the following code block at the end of The The Finally, assign the actions to the sprite - again using the Compile and run - you now see Capguy walking down the street. 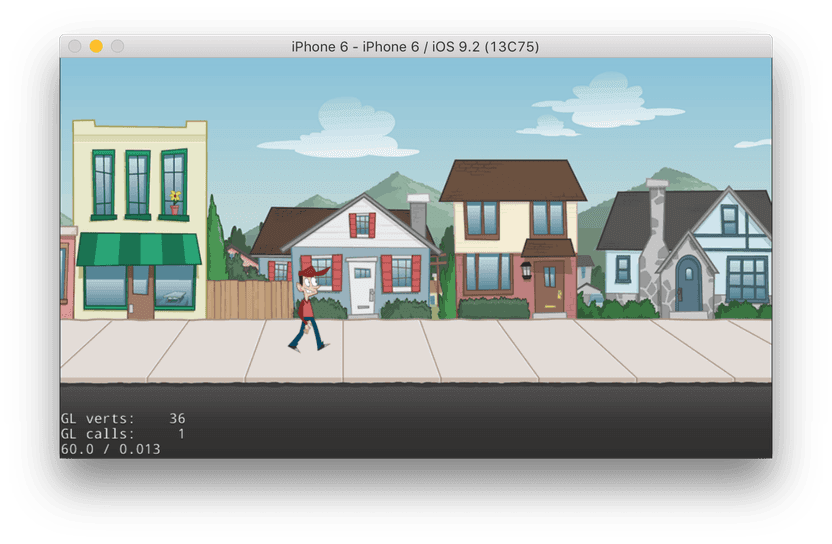 ReferencesOn this page
FooterTexturePackerTexturePacker3DSpriteIlluminatorPhysicsEditorBabelEditLicensing© 2025 by CodeAndWeb GmbH. All rights reserved. |
||||||||||||||||||||||||||||||||||||||||||||||||||||||||||||||||||||||||||||||||||
cocos2d/cocos2d-xFolders and files
Repository files navigation
cocos2d-x is a multi-platform framework for building 2d games, interactive books, demos and other graphical applications. It is based on cocos2d-iphone, but instead of using Objective-C, it uses C++. It works on iOS, Android, macOS, Windows and Linux. Cocos2d-x Framework Architecture:
cocos2d-x is:
Should set up environment before starting a new game or running tests Should invoke this script if using linux system You can also create a Lua project with If need to debug program, then it is more convinent to use IDE to run and debug it. All platforms other than Android can use CMake to generate corresponding project file. Can refer to Detail CMake Guide for detail information. For Android, the Android Studio project file lies in You can help us spread the word about cocos2d-x! We would surely appreciate it!
Cocos2d-x is licensed under the MIT License. We welcome participation! Did you find a bug? Do you have feature request? Do you want to merge a feature? Cocos Creator is the new generation of Cocos game engine with a full featured editor and content creation friendly workflow. It supports all major platforms allowing games to be quickly released for the web, iOS, Android, Windows, Mac, and various mini-game platforms. Millions of developers have built 2D / 3D experiences, from hardcore games to web instant entertainment. A pure JavaScript-developed engine runtime is available on the web and mini-game platforms for better performance and smaller packages. On other native platforms, C++ is used to implement the underlying framework, providing greater operational efficiency. The engine is completely open source, and retains the advantages of Cocos2d-x which includes high performance, customizability, ease for debugging, easy to learn, and small package size. Therefore, we no longer recommend new users to start with Cocos2d-x. Instead, please use the brand-new Cocos Creator for project development to enjoy the best editor and 3D support. Footer |
||||||||||||||||||||||||||||||||||||||||||||||||||||||||||||||||||||||||||||||||||
使用图集图集(Sprite Sheet) 是通过专门的工具将多张图片合并成一张大图,并通过 plist 等格式的文件索引的资源,使用图集比使用多个独立图像占用的磁盘空间更少,还会有更好的性能。这种方式已经是游戏行业中提高游戏性能的标准方法之一。 在使用图集时,首先将其全部加载到 示例:
单看这个图集,似乎很难分析出什么,让我们对比一下:
这就很容易看出来,它至少完成了将多个图像素材合为一个,同时减少了磁盘空间占用。 继续来看如何在代码中使用。 加载图集获取到 这样我们就完成了,将一个图集添加到 创建图集手动创建图集资源是一个单调乏味的过程,幸运的是有一些工具能帮助我们自动创建,下面是推荐的几个工具: 其中 Texture Packer 有一个专门为 Cocos2d-x 写的图集创建指南。传送门 |
||||||||||||||||||||||||||||||||||||||||||||||||||||||||||||||||||||||||||||||||||
  PRODUCTS AND SERVICES
产品与服务
COCOS CREATOR
高效、轻量、跨平台的一体化 3D 开发引擎
CASE DISPLAY
案例展示
                                     我们的优势
Cocos 目前在全球拥有 170 万注册开发者,遍布全球 203 个国家和地区,覆盖 20 亿玩家设备,采用 Cocos 引擎开发的游戏覆盖市面全品类,在中国手游市场份额占比 40%,全球手游市场份额占比 20%。
0
注册开发者
0
游戏玩家
0
国家和地区
 LATEST INFORMATION
最新资讯
 一个人+AI,TapTap8.7分|独立游戏《三国战争策略》专访
 包体、性能、Spine、Skew、Box2D、鸿蒙Next|Cocos Creator 3.8.6 正式版来了!
 打开财富密码!小游戏独家干货分享|Cocos开发者沙龙深圳站精彩回顾
 哎,小编去HarmonyOS NEXT会场摸鱼被老板发现了!
 【手把手教程】不写一行代码!零基础用DeepSeek开发一款3D游戏
 3月22日深圳见!Cocos 开发者沙龙@深圳站报名开启,名额有限报名从速!
 干货!3D次世代模拟飞行游戏用到了哪些核心技术?
 开源鸿蒙游戏开发挑战赛有哪些精彩作品?强调:全部开源!
 强!Cocos + DeepSeek,不写一行代码,零基础做一款微信小游戏
 有哪些用 Cocos Creator 开发的小游戏,成为了春节爆款?
 Cocos 车机技术在汽车行业的创新应用与实践分享
 第二届OpenHarmony创新应用挑战赛决赛晋级名单公示
COOPERATIVE PARTNER
合作伙伴
 2025 @ Cocos.com 版权所有增值电信业务经营许可证:闽B2-20160169闽ICP备14002653号
|
||||||||||||||||||||||||||||||||||||||||||||||||||||||||||||||||||||||||||||||||||


 浙公网安备 33010602011771号