


天气接口调用
1, 接口网站
https://www.qweather.com/

2,注册账号
https://dev.qweather.com/
https://dev.qweather.com/docs/finance/pricing/#weather-and-environment
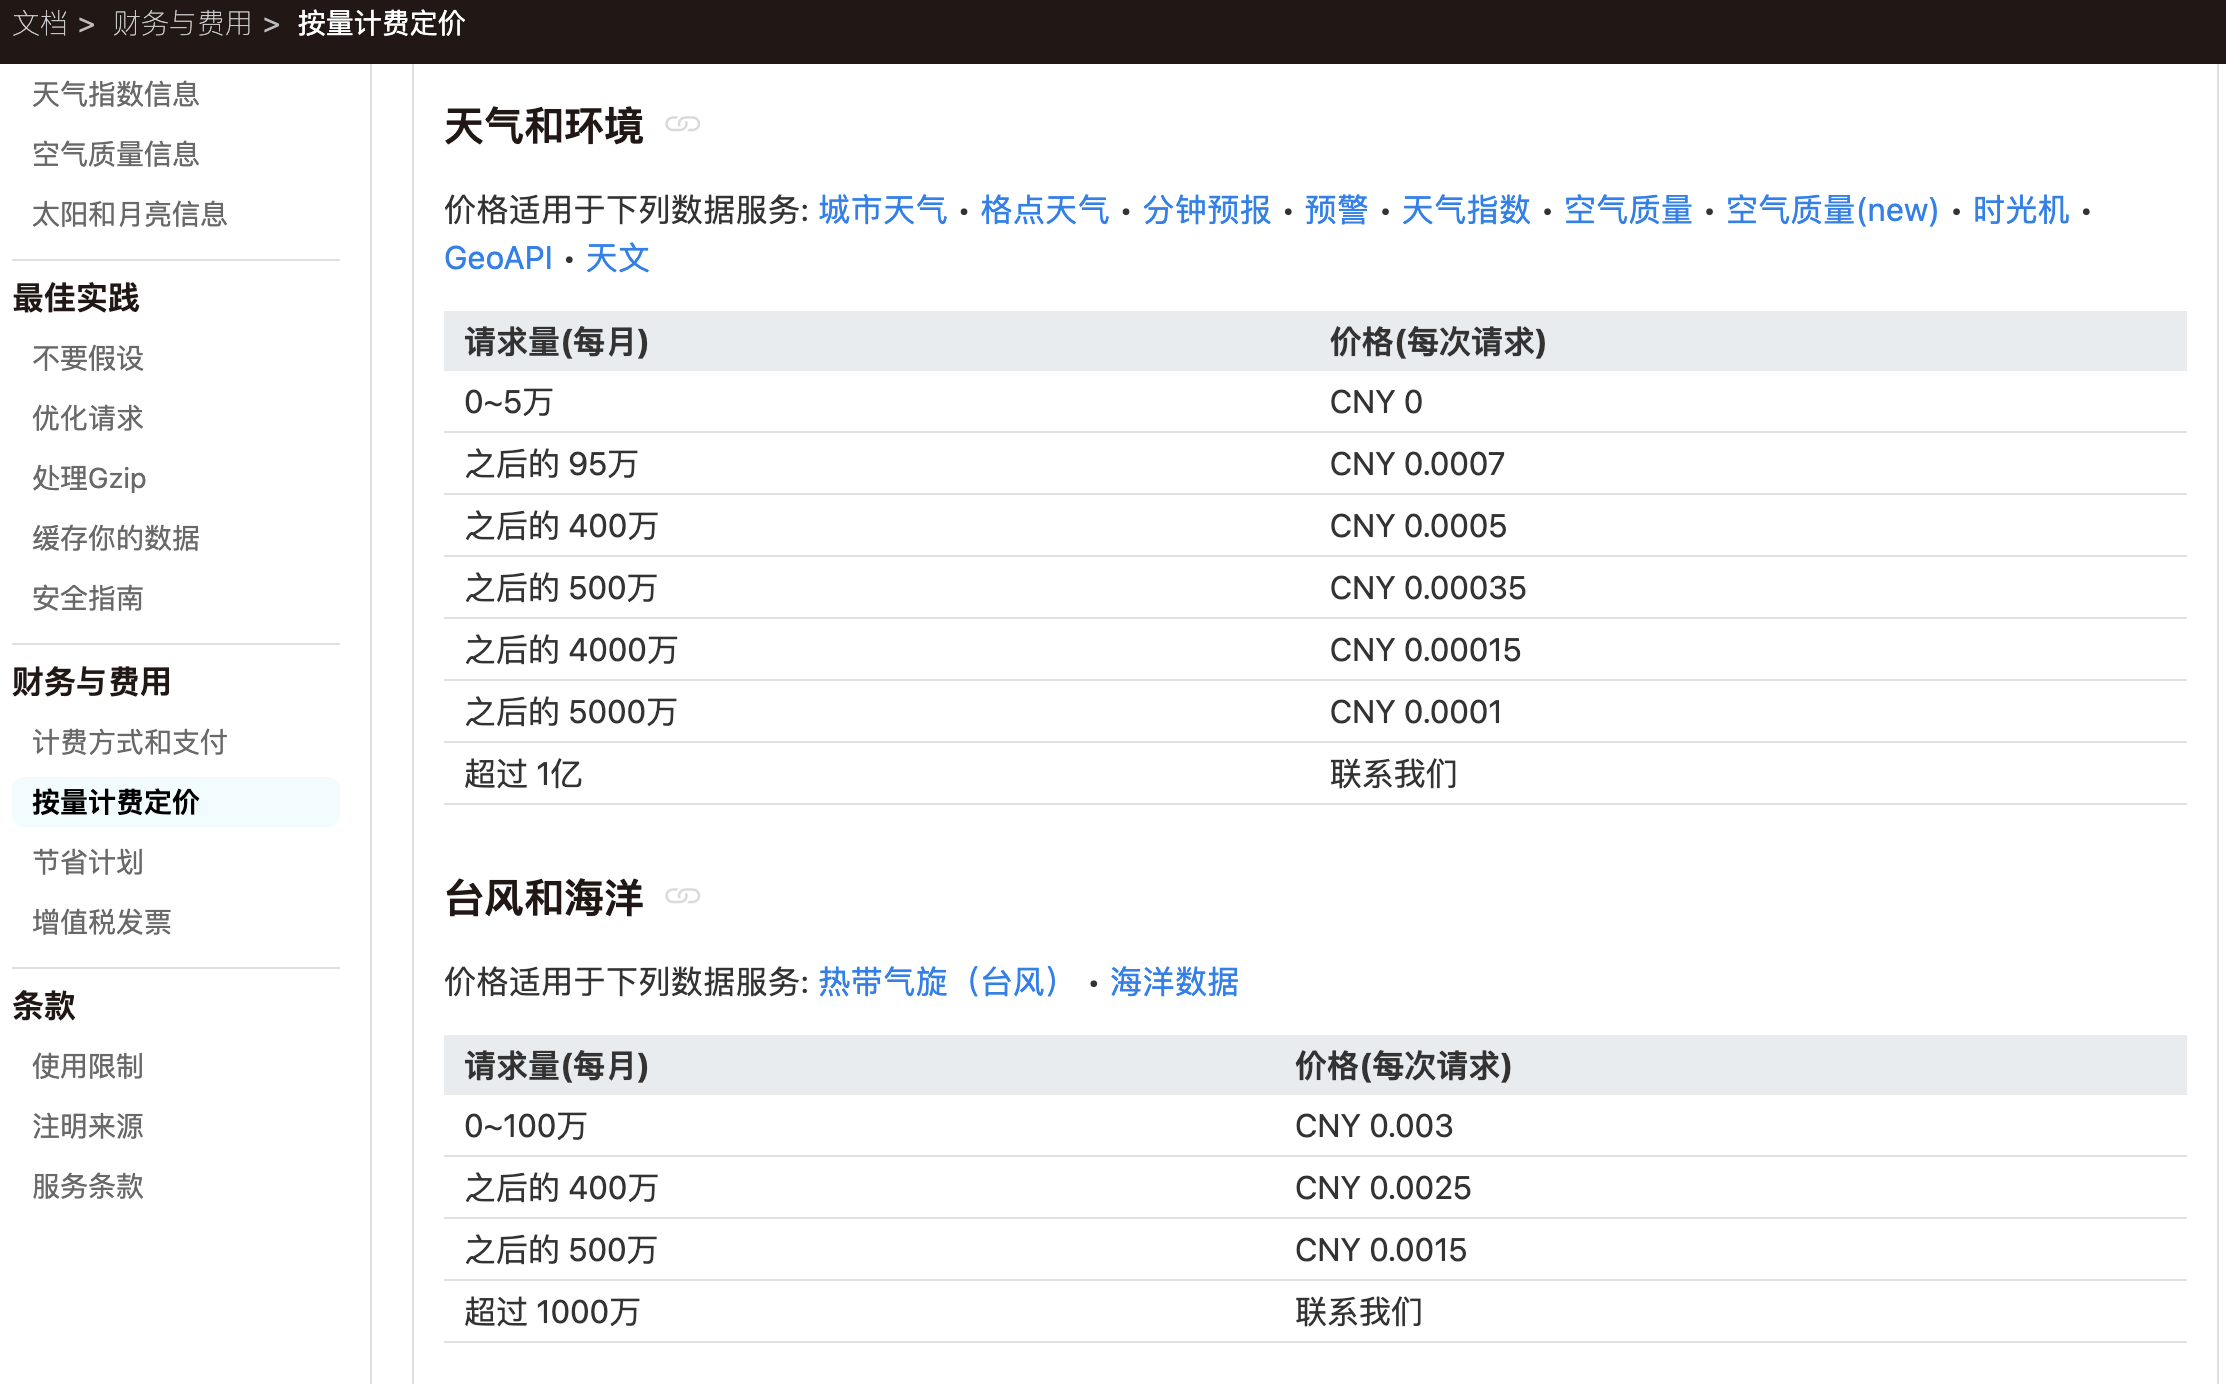
3,接口收费
https://dev.qweather.com/docs/finance/pricing/#weather-and-environment

4,token验证
https://dev.qweather.com/docs/configuration/
开发配置
在开始使用和风天气开发服务之前,你需要进行一些基础配置,例如创建项目和KEY,下载SDK等等。
https://dev.qweather.com/docs/configuration/authentication/#prerequisites
生成Ed25519密钥
这里介绍一种使用OpenSSL创建Ed25519密钥的方法。
提示:我们建议使用OpenSSL 3.0.1及以上版本创建Ed25519和验证签名。在大多数Linux和macOS的最新版本中已经集成OpenSSl 3.0+,对于Windows,我们推荐使用winget安装OpenSSL。
提示:你也可以通过在线工具、熟悉的开发语言或第三方库生成Ed25519私钥和公钥。
打开终端,粘贴下列文本生成公钥和私钥:
openssl genpkey -algorithm ED25519 -out ed25519-private.pem \
&& openssl pkey -pubout -in ed25519-private.pem > ed25519-public.pem
这将在当前目录创建两个文件:
- ed25519-private.pem,私钥,用于JWT认证的签名。你应该妥善安全的保管私钥。
- ed25519-public.pem,公钥,用于签名的验证,需要上传到和风天气控制台
上传公钥
当你完成密钥对的生成后,你需要将其中的公钥添加到和风天气控制台,用于JWT身份验证。
- 前往控制台-项目管理
- 在项目列表中点击你需要添加凭据的项目
- 点击凭据区域右侧的“添加凭据”按钮
- 输入凭据名称
- 选择身份认证方式JSON Web Token
- 使用任意文本编辑器打开公钥文件(比如刚才创建的ed25519-public.pem),复制其中的全部内容,这些内容看起来像是:
-----BEGIN PUBLIC KEY----- MCowBQYDK2VwAyEAARbeZ5AhklFG4gg1Gx5g5bWxMMdsUd6b2MC4wV0/M9Q= -----END PUBLIC KEY----- - 在公钥文本框中粘贴公钥内容
- 点击“保存”按钮
生成JWT
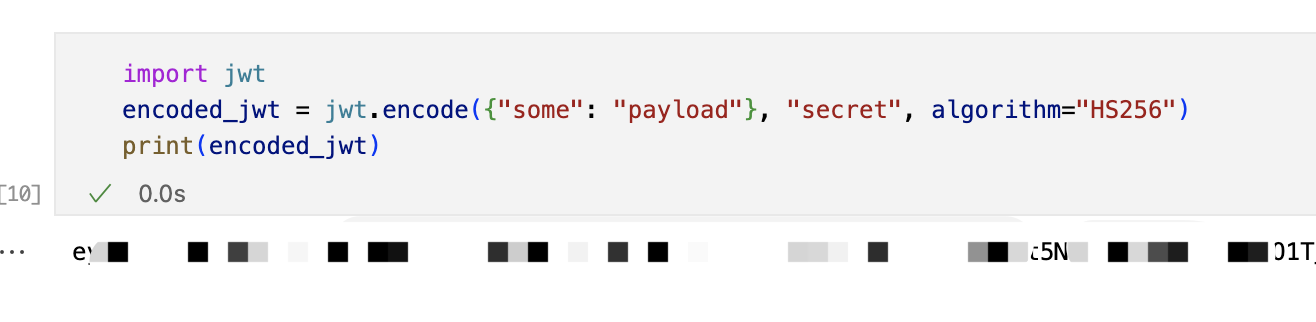
Python3
需要运行 pip3 install PyJWT 才能安装 PyJWT 包。
#!/usr/bin/env python3
import sys
import time
import jwt

# Open PEM
private_key = """YOUR_PRIVATE_KEY"""

payload = {
    'iat': int(time.time()) - 30,
    'exp': int(time.time()) + 900,
    'sub': 'YOUR_PROJECT_ID'
}
headers = {
    'kid': 'YOUR_KEY_ID'
}

# Generate JWT
encoded_jwt = jwt.encode(payload, private_key, algorithm='EdDSA', headers = headers)

print(f"JWT:  {encoded_jwt}")
YOUR_PRIVATE_KEY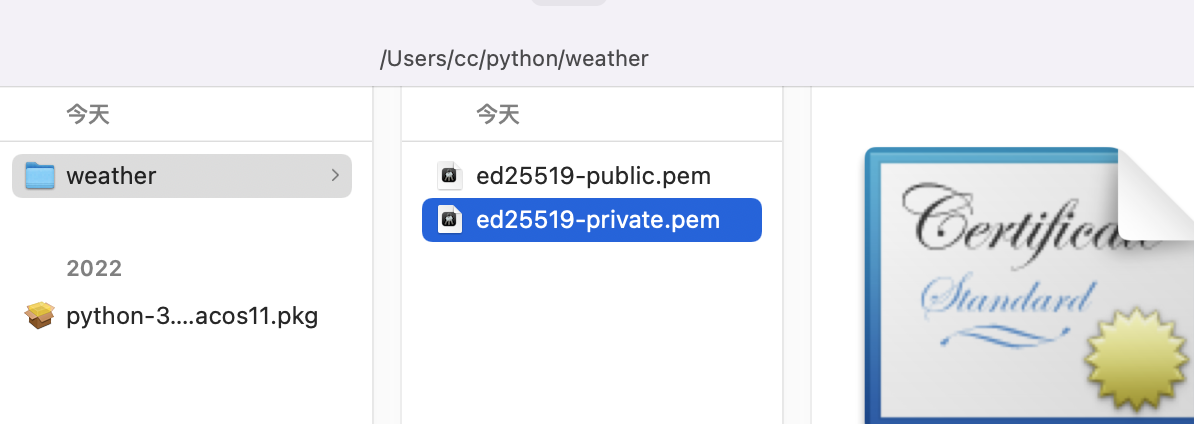
创建项目; 项目中上传本地的 公钥凭证。
上传本地公钥凭证。

YOUR_PROJECT_ID 项目ID;YOUR_KEY_ID 凭据ID ; 本地的公钥凭证。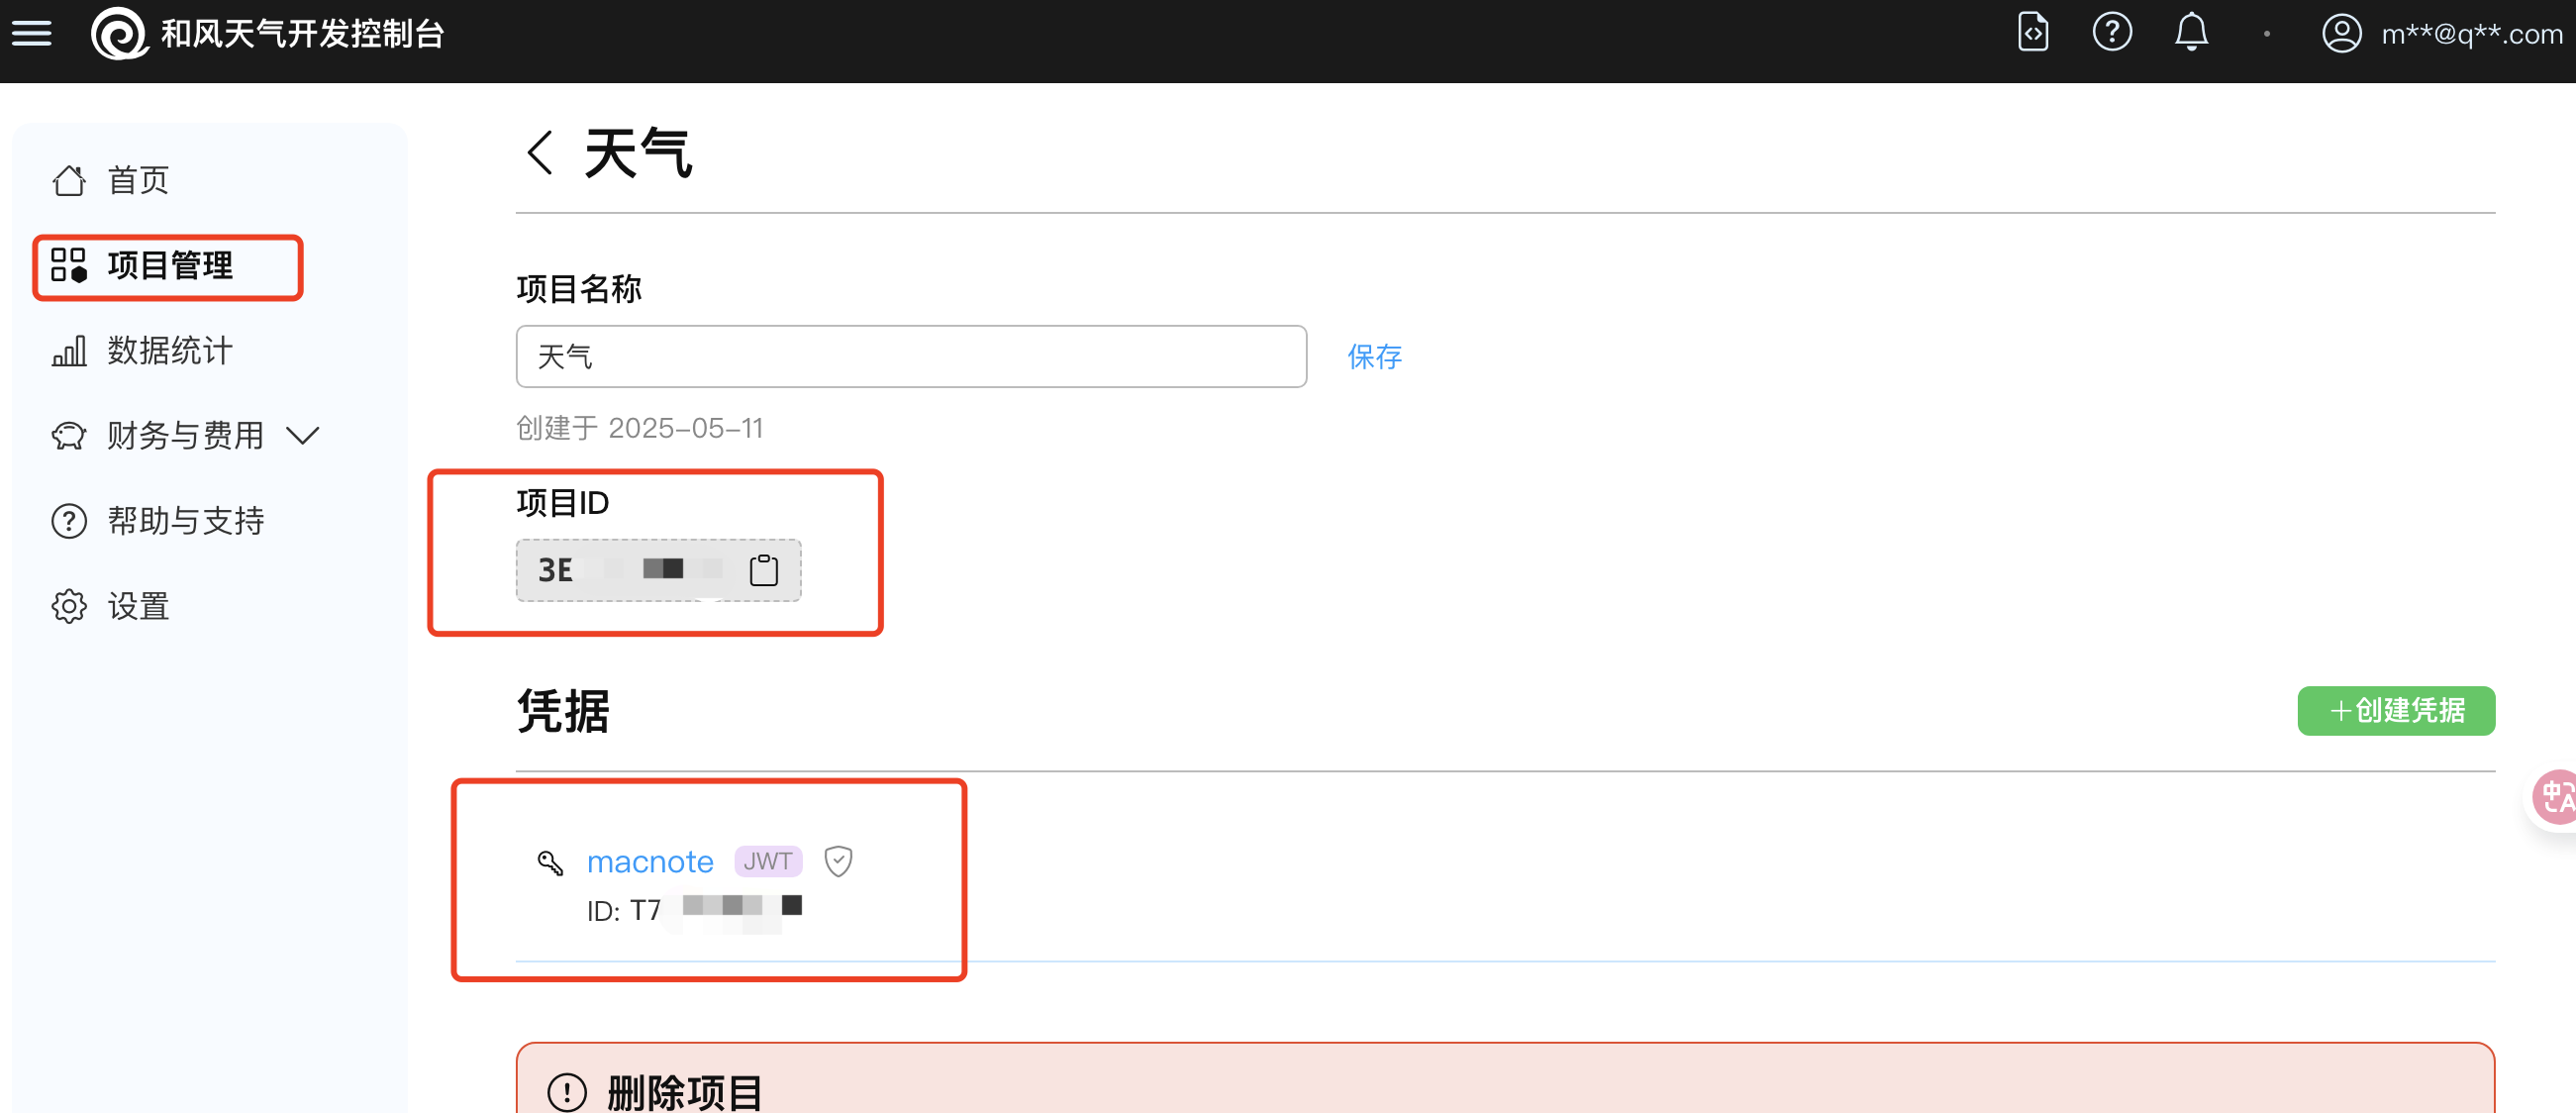
5,接口请求
https://dev.qweather.com/docs/api/geoapi/city-lookup/
城市搜索
使用城市搜索,可获取到该城市的基本信息,包括城市的Location ID(你需要这个ID去查询天气),多语言名称、经纬度、时区、海拔、Rank值、归属上级行政区域、所在行政区域等。
查询参数
location(必选)需要查询地区的名称,支持文字、以英文逗号分隔的经度,纬度坐标(十进制,最多支持小数点后两位)、LocationID或Adcode(仅限中国城市)。例如location=北京或location=116.41,39.92
模糊搜索,当location传递的为文字时,支持模糊搜索,即用户可以只输入城市名称一部分进行搜索,最少一个汉字或2个字符,结果将按照相关性和Rank值进行排列,便于开发或用户进行选择他们需要查看哪个城市的天气。例如
location=bei,将返回与bei相关性最强的若干结果,包括黎巴嫩的贝鲁特和中国的北京市
https://dev.qweather.com/docs/api/weather/weather-now/
实时天气
根据id查询 城市实时天气
查询参数
location(必选)需要查询地区的LocationID或以英文逗号分隔的经度,纬度坐标(十进制,最多支持小数点后两位),LocationID可通过GeoAPI获取。例如location=101010100或location=116.41,39.92lang多语言设置,请阅读多语言文档,了解我们的多语言是如何工作、如何设置以及数据是否支持多语言。unit数据单位设置,可选值包括unit=m(公制单位,默认)和unit=i(英制单位)。更多选项和说明参考度量衡单位。
错误码;https://dev.qweather.com/docs/resource/error-code/
6,测试代码
curl -X GET --compressed \
-H 'Authorization: Bearer your_token' \
'https://your_api_host/v7/weather/now?location=101010100'
请将your_token替换为你的JWT身份认证,将your_api_host替换为你的API Host
Python3 获取token
需要运行 pip3 install PyJWT 才能安装 PyJWT 包。
#!/usr/bin/env python3
import sys
import time
import jwt

# Open PEM
private_key = """YOUR_PRIVATE_KEY"""

payload = {
    'iat': int(time.time()) - 30,
    'exp': int(time.time()) + 900,
    'sub': 'YOUR_PROJECT_ID'
}
headers = {
    'kid': 'YOUR_KEY_ID'
}

# Generate JWT
encoded_jwt = jwt.encode(payload, private_key, algorithm='EdDSA', headers = headers)

print(f"JWT:  {encoded_jwt}")
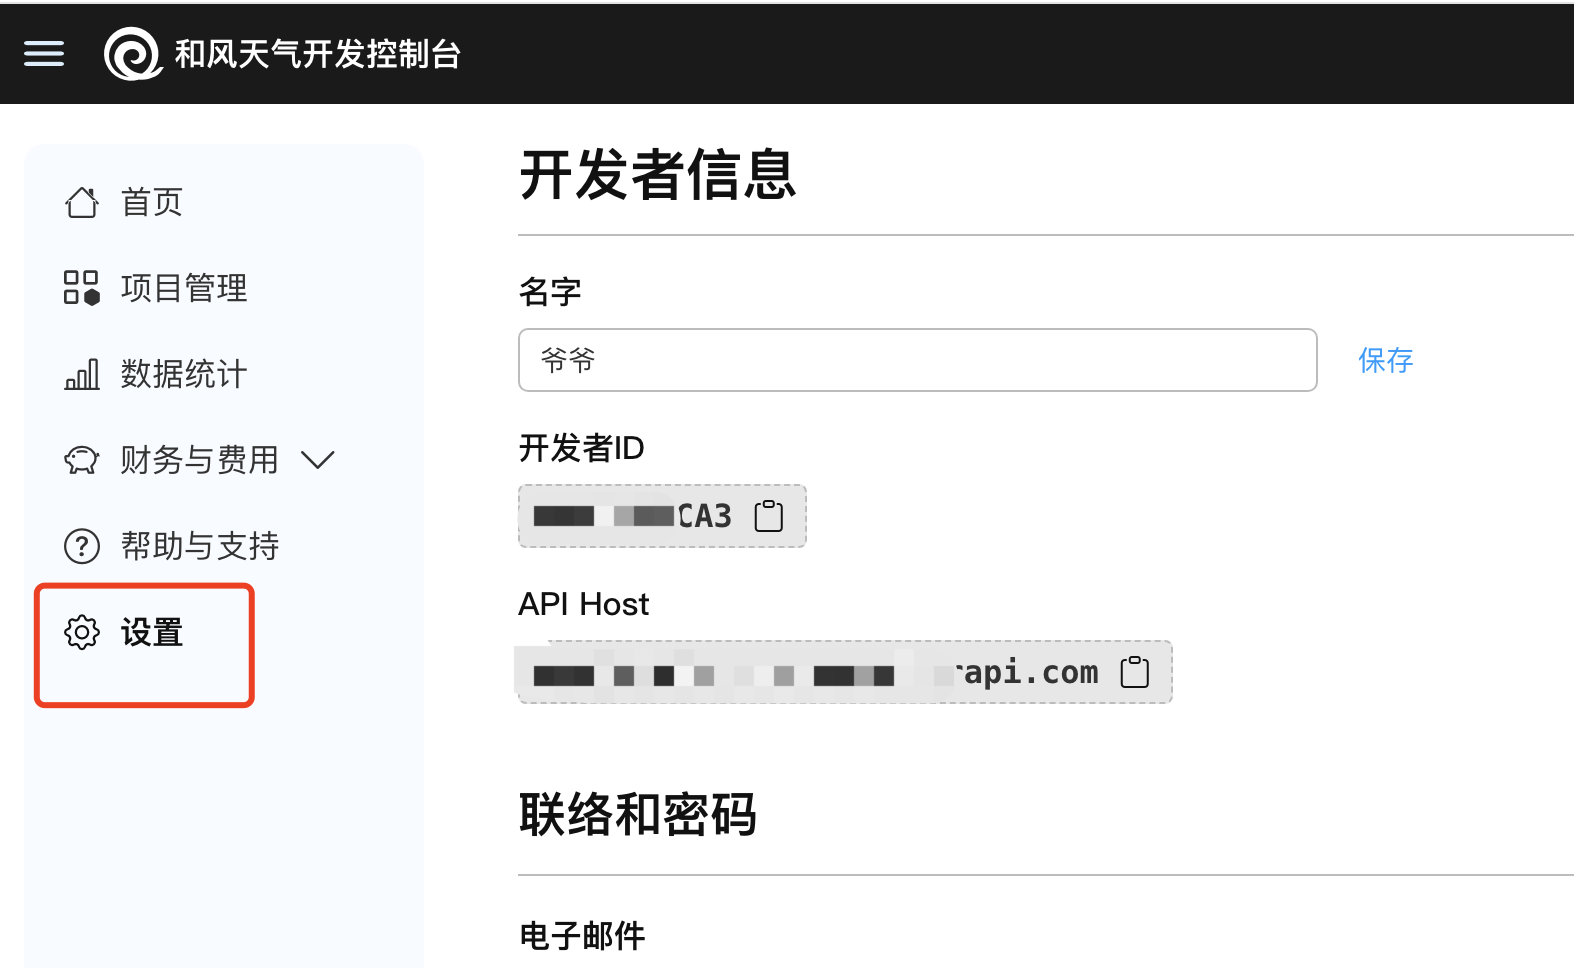
查看请求 host
https://console.qweather.com/setting?lang=zh
Python
6.1 , token

import jwt
import time
# pip install PyJWT -i https://pypi.tuna.tsinghua.edu.cn/simple
# 替换为你的私钥内容
private_key = """
-----BEGIN PRIVATE KEY-----
MC4C本地私钥xXF6G3
-----END PRIVATE KEY-----
"""

# 替换为你的凭据ID和项目ID
kid = "111"  # 凭据ID
sub = "111"  # 项目ID

# 设置签发时间和过期时间
iat = int(time.time()) - 30  # 当前时间减去30秒
exp = iat + 900  # 15分钟后过期

# 构建JWT的Header和Payload
header = {
    "alg": "EdDSA",
    "kid": kid
}
payload = {
    "sub": sub,
    "iat": iat,
    "exp": exp
}

# 生成JWT
try:
    encoded_jwt = jwt.encode(payload, private_key, algorithm='EdDSA', headers=header)
    print(f"JWT: {encoded_jwt}")
except Exception as e:
    print(f"生成JWT时出错:{e}")
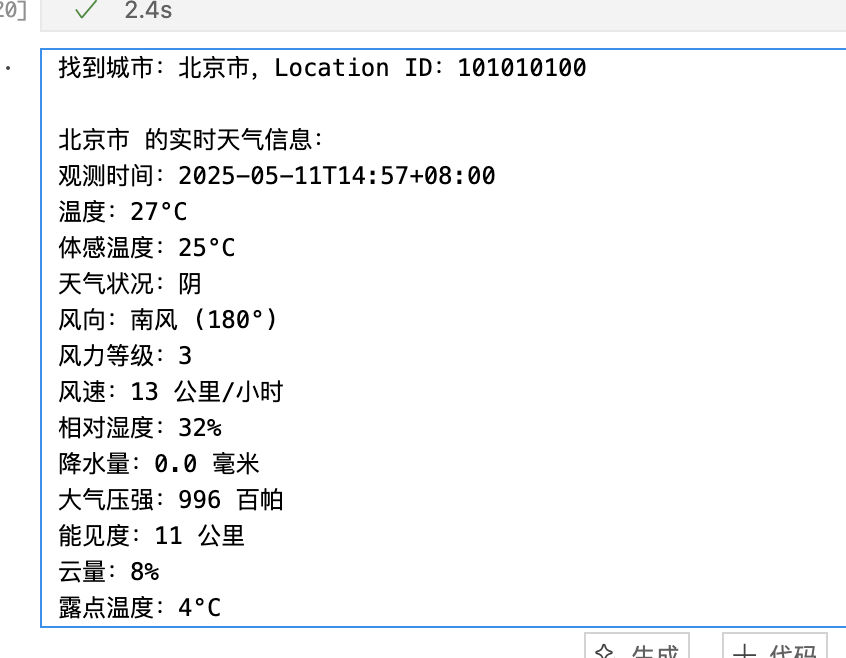
6.2, api 调用
API_TOKEN, 需要新获取
import requests

# 替换为你的 QWeather API Token
API_TOKEN = "11.11.zST-11-11-11"
API_HOST = "https://11.re.1.com"


def get_city_location(city_name):
    """
    调用城市搜索接口,获取城市的Location ID
    """
    url = f"{API_HOST}/geo/v2/city/lookup?location={city_name}"
    headers = {
        "Authorization": f"Bearer {API_TOKEN}"
    }
    response = requests.get(url, headers=headers)

    if response.status_code == 200:
        data = response.json()
        if data['code'] == '200' and data['location']:
            # 返回第一个匹配的城市的Location ID
            return data['location'][0]['id']
        else:
            print(f"未找到城市:{city_name}")
            return None
    else:
        print(f"请求失败,状态码:{response.status_code}")
        return None

def get_realtime_weather(location_id):
    """
    调用实时天气接口,获取实时天气数据
    """
    url = f"{API_HOST}/v7/weather/now?location={location_id}"
    headers = {
        "Authorization": f"Bearer {API_TOKEN}"
    }
    response = requests.get(url, headers=headers)

    if response.status_code == 200:
        data = response.json()
        if data['code'] == '200':
            weather_data = data['now']
            return weather_data
        else:
            print(f"未找到实时天气数据:{location_id}")
            return None
    else:
        print(f"请求失败,状态码:{response.status_code}")
        return None

def display_weather(weather_data):
    """
    显示实时天气信息
    """
    if weather_data:
        print(f"观测时间:{weather_data['obsTime']}")
        print(f"温度:{weather_data['temp']}°C")
        print(f"体感温度:{weather_data['feelsLike']}°C")
        print(f"天气状况:{weather_data['text']}")
        print(f"风向:{weather_data['windDir']} ({weather_data['wind360']}°)")
        print(f"风力等级:{weather_data['windScale']}")
        print(f"风速:{weather_data['windSpeed']} 公里/小时")
        print(f"相对湿度:{weather_data['humidity']}%")
        print(f"降水量:{weather_data['precip']} 毫米")
        print(f"大气压强:{weather_data['pressure']} 百帕")
        print(f"能见度:{weather_data['vis']} 公里")
        print(f"云量:{weather_data.get('cloud', '无')}%")
        print(f"露点温度:{weather_data.get('dew', '无')}°C")
    else:
        print("未获取到天气数据")

def main():
    city_name = input("请输入城市名称:")
    location_id = get_city_location(city_name)

    if location_id:
        print(f"找到城市:{city_name},Location ID:{location_id}")
        weather_data = get_realtime_weather(location_id)
        if weather_data:
            print(f"\n{city_name} 的实时天气信息:")
            display_weather(weather_data)
        else:
            print("无法获取实时天气数据")
    else:
        print("无法找到该城市")

if __name__ == "__main__":
    main()


 浙公网安备 33010602011771号