【elasticsearch】centos7下安装elasticsearch7.6.2、kibana7.6.2(rpm方式)
本文演示版本为7.6.2
elasticsearch
一、下载
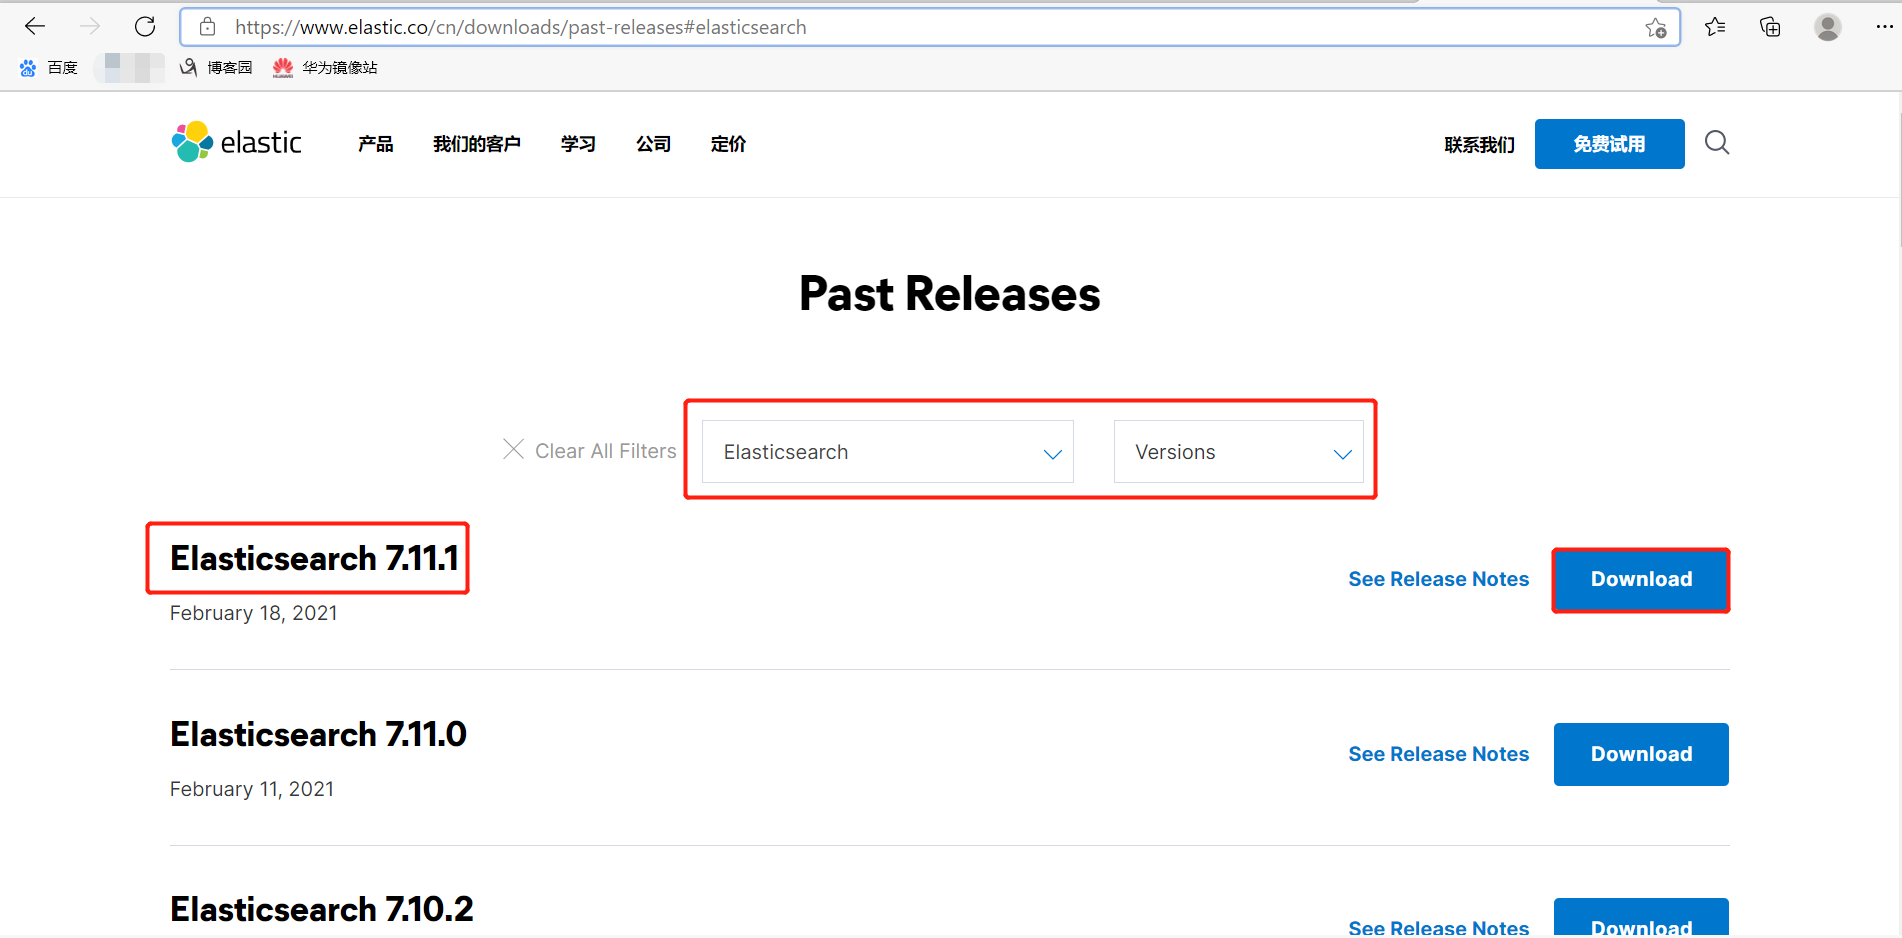
下载地址:https://www.elastic.co/cn/downloads/past-releases#elasticsearch
1. 选择好要安装的版本,点击下载
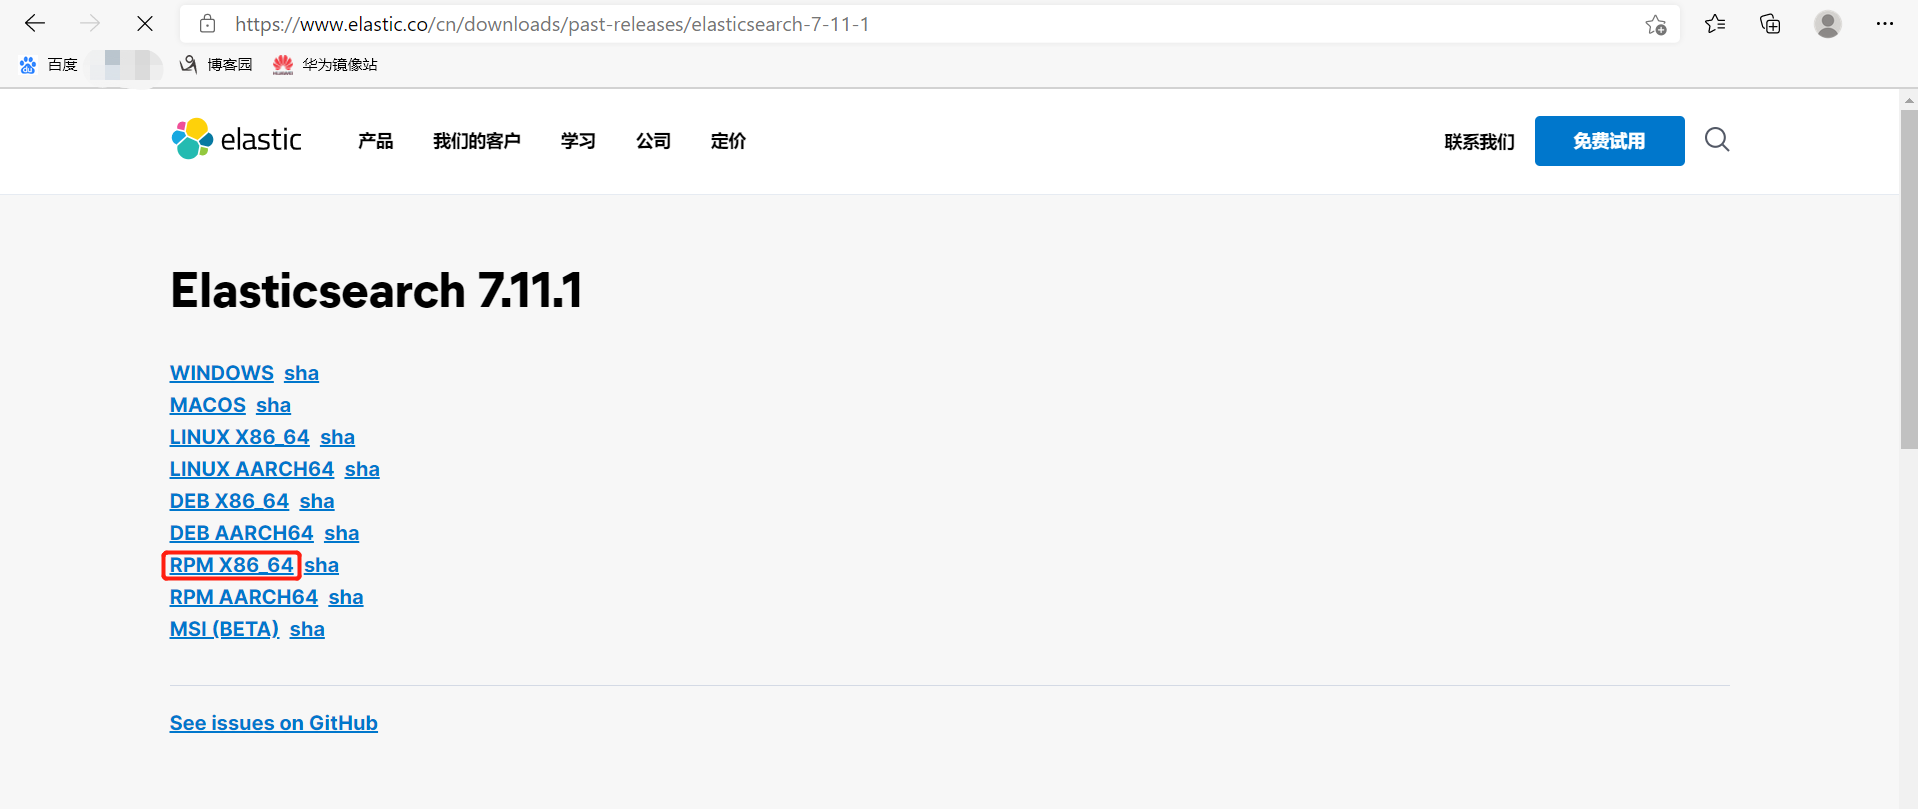
2.点击rpm选项进行下载
 二、安装
二、安装
1. 首先将下载好的rpm包复制到虚拟机/服务器中。我这里是在usr/local下创建了一个elasticsearch文件夹,将rpm包放了进去,执行安装命令:
rpm -ivh elasticsearch-7.6.2-x86_64.rpm
[root@localhost elasticsearch]# rpm -ivh elasticsearch-7.6.2-x86_64.rpm
警告:elasticsearch-7.6.2-x86_64.rpm: 头V4 RSA/SHA512 Signature, 密钥 ID d88e42b4: NOKEY
准备中...                          ################################# [100%]
Creating elasticsearch group... OK
Creating elasticsearch user... OK
正在升级/安装...
   1:elasticsearch-0:7.6.2-1          ################################# [100%]
### NOT starting on installation, please execute the following statements to configure elasticsearch service to start automatically using systemd
 sudo systemctl daemon-reload
 sudo systemctl enable elasticsearch.service
### You can start elasticsearch service by executing
 sudo systemctl start elasticsearch.service
Created elasticsearch keystore in /etc/elasticsearch
2. 编辑elasticsearch的配置文件
vi /etc/elasticsearch/elasticsearch.yml
修改内容如下:
cluster.name: my-application

node.name: node-1

//这里路径可以修改 记下来,一会会用到
path.data: /var/lib/elasticsearch

//这里路径也可以修改 记下来,一会会用到
path.logs: /var/log/elasticsearch

network.host: 0.0.0.0

cluster.initial_master_nodes: ["node-1"]
我的配置文件所有内容如下:(仅供参考)


# ======================== Elasticsearch Configuration =========================
#
# NOTE: Elasticsearch comes with reasonable defaults for most settings.
#       Before you set out to tweak and tune the configuration, make sure you
#       understand what are you trying to accomplish and the consequences.
#
# The primary way of configuring a node is via this file. This template lists
# the most important settings you may want to configure for a production cluster.
#
# Please consult the documentation for further information on configuration options:
# https://www.elastic.co/guide/en/elasticsearch/reference/index.html
#
# ---------------------------------- Cluster -----------------------------------
#
# Use a descriptive name for your cluster:
#
cluster.name: my-application
#
# ------------------------------------ Node ------------------------------------
#
# Use a descriptive name for the node:
#
node.name: node-1
#
# Add custom attributes to the node:
#
#node.attr.rack: r1
#
# ----------------------------------- Paths ------------------------------------
#
# Path to directory where to store the data (separate multiple locations by comma):
#
path.data: /var/lib/elasticsearch
#
# Path to log files:
#
path.logs: /var/log/elasticsearch
#
# ----------------------------------- Memory -----------------------------------
#
# Lock the memory on startup:
#
#bootstrap.memory_lock: true
#
# Make sure that the heap size is set to about half the memory available
# on the system and that the owner of the process is allowed to use this
# limit.
#
# Elasticsearch performs poorly when the system is swapping the memory.
#
# ---------------------------------- Network -----------------------------------
#
# Set the bind address to a specific IP (IPv4 or IPv6):
#
network.host: 0.0.0.0
#
# Set a custom port for HTTP:
#
#http.port: 9200
#
# For more information, consult the network module documentation.
#
# --------------------------------- Discovery ----------------------------------
#
# Pass an initial list of hosts to perform discovery when this node is started:
# The default list of hosts is ["127.0.0.1", "[::1]"]
#
#discovery.seed_hosts: ["host1", "host2"]
#
# Bootstrap the cluster using an initial set of master-eligible nodes:
#
cluster.initial_master_nodes: ["node-1"]
#
# For more information, consult the discovery and cluster formation module documentation.
#
# ---------------------------------- Gateway -----------------------------------
#
# Block initial recovery after a full cluster restart until N nodes are started:
#
#gateway.recover_after_nodes: 3
#
# For more information, consult the gateway module documentation.
#
# ---------------------------------- Various -----------------------------------
#
# Require explicit names when deleting indices:
#
#action.destructive_requires_name: true
3. 修改文件所有者
// 后面的两个路径就是上面配置文件中的路径
chown elasticsearch:elasticsearch -R /var/lib/elasticsearch

chown elasticsearch:elasticsearch -R /var/log/elasticsearch
4. 设置成开机自启
systemctl enable elasticsearch.service
5. 启动、停止、查看状态命令
//启动
systemctl start elasticsearch.service
//停止
systemctl stop elasticsearch.service
//查看状态
systemctl status elasticsearch.service
6. 验证
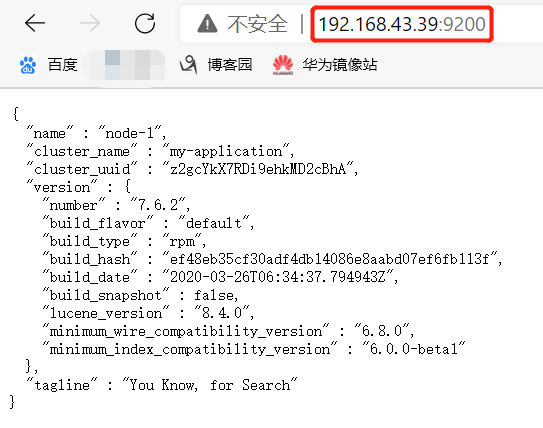
启动成功后,执行如下命令:
curl http://127.0.0.1:9200
效果如下即为启动成功:
[root@localhost elasticsearch]# curl http://127.0.0.1:9200
{
  "name" : "node-1",
  "cluster_name" : "my-application",
  "cluster_uuid" : "z2gcYkX7RDi9ehkMD2cBhA",
  "version" : {
    "number" : "7.6.2",
    "build_flavor" : "default",
    "build_type" : "rpm",
    "build_hash" : "ef48eb35cf30adf4db14086e8aabd07ef6fb113f",
    "build_date" : "2020-03-26T06:34:37.794943Z",
    "build_snapshot" : false,
    "lucene_version" : "8.4.0",
    "minimum_wire_compatibility_version" : "6.8.0",
    "minimum_index_compatibility_version" : "6.0.0-beta1"
  },
  "tagline" : "You Know, for Search"
}
同理,物理机访问:
7. 问题
在启动的时候,遇到过如下问题:
[root@localhost ~]# journalctl -f -u elasticsearch.service
-- Logs begin at 三 2021-03-03 11:26:29 CST. --
3月 03 16:25:50 localhost.localdomain elasticsearch[60333]: OpenJDK 64-Bit Server VM warning: Option UseConcMarkSweepGC was deprecated in version 9.0 and will likely be removed in a future release.
3月 03 16:26:23 localhost.localdomain elasticsearch[60333]: ERROR: [1] bootstrap checks failed
3月 03 16:26:23 localhost.localdomain elasticsearch[60333]: [1]: the default discovery settings are unsuitable for production use; at least one of [discovery.seed_hosts, discovery.seed_providers, cluster.initial_master_nodes] must be configured
3月 03 16:26:23 localhost.localdomain elasticsearch[60333]: ERROR: Elasticsearch did not exit normally - check the logs at /var/log/elasticsearch/my-application.log
3月 03 16:26:24 localhost.localdomain systemd[1]: elasticsearch.service: main process exited, code=exited, status=78/n/a
3月 03 16:26:24 localhost.localdomain systemd[1]: Failed to start Elasticsearch.
3月 03 16:26:24 localhost.localdomain systemd[1]: Unit elasticsearch.service entered failed state.
3月 03 16:26:24 localhost.localdomain systemd[1]: elasticsearch.service failed.
3月 03 16:26:57 localhost.localdomain systemd[1]: Starting Elasticsearch...
3月 03 16:26:57 localhost.localdomain elasticsearch[60524]: OpenJDK 64-Bit Server VM warning: Option UseConcMarkSweepGC was deprecated in version 9.0 and will likely be removed in a future release.
3月 03 16:27:13 localhost.localdomain elasticsearch[60524]: ERROR: [1] bootstrap checks failed
3月 03 16:27:13 localhost.localdomain elasticsearch[60524]: [1]: the default discovery settings are unsuitable for production use; at least one of [discovery.seed_hosts, discovery.seed_providers, cluster.initial_master_nodes] must be configured
3月 03 16:27:13 localhost.localdomain elasticsearch[60524]: ERROR: Elasticsearch did not exit normally - check the logs at /var/log/elasticsearch/my-application.log
原因是yml配置文件没有配置对造成的。
注意:elasticsearch安装完成后,默认路径为:/usr/share/elasticsearch/
kibana
1. 下载
下载方式同上面es方式一致,要注意版本和es的版本要一样
2. 安装
同样复制到虚拟机/服务器中某一位置,执行命令:
rpm -ivh kibana-7.6.2-x86_64.rpm

//结果如下
[root@localhost kibana]# rpm -ivh kibana-7.6.2-x86_64.rpm
警告:kibana-7.6.2-x86_64.rpm: 头V4 RSA/SHA512 Signature, 密钥 ID d88e42b4: NOKEY
准备中...                          ################################# [100%]
正在升级/安装...
   1:kibana-7.6.2-1                   ################################# [100%]
3. 修改kibana.yml配置文件
vim /etc/kibana/kibana.yml
修改内容如下:
server.port: 5601

server.host: "0.0.0.0"

elasticsearch.hosts: ["http://localhost:9200"]

i18n.locale: "zh-CN"
4. 启动、停止、查看状态
//启动服务
systemctl start kibana.service
//查看状态
systemctl status kibana.service
//停止服务
systemctl stop kibana.service
//设置服务开机自启
systemctl enable kibana.service
5. 访问
虚拟机/服务器上打开浏览器输入:http://localhost:5601/
效果如下:

物理机上访问:http://192.168.43.39:5601/
效果如下:

参考:
1. https://www.cnblogs.com/12james/p/12768478.html
2. https://www.pianshen.com/article/95181158665/

 浙公网安备 33010602011771号