

3 创建简单的机器人模型smartcar
博客转载自: https://blog.csdn.net/hcx25909/article/details/8904292
在机器人操作系统(ROS)中,经常需要模拟机器人运动,那么首先需要新建一个机器人。
创建简单的机器人模型的步骤如下:
(1)创建硬件描述包
(2)建立urdf文件
(3)建立launch命令文件
(4)效果演示
1. 在工作区创建硬件描述包,使用如下命令
mkdir ~/smartcar_description/src -p
cd ~/smartcar_description/src
catkin_create_pkg smartcar_description
2. 新建模型的描述文件smartcar.urdf
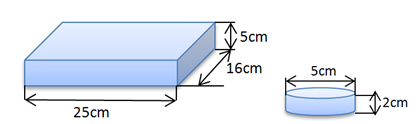
urdf的全称为(Unified Robot Description Format),此文件是对机器人的描述,下面的代码表示smartcar有机身和四个轮子。因为建立的是一个非常简单的机器人,所以我们尽量使用简单的元素:使用长方体代替车模,使用圆柱代替车轮,具体尺寸如下:
cd ~/smartcar_description/src/smartcar_description/
mkdir urdf
cd urdf
touch smartcar.urdf
智能车的描述文件smartcar.urdf,描述代码如下:
<?xml version="1.0"?>
<robot name="smartcar">
  <link name="base_link">
    <visual>
      <geometry>
        <box size="0.25 .16 .05"/>
    </geometry>
    <origin rpy="0 0 1.57075" xyz="0 0 0"/>
    <material name="blue">
        <color rgba="0 0 .8 1"/>
    </material>
    </visual>
 </link>

 <link name="right_front_wheel">
    <visual>
      <geometry>
        <cylinder length=".02" radius="0.025"/>
      </geometry>
      <material name="black">
        <color rgba="0 0 0 1"/>
      </material>
    </visual>
  </link>

  <joint name="right_front_wheel_joint" type="continuous">
    <axis xyz="0 0 1"/>
    <parent link="base_link"/>
    <child link="right_front_wheel"/>
    <origin rpy="0 1.57075 0" xyz="0.08 0.1 -0.03"/>
    <limit effort="100" velocity="100"/>
    <joint_properties damping="0.0" friction="0.0"/>
  </joint>

  <link name="right_back_wheel">
    <visual>
      <geometry>
        <cylinder length=".02" radius="0.025"/>
      </geometry>
      <material name="black">
        <color rgba="0 0 0 1"/>
      </material>
    </visual>
  </link>

  <joint name="right_back_wheel_joint" type="continuous">
    <axis xyz="0 0 1"/>
    <parent link="base_link"/>
    <child link="right_back_wheel"/>
    <origin rpy="0 1.57075 0" xyz="0.08 -0.1 -0.03"/>
    <limit effort="100" velocity="100"/>
    <joint_properties damping="0.0" friction="0.0"/>
 </joint>

 <link name="left_front_wheel">
    <visual>
      <geometry>
        <cylinder length=".02" radius="0.025"/>
      </geometry>
      <material name="black">
        <color rgba="0 0 0 1"/>
      </material>
    </visual>
  </link>

  <joint name="left_front_wheel_joint" type="continuous">
    <axis xyz="0 0 1"/>
    <parent link="base_link"/>
    <child link="left_front_wheel"/>
    <origin rpy="0 1.57075 0" xyz="-0.08 0.1 -0.03"/>
    <limit effort="100" velocity="100"/>
    <joint_properties damping="0.0" friction="0.0"/>
  </joint>

  <link name="left_back_wheel">
    <visual>
      <geometry>
        <cylinder length=".02" radius="0.025"/>
      </geometry>
      <material name="black">
        <color rgba="0 0 0 1"/>
      </material>
    </visual>
  </link>

  <joint name="left_back_wheel_joint" type="continuous">
    <axis xyz="0 0 1"/>
    <parent link="base_link"/>
    <child link="left_back_wheel"/>
    <origin rpy="0 1.57075 0" xyz="-0.08 -0.1 -0.03"/>
    <limit effort="100" velocity="100"/>
    <joint_properties damping="0.0" friction="0.0"/>
  </joint>

  <link name="head">
    <visual>
      <geometry>
        <box size=".02 .03 .03"/>
      </geometry>
      <material name="white">
          <color rgba="1 1 1 1"/>
      </material>
    </visual>
  </link>

  <joint name="tobox" type="fixed">
    <parent link="base_link"/>
    <child link="head"/>
    <origin xyz="0 0.08 0.025"/>
  </joint>
</robot>
3. 建立launch命令文件
.launch文件的作用是:同时启动多个节点,使用roslaunch命令运行.launch文件中指定的节点。建立launch命令文件步骤如下,在smartcar_description文件夹下建立launch文件夹,
cd ~/smartcar_description/src/smartcar_description/
mkdir launch
cd launch
touch base.urdf.rviz.launch
编辑文件base.urdf.rviz.launch如下
<launch>
<arg name="model" />
<arg name="gui" default="False" />
<param name="robot_description" textfile="$(find smartcar_description)/urdf/smartcar.urdf" />
<param name="use_gui" value="$(arg gui)"/>
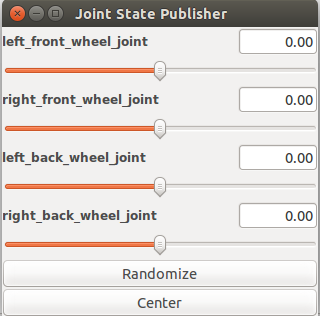
<node name="joint_state_publisher" pkg="joint_state_publisher" type="joint_state_publisher" ></node>
<node name="robot_state_publisher" pkg="robot_state_publisher" type="state_publisher" />
</launch>
分析以上代码可以看出,有3个标签,表示启动了ros中的3个节点,。其实如果在命令行输入3次输入启动节点的命令和使用roslaunch也是一样的效果。
4. 在rviz中显示小车
文件都编辑好了,首先编译一下smartcar_description包
cd ~/smartcar_description/
catkin_make
source devel/setup.bash
其中source devel/setup.bash让smartcar_description包路径信息出现在ROS_PACKAGE_PATH中

运行base.urdf.rviz.launch文件中的命令
roslaunch smartcar_description base.urdf.rviz.launch gui:=true
gui:=true会将urdf中的参数以控制bar的形式显示出来
roslaunch的语法为
Usage: roslaunch [options] [package] [arg_name:=value…]
roslaunch 包名 文件名 参数名:=值
启动rviz来显示
rosrun rviz rviz
启动后是没有模型的,需要增加模型,点左边的add,选择RobotModel如图
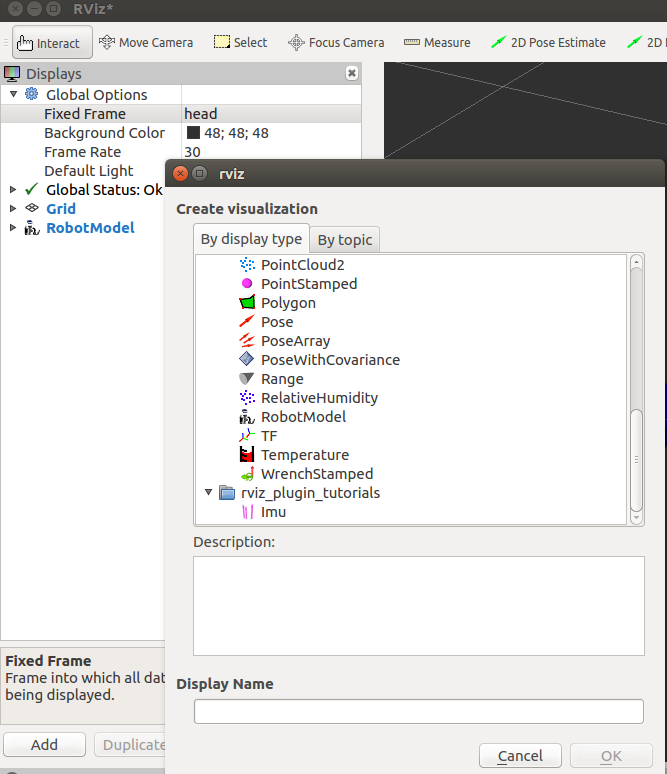
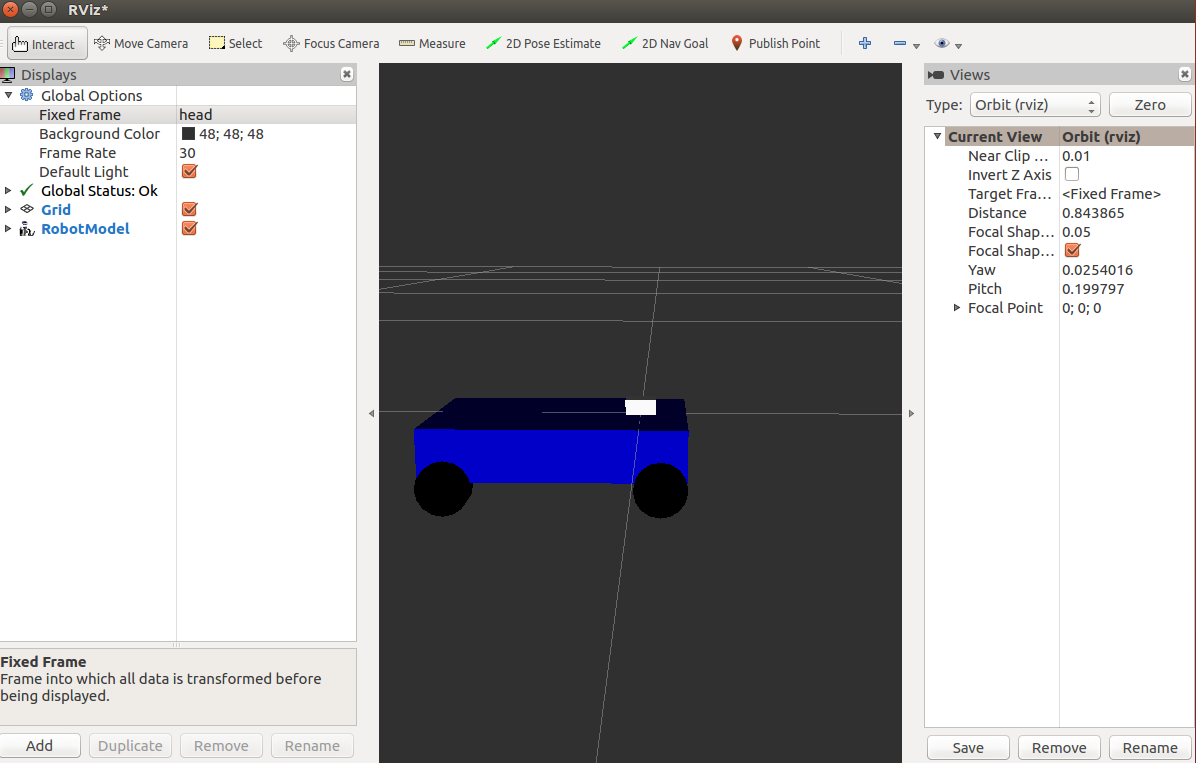
此时左边还是红色,在Global Options中的Fixed Frame中选择head就可以加载机器人模型了

 浙公网安备 33010602011771号