
Fishlulu黑马头条微服务项目日志
写在前面(日志持续更新中)
🌟 本项目教程来自于2023黑马头条微服务实战项目,该日志将记录禄禄鱼在学习这个项目过程中开发的所有细节和各种疑难问题解答,方便后来人更好的学习这个项目,也方便本人更好准备大二下的实习,那废话不多说,我们直接进入正题吧~
前置知识
如果前置知识还没有掌握,以下是推荐的前置课程
- Springboot
- 基础入门 : 2023黑马javaweb教程
- 单体实战项目 : 2023黑马苍穹外卖(博客园有我的学习笔记,已全部完结,内容非常详细)
- 微服务
- 基础入门 : 2021微服务全套技术栈教程(自己当初学的是这一版本,也可根据自己想法选择更新的教程)
学习重点
遇到问题怎么办
调试,搜索,问大语言模型,实在解决不了问题再来b站评论区问我(当然目前我还没学完这个项目,所以还没有发项目的成果展示视频)
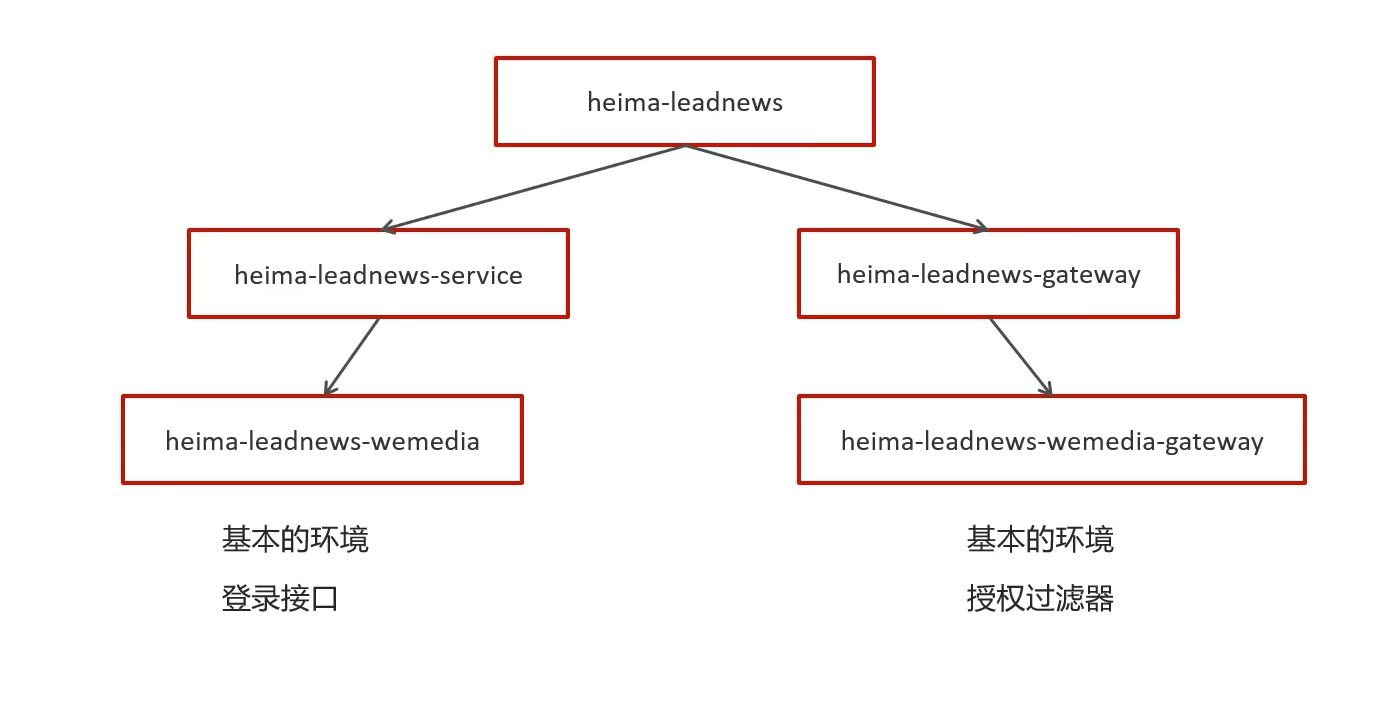
Day01 2024.03.10 项目环境搭建
环境搭建概述
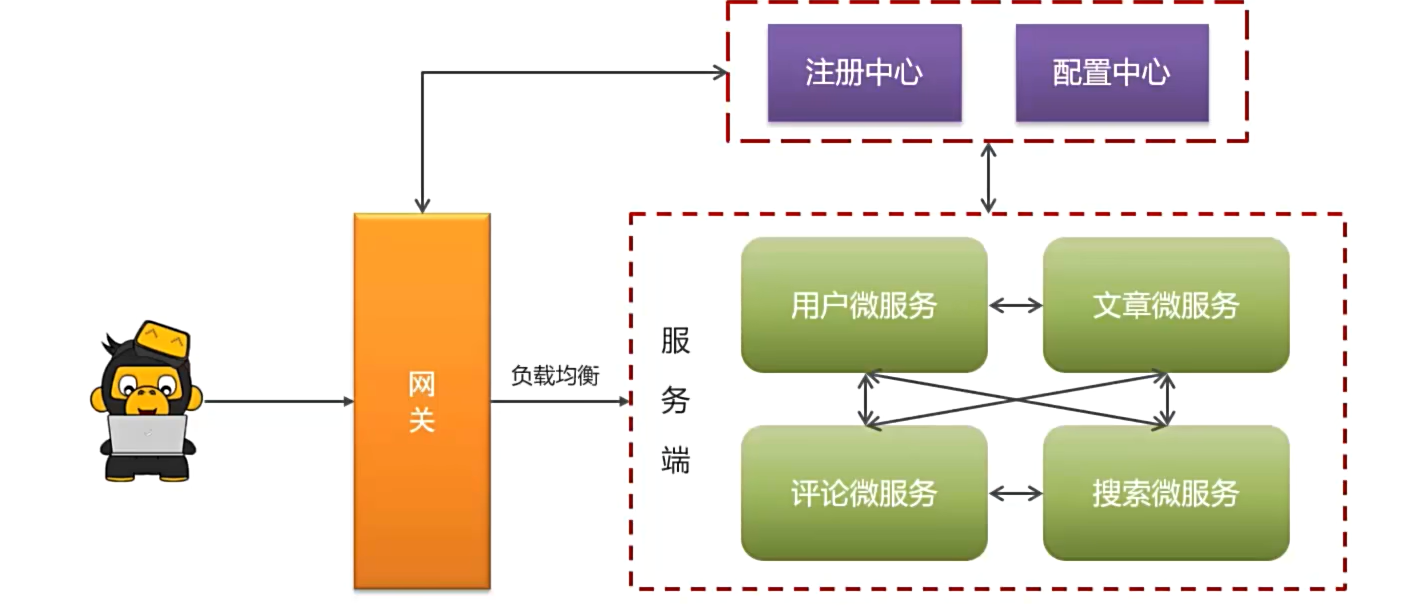
先进行微服务整体架构搭建,包括设置注册和配置中心,配置各个微服务之间的调用以及网关的搭建
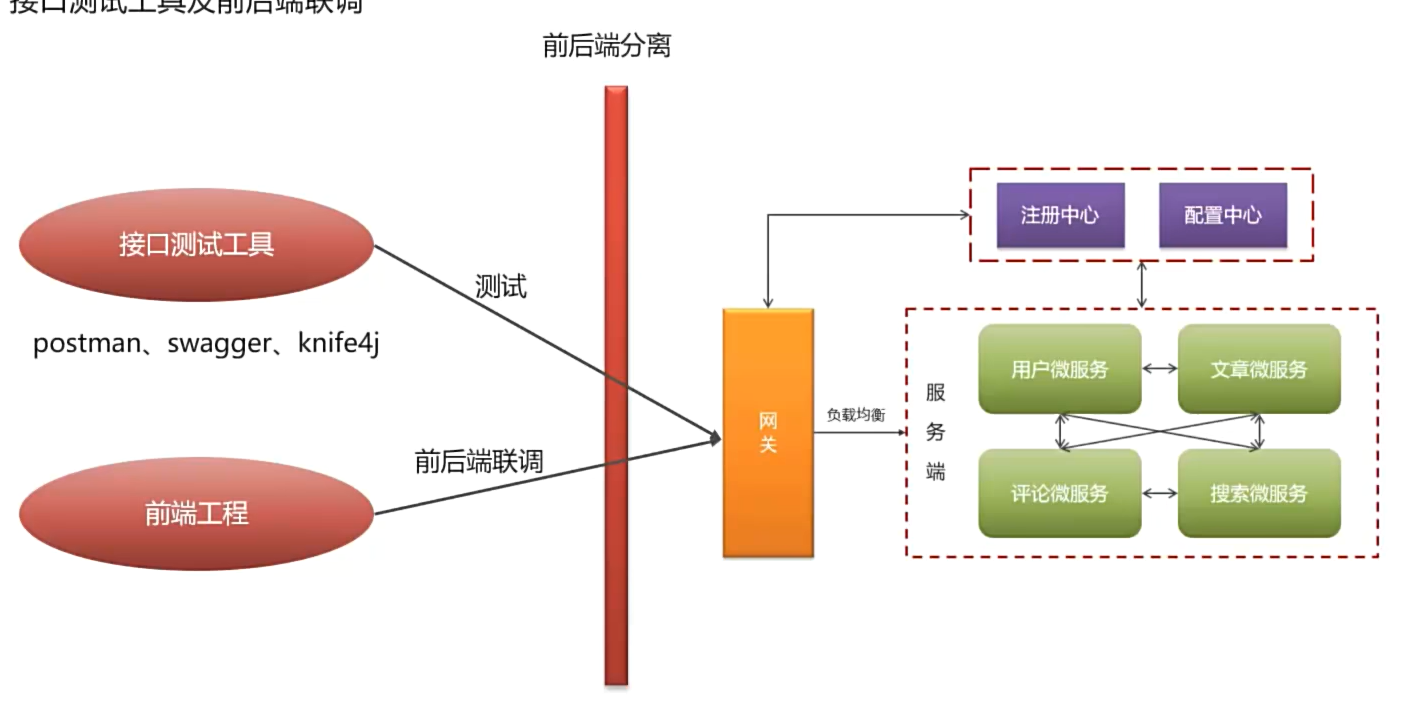
然后导入前端环境进行接口测试,完成登录接口开发
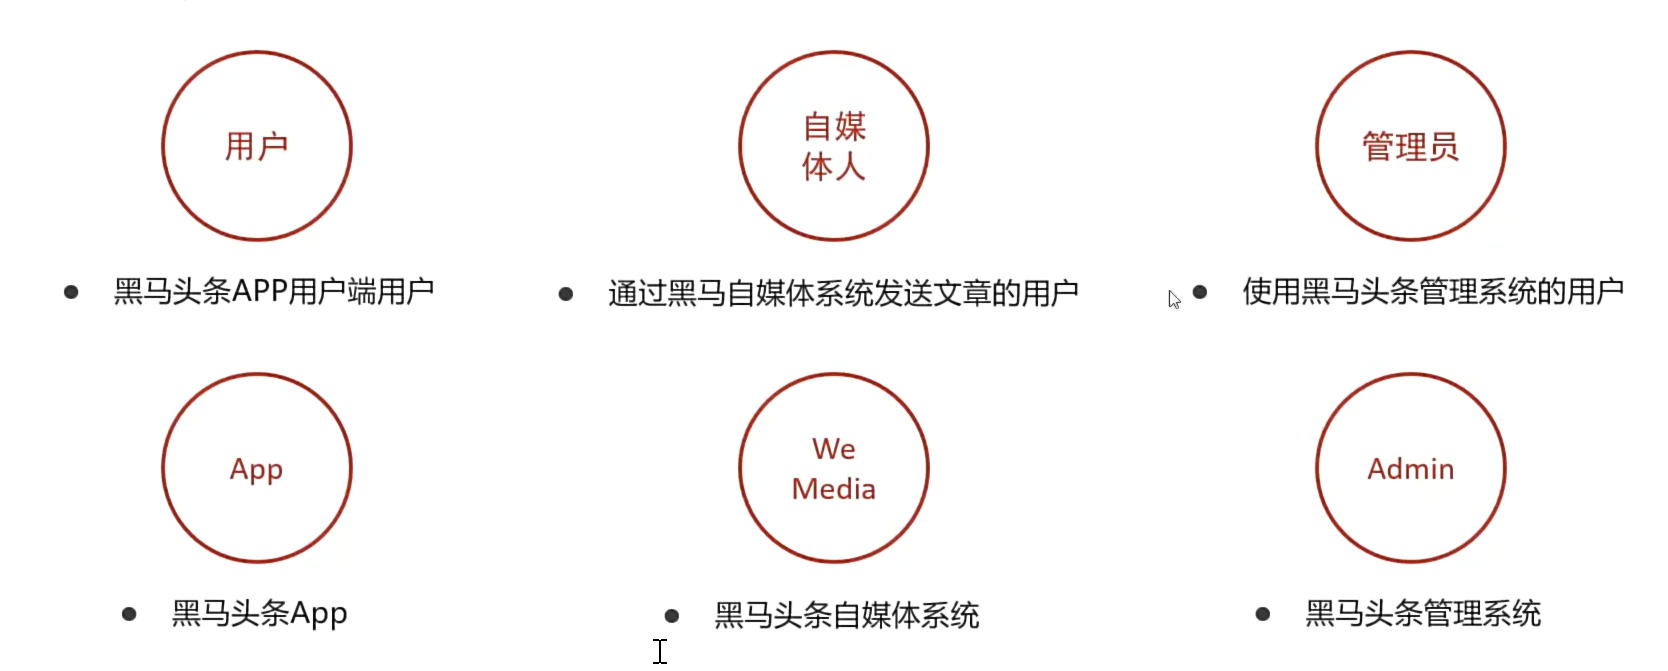
项目介绍
是一个类似今日头条的新闻资讯类项目
业务说明
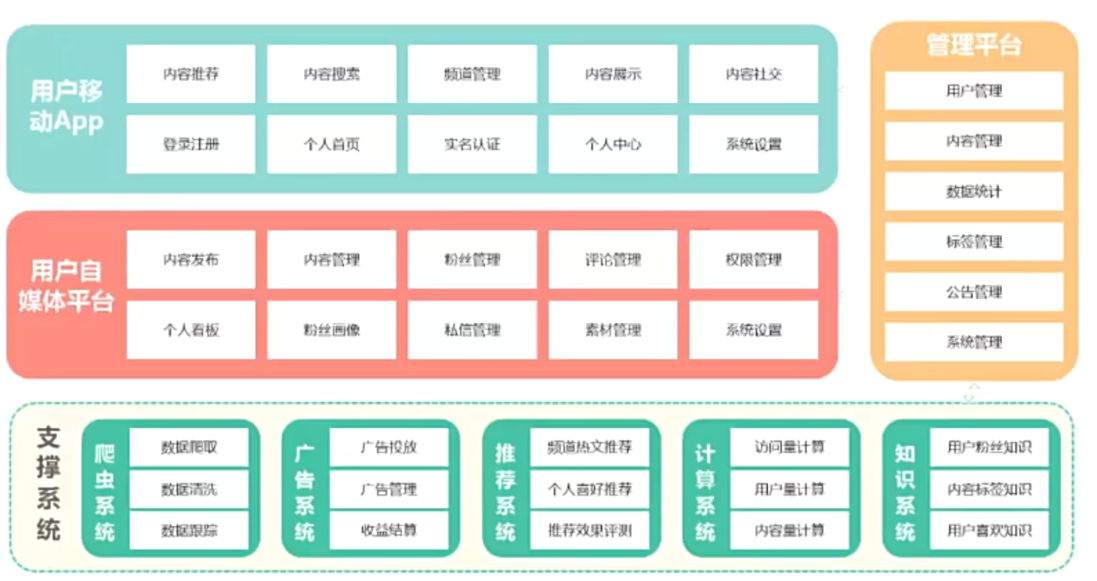
-
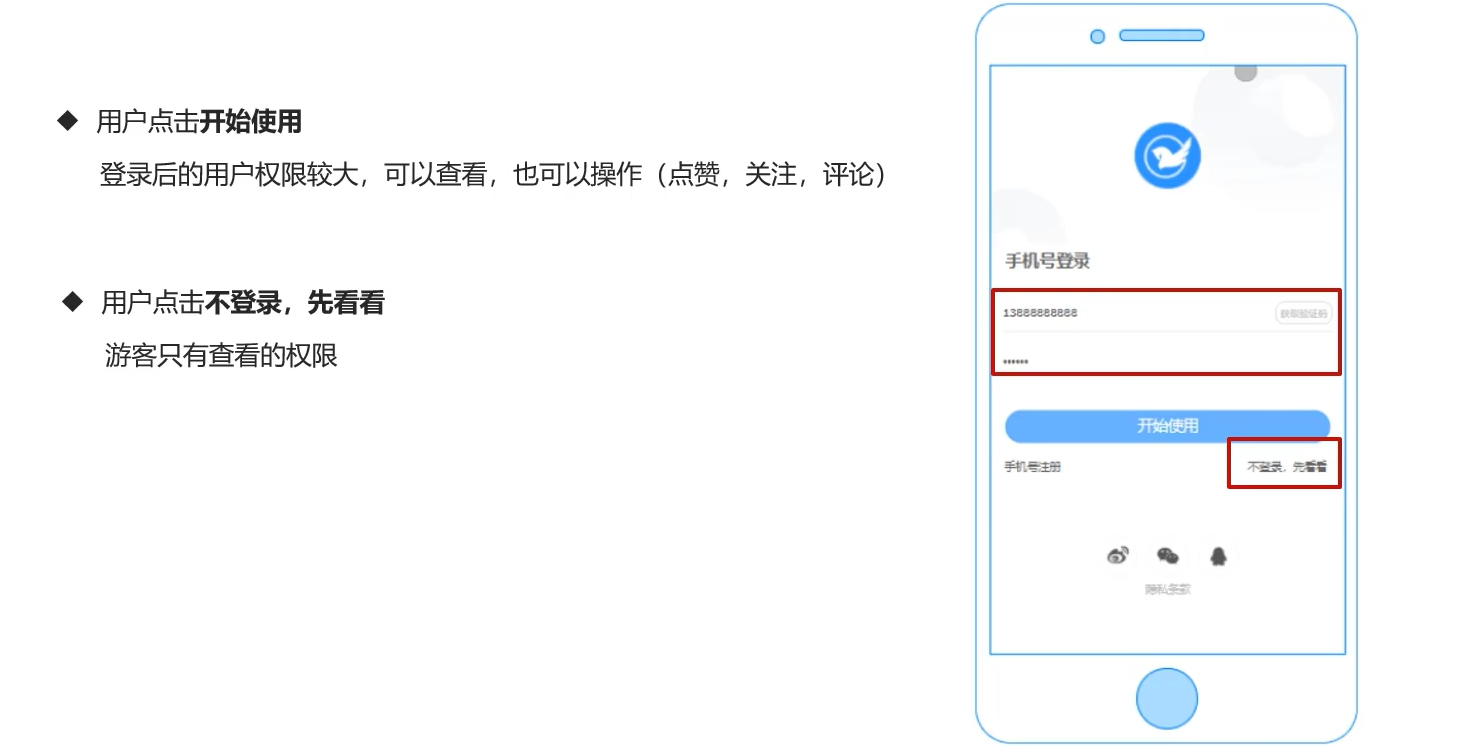
用户移动App端,提供给用户来查看的(移动端)
移动端有两种打开模式
-
谷歌浏览器调成移动端模式打开
-
手机浏览器打开或扫描该二维码(当然是老师自己上线的项目)


-
-
用户自媒体平台:用户用来发布和管理审核文章用(PC端)
-
管理平台:平台官方用来管理用户和文章(PC端)
-
项目术语
技术栈说明
基础层
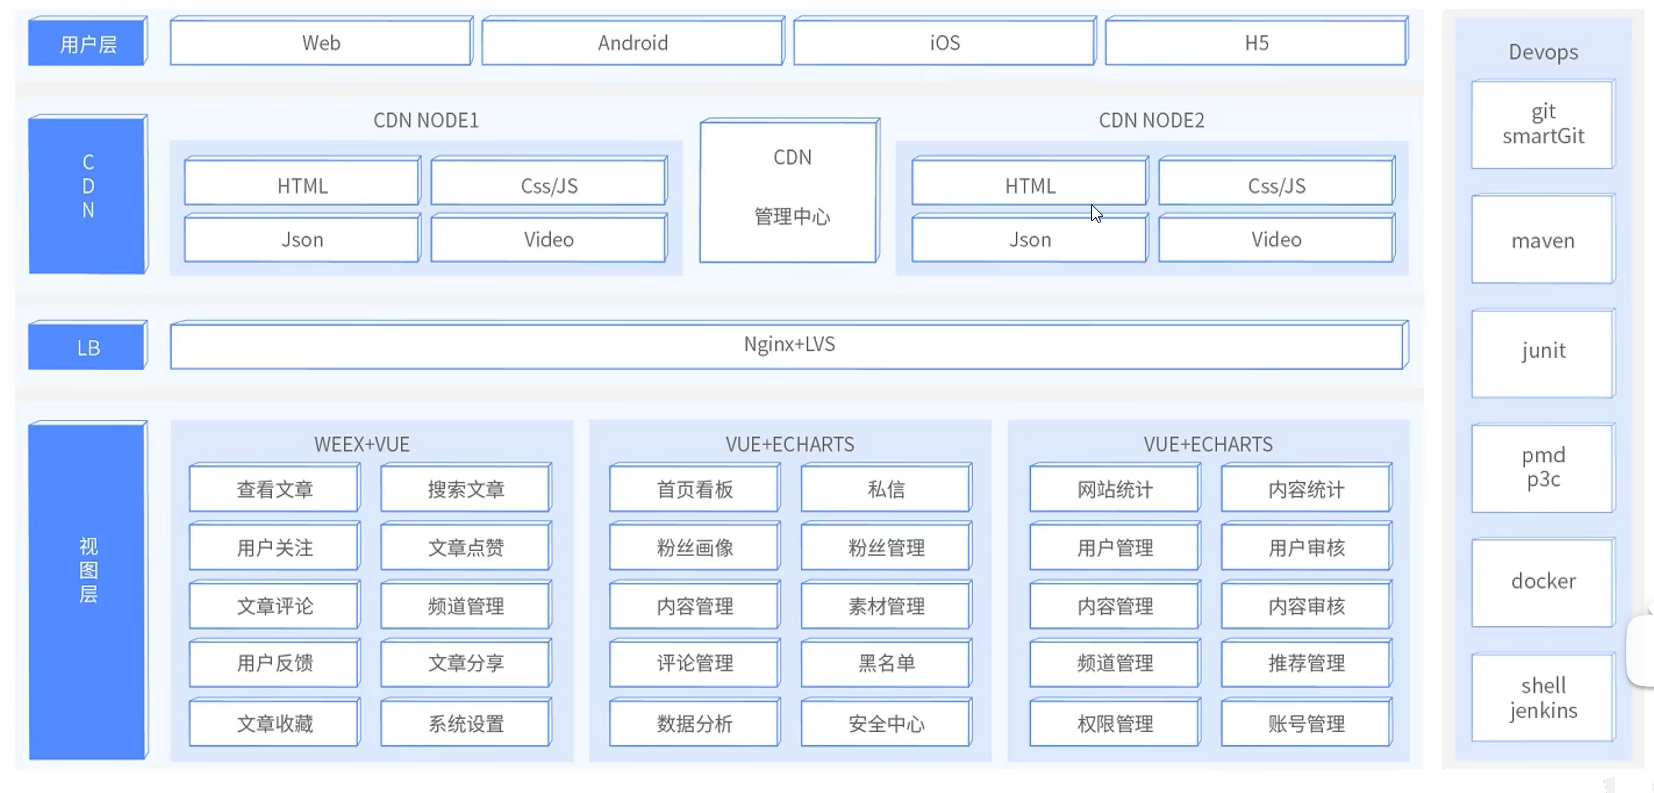
用户端通过cdn分发的请求通过nginx负载均衡访问前端(移动端,自媒体端和管理端),然后前端访问服务端接口,获取数据
服务层
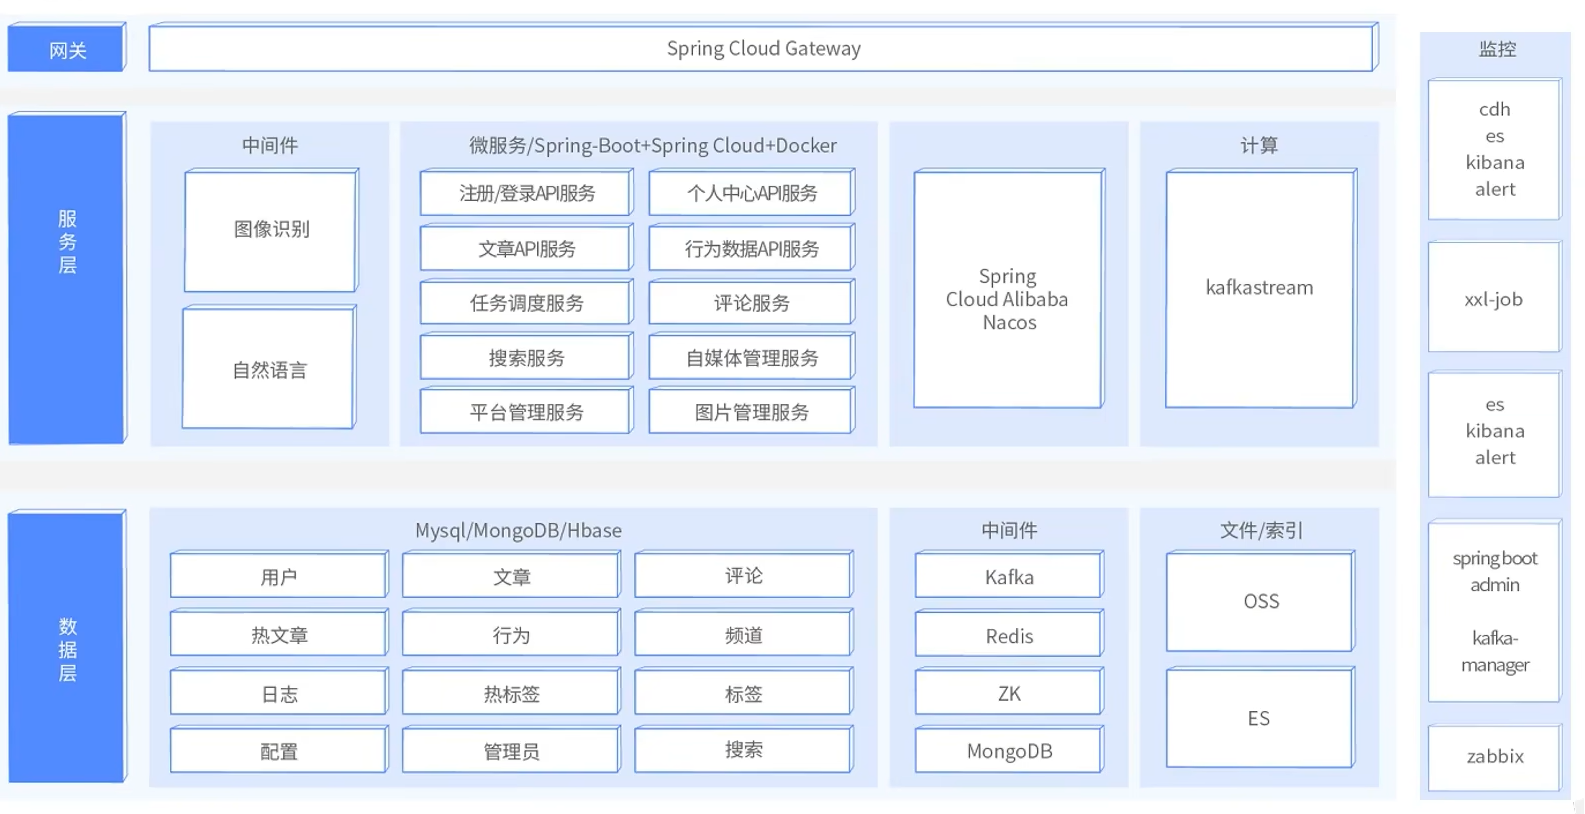
前端过来的请求先经过网关分发过滤访问指定的微服务,其中用到了nacos来管理配置和服务间的调用,还有图像识别,自然语言等中间件的应用,微服务通过访问数据层获取数据(包括持久化存储,文件存储以及中间件缓存等)
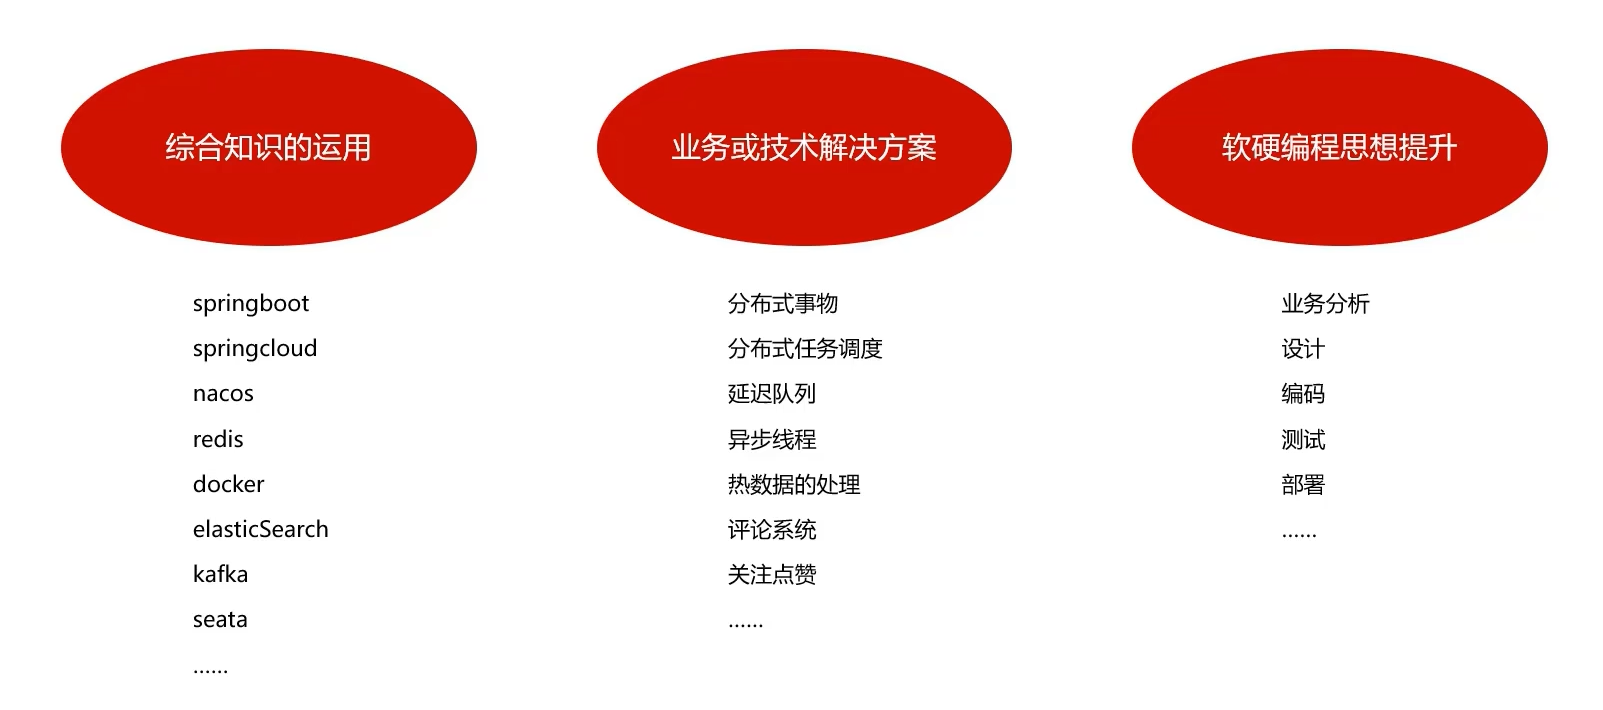
课程介绍
能学到什么
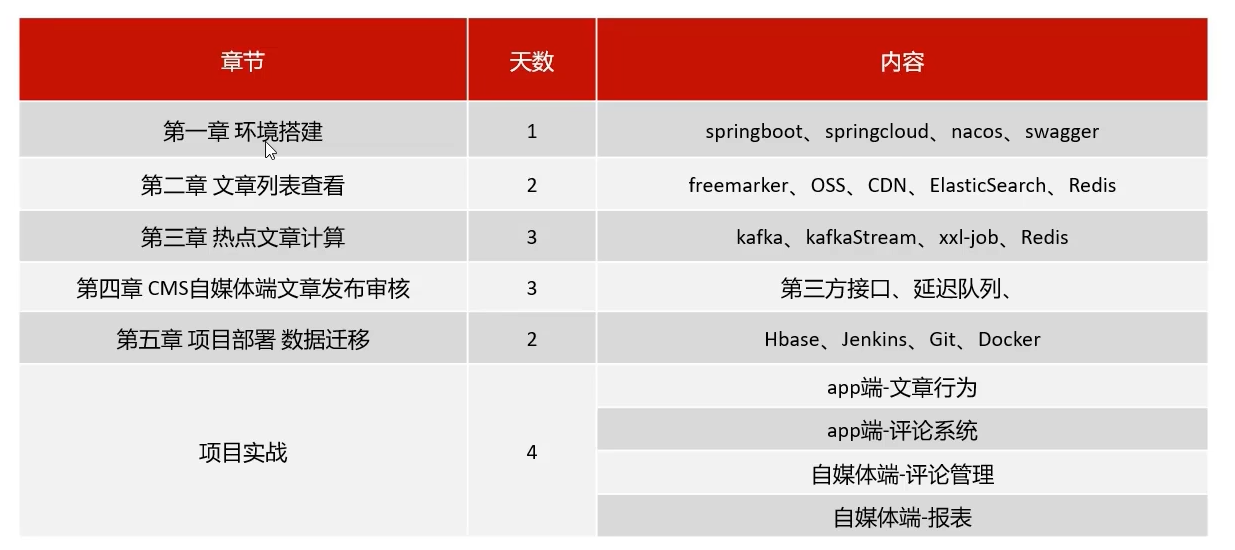
项目课程大纲
一共15天
nacos
服务器环境准备
配置虚拟机
这里为了项目环境的隔离和后续不和课程产生太大冲突,我就采用黑马课程资料提供的vmx文件而非自己原来的fishlulu01虚拟机了(反正换了新电脑容量够用,性能够造(笑))
用vmware打开解压好的虚拟机vmx文件,好家伙,一共50个G,赶上某2字开放世界游戏了
自己之前有装过centos7的镜像,所以其实不用再下载一遍黑马提供的系统iso文件了
进行网络配置
由于自己之前的fishlulu01虚拟机已经配置好了vmnet8NAT网络适配器,因此我这里打算修改系统内部的ip而不是修改vmware网络适配器的网段
如果想具体了解网络是如何配置的,请参考黑马linux入门教程中p19-p22关于网络配置的部分
先以root用户进入虚拟机(密码itcast)开启networkmanager
# 设置开机自启动
sudo systemctl enable NetworkManager
# 开启服务
systemctl start NetworkManager
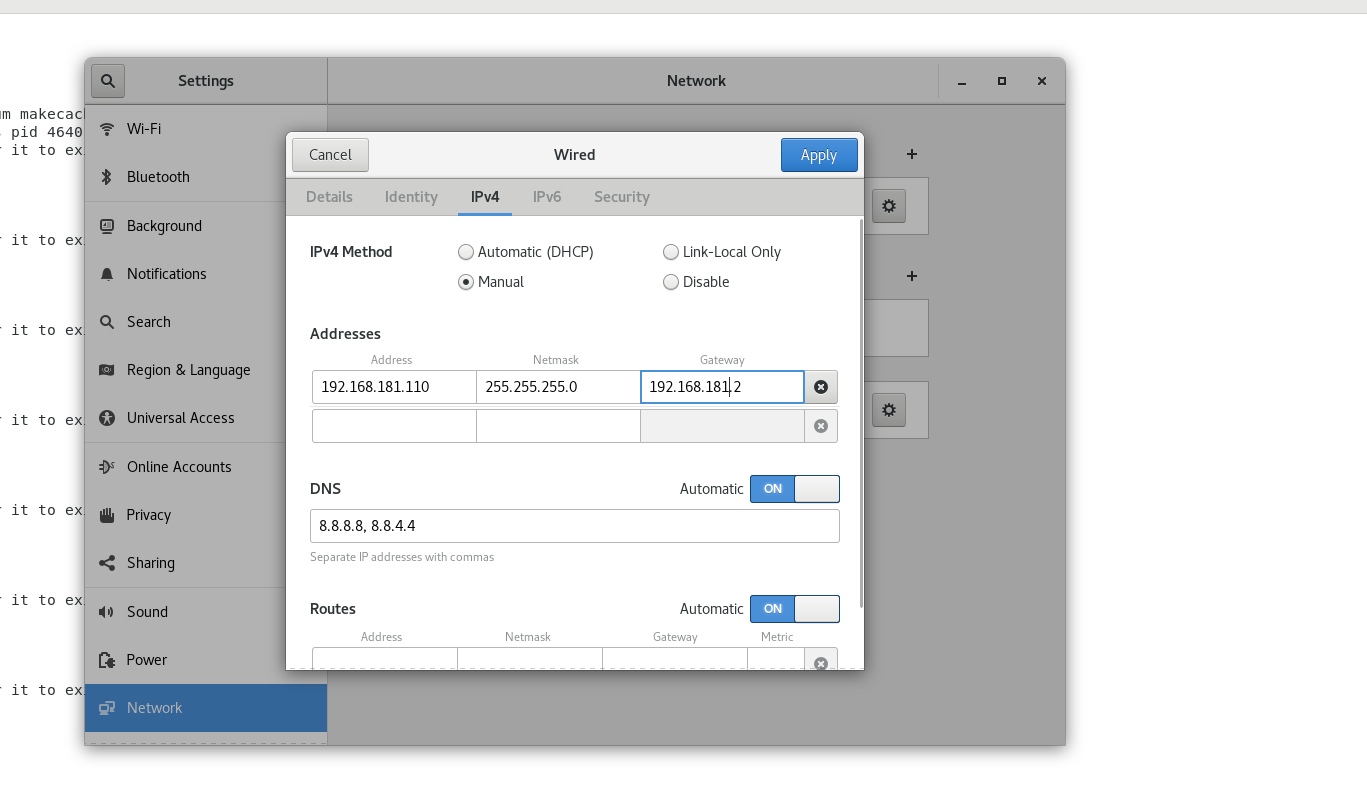
然后进入系统设置,在有线网络的ipv4设置选项中,按照如下修改ipv4地址
(192.168.181.110ip地址组成中,前两个数字一般是固定的(这里代表的是家庭或个人用户网络),如果你使用的是公司网络会有所不同,第三个数字要求和上面vmnet8适配器第三个数字相同,最后一个数字看个人喜好,只要不冲突就行,我个人规定100-109为个人私建的虚拟机ip,110-119为学习项目专用虚拟机地址,网关地址前三个数字和ip地址一致,最后一个数字默认为2,子网掩码也不用动)
设置好之后重启,然后先ifconfig以下看看ens33的ipv4地址有没有改变,再打开firefox浏览器看能不能正常访问网页,如果正常则配置成功
开启ipv4(防docker在虚拟机挂起后重开断连)
由于之前遇到了挂起虚拟机之后docker容器无法连接的问题,因此最好配置一下开启ipv4连接(自己在java微服务笔记中有提到过)
修改hosts文件配置主机名

呦西,以后就用hmtt代替ip地址来配置项目了
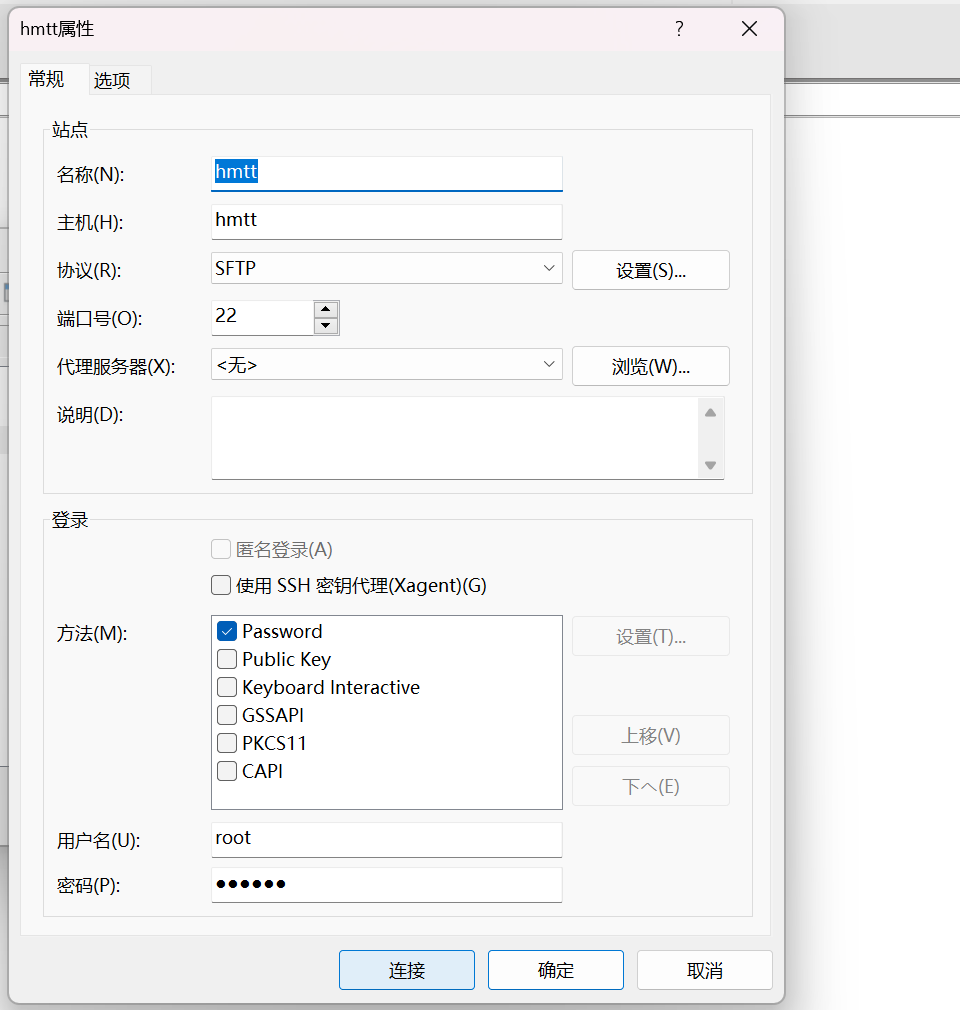
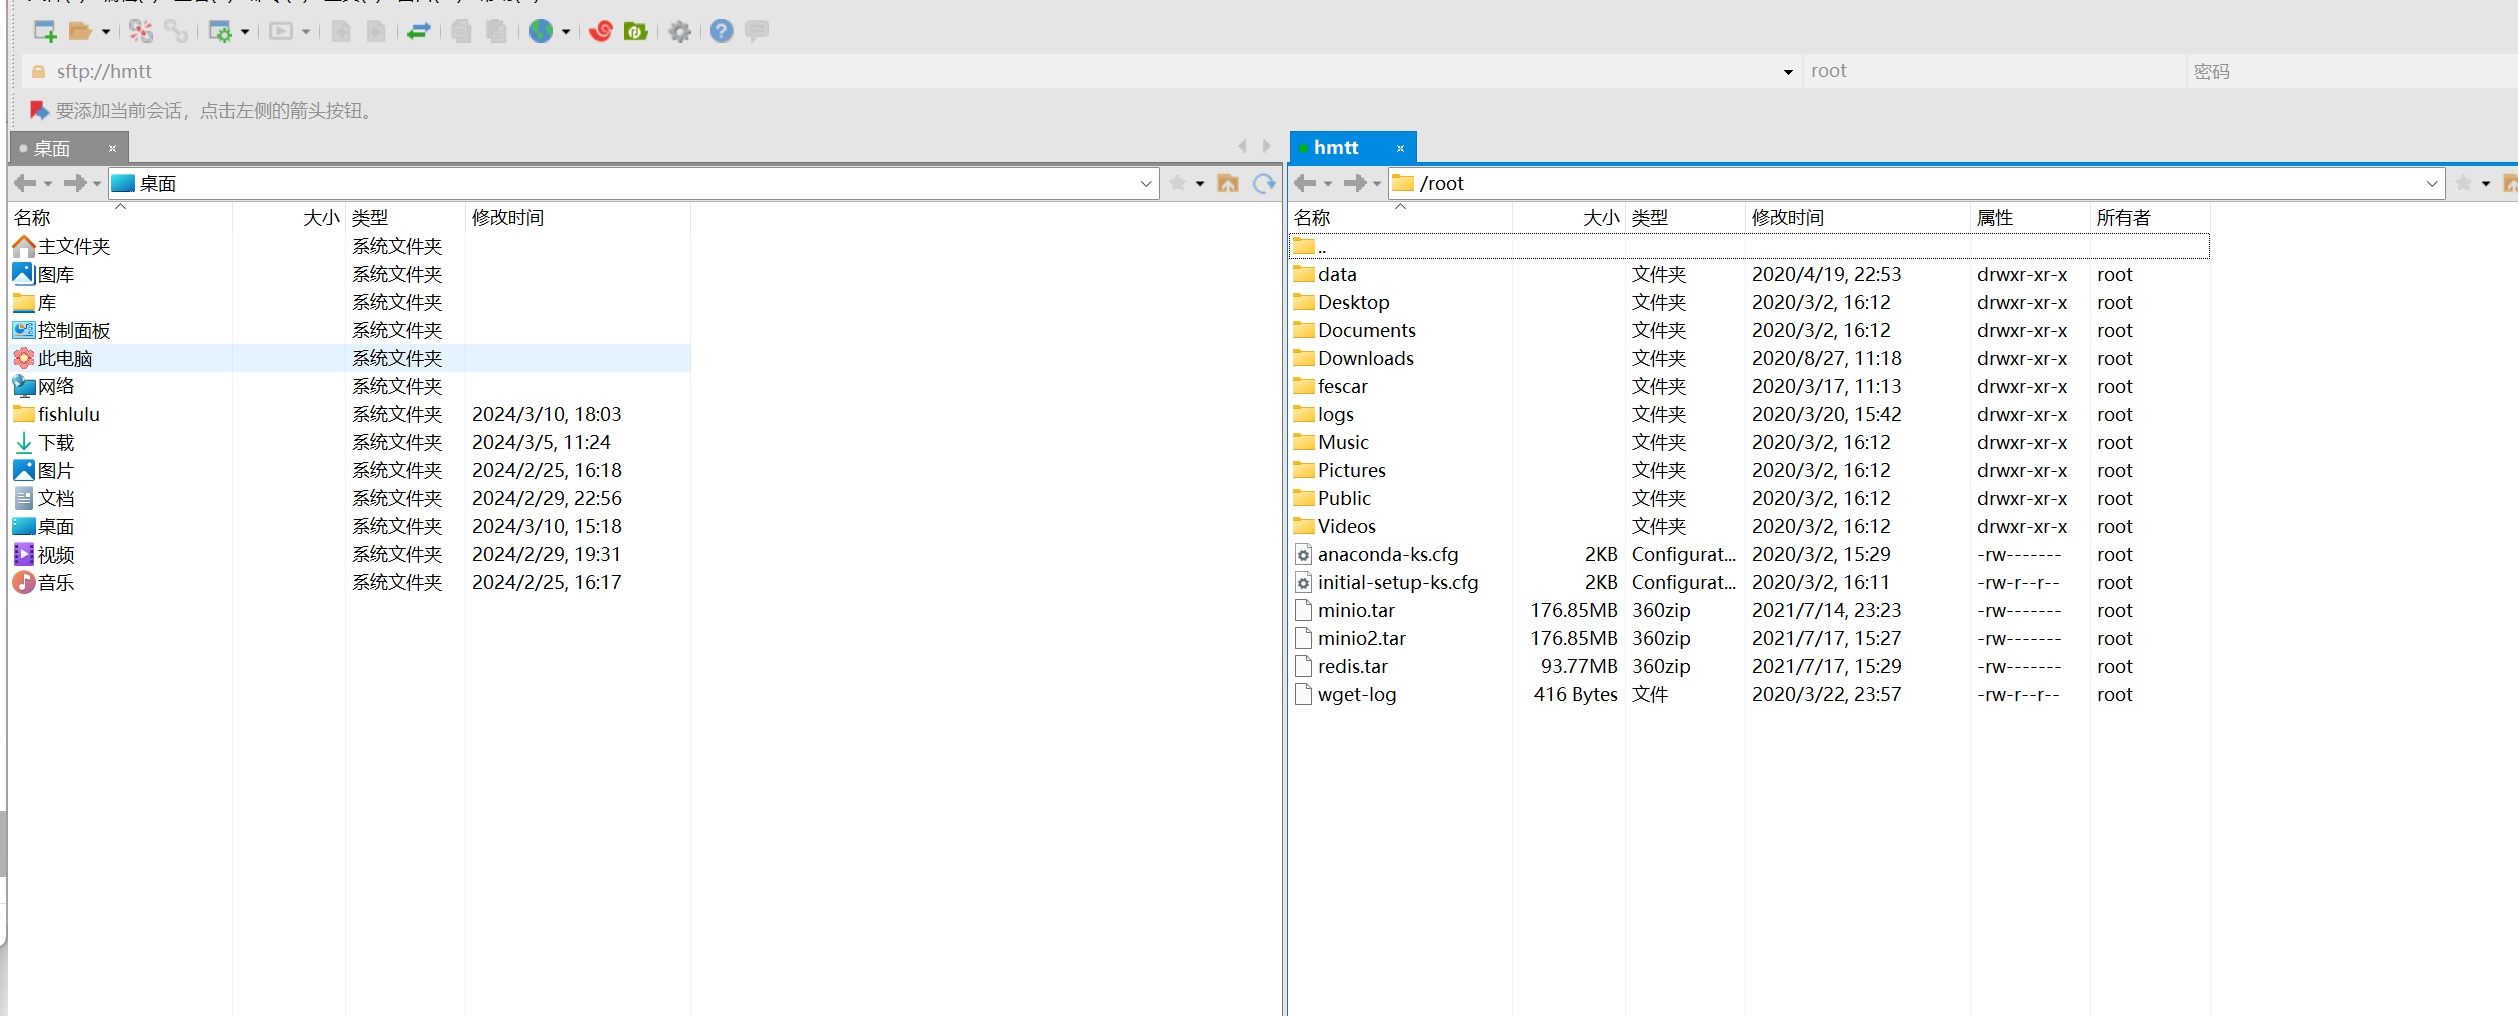
配置远程连接
我这里的话其实感觉也没有太多必要,如果需要的话推荐用finalshell或者vscode连接吧,这里就不演示了
如果想要进行文件传输可以试试xftp
nacos安装
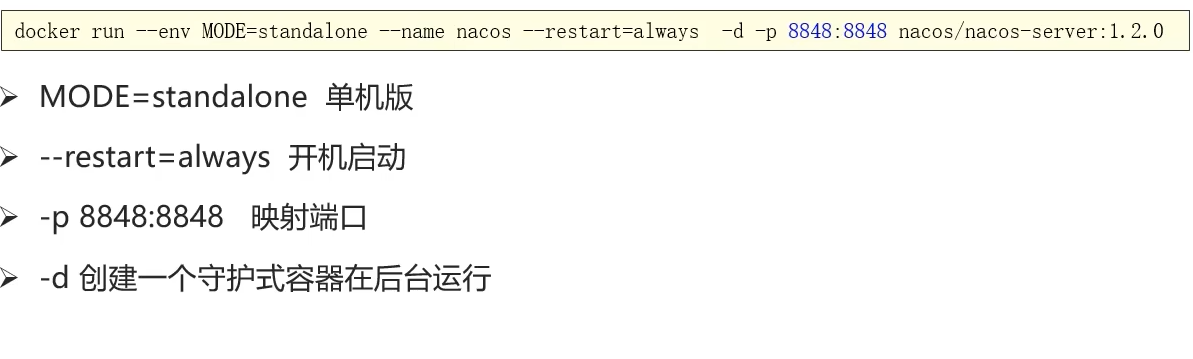
docker安装nacos
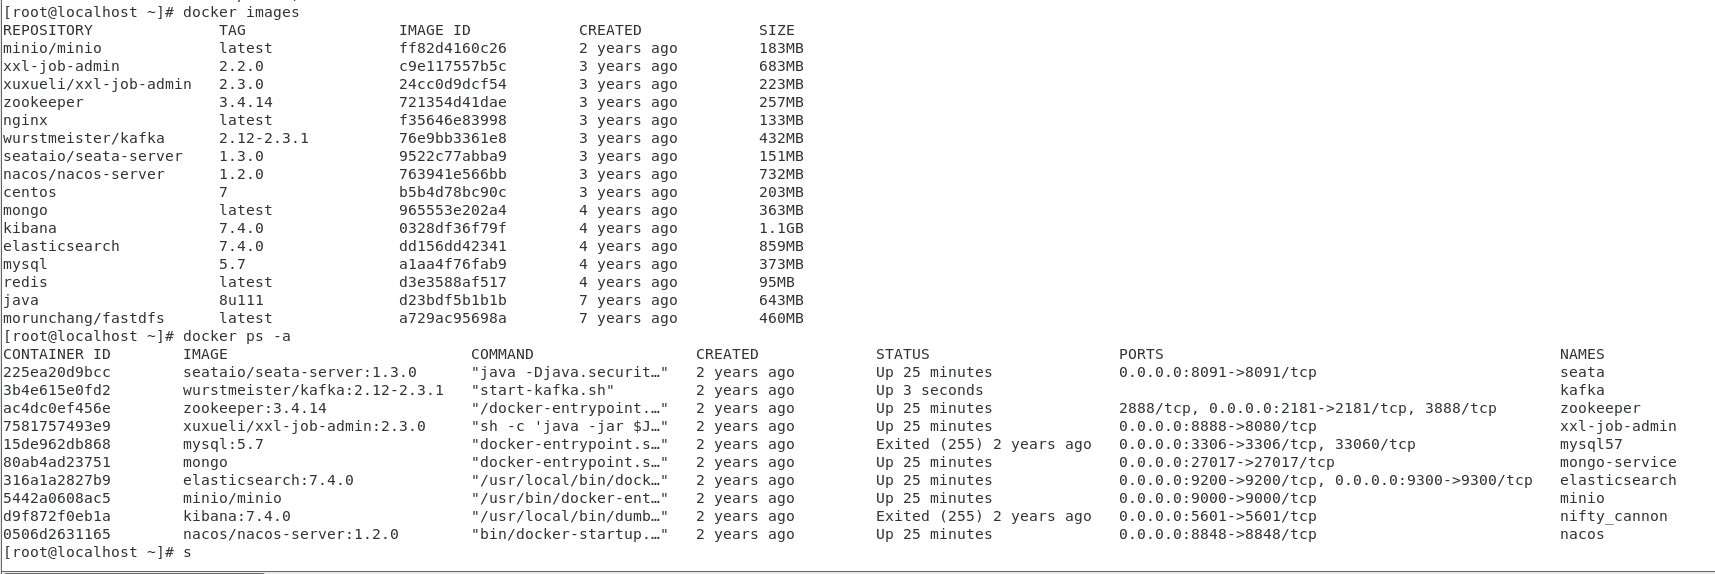
不过资料提供的虚拟机已经帮咱把镜像和容器都搭建好了,所以专心听课就可以了,当然你要是想锻炼自己的部署能力也可以自己从头搭建,我这里偷懒就用现成的了
不过自己之前因为修改了虚拟机ip地址,可能会导致一部分容器运行出错(不过到时候再说吧)
可以了解一下启动参数
初始工程搭建
环境准备
项目依赖环境
- JDK 1.8
- IDEA
- maven-3.6.1
- Git
初始工程导入
将课程资料中的heima-leadnews.zip解压放到自己平常存放项目的文件夹(要求没有空格和中文的目录),用idea打开
配置maven仓库
由于项目有部分依赖是中央仓库找不到的,因此需要我们导入资料提供的一个仓库进行配置

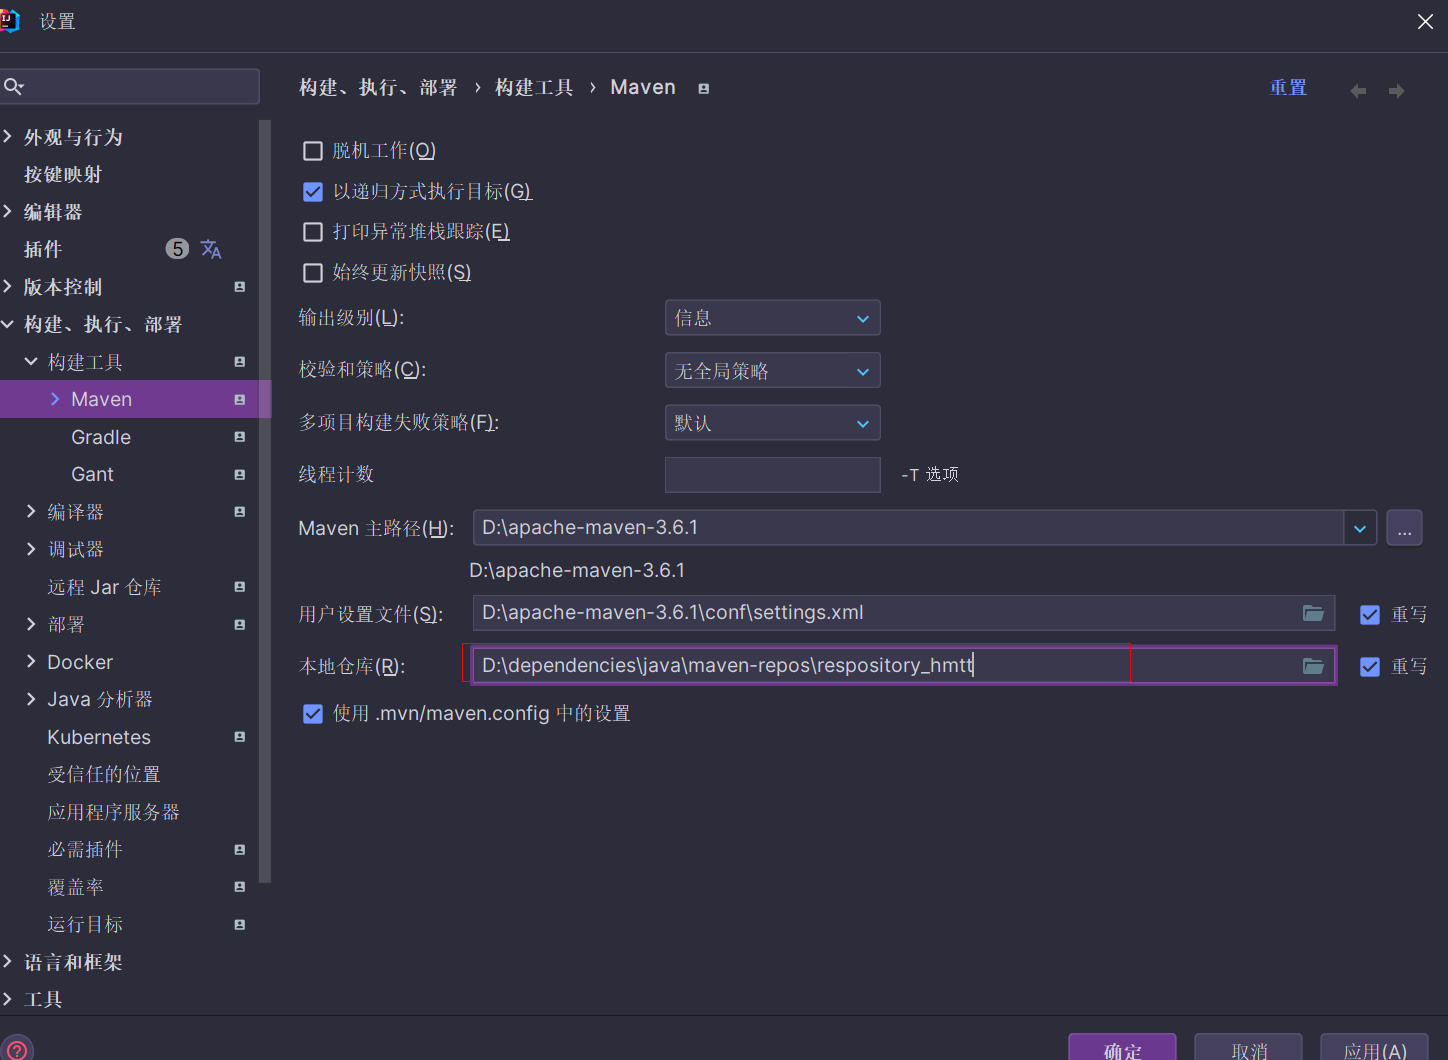
一般进企业工作都是二次项目开发,因此依赖啥的之前肯定就已经配好了,我们只需要开箱即用就行
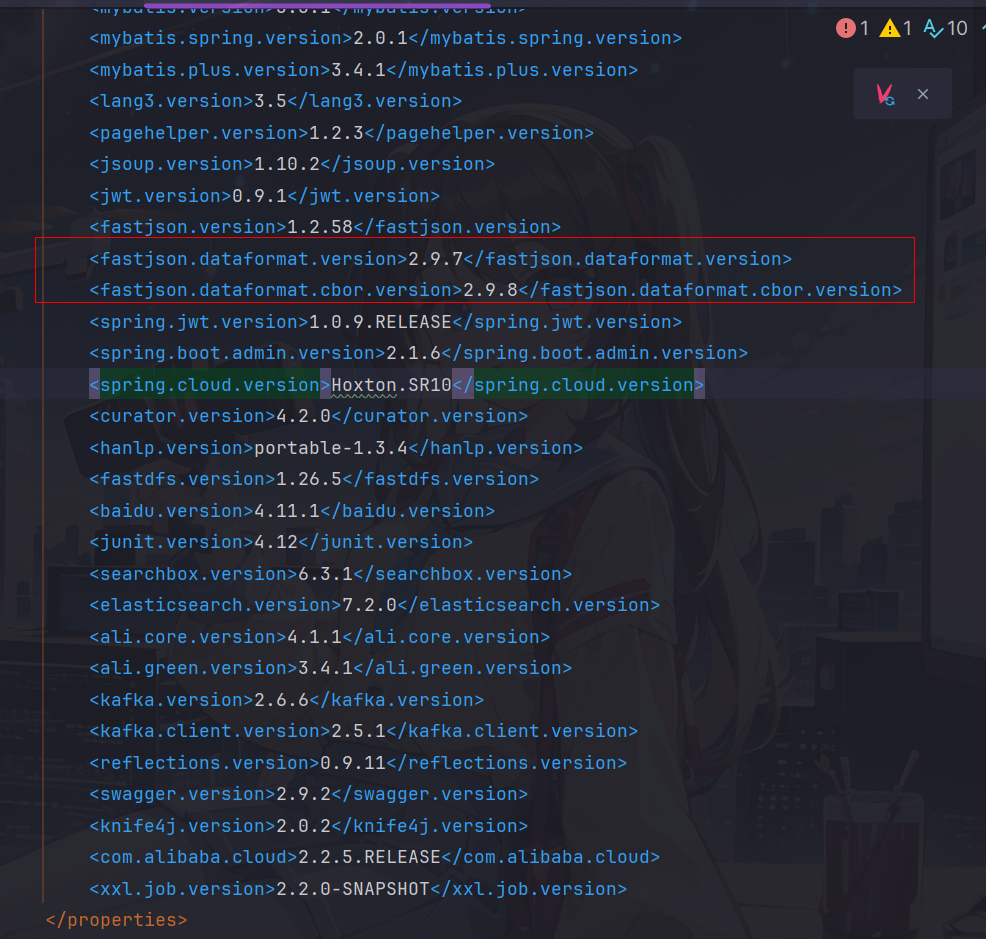
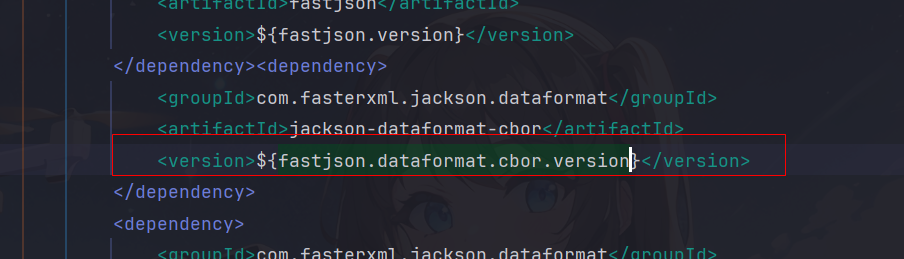
这里可能父工程pom文件可能会提示找不到对应版本的这个依赖
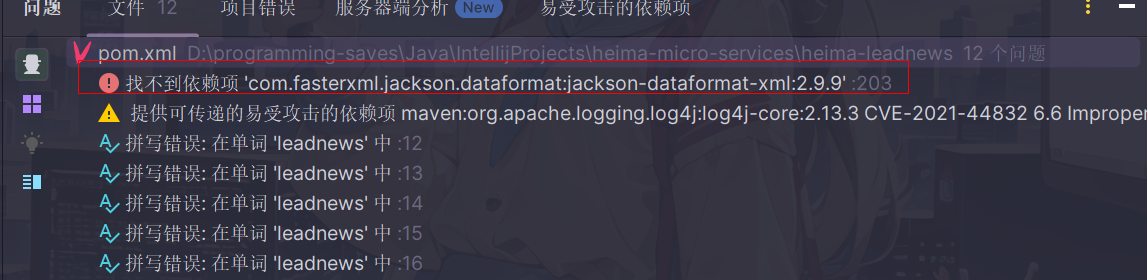
经过我在仓库的搜索,只需要在父工程pom文件设置版本为2.9.7,并另设置cbor依赖版本为2.9.8即可
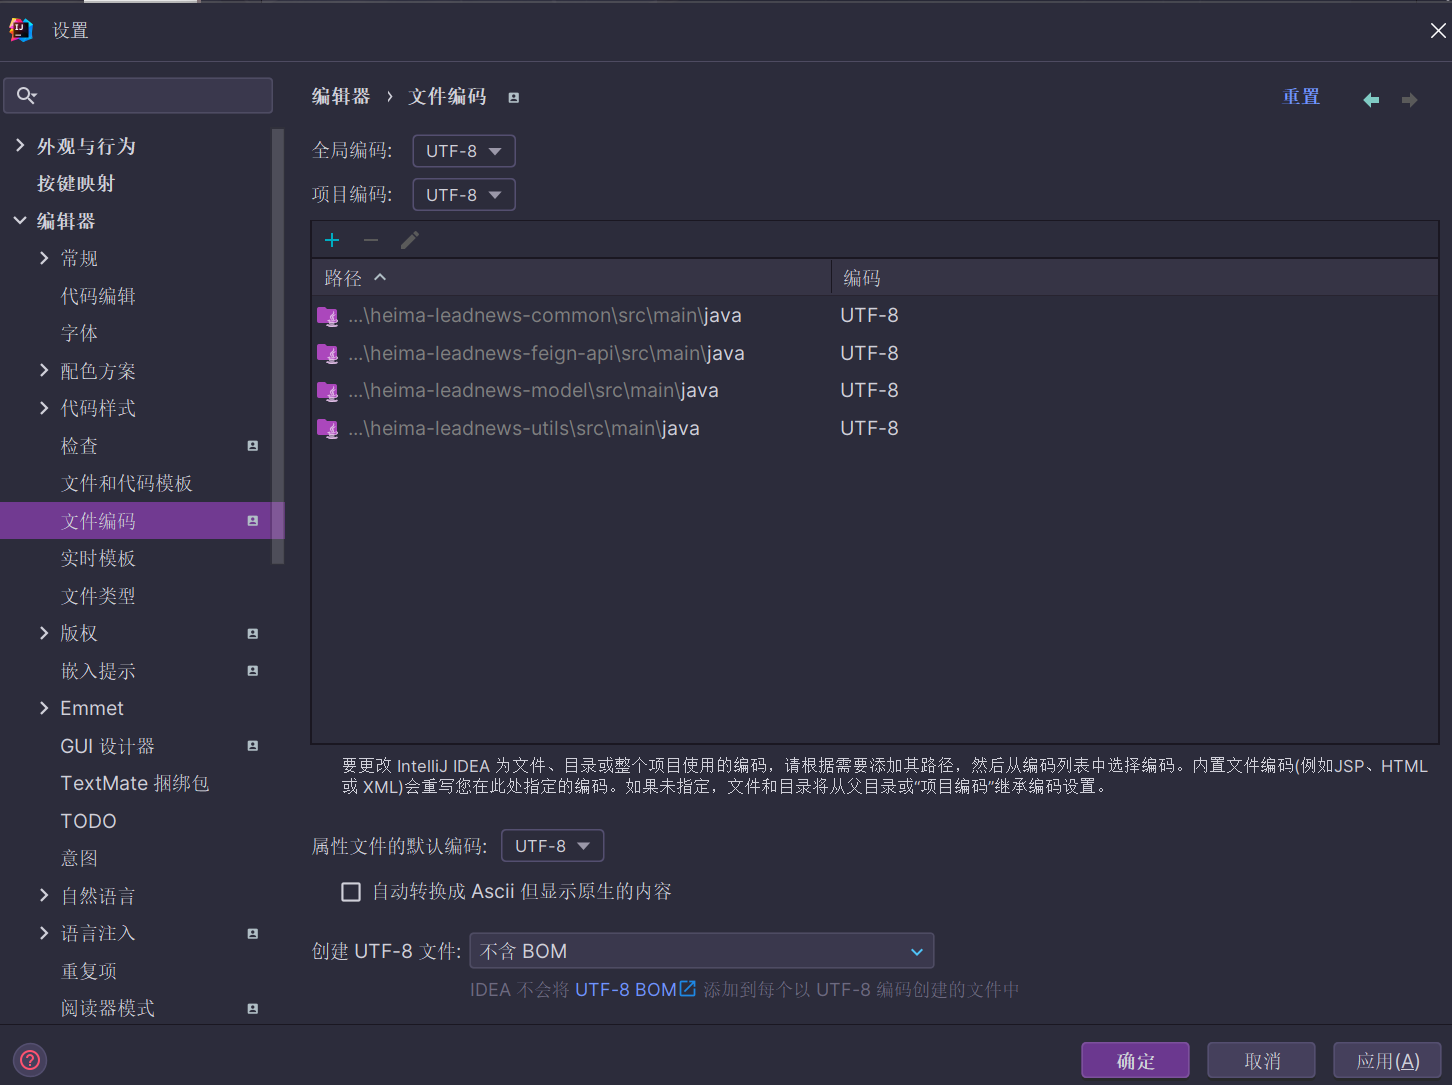
设置项目编码统一utf-8
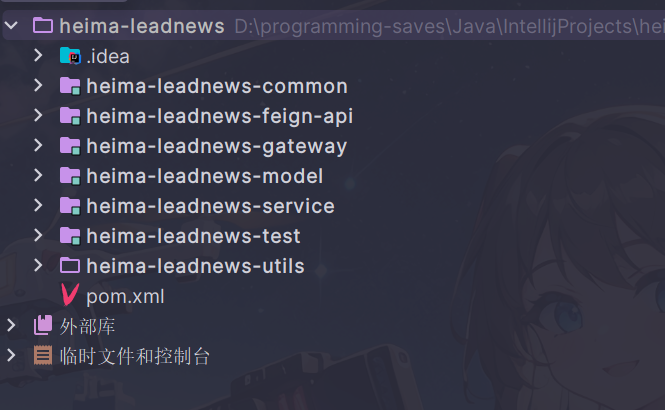
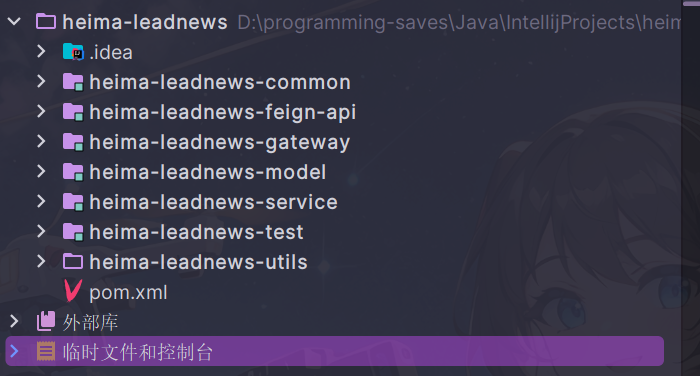
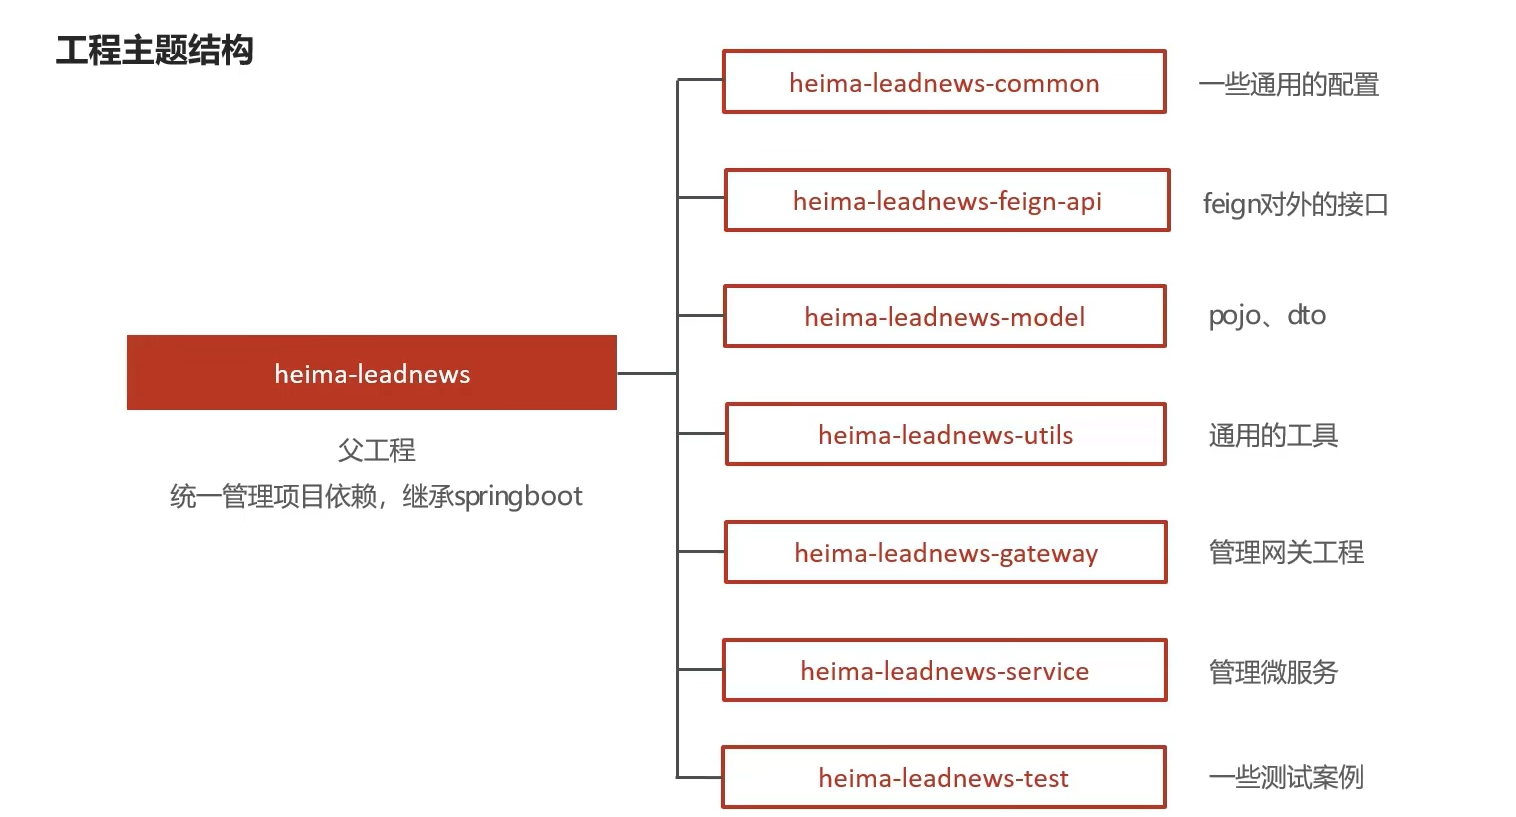
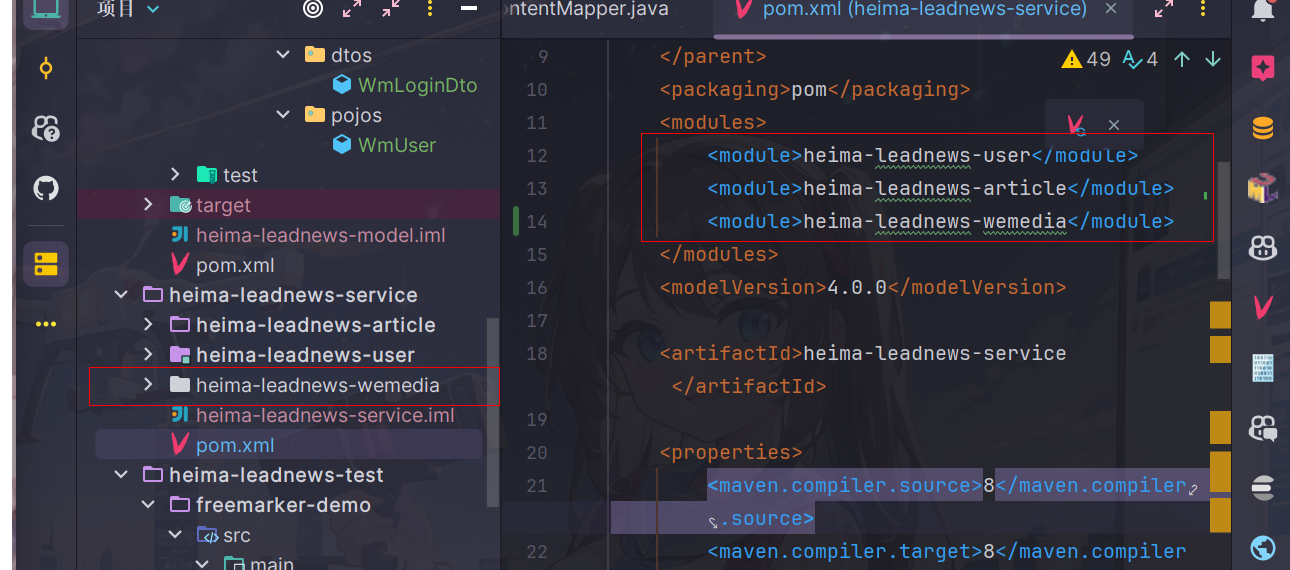
主体结构
-
heima-leadnews 项目父工程,定义通用jar包的使用版本
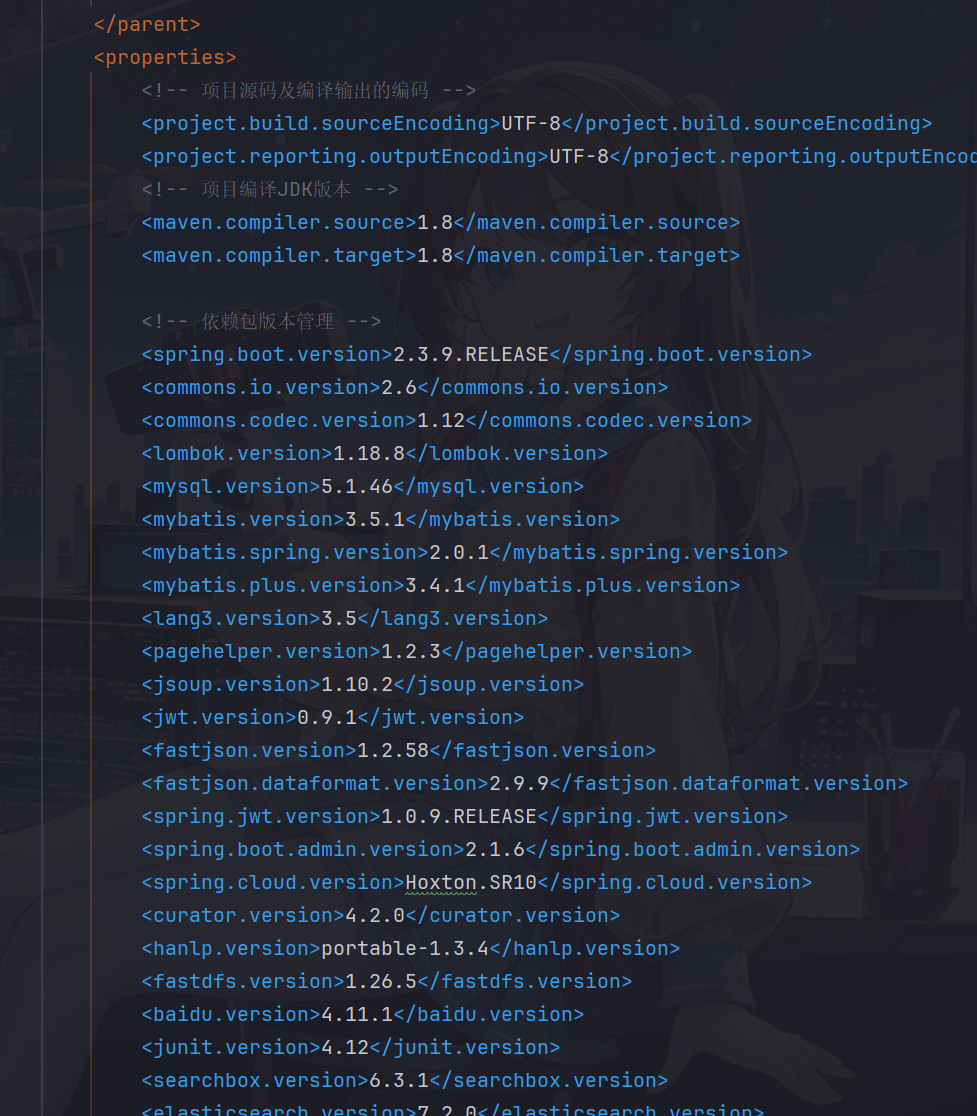
依赖版本管理
-
common模块,定义项目通用配置,主要是全局异常处理
-
feign-api模块,定义远程调用接口
-
gateway模块,管理网关微服务
-
model模块.存放相关实体类
-
service模块,存放所有的微服务工程
-
test模块,存放测试类
-
utils模块,存放工具类,如编码加密等
全局异常
- 可预知异常,可以抛出对应的错误码和错误信息
- 不可预知异常:统一返回异常消息
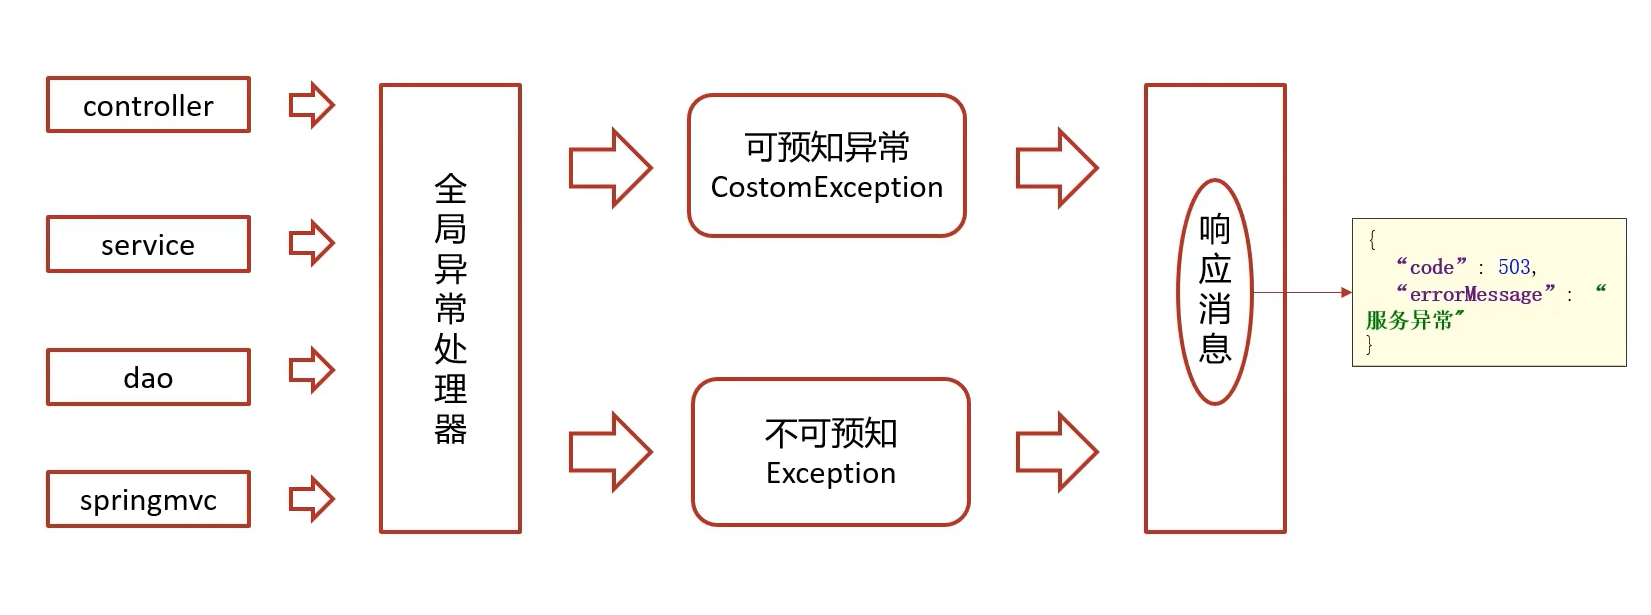
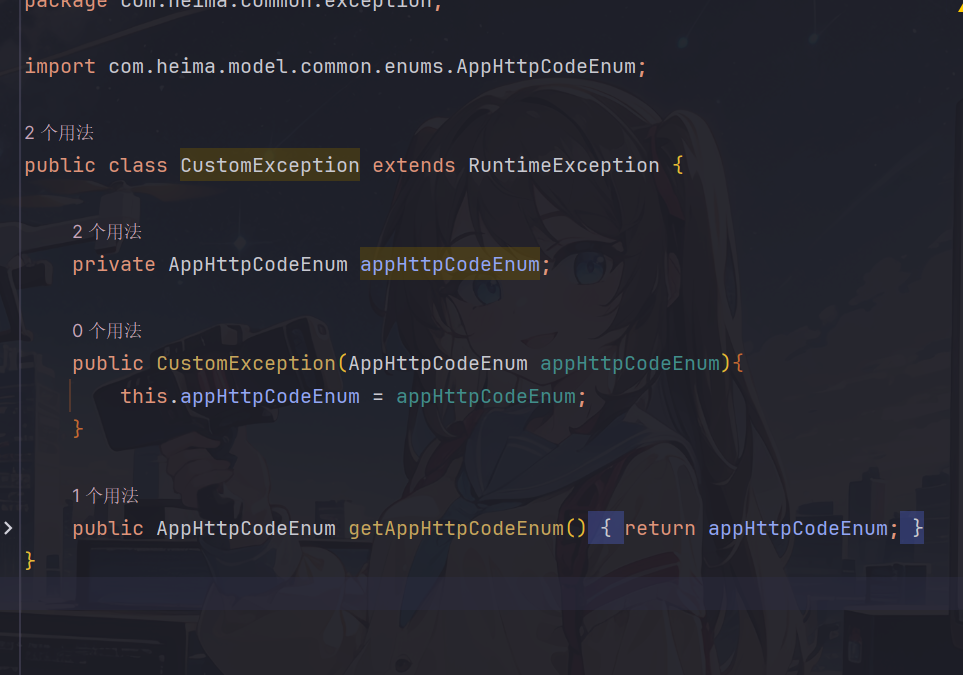
- CustomException自定义异常,存储自定义的异常信息(由枚举类进行存储)
- ExceptionCatch对异常进行拦截处理,包括处理可预测异常和不可预测异常
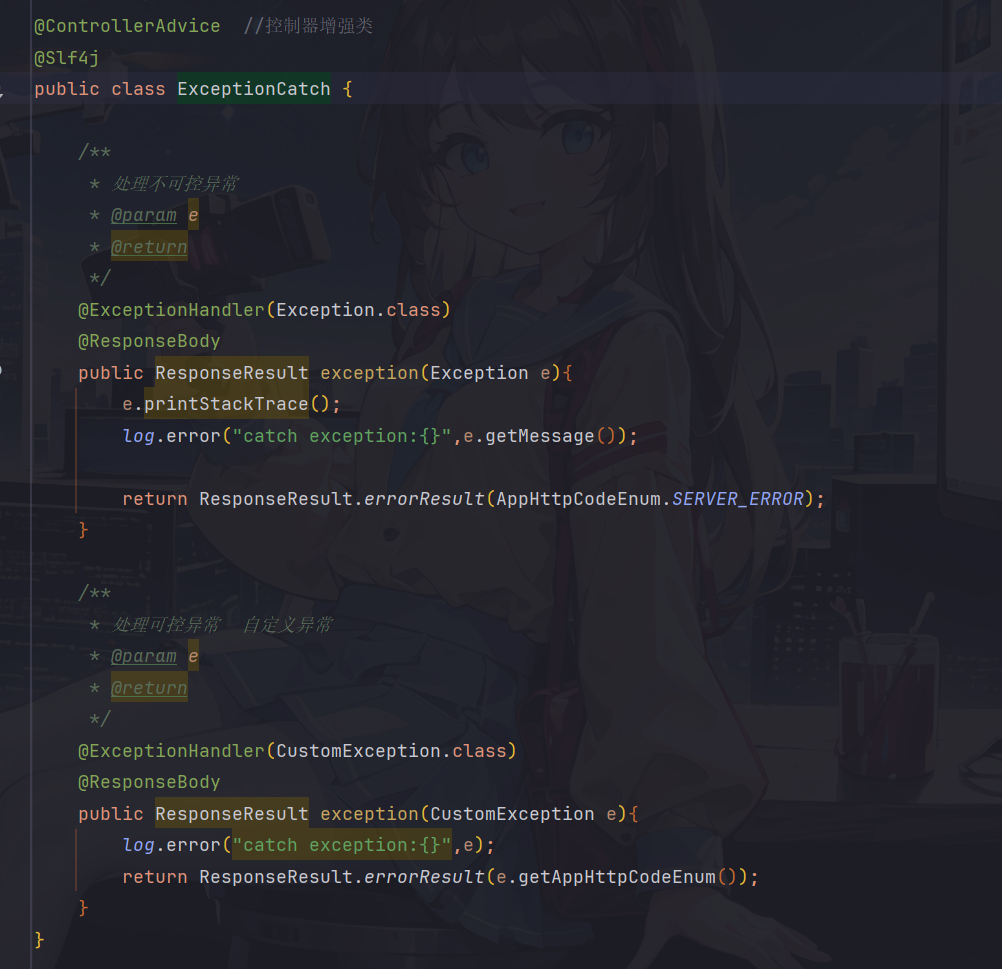
📑 注解
ControllerAdvice:控制器增强注解,是Spring3.2提供的新注解,注解声明的类可以作用到所有Controller上面(其实Advice就代表了AOP(面向切面编程)的含义),因此可以配合@ExceptionHandler实现全局异常处理,也可以配合日志框架实现全局的日志记录ℹ️其实完全可以用
@RestControllerAdvice注解来代替@ControllerAdvice和@ResponseBody注解
- 元数据配置,设置启动时异常处理类自动加载装配
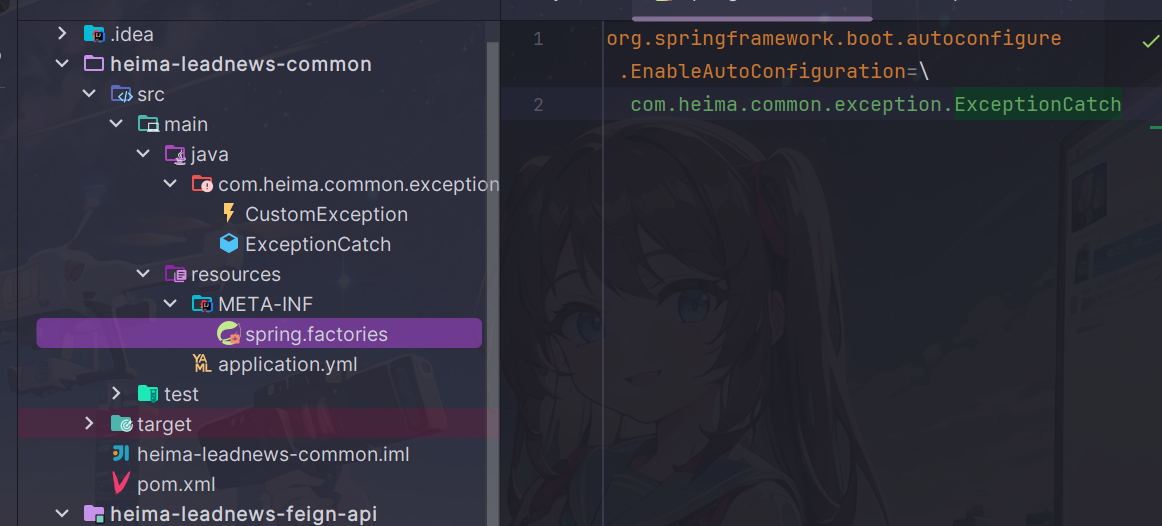
ℹ️ 其实你也可以通过在spring启动类上面设置扫描包的范围来配置自动加载
总结
登录接口开发
需求分析
表结构分析
由于app段用户相关内容比较多,可以单独设置一个库
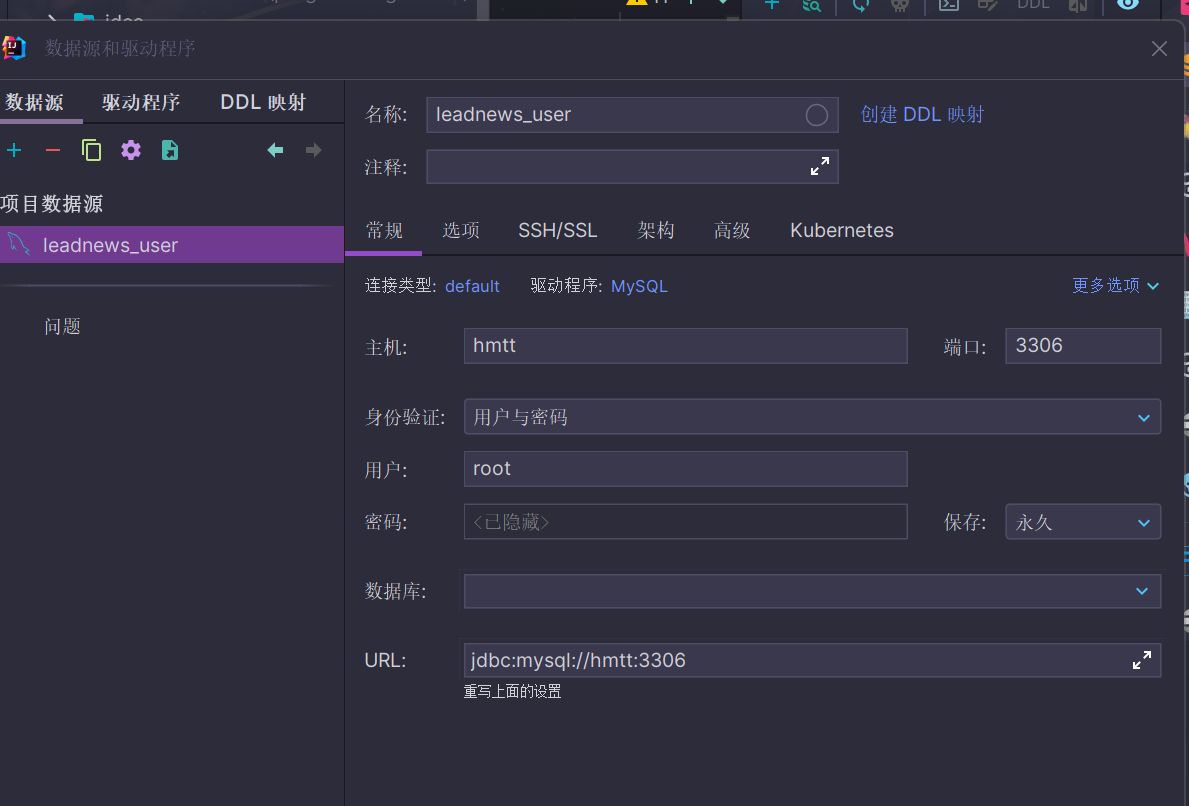
leadnews_user
导入用户库(配置docker数据库)
🔔这里我个人不太倾向于把用户库表存放在本地mysql中,毕竟如果后续会有迁移数据的麻烦(自己之前换电脑的时候就是这样,迁移mysql数据花了我一晚上的时间),docker的话还可以直接放到服务器上跑,省去了许多麻烦,这里由于老师虚拟机提供的mysql5.7版本容器密码登录不上,而且连接也出现了问题,打算另开一个mysql8容器
- 配置docker镜像源(可以不配,因为原来已经配好了一个网易的镜像源)
vim /etc/docker/daemon.json
{
    "registry-mirrors": [
        "http://hub-mirror.c.163.com",
        "https://docker.mirrors.ustc.edu.cn",
        "https://registry.docker-cn.com"
    ]
}
重启docker
- 配置mysql容器
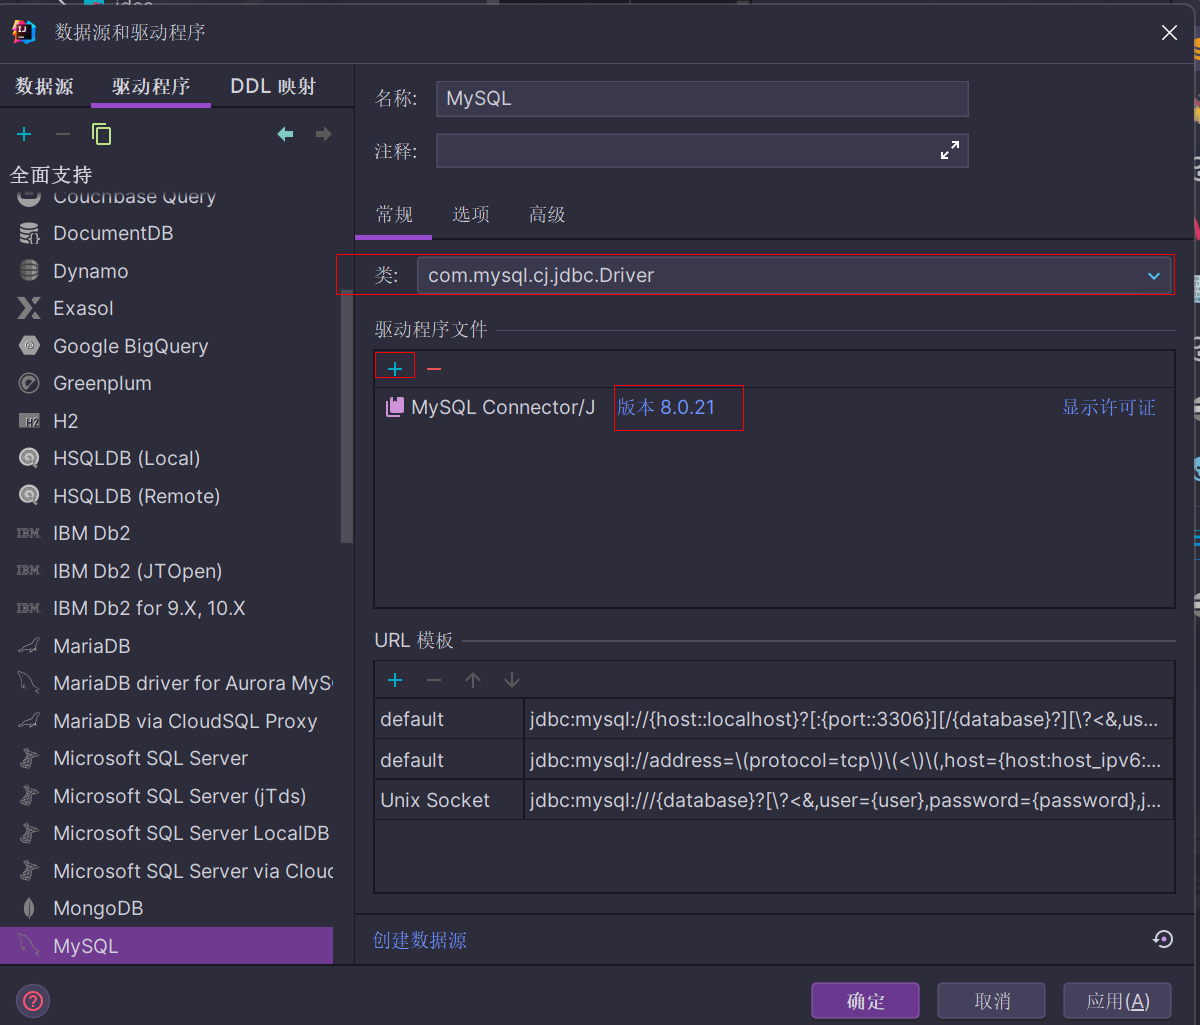
这里选择版本8.0.21,反正自己瞎选的,听说版本比较稳定一些,感觉还是用8版本比较好吧
docker pull mysql:8.0.21

#移除之前配好的mysql5.7,自己打算后续mysql版本都升级到8版本
docker rm mysql57
#运行mysql容器,容器名和密码自己定
docker run \
  --name mysql8 \
  -p 3306:3306 \
  -e MYSQL_ROOT_PASSWORD=123456 \
  -v mysql_hmtt_data:/var/lib/mysql \
  -d mysql:8.0.21
-
idea配置连接
个人觉得最好把mysql驱动安装到对应版本的(以防万一嘛)
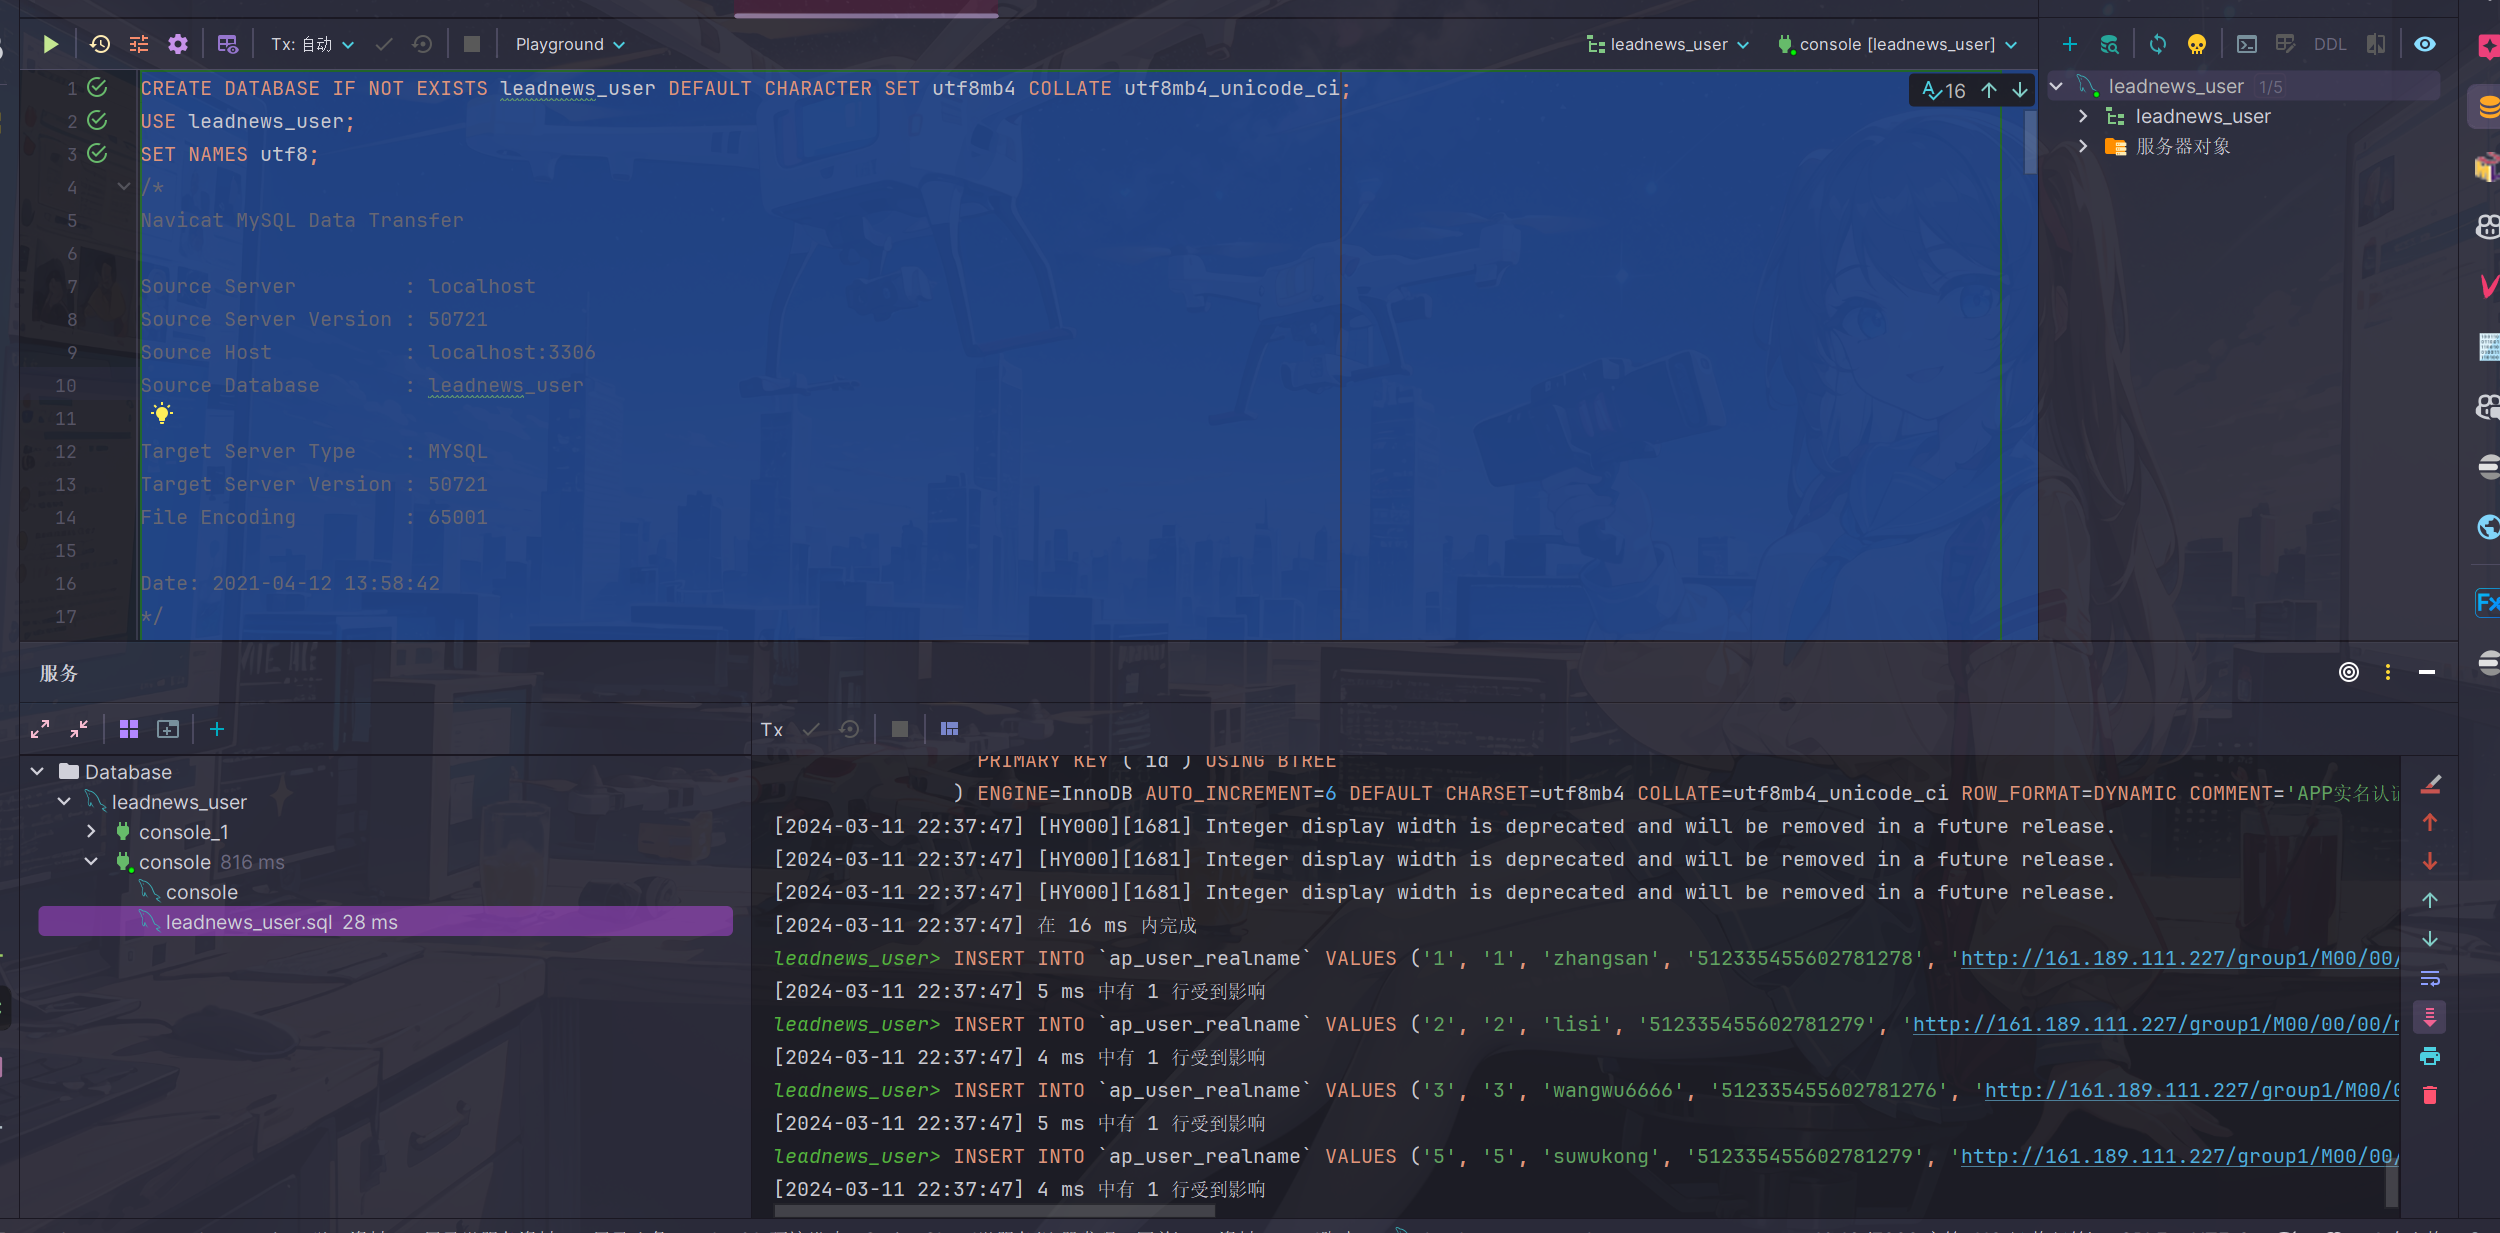
- 导入数据库
这步倒是挺轻松的
导入实体类
登录用到的是ap_user表
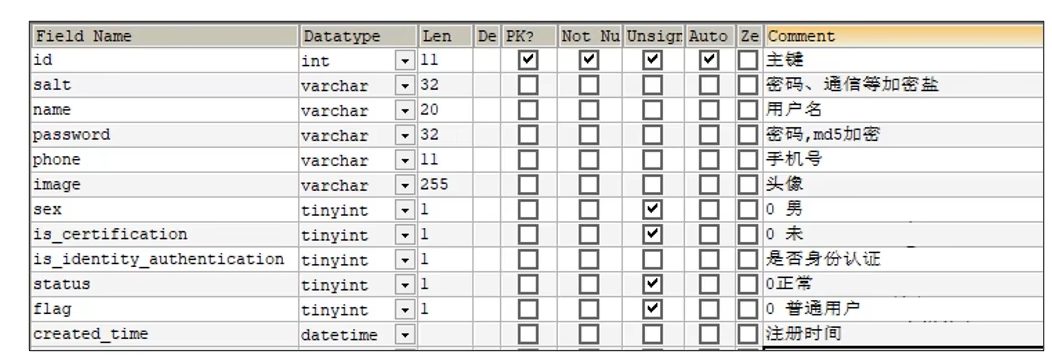
tinyint类型:占1个字节,有符号-128-127,无符号0-255,通常用来表示true和false,true为1,false为0
把ap_user表对应的实体类放在model模块的com.heima.model.user.pojos包下面(当然也可以自己用mp生成一个)
package com.heima.model.user.pojos;

import com.baomidou.mybatisplus.annotation.IdType;
import com.baomidou.mybatisplus.annotation.TableField;
import com.baomidou.mybatisplus.annotation.TableId;
import com.baomidou.mybatisplus.annotation.TableName;
import lombok.Data;

import java.io.Serializable;
import java.util.Date;

/**
 * <p>
 * APP用户信息表
 * </p>
 *
 * @author itheima
 */
@Data
@TableName("ap_user")
public class ApUser implements Serializable {

    private static final long serialVersionUID = 1L;

    /**
     * 主键
     */
    @TableId(value = "id", type = IdType.AUTO)
    private Integer id;

    /**
     * 密码、通信等加密盐
     */
    @TableField("salt")
    private String salt;

    /**
     * 用户名
     */
    @TableField("name")
    private String name;

    /**
     * 密码,md5加密
     */
    @TableField("password")
    private String password;

    /**
     * 手机号
     */
    @TableField("phone")
    private String phone;

    /**
     * 头像
     */
    @TableField("image")
    private String image;

    /**
     * 0 男
            1 女
            2 未知
     */
    @TableField("sex")
    private Boolean sex;

    /**
     * 0 未
            1 是
     */
    @TableField("is_certification")
    private Boolean certification;

    /**
     * 是否身份认证
     */
    @TableField("is_identity_authentication")
    private Boolean identityAuthentication;

    /**
     * 0正常
            1锁定
     */
    @TableField("status")
    private Boolean status;

    /**
     * 0 普通用户
            1 自媒体人
            2 大V
     */
    @TableField("flag")
    private Short flag;

    /**
     * 注册时间
     */
    @TableField("created_time")
    private Date createdTime;

}
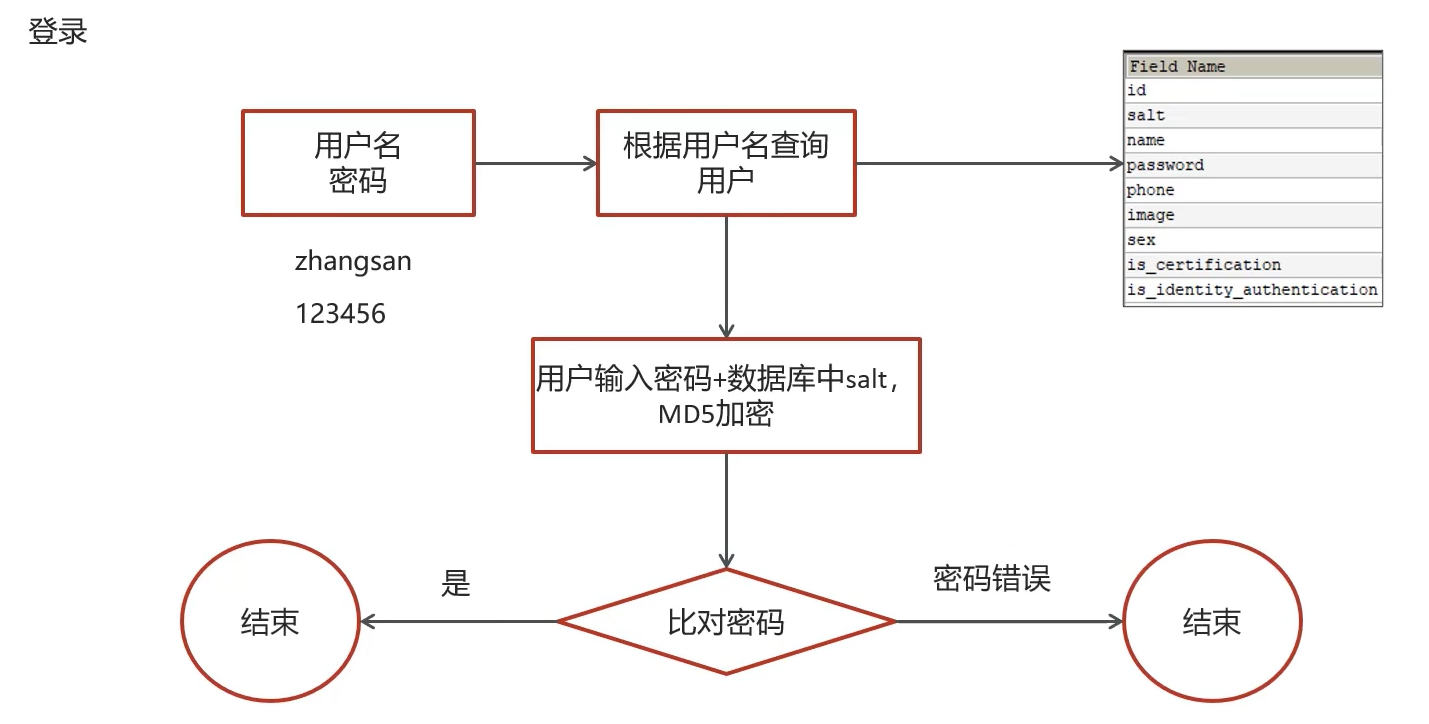
手动加密(md5+随机字符串)
md5是不可逆加密,但md5相同的密码每次加密都一样,不太安全,因此在md5基础上可以手动加盐(salt)处理(很形象的称呼)
个人猜想预防的是黑客通过常见密码的MD5加密和数据库中的比对撞库,即便黑客碰出来了密码也是加了随机字符串的密码,这样照样登录不了网站
加密流程

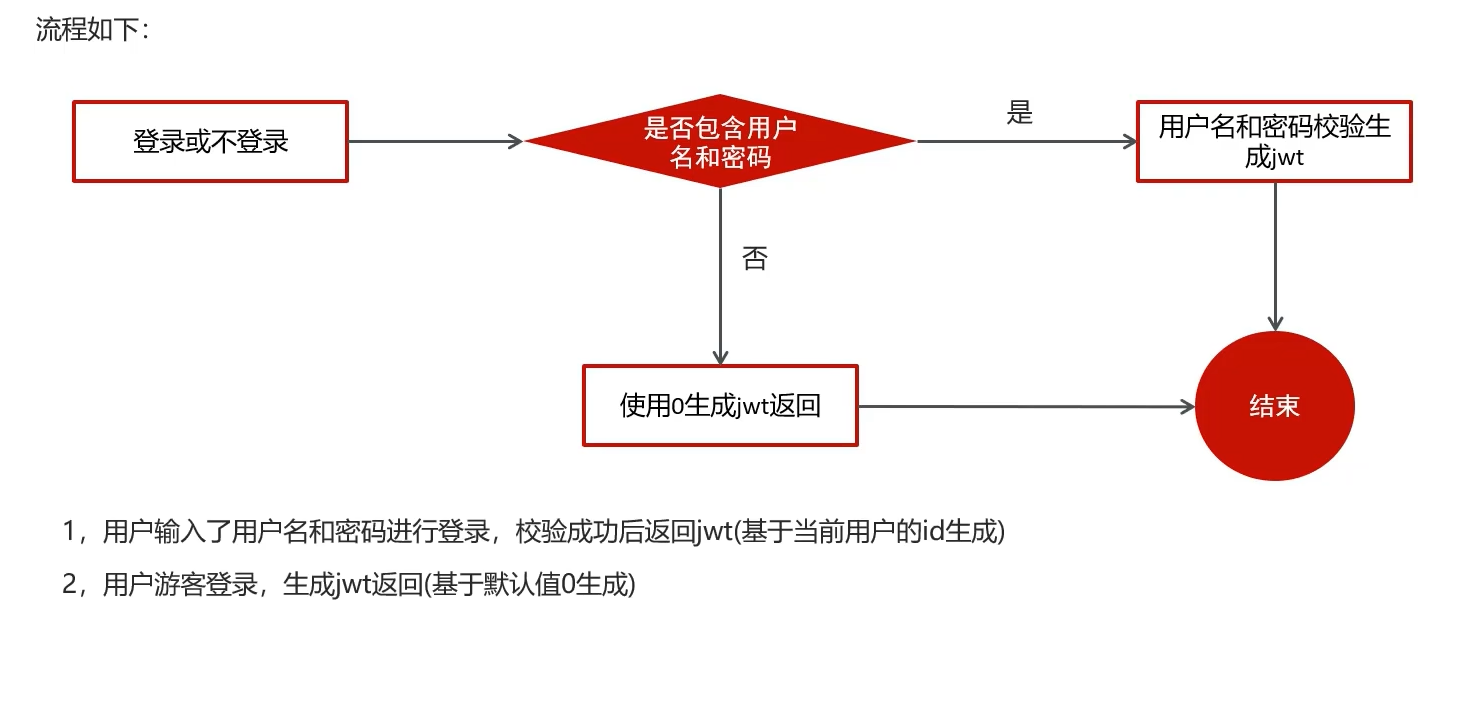
登录流程
接口定义
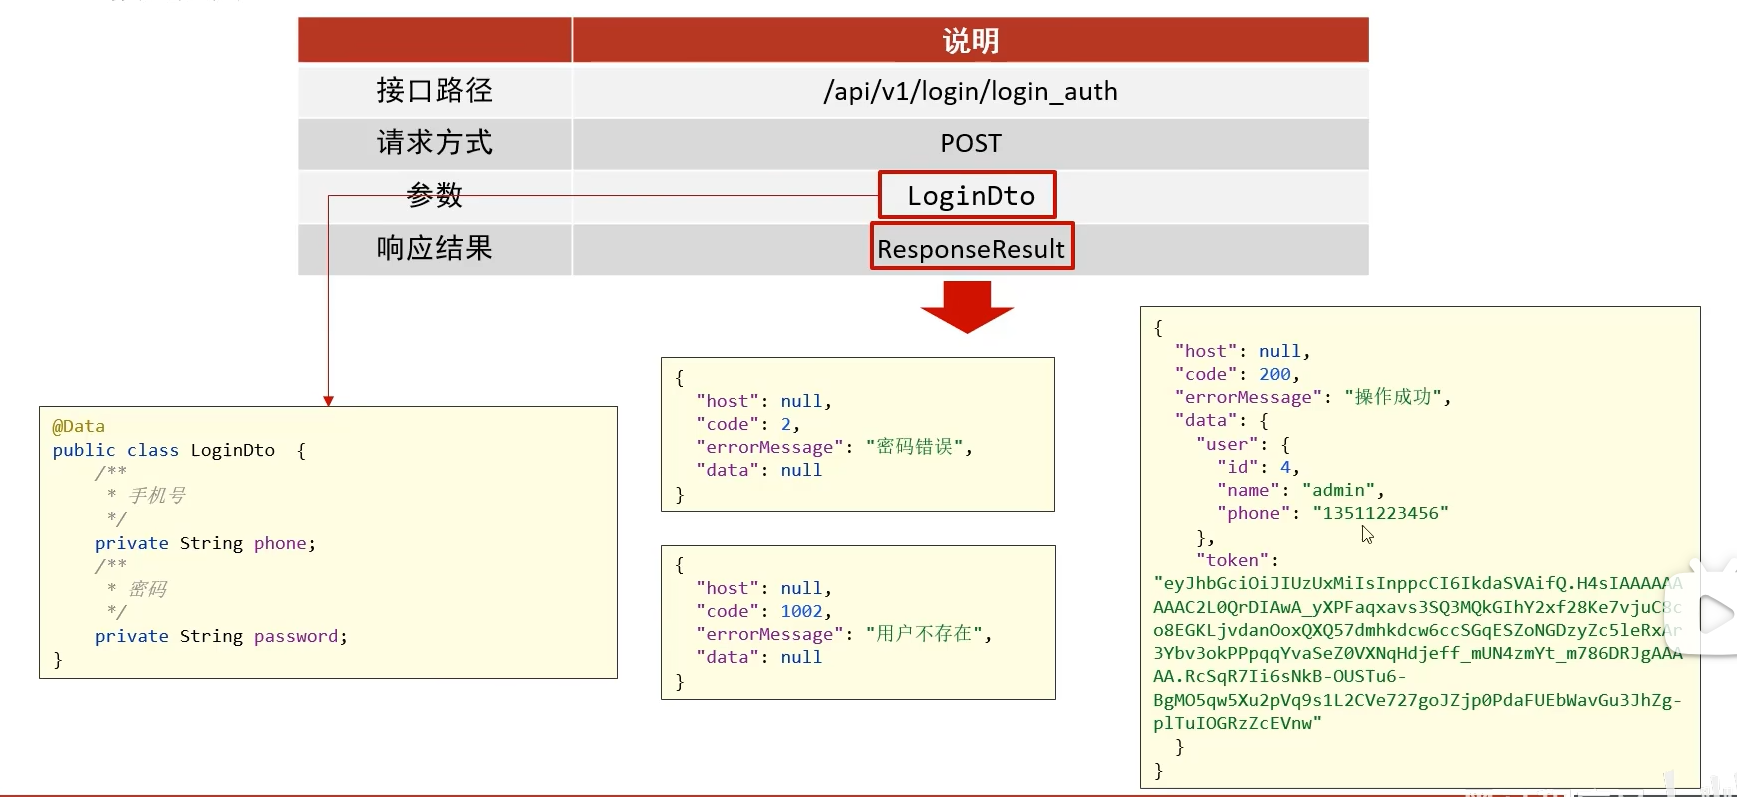
ResponseResult
后端统一返回数据格式
枚举类定义了状态码
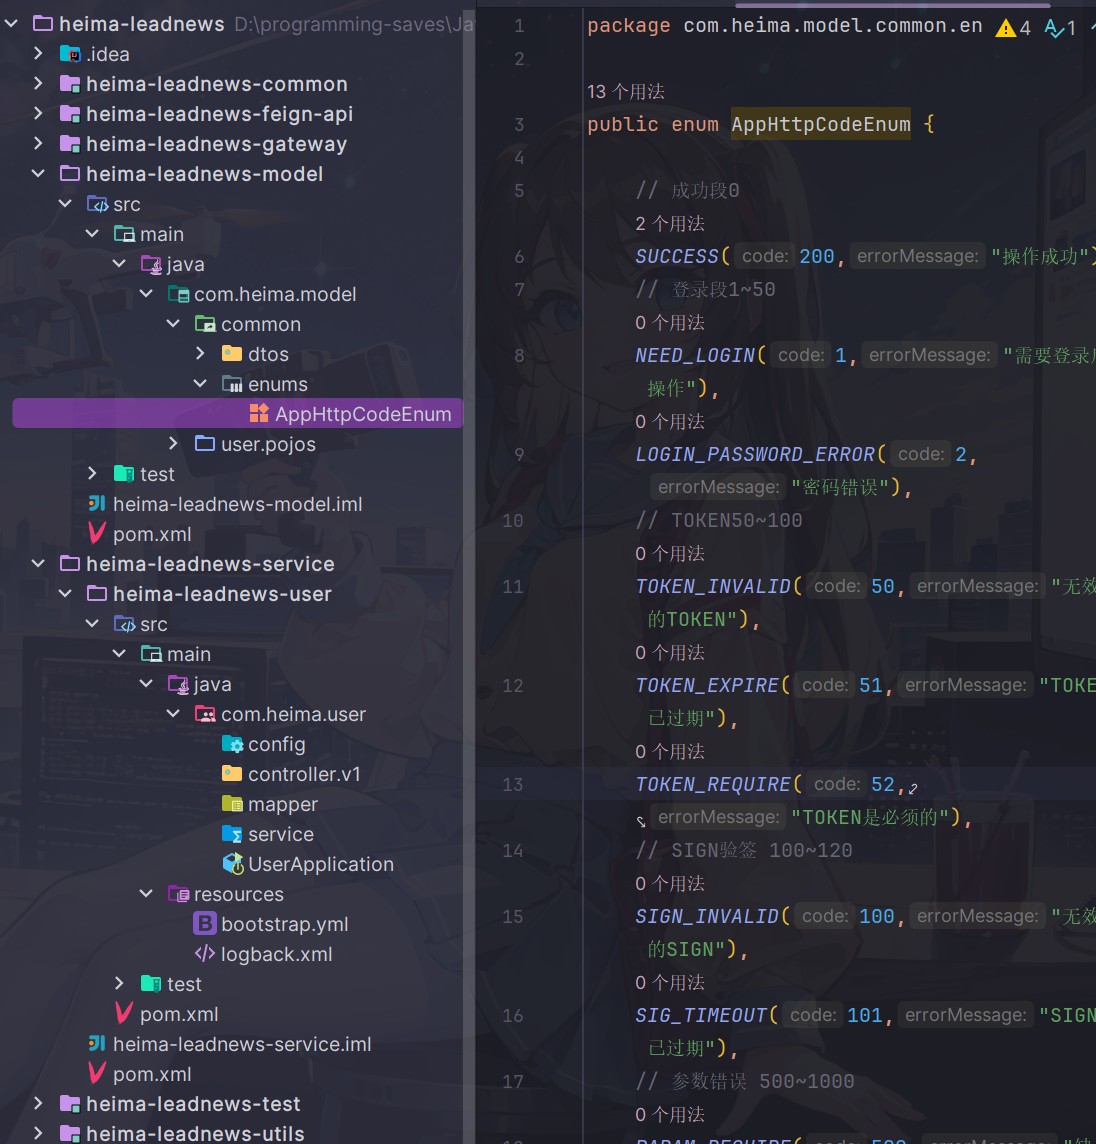
ResponseResult封装了host,状态码,错误信息,返回结果分为三类
- 成功success,无返回数据
- 成功success,并返回数据(json)
- 失败err
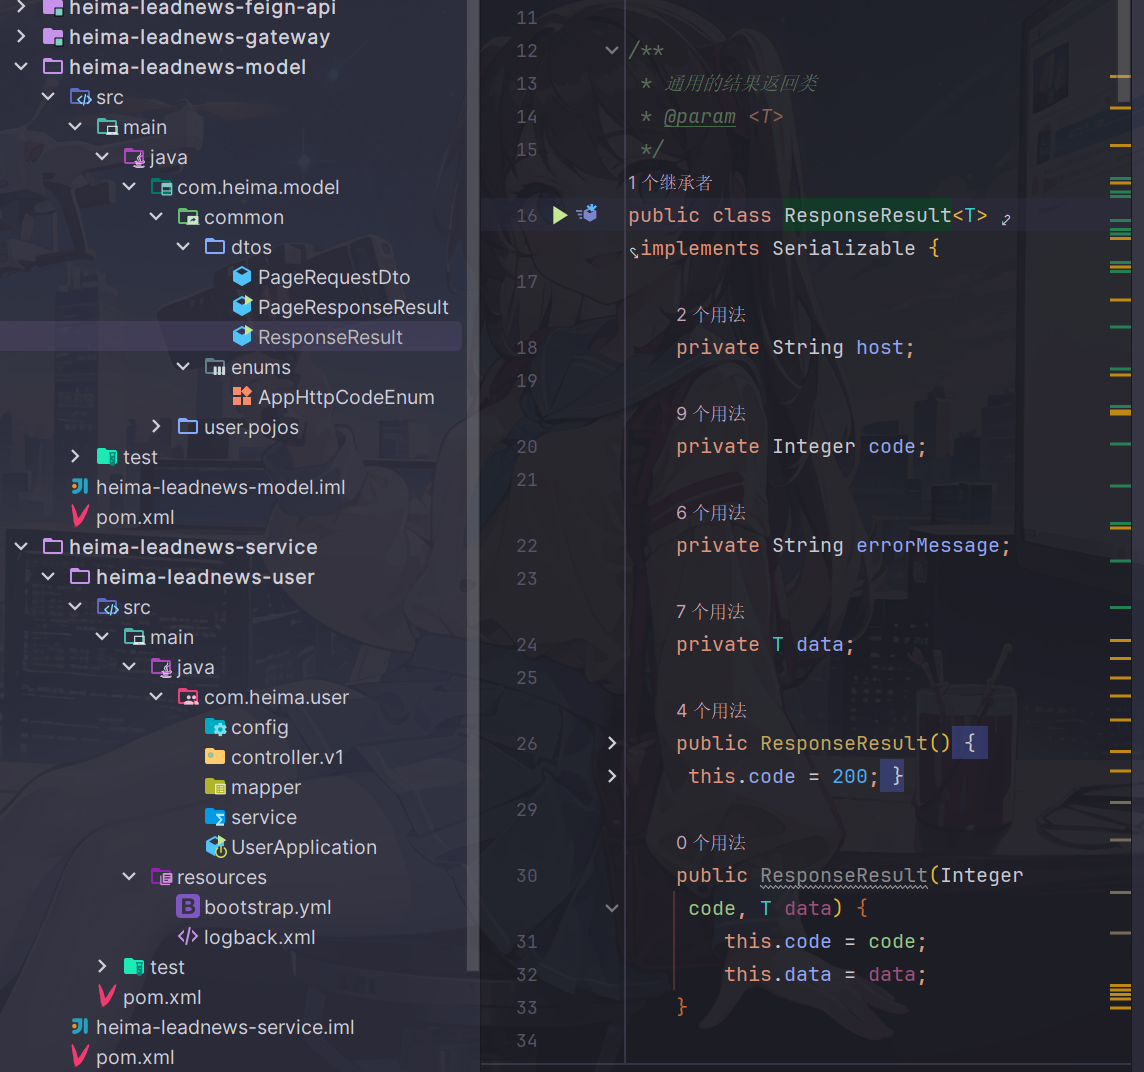
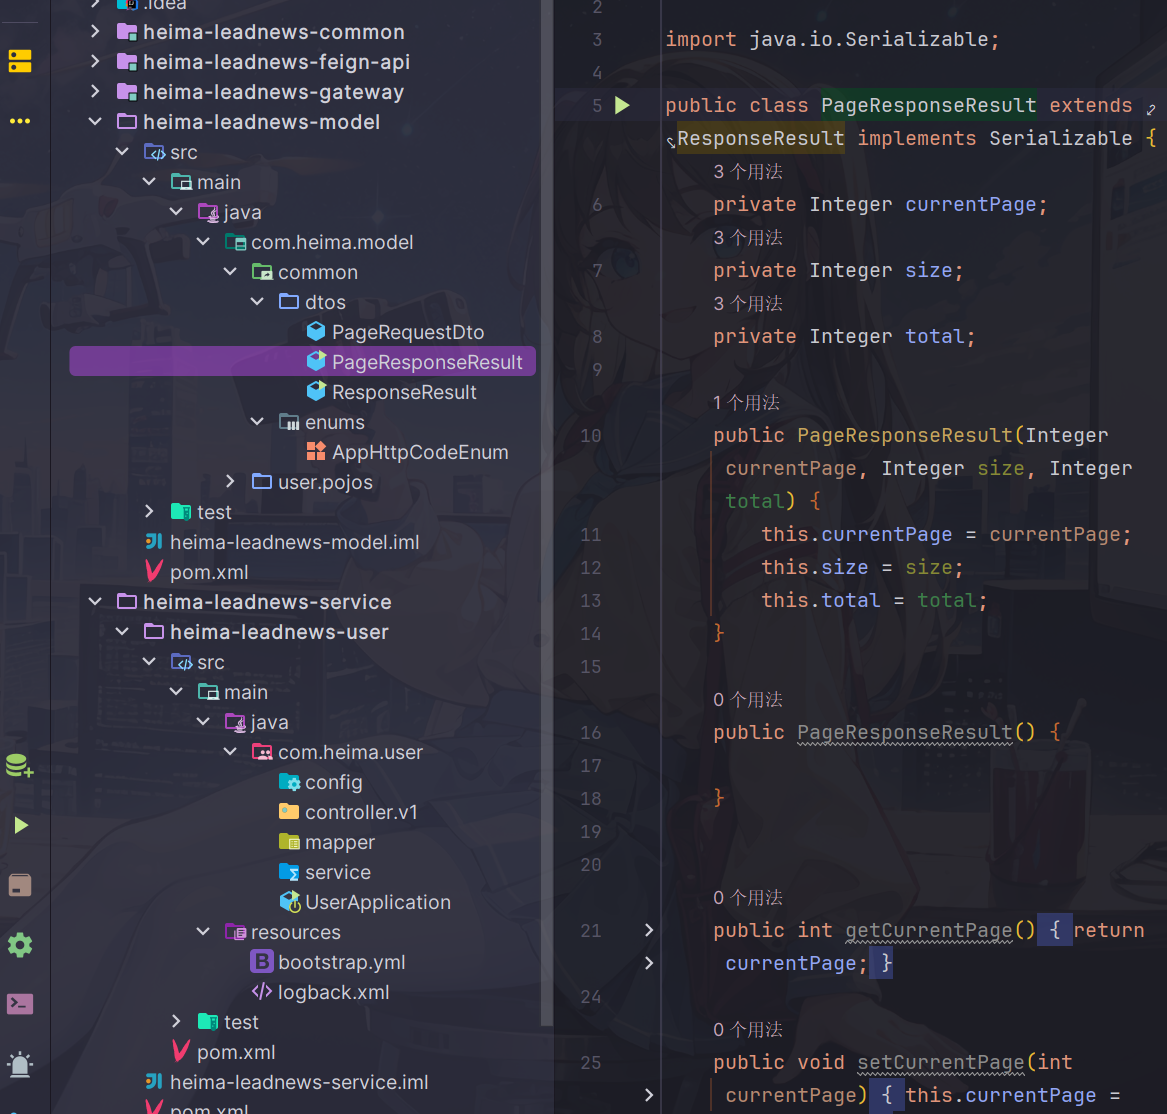
而PageResponseResult是ResponseResult的子类
在基础上多了分页相关字段和方法
功能实现
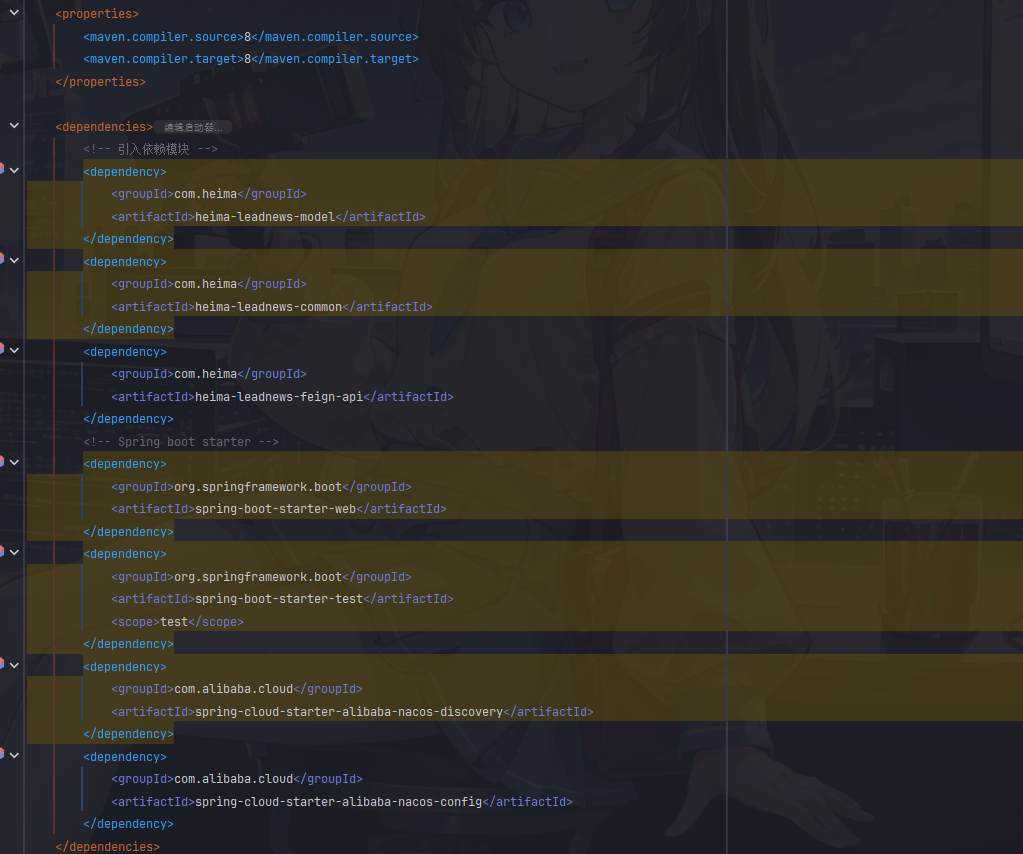
用户端微服务搭建
service模块已经配置好了依赖项目模块,nacos,feign,spring-boot依赖
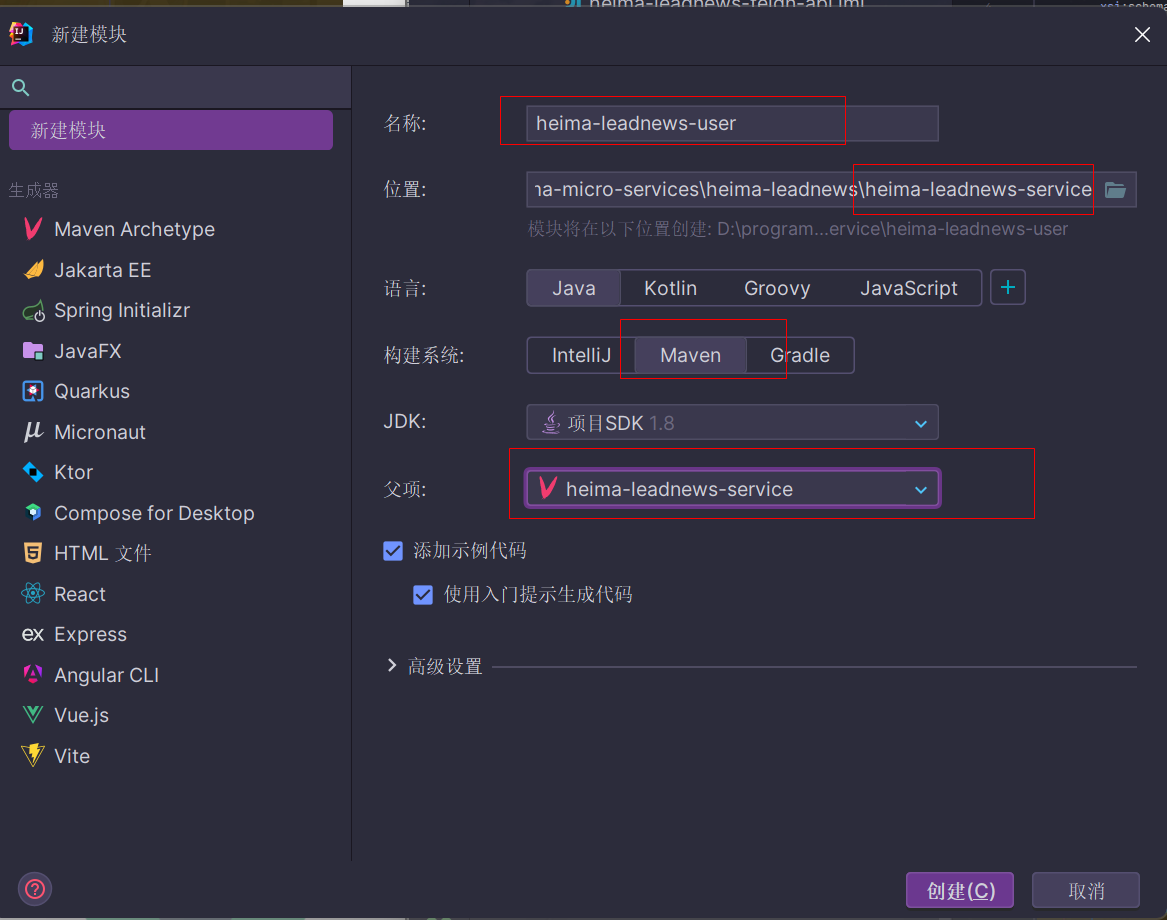
- 在service模块下创建用户端微服务
注意父模块要选择service模块
创建启动类和各个基础软件包
启动类
package com.heima.user;
@SpringBootApplication
@EnableDiscoveryClient
@MapperScan("com.heima.user.mapper")
public class UserApplication {

    public static void main(String[] args) {
        SpringApplication.run(UserApplication.class, args);
    }
}
按照如下创建软件包和配置文件
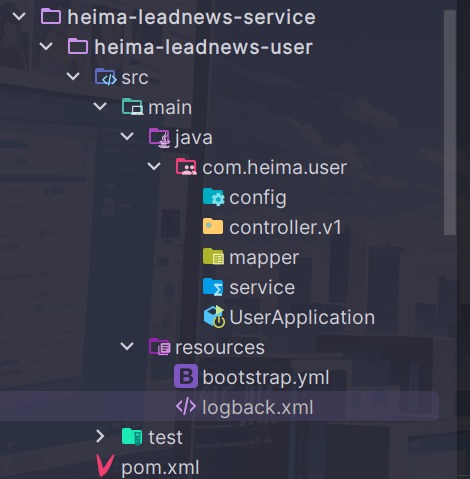
之所以创建controller.v1,是为了适应不同的业务情形,设置不同的接口服务
从资料中复制粘贴bootstrap.yml内容(记得把ip地址改成自己的)
server:
  port: 51801
spring:
  application:
    name: leadnews-user
  cloud:
    nacos:
      discovery:
        server-addr: hmtt:8848
      config:
        server-addr: hmtt:8848
        file-extension: yml
而关于mybatis的配置,可以通过nacos配置中心进行统一加载
访问nacos控制台hmtt:8848/nacos
由于之前老师虚拟机nacos已经给配置好了配置,我们需要进入进行一下更改
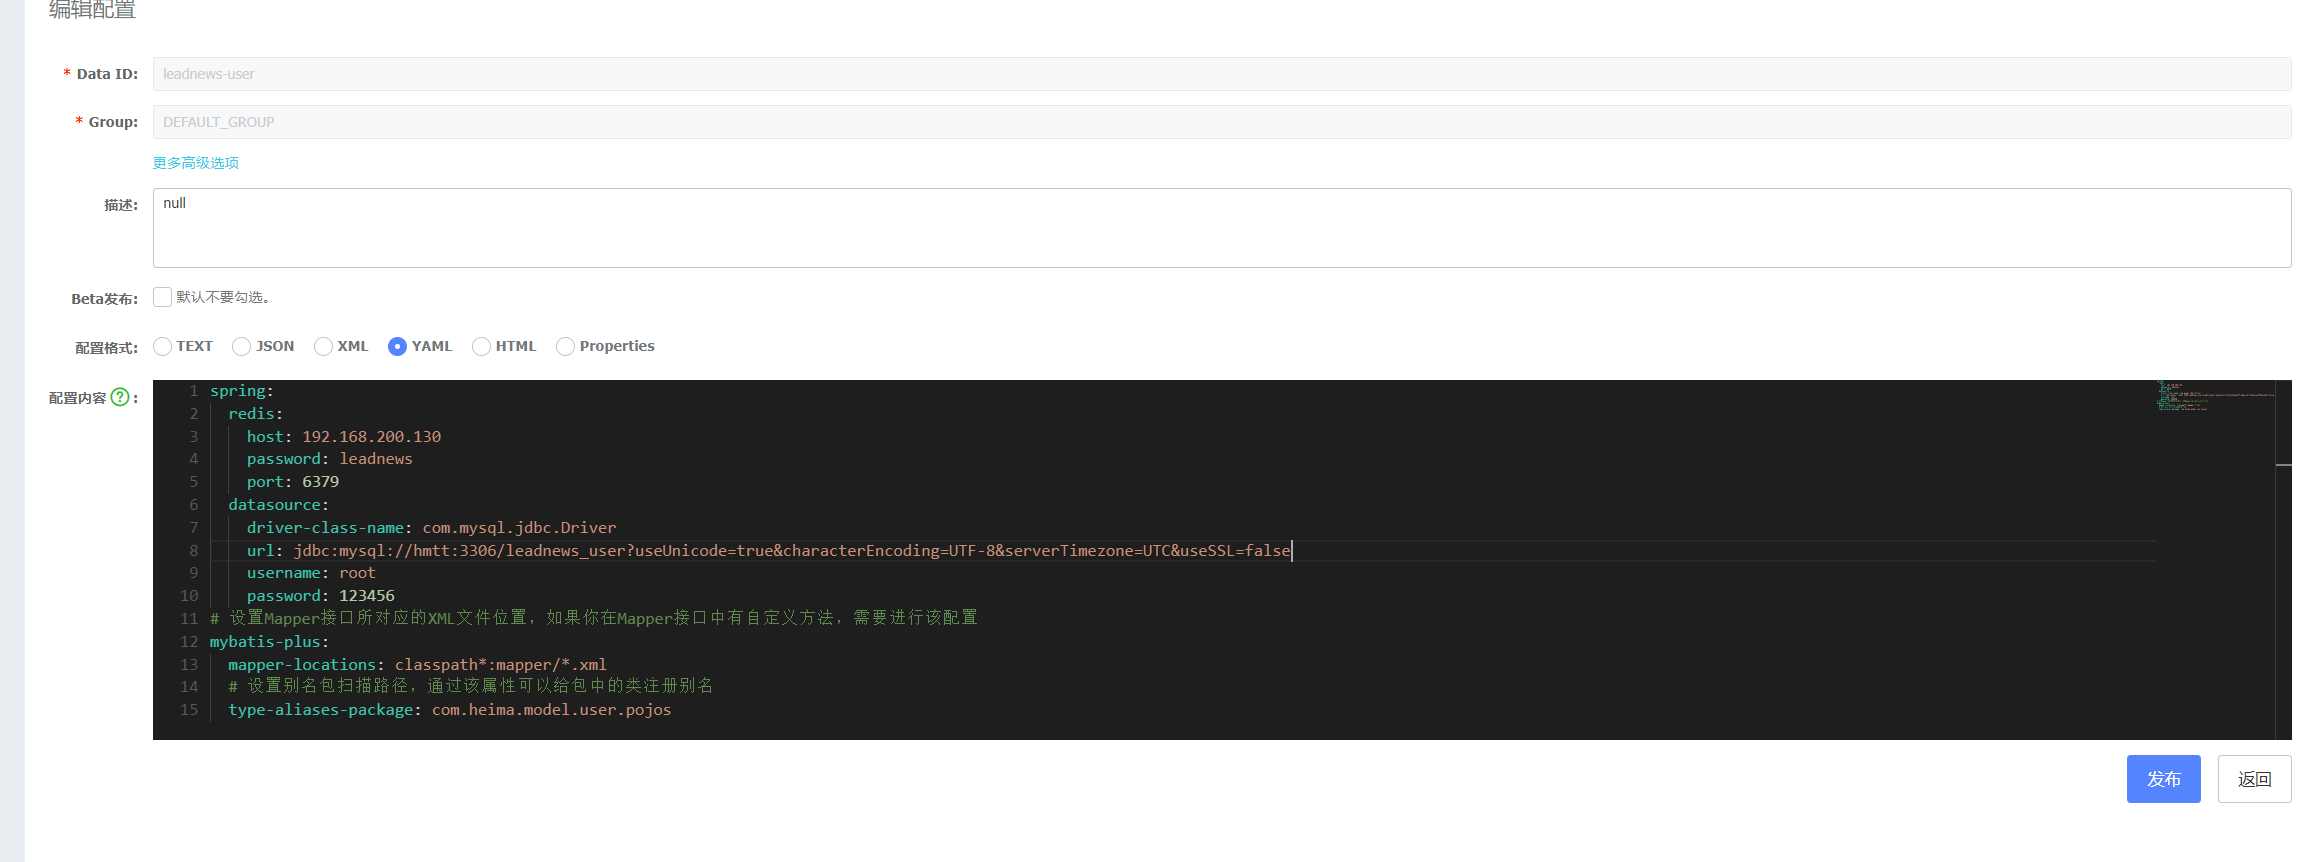
将有关mybatis和redis的部分进行更改
❗记得把连接的地址和用户密码改成自己的
数据库连接添加参数
useSSL=false,不然会出现红色的警告,非常显眼redis建议顺便也给更改了
spring:
  redis:
    host: hmtt
    password: leadnews
    port: 6379
  datasource:
    driver-class-name: com.mysql.jdbc.Driver
    url: jdbc:mysql://hmtt:3306/leadnews_user?useUnicode=true&characterEncoding=UTF-8&serverTimezone=UTC&useSSL=false
    username: root
    password: 123456
# 设置Mapper接口所对应的XML文件位置,如果你在Mapper接口中有自定义方法,需要进行该配置
mybatis-plus:
  mapper-locations: classpath*:mapper/*.xml
  # 设置别名包扫描路径,通过该属性可以给包中的类注册别名
  type-aliases-package: com.heima.model.user.pojos
mybatis相关依赖配置在了model模块,而service模块依赖model模块,因此可以不必再引入依赖,相关配置也能传递过去
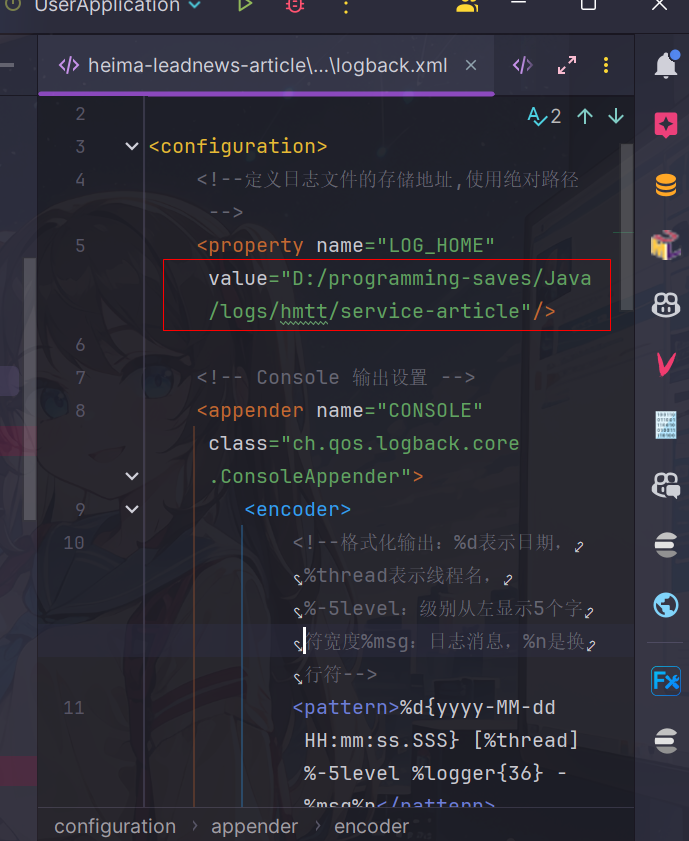
配置logback.xml
复制粘贴老师资料里面提供的xml代码
❗ 注意把log存储的目录改成自己设置好的目录啊,我的电脑是没有e盘的
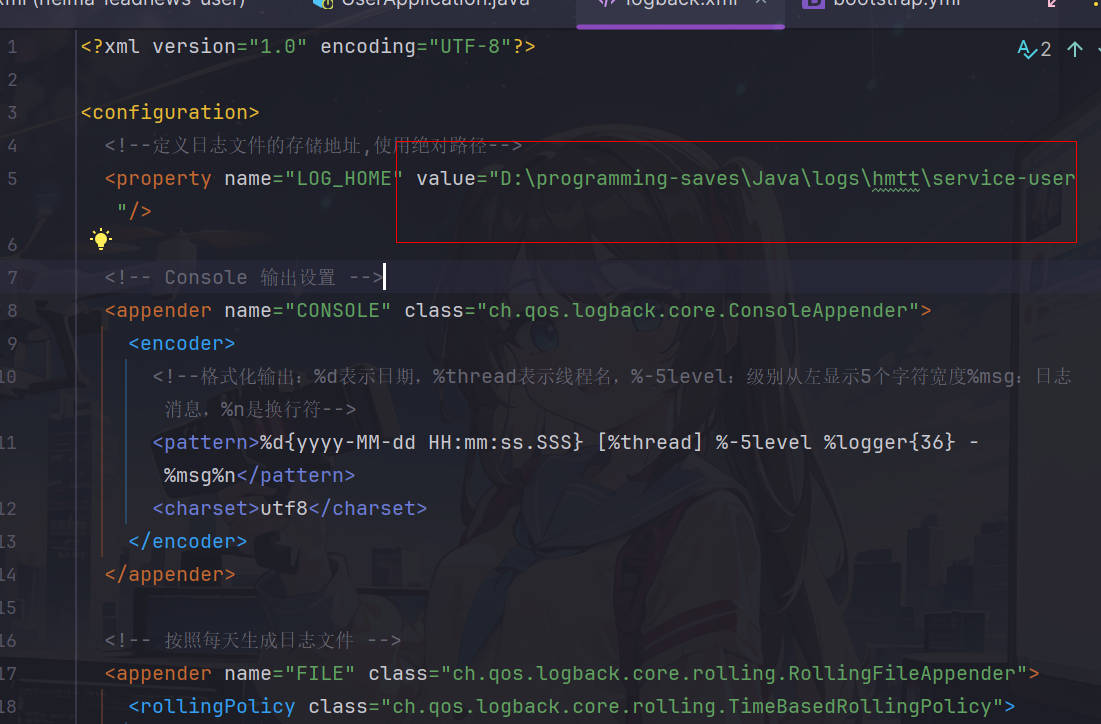
<?xml version="1.0" encoding="UTF-8"?>

<configuration>
  <!--定义日志文件的存储地址,使用绝对路径-->
	<property name="LOG_HOME" value="D:/programming-saves/Java/logs/hmtt/service-user"/>

  <!-- Console 输出设置 -->
  <appender name="CONSOLE" class="ch.qos.logback.core.ConsoleAppender">
    <encoder>
      <!--格式化输出:%d表示日期,%thread表示线程名,%-5level:级别从左显示5个字符宽度%msg:日志消息,%n是换行符-->
      <pattern>%d{yyyy-MM-dd HH:mm:ss.SSS} [%thread] %-5level %logger{36} - %msg%n</pattern>
      <charset>utf8</charset>
    </encoder>
  </appender>

  <!-- 按照每天生成日志文件 -->
  <appender name="FILE" class="ch.qos.logback.core.rolling.RollingFileAppender">
    <rollingPolicy class="ch.qos.logback.core.rolling.TimeBasedRollingPolicy">
      <!--日志文件输出的文件名-->
      <fileNamePattern>${LOG_HOME}/leadnews.%d{yyyy-MM-dd}.log</fileNamePattern>
    </rollingPolicy>
    <encoder>
      <pattern>%d{yyyy-MM-dd HH:mm:ss.SSS} [%thread] %-5level %logger{36} - %msg%n</pattern>
    </encoder>
  </appender>

  <!-- 异步输出 -->
  <appender name="ASYNC" class="ch.qos.logback.classic.AsyncAppender">
    <!-- 不丢失日志.默认的,如果队列的80%已满,则会丢弃TRACT、DEBUG、INFO级别的日志 -->
    <discardingThreshold>0</discardingThreshold>
    <!-- 更改默认的队列的深度,该值会影响性能.默认值为256 -->
    <queueSize>512</queueSize>
    <!-- 添加附加的appender,最多只能添加一个 -->
    <appender-ref ref="FILE"/>
  </appender>


  <logger name="org.apache.ibatis.cache.decorators.LoggingCache" level="DEBUG" additivity="false">
    <appender-ref ref="CONSOLE"/>
  </logger>
  <logger name="org.springframework.boot" level="debug"/>
  <root level="info">
    <!--<appender-ref ref="ASYNC"/>-->
    <appender-ref ref="FILE"/>
    <appender-ref ref="CONSOLE"/>
  </root>
</configuration>
代码实现
- model模块的user.dtos包下面创建loginDto实体类
package com.heima.model.user.dtos;

import lombok.Data;

@Data
public class LoginDto {

    /**
     * 手机号
     */
    private String phone;
    /**
     * 密码
     */
    private String password;
}
-
在user微服务编写三层架构代码(都是用mybatis-plus)
登录流程
mapper
package com.heima.user.mapper;
@Mapper
public interface ApUserMapper extends BaseMapper<ApUser> {
}
service接口
public interface ApUserService extends IService<ApUser> {
	    /**
     * app端登录功能
     * @param dto
     * @return
     */
    ResponseResult login(LoginDto dto);

}
service实现
@Service
@Transactional
@Slf4j
public class ApUserServiceImpl extends ServiceImpl<ApUserMapper, ApUser> implements ApUserService {

    /**
     * app端登录功能
     *
     * @param dto
     * @return
     */
    @Override
    public ResponseResult login(LoginDto dto) {
        //正常登录,需要用户名和密码
        if(StringUtils.isNotBlank(dto.getPhone()) && StringUtils.isNotBlank(dto.getPassword())){
            //根据手机号查询用户信息
            ApUser dbUser = getOne(Wrappers.<ApUser>lambdaQuery().eq(ApUser::getPhone, dto.getPhone()));
            //如果用户不存在,返回不存在
            if(dbUser == null){
                return ResponseResult.errorResult(AppHttpCodeEnum.AP_USER_DATA_NOT_EXIST);
            }
            //比对密码
            String salt = dbUser.getSalt();
            String pwd = dto.getPassword();
            String md5Pwd = DigestUtils.md5DigestAsHex((pwd + salt).getBytes());
            if(!md5Pwd.equals(dbUser.getPassword())){
                return ResponseResult.errorResult(AppHttpCodeEnum.LOGIN_PASSWORD_ERROR);
            }
            //密码正确,返回Ap_User对象,生成jwt token
            String token = AppJwtUtil.getToken(dbUser.getId().longValue());
            Map<String,Object> map = new HashMap<>();
            //这里key值要和前端约定好保持一致
            map.put("token",token);
            //要把密码和盐值去掉
            dbUser.setPassword("");
            dbUser.setSalt("");
            map.put("user",dbUser);

            return ResponseResult.okResult(map);
        }
        else{
            //游客登录
            Map<String,Object> map = new HashMap<>();
            String token = AppJwtUtil.getToken(0L);//默认返回id为0生成的token
            return ResponseResult.okResult(map);
        }
    }
}
这里对于报错信息,为了不把报错信息写死,我直接传递了枚举类对象,因为有一个方法可以默认打印对应错误码枚举类的报错信息

controller
@RestController
@RequestMapping("/api/v1/login")
public class ApUserLoginController {
    @Autowired
    private ApUserService apUserService;

    @PostMapping("/login_auth")
    public ResponseResult login(@RequestBody LoginDto loginDto){
        return apUserService.login(loginDto);
    }
}
运行测试
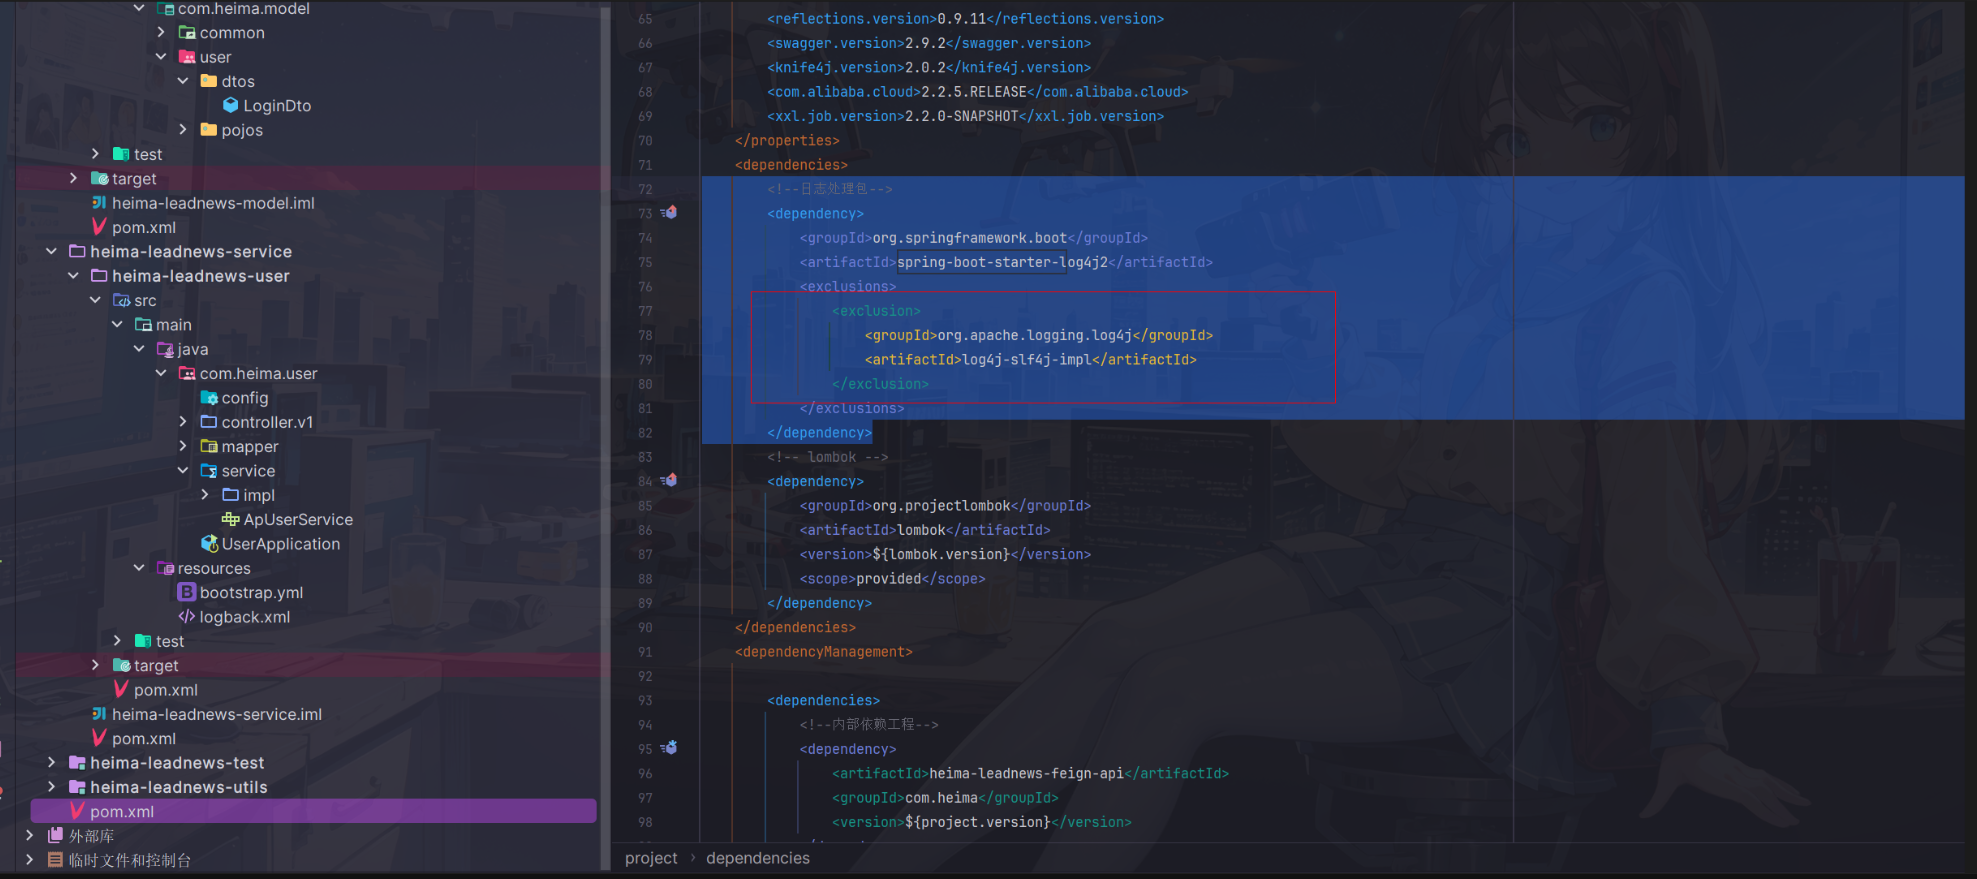
这里报错日志依赖冲突

因为老师选择配置的日志是logback,因此我们这里只要把log4j-slf4j-impl这个依赖排除掉就行了
根据idea自带的依赖关系分析图表,很快锁定引用这个冲突依赖的依赖是父工程下面的spring-boot-starter-log4j2这个依赖
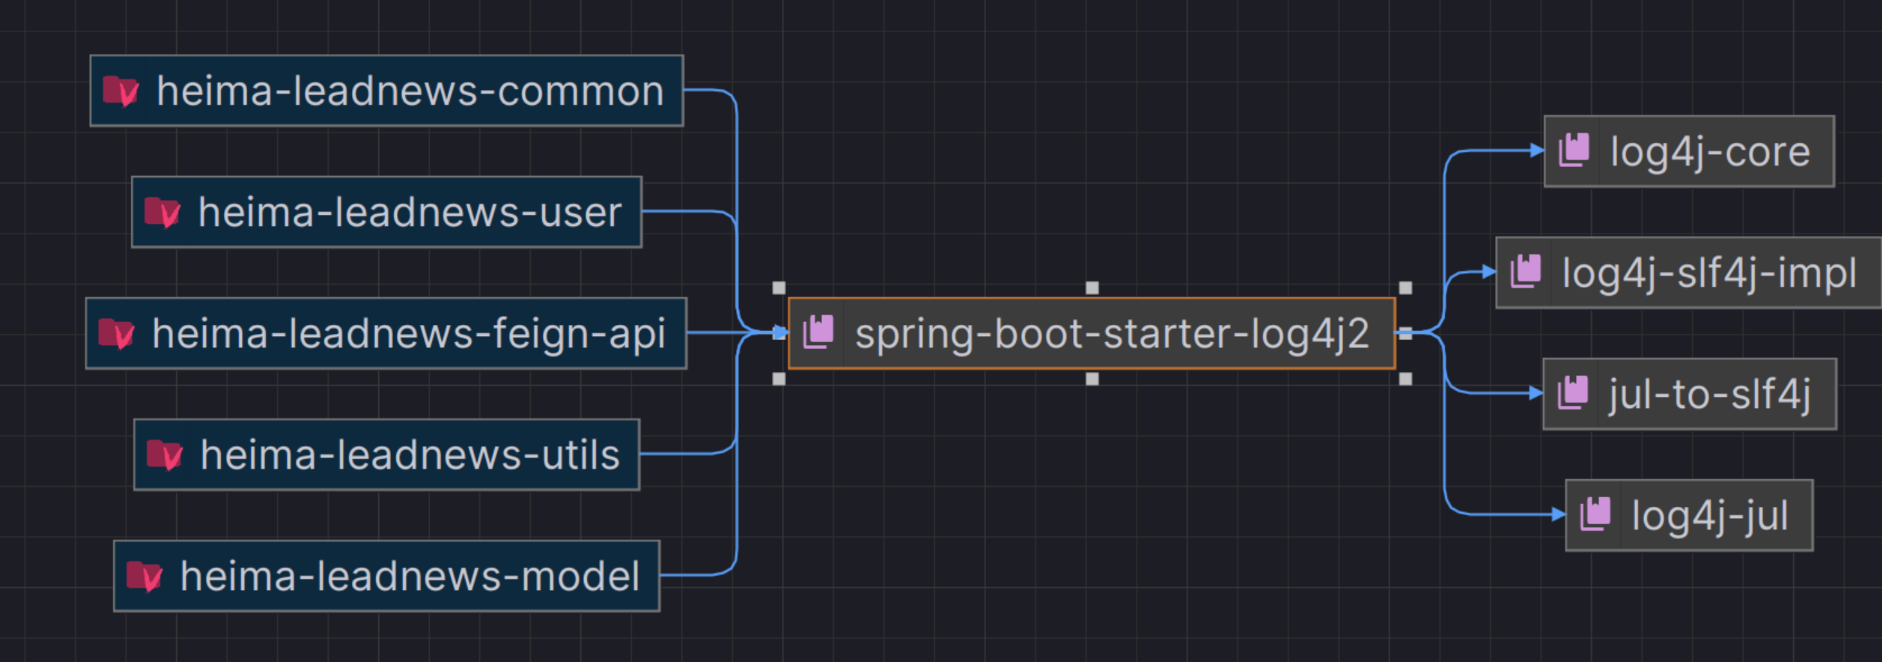
在这个依赖处添加exclusion标签排除掉冲突的依赖就可以正常运行了
当然由于还没有启动redis服务,会报错redis连接失败,不过不影响后面的进行
可以看到服务注册成功了

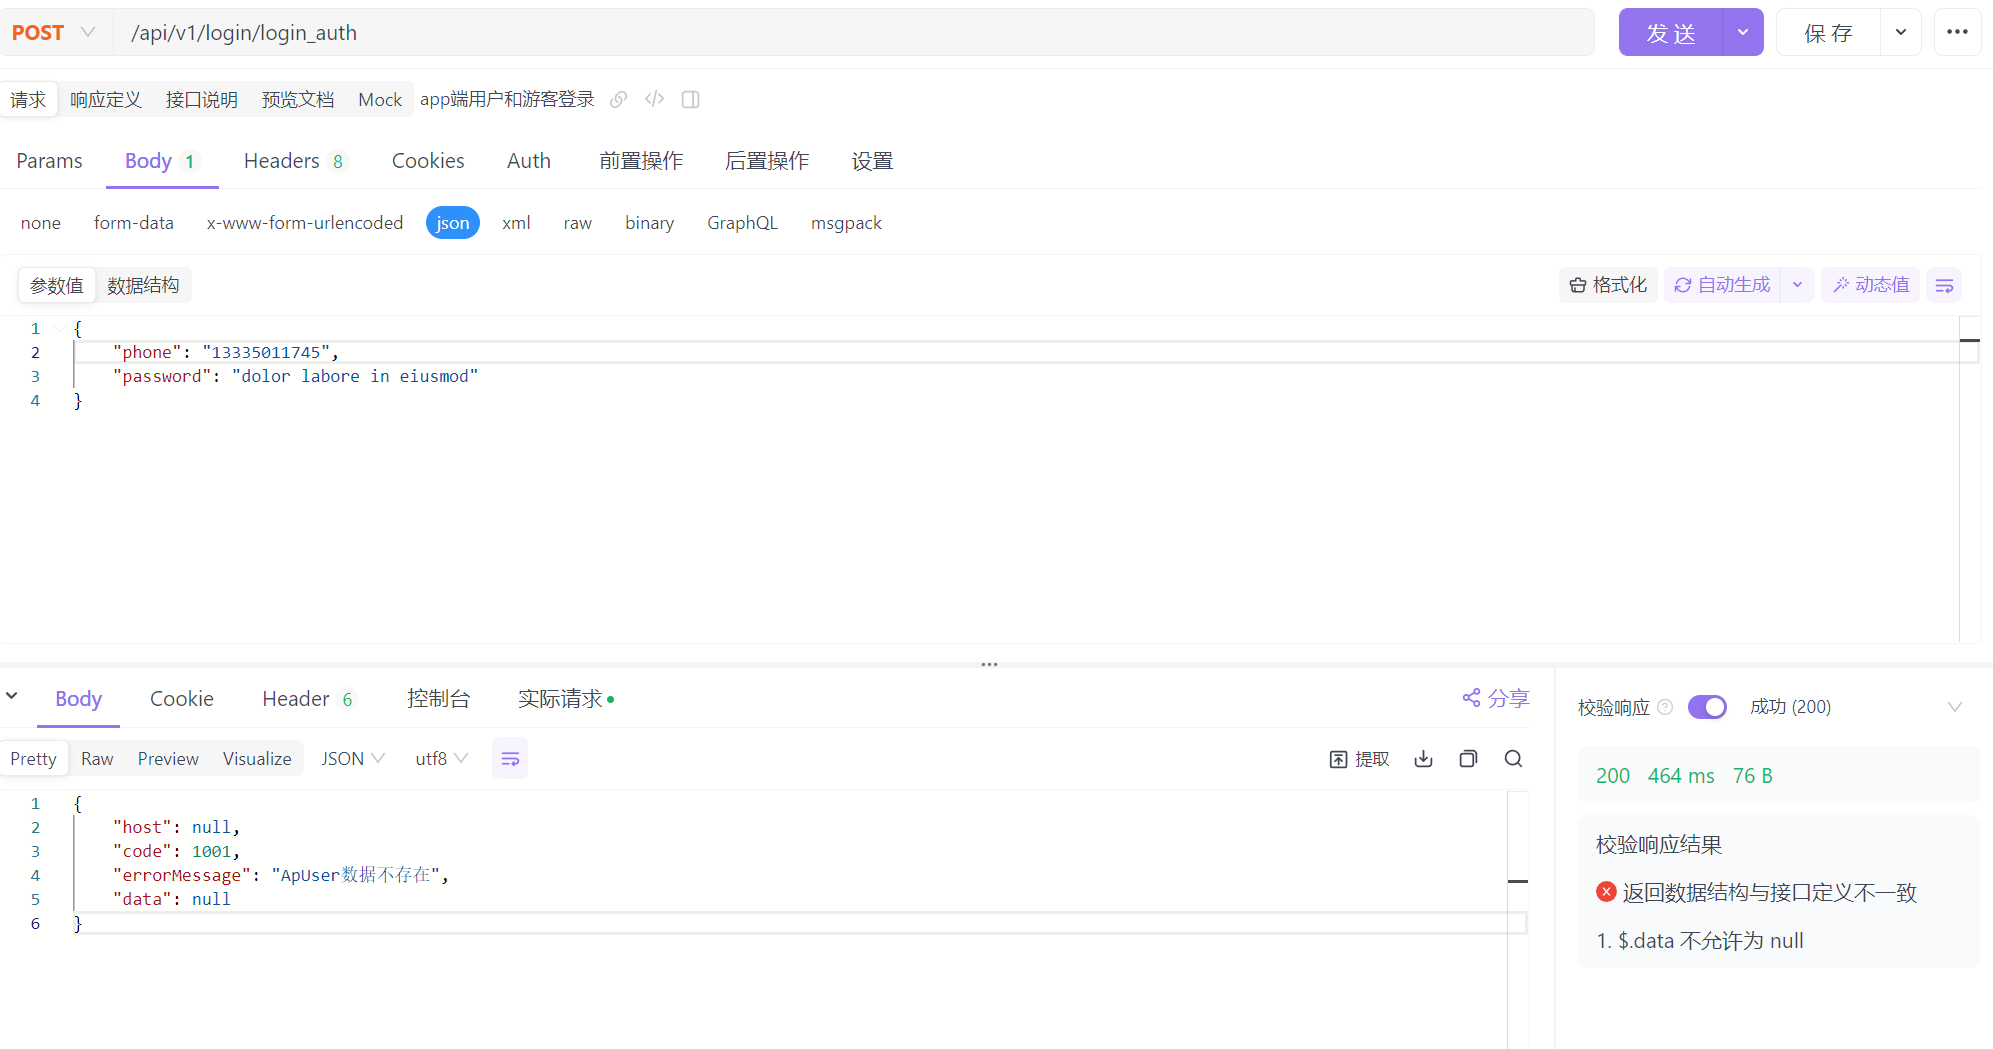
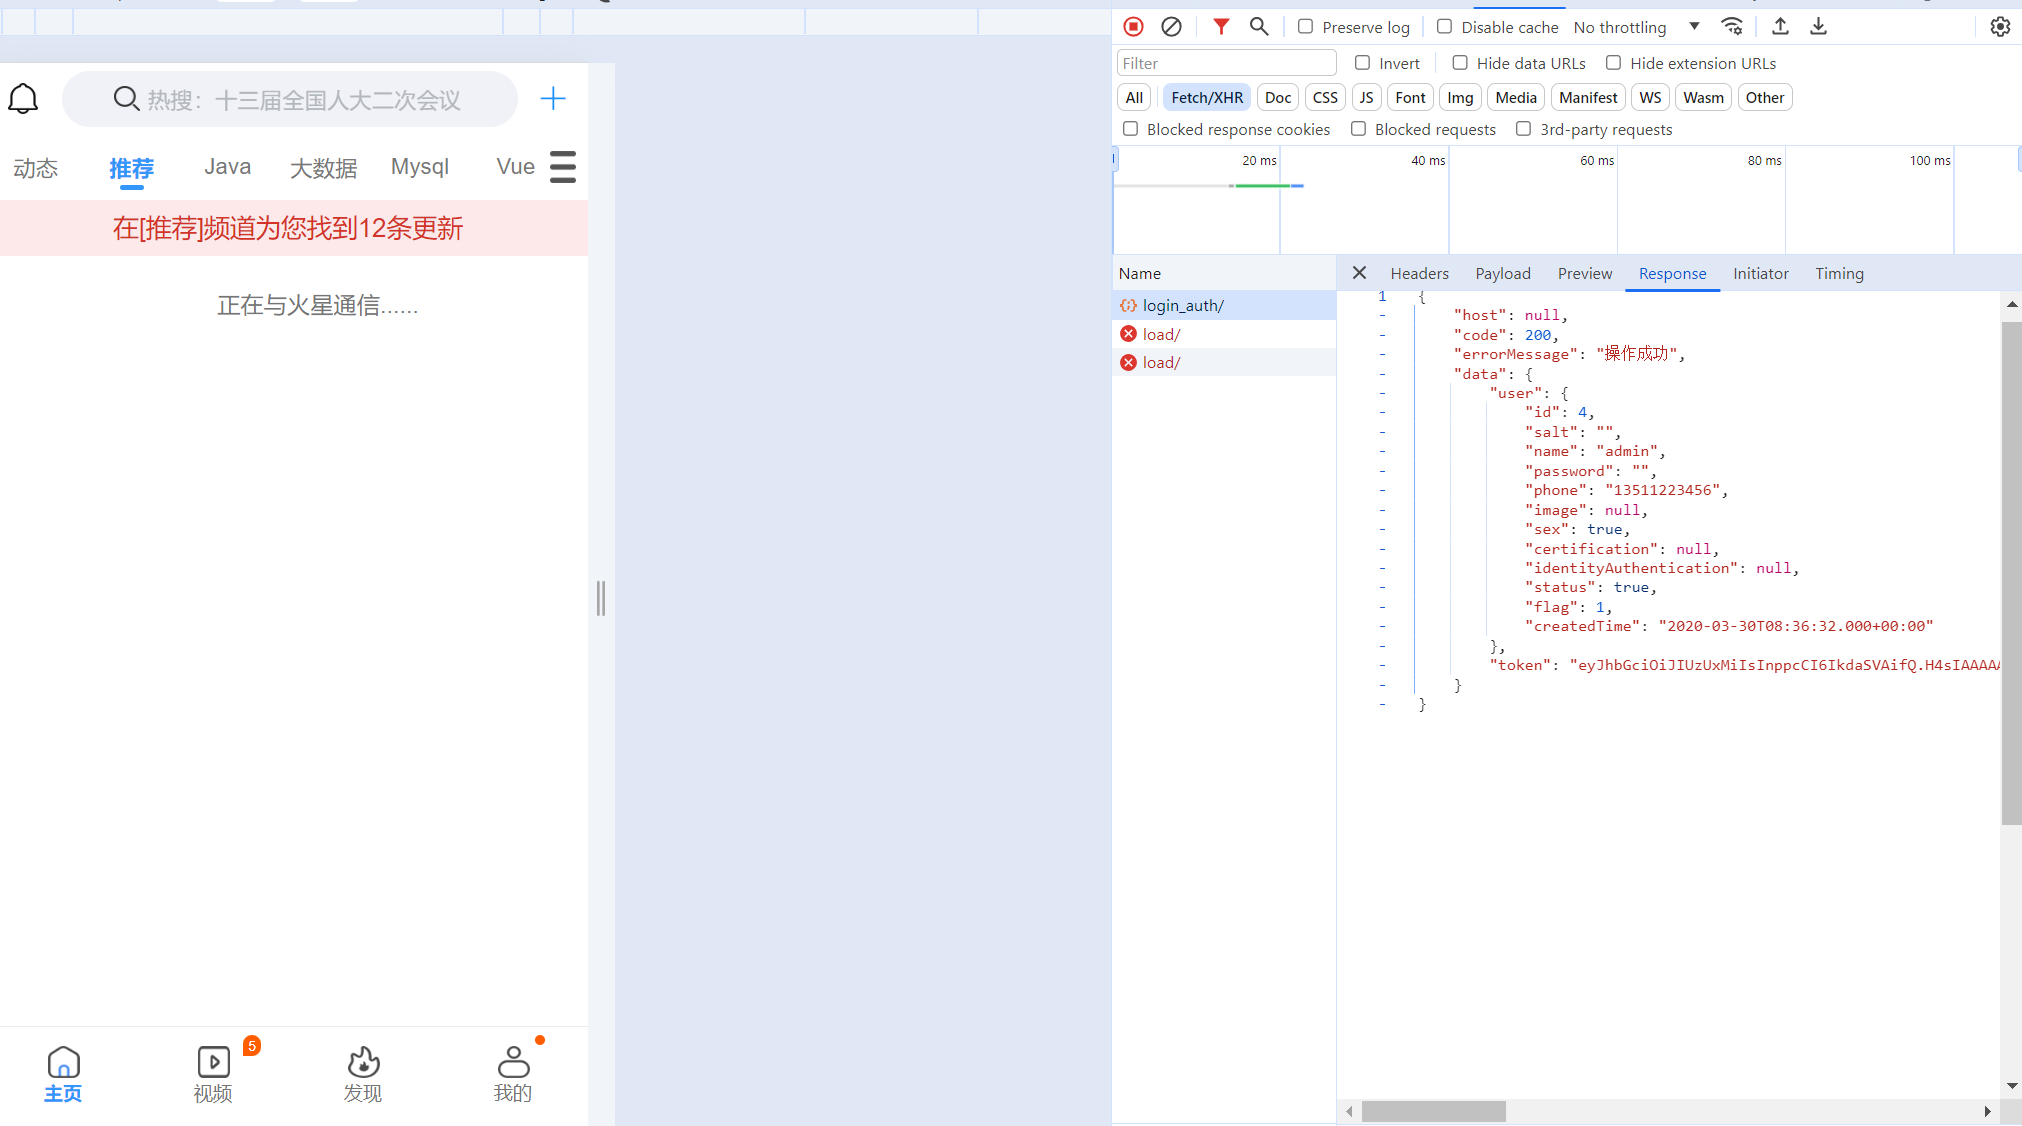
接口测试(Apifox平替版)
Apifox接口测试
之前已经学过postman如何进行接口测试,听说apifox更常用也更爽f,因此不妨多探索新的技术
从官网下载安装包
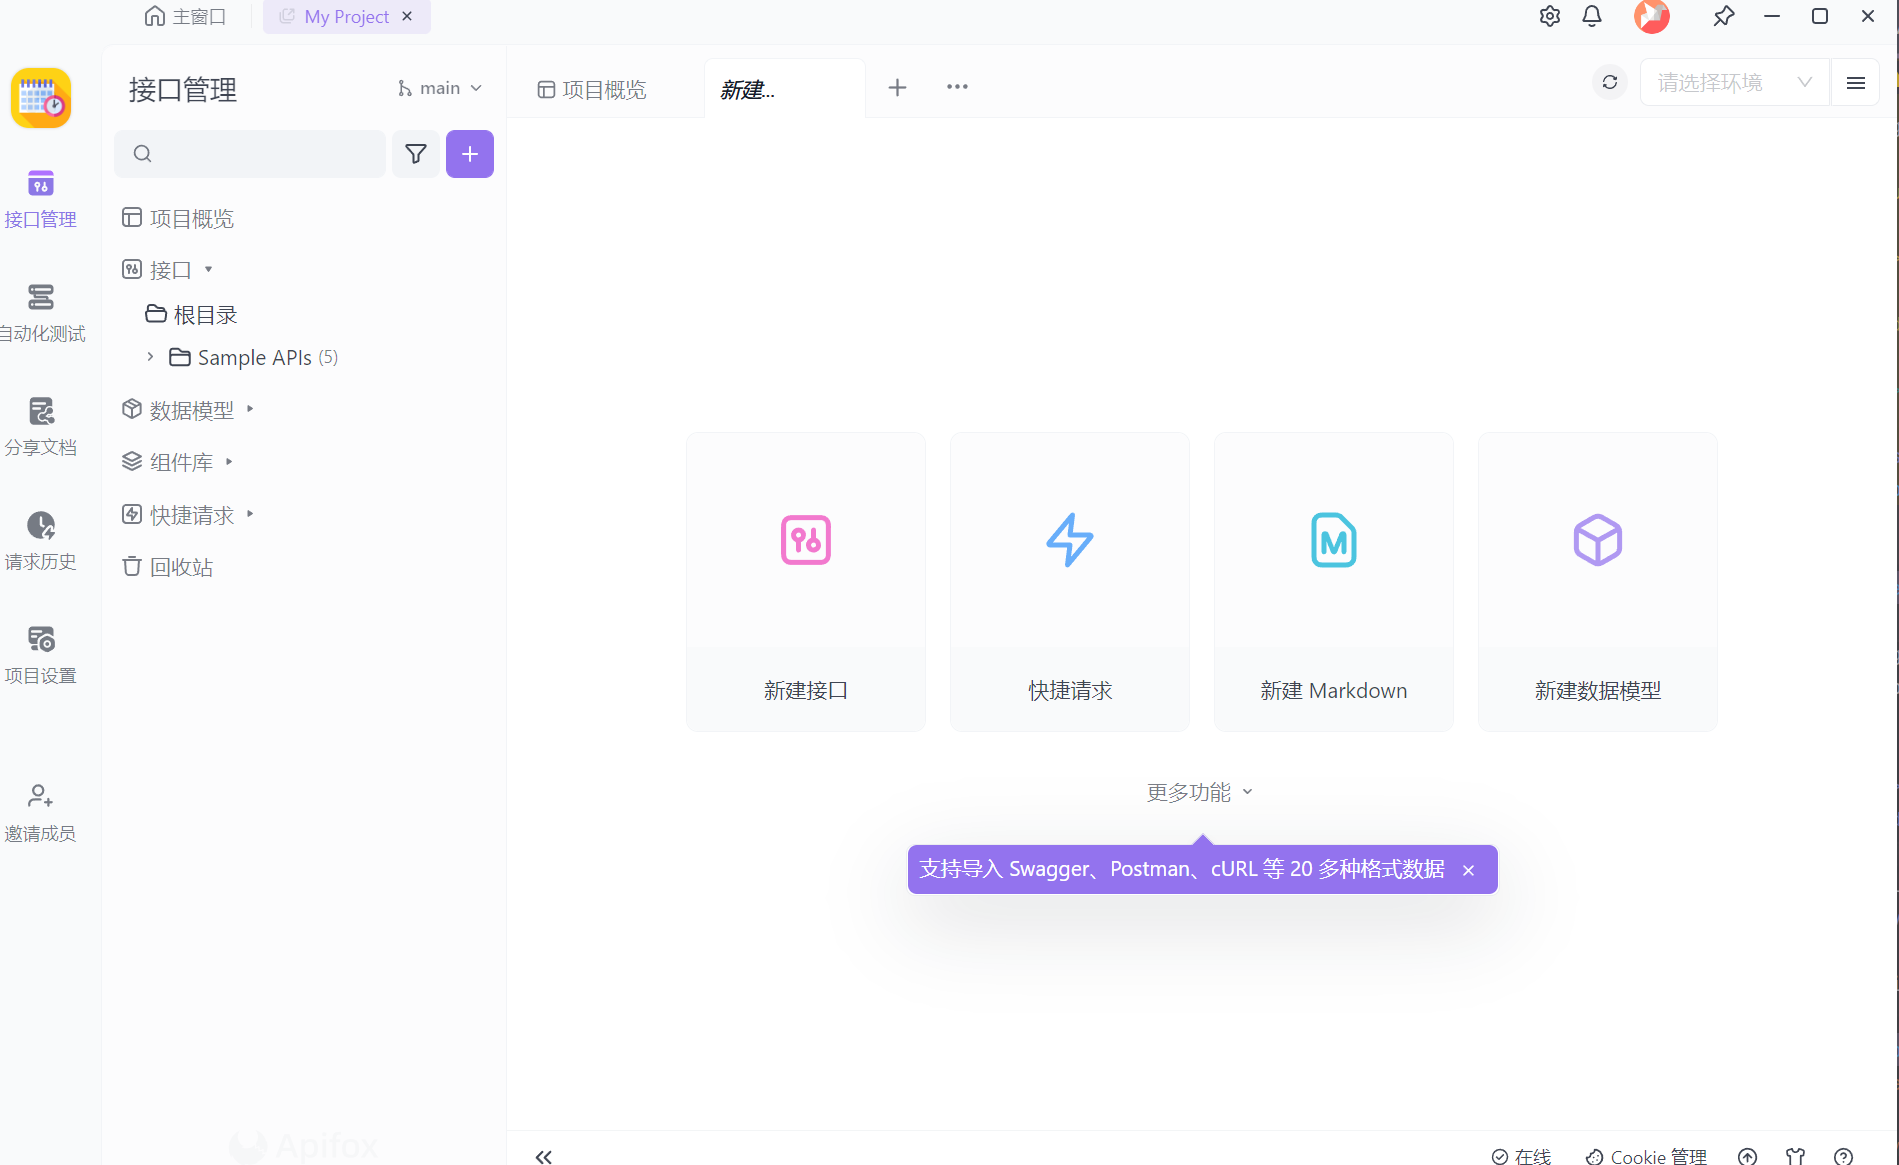
点击快速请求,然后就可以像postman一样发送请求了
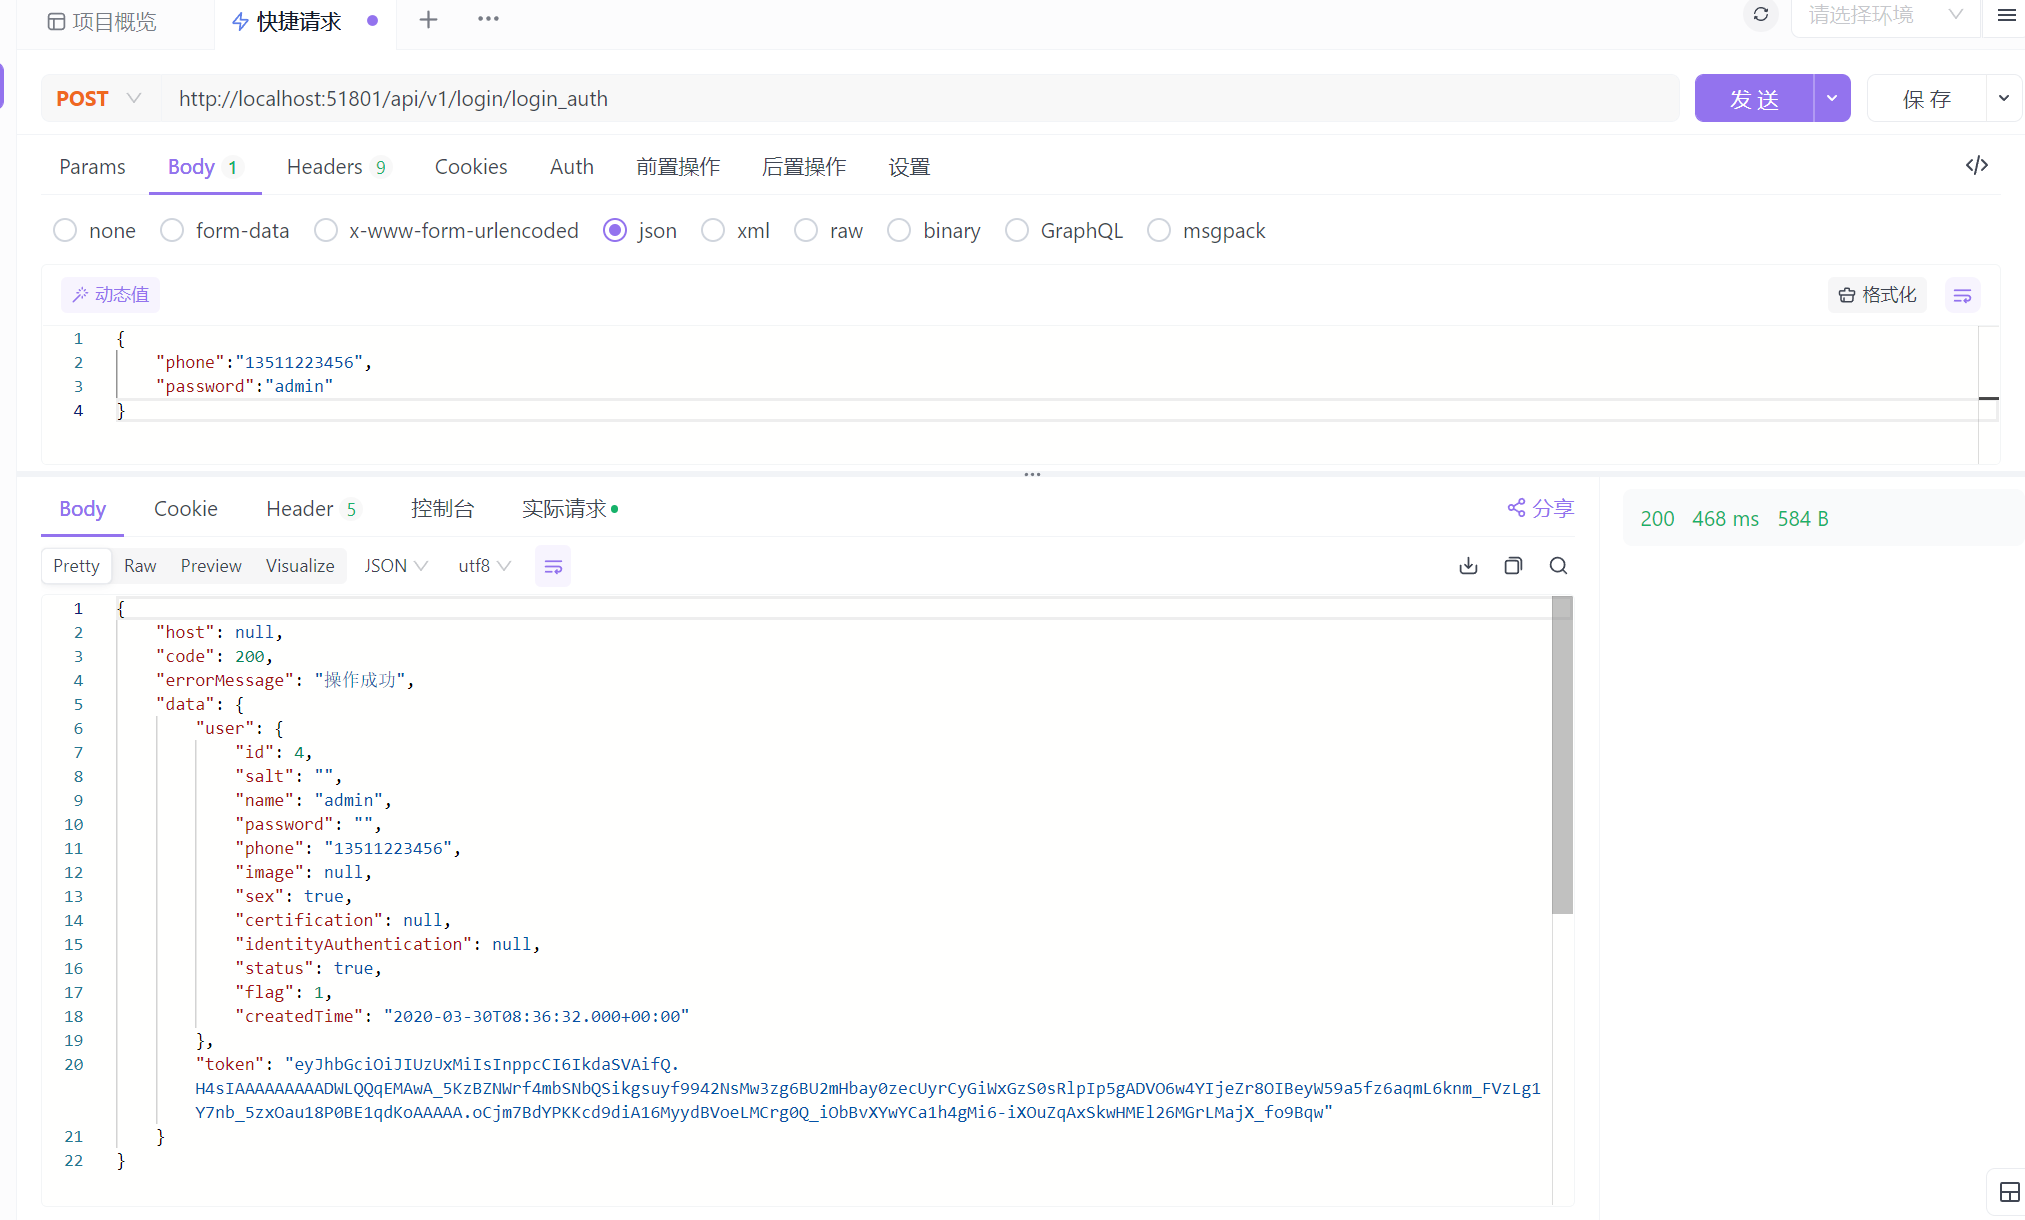
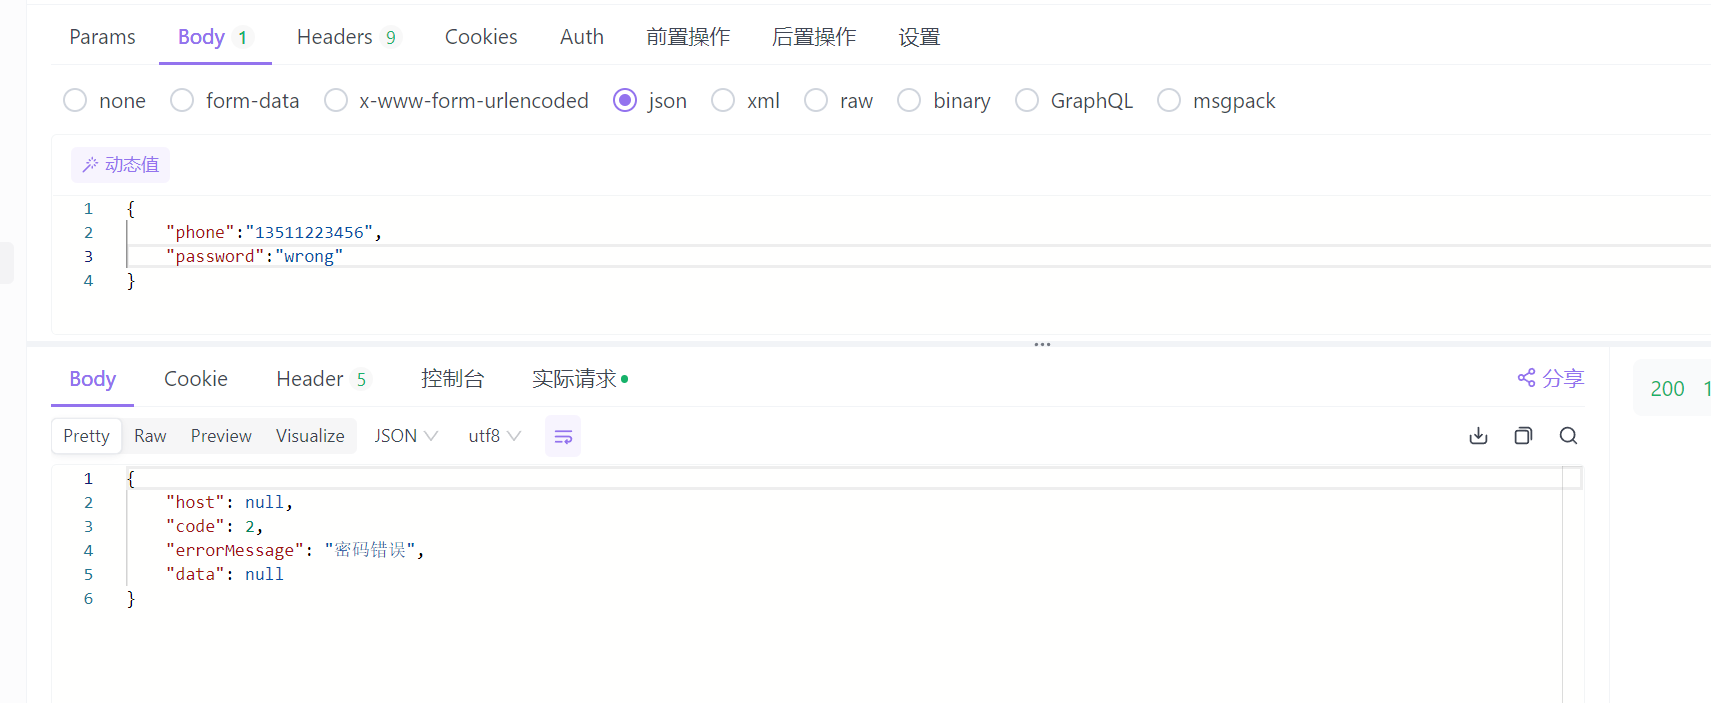
这里我们用admin登录进行测试
POST http://localhost:51801/api/v1/login/login_auth
{
    "phone":"13511223456",
    "password":"admin"
}
成功返回了token
如果输入错误密码,则返回密码错误
Apifox自动生成api文档
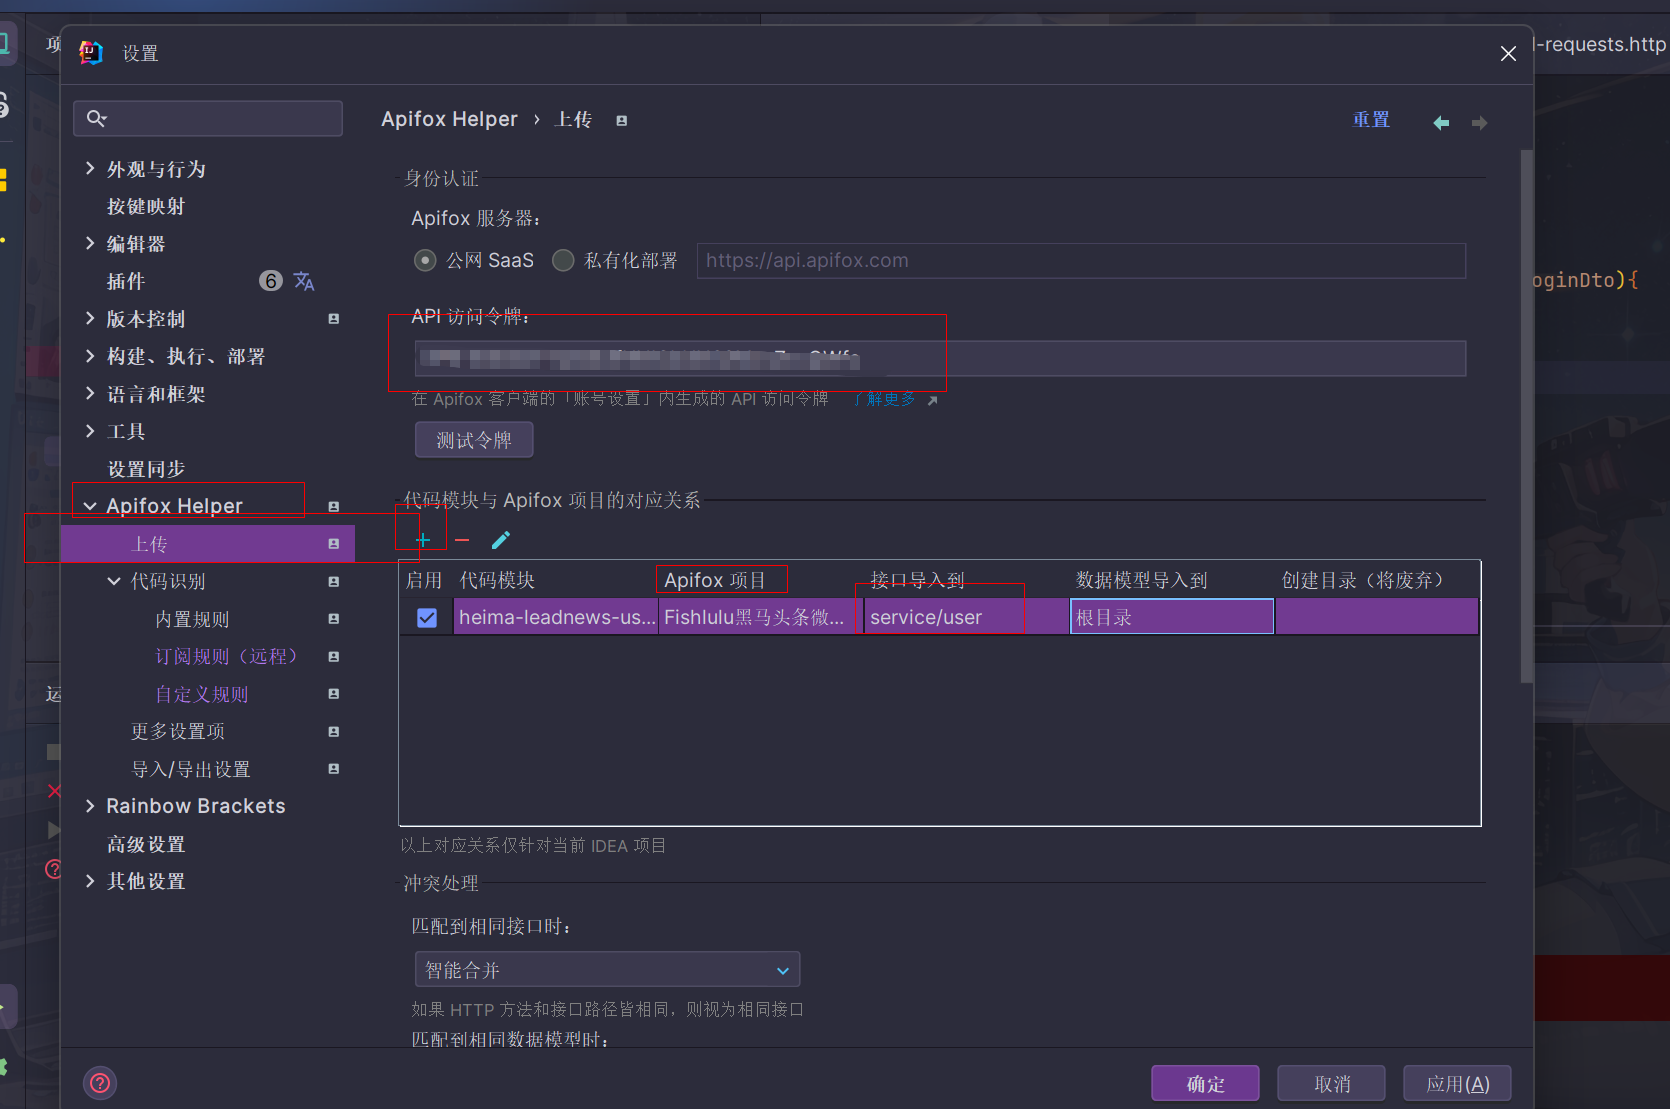
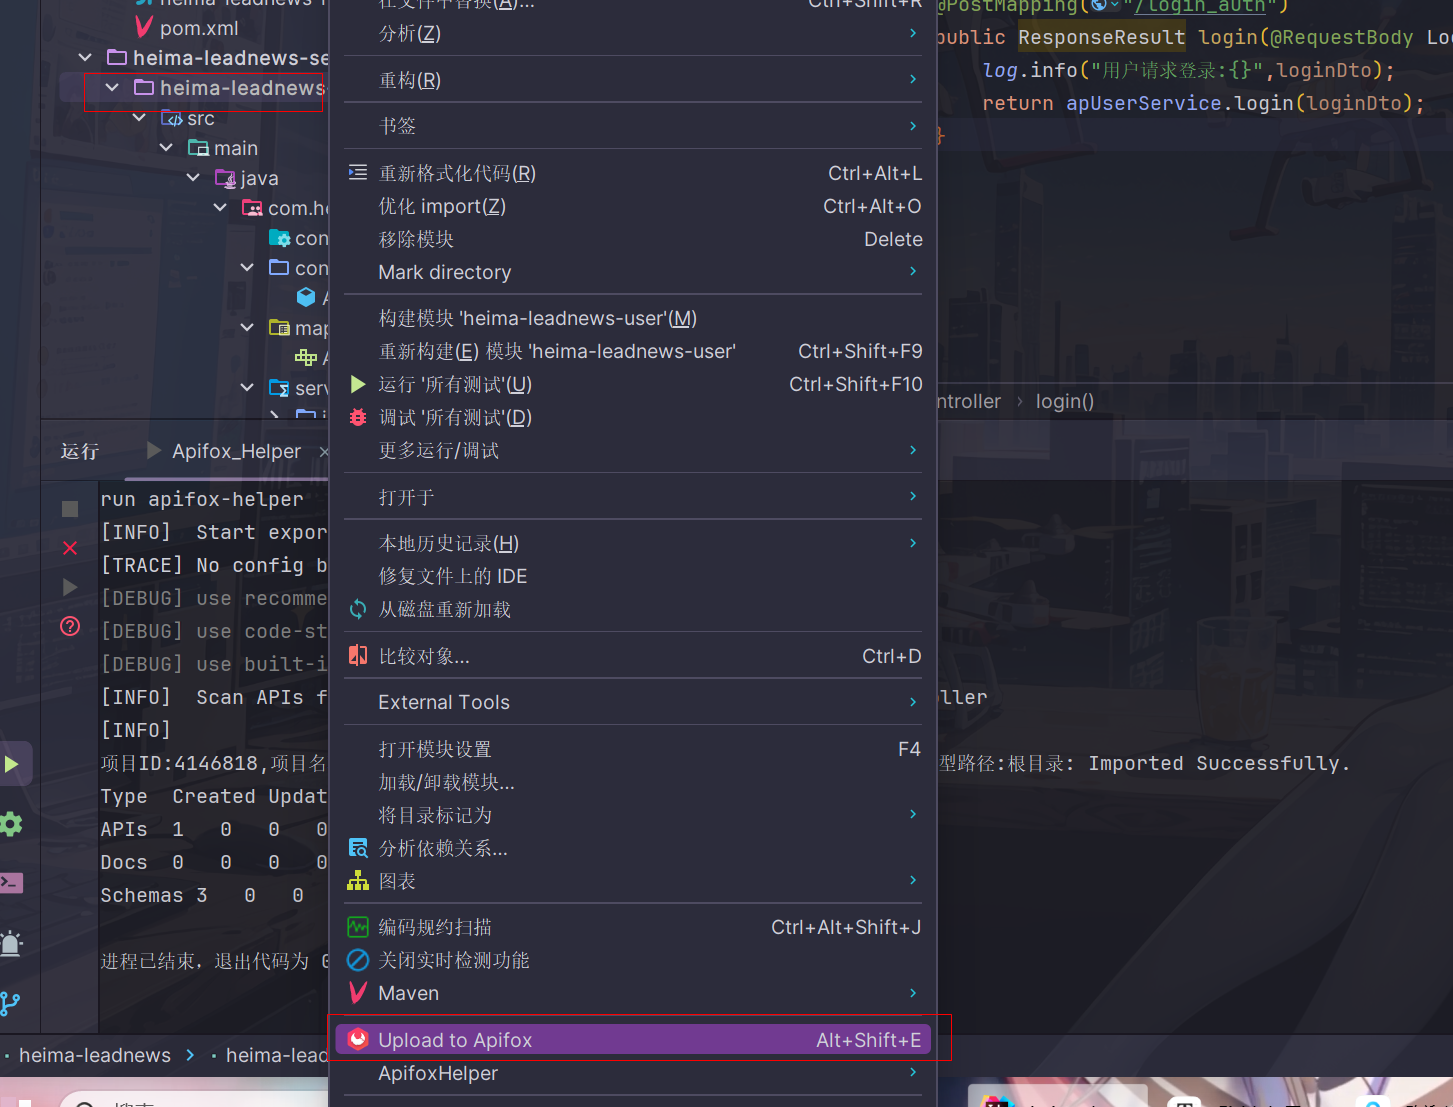
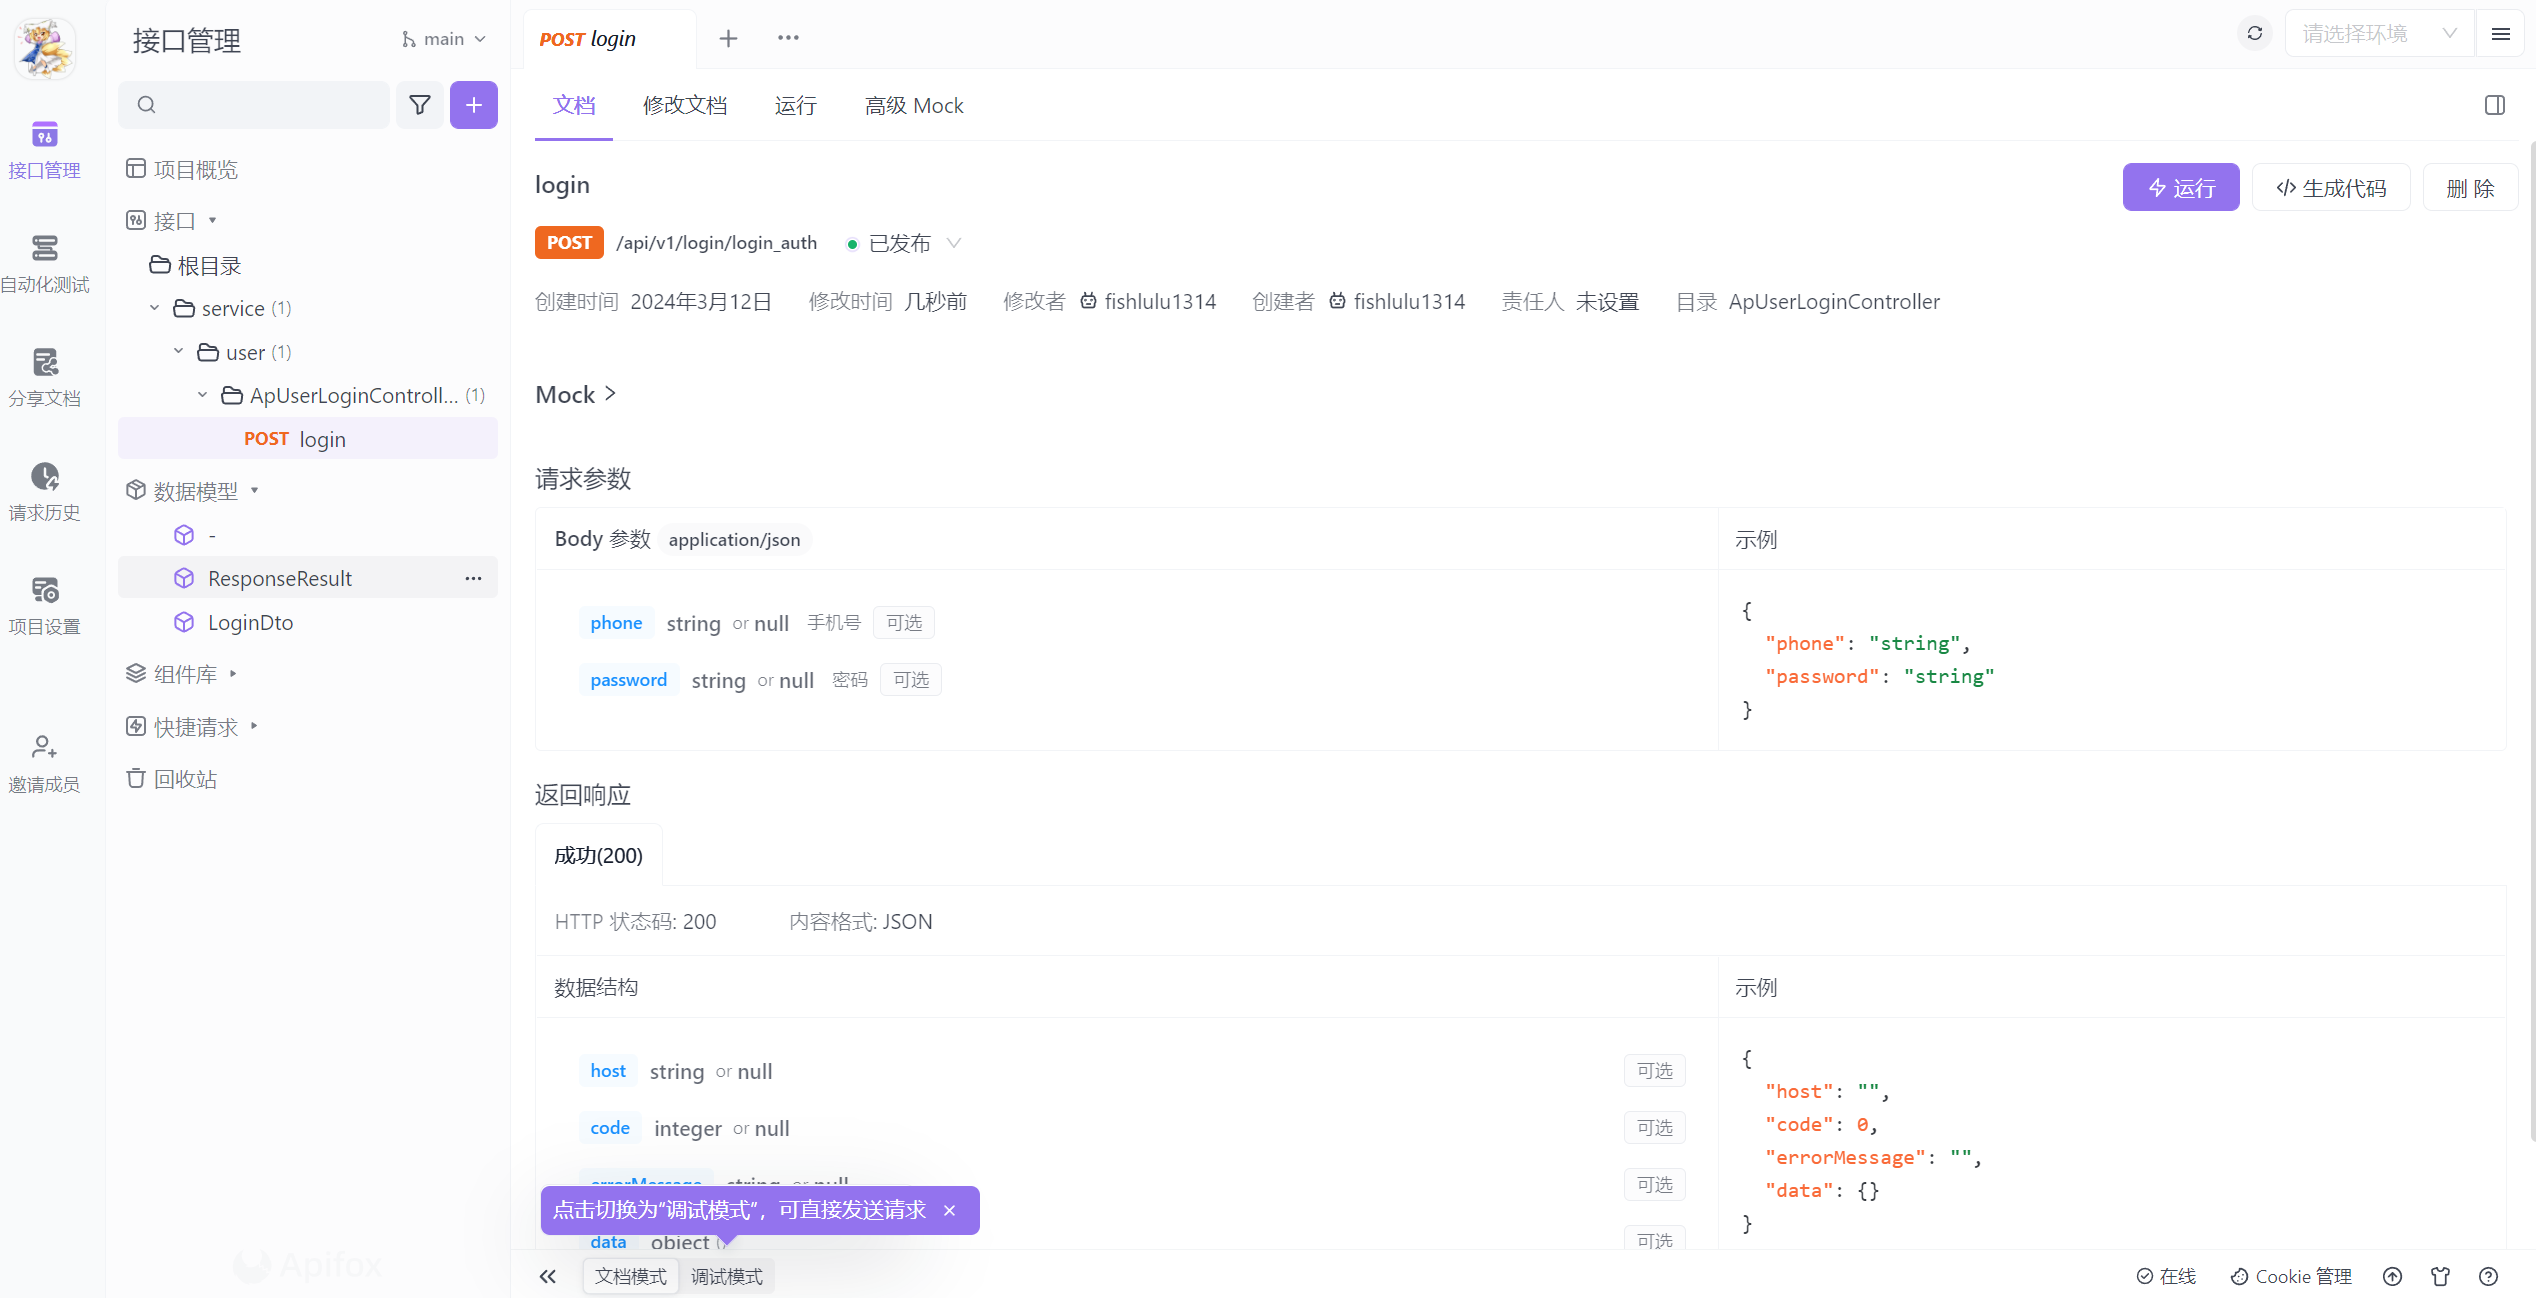
这里我打算使用apifox来平替swagger,因为它可以做到仅用javadoc和spring注解自动生成api文档,真正做到代码无侵入
下载apifox helper插件,然后新建项目,在接口文件夹根目录下创建/service/user文件夹,然后在apifox上面配置API访问令牌,把user模块按照下图对应到接口/service/user目录下面
网关
app端网关搭建
前端发送过来的请求要经过网关的路由和过滤才能发送给具体的微服务
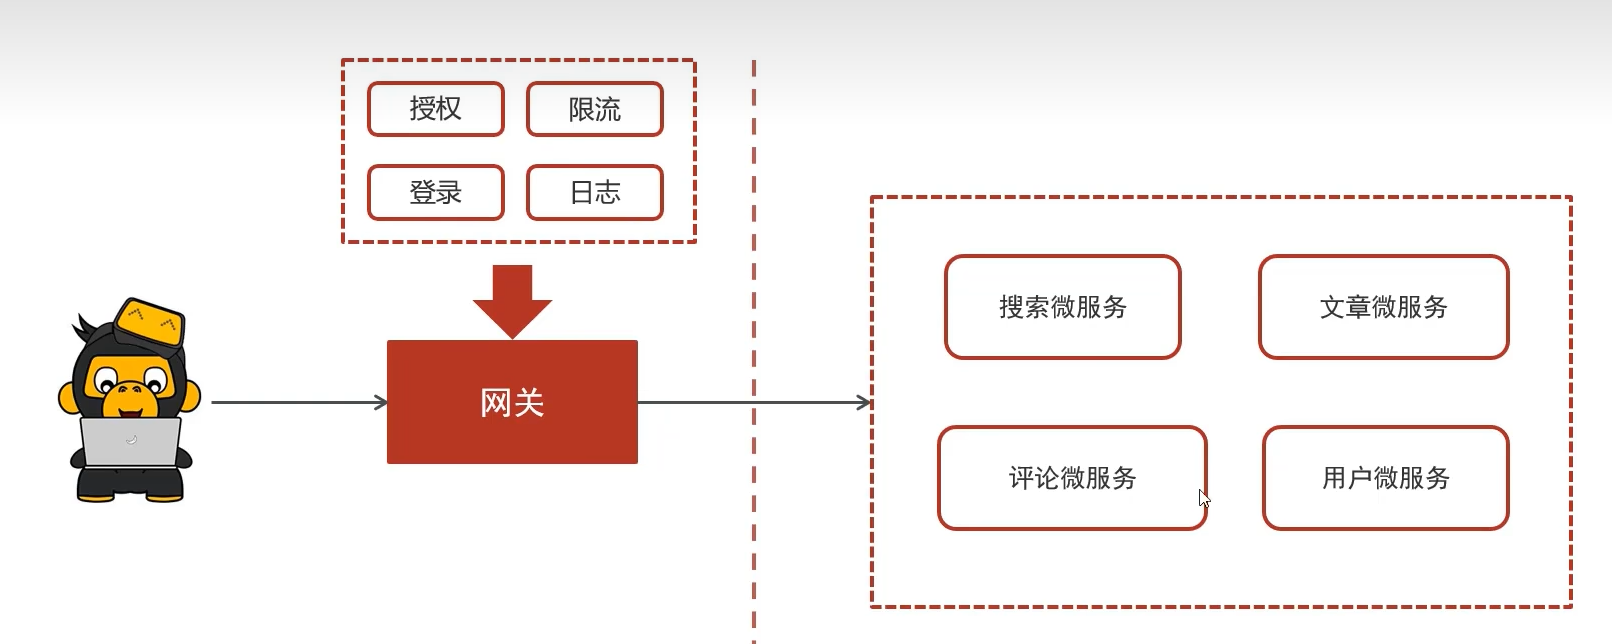
gateway网关微服务
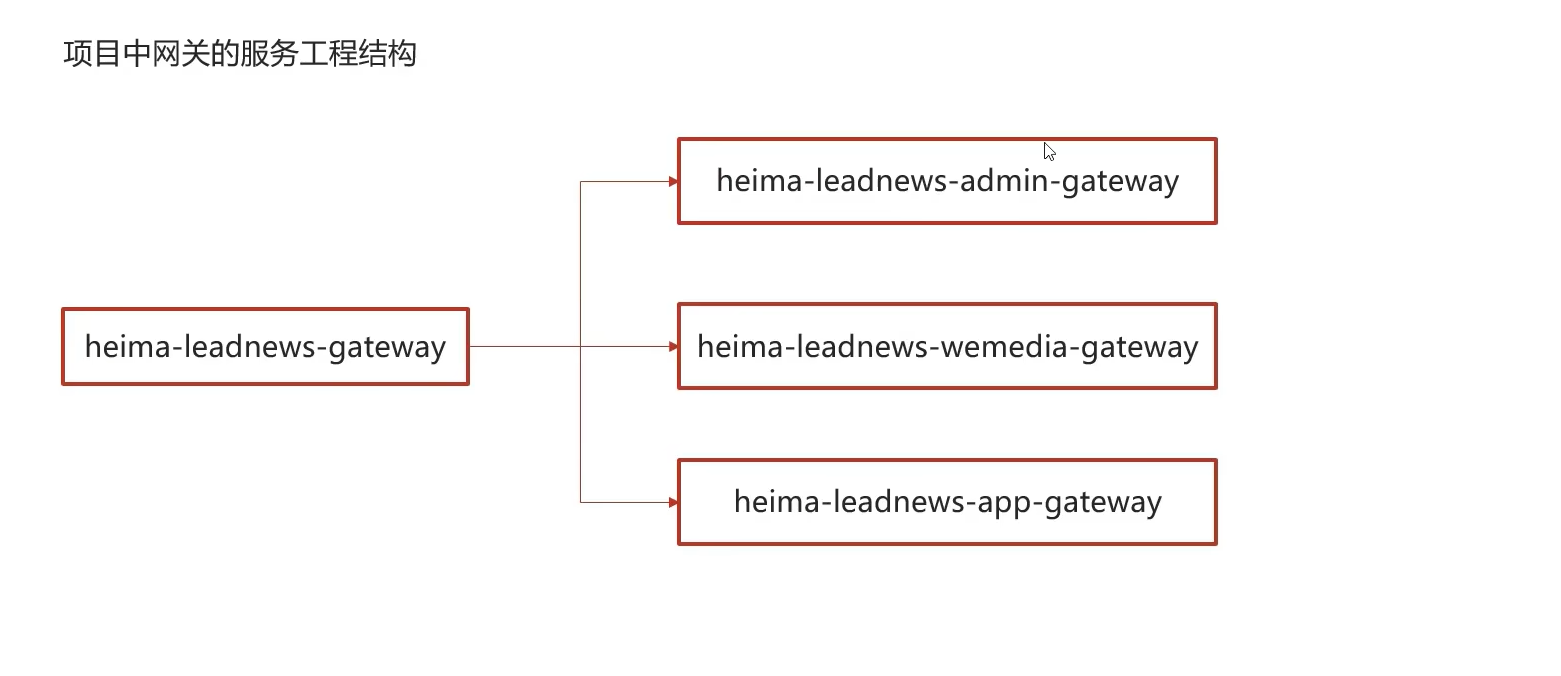
会一共设置三个网关,分别对应了设置的三个平台
模块搭建
- 导入依赖
将网关相关依赖导入到gateway微服务的pom文件中
<dependencies>
    <dependency>
        <groupId>org.springframework.cloud</groupId>
        <artifactId>spring-cloud-starter-gateway</artifactId>
    </dependency>
    <dependency>
        <groupId>com.alibaba.cloud</groupId>
        <artifactId>spring-cloud-starter-alibaba-nacos-discovery</artifactId>
    </dependency>
     <dependency>
            <groupId>com.alibaba.cloud</groupId>
            <artifactId>spring-cloud-starter-alibaba-nacos-config</artifactId>
        </dependency>
    <dependency>
        <groupId>io.jsonwebtoken</groupId>
        <artifactId>jjwt</artifactId>
    </dependency>
</dependencies>
- 创建app端网关模块
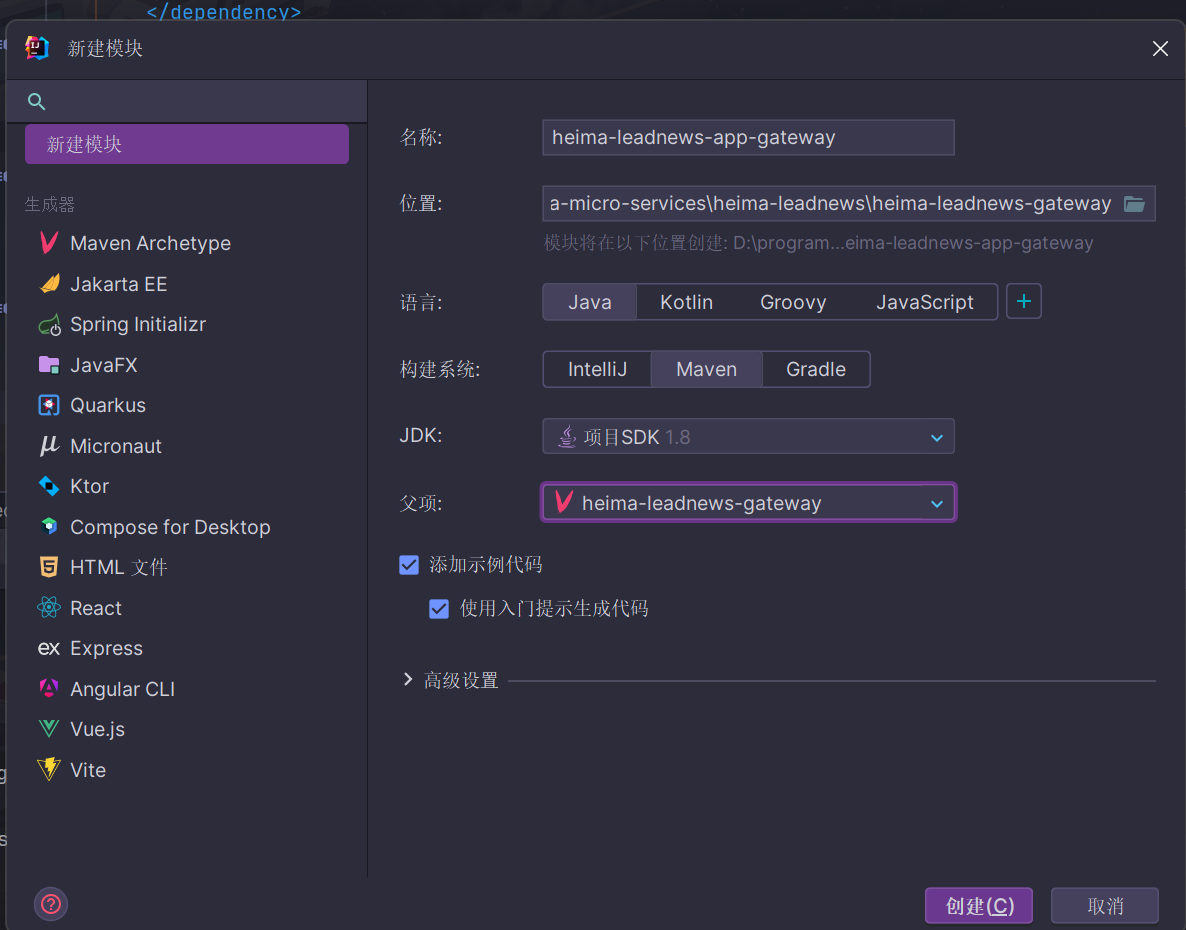
- 创建启动类和bootstrap.yml
package com.heima.app.gateway;

import org.springframework.boot.SpringApplication;
import org.springframework.boot.autoconfigure.SpringBootApplication;
import org.springframework.cloud.client.discovery.EnableDiscoveryClient;

@SpringBootApplication
@EnableDiscoveryClient
public class AppGatewayApplication {

    public static void main(String[] args) {
        SpringApplication.run(AppGatewayApplication.class, args);
    }
}
同样记得把地址改成自己的
server:
  port: 51601
spring:
  application:
    name: leadnews-app-gateway
  cloud:
    nacos:
      discovery:
        server-addr: hmtt:8848
      config:
        server-addr: hmtt:8848
        file-extension: yml
- 在nacos配置中心设置app网关配置(原来已经写好了,而且没有需要改动的地方)
spring:
  cloud:
    gateway:
      globalcors:
        add-to-simple-url-handler-mapping: true
        corsConfigurations:
          '[/**]':
            allowedHeaders: "*"
            allowedOrigins: "*"
            allowedMethods:
              - GET
              - POST
              - DELETE
              - PUT
              - OPTION
      routes:
        # 用户微服务
        - id: user
          uri: lb://leadnews-user
          predicates:
            - Path=/user/**
          filters:
            - StripPrefix= 1
        # 文章微服务
        - id: article
          uri: lb://leadnews-article
          predicates:
            - Path=/article/**
          filters:
            - StripPrefix= 1
        #搜索微服务
        - id: leadnews-search
          uri: lb://leadnews-search
          predicates:
            - Path=/search/**
          filters:
            - StripPrefix= 1
        #行为微服务
        - id: leadnews-behavior
          uri: lb://leadnews-behavior
          predicates:
            - Path=/behavior/**
          filters:
            - StripPrefix= 1
        #评论微服务
        - id: leadnews-comment
          uri: lb://leadnews-comment
          predicates:
            - Path=/comment/**
          filters:
            - StripPrefix= 1
功能测试
首先进入login接口测试,在右上角设置开发环境,提那家用户app网关服务url前缀http://localhost:51601/user
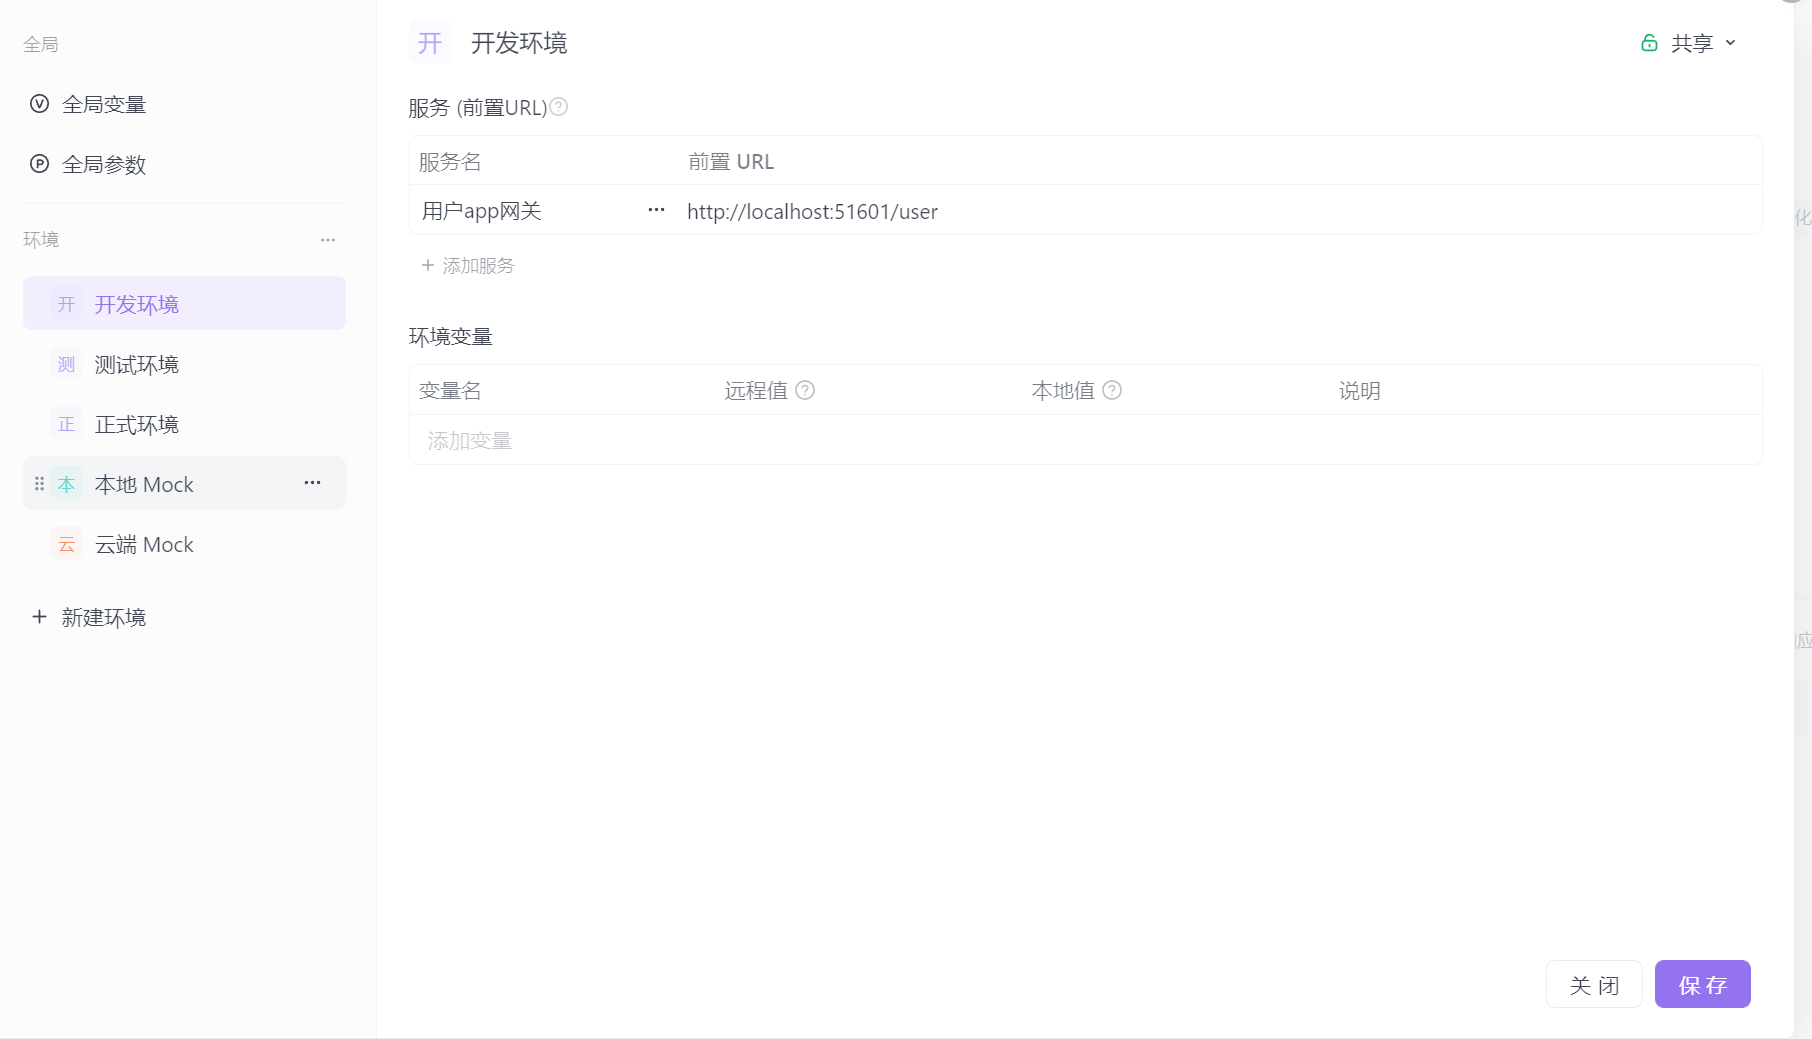
开启user微服务和网关微服务
发送请求测试成功
认证过滤器
全局过滤器实现jwt校验
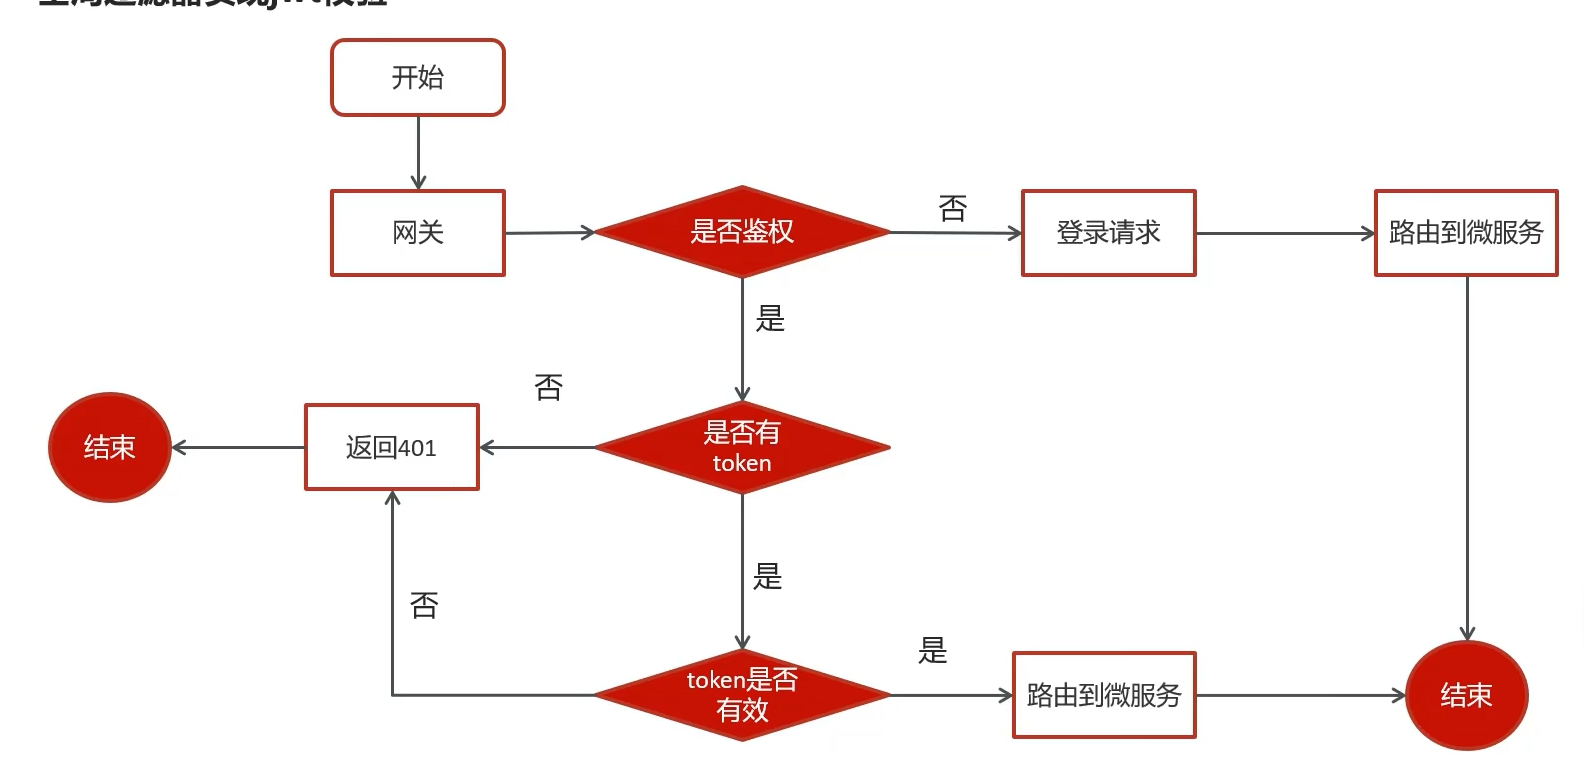
想起来了吗,苍穹外卖jwt校验是通过拦截器实现的,这里转变为由网关负责了
自定义网关过滤器
package com.heima.app.gateway.filter;

@Component
@Slf4j
public class AuthorizeFilter implements Ordered, GlobalFilter {

    /**
     * 过滤器逻辑
     * @param exchange
     * @param chain
     * @return
     */
    @Override
    public Mono<Void> filter(ServerWebExchange exchange, GatewayFilterChain chain) {
        ServerHttpResponse response = exchange.getResponse();
        //判断是否是登录请求
        String path = exchange.getRequest().getURI().getPath();
        if (path.contains("/login")) {
            return chain.filter(exchange);
        }
        //判断是否携带了token
        String token = exchange.getRequest().getHeaders().getFirst("token");//前端约定的token名称
        //如果token为空,直接返回验证失败
        if(StringUtils.isBlank(token)){
            response.setStatusCode(HttpStatus.UNAUTHORIZED);
            return response.setComplete();
        }
        try {
            //判断token是否有效
            int result = AppJwtUtil.verifyToken(AppJwtUtil.getClaimsBody(token));
            //如果过期
            if(result == 1 || result == 2){
                response.setStatusCode(HttpStatus.UNAUTHORIZED);
                return response.setComplete();
            }
        } catch (Exception e) {//可能会解析异常
            e.printStackTrace();
            response.setStatusCode(HttpStatus.UNAUTHORIZED);
            return response.setComplete();
        }
        //放行
        return chain.filter(exchange);
    }

    /**
     * 过滤器执行顺序,返回值越小,执行优先级越高
     * @return
     */
    @Override
    public int getOrder() {
        return 0;
    }
}
由于gateway模块没有引入common模块和util模块的依赖,因此需要单独把util模块中的AppJwtUtil类复制到util包下面,然后对上述解析token'部分进行try-catch包围
前端集成
nginx配置
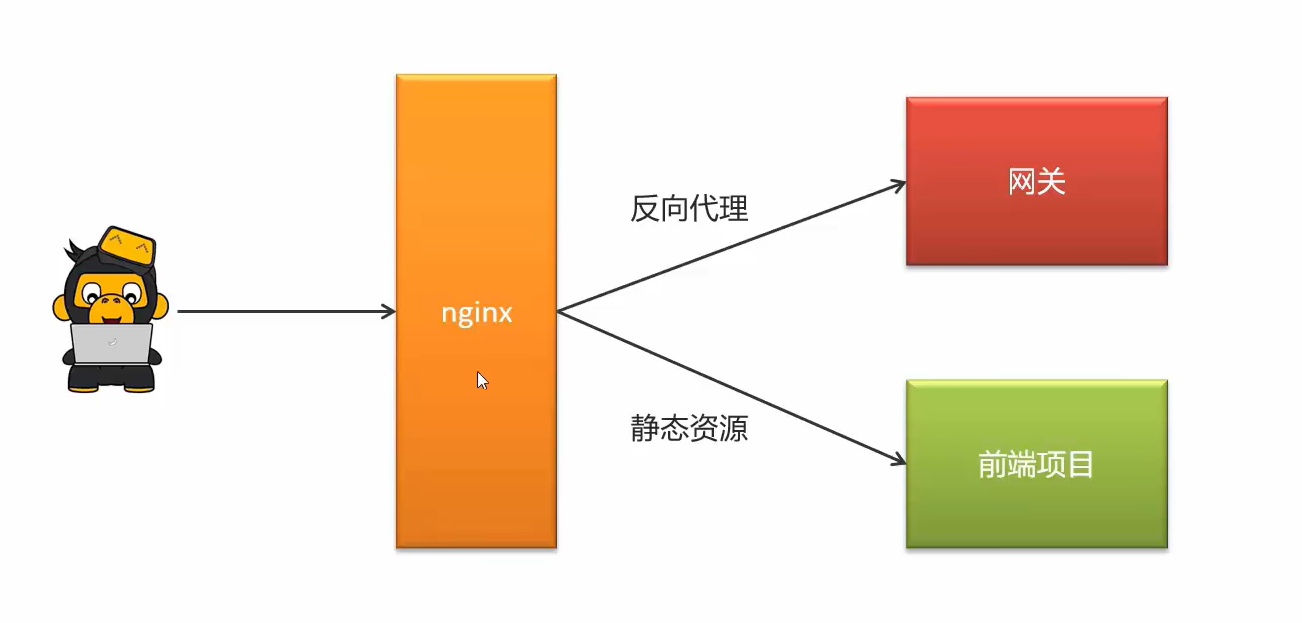
通过nginx来进行配置,功能如下
- 通过nginx的反向代理功能访问后台的网关资源
- 通过nginx的静态服务器功能访问前端静态页面
配置nginx
这里就把nginx配置在本地了,等之后部署上线前端的时候再一起用docker配置
①:解压资料文件夹中的压缩包nginx-1.18.0.zip
②:解压资料文件夹中的前端项目app-web.zip
③:配置nginx.conf文件
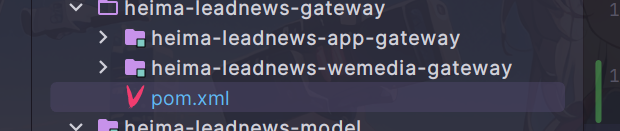
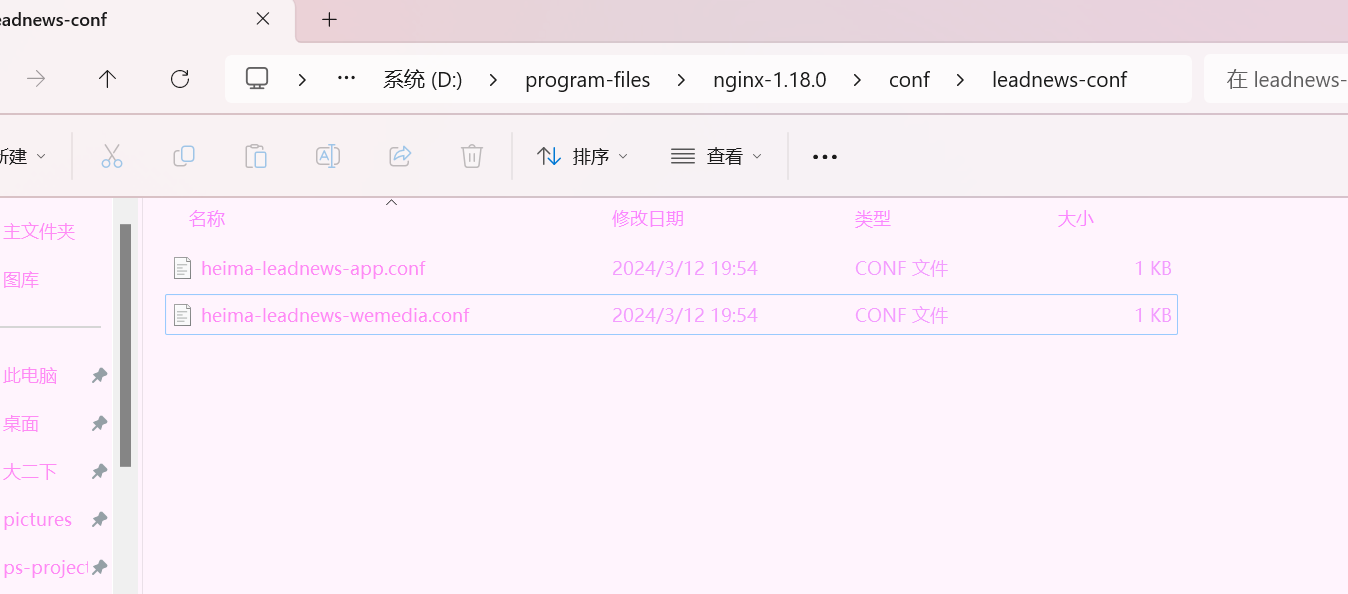
在nginx安装的conf目录下新建一个文件夹leadnews-conf,在当前文件夹中新建heima-leadnews-app.conf文件
这里觉得文件夹用
.来命名容易引起歧义,因此自己改成用-来代替了
heima-leadnews-app.conf配置如下:
记得把路径改成自己规定存放前端项目的路径
upstream  heima-app-gateway{
    server localhost:51601;
}

server {
	listen 8801;
	location / {
		root D:/programming-saves/env/hmtt/frontend-env/app-web/;
		index index.html;
	}

	location ~/app/(.*) {
		proxy_pass http://heima-app-gateway/$1;
		proxy_set_header HOST $host;  # 不改变源请求头的值
		proxy_pass_request_body on;  #开启获取请求体
		proxy_pass_request_headers on;  #开启获取请求头
		proxy_set_header X-Real-IP $remote_addr;   # 记录真实发出请求的客户端IP
		proxy_set_header X-Forwarded-For $proxy_add_x_forwarded_for;  #记录代理信息
	}
}
nginx.conf 把里面注释的内容和静态资源配置相关删除,引入heima-leadnews-app.conf文件加载
#user  nobody;
worker_processes  1;

events {
    worker_connections  1024;
}
http {
    include       mime.types;
    default_type  application/octet-stream;
    sendfile        on;
    keepalive_timeout  65;
	# 引入自定义配置文件
	include leadnews-conf/*.conf;
}
启动app前端工程
④ :启动nginx
在nginx安装包中使用命令提示符打开,输入命令nginx启动项目
可查看进程,检查nginx是否启动
重新加载配置文件:nginx -s reload
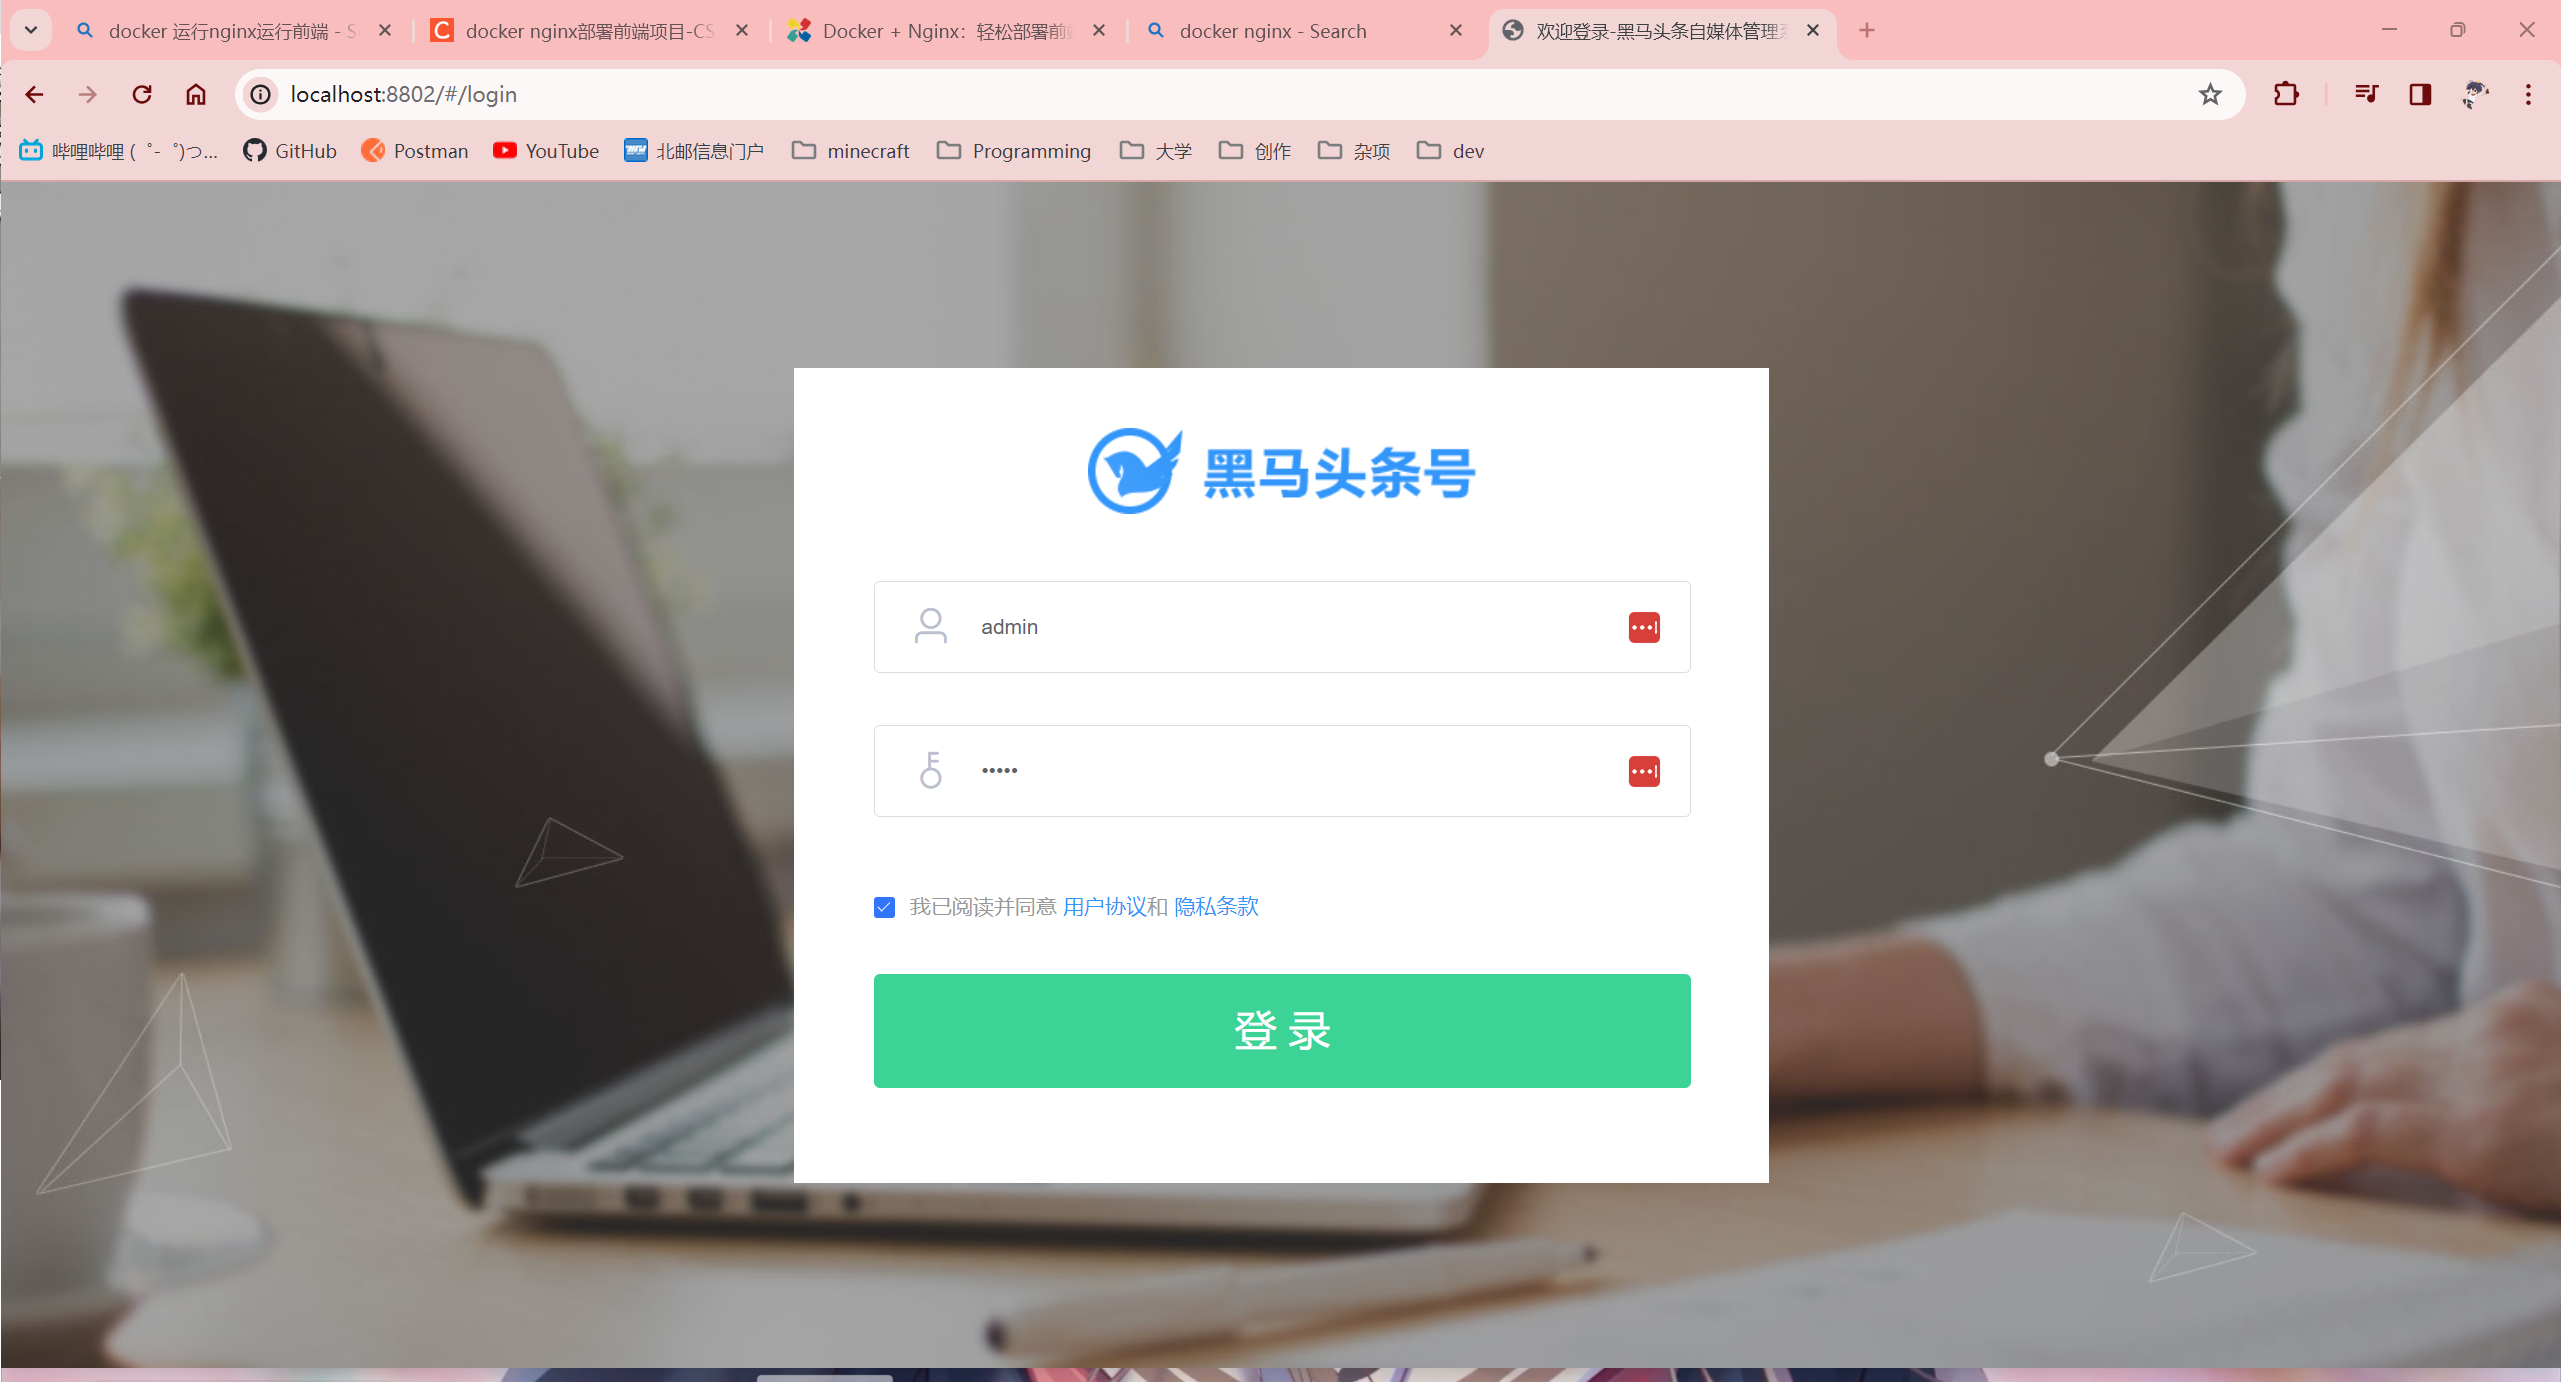
⑤:打开前端项目进行测试 -- > http://localhost:8801
用谷歌浏览器打开,调试移动端模式进行访问
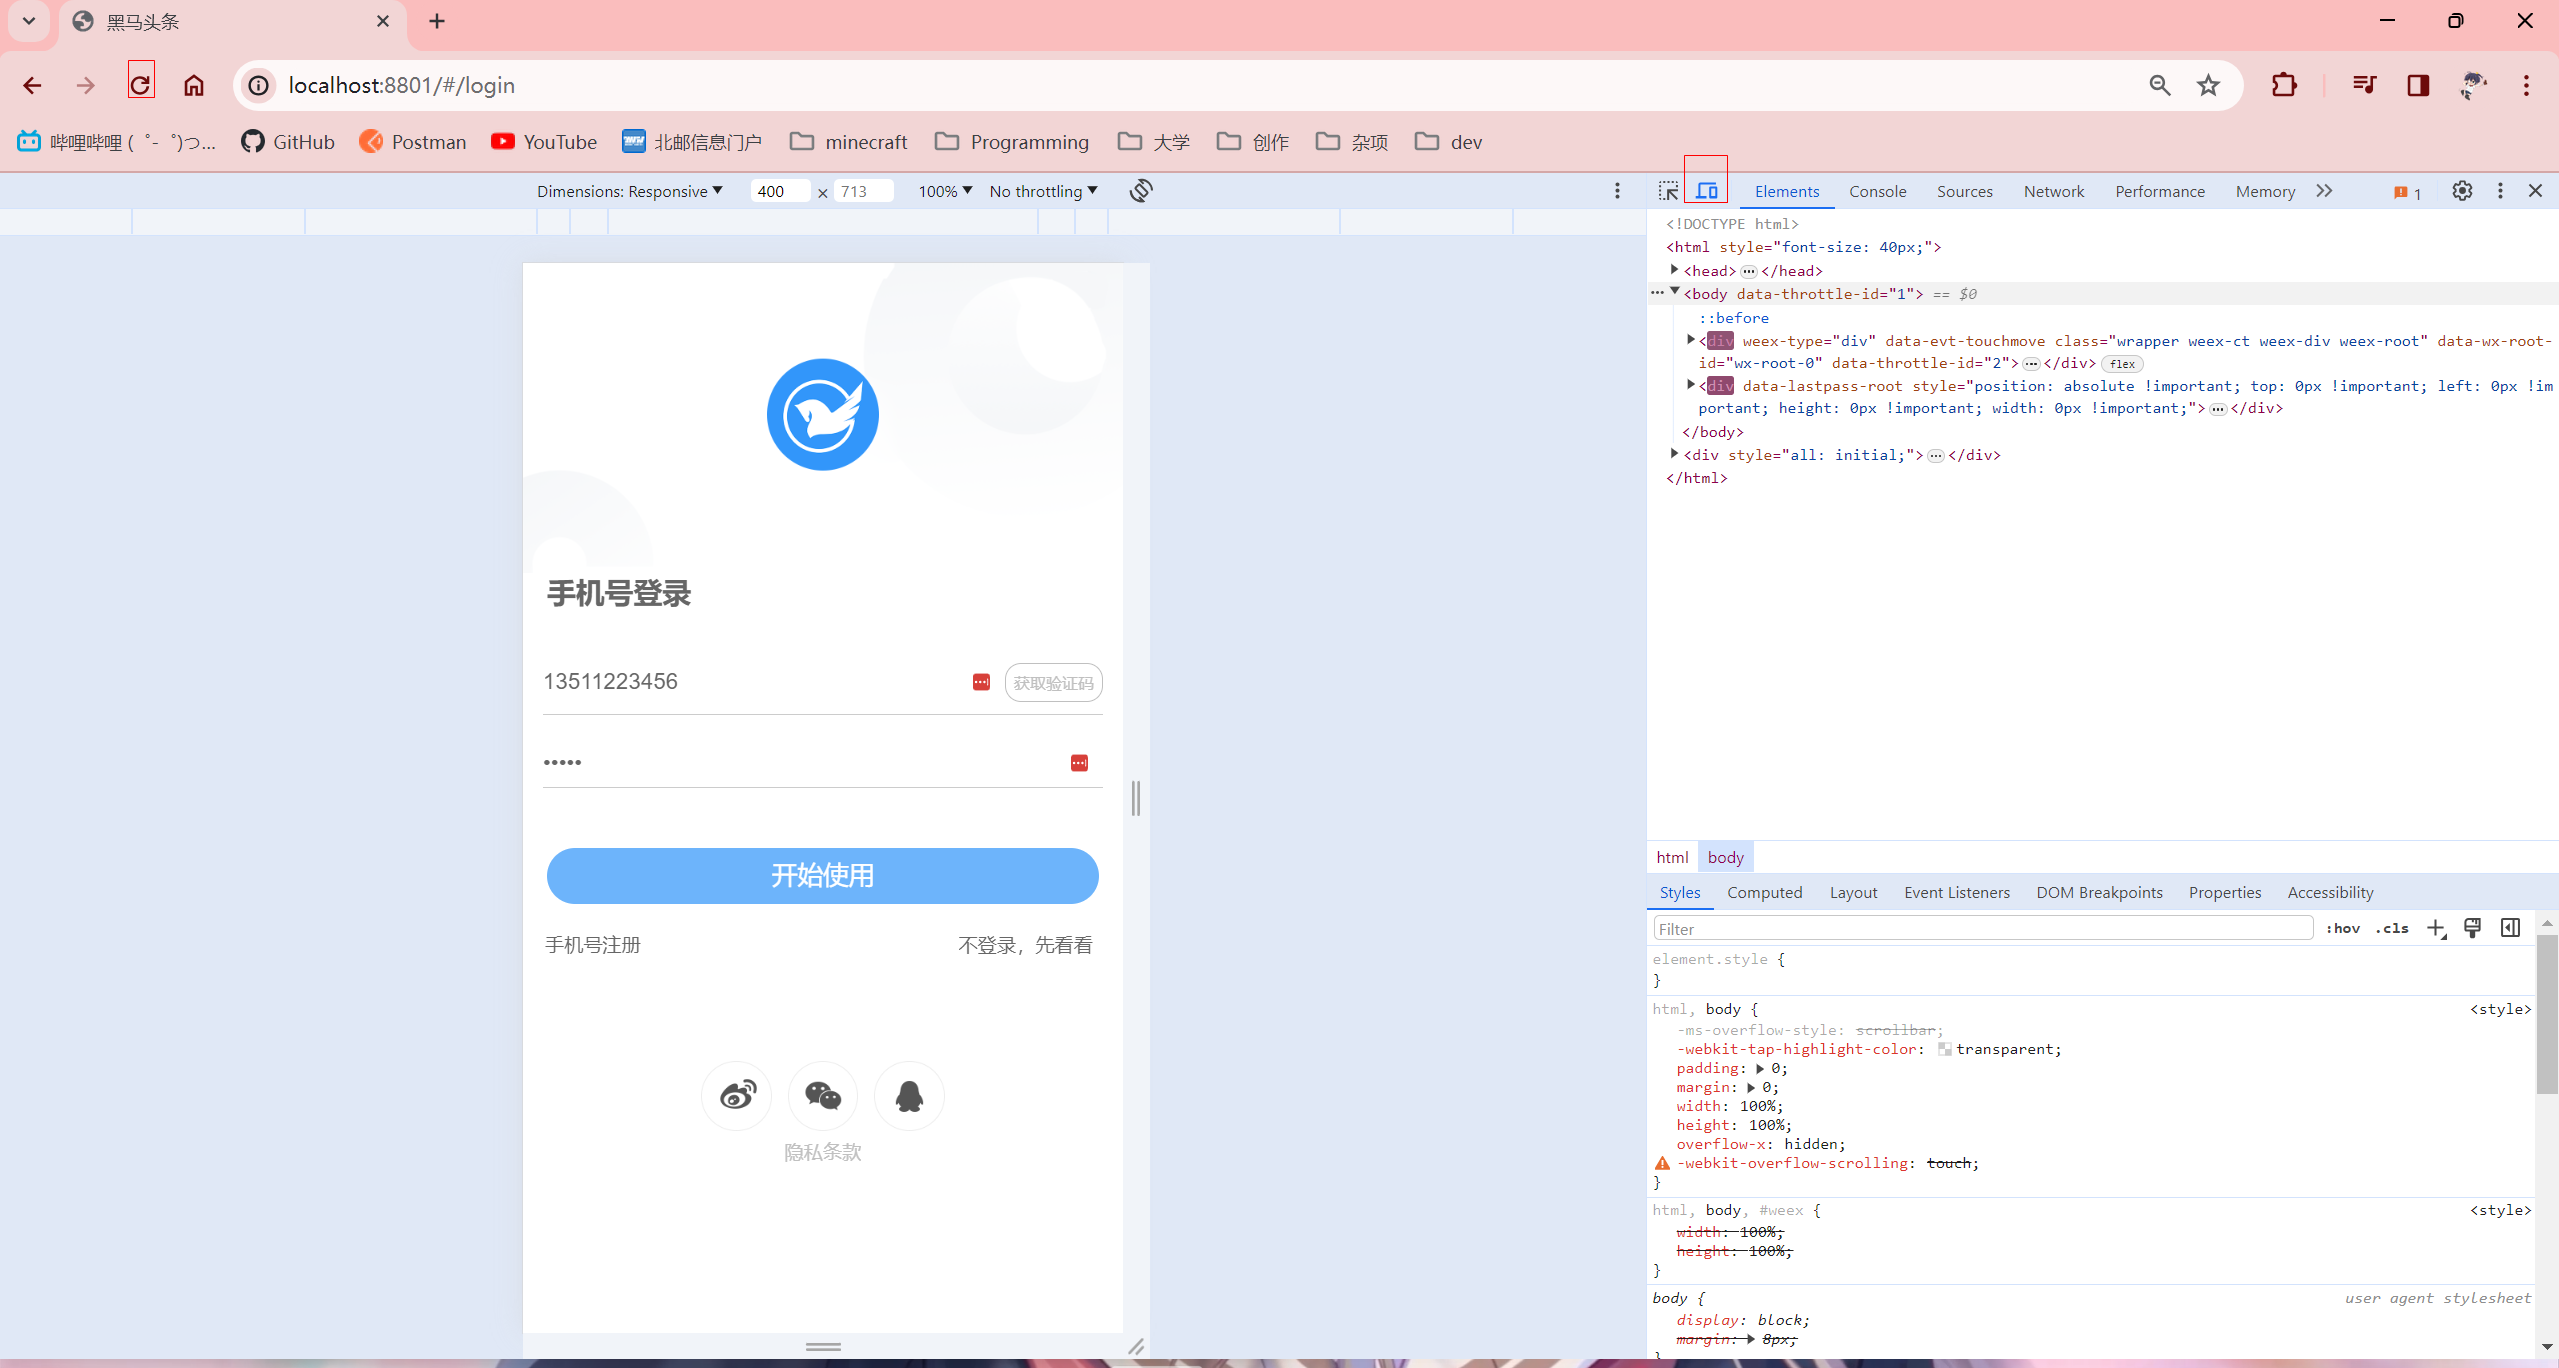
登录接口也请求成功了
Day02 2024.03.12 APP文章展示
学习内容
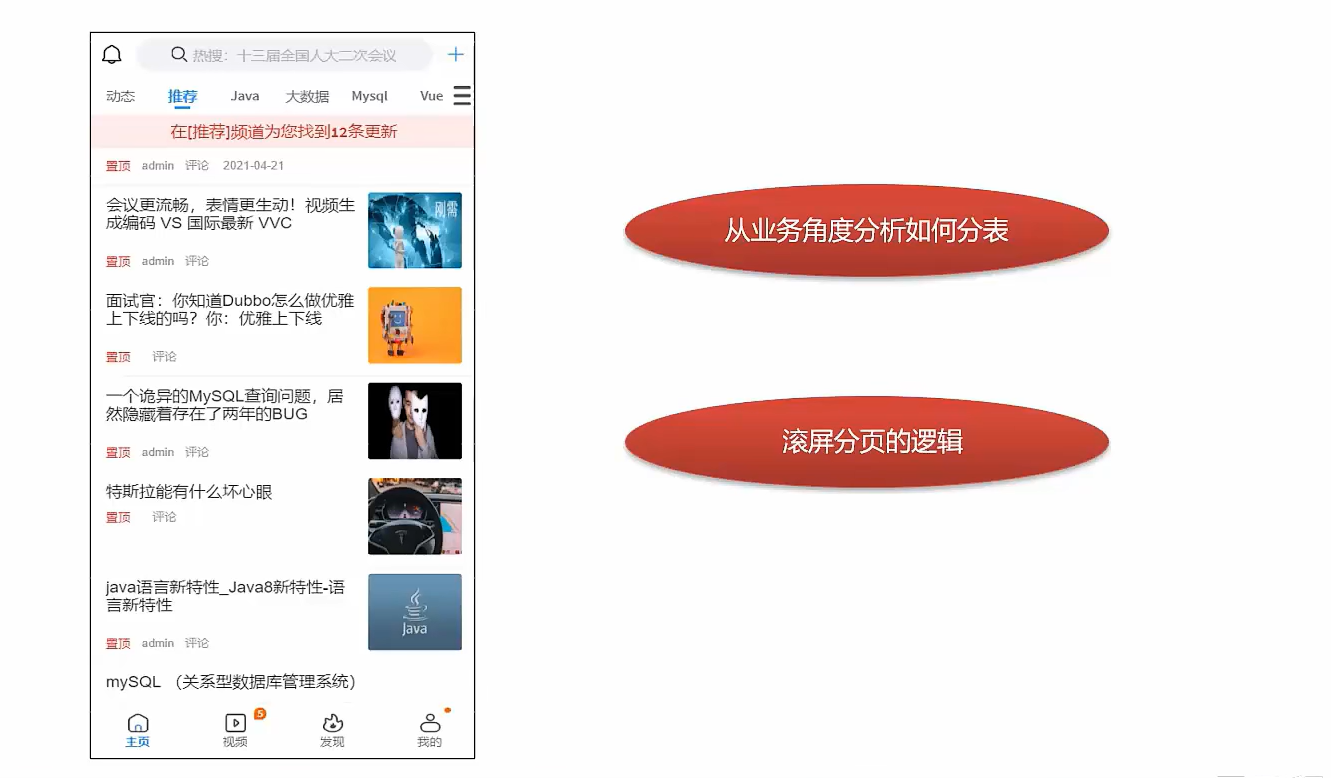
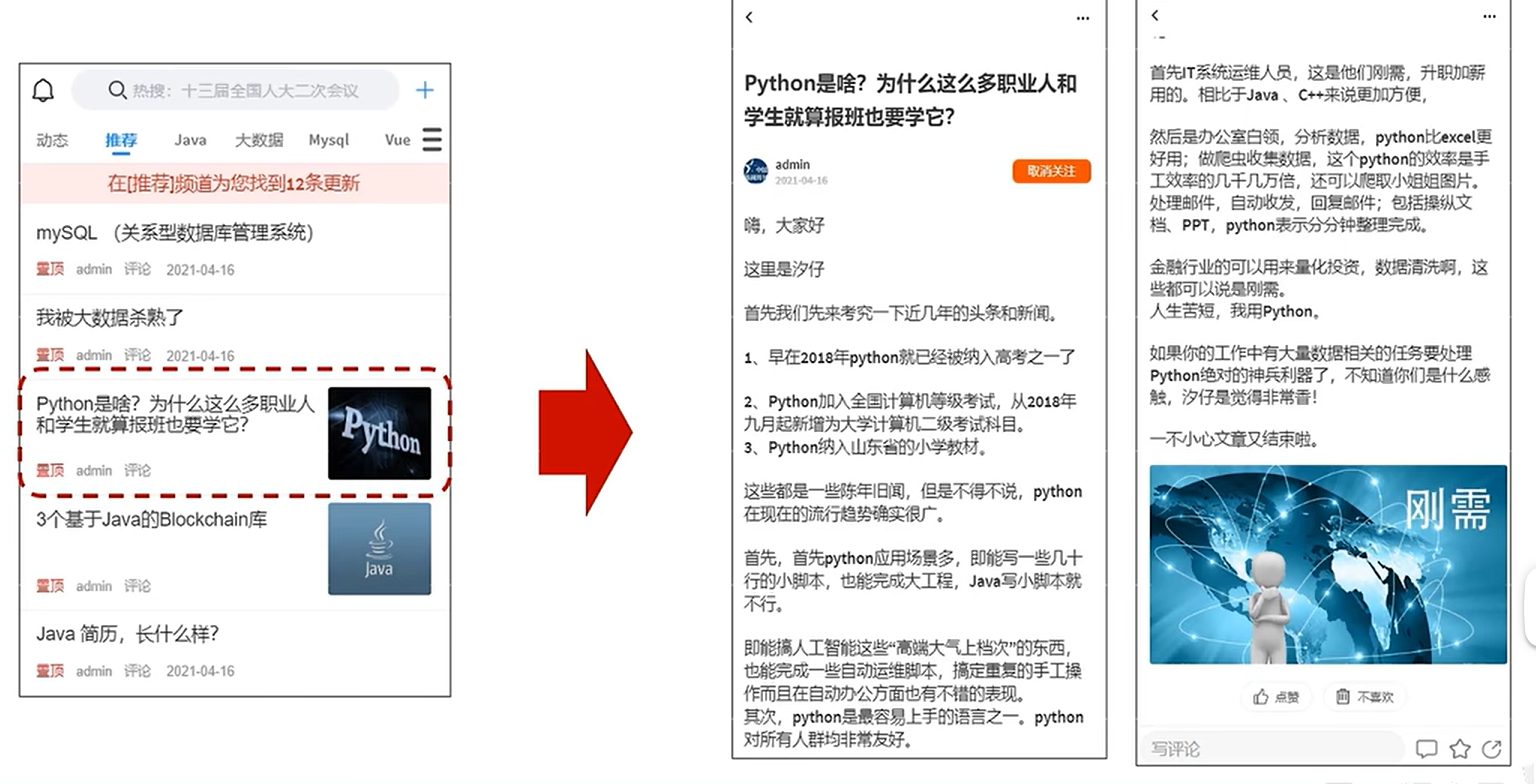
app端文章列表
需求分析
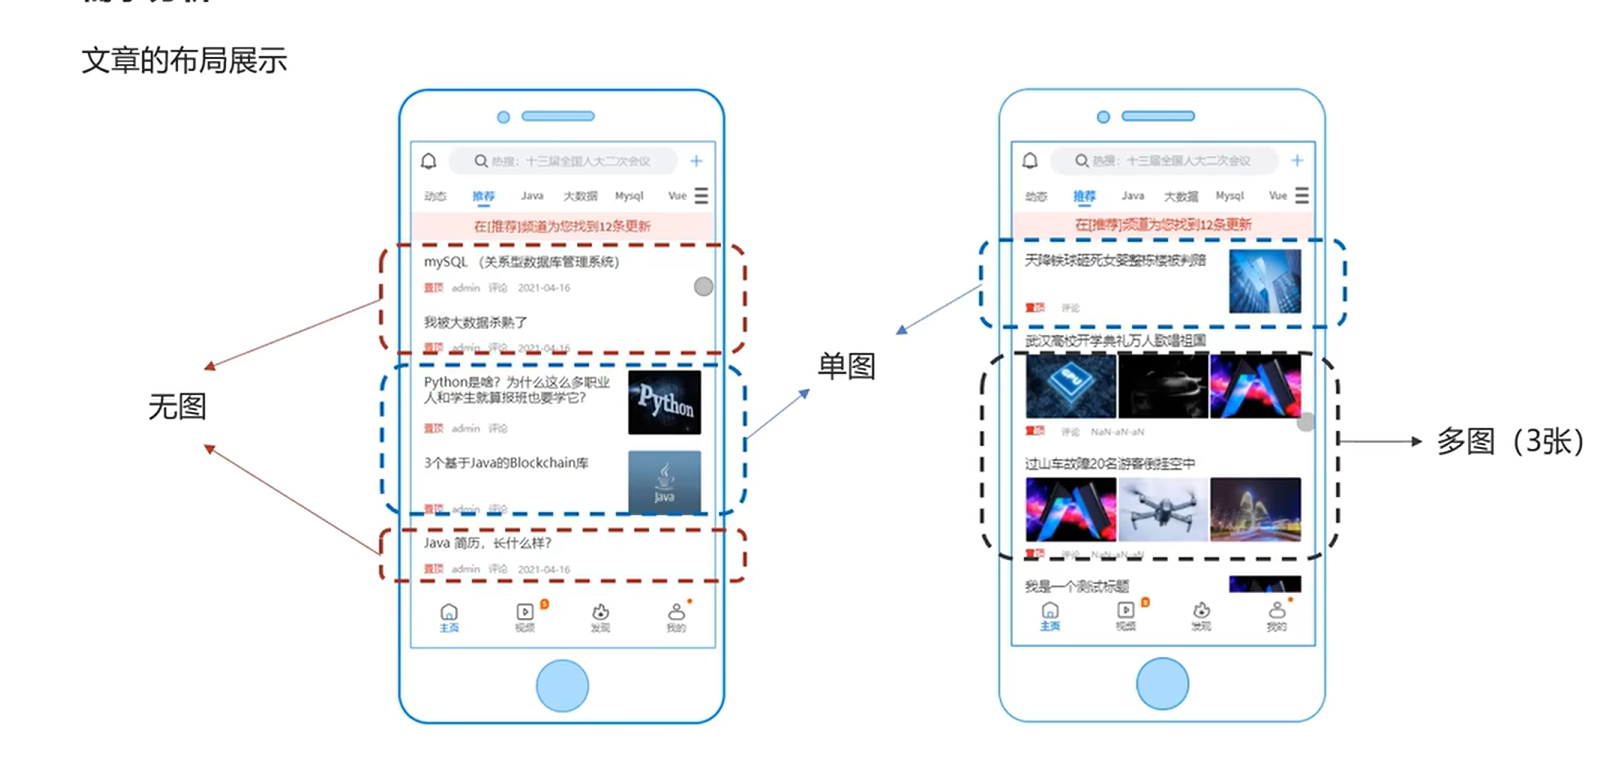
文章的布局
表结构分析
导入文章数据库
执行资料提供的脚本,还放在之前虚拟机创建的mysql8容器上面
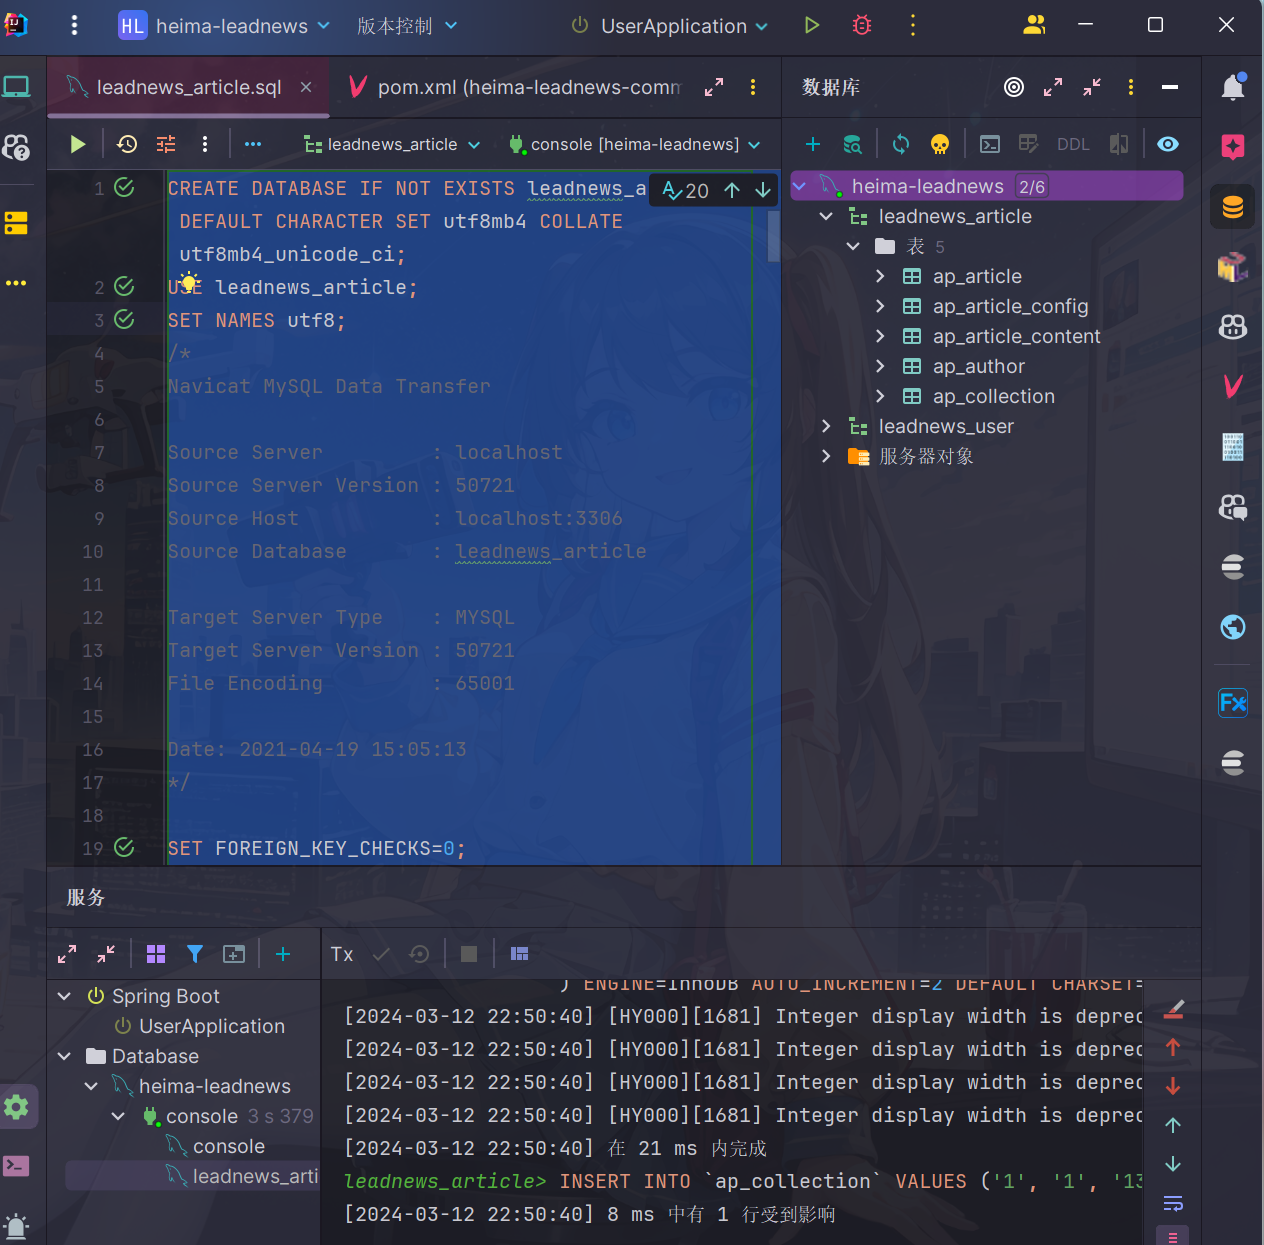
表结构
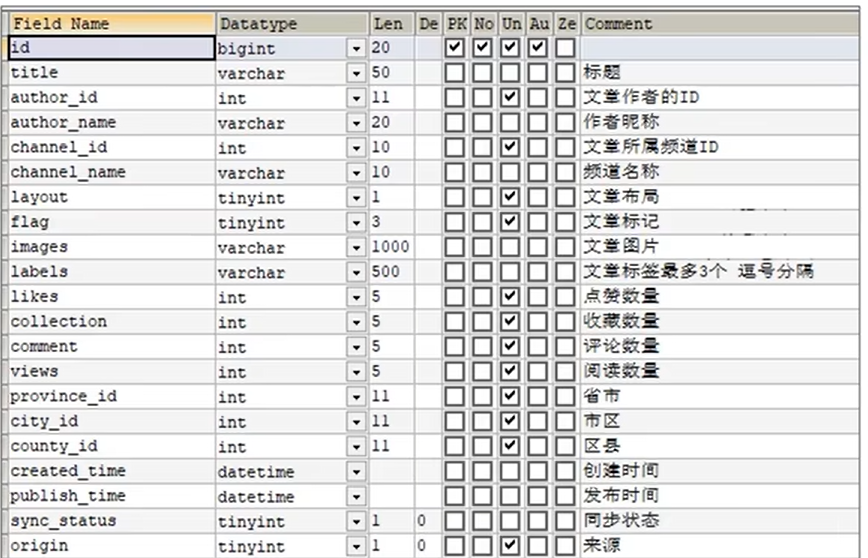
- 文章基本信息表
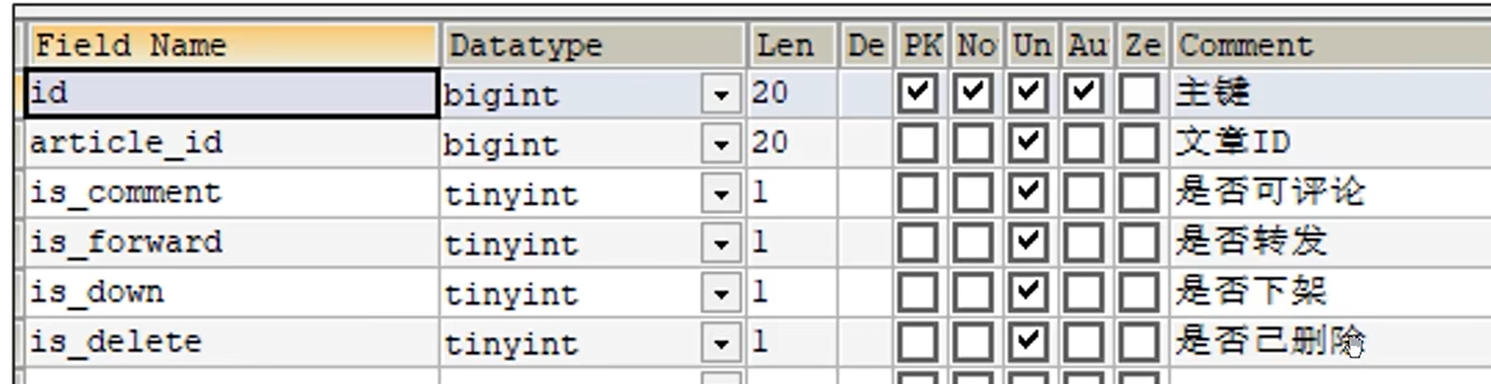
- 文章配置表
- 文章内容表

这里由于文章内容文本量可能会很大,用的是longtext来存储
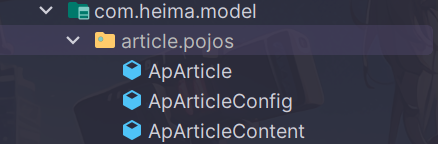
把资料中三个表对应实体类拷贝到model/pojos下面
❓明明上述表内容都是一对一的关系,为什么要分多张表来进行查询?
->这叫做
垂直分表:将一个表的字段分散到多个表中,每个表存储其中一部分字段优势:
- 减少IO争抢,减少锁表的几率,查看文章概述与文章详情互不影响
- 充分发挥高频数据的操作效率,对文章概述数据操作的高效率不会被操作文章详情数据的低效率所拖累
拆分规则
- 把不常用的字段单独放在一张表
- 把text,blob((Binary Large Object),用于存储大容量的二进制数据。如图像、音频、视频、文档或其他任何类型的非文本数据)等大字段拆分出来单独放在一张表
- 经常组合查询的字段单独放在一张表中
实现思路
-
在默认频道展示10条文章信息
-
可以切换频道查看不同种类的文章
-
当用户下拉可以加载最新的文章(分页)
-
当用户上拉可以加载更多的文章信息(按照发布时间越来越早)
-
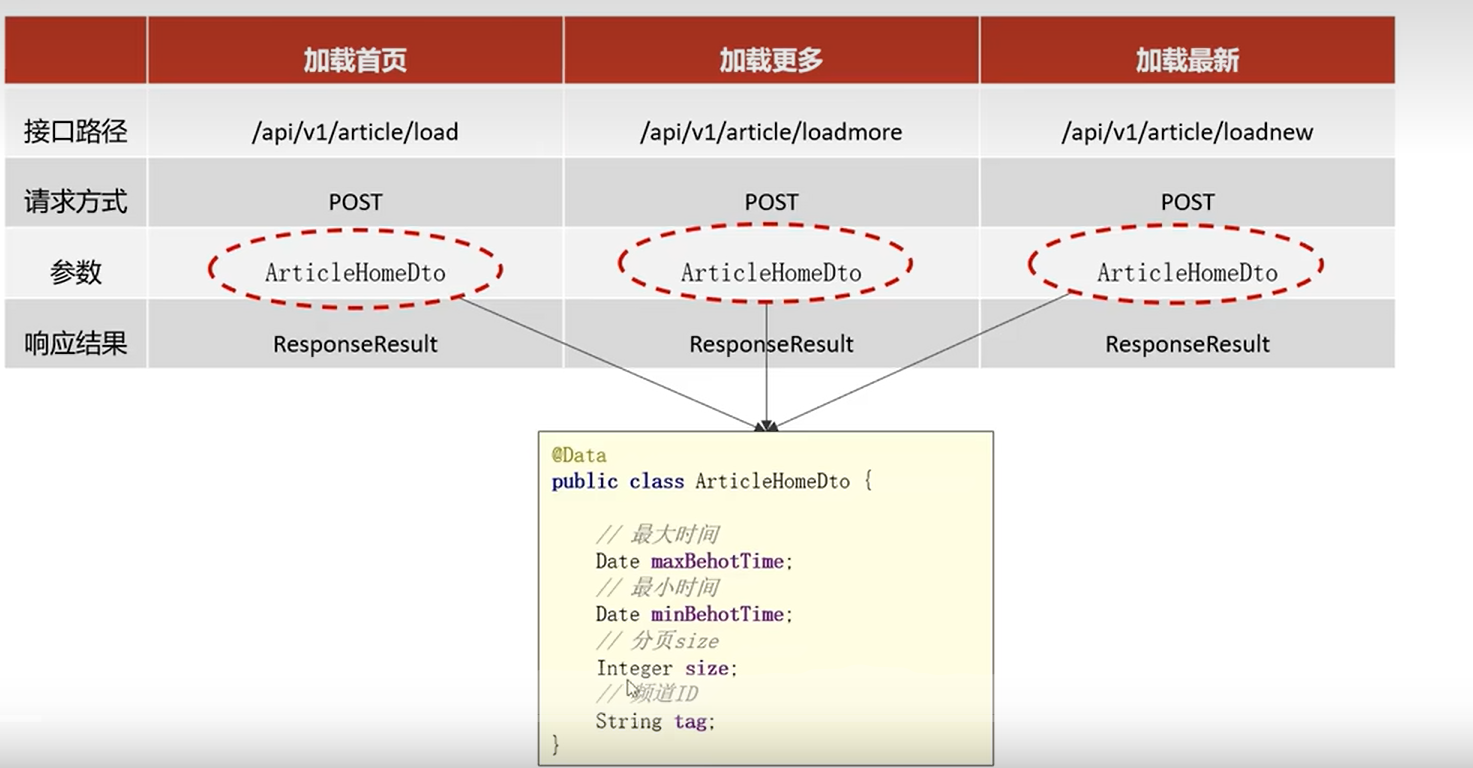
如果是当前频道的首页,前端传递默认参数:
maxBehotTIme:0毫秒
minBehotTime:2*1013 毫秒(时间戳对应为2063年,即默认可以查询到发布时间在2063年之前的文章,一般这种资讯类的软件活不了几年,因此这种千年虫问题大可不必担心(大概))
接口定义
代码实现
导入微服务
解压文件夹到项目目录并放在service模块下面
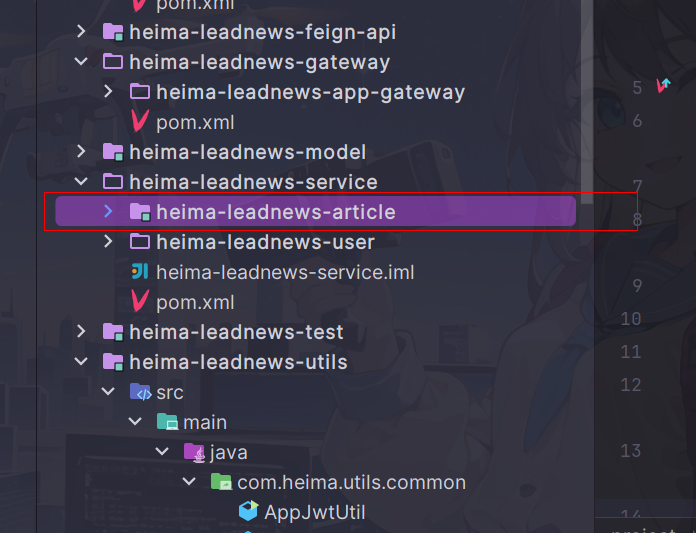
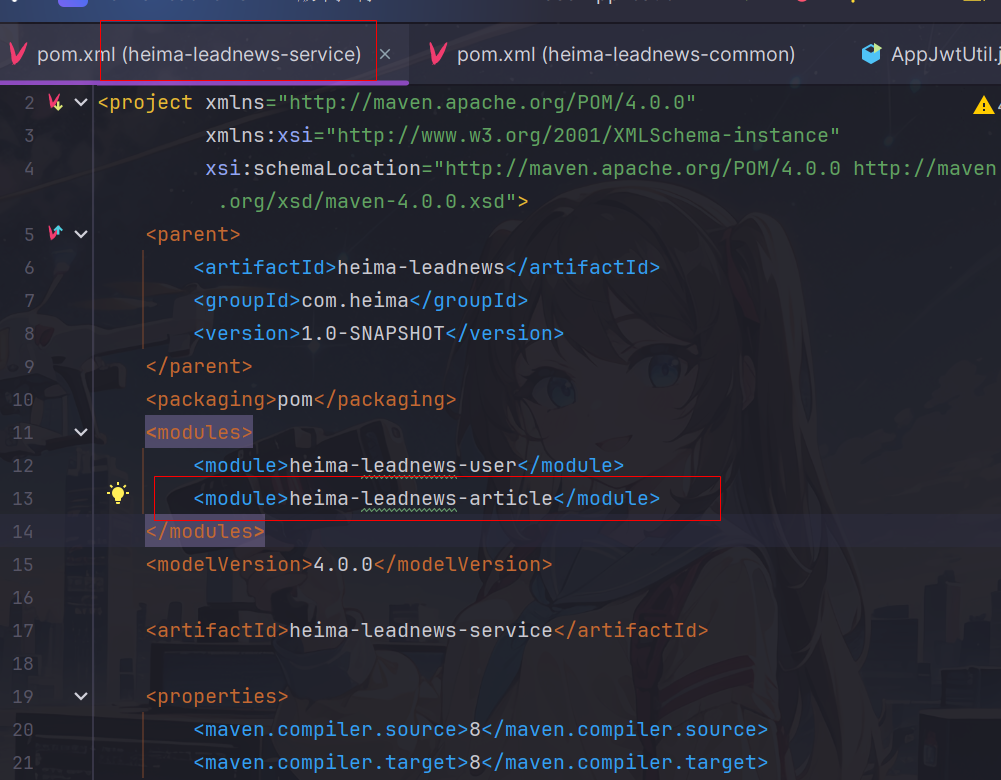
在service模块配置article模块为子模块
修改模块的配置信息,如bootstrap,logback.xml
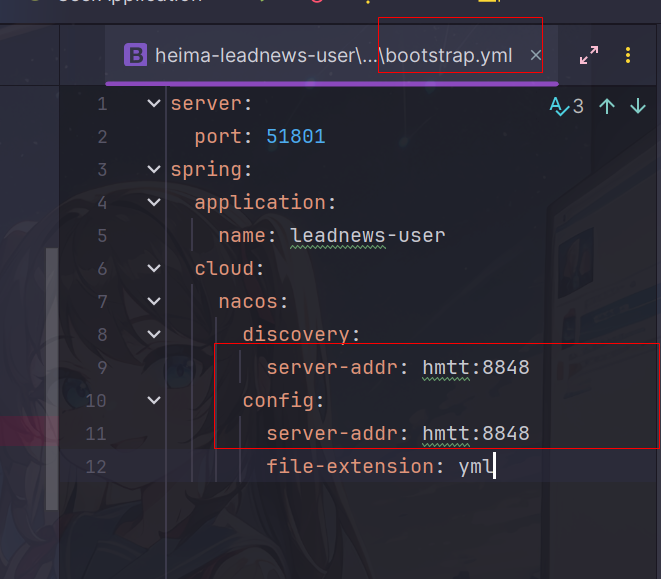
配置nacos相关配置
顺便把配置里面地址密码都换成自己的吧,观察仔细一些
spring:
  redis:
    host: hmtt
    password: leadnews
    port: 6379
  kafka:
    bootstrap-servers: hmtt:9092
    producer:
      retries: 10
      key-serializer: org.apache.kafka.common.serialization.StringSerializer
      value-serializer: org.apache.kafka.common.serialization.StringSerializer
    consumer:
      group-id: ${spring.application.name}
      key-deserializer: org.apache.kafka.common.serialization.StringDeserializer
      value-deserializer: org.apache.kafka.common.serialization.StringDeserializer
  datasource:
    driver-class-name: com.mysql.jdbc.Driver
    url: jdbc:mysql://hmtt:3306/leadnews_article?useUnicode=true&characterEncoding=UTF-8&serverTimezone=UTC&useSSL=false
    username: root
    password: 123456
# 设置Mapper接口所对应的XML文件位置,如果你在Mapper接口中有自定义方法,需要进行该配置
mybatis-plus:
  mapper-locations: classpath*:mapper/*.xml
  # 设置别名包扫描路径,通过该属性可以给包中的类注册别名
  type-aliases-package: com.heima.model.article.pojos
  global-config:
    datacenter-id: 1
    workerId: 1

minio:
  accessKey: minio
  secretKey: minio123
  bucket: leadnews
  endpoint: http://hmtt:9000
  readPath: http://hmtt:9000
xxl:
  job:
    admin:
      addresses: http://hmtt:8888/xxl-job-admin
    executor:
      appname: leadnews-hot-article-executor
      port: 9999
kafka:
  hosts: hmtt:9092
  group: ${spring.application.name}
model模块导入ArticleHomeDto
package com.heima.model.article.dtos;

import lombok.Data;

import java.util.Date;

@Data
public class ArticleHomeDto {

    /**
     * 最大时间
     */
    Date maxBehotTime;
    /**
     * 最小时间
     */
    Date minBehotTime;
    /**
     * 分页size
     */
    Integer size;
    /**
     * 频道ID
     */
    String tag;
}
导入mapper.xml
<?xml version="1.0" encoding="UTF-8"?>
<!DOCTYPE mapper PUBLIC "-//mybatis.org//DTD Mapper 3.0//EN" "http://mybatis.org/dtd/mybatis-3-mapper.dtd">
<mapper namespace="com.heima.article.mapper.ApArticleMapper">

    <resultMap id="resultMap" type="com.heima.model.article.pojos.ApArticle">
        <id column="id" property="id"/>
        <result column="title" property="title"/>
        <result column="author_id" property="authorId"/>
        <result column="author_name" property="authorName"/>
        <result column="channel_id" property="channelId"/>
        <result column="channel_name" property="channelName"/>
        <result column="layout" property="layout"/>
        <result column="flag" property="flag"/>
        <result column="images" property="images"/>
        <result column="labels" property="labels"/>
        <result column="likes" property="likes"/>
        <result column="collection" property="collection"/>
        <result column="comment" property="comment"/>
        <result column="views" property="views"/>
        <result column="province_id" property="provinceId"/>
        <result column="city_id" property="cityId"/>
        <result column="county_id" property="countyId"/>
        <result column="created_time" property="createdTime"/>
        <result column="publish_time" property="publishTime"/>
        <result column="sync_status" property="syncStatus"/>
        <result column="static_url" property="staticUrl"/>
    </resultMap>
    <select id="loadArticleList" resultMap="resultMap">
        SELECT
        aa.*
        FROM
        `ap_article` aa
        LEFT JOIN ap_article_config aac ON aa.id = aac.article_id
        <where>
            and aac.is_delete != 1
            and aac.is_down != 1
            <!-- loadmore -->
            <if test="type != null and type == 1">
                and aa.publish_time <![CDATA[<]]> #{dto.minBehotTime}
            </if>
            <if test="type != null and type == 2">
                and aa.publish_time <![CDATA[>]]> #{dto.maxBehotTime}
            </if>
            <if test="dto.tag != '__all__'">
                and aa.channel_id = #{dto.tag}
            </if>
        </where>
        order by aa.publish_time desc
        limit #{dto.size}
    </select>

</mapper>
因为涉及到多表查询,mp对这方面支持效果并不是特别好,因此使用自定义mapper的方式实现
mapper
@Mapper
public interface ApArticleMapper extends BaseMapper<ApArticle> {

    /**
     * 加兹文章列表
     * @param dto
     * @param type 1加载更多 2加载最新
     * @return
     */
    List<ApArticle> loadArticleList(ArticleHomeDto dto,Short type);
}
controller
package com.heima.article.controller.v1;
@RestController
@RequestMapping("/api/v1/article")
public class ArticleHomeController {
    @Autowired
    private ApArticleService apArticleService;
    /**
     * 加载首页文章
     * @param dto
     * @return
     */
    @PostMapping("/load")
    public ResponseResult load(@RequestBody ArticleHomeDto dto){
        return apArticleService.load(dto, ArticleConstants.LOADTYPE_LOAD_MORE);
    }
    /**
     * 加载更多文章
     * @param dto
     * @return
     */
    @PostMapping("/loadmore")
    public ResponseResult loadmore(@RequestBody ArticleHomeDto dto){
        return apArticleService.load(dto,ArticleConstants.LOADTYPE_LOAD_MORE);
    }
    /**
     * 加载最新文章
     * @param dto
     * @return
     */
    @PostMapping("/loadnew")
    public ResponseResult loadnew(@RequestBody ArticleHomeDto dto){
        return apArticleService.load(dto,ArticleConstants.LOADTYPE_LOAD_NEW);
    }
}
service接口
package com.heima.article.service;

import com.baomidou.mybatisplus.extension.service.IService;
import com.heima.model.article.dtos.ArticleHomeDto;
import com.heima.model.article.pojos.ApArticle;
import com.heima.model.common.dtos.ResponseResult;

public interface ApArticleService extends IService<ApArticle> {
    /**
     * 加载文章列表
     * @param dto
     * @param type 1加载更多 2加载最新
     * @return
     */
    ResponseResult load(ArticleHomeDto dto,short type);

}
service实现
package com.heima.article.service.impl;

import com.baomidou.mybatisplus.extension.service.impl.ServiceImpl;
import com.heima.article.mapper.ApArticleMapper;
import com.heima.article.service.ApArticleService;
import com.heima.common.constants.ArticleConstants;
import com.heima.model.article.dtos.ArticleHomeDto;
import com.heima.model.article.pojos.ApArticle;
import com.heima.model.common.dtos.ResponseResult;
import java.util.Date;
import java.util.List;
import lombok.extern.slf4j.Slf4j;
import org.apache.commons.lang3.StringUtils;
import org.springframework.beans.factory.annotation.Autowired;
import org.springframework.stereotype.Service;
import org.springframework.transaction.annotation.Transactional;

@Service
@Transactional
@Slf4j
public class ApArticleServiceImpl extends ServiceImpl<ApArticleMapper, ApArticle> implements
    ApArticleService {
    private static final int MAX_PAGE_SIZE = 50;
    private static final int DEFAULT_PAGE_SIZE = 10;
    @Autowired
    private ApArticleMapper apArticleMapper;

    /**
     * 加载文章列表
     *
     * @param dto
     * @param type 1加载更多 2加载最新
     * @return
     */
    @Override
    public ResponseResult load(ArticleHomeDto dto, short type) {
        //校验参数
        //分页条数校验
        Integer size = dto.getSize();
        if (size == null || size <= 0) {
            size = DEFAULT_PAGE_SIZE;
        }
        //分页的值不超过50
        Math.min(size, MAX_PAGE_SIZE);
        //校验type参数,如果参数错误,默认加载更多
        if(type != ArticleConstants.LOADTYPE_LOAD_MORE && type != ArticleConstants.LOADTYPE_LOAD_NEW){
            type = ArticleConstants.LOADTYPE_LOAD_MORE;
        }
        //频道参数校验
        if(StringUtils.isBlank(dto.getTag())){
            dto.setTag(ArticleConstants.DEFAULT_TAG);
        }
        //时间校验
        //最大时间
        if(dto.getMaxBehotTime() == null){
            dto.setMaxBehotTime(new Date());
        }
        //最小时间
        if(dto.getMinBehotTime() == null){
            dto.setMinBehotTime(new Date());
        }
        //查询
        List<ApArticle> apArticleList = apArticleMapper.loadArticleList(dto, type);
        //返回结果
        return ResponseResult.okResult(apArticleList);
    }
}
这里推荐将常数封装为常量
网关配置文章微服务的路由(老师之前已经给配好了)
        # 文章微服务
        - id: article
          uri: lb://leadnews-article
          predicates:
            - Path=/article/**
          filters:
            - StripPrefix= 1
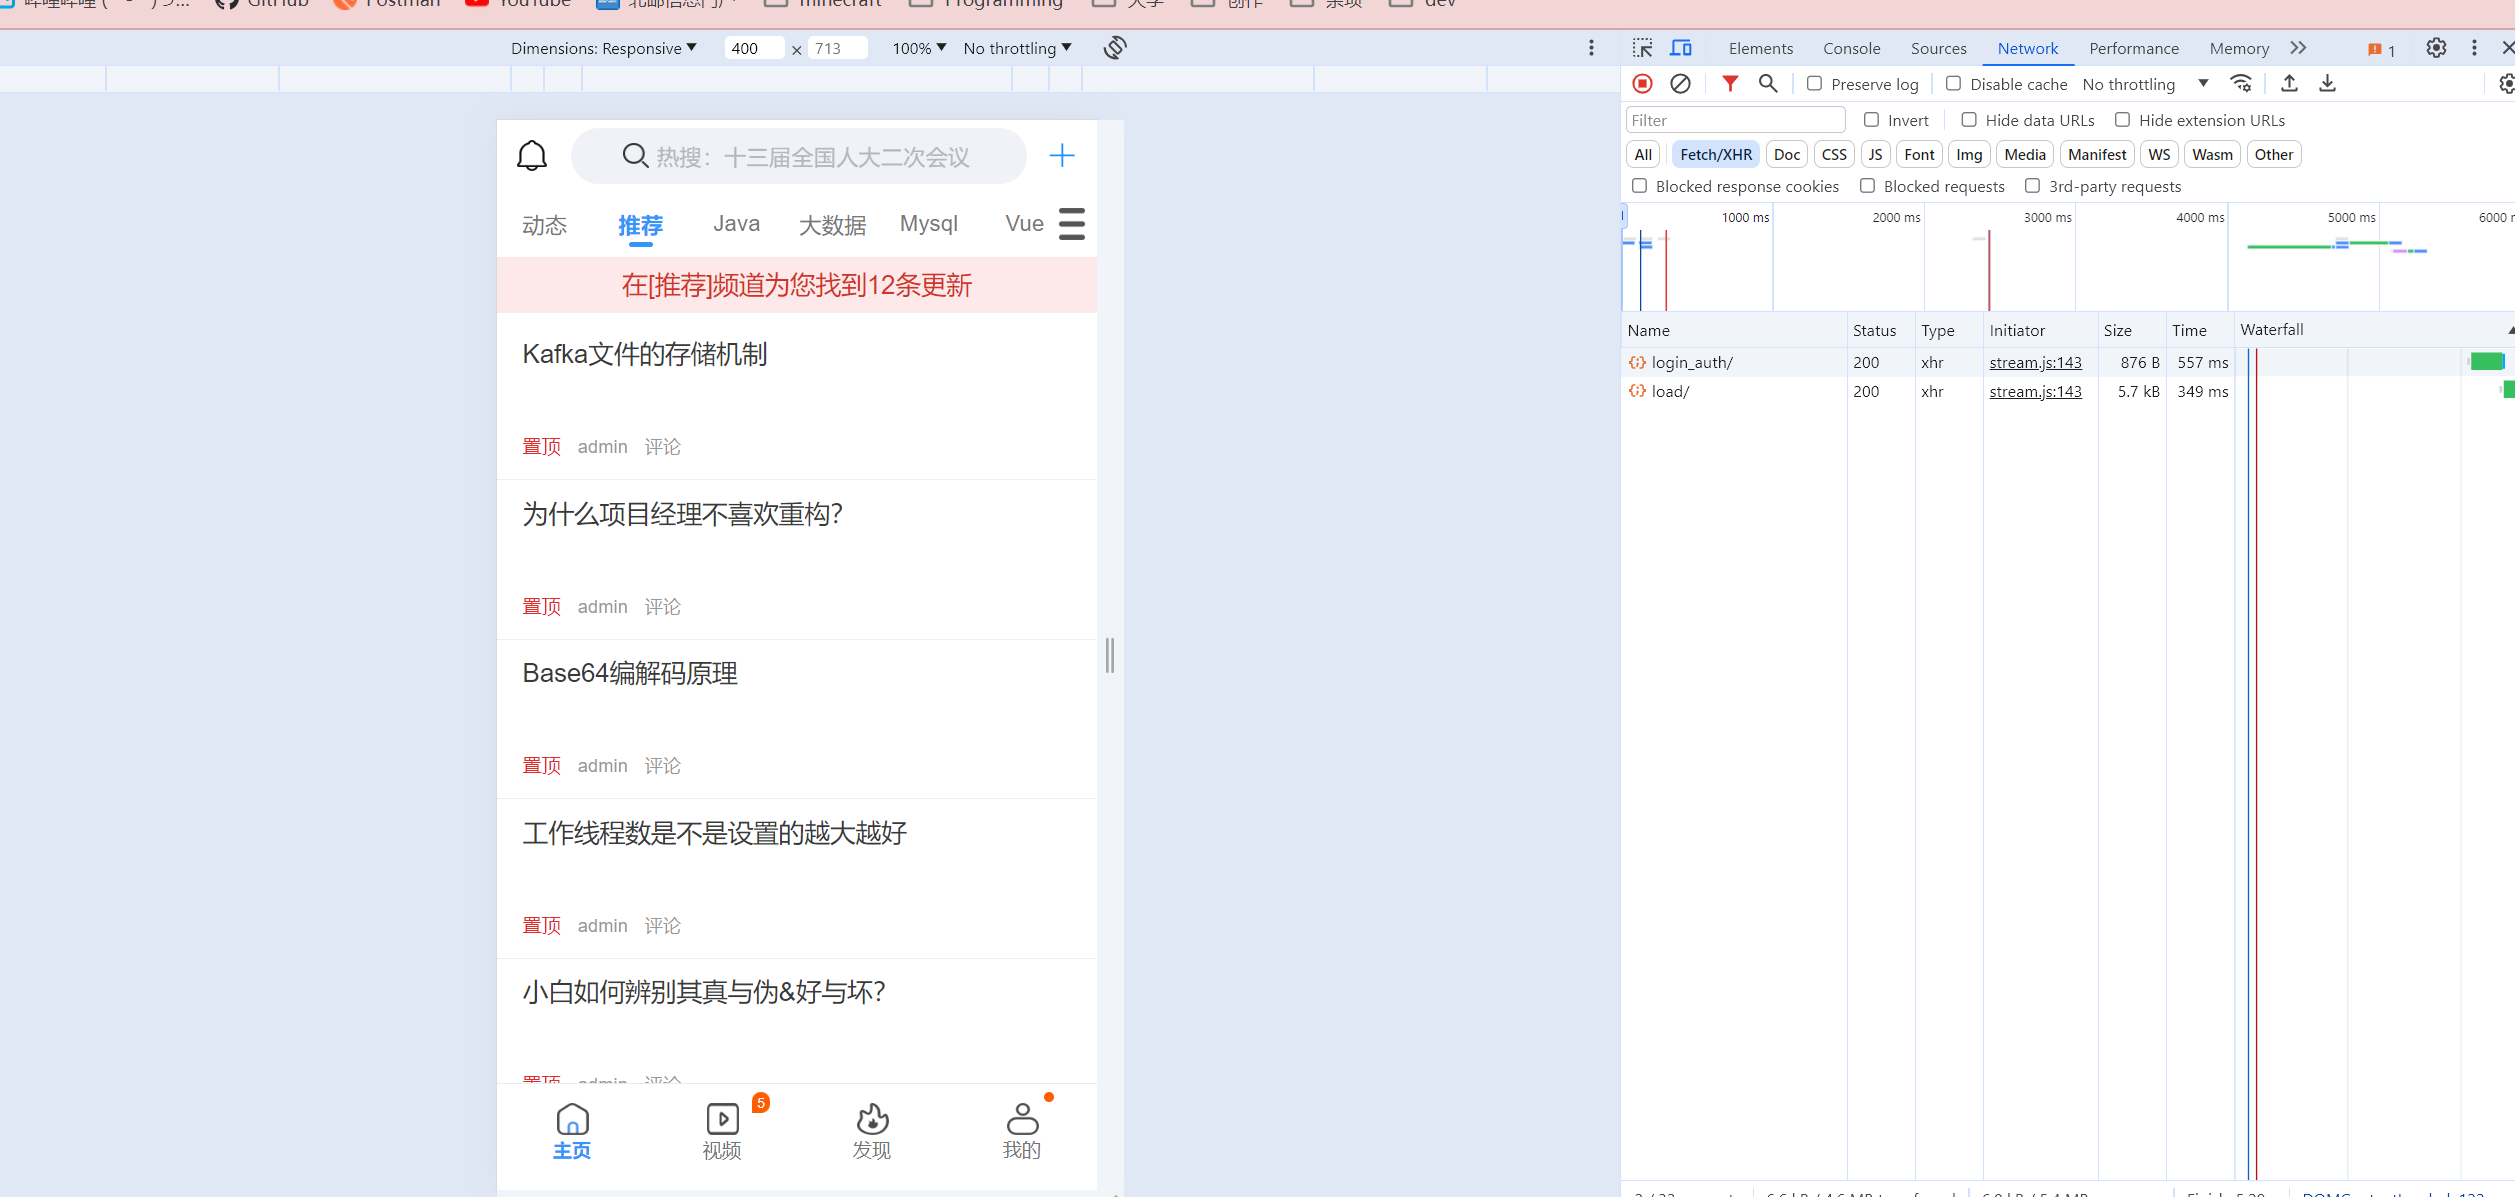
功能测试
❗ 运行前记得把article模块target目录内容删掉,不然运行的是老师的配置编译的代码
🔔 成功显示,图片加载不出来是正常的,毕竟咱还没有老师的oss
🐛 不过前端往下翻加载不出来更多数据(前端压根没有发送过来请求),希望之后能找机会解决掉
记得将文章模块配置apifox自动生成api文档
可以自己建一个git仓库将代码提交上去
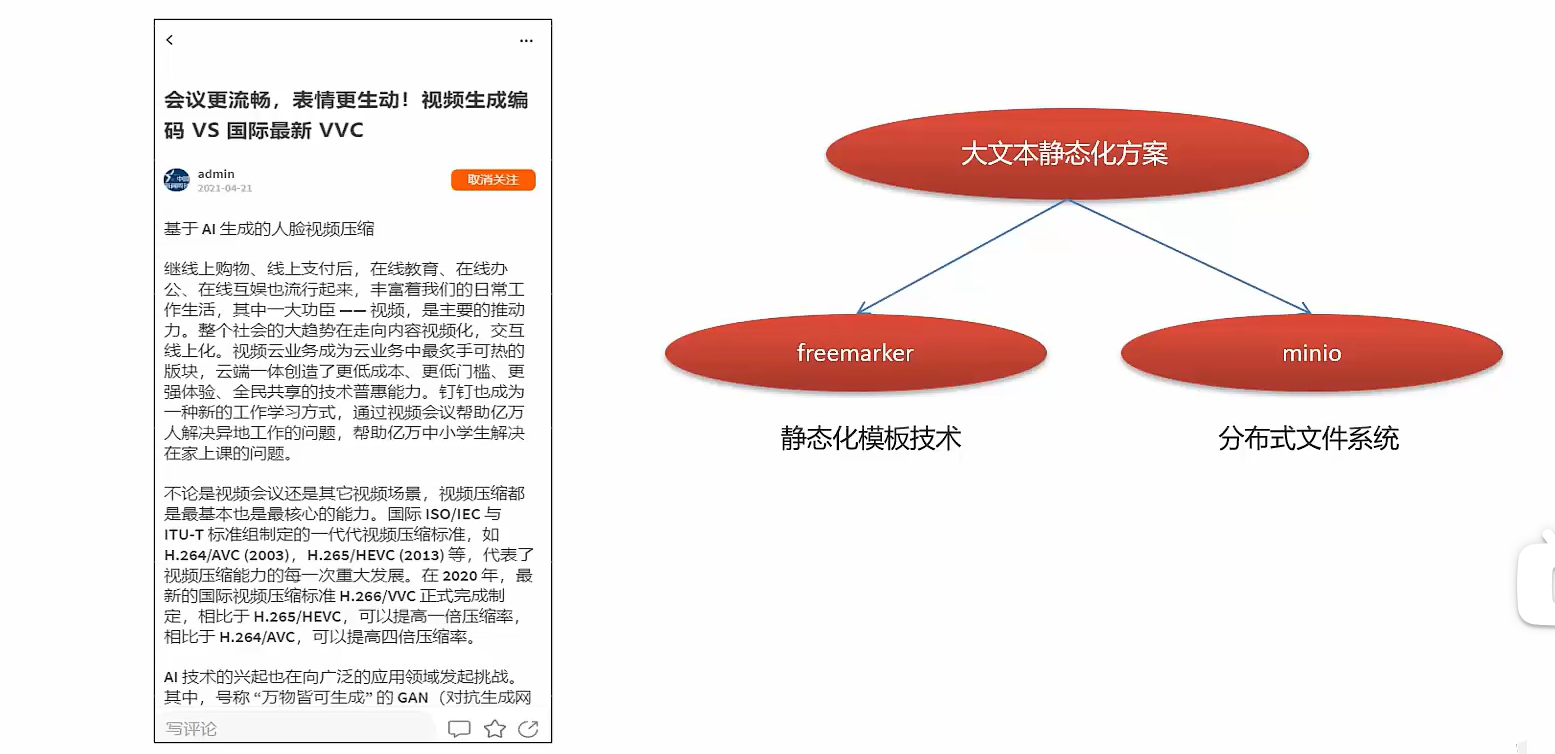
app端文章详情
需求分析
实现思路
方案一
直接通过id查询数据库文本内容返回

方案二
静态模板展示
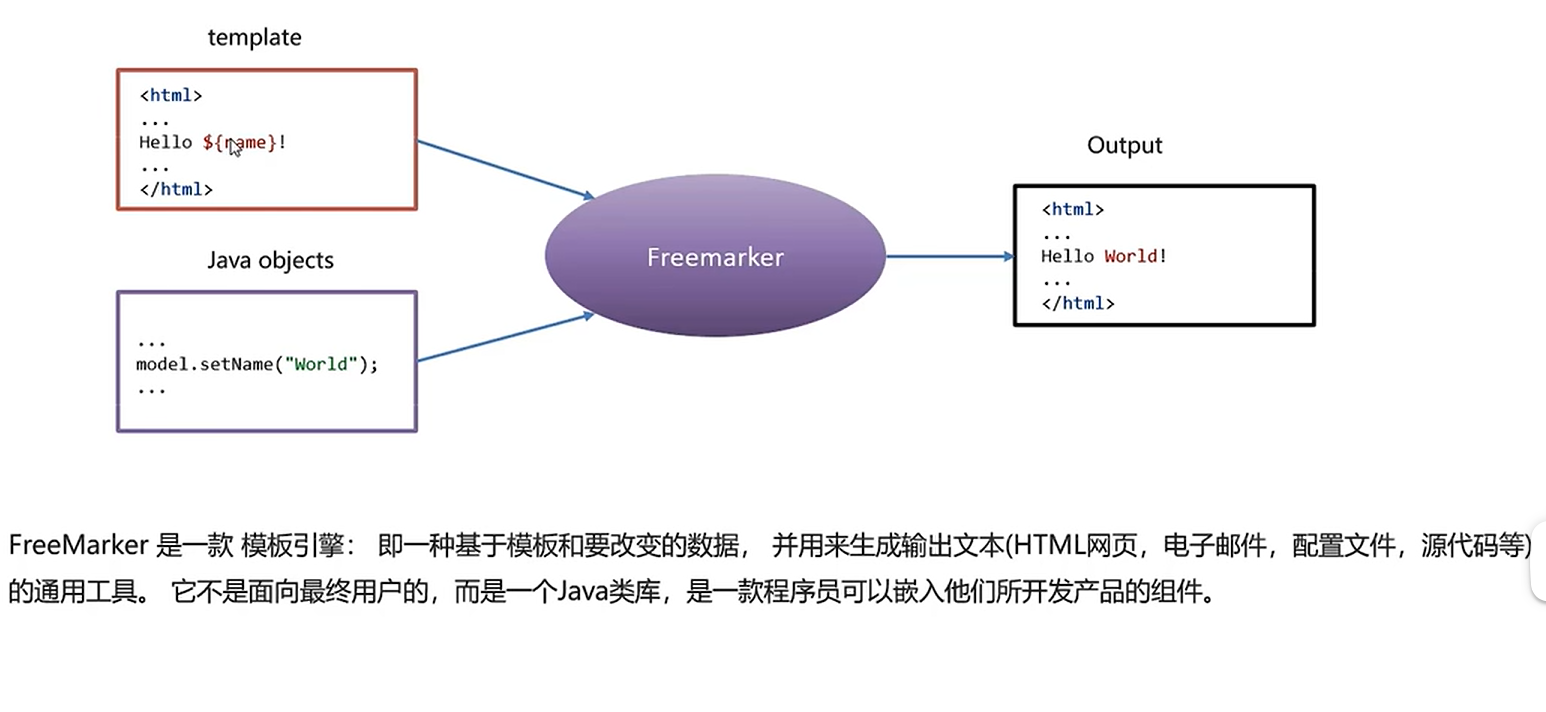
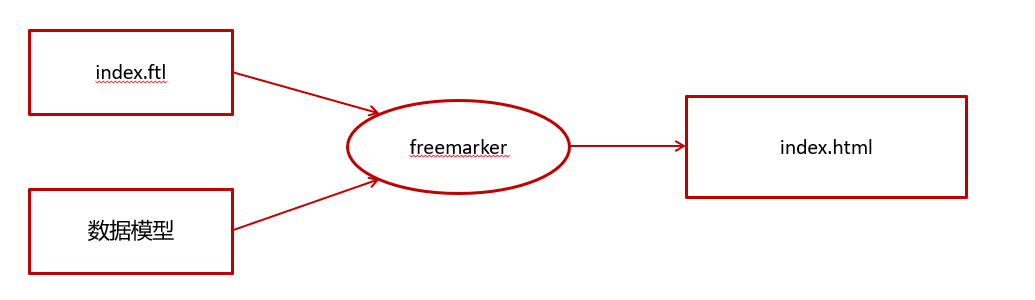
freemarker
这个技术说实话感觉就是早期前后端还没有分离的时候诞生的技术,应该就是方便后端程序员快速构建一个静态页面吧,就不必再麻烦前端来创建模板了
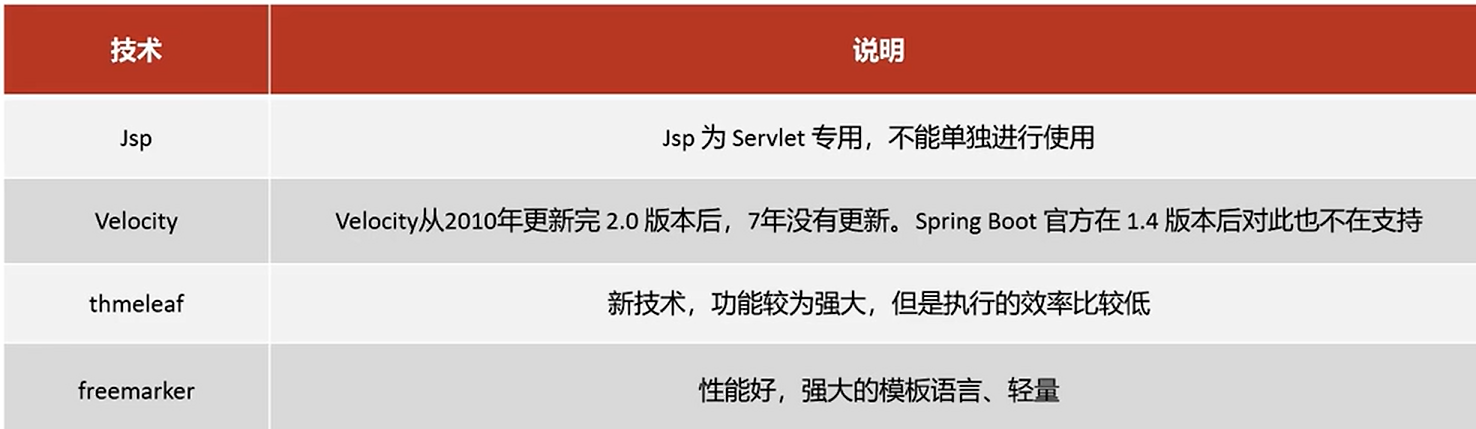
模板引擎
技术选型对比
环境搭建与快速入门
freemarker模板文件都是以ftl作为扩展名,也可以为html,xml,jsp等等
需要创建Spring Boot+Freemarker工程用于测试模板
创建测试工程
创建一个freemarker-demo 的测试工程专门用于freemarker的功能测试与模板的测试。
pom.xml如下
<?xml version="1.0" encoding="UTF-8"?>
<project xmlns="http://maven.apache.org/POM/4.0.0"
         xmlns:xsi="http://www.w3.org/2001/XMLSchema-instance"
         xsi:schemaLocation="http://maven.apache.org/POM/4.0.0 http://maven.apache.org/xsd/maven-4.0.0.xsd">
    <parent>
        <artifactId>heima-leadnews-test</artifactId>
        <groupId>com.heima</groupId>
        <version>1.0-SNAPSHOT</version>
    </parent>
    <modelVersion>4.0.0</modelVersion>

    <artifactId>freemarker-demo</artifactId>

    <properties>
        <maven.compiler.source>8</maven.compiler.source>
        <maven.compiler.target>8</maven.compiler.target>
    </properties>

    <dependencies>
        <dependency>
            <groupId>org.springframework.boot</groupId>
            <artifactId>spring-boot-starter-web</artifactId>
        </dependency>
        <dependency>
            <groupId>org.springframework.boot</groupId>
            <artifactId>spring-boot-starter-freemarker</artifactId>
        </dependency>

        <dependency>
            <groupId>org.springframework.boot</groupId>
            <artifactId>spring-boot-starter-test</artifactId>
        </dependency>
        <!-- lombok -->
        <dependency>
            <groupId>org.projectlombok</groupId>
            <artifactId>lombok</artifactId>
        </dependency>

        <!-- apache 对 java io 的封装工具库 -->
        <dependency>
            <groupId>org.apache.commons</groupId>
            <artifactId>commons-io</artifactId>
            <version>1.3.2</version>
        </dependency>
    </dependencies>

</project>
配置文件
配置application.yml
server:
  port: 8881 #服务端口
spring:
  application:
    name: freemarker-demo #指定服务名
  freemarker:
    cache: false  #关闭模板缓存,方便测试
    settings:
      template_update_delay: 0 #检查模板更新延迟时间,设置为0表示立即检查,如果时间大于0会有缓存不方便进行模板测试
    suffix: .ftl               #指定Freemarker模板文件的后缀名
创建模型类
在freemarker的测试工程下创建模型类型用于测试
package com.heima.freemarker.entity;

import lombok.Data;

import java.util.Date;

@Data
public class Student {
    private String name;//姓名
    private int age;//年龄
    private Date birthday;//生日
    private Float money;//钱包
}
创建模板
在resources下创建templates,此目录为freemarker的默认模板存放目录。
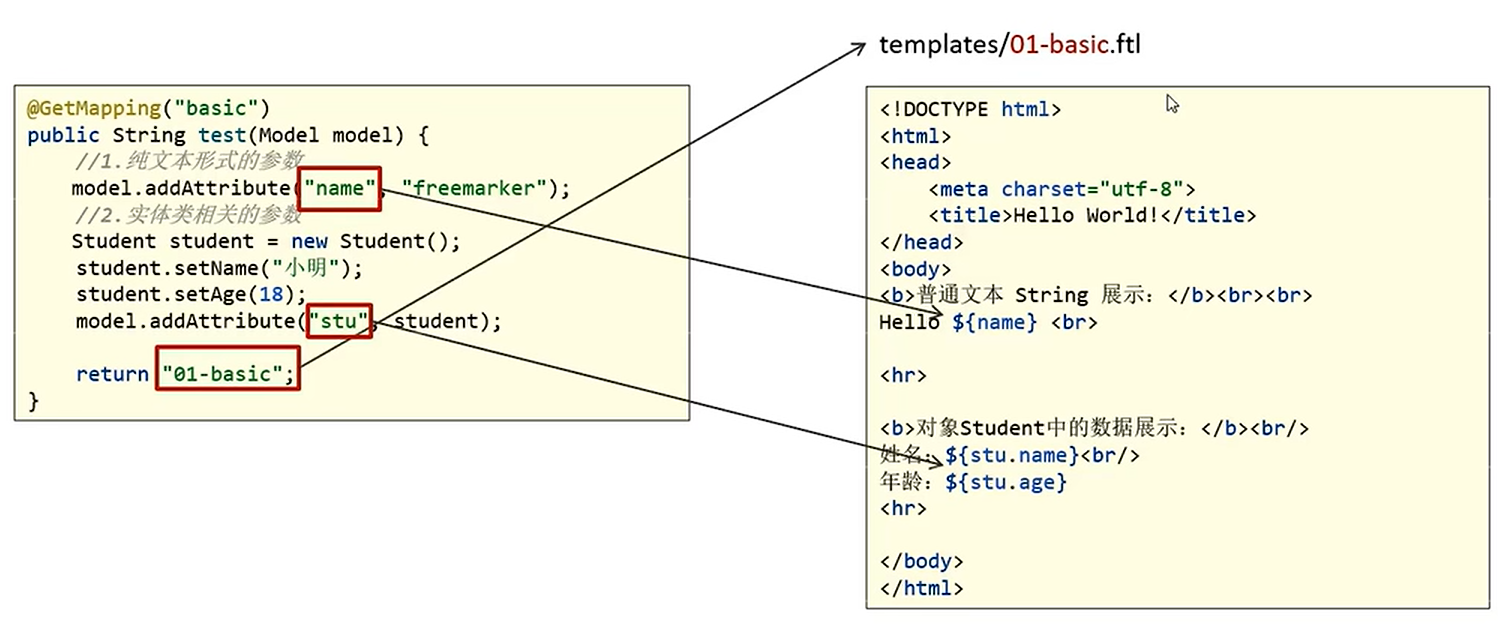
在templates下创建模板文件 01-basic.ftl ,模板中的插值表达式最终会被freemarker替换成具体的数据。
<!DOCTYPE html>
<html>
<head>
    <meta charset="utf-8">
    <title>Hello World!</title>
</head>
<body>
<b>普通文本 String 展示:</b><br><br>
Hello ${name} <br>
<hr>
<b>对象Student中的数据展示:</b><br/>
姓名:${stu.name}<br/>
年龄:${stu.age}
<hr>
</body>
</html>
创建controller
freemarker作为springmvc一种视图格式,默认情况下SpringMVC支持freemarker视图格式
创建Controller类,
package com.heima.freemarker.controller;

import com.heima.freemarker.entity.Student;
import org.springframework.stereotype.Controller;
import org.springframework.ui.Model;
import org.springframework.web.bind.annotation.GetMapping;

@Controller
public class HelloController {

    @GetMapping("/basic")
    public String test(Model model) {


        //1.纯文本形式的参数
        model.addAttribute("name", "freemarker");
        //2.实体类相关的参数

        Student student = new Student();
        student.setName("小明");
        student.setAge(18);
        model.addAttribute("stu", student);

        return "01-basic";
    }
}
❗ 这里因为返回的是模板视图,返回的并不是json字符串,因此不要思维惯性顺手就写了一个
@RestController出来
创建启动类
package com.heima.freemarker;

import org.springframework.boot.SpringApplication;
import org.springframework.boot.autoconfigure.SpringBootApplication;

@SpringBootApplication
public class FreemarkerDemotApplication {
    public static void main(String[] args) {
        SpringApplication.run(FreemarkerDemotApplication.class,args);
    }
}
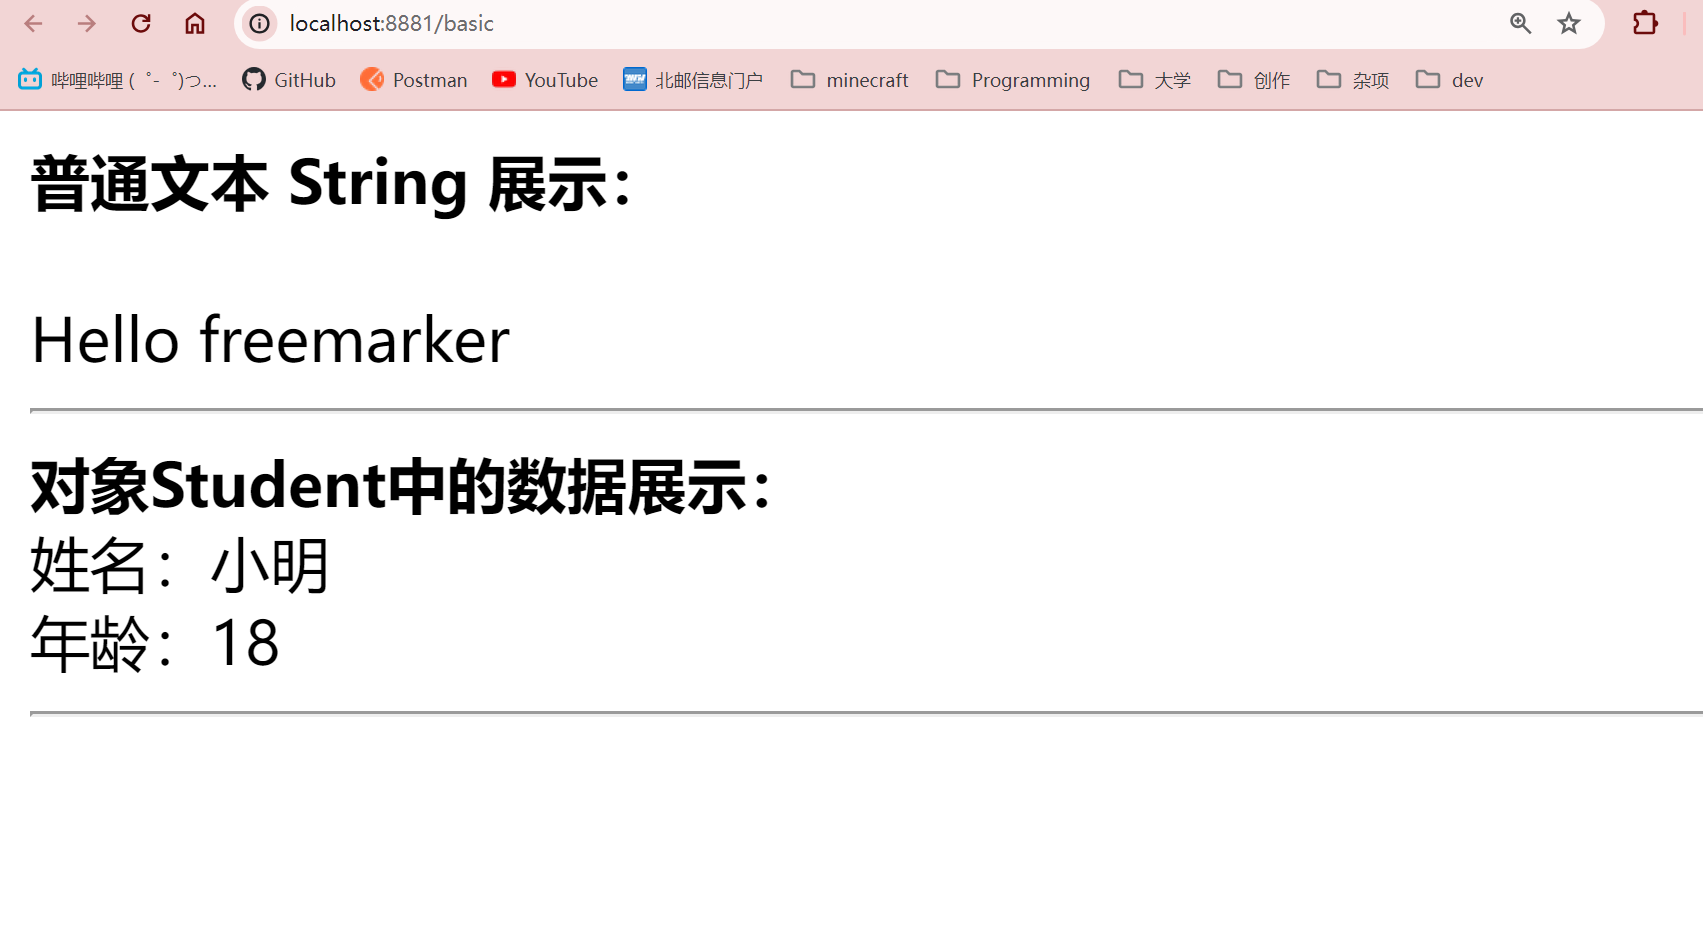
测试
请求:http://localhost:8881/basic
Freemarker指令语法
基础语法种类
1、注释,即<#-- -->,介于其之间的内容会被freemarker忽略
<#--我是一个freemarker注释-->
2、插值(Interpolation):即 ${..} 部分,freemarker会用真实的值代替${..}
Hello ${name}
3、FTL指令:和HTML标记类似,名字前加#予以区分,Freemarker会解析标签中的表达式或逻辑。
<# >FTL指令</#>
4、文本,仅文本信息,这些不是freemarker的注释、插值、FTL指令的内容会被freemarker忽略解析,直接输出内容。
<#--freemarker中的普通文本-->
我是一个普通的文本
集合指令(List和Map)
1、数据模型:
在HelloController中新增如下方法:
@GetMapping("/list")
public String list(Model model){

    //------------------------------------
    Student stu1 = new Student();
    stu1.setName("小强");
    stu1.setAge(18);
    stu1.setMoney(1000.86f);
    stu1.setBirthday(new Date());

    //小红对象模型数据
    Student stu2 = new Student();
    stu2.setName("小红");
    stu2.setMoney(200.1f);
    stu2.setAge(19);

    //将两个对象模型数据存放到List集合中
    List<Student> stus = new ArrayList<>();
    stus.add(stu1);
    stus.add(stu2);

    //向model中存放List集合数据
    model.addAttribute("stus",stus);

    //------------------------------------

    //创建Map数据
    HashMap<String,Student> stuMap = new HashMap<>();
    stuMap.put("stu1",stu1);
    stuMap.put("stu2",stu2);
    // 3.1 向model中存放Map数据
    model.addAttribute("stuMap", stuMap);

    return "02-list";
}
2、模板:
在templates中新增02-list.ftl文件
<!DOCTYPE html>
<html>
<head>
<meta charset="utf-8">
<title>Hello World!</title>
</head>
<body>
<#-- list 数据的展示 -->
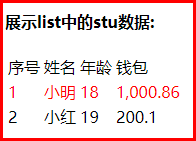
<b>展示list中的stu数据:</b>
<br>
<br>
<table>
<tr>
<td>序号</td>
<td>姓名</td>
<td>年龄</td>
<td>钱包</td>
</tr>
</table>
<hr>
<#-- Map 数据的展示 -->
<b>map数据的展示:</b>
<br/><br/>
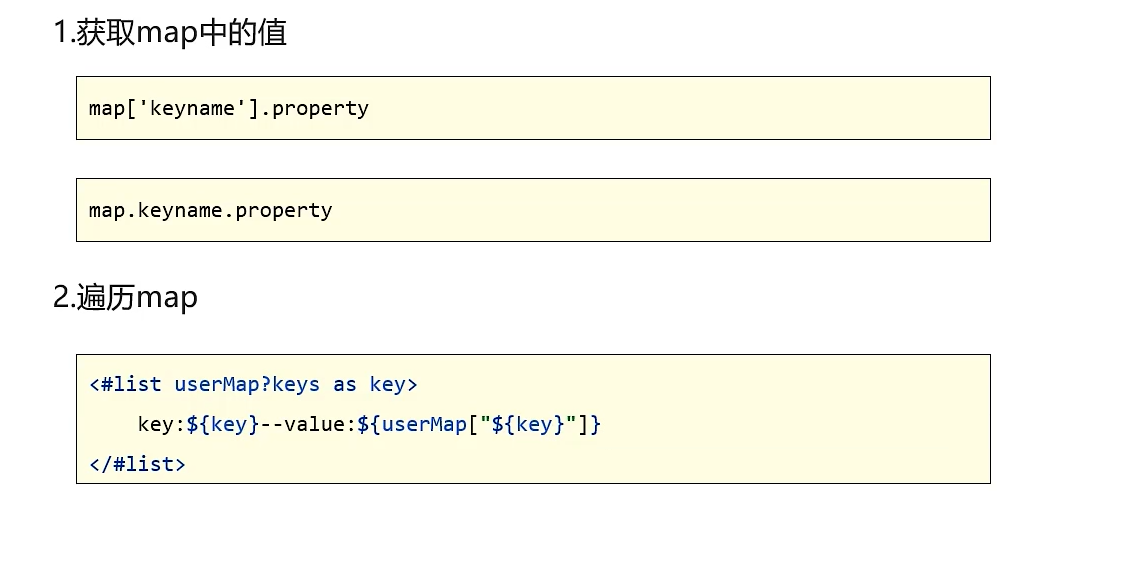
<a href="###">方式一:通过map['keyname'].property</a><br/>
输出stu1的学生信息:<br/>
姓名:<br/>
年龄:<br/>
<br/>
<a href="###">方式二:通过map.keyname.property</a><br/>
输出stu2的学生信息:<br/>
姓名:<br/>
年龄:<br/>
<br/>
<a href="###">遍历map中两个学生信息:</a><br/>
<table>
<tr>
<td>序号</td>
<td>姓名</td>
<td>年龄</td>
<td>钱包</td>
</tr>
</table>
<hr>
</body>
</html>
实例代码:
<!DOCTYPE html>
<html>
<head>
    <meta charset="utf-8">
    <title>Hello World!</title>
</head>
<body>

<#-- list 数据的展示 -->
<b>展示list中的stu数据:</b>
<br>
<br>
<table>
    <tr>
        <td>序号</td>
        <td>姓名</td>
        <td>年龄</td>
        <td>钱包</td>
    </tr>
    <#list stus as stu>
        <tr>
            <td>${stu_index+1}</td>
            <td>${stu.name}</td>
            <td>${stu.age}</td>
            <td>${stu.money}</td>
        </tr>
    </#list>

</table>
<hr>

<#-- Map 数据的展示 -->
<b>map数据的展示:</b>
<br/><br/>
<a href="###">方式一:通过map['keyname'].property</a><br/>
输出stu1的学生信息:<br/>
姓名:${stuMap['stu1'].name}<br/>
年龄:${stuMap['stu1'].age}<br/>
<br/>
<a href="###">方式二:通过map.keyname.property</a><br/>
输出stu2的学生信息:<br/>
姓名:${stuMap.stu2.name}<br/>
年龄:${stuMap.stu2.age}<br/>

<br/>
<a href="###">遍历map中两个学生信息:</a><br/>
<table>
    <tr>
        <td>序号</td>
        <td>姓名</td>
        <td>年龄</td>
        <td>钱包</td>
    </tr>
    <#list stuMap?keys as key >
        <tr>
            <td>${key_index}</td>
            <td>${stuMap[key].name}</td>
            <td>${stuMap[key].age}</td>
            <td>${stuMap[key].money}</td>
        </tr>
    </#list>
</table>
<hr>

</body>
</html>
上面代码解释:
${k_index}:
index:得到循环的下标,使用方法是在stu后边加"_index",它的值是从0开始
if指令
if 指令即判断指令,是常用的FTL指令,freemarker在解析时遇到if会进行判断,条件为真则输出if中间的内容,否则跳过内容不再输出。
- 指令格式
<#if ></if>
1、数据模型:
使用list指令中测试数据模型,判断名称为小红的数据字体显示为红色。
2、模板:
<table>
    <tr>
        <td>姓名</td>
        <td>年龄</td>
        <td>钱包</td>
    </tr>
    <#list stus as stu>
        <tr>
            <td >${stu.name}</td>
            <td>${stu.age}</td>
            <td >${stu.mondy}</td>
        </tr>
    </#list>

</table>
实例代码:
<table>
    <tr>
        <td>姓名</td>
        <td>年龄</td>
        <td>钱包</td>
    </tr>
    <#list stus as stu >
        <#if stu.name='小红'>
            <tr style="color: red">
                <td>${stu_index}</td>
                <td>${stu.name}</td>
                <td>${stu.age}</td>
                <td>${stu.money}</td>
            </tr>
            <#else >
            <tr>
                <td>${stu_index}</td>
                <td>${stu.name}</td>
                <td>${stu.age}</td>
                <td>${stu.money}</td>
            </tr>
        </#if>
    </#list>
</table>
3、输出:
姓名为“小强”则字体颜色显示为红色。
运算符
1、算数运算符
FreeMarker表达式中完全支持算术运算,FreeMarker支持的算术运算符包括:
- 加法:
+ - 减法:
- - 乘法:
* - 除法:
/ - 求模 (求余):
%
模板代码
<b>算数运算符</b>
<br/><br/>
    100+5 运算:  ${100 + 5 }<br/>
    100 - 5 * 5运算:${100 - 5 * 5}<br/>
    5 / 2运算:${5 / 2}<br/>
    12 % 10运算:${12 % 10}<br/>
<hr>
除了 + 运算以外,其他的运算只能和 number 数字类型的计算。
2、比较运算符
=或者==:判断两个值是否相等.!=:判断两个值是否不等.>或者gt:判断左边值是否大于右边值>=或者gte:判断左边值是否大于等于右边值<或者lt:判断左边值是否小于右边值<=或者lte:判断左边值是否小于等于右边值
= 和 == 模板代码
<!DOCTYPE html>
<html>
<head>
    <meta charset="utf-8">
    <title>Hello World!</title>
</head>
<body>

    <b>比较运算符</b>
    <br/>
    <br/>

    <dl>
        <dt> =/== 和 != 比较:</dt>
        <dd>
            <#if "xiaoming" == "xiaoming">
                字符串的比较 "xiaoming" == "xiaoming"
            </#if>
        </dd>
        <dd>
            <#if 10 != 100>
                数值的比较 10 != 100
            </#if>
        </dd>
    </dl>


    <dl>
        <dt>其他比较</dt>
        <dd>
            <#if 10 gt 5 >
                形式一:使用特殊字符比较数值 10 gt 5
            </#if>
        </dd>
        <dd>
            <#-- 日期的比较需要通过?date将属性转为data类型才能进行比较 -->
            <#if (date1?date >= date2?date)>
                形式二:使用括号形式比较时间 date1?date >= date2?date
            </#if>
        </dd>
    </dl>

    <br/>
<hr>
</body>
</html>
Controller 的 数据模型代码
@GetMapping("operation")
public String testOperation(Model model) {
    //构建 Date 数据
    Date now = new Date();
    model.addAttribute("date1", now);
    model.addAttribute("date2", now);

    return "03-operation";
}
比较运算符注意
=和!=可以用于字符串、数值和日期来比较是否相等=和!=两边必须是相同类型的值,否则会产生错误- 字符串
"x"、"x "、"X"比较是不等的.因为FreeMarker是精确比较 - 其它的运行符可以作用于数字和日期,但不能作用于字符串
- 使用
gt等字母运算符代替>会有更好的效果,因为 FreeMarker会把>解释成FTL标签的结束字符 - 可以使用括号来避免这种情况,如:
<#if (x>y)>
3、逻辑运算符
- 逻辑与:&&
- 逻辑或:||
- 逻辑非:!
逻辑运算符只能作用于布尔值,否则将产生错误 。
模板代码
<b>逻辑运算符</b>
    <br/>
    <br/>
    <#if (10 lt 12 )&&( 10  gt  5 )  >
        (10 lt 12 )&&( 10  gt  5 )  显示为 true
    </#if>
    <br/>
    <br/>
    <#if !false>
        false 取反为true
    </#if>
<hr>
2.3.5) 空值处理
1、判断某变量是否存在使用 “??”
用法为:variable??,如果该变量存在,返回true,否则返回false
例:为防止stus为空报错可以加上判断如下:
    <#if stus??>
    <#list stus as stu>
    	......
    </#list>
    </#if>
2、缺失变量默认值使用 “!”
-
使用!要以指定一个默认值,当变量为空时显示默认值
例: ${name!''}表示如果name为空显示空字符串。
-
如果是嵌套对象则建议使用()括起来
例: ${(stu.bestFriend.name)!''}表示,如果stu或bestFriend或name为空默认显示空字符串。
2.3.6) 内建函数
内建函数语法格式: 变量+?+函数名称
1、和到某个集合的大小
${集合名?size}
2、日期格式化
显示年月日: ${today?date}
显示时分秒:${today?time}
显示日期+时间:${today?datetime}
自定义格式化: ${today?string("yyyy年MM月")}
3、内建函数c
model.addAttribute("point", 102920122);
point是数字型,使用${point}会显示这个数字的值,每三位使用逗号分隔。
如果不想显示为每三位分隔的数字,可以使用c函数将数字型转成字符串输出
${point?c}
4、将json字符串转成对象
一个例子:
其中用到了 assign标签,assign的作用是定义一个变量。
<#assign text="{'bank':'工商银行','account':'10101920201920212'}" />
<#assign data=text?eval />
开户行:${data.bank}  账号:${data.account}
模板代码:
<!DOCTYPE html>
<html>
<head>
    <meta charset="utf-8">
    <title>inner Function</title>
</head>
<body>

    <b>获得集合大小</b><br>

    集合大小:
    <hr>


    <b>获得日期</b><br>

    显示年月日:      <br>

    显示时分秒:<br>

    显示日期+时间:<br>

    自定义格式化:  <br>

    <hr>

    <b>内建函数C</b><br>
    没有C函数显示的数值: <br>

    有C函数显示的数值:

    <hr>

    <b>声明变量assign</b><br>


<hr>
</body>
</html>
内建函数模板页面:
<!DOCTYPE html>
<html>
<head>
    <meta charset="utf-8">
    <title>inner Function</title>
</head>
<body>

    <b>获得集合大小</b><br>

    集合大小:${stus?size}
    <hr>


    <b>获得日期</b><br>

    显示年月日: ${today?date}       <br>

    显示时分秒:${today?time}<br>

    显示日期+时间:${today?datetime}<br>

    自定义格式化:  ${today?string("yyyy年MM月")}<br>

    <hr>

    <b>内建函数C</b><br>
    没有C函数显示的数值:${point} <br>

    有C函数显示的数值:${point?c}

    <hr>

    <b>声明变量assign</b><br>
    <#assign text="{'bank':'工商银行','account':'10101920201920212'}" />
    <#assign data=text?eval />
    开户行:${data.bank}  账号:${data.account}

<hr>
</body>
</html>
内建函数Controller数据模型:
@GetMapping("innerFunc")
public String testInnerFunc(Model model) {
    //1.1 小强对象模型数据
    Student stu1 = new Student();
    stu1.setName("小强");
    stu1.setAge(18);
    stu1.setMoney(1000.86f);
    stu1.setBirthday(new Date());
    //1.2 小红对象模型数据
    Student stu2 = new Student();
    stu2.setName("小红");
    stu2.setMoney(200.1f);
    stu2.setAge(19);
    //1.3 将两个对象模型数据存放到List集合中
    List<Student> stus = new ArrayList<>();
    stus.add(stu1);
    stus.add(stu2);
    model.addAttribute("stus", stus);
    // 2.1 添加日期
    Date date = new Date();
    model.addAttribute("today", date);
    // 3.1 添加数值
    model.addAttribute("point", 102920122);
    return "04-innerFunc";
}
输出静态化文件
之前的测试都是SpringMVC将Freemarker作为视图解析器(ViewReporter)来集成到项目中,工作中,有的时候需要使用Freemarker原生Api来生成静态内容,下面一起来学习下原生Api生成文本文件。
需求分析
使用freemarker原生Api将页面生成html文件,本节测试html文件生成的方法:
静态化测试
根据模板文件生成html文件
①:修改application.yml文件,添加以下模板存放位置的配置信息,完整配置如下:
server:
  port: 8881 #服务端口
spring:
  application:
    name: freemarker-demo #指定服务名
  freemarker:
    cache: false  #关闭模板缓存,方便测试
    settings:
      template_update_delay: 0 #检查模板更新延迟时间,设置为0表示立即检查,如果时间大于0会有缓存不方便进行模板测试
    suffix: .ftl               #指定Freemarker模板文件的后缀名
    template-loader-path: classpath:/templates   #模板存放位置
②:在test下创建测试类
package com.heima.freemarker.test;


import com.heima.freemarker.FreemarkerDemoApplication;
import com.heima.freemarker.entity.Student;
import freemarker.template.Configuration;
import freemarker.template.Template;
import freemarker.template.TemplateException;
import org.junit.Test;
import org.junit.runner.RunWith;
import org.springframework.beans.factory.annotation.Autowired;
import org.springframework.boot.test.context.SpringBootTest;
import org.springframework.test.context.junit4.SpringRunner;

import java.io.FileWriter;
import java.io.IOException;
import java.util.*;

@SpringBootTest(classes = FreemarkerDemoApplication.class)
@RunWith(SpringRunner.class)
public class FreemarkerTest {

    @Autowired
    private Configuration configuration;

    @Test
    public void test() throws IOException, TemplateException {
        //freemarker的模板对象,获取模板
        Template template = configuration.getTemplate("02-list.ftl");
        Map params = getData();
        //合成
        //第一个参数 数据模型
        //第二个参数  输出流
        template.process(params, new FileWriter("d:/list.html"));
    }

    private Map getData() {
        Map<String, Object> map = new HashMap<>();

        //小强对象模型数据
        Student stu1 = new Student();
        stu1.setName("小强");
        stu1.setAge(18);
        stu1.setMoney(1000.86f);
        stu1.setBirthday(new Date());

        //小红对象模型数据
        Student stu2 = new Student();
        stu2.setName("小红");
        stu2.setMoney(200.1f);
        stu2.setAge(19);

        //将两个对象模型数据存放到List集合中
        List<Student> stus = new ArrayList<>();
        stus.add(stu1);
        stus.add(stu2);

        //向map中存放List集合数据
        map.put("stus", stus);


        //创建Map数据
        HashMap<String, Student> stuMap = new HashMap<>();
        stuMap.put("stu1", stu1);
        stuMap.put("stu2", stu2);
        //向map中存放Map数据
        map.put("stuMap", stuMap);

        //返回Map
        return map;
    }
}
minIO
minIO是一个分布式文件系统
其他文件系统
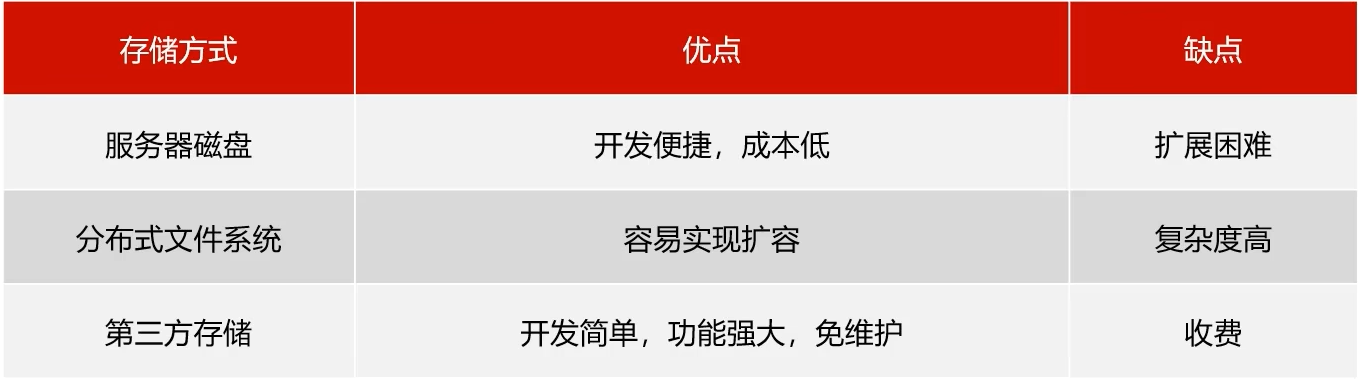
之前苍穹外卖用的是第三方存储:阿里云oss服务
分布式文件系统
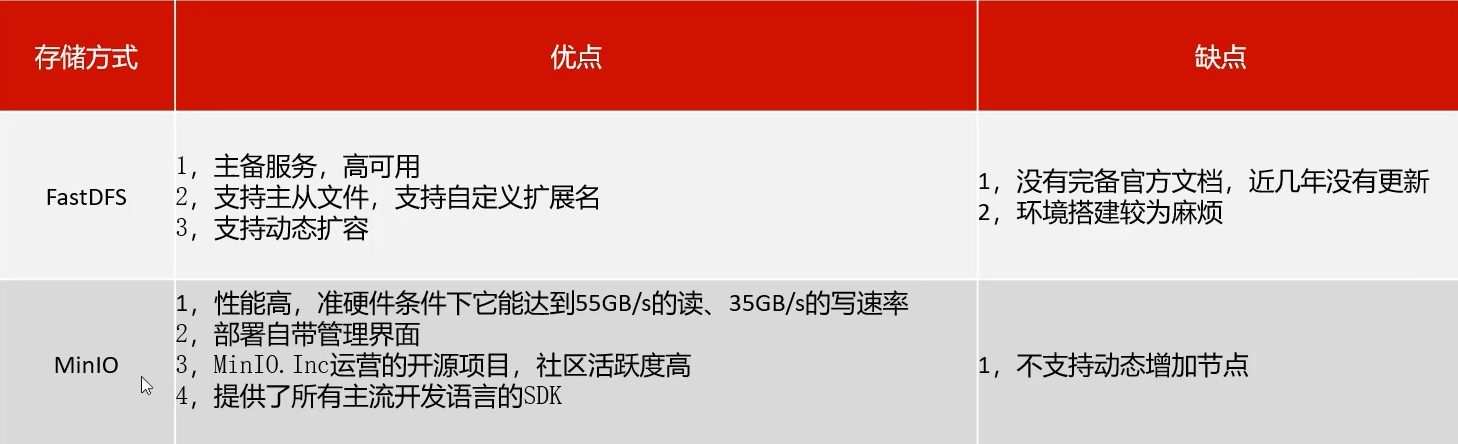
minIO不支持动态增加节点也有方案可以解决
简介
MinIO基于Apache License v2.0开源协议的对象存储服务,可以做为云存储的解决方案用来保存海量的图片,视频,文档。
由于采用Golang实现,服务端可以工作在Windows,Linux, OS X和FreeBSD上。配置简单,基本是复制可执行程序,单行命令可以运行起来。
MinIO兼容亚马逊S3云存储服务接口,非常适合于存储大容量非结构化的数据,例如图片、视频、日志文件、备份数据和容器/虚拟机镜像等,而一个对象文件可以是任意大小,从几kb到最大5T不等。
安装使用
我们提供的镜像中已经有minio的环境
我们可以使用docker进行环境部署和启动
docker run -p 9000:9000 --name minio -d --restart=always -e "MINIO_ACCESS_KEY=minio" -e "MINIO_SECRET_KEY=leadnews" -v /home/data:/data -v /home/config:/root/.minio minio/minio server /data
老师虚拟机已经运行了minio容器,如果你希望修改密码的话可以删除容器重新创建一个
我们在地址栏输入:http://hmtt:9000/ 即可进入登录界面。
基本概念
- bucket - 类似于文件系统中的目录
- Object - 类比文件系统中的文件
- keys - 类比文件名
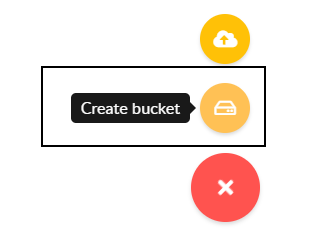
老师虚拟机已经创建好了目录
快速入门
创建minio-demo,对应pom如下
<?xml version="1.0" encoding="UTF-8"?>
<project xmlns="http://maven.apache.org/POM/4.0.0"
         xmlns:xsi="http://www.w3.org/2001/XMLSchema-instance"
         xsi:schemaLocation="http://maven.apache.org/POM/4.0.0 http://maven.apache.org/xsd/maven-4.0.0.xsd">
    <parent>
        <artifactId>heima-leadnews-test</artifactId>
        <groupId>com.heima</groupId>
        <version>1.0-SNAPSHOT</version>
    </parent>
    <modelVersion>4.0.0</modelVersion>

    <artifactId>minio-demo</artifactId>

    <properties>
        <maven.compiler.source>8</maven.compiler.source>
        <maven.compiler.target>8</maven.compiler.target>
    </properties>

    <dependencies>

        <dependency>
            <groupId>io.minio</groupId>
            <artifactId>minio</artifactId>
            <version>7.1.0</version>
        </dependency>
        <dependency>
            <groupId>org.springframework.boot</groupId>
            <artifactId>spring-boot-starter-web</artifactId>
        </dependency>

        <dependency>
            <groupId>org.springframework.boot</groupId>
            <artifactId>spring-boot-starter-test</artifactId>
        </dependency>
    </dependencies>

</project>
引导类:
package com.heima.minio;

import org.springframework.boot.SpringApplication;
import org.springframework.boot.autoconfigure.SpringBootApplication;


@SpringBootApplication
public class MinIOApplication {

    public static void main(String[] args) {
        SpringApplication.run(MinIOApplication.class,args);
    }
}
创建测试类,上传html文件
package com.heima.minio.test;

import io.minio.MinioClient;
import io.minio.PutObjectArgs;

import java.io.FileInputStream;

public class MinIOTest {


    public static void main(String[] args) {

        FileInputStream fileInputStream = null;
        try {

            fileInputStream =  new FileInputStream("D:\\list.html");;

            //1.创建minio链接客户端
            MinioClient minioClient = MinioClient.builder().credentials("minio", "minio123").endpoint("http://192.168.200.130:9000").build();
            //2.上传
            PutObjectArgs putObjectArgs = PutObjectArgs.builder()
                    .object("list.html")//文件名
                    .contentType("text/html")//文件类型
                    .bucket("leadnews")//桶名词  与minio创建的名词一致
                    .stream(fileInputStream, fileInputStream.available(), -1) //文件流
                    .build();
            minioClient.putObject(putObjectArgs);

            System.out.println("http://192.168.200.130:9000/leadnews/ak47.jpg");

        } catch (Exception ex) {
            ex.printStackTrace();
        }
    }

}
credentials是
凭证的意思
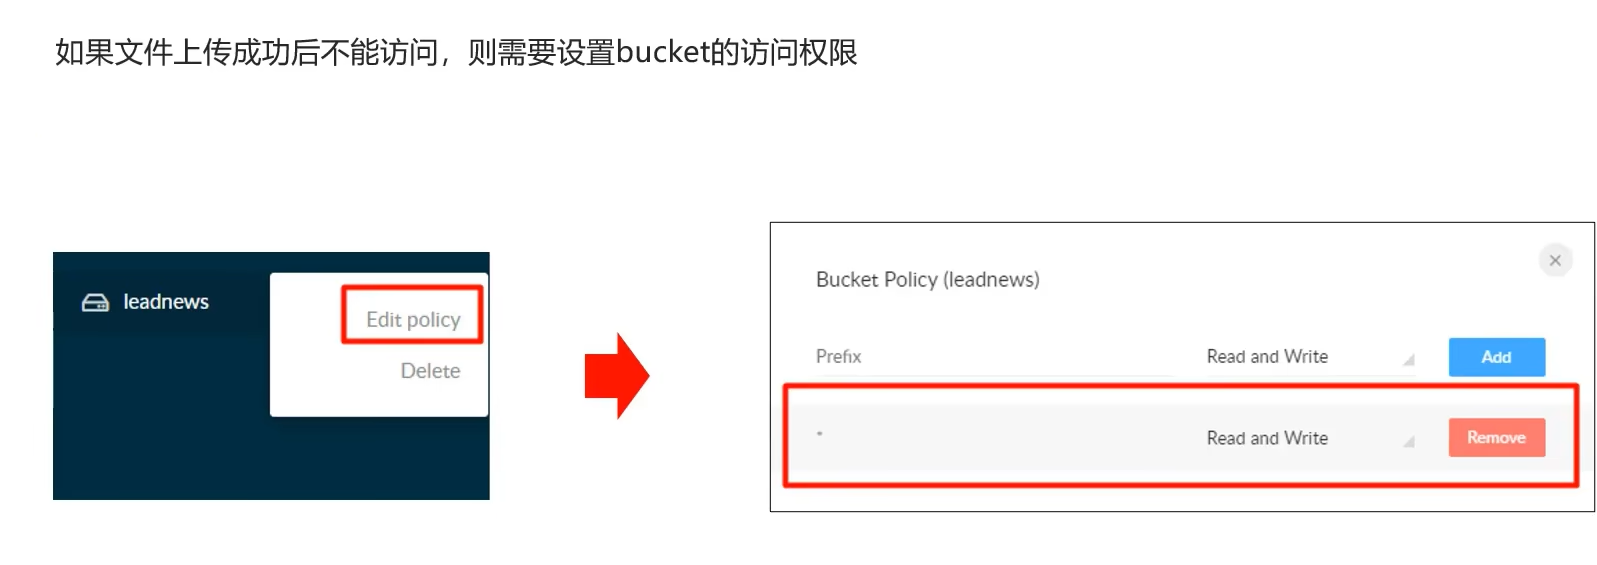
上传文件进行静态访问
封装minIO为starter
由于有多个微服务要用到分布式文件系统,因此可以参考SpringBoot那样自己封装一个start来进行统一部署
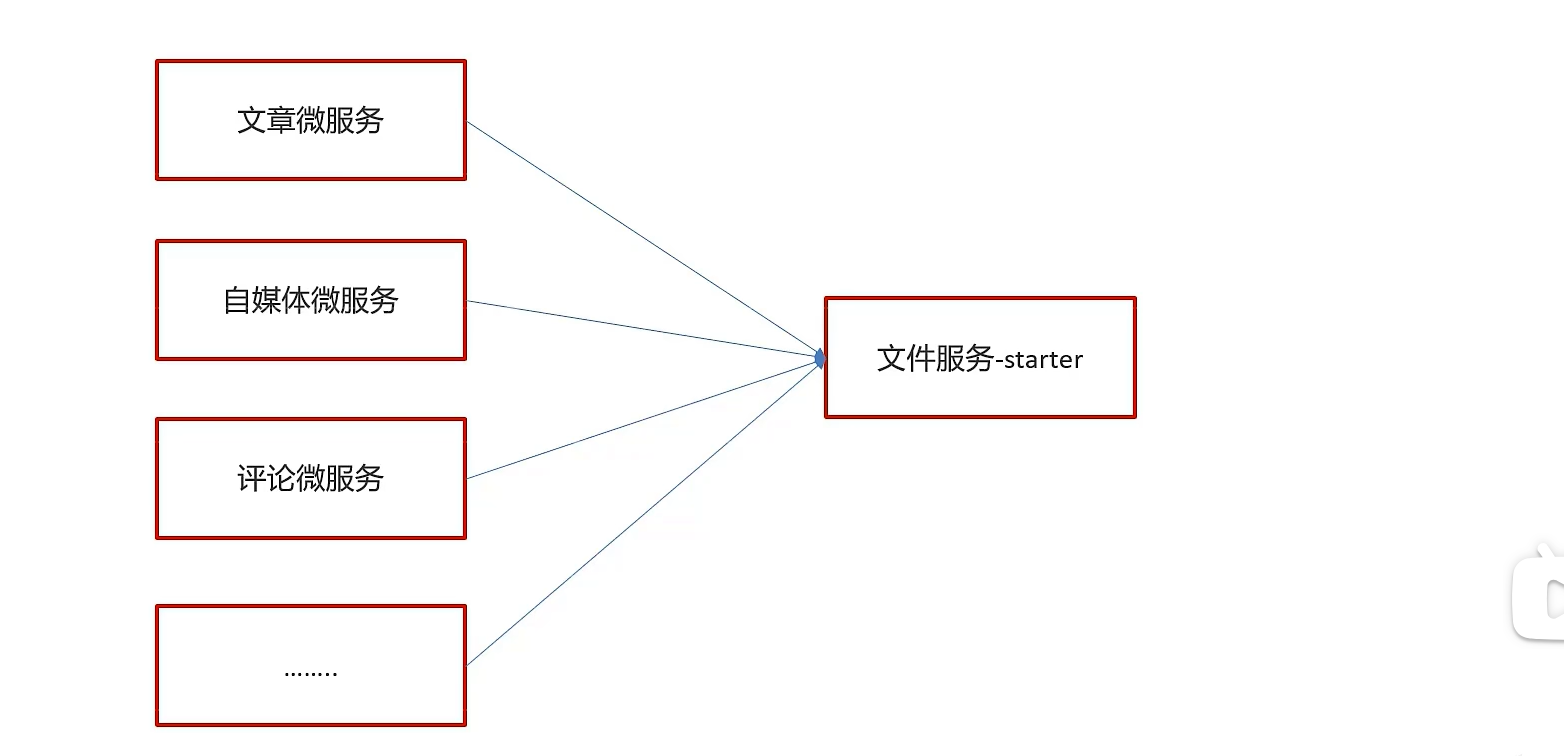
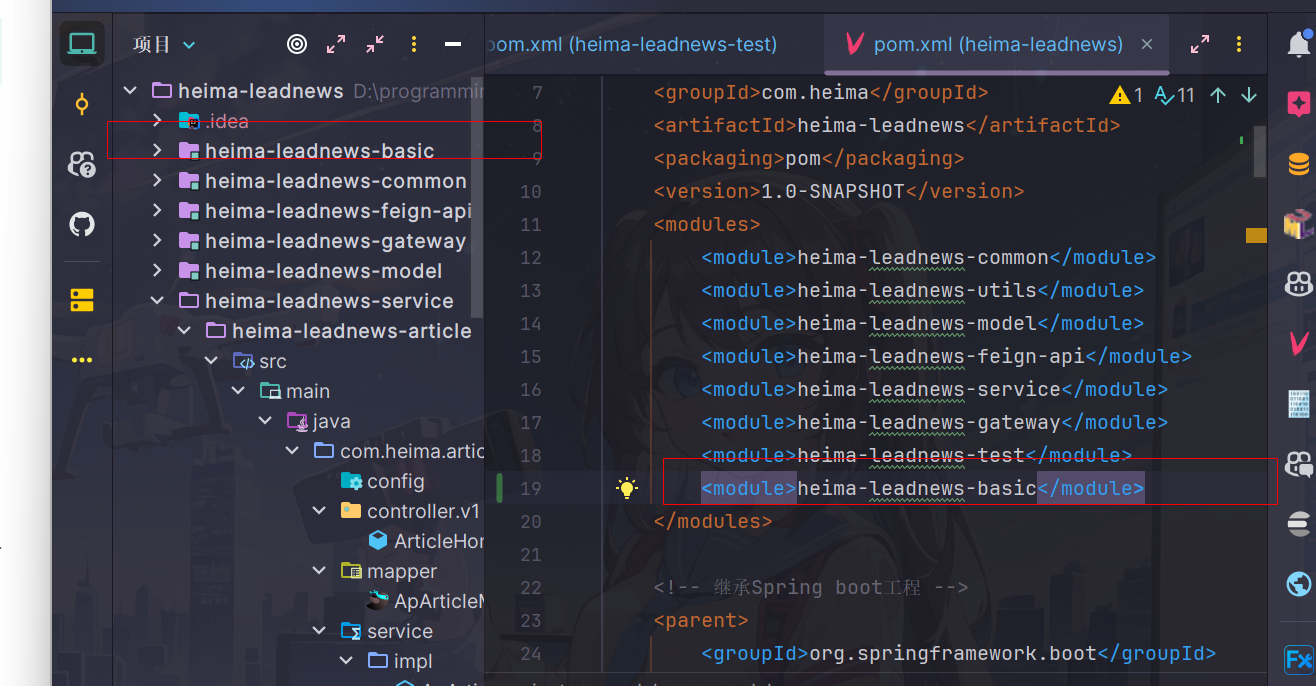
导入basic文件夹到父工程目录下面,父工程配置该模块即可
后面部分是模块各个部分内容代码和测试工程
starter内部细节
创建模块heima-file-starter
导入依赖
<dependencies>
    <dependency>
        <groupId>org.springframework.boot</groupId>
        <artifactId>spring-boot-autoconfigure</artifactId>
    </dependency>
    <dependency>
        <groupId>io.minio</groupId>
        <artifactId>minio</artifactId>
        <version>7.1.0</version>
    </dependency>
    <dependency>
        <groupId>org.springframework.boot</groupId>
        <artifactId>spring-boot-starter</artifactId>
    </dependency>
    <dependency>
        <groupId>org.springframework.boot</groupId>
        <artifactId>spring-boot-configuration-processor</artifactId>
        <optional>true</optional>
    </dependency>
    <dependency>
        <groupId>org.springframework.boot</groupId>
        <artifactId>spring-boot-starter-actuator</artifactId>
    </dependency>
</dependencies>
配置类
MinIOConfigProperties
package com.heima.file.config;


import lombok.Data;
import org.springframework.boot.context.properties.ConfigurationProperties;

import java.io.Serializable;

@Data
@ConfigurationProperties(prefix = "minio")  // 文件上传 配置前缀file.oss
public class MinIOConfigProperties implements Serializable {

    private String accessKey;
    private String secretKey;
    private String bucket;
    private String endpoint;
    private String readPath;
}
MinIOConfig
package com.heima.file.config;

import com.heima.file.service.FileStorageService;
import io.minio.MinioClient;
import lombok.Data;
import org.springframework.beans.factory.annotation.Autowired;
import org.springframework.boot.autoconfigure.condition.ConditionalOnClass;
import org.springframework.boot.context.properties.EnableConfigurationProperties;
import org.springframework.context.annotation.Bean;
import org.springframework.context.annotation.Configuration;


@Data
@Configuration
@EnableConfigurationProperties({MinIOConfigProperties.class})
//当引入FileStorageService接口时
@ConditionalOnClass(FileStorageService.class)
public class MinIOConfig {

   @Autowired
   private MinIOConfigProperties minIOConfigProperties;

    @Bean
    public MinioClient buildMinioClient(){
        return MinioClient
                .builder()
                .credentials(minIOConfigProperties.getAccessKey(), minIOConfigProperties.getSecretKey())
                .endpoint(minIOConfigProperties.getEndpoint())
                .build();
    }
}
封装操作minIO类
FileStorageService
package com.heima.file.service;

import java.io.InputStream;

/**
 * @author itheima
 */
public interface FileStorageService {


    /**
     *  上传图片文件
     * @param prefix  文件前缀
     * @param filename  文件名
     * @param inputStream 文件流
     * @return  文件全路径
     */
    public String uploadImgFile(String prefix, String filename,InputStream inputStream);

    /**
     *  上传html文件
     * @param prefix  文件前缀
     * @param filename   文件名
     * @param inputStream  文件流
     * @return  文件全路径
     */
    public String uploadHtmlFile(String prefix, String filename,InputStream inputStream);

    /**
     * 删除文件
     * @param pathUrl  文件全路径
     */
    public void delete(String pathUrl);

    /**
     * 下载文件
     * @param pathUrl  文件全路径
     * @return
     *
     */
    public byte[]  downLoadFile(String pathUrl);

}
MinIOFileStorageService
package com.heima.file.service.impl;


import com.heima.file.config.MinIOConfig;
import com.heima.file.config.MinIOConfigProperties;
import com.heima.file.service.FileStorageService;
import io.minio.GetObjectArgs;
import io.minio.MinioClient;
import io.minio.PutObjectArgs;
import io.minio.RemoveObjectArgs;
import lombok.extern.slf4j.Slf4j;
import org.springframework.beans.factory.annotation.Autowired;
import org.springframework.boot.context.properties.EnableConfigurationProperties;
import org.springframework.context.annotation.Import;
import org.springframework.util.StringUtils;

import java.io.ByteArrayOutputStream;
import java.io.IOException;
import java.io.InputStream;
import java.text.SimpleDateFormat;
import java.util.Date;

@Slf4j
@EnableConfigurationProperties(MinIOConfigProperties.class)
@Import(MinIOConfig.class)
public class MinIOFileStorageService implements FileStorageService {

    @Autowired
    private MinioClient minioClient;

    @Autowired
    private MinIOConfigProperties minIOConfigProperties;

    private final static String separator = "/";

    /**
     * @param dirPath
     * @param filename  yyyy/mm/dd/file.jpg
     * @return
     */
    public String builderFilePath(String dirPath,String filename) {
        StringBuilder stringBuilder = new StringBuilder(50);
        if(!StringUtils.isEmpty(dirPath)){
            stringBuilder.append(dirPath).append(separator);
        }
        SimpleDateFormat sdf = new SimpleDateFormat("yyyy/MM/dd");
        String todayStr = sdf.format(new Date());
        stringBuilder.append(todayStr).append(separator);
        stringBuilder.append(filename);
        return stringBuilder.toString();
    }

    /**
     *  上传图片文件
     * @param prefix  文件前缀
     * @param filename  文件名
     * @param inputStream 文件流
     * @return  文件全路径
     */
    @Override
    public String uploadImgFile(String prefix, String filename,InputStream inputStream) {
        String filePath = builderFilePath(prefix, filename);
        try {
            PutObjectArgs putObjectArgs = PutObjectArgs.builder()
                    .object(filePath)
                    .contentType("image/jpg")
                    .bucket(minIOConfigProperties.getBucket()).stream(inputStream,inputStream.available(),-1)
                    .build();
            minioClient.putObject(putObjectArgs);
            StringBuilder urlPath = new StringBuilder(minIOConfigProperties.getReadPath());
            urlPath.append(separator+minIOConfigProperties.getBucket());
            urlPath.append(separator);
            urlPath.append(filePath);
            return urlPath.toString();
        }catch (Exception ex){
            log.error("minio put file error.",ex);
            throw new RuntimeException("上传文件失败");
        }
    }

    /**
     *  上传html文件
     * @param prefix  文件前缀
     * @param filename   文件名
     * @param inputStream  文件流
     * @return  文件全路径
     */
    @Override
    public String uploadHtmlFile(String prefix, String filename,InputStream inputStream) {
        String filePath = builderFilePath(prefix, filename);
        try {
            PutObjectArgs putObjectArgs = PutObjectArgs.builder()
                    .object(filePath)
                    .contentType("text/html")
                    .bucket(minIOConfigProperties.getBucket()).stream(inputStream,inputStream.available(),-1)
                    .build();
            minioClient.putObject(putObjectArgs);
            StringBuilder urlPath = new StringBuilder(minIOConfigProperties.getReadPath());
            urlPath.append(separator+minIOConfigProperties.getBucket());
            urlPath.append(separator);
            urlPath.append(filePath);
            return urlPath.toString();
        }catch (Exception ex){
            log.error("minio put file error.",ex);
            ex.printStackTrace();
            throw new RuntimeException("上传文件失败");
        }
    }

    /**
     * 删除文件
     * @param pathUrl  文件全路径
     */
    @Override
    public void delete(String pathUrl) {
        String key = pathUrl.replace(minIOConfigProperties.getEndpoint()+"/","");
        int index = key.indexOf(separator);
        String bucket = key.substring(0,index);
        String filePath = key.substring(index+1);
        // 删除Objects
        RemoveObjectArgs removeObjectArgs = RemoveObjectArgs.builder().bucket(bucket).object(filePath).build();
        try {
            minioClient.removeObject(removeObjectArgs);
        } catch (Exception e) {
            log.error("minio remove file error.  pathUrl:{}",pathUrl);
            e.printStackTrace();
        }
    }


    /**
     * 下载文件
     * @param pathUrl  文件全路径
     * @return  文件流
     *
     */
    @Override
    public byte[] downLoadFile(String pathUrl)  {
        String key = pathUrl.replace(minIOConfigProperties.getEndpoint()+"/","");
        int index = key.indexOf(separator);
        String bucket = key.substring(0,index);
        String filePath = key.substring(index+1);
        InputStream inputStream = null;
        try {
            inputStream = minioClient.getObject(GetObjectArgs.builder().bucket(minIOConfigProperties.getBucket()).object(filePath).build());
        } catch (Exception e) {
            log.error("minio down file error.  pathUrl:{}",pathUrl);
            e.printStackTrace();
        }

        ByteArrayOutputStream byteArrayOutputStream = new ByteArrayOutputStream();
        byte[] buff = new byte[100];
        int rc = 0;
        while (true) {
            try {
                if (!((rc = inputStream.read(buff, 0, 100)) > 0)) break;
            } catch (IOException e) {
                e.printStackTrace();
            }
            byteArrayOutputStream.write(buff, 0, rc);
        }
        return byteArrayOutputStream.toByteArray();
    }
}
对外加入自动配置
在resources中新建META-INF/spring.factories
org.springframework.boot.autoconfigure.EnableAutoConfiguration=\
  com.heima.file.service.impl.MinIOFileStorageService
导入starter测试
第一,导入heima-file-starter的依赖
第二,在微服务中添加minio所需要的配置
minio:
  accessKey: minio
  secretKey: leadnews
  bucket: leadnews
  endpoint: http://192.168.200.130:9000
  readPath: http://192.168.200.130:9000
第三,在对应使用的业务类中注入FileStorageService,样例如下:
package com.heima.minio.test;


import com.heima.file.service.FileStorageService;
import com.heima.minio.MinioApplication;
import org.junit.Test;
import org.junit.runner.RunWith;
import org.springframework.beans.factory.annotation.Autowired;
import org.springframework.boot.test.context.SpringBootTest;
import org.springframework.test.context.junit4.SpringRunner;

import java.io.FileInputStream;
import java.io.FileNotFoundException;

@SpringBootTest(classes = MinioApplication.class)
@RunWith(SpringRunner.class)
public class MinioTest {

    @Autowired
    private FileStorageService fileStorageService;

    @Test
    public void testUpdateImgFile() {
        try {
            FileInputStream fileInputStream = new FileInputStream("E:\\tmp\\ak47.jpg");
            String filePath = fileStorageService.uploadImgFile("", "ak47.jpg", fileInputStream);
            System.out.println(filePath);
        } catch (FileNotFoundException e) {
            e.printStackTrace();
        }
    }
}
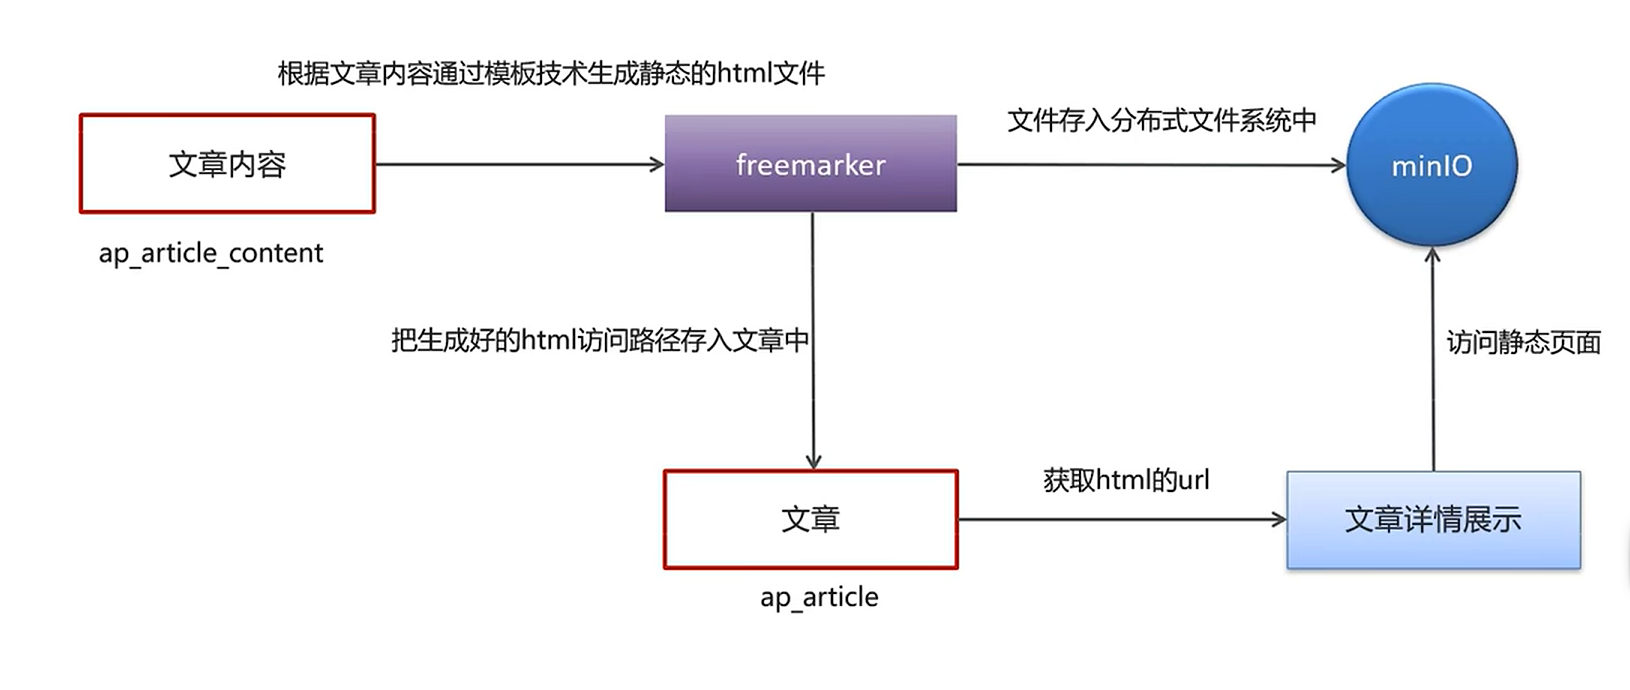
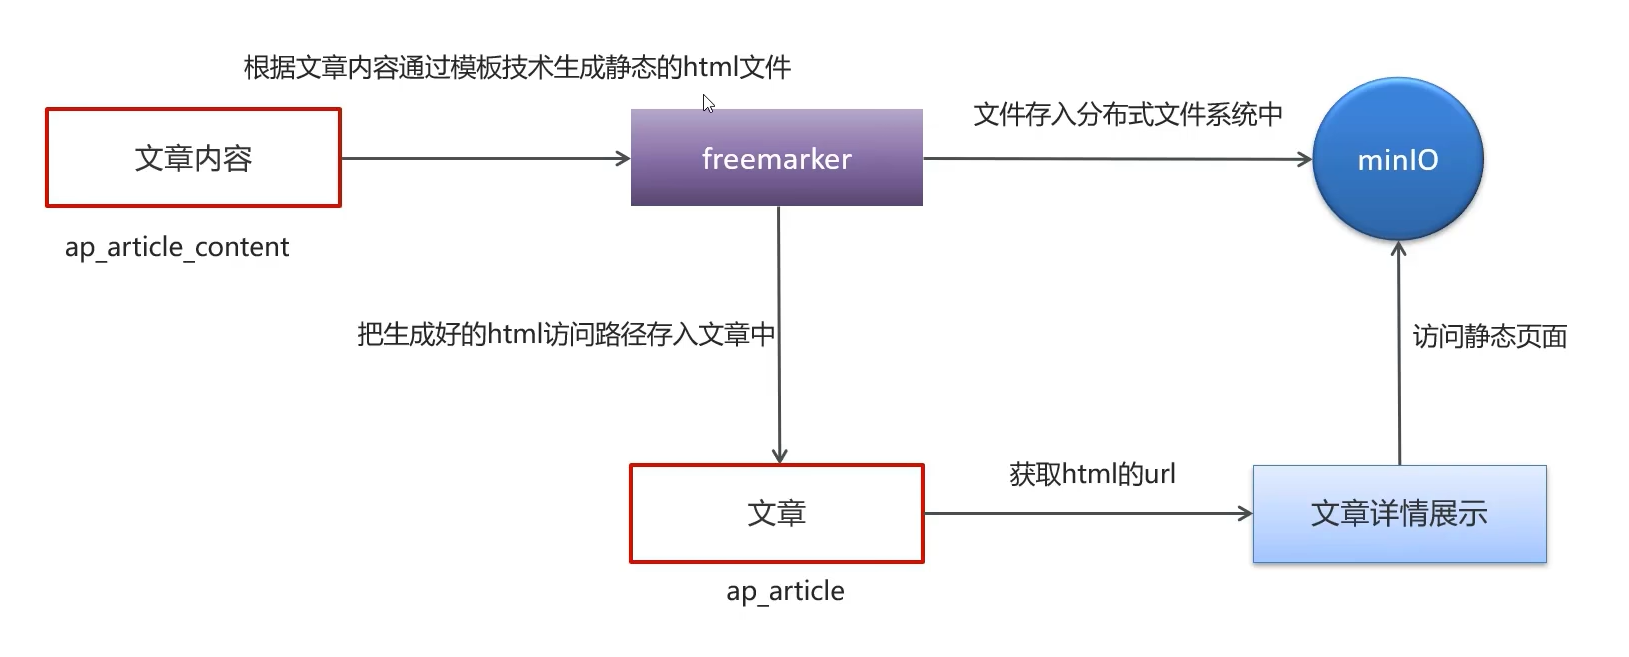
文章详情代码实现
实现思路:通过freemarker根据文章内容生成html静态页面,将页面上传到minIO上,返回url存储到数据库,当查看文章详情的时候根据url获取对应页面查看详情
在article模块添加minio和freemarker支持
微服务导入miniostarter
<dependencies>
    <dependency>
        <groupId>org.springframework.boot</groupId>
        <artifactId>spring-boot-starter-freemarker</artifactId>
    </dependency>
    <dependency>
        <groupId>com.heima</groupId>
        <artifactId>heima-file-starter</artifactId>
        <version>1.0-SNAPSHOT</version>
    </dependency>
</dependencies>
在nacos配置minio
老师已经配置完了,而且自己只需要根据自己情况更改minio链接密码和连接地址即可,这里就不演示了
导入模板文件和样式
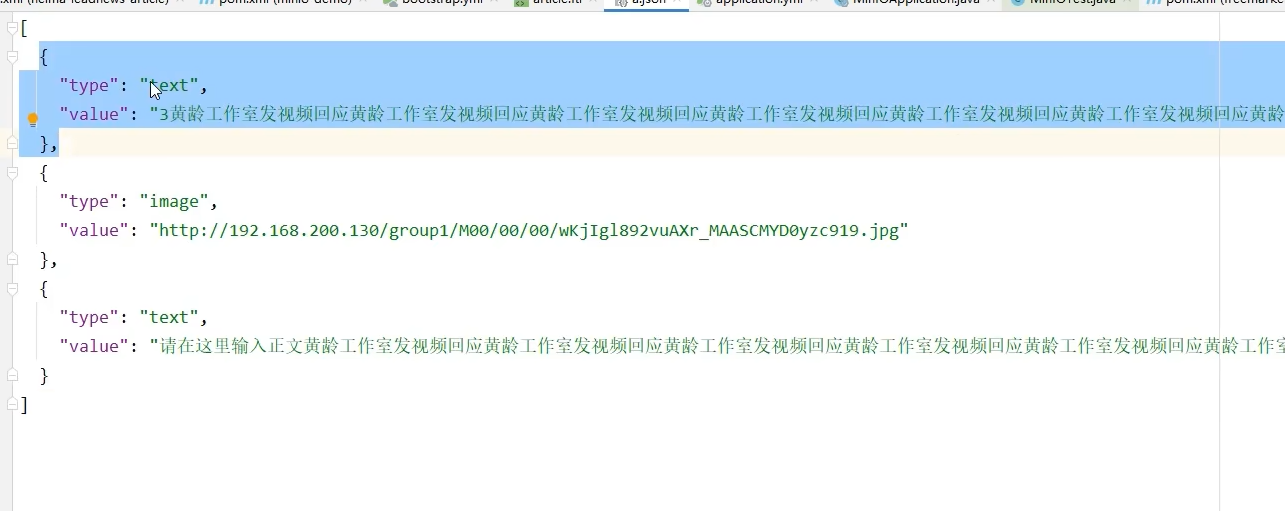
模板文件内容
文章数据库中存储的长文本其实每一条由多个对象组成,包括文本和图片,模板文件会根据顺序遍历这些内容并展示在静态页面上
<!DOCTYPE html>
<html>

<head>
    <meta charset="utf-8">
    <meta http-equiv="X-UA-Compatible" content="IE=edge">
    <meta name="viewport"
          content="width=device-width, initial-scale=1.0, maximum-scale=1.0, minimum-scale=1.0, viewport-fit=cover">
    <title>黑马头条</title>
    <!-- 引入样式文件 -->
    <link rel="stylesheet" href="https://cdn.jsdelivr.net/npm/vant@2.12.20/lib/index.css">
    <!-- 页面样式 -->
    <link rel="stylesheet" href="../../../plugins/css/index.css">
</head>

<body>
<div id="app">
    <div class="article">
        <van-row>
            <van-col span="24" class="article-title" v-html="title"></van-col>
        </van-row>

        <van-row type="flex" align="center" class="article-header">
            <van-col span="3">
                <van-image round class="article-avatar" src="https://p3.pstatp.com/thumb/1480/7186611868"></van-image>
            </van-col>
            <van-col span="16">
                <div v-html="authorName"></div>
                <div>{{ publishTime | timestampToDateTime }}</div>
            </van-col>
            <van-col span="5">
                <van-button round :icon="relation.isfollow ? '' : 'plus'" type="info" class="article-focus"
                            :text="relation.isfollow ? '取消关注' : '关注'" :loading="followLoading" @click="handleClickArticleFollow">
                </van-button>
            </van-col>
        </van-row>

        <van-row class="article-content">
            <#if content??>
                <#list content as item>
                    <#if item.type='text'>
                        <van-col span="24" class="article-text">${item.value}</van-col>
                    <#else>
                        <van-col span="24" class="article-image">
                            <van-image width="100%" src="${item.value}"></van-image>
                        </van-col>
                    </#if>
                </#list>
            </#if>
        </van-row>

        <van-row type="flex" justify="center" class="article-action">
            <van-col>
                <van-button round :icon="relation.islike ? 'good-job' : 'good-job-o'" class="article-like"
                            :loading="likeLoading" :text="relation.islike ? '取消赞' : '点赞'" @click="handleClickArticleLike"></van-button>
                <van-button round :icon="relation.isunlike ? 'delete' : 'delete-o'" class="article-unlike"
                            :loading="unlikeLoading" @click="handleClickArticleUnlike">不喜欢</van-button>
            </van-col>
        </van-row>

        <!-- 文章评论列表 -->
        <van-list v-model="commentsLoading" :finished="commentsFinished" finished-text="没有更多了"
                  @load="onLoadArticleComments">
            <van-row id="#comment-view" type="flex" class="article-comment" v-for="(item, index) in comments" :key="index">
                <van-col span="3">
                    <van-image round src="https://p3.pstatp.com/thumb/1480/7186611868" class="article-avatar"></van-image>
                </van-col>
                <van-col span="21">
                    <van-row type="flex" align="center" justify="space-between">
                        <van-col class="comment-author" v-html="item.authorName"></van-col>
                        <van-col>
                            <van-button round :icon="item.operation === 0 ? 'good-job' : 'good-job-o'" size="normal"
                                        @click="handleClickCommentLike(item)">{{ item.likes || '' }}
                            </van-button>
                        </van-col>
                    </van-row>

                    <van-row>
                        <van-col class="comment-content" v-html="item.content"></van-col>
                    </van-row>
                    <van-row type="flex" align="center">
                        <van-col span="10" class="comment-time">
                            {{ item.createdTime | timestampToDateTime }}
                        </van-col>
                        <van-col span="3">
                            <van-button round size="normal" v-html="item.reply" @click="showCommentRepliesPopup(item.id)">回复 {{
                                item.reply || '' }}
                            </van-button>
                        </van-col>
                    </van-row>
                </van-col>
            </van-row>
        </van-list>
    </div>
    <!-- 文章底部栏 -->
    <van-row type="flex" justify="space-around" align="center" class="article-bottom-bar">
        <van-col span="13">
            <van-field v-model="commentValue" placeholder="写评论">
                <template #button>
                    <van-button icon="back-top" @click="handleSaveComment"></van-button>
                </template>
            </van-field>
        </van-col>
        <van-col span="3">
            <van-button icon="comment-o" @click="handleScrollIntoCommentView"></van-button>
        </van-col>
        <van-col span="3">
            <van-button :icon="relation.iscollection ? 'star' : 'star-o'" :loading="collectionLoading"
                        @click="handleClickArticleCollection"></van-button>
        </van-col>
        <van-col span="3">
            <van-button icon="share-o"></van-button>
        </van-col>
    </van-row>

    <!-- 评论Popup 弹出层 -->
    <van-popup v-model="showPopup" closeable position="bottom"
               :style="{ width: '750px', height: '60%', left: '50%', 'margin-left': '-375px' }">
        <!-- 评论回复列表 -->
        <van-list v-model="commentRepliesLoading" :finished="commentRepliesFinished" finished-text="没有更多了"
                  @load="onLoadCommentReplies">
            <van-row id="#comment-reply-view" type="flex" class="article-comment-reply"
                     v-for="(item, index) in commentReplies" :key="index">
                <van-col span="3">
                    <van-image round src="https://p3.pstatp.com/thumb/1480/7186611868" class="article-avatar"></van-image>
                </van-col>
                <van-col span="21">
                    <van-row type="flex" align="center" justify="space-between">
                        <van-col class="comment-author" v-html="item.authorName"></van-col>
                        <van-col>
                            <van-button round :icon="item.operation === 0 ? 'good-job' : 'good-job-o'" size="normal"
                                        @click="handleClickCommentReplyLike(item)">{{ item.likes || '' }}
                            </van-button>
                        </van-col>
                    </van-row>

                    <van-row>
                        <van-col class="comment-content" v-html="item.content"></van-col>
                    </van-row>
                    <van-row type="flex" align="center">
                        <!-- TODO: js计算时间差 -->
                        <van-col span="10" class="comment-time">
                            {{ item.createdTime | timestampToDateTime }}
                        </van-col>
                    </van-row>
                </van-col>
            </van-row>
        </van-list>
        <!-- 评论回复底部栏 -->
        <van-row type="flex" justify="space-around" align="center" class="comment-reply-bottom-bar">
            <van-col span="13">
                <van-field v-model="commentReplyValue" placeholder="写评论">
                    <template #button>
                        <van-button icon="back-top" @click="handleSaveCommentReply"></van-button>
                    </template>
                </van-field>
            </van-col>
            <van-col span="3">
                <van-button icon="comment-o"></van-button>
            </van-col>
            <van-col span="3">
                <van-button icon="star-o"></van-button>
            </van-col>
            <van-col span="3">
                <van-button icon="share-o"></van-button>
            </van-col>
        </van-row>
    </van-popup>
</div>

<!-- 引入 Vue 和 Vant 的 JS 文件 -->
<script src=" https://cdn.jsdelivr.net/npm/vue/dist/vue.min.js">
</script>
<script src="https://cdn.jsdelivr.net/npm/vant@2.12.20/lib/vant.min.js"></script>
<!-- 引入 Axios 的 JS 文件 -->
<#--<script src="https://unpkg.com/axios/dist/axios.min.js"></script>-->
<script src="../../../plugins/js/axios.min.js"></script>
<!-- 页面逻辑 -->
<script src="../../../plugins/js/index.js"></script>
</body>

</html>
将资料中的index.js和index.css上传到minio中
这步老师已经帮忙上传了,因此不用自己手动上传了
ℹ️其中老师还上传了一个
axios.min.js的文件,因为正常这个文件是通过网络访问请求得到的,如果网络不好的话,可以把这个文件上传到本地minIO中,这样就不必请求网络了
新增测试类
在article微服务中新增测试类(后期新增文章的时候在将生成静态页封装到服务中,暂时将写好的代码存放在测试类中)
就用这篇文章测试一下吧
测试类代码
package com.heima.article.test;
import com.alibaba.fastjson.JSONArray;
import com.baomidou.mybatisplus.core.toolkit.Wrappers;
import com.heima.article.ArticleApplication;
import com.heima.article.mapper.ApArticleContentMapper;
import com.heima.article.service.ApArticleService;
import com.heima.file.service.FileStorageService;
import com.heima.model.article.pojos.ApArticle;
import com.heima.model.article.pojos.ApArticleContent;
import freemarker.template.Configuration;
import freemarker.template.Template;
import freemarker.template.TemplateException;
import java.io.ByteArrayInputStream;
import java.io.IOException;
import java.io.InputStream;
import java.io.StringWriter;
import java.util.HashMap;
import java.util.Map;
import org.apache.commons.lang3.StringUtils;
import org.junit.Test;
import org.junit.runner.RunWith;
import org.springframework.beans.factory.annotation.Autowired;
import org.springframework.boot.test.context.SpringBootTest;
import org.springframework.test.context.junit4.SpringRunner;
@SpringBootTest(classes = ArticleApplication.class)
@RunWith(SpringRunner.class)
public class ArticleFreemarkerTest {
@Autowired
private ApArticleContentMapper apArticleContentMapper;
@Autowired
private Configuration configuration;
@Autowired
private FileStorageService fileStorageService;
@Autowired
private ApArticleService apArticleService;
@Test
public void testCreateStaticUrl() throws IOException, TemplateException {
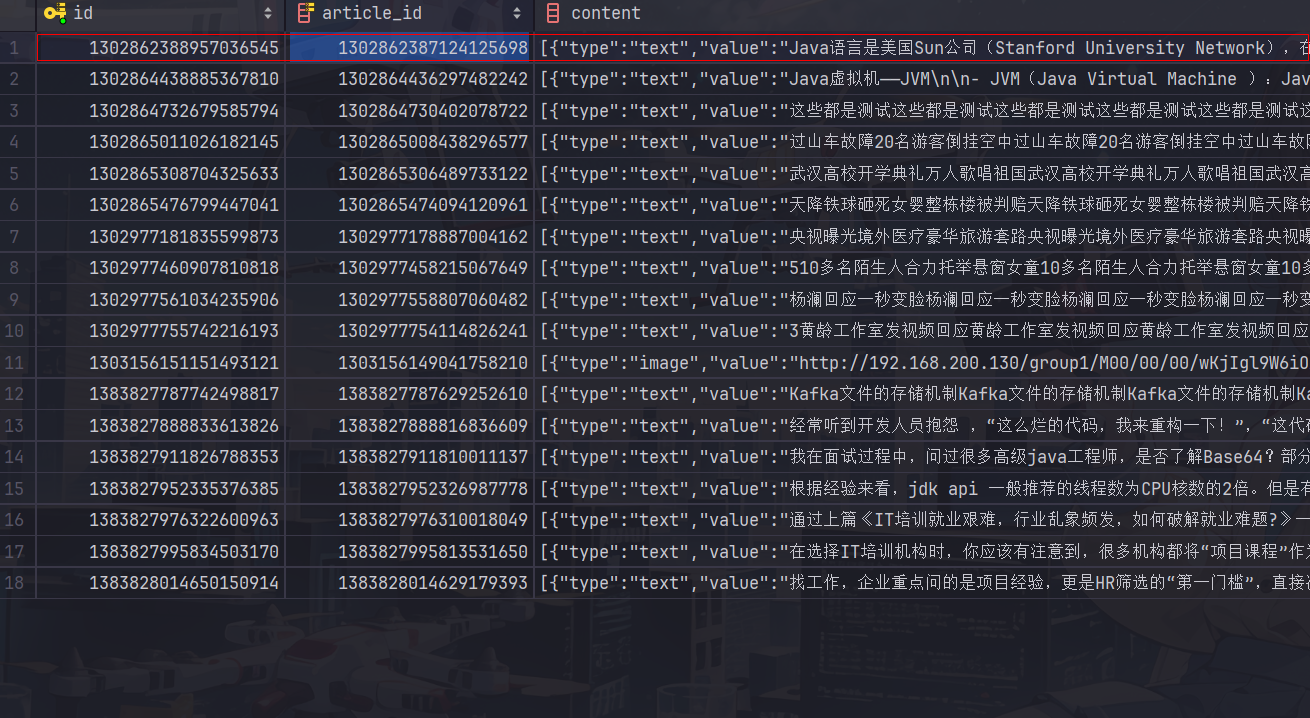
//获取文章内容
ApArticleContent apArticleContent = apArticleContentMapper.selectOne(
Wrappers.<ApArticleContent>lambdaQuery()
.eq(ApArticleContent::getArticleId, "1302862387124125698"));
if (apArticleContent != null || StringUtils.isNotBlank(apArticleContent.getContent())) {
//生成静态页面
Template template = configuration.getTemplate("article.ftl");
//数据模型
Map<String,Object> content = new HashMap<>();
content.put("content", JSONArray.parseArray(apArticleContent.getContent()));
StringWriter out = new StringWriter();
template.process(content,out);
//上传到minio中
InputStream in = new ByteArrayInputStream(out.toString().getBytes());
String staticUrl = fileStorageService.uploadHtmlFile("", apArticleContent.getArticleId()+".html", in);
//修改ap_article表,保存static_url字段
apArticleService.update(Wrappers.<ApArticle>lambdaUpdate()
.eq(ApArticle::getId, apArticleContent.getArticleId())
.set(ApArticle::getStaticUrl, staticUrl));
}
}
}
测试成功
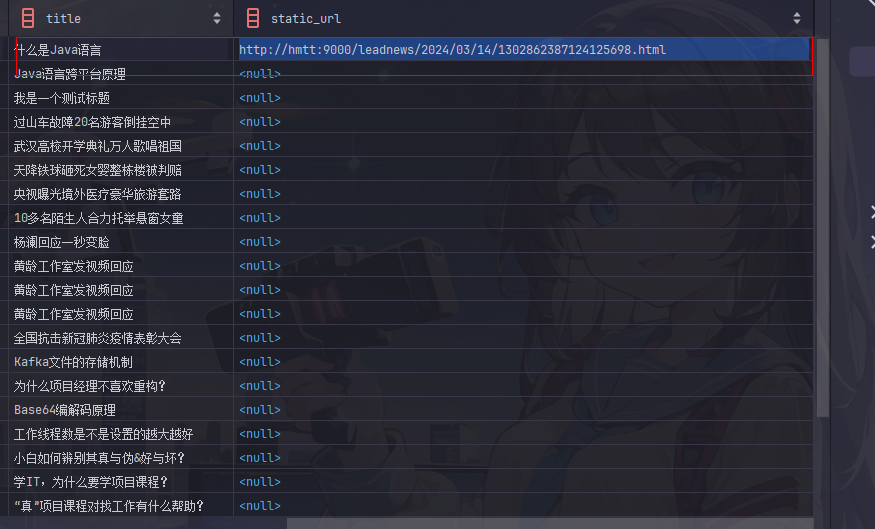
访问对应地址加载出来了静态页面
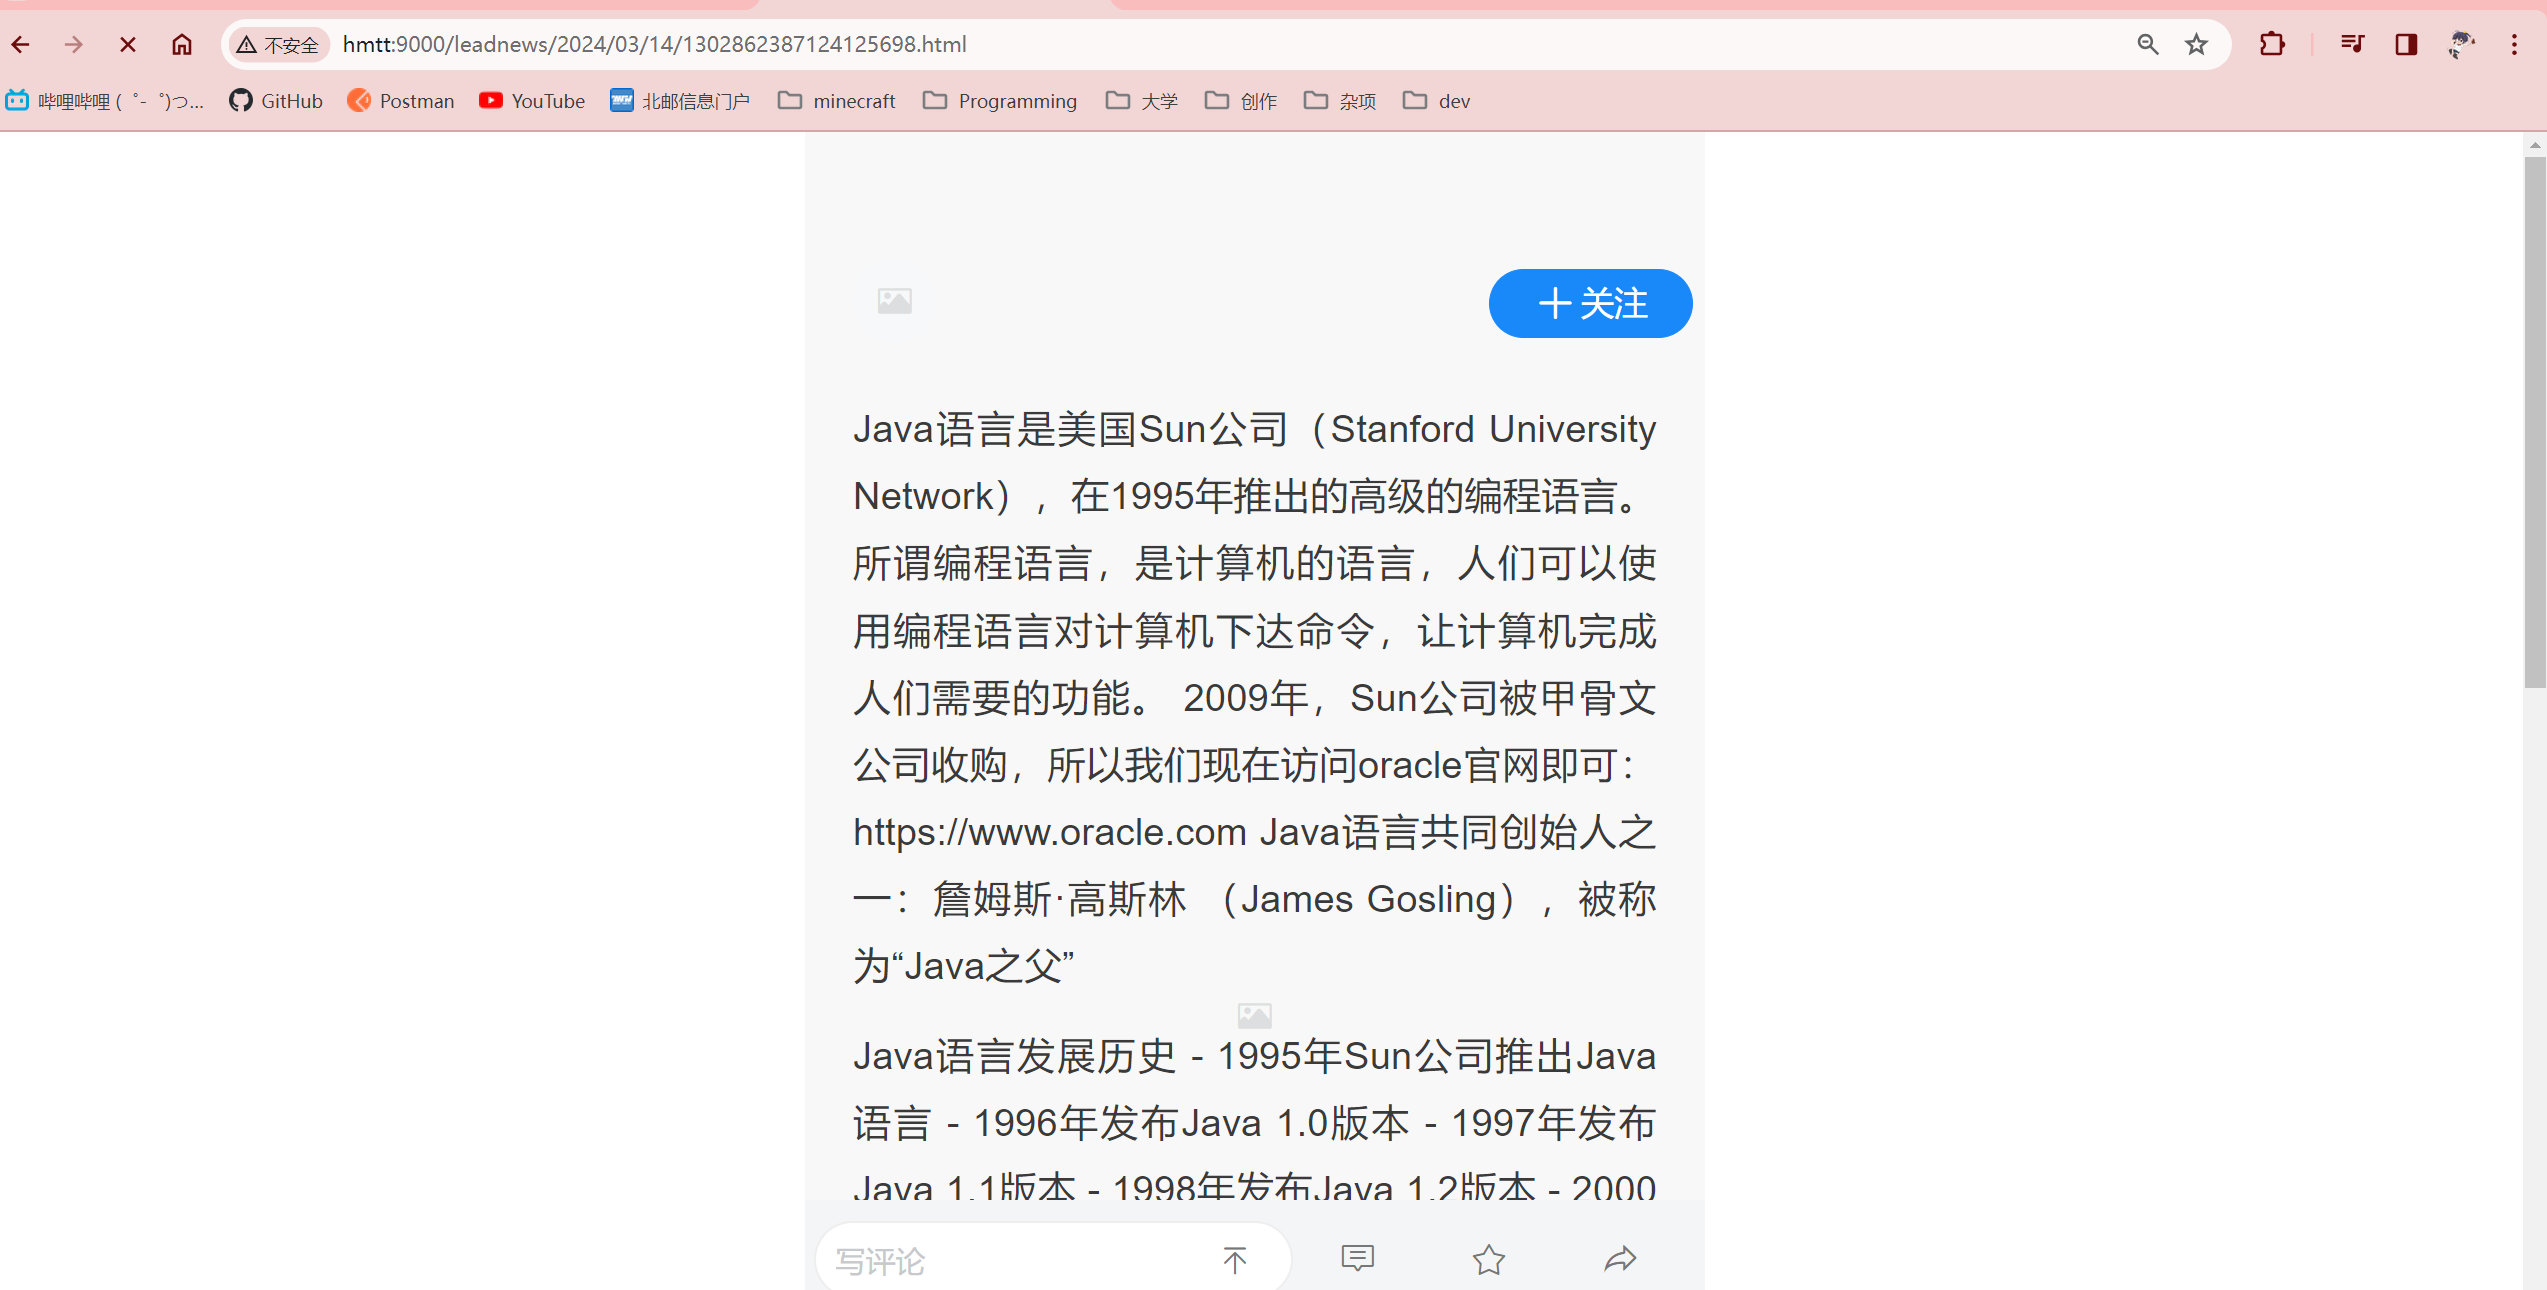
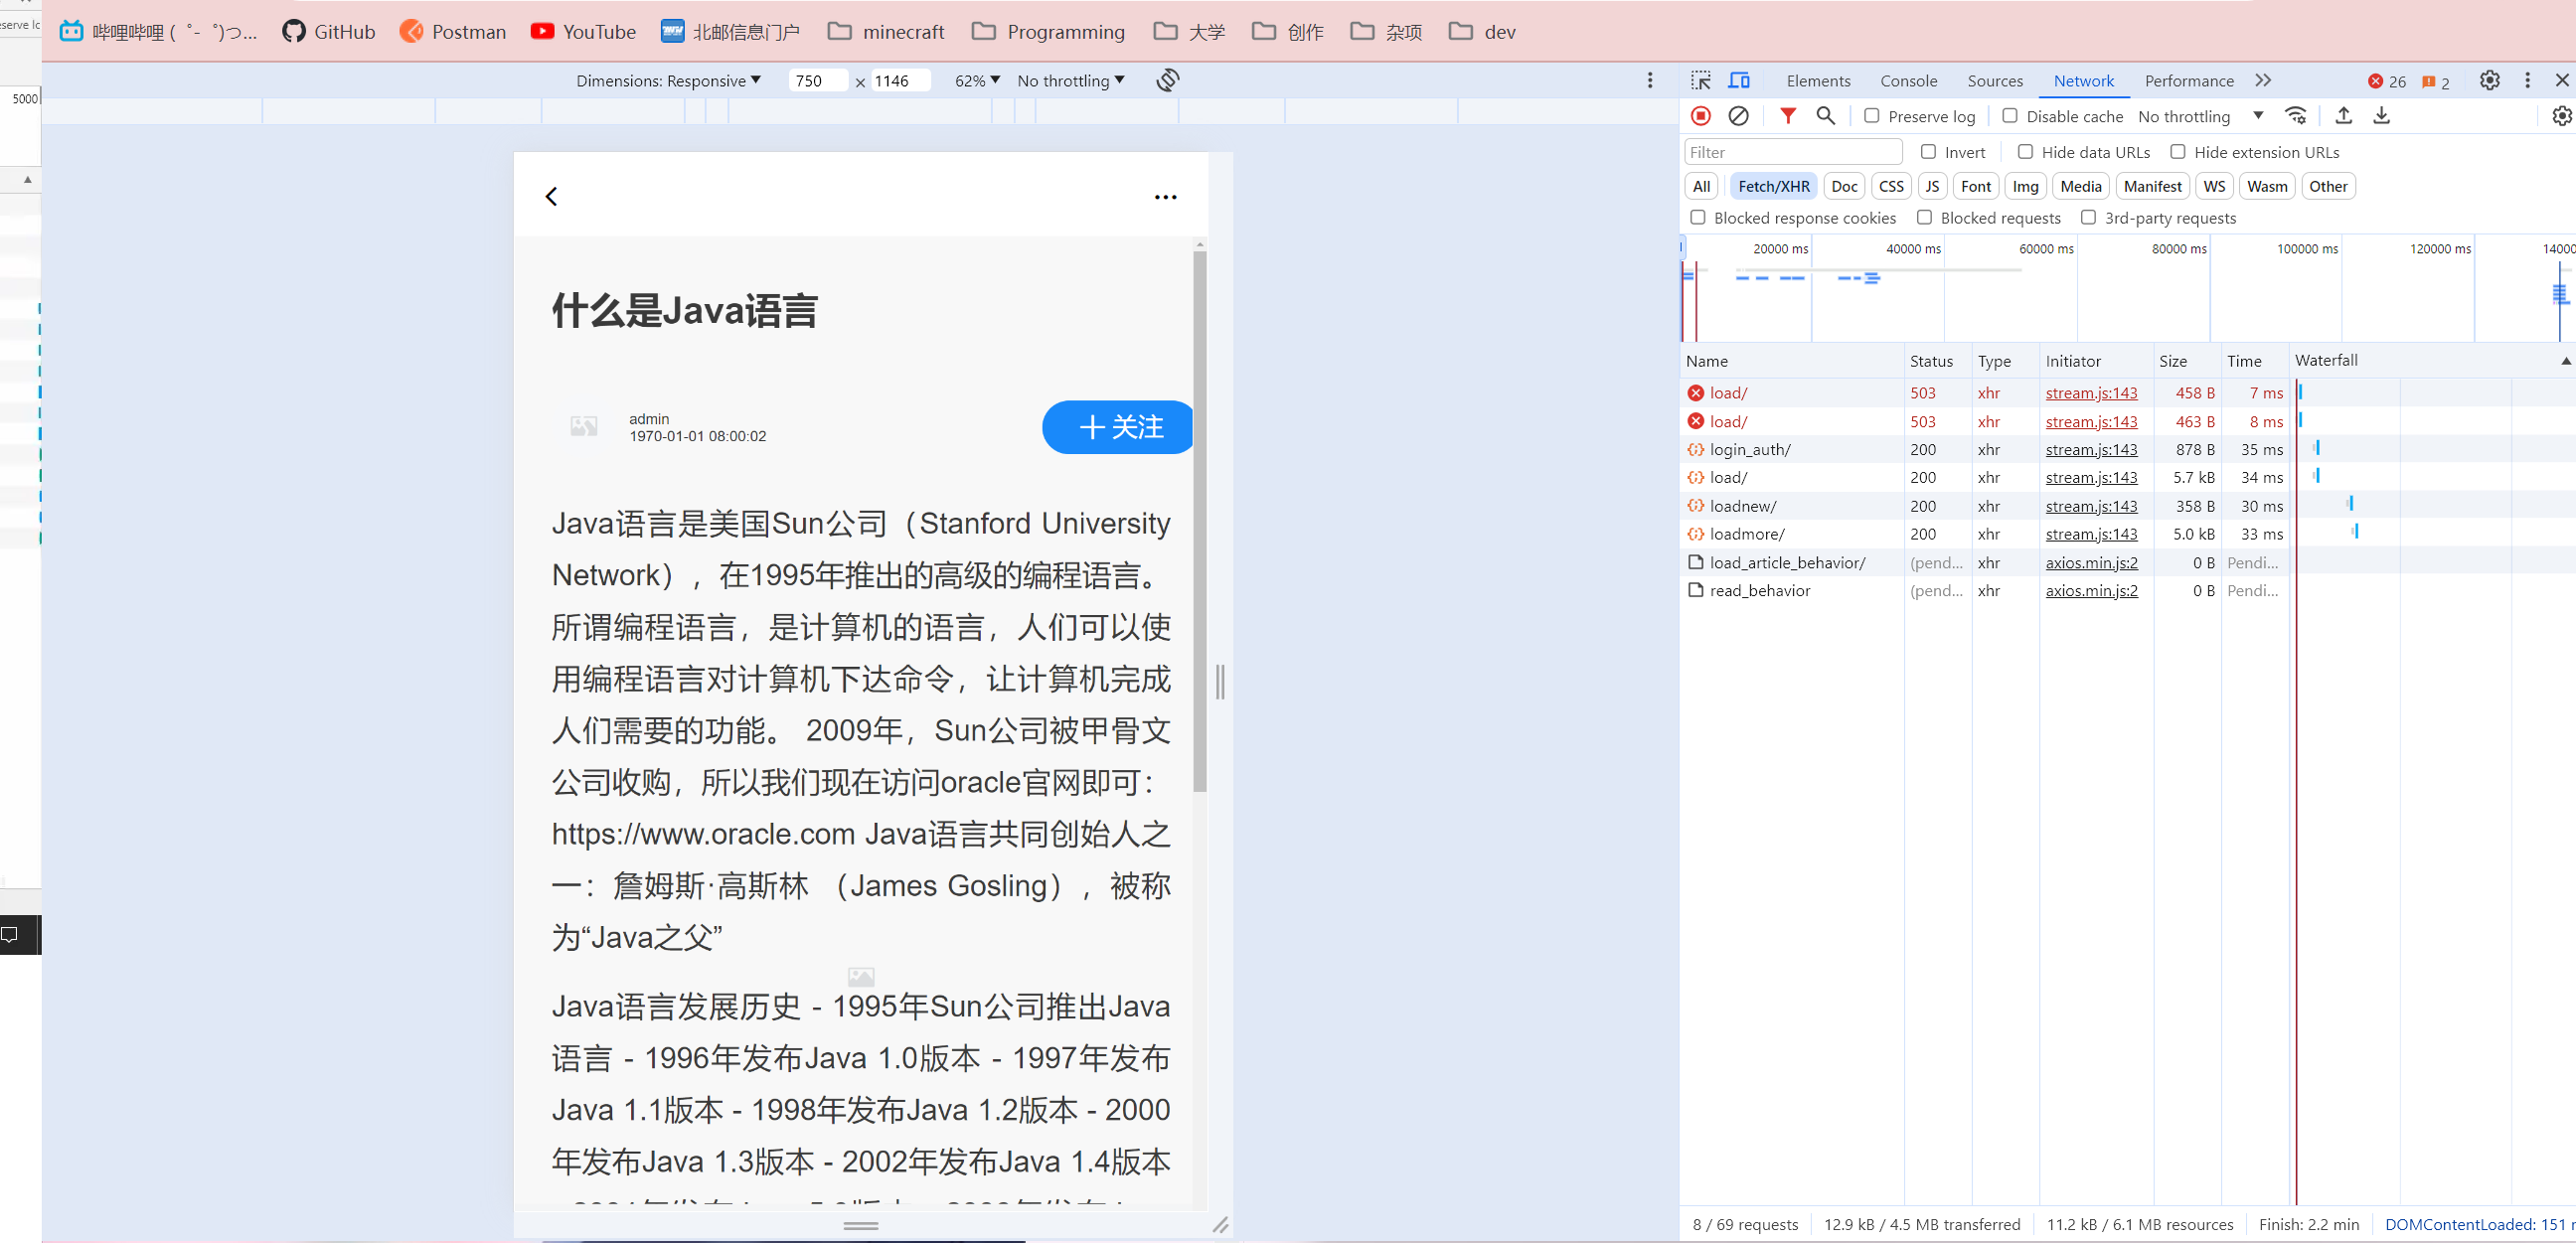
启动前后端,可以从文档列表中根据静态地址跳转到文章详情页
完成了任务记得更新一下apifox,然后把代码提交一下
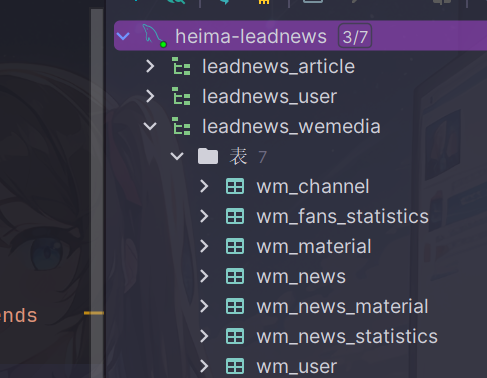
Day03 2024.03.14 自媒体文章发布
学习内容
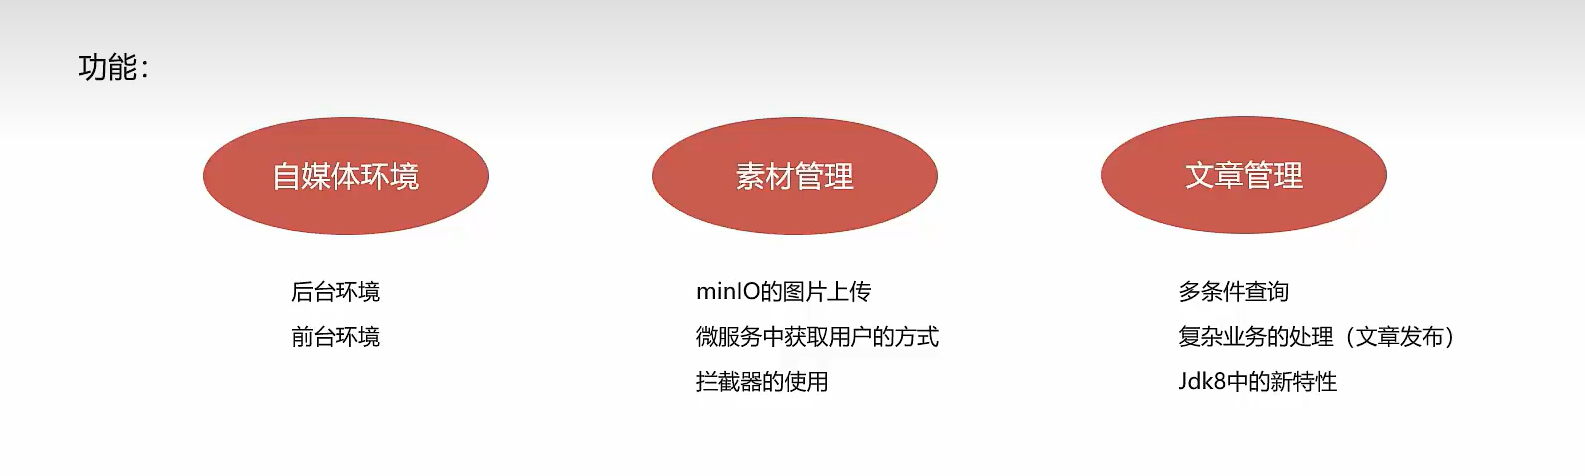
自媒体前后端搭建
后台搭建
-
导入sql脚本创建数据库(记得先自己创建数据库再执行sql语句)
-
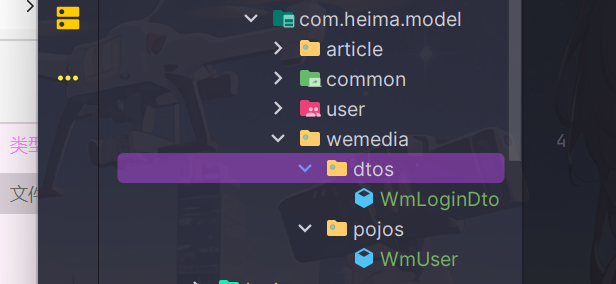
导入model实体类
- 导入微服务模块
记得修改相关配置(bootstrap和logback日志目录)
- 进行nacos配置
同样老师已经导入,修改成自己的地址即可
spring:
  kafka:
    bootstrap-servers: hmtt:9092
    producer:
      retries: 10
      key-serializer: org.apache.kafka.common.serialization.StringSerializer
      value-serializer: org.apache.kafka.common.serialization.StringSerializer
  datasource:
    driver-class-name: com.mysql.jdbc.Driver
    url: jdbc:mysql://hmtt:3306/leadnews_wemedia?useUnicode=true&characterEncoding=UTF-8&serverTimezone=UTC&useSSL=false
    username: root
    password: 123456
# 设置Mapper接口所对应的XML文件位置,如果你在Mapper接口中有自定义方法,需要进行该配置
mybatis-plus:
  mapper-locations: classpath*:mapper/*.xml
  # 设置别名包扫描路径,通过该属性可以给包中的类注册别名
  type-aliases-package: com.heima.model.media.pojos

minio:
  accessKey: minio
  secretKey: leadnews
  bucket: leadnews
  endpoint: http://hmtt:9000
  readPath: http://hmtt:9000
aliyun:
  accessKeyId: LTAI5tCWHCcfvqQzu8k2oKmX
  secret: auoKUFsghimbfVQHpy7gtRyBkoR4vc
  #aliyun.scenes=porn,terrorism,ad,qrcode,live,logo
  scenes: terrorism

feign:
  # 开启feign对hystrix熔断降级的支持
  hystrix:
    enabled: true
  # 修改调用超时时间
  client:
    config:
      default:
        connectTimeout: 2000
        readTimeout: 2000
- 导入网关微服务
- 配置网关nacos
同上
前台搭建
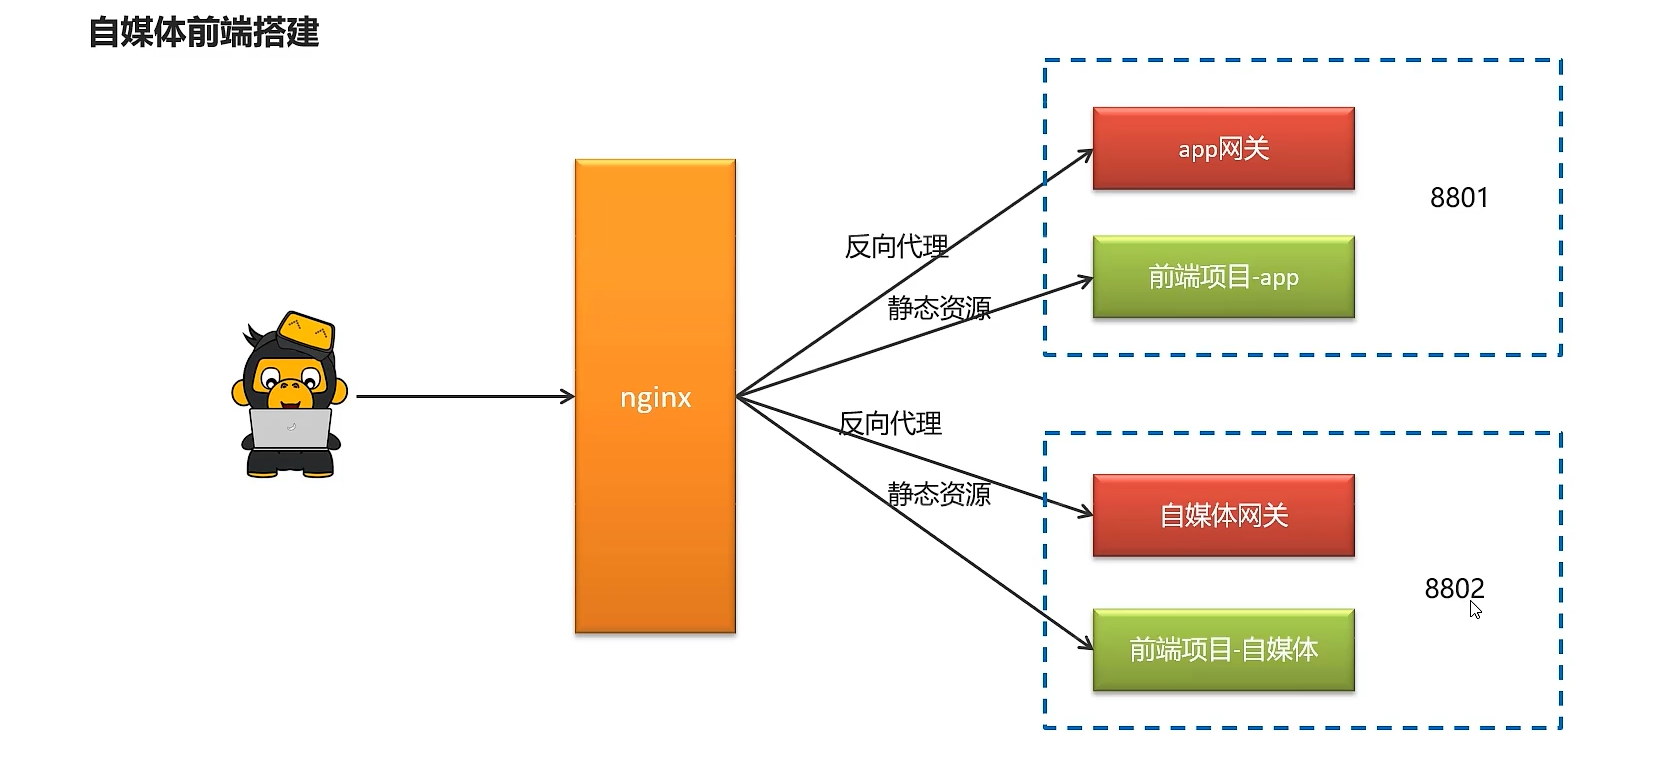
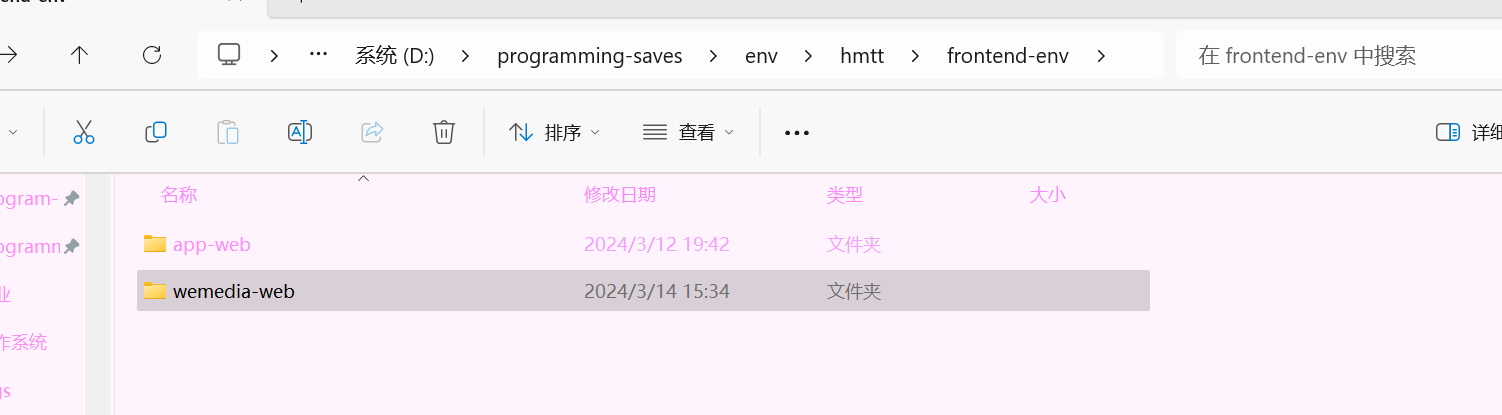
- 解压前端目录
- 配置wemedia的nginx配置
upstream  heima-wemedia-gateway{
    server localhost:51602;
}
server {
	listen 8802;
	location / {
		root D:/programming-saves/env/hmtt/frontend-env/wemedia-web/;
		index index.html;
	}

	location ~/wemedia/MEDIA/(.*) {
		proxy_pass http://heima-wemedia-gateway/$1;
		proxy_set_header HOST $host;  # 不改变源请求头的值
		proxy_pass_request_body on;  #开启获取请求体
		proxy_pass_request_headers on;  #开启获取请求头
		proxy_set_header X-Real-IP $remote_addr;   # 记录真实发出请求的客户端IP
		proxy_set_header X-Forwarded-For $proxy_add_x_forwarded_for;  #记录代理信息
	}
}
- 启动nginx,测试前端
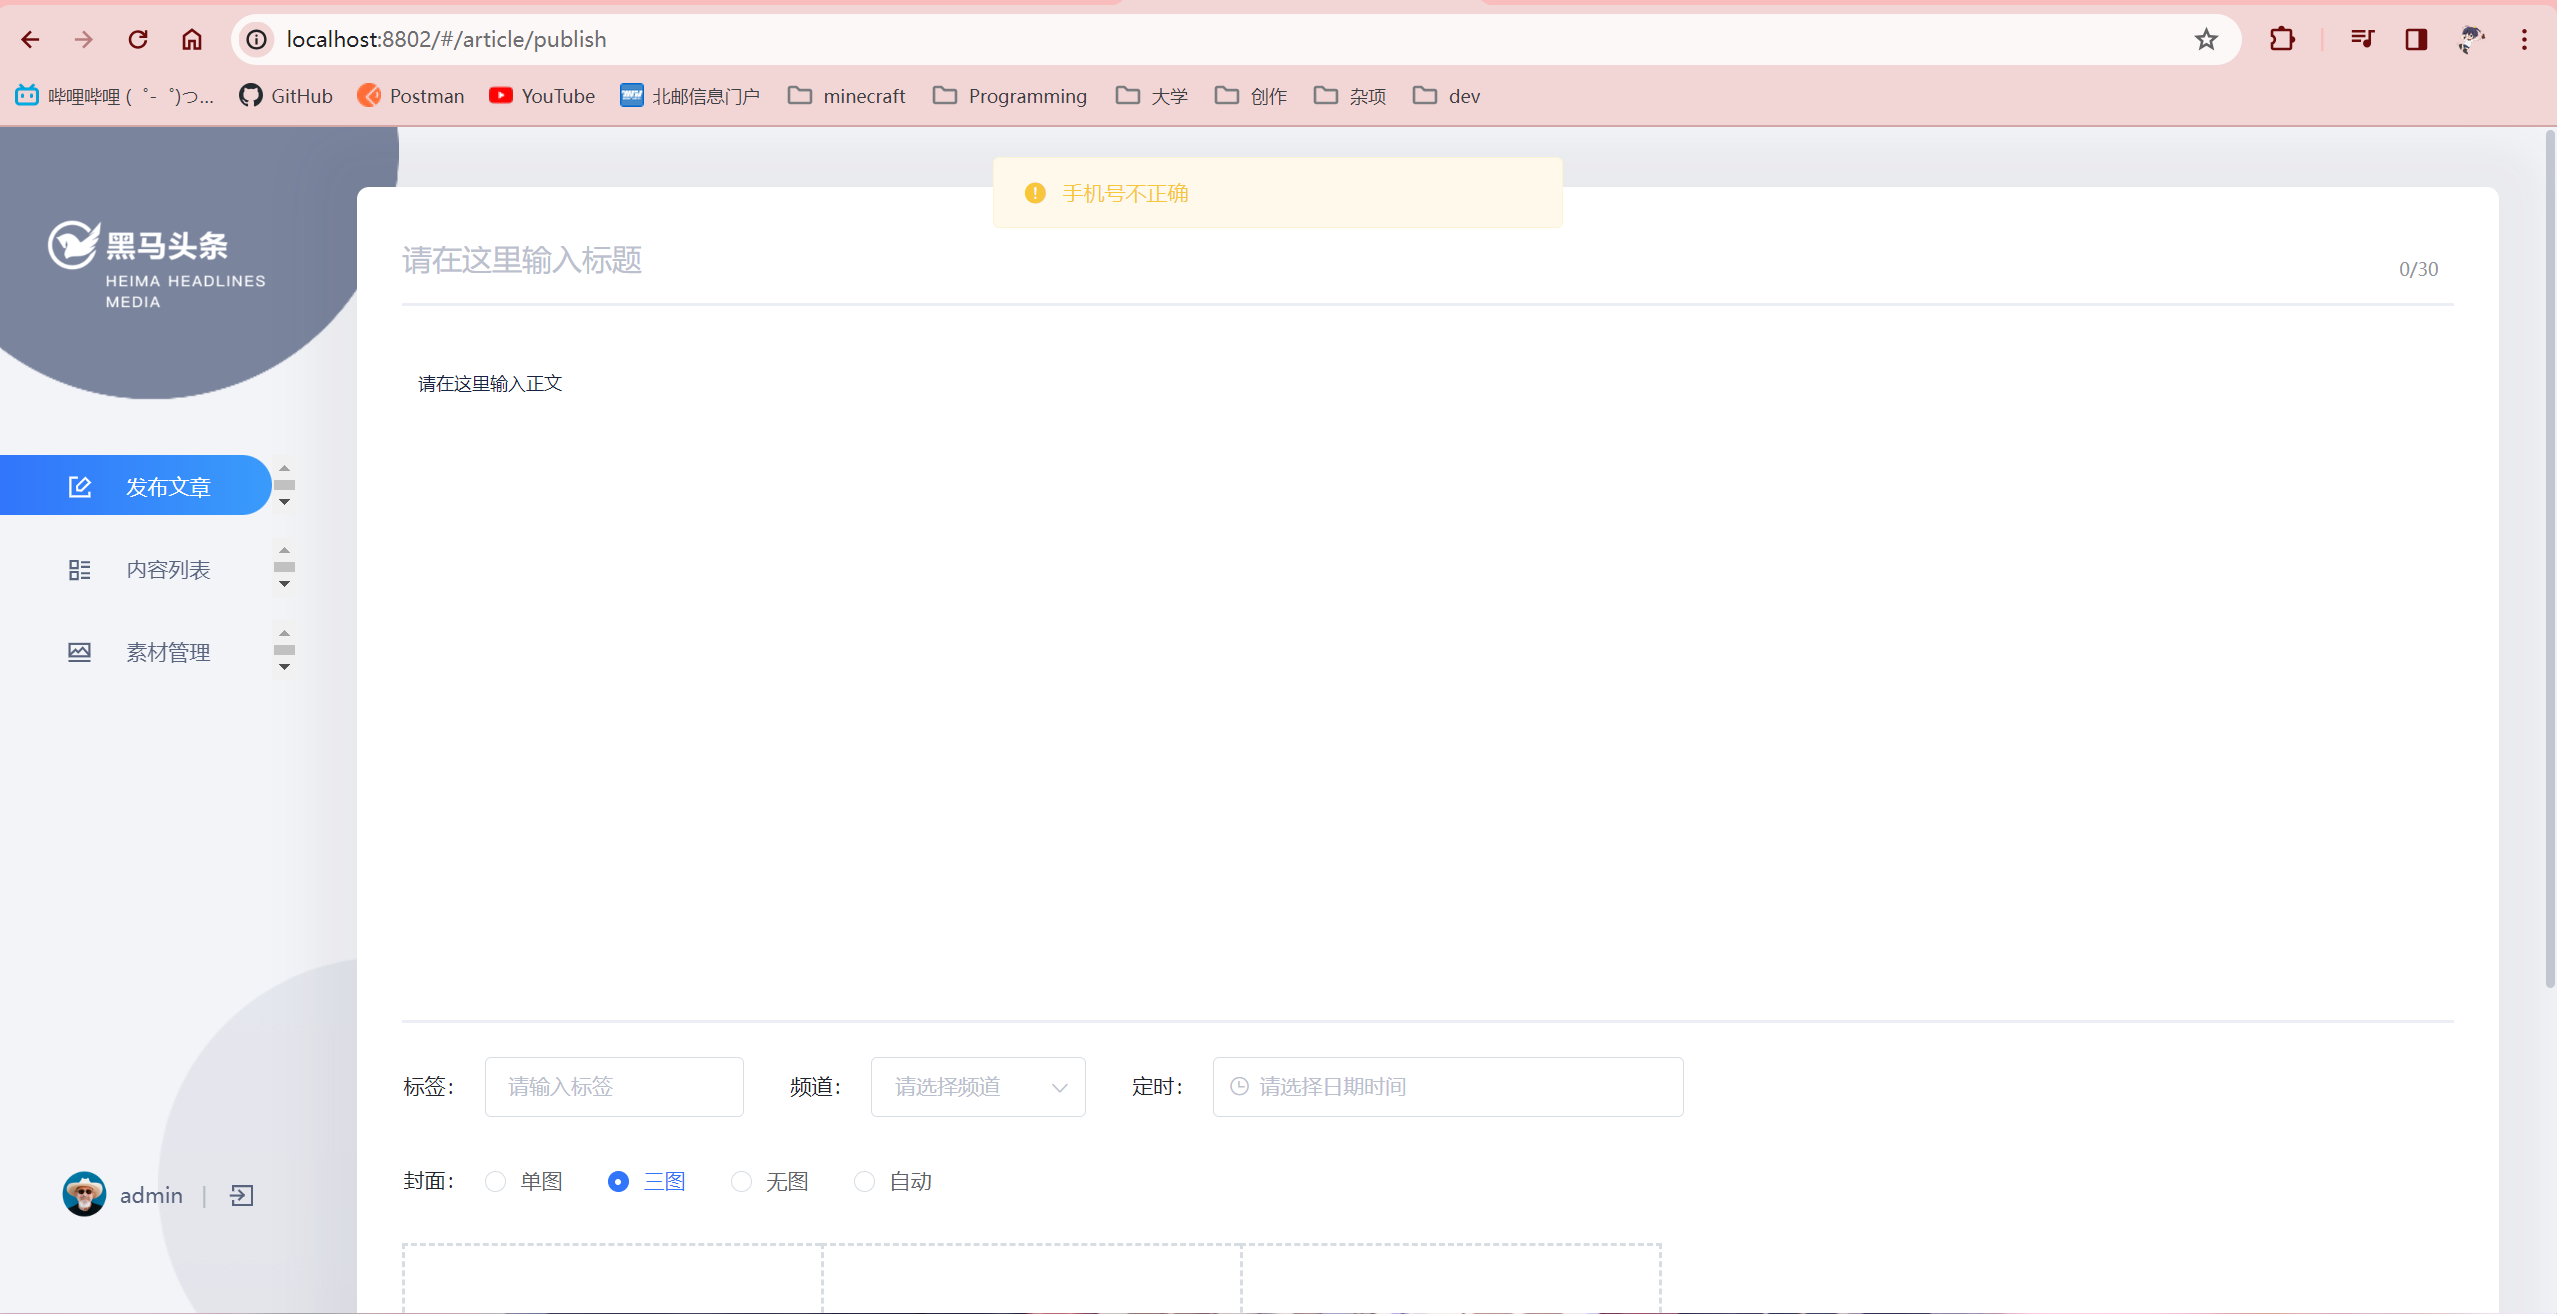
自媒体素材管理
图片上传
表结构
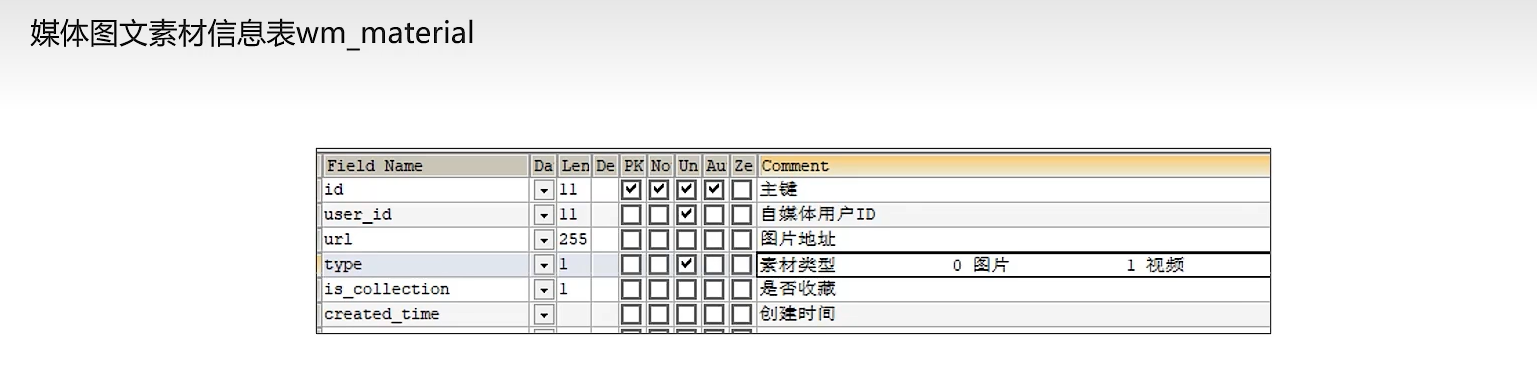
导入实体类
package com.heima.model.wemedia.pojos;

import com.baomidou.mybatisplus.annotation.IdType;
import com.baomidou.mybatisplus.annotation.TableField;
import com.baomidou.mybatisplus.annotation.TableId;
import com.baomidou.mybatisplus.annotation.TableName;
import lombok.Data;

import java.io.Serializable;
import java.util.Date;

/**
 * <p>
 * 自媒体图文素材信息表
 * </p>
 *
 * @author itheima
 */
@Data
@TableName("wm_material")
public class WmMaterial implements Serializable {

    private static final long serialVersionUID = 1L;

    /**
     * 主键
     */
    @TableId(value = "id", type = IdType.AUTO)
    private Integer id;

    /**
     * 自媒体用户ID
     */
    @TableField("user_id")
    private Integer userId;

    /**
     * 图片地址
     */
    @TableField("url")
    private String url;

    /**
     * 素材类型
     0 图片
     1 视频
     */
    @TableField("type")
    private Short type;

    /**
     * 是否收藏
     */
    @TableField("is_collection")
    private Short isCollection;

    /**
     * 创建时间
     */
    @TableField("created_time")
    private Date createdTime;

}
实现思路
需要解决两个问题
- 素材表中的用户信息如何获取
- 通过拦截器将token存储当前线程
- 素材的信息保存到什么位置
- 保存到minio中,同时数据库存入地址
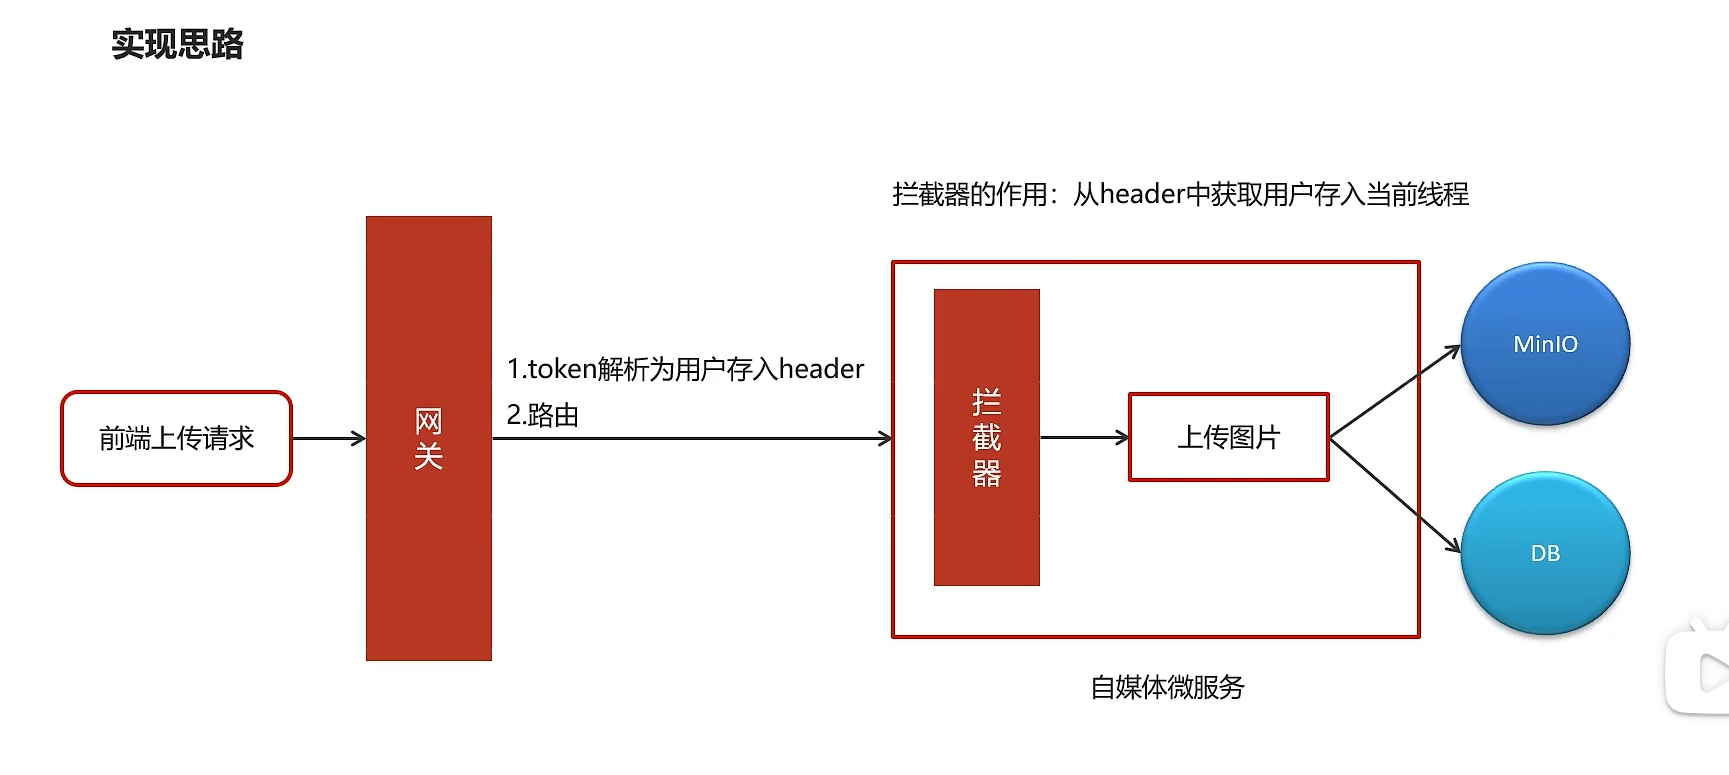
网关存入token
改造自媒体网关过滤器,添加将token解析用户id存入请求头的操作
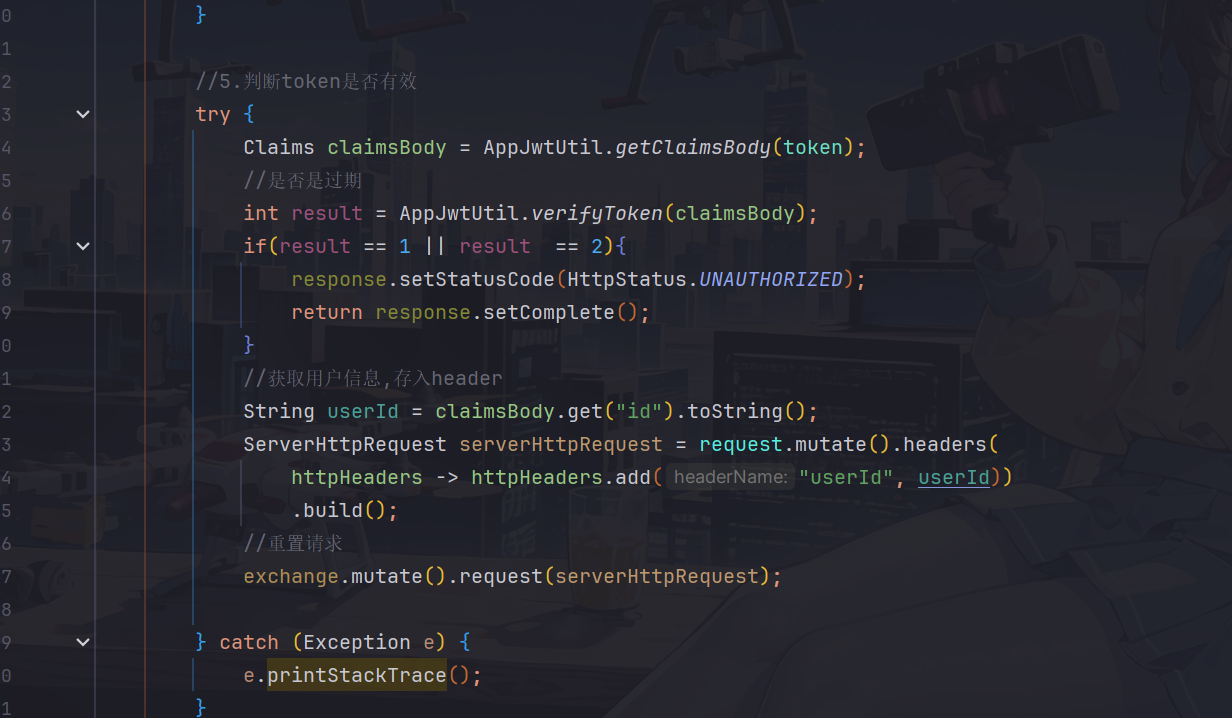
            //获取用户信息,存入header
            String userId = claimsBody.get("id").toString();
            ServerHttpRequest serverHttpRequest = request.mutate().headers(
                httpHeaders -> httpHeaders.add("userId", userId))
                .build();
            //重置请求
            exchange.mutate().request(serverHttpRequest);
配置拦截器存入线程
-
在util模块创建thread包,配置wmUserThreadLocal操作工具类
package com.heima.utils.thread; import com.heima.model.wemedia.pojos.WmUser; public class WmThreadLocalUtil { private final static ThreadLocal<WmUser> WM_USER_THREAD_LOCAL = new ThreadLocal<>(); //存入线程 public static void setUser(WmUser wmUser){ WM_USER_THREAD_LOCAL.set(wmUser); } //从线程中获取 public static WmUser getUser(){ return WM_USER_THREAD_LOCAL.get(); } //清理 public static void clear(){ WM_USER_THREAD_LOCAL.remove(); } } -
在wemedia-service中配置拦截器,设置拦截操作
package com.heima.wemedia.interceptor; import com.heima.model.wemedia.pojos.WmUser; import com.heima.utils.thread.WmThreadLocalUtil; import javax.servlet.http.HttpServletRequest; import javax.servlet.http.HttpServletResponse; import org.springframework.web.servlet.HandlerInterceptor; public class WmTokenInterceptor implements HandlerInterceptor { /** * 前置拦截器,得到header中的用户信息,并存入到当前线程中 * @param request * @param response * @param handler * @return * @throws Exception */ @Override public boolean preHandle(HttpServletRequest request, HttpServletResponse response, Object handler){ String userId = request.getHeader("userId"); if (userId != null){ //存入当前线程中 WmUser wmUser = new WmUser(); wmUser.setId(Integer.valueOf(userId)); WmThreadLocalUtil.setUser(wmUser); } return true; } /** * 后置拦截器,清除当前线程中的用户信息 * @param request * @param response * @param handler * @param ex * @throws Exception */ @Override public void afterCompletion(HttpServletRequest request, HttpServletResponse response, Object handler, Exception ex){ WmThreadLocalUtil.clear(); } } -
在wemedia-service配置相关配置类,用于注册拦截器
package com.heima.wemedia.config;

import com.heima.wemedia.interceptor.WmTokenInterceptor;
import org.springframework.web.servlet.config.annotation.InterceptorRegistry;
import org.springframework.web.servlet.config.annotation.WebMvcConfigurer;

@Configuration
public class WebMvcConfig implements WebMvcConfigurer {
    @Override
    public void addInterceptors(InterceptorRegistry registry) {
        registry.addInterceptor(new WmTokenInterceptor()).addPathPatterns("/**");//拦截所有请求
    }

}
代码实现
接口定义
代码实现
- 导入heima-file-starter
<dependencies>
    <dependency>
        <groupId>com.heima</groupId>
        <artifactId>heima-file-starter</artifactId>
        <version>1.0-SNAPSHOT</version>
    </dependency>
</dependencies>
- 在自媒体微服务的配置中心添加以下配置:
minio:
  accessKey: minio
  secretKey: leadnews
  bucket: leadnews
  endpoint: http://hmtt:9000
  readPath: http://hmtt:9000
- 创建WmMaterialController
package com.heima.wemedia.controller.v1;
import com.heima.model.common.dtos.ResponseResult;
import com.heima.wemedia.service.WmMaterialService;
import org.springframework.beans.factory.annotation.Autowired;
import org.springframework.web.bind.annotation.PostMapping;
import org.springframework.web.bind.annotation.RequestMapping;
import org.springframework.web.bind.annotation.RestController;
import org.springframework.web.multipart.MultipartFile;
@RestController
@RequestMapping("/api/v1/material")
public class WmMaterialController {
@Autowired
private WmMaterialService wmMaterialService;
/**
* 上传图片素材
* @param multipartFile
* @return
*/
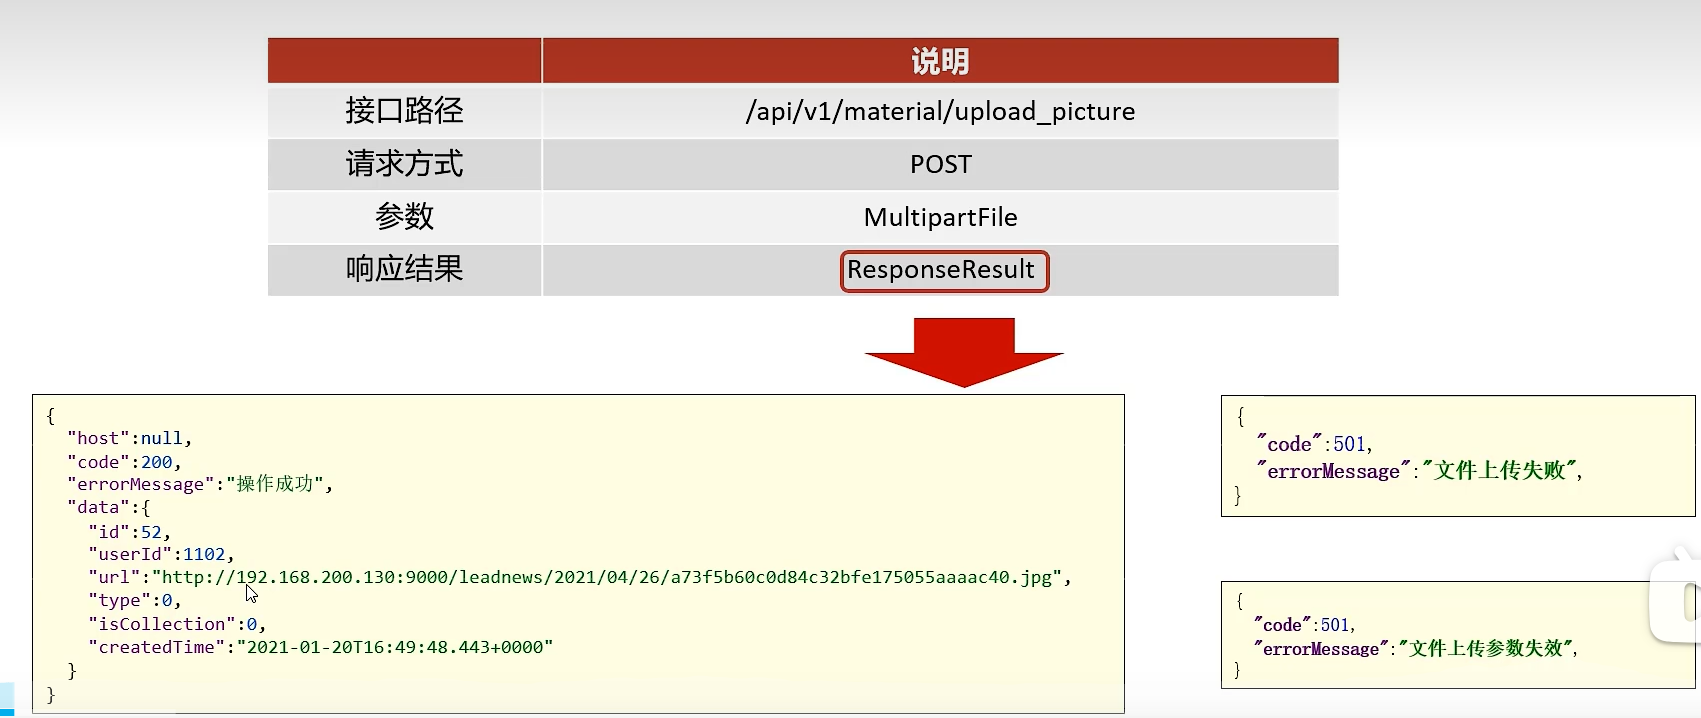
@PostMapping("/upload_picture")
//传入方法参数名一定要是multipartFile,因为前端上传的时候是这个名字
public ResponseResult uploadPicture(MultipartFile multipartFile){
return wmMaterialService.uploadPicture(multipartFile);
}
}
- mapper
package com.heima.wemedia.mapper;

import com.baomidou.mybatisplus.core.mapper.BaseMapper;
import com.heima.model.wemedia.pojos.WmMaterial;
import org.apache.ibatis.annotations.Mapper;

@Mapper
public interface WmMaterialMapper extends BaseMapper<WmMaterial> {
}
③:业务层:
package com.heima.wemedia.service;

import com.baomidou.mybatisplus.extension.service.IService;
import com.heima.model.common.dtos.ResponseResult;
import com.heima.model.wemedia.pojos.WmMaterial;
import org.springframework.web.multipart.MultipartFile;

public interface WmMaterialService extends IService<WmMaterial> {

    /**
     * 上传图片素材
     * @param multipartFile
     * @return
     */
    ResponseResult uploadPicture(MultipartFile multipartFile);
}
业务层实现类:
package com.heima.wemedia.service.impl;

import com.baomidou.mybatisplus.extension.service.impl.ServiceImpl;
import com.heima.file.service.FileStorageService;
import com.heima.model.common.dtos.ResponseResult;
import com.heima.model.common.enums.AppHttpCodeEnum;
import com.heima.model.wemedia.pojos.WmMaterial;
import com.heima.utils.thread.WmThreadLocalUtil;
import com.heima.wemedia.mapper.WmMaterialMapper;
import com.heima.wemedia.service.WmMaterialService;
import java.io.IOException;
import java.util.Date;
import java.util.UUID;
import lombok.extern.slf4j.Slf4j;
import org.springframework.beans.factory.annotation.Autowired;
import org.springframework.stereotype.Service;
import org.springframework.transaction.annotation.Transactional;
import org.springframework.web.multipart.MultipartFile;


@Slf4j
@Service
@Transactional
public class WmMaterialServiceImpl extends ServiceImpl<WmMaterialMapper, WmMaterial> implements WmMaterialService {

    @Autowired
    private FileStorageService fileStorageService;
    /**
     * 上传图片素材
     *
     * @param multipartFile
     * @return
     */
    @Override
    public ResponseResult uploadPicture(MultipartFile multipartFile) {
        //检查参数
        if(multipartFile == null || multipartFile.getSize() == 0){
            return ResponseResult.errorResult(AppHttpCodeEnum.PARAM_INVALID);
        }
        //上传图片到minio中
        String fileName = UUID.randomUUID().toString().replace("-", "");
        String originalFilename = multipartFile.getOriginalFilename();
        String postfix = originalFilename.substring(originalFilename.lastIndexOf("."));
        String fieldId = null;
        try {
            fieldId = fileStorageService.uploadImgFile("", fileName + postfix,
                multipartFile.getInputStream());
            log.info("上传图片到minio中,field:{}",fieldId);
        } catch (IOException e) {
            e.printStackTrace();
            log.error("{}上传图片到minio中失败",this.getClass().getName());
        }
        //保存图片信息到数据库
        WmMaterial wmMaterial = WmMaterial.builder()
            .url(fieldId)
            .isCollection((short)0)
            .type((short)0)
            .userId(WmThreadLocalUtil.getUser().getId())
            .createdTime(new Date())
            .build();
        save(wmMaterial);
        return ResponseResult.okResult(wmMaterial);
    }
}
功能测试
可以看到图片上传成功
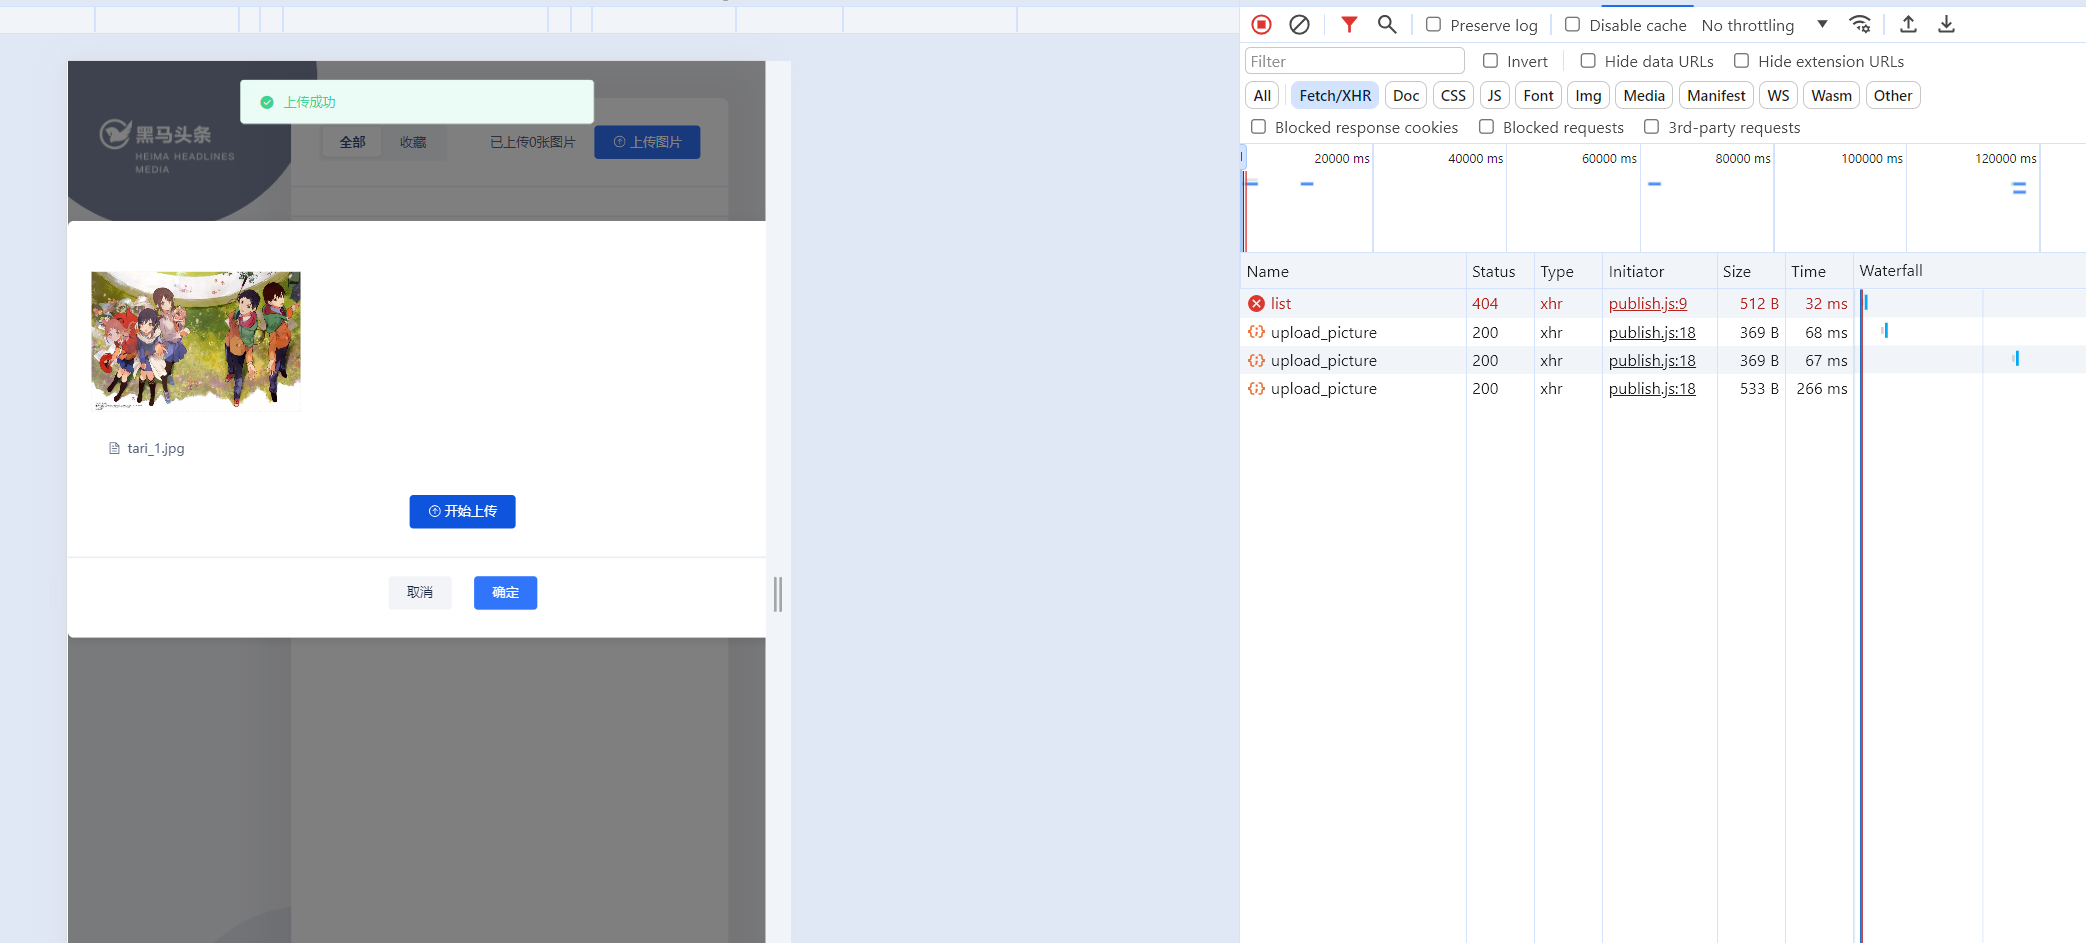
图片列表查看
接口定义
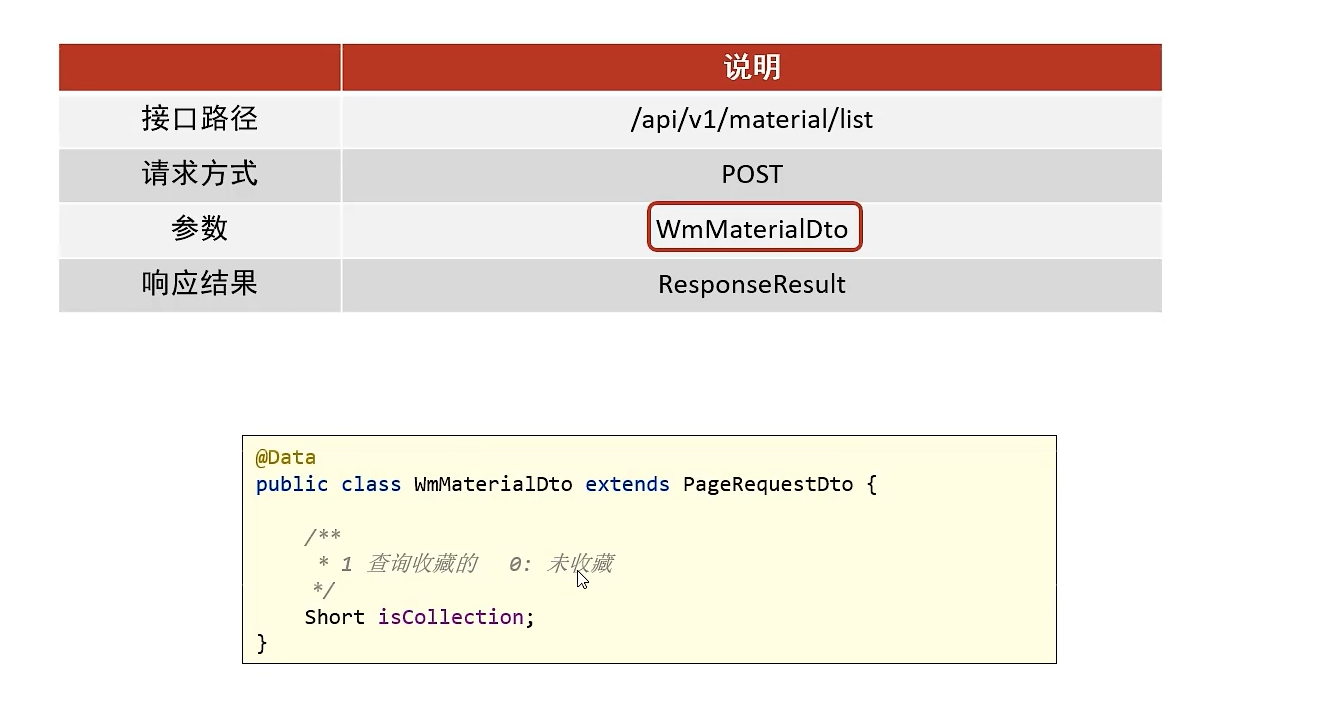
代码实现
controller
@PostMapping("/list")
public ResponseResult list(@RequestBody WmMaterialDto wmMaterialDto){
    return wmMaterialService.findList(wmMaterialDto);
}
serviceImpl
/**
     * 查询素材列表
     *
     * @param dto
     * @return
     */
    @Override
    public ResponseResult findList(WmMaterialDto dto) {
        //检查参数
        dto.checkParam();//如果缺失分页参数,则设置默认值
        //分页查询
        IPage page = new Page(dto.getPage(),dto.getSize());
        LambdaQueryWrapper<WmMaterial> lambdaQueryWrapper = new LambdaQueryWrapper<>();
        //是否收藏
        if(dto.getIsCollection() != null && dto.getIsCollection() == 1){
            lambdaQueryWrapper.eq(WmMaterial::getIsCollection,dto.getIsCollection());
        }
        //按照用户查询
        lambdaQueryWrapper.eq(WmMaterial::getUserId,WmThreadLocalUtil.getUser().getId());
        //按照时间倒序查询
        lambdaQueryWrapper.orderByDesc(WmMaterial::getCreatedTime);
        page(page,lambdaQueryWrapper);
        //结果返回
        ResponseResult responseResult = new PageResponseResult(dto.getPage(),dto.getSize(),(int)page.getTotal());
        responseResult.setData(page.getRecords());
        return responseResult;

    }
功能测试
正常显示图片,有一部分是老师原来自带的图片,这里没有所以展示不出来
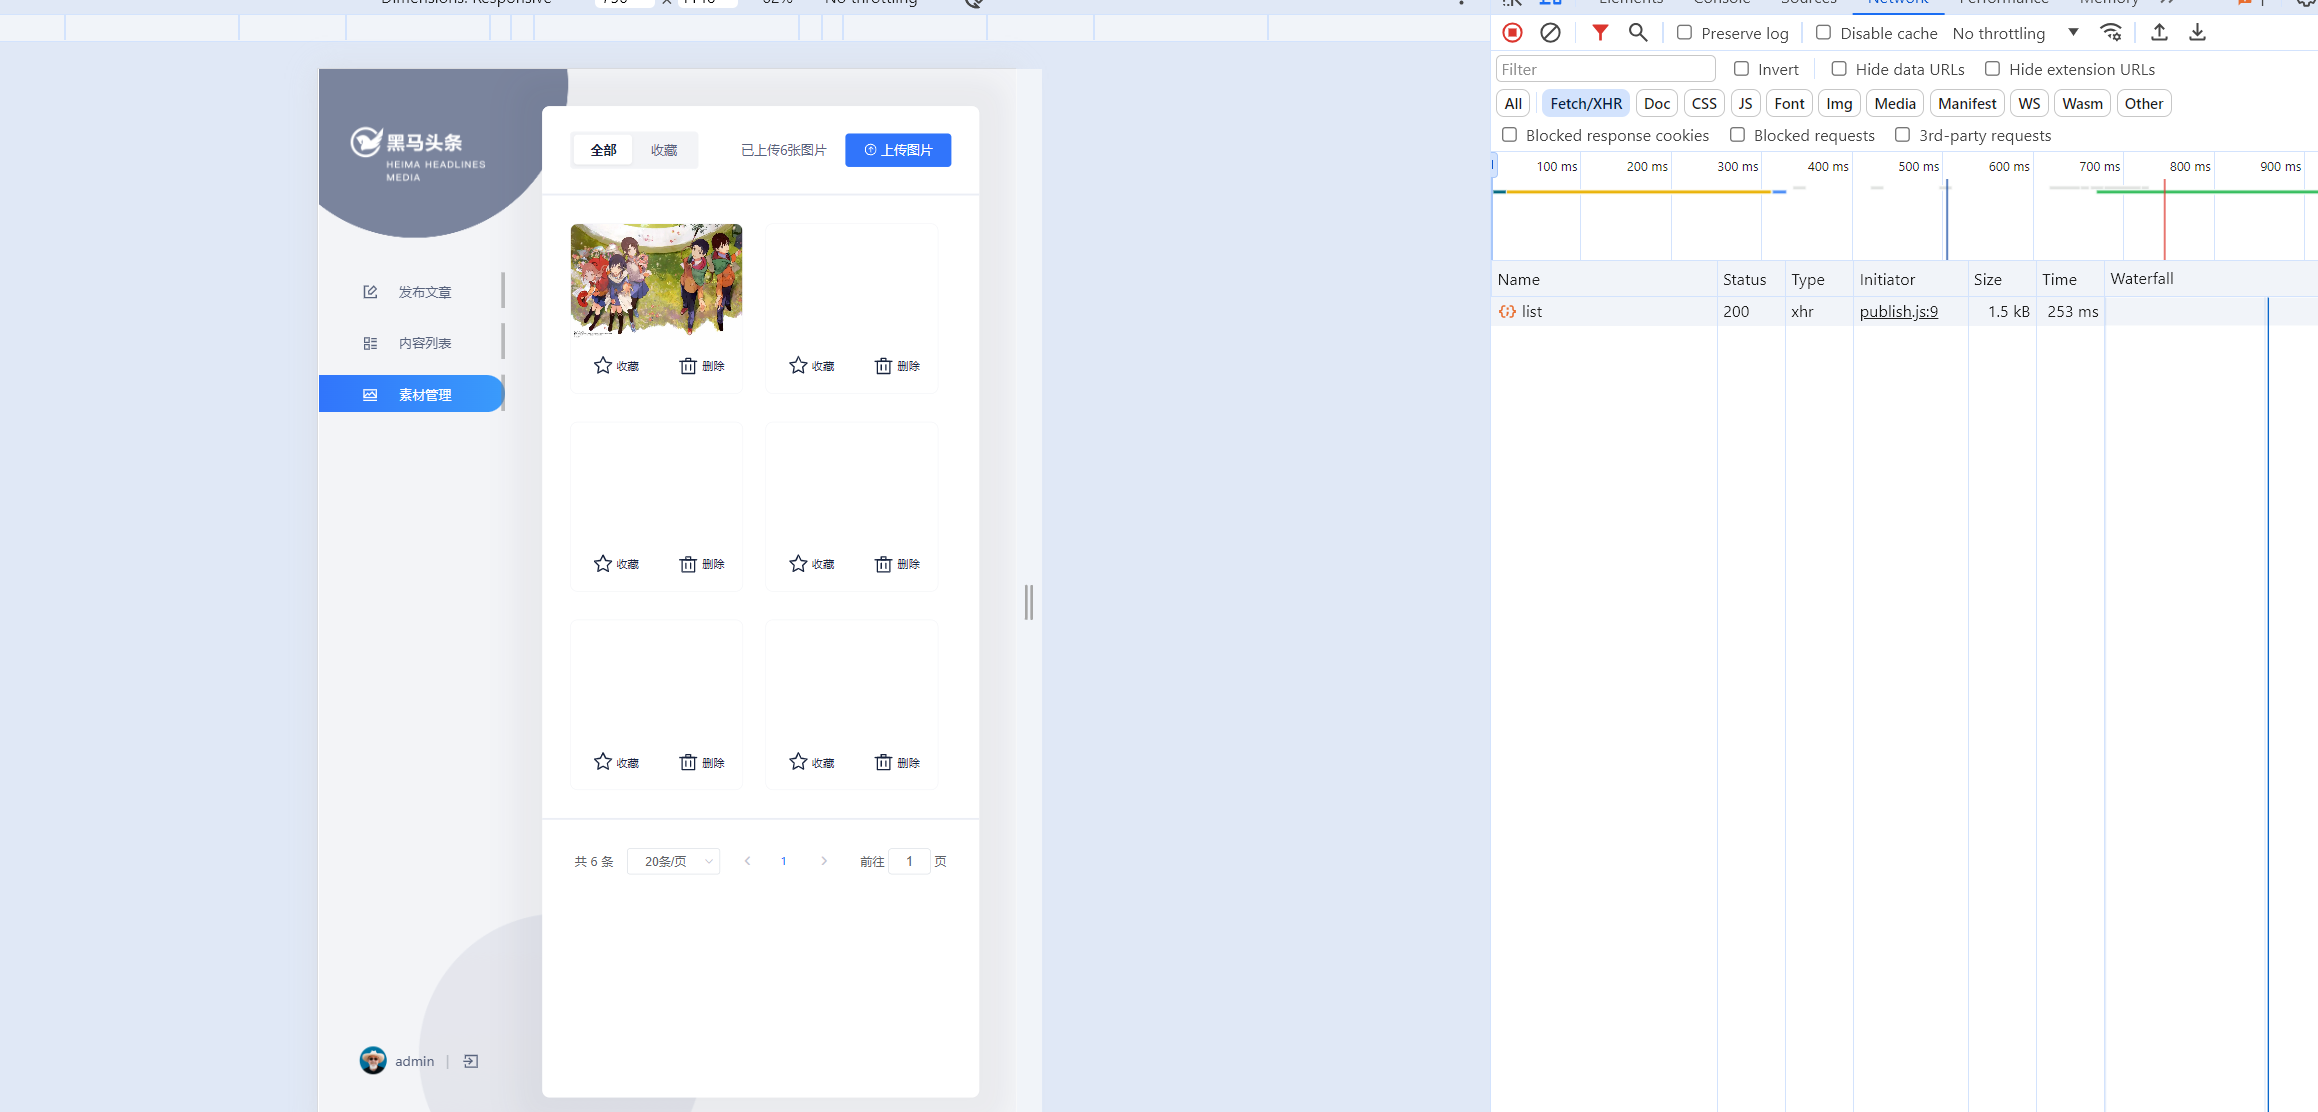
自己多传几张图片测试
可以看到正常分页显示是没有问题的
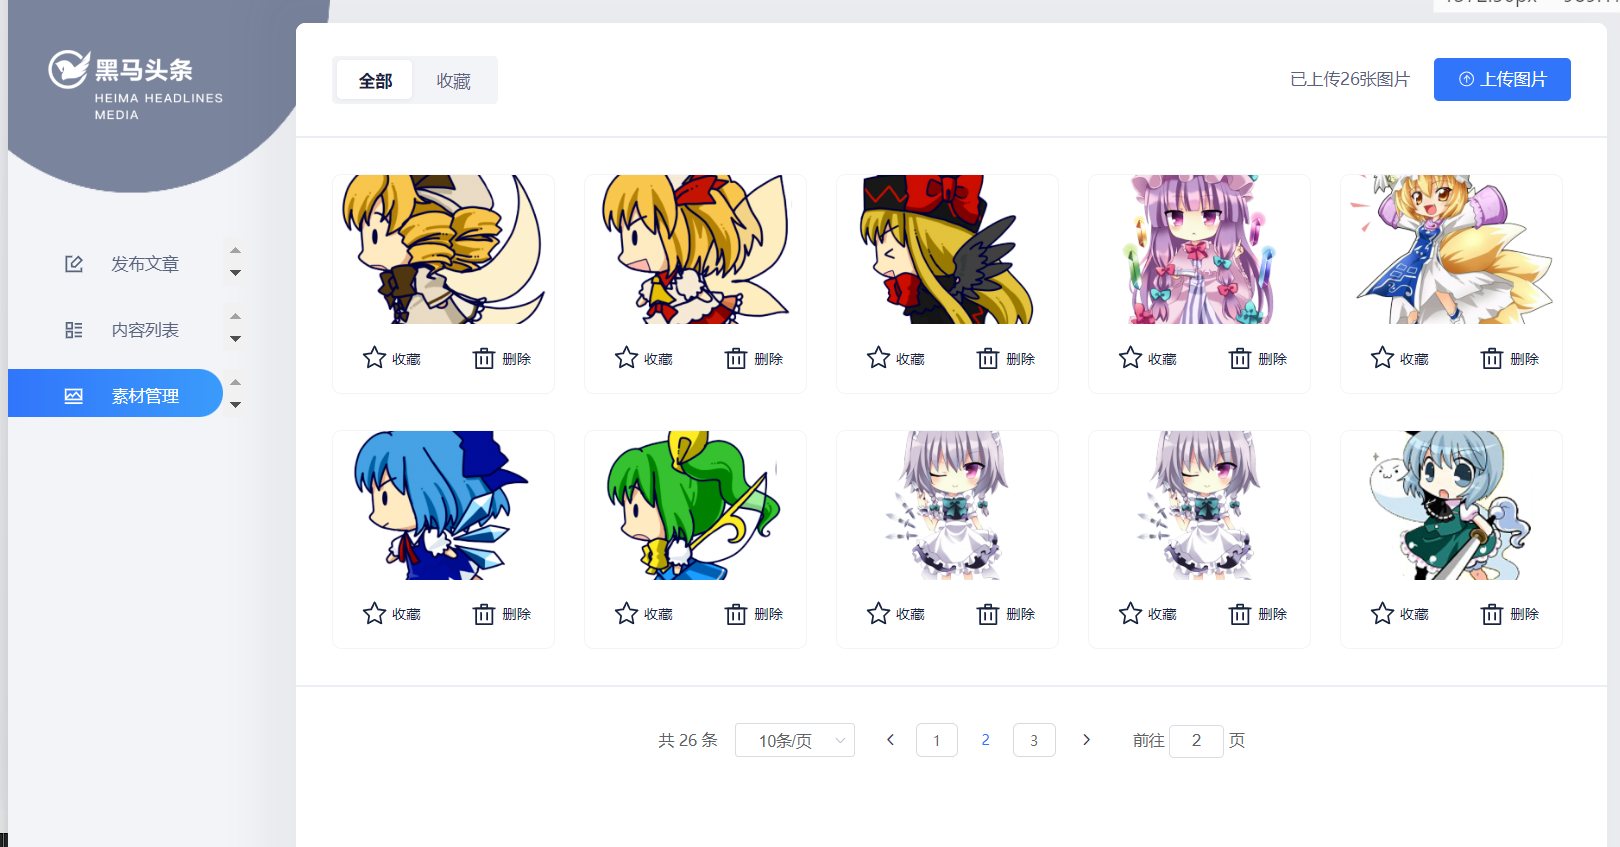
频道列表查询
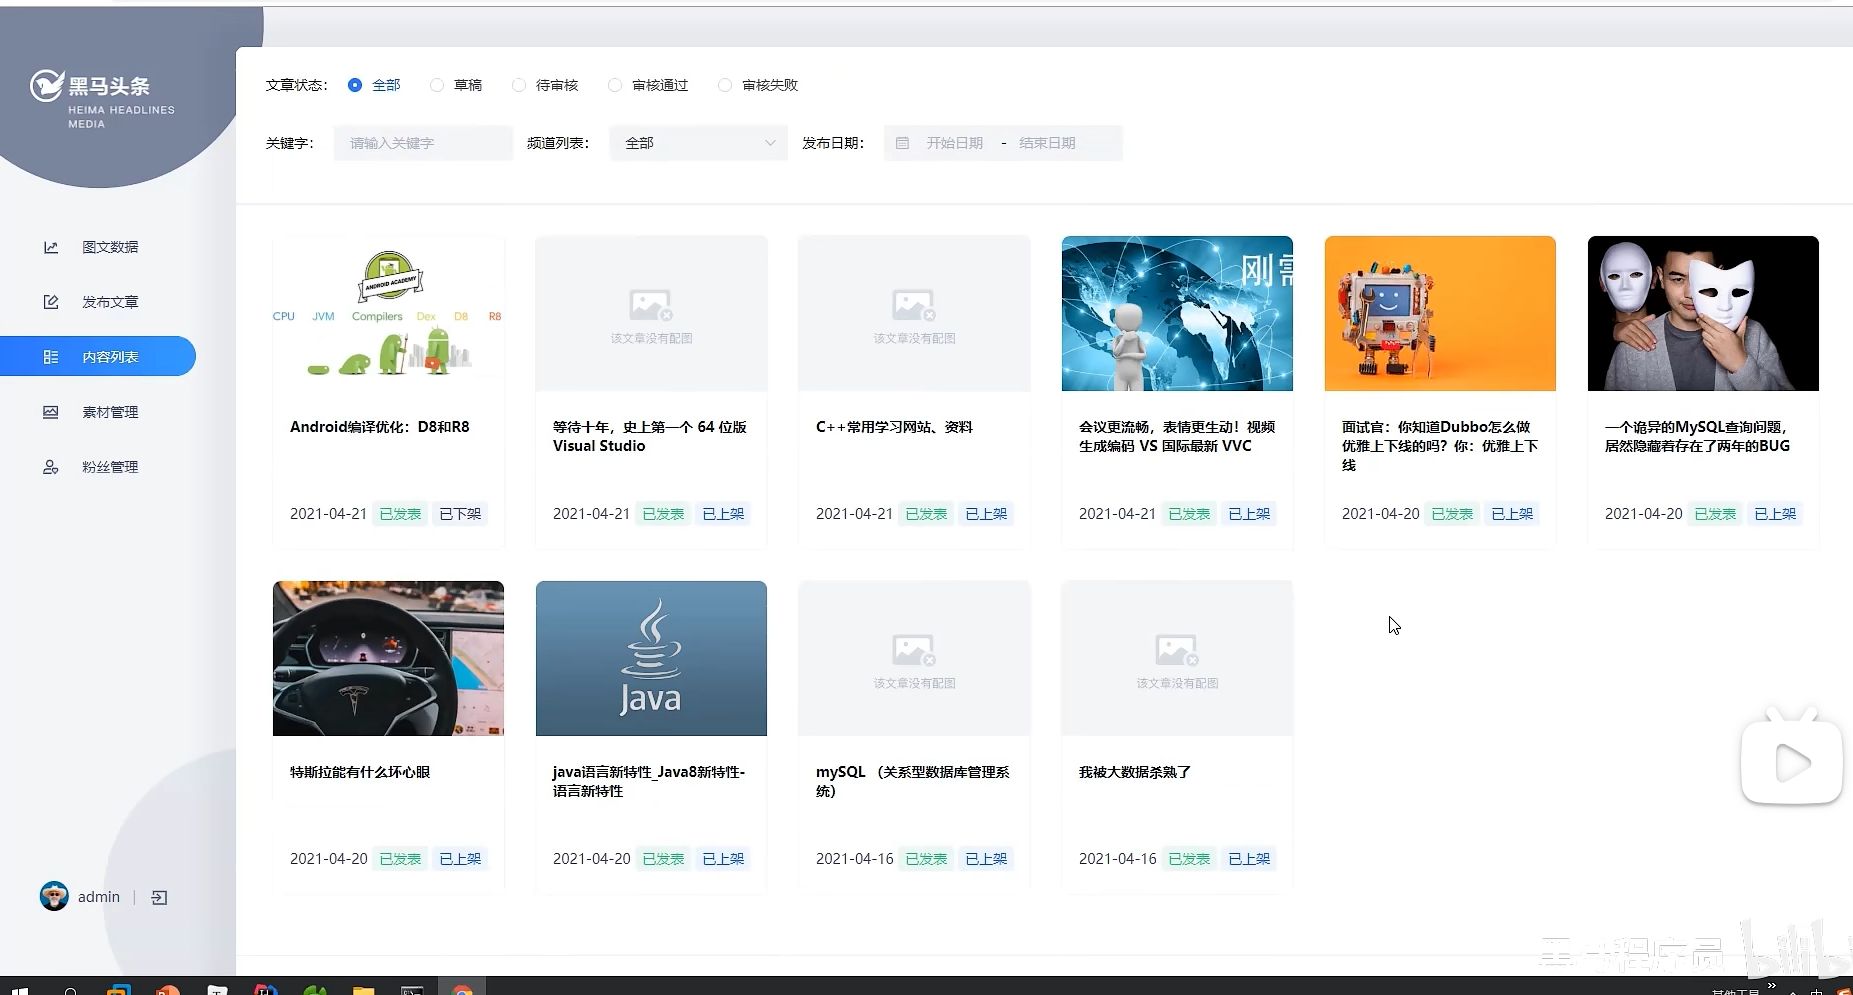
表结构
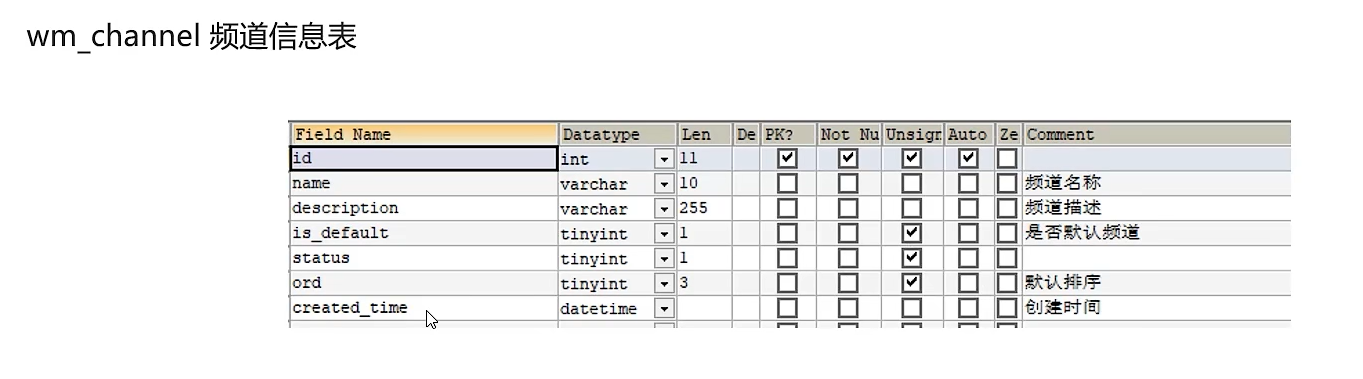
接口定义
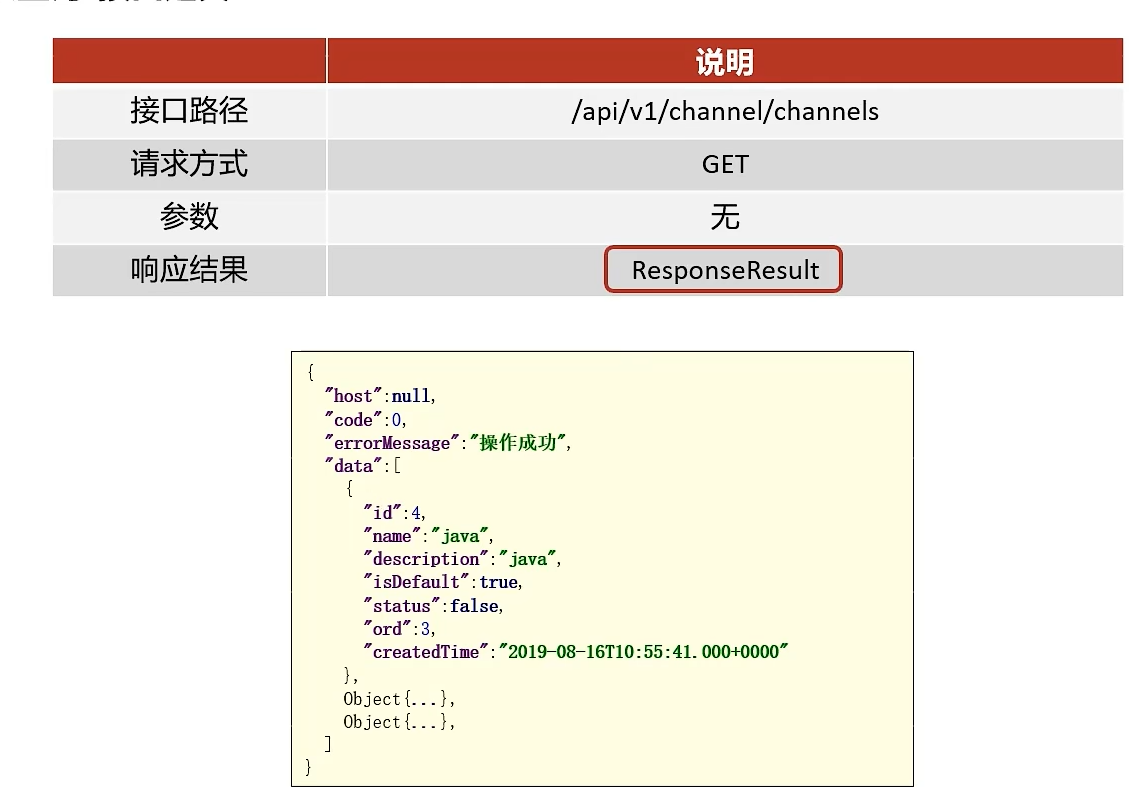
功能实现
-
导入Channel实体类
package com.heima.model.wemedia.pojos;

import com.baomidou.mybatisplus.annotation.IdType;
import com.baomidou.mybatisplus.annotation.TableField;
import com.baomidou.mybatisplus.annotation.TableId;
import com.baomidou.mybatisplus.annotation.TableName;
import lombok.Data;

import java.io.Serializable;
import java.util.Date;

/**
 * <p>
 * 频道信息表
 * </p>
 *
 * @author itheima
 */
@Data
@TableName("wm_channel")
public class WmChannel implements Serializable {

    private static final long serialVersionUID = 1L;

    @TableId(value = "id", type = IdType.AUTO)
    private Integer id;

    /**
     * 频道名称
     */
    @TableField("name")
    private String name;

    /**
     * 频道描述
     */
    @TableField("description")
    private String description;

    /**
     * 是否默认频道
     * 1:默认     true
     * 0:非默认   false
     */
    @TableField("is_default")
    private Boolean isDefault;

    /**
     * 是否启用
     * 1:启用   true
     * 0:禁用   false
     */
    @TableField("status")
    private Boolean status;

    /**
     * 默认排序
     */
    @TableField("ord")
    private Integer ord;

    /**
     * 创建时间
     */
    @TableField("created_time")
    private Date createdTime;

}
mapper
package com.heima.wemedia.mapper;

import com.baomidou.mybatisplus.core.mapper.BaseMapper;
import com.heima.model.wemedia.pojos.WmChannel;
import org.apache.ibatis.annotations.Mapper;

@Mapper
public interface WmChannelMapper extends BaseMapper<WmChannel> {
}
service
package com.heima.wemedia.service;

import com.baomidou.mybatisplus.extension.service.IService;
import com.heima.model.common.dtos.ResponseResult;
import com.heima.model.wemedia.pojos.WmChannel;

public interface WmChannelService extends IService<WmChannel> {

    /**
     * 查询所有频道
     * @return
     */
    public ResponseResult findAll();


}
实现类
package com.heima.wemedia.service.impl;

import com.baomidou.mybatisplus.extension.service.impl.ServiceImpl;
import com.heima.model.common.dtos.ResponseResult;
import com.heima.model.wemedia.pojos.WmChannel;
import com.heima.wemedia.mapper.WmChannelMapper;
import com.heima.wemedia.service.WmChannelService;
import lombok.extern.slf4j.Slf4j;
import org.springframework.stereotype.Service;
import org.springframework.transaction.annotation.Transactional;

@Service
@Transactional
@Slf4j
public class WmChannelServiceImpl extends ServiceImpl<WmChannelMapper, WmChannel> implements WmChannelService {


    /**
     * 查询所有频道
     * @return
     */
    @Override
    public ResponseResult findAll() {
        return ResponseResult.okResult(list());
    }
}
控制层
package com.heima.wemedia.controller.v1;

import com.heima.model.common.dtos.ResponseResult;
import com.heima.wemedia.service.WmChannelService;
import org.springframework.beans.factory.annotation.Autowired;
import org.springframework.web.bind.annotation.GetMapping;
import org.springframework.web.bind.annotation.RequestMapping;
import org.springframework.web.bind.annotation.RestController;

@RestController
@RequestMapping("/api/v1/channel")
public class WmchannelController {

    @Autowired
    private WmChannelService wmChannelService;

    @GetMapping("/channels")
    public ResponseResult findAll(){
        return wmChannelService.findAll();
    }
}
3.1.5)测试
功能测试成功
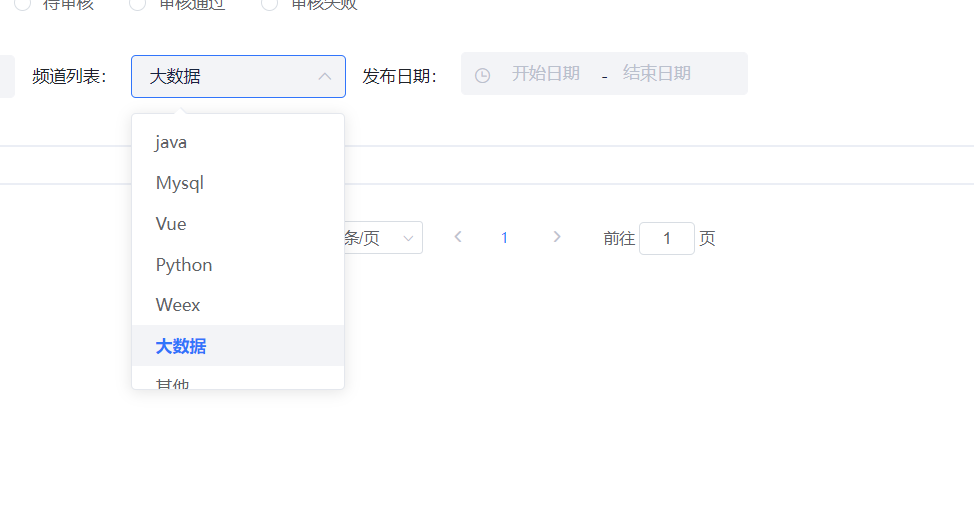
文章列表查询
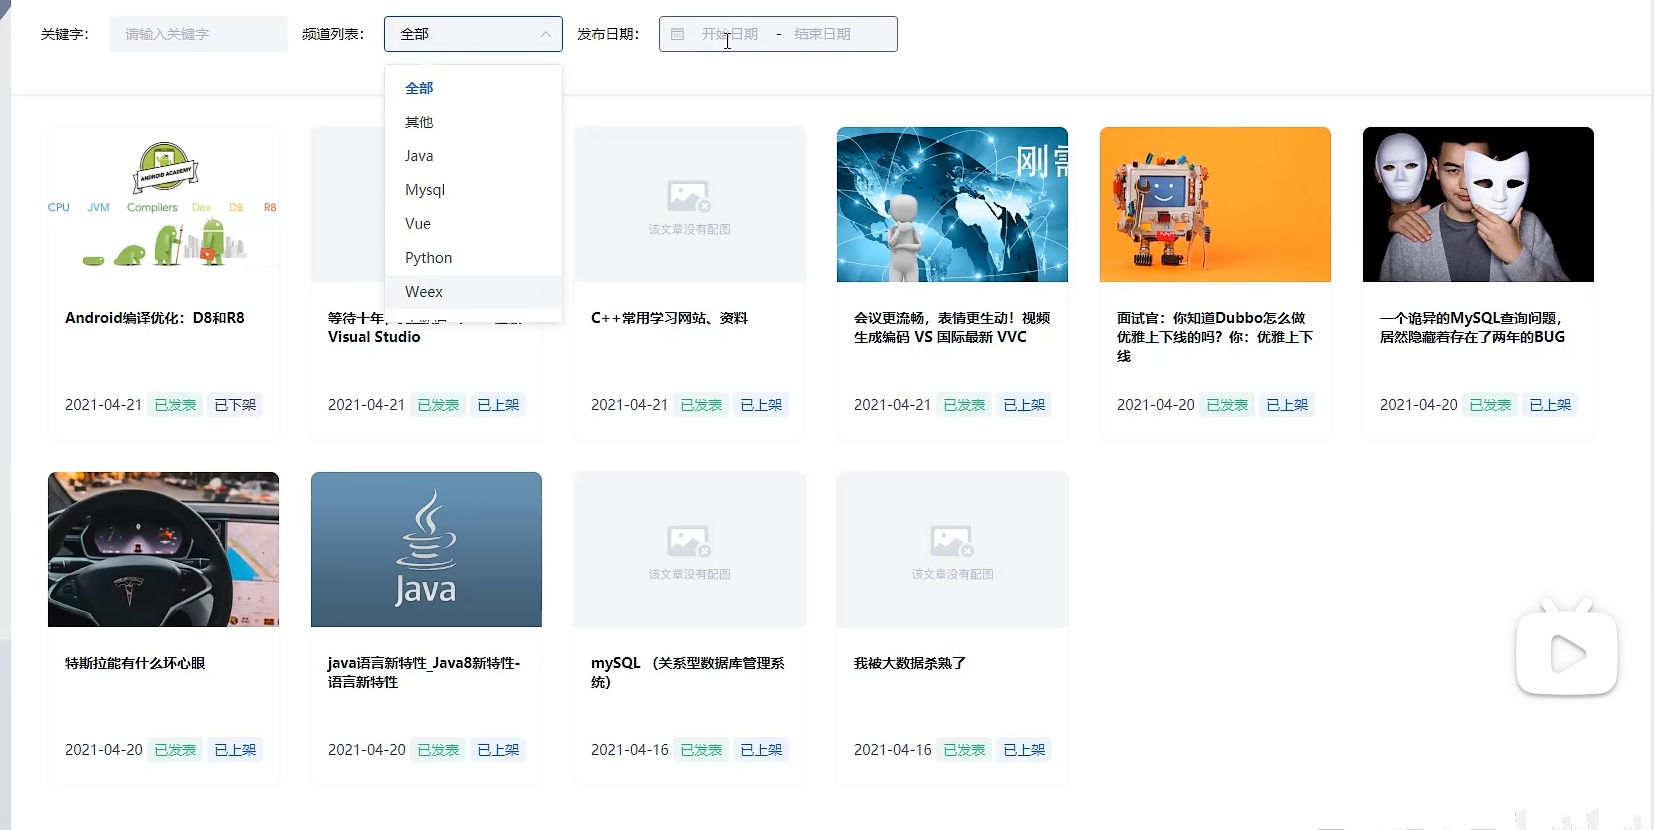
需求分析
表结构
wm_news
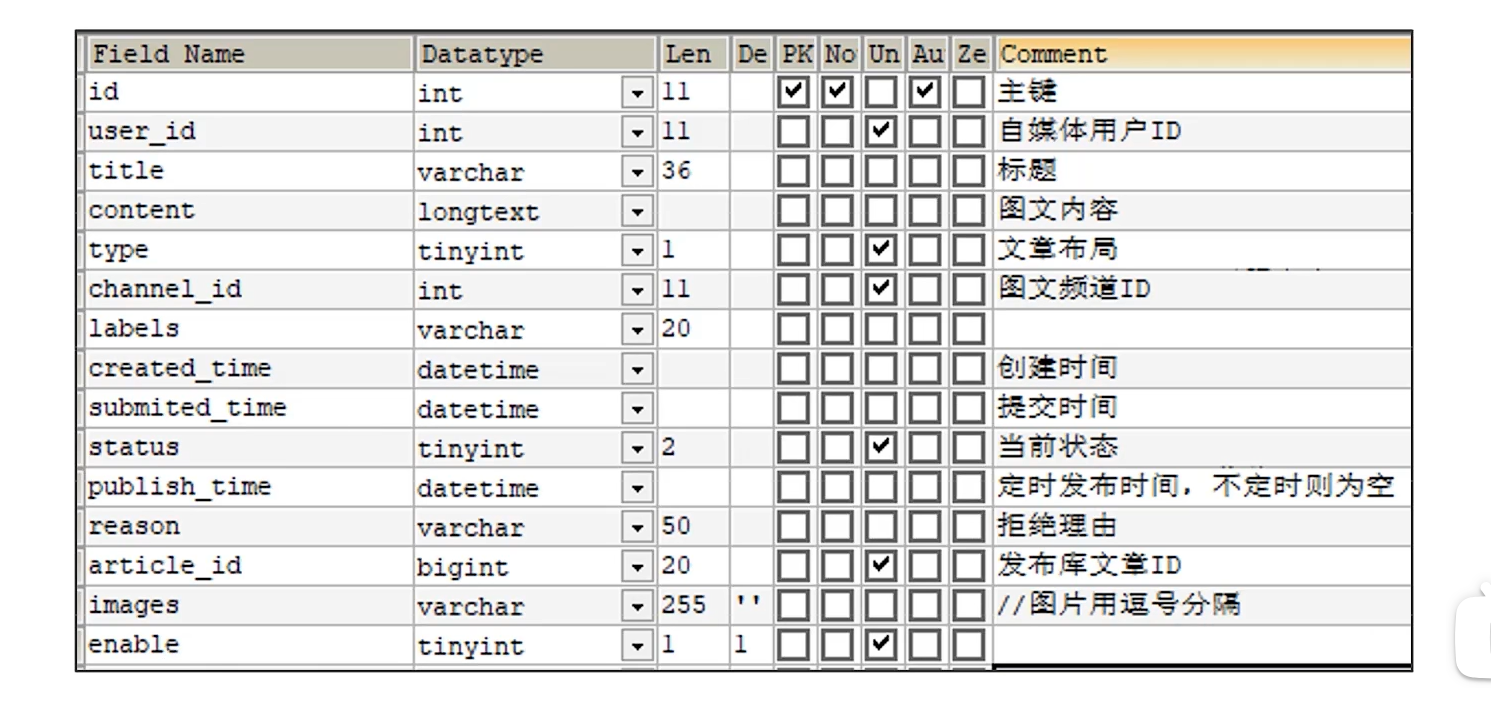
- type 文章布局
- 无图文章
- 单图文章
- 多图文章
- 当前状态
- 草稿
- 提交(待审核)
- 审核失败
- 人工审核中
- 人工审核通过
- 审核通过待发布
- 已发布
导入实体类
package com.heima.model.wemedia.pojos;

import com.baomidou.mybatisplus.annotation.IdType;
import com.baomidou.mybatisplus.annotation.TableField;
import com.baomidou.mybatisplus.annotation.TableId;
import com.baomidou.mybatisplus.annotation.TableName;
import lombok.Data;
import org.apache.ibatis.type.Alias;

import java.io.Serializable;
import java.util.Date;

/**
 * <p>
 * 自媒体图文内容信息表
 * </p>
 *
 * @author itheima
 */
@Data
@TableName("wm_news")
public class WmNews implements Serializable {

    private static final long serialVersionUID = 1L;

    /**
     * 主键
     */
    @TableId(value = "id", type = IdType.AUTO)
    private Integer id;

    /**
     * 自媒体用户ID
     */
    @TableField("user_id")
    private Integer userId;

    /**
     * 标题
     */
    @TableField("title")
    private String title;

    /**
     * 图文内容
     */
    @TableField("content")
    private String content;

    /**
     * 文章布局
            0 无图文章
            1 单图文章
            3 多图文章
     */
    @TableField("type")
    private Short type;

    /**
     * 图文频道ID
     */
    @TableField("channel_id")
    private Integer channelId;

    @TableField("labels")
    private String labels;

    /**
     * 创建时间
     */
    @TableField("created_time")
    private Date createdTime;

    /**
     * 提交时间
     */
    @TableField("submited_time")
    private Date submitedTime;

    /**
     * 当前状态
            0 草稿
            1 提交(待审核)
            2 审核失败
            3 人工审核
            4 人工审核通过
            8 审核通过(待发布)
            9 已发布
     */
    @TableField("status")
    private Short status;

    /**
     * 定时发布时间,不定时则为空
     */
    @TableField("publish_time")
    private Date publishTime;

    /**
     * 拒绝理由
     */
    @TableField("reason")
    private String reason;

    /**
     * 发布库文章ID
     */
    @TableField("article_id")
    private Long articleId;

    /**
     * //图片用逗号分隔
     */
    @TableField("images")
    private String images;

    @TableField("enable")
    private Short enable;

     //状态枚举类
    @Alias("WmNewsStatus")
    public enum Status{
        NORMAL((short)0),SUBMIT((short)1),FAIL((short)2),ADMIN_AUTH((short)3),ADMIN_SUCCESS((short)4),SUCCESS((short)8),PUBLISHED((short)9);
        short code;
        Status(short code){
            this.code = code;
        }
        public short getCode(){
            return this.code;
        }
    }

}
内部定义了一个枚举类来表示文章的状态
接口定义
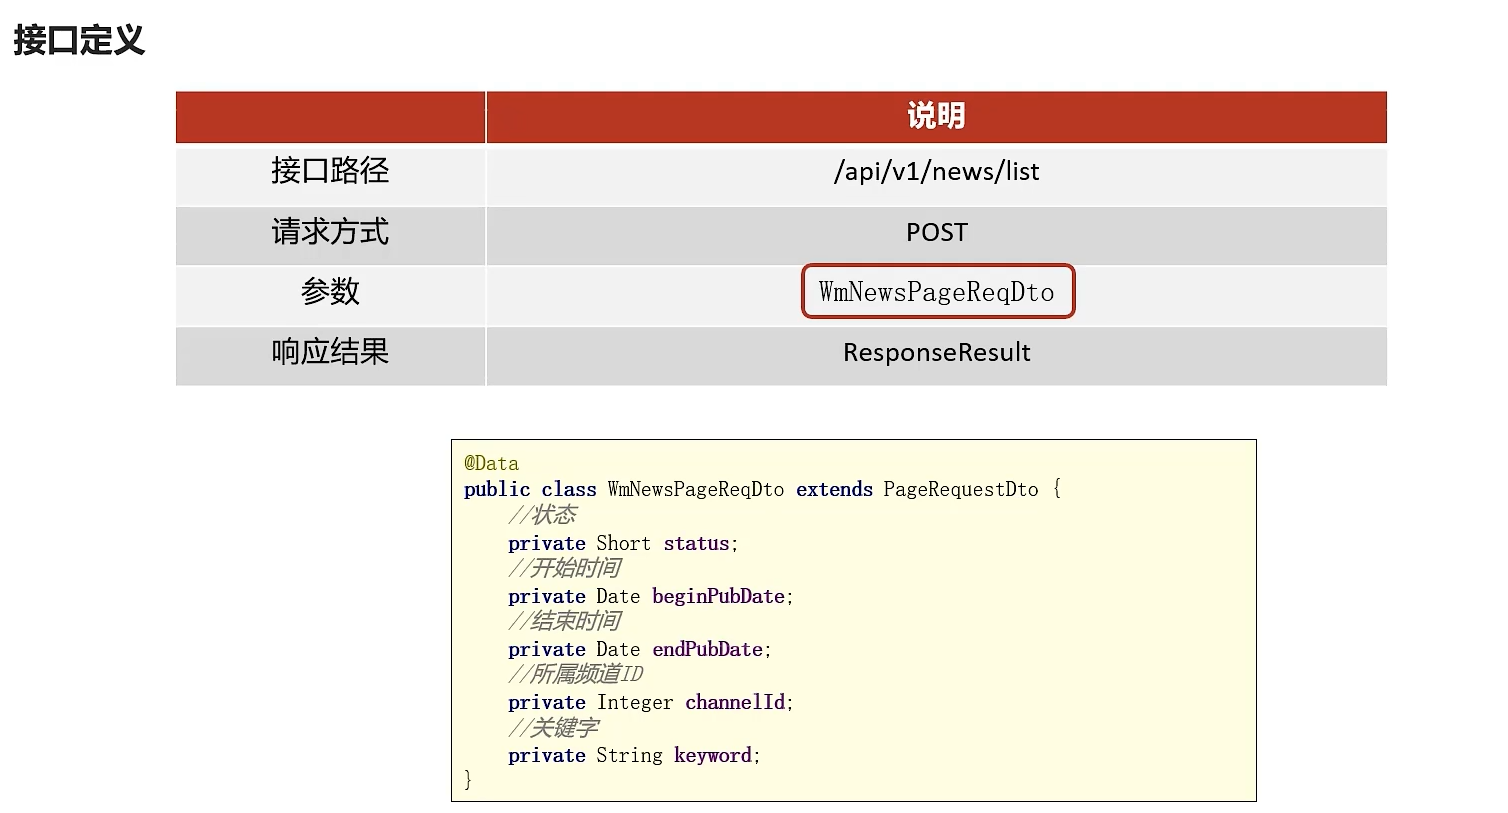
功能实现
controller
package com.heima.wemedia.controller.v1;


import com.heima.model.common.dtos.ResponseResult;
import com.heima.model.wemedia.dtos.WmNewsPageReqDto;
import com.heima.wemedia.service.WmNewsService;
import org.springframework.beans.factory.annotation.Autowired;
import org.springframework.web.bind.annotation.PostMapping;
import org.springframework.web.bind.annotation.RequestBody;
import org.springframework.web.bind.annotation.RequestMapping;
import org.springframework.web.bind.annotation.RestController;

@RestController
@RequestMapping("/api/v1/news")
public class WmNewsController {
    @Autowired
    private WmNewsService wmNewsService;

    /**
     * 条件查询文章列表
     * @param dto
     * @return
     */
    @PostMapping("/list")
    public ResponseResult list(@RequestBody WmNewsPageReqDto dto){
        return wmNewsService.findList(dto);
    }
}
serviceImpl
package com.heima.wemedia.service.impl;


import com.baomidou.mybatisplus.core.conditions.query.LambdaQueryWrapper;
import com.baomidou.mybatisplus.core.metadata.IPage;
import com.baomidou.mybatisplus.extension.plugins.pagination.Page;
import com.baomidou.mybatisplus.extension.service.impl.ServiceImpl;
import com.heima.model.common.dtos.PageResponseResult;
import com.heima.model.common.dtos.ResponseResult;
import com.heima.model.wemedia.dtos.WmNewsPageReqDto;
import com.heima.model.wemedia.pojos.WmNews;
import com.heima.utils.thread.WmThreadLocalUtil;
import com.heima.wemedia.mapper.WmNewsMapper;
import com.heima.wemedia.service.WmNewsService;
import lombok.extern.slf4j.Slf4j;
import org.apache.commons.lang3.StringUtils;
import org.springframework.stereotype.Service;
import org.springframework.transaction.annotation.Transactional;

@Service
@Slf4j
@Transactional
public class WmNewsServiceImpl  extends ServiceImpl<WmNewsMapper, WmNews> implements WmNewsService {


    /**
     * 条件查询文章列表
     *
     * @param dto
     * @return
     */
    @Override
    public ResponseResult findList(WmNewsPageReqDto dto) {
        //检查参数
        //分页检查
        dto.checkParam();
        //分页条件查询
        IPage page = new Page(dto.getPage(), dto.getSize());
        LambdaQueryWrapper<WmNews> lambdaQueryWrapper = new LambdaQueryWrapper<>();
        lambdaQueryWrapper
        //状态精确查询
        .eq(dto.getStatus() != null, WmNews::getStatus, dto.getStatus())
        //频道精确查询
        .eq(dto.getChannelId() != null, WmNews::getChannelId, dto.getChannelId())
        //时间范围查询
        .ge(dto.getBeginPubDate() != null, WmNews::getPublishTime, dto.getBeginPubDate())
        .le(dto.getEndPubDate() != null, WmNews::getPublishTime, dto.getEndPubDate())
        //查询当前登录人的文章
        .eq(WmNews::getUserId, WmThreadLocalUtil.getUser().getId())
        //关键字模糊查询
        .like(StringUtils.isNotBlank(dto.getKeyword()), WmNews::getTitle, dto.getKeyword())
        //按照发布时间倒序查询
        .orderByDesc(WmNews::getPublishTime);
        page = page(page, lambdaQueryWrapper);
        //返回结果
        PageResponseResult pageResponseResult = PageResponseResult.builder()
            .currentPage(dto.getPage())
            .size(dto.getSize())
            .total((int) page.getTotal()).build();
        pageResponseResult.setData(page.getRecords());
        return pageResponseResult;

    }
}
明明mp自带条件查询,感觉完全没有必要像老师那样用if判断括起来,然后我个人喜欢用builder注解来构建对象,看起来更整洁清晰(不过代价是改动了原有代码结构,不过就一个学习项目,感觉其实不用太担心)
功能测试
成功
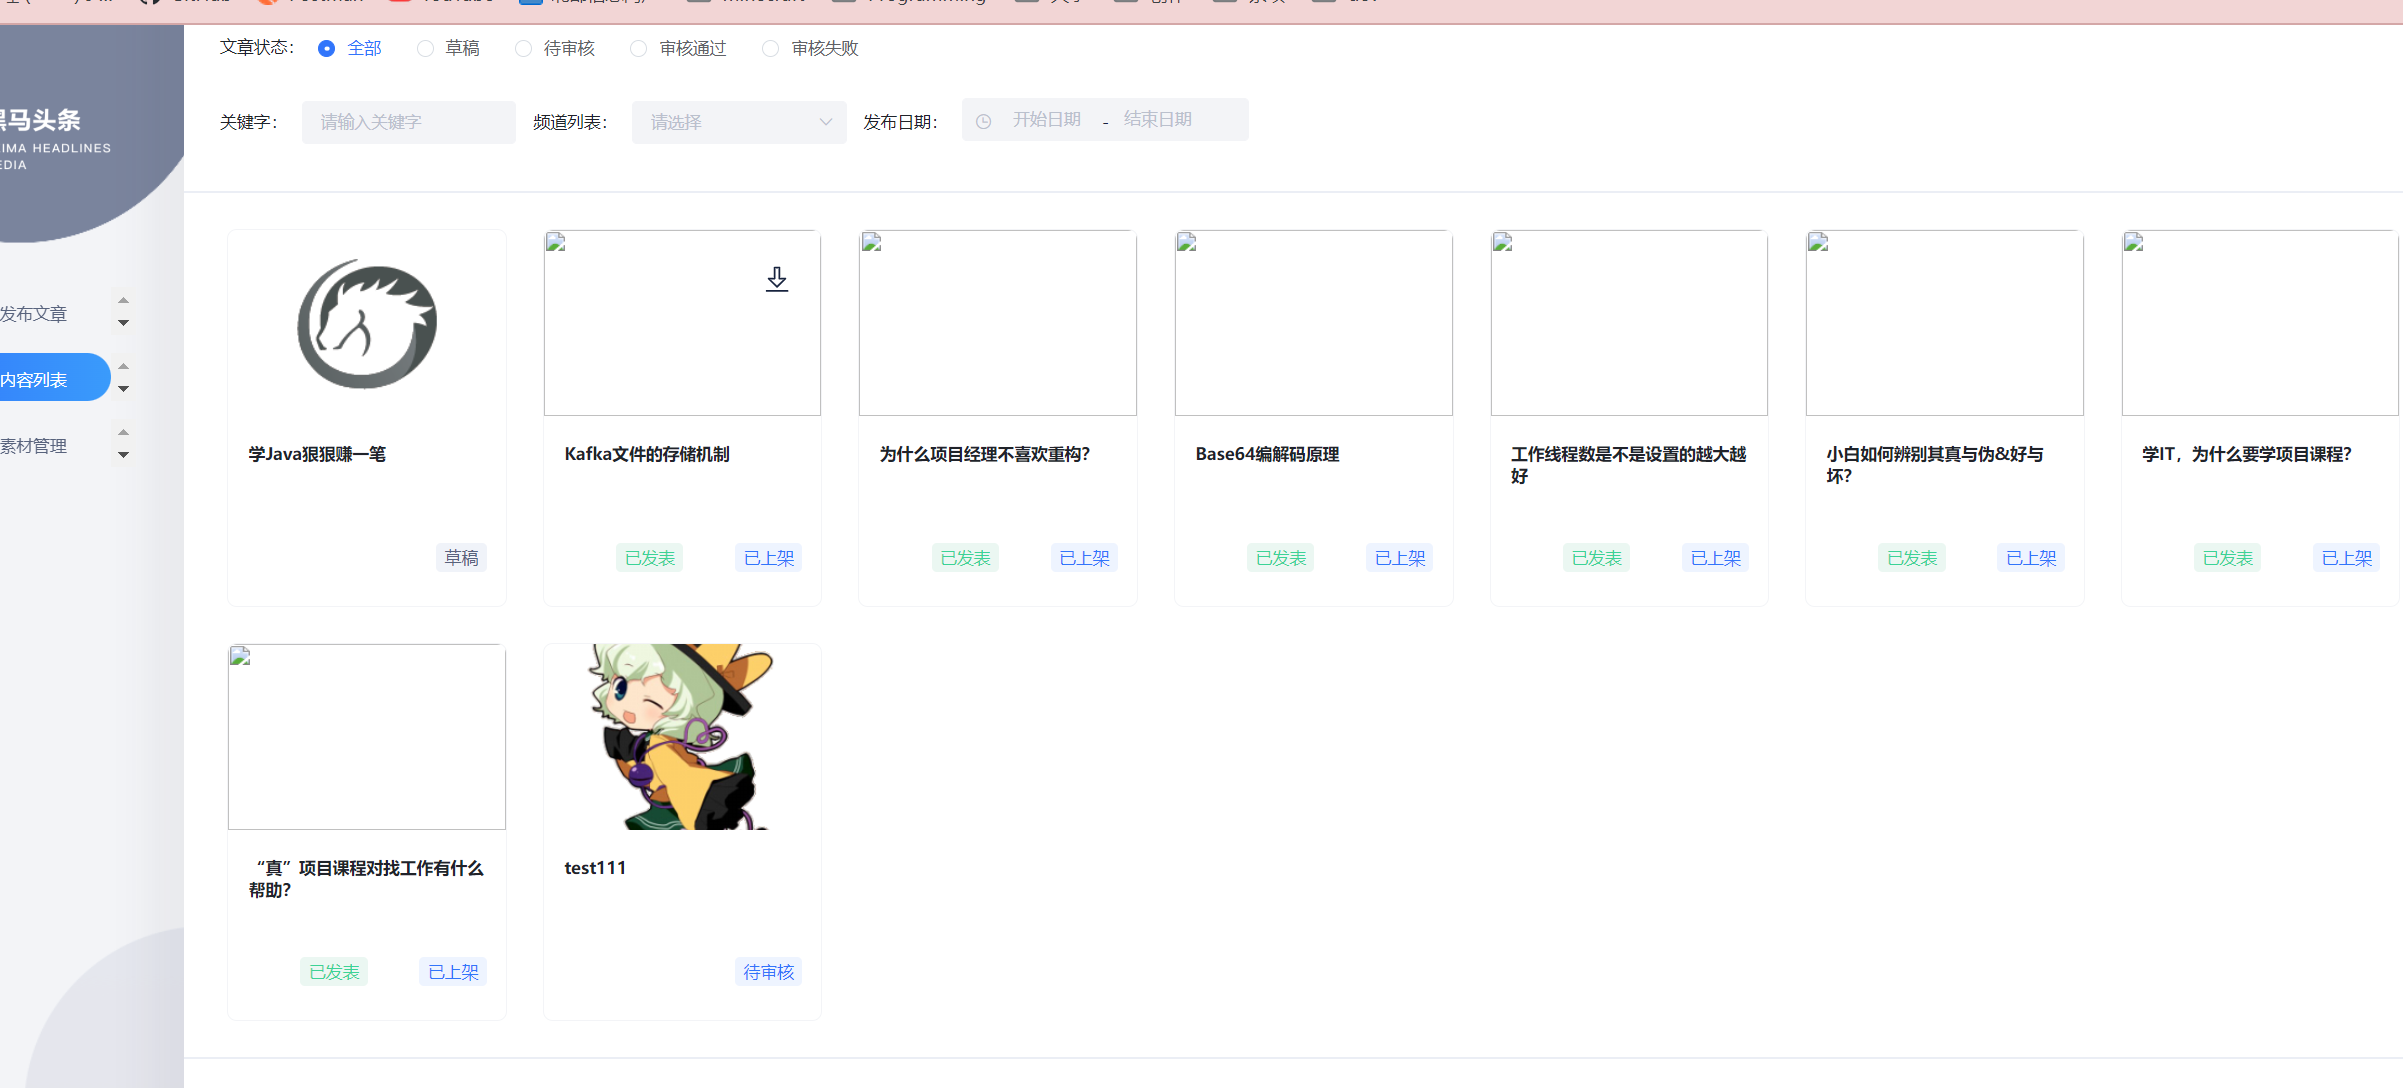
发布,修改,保存草稿
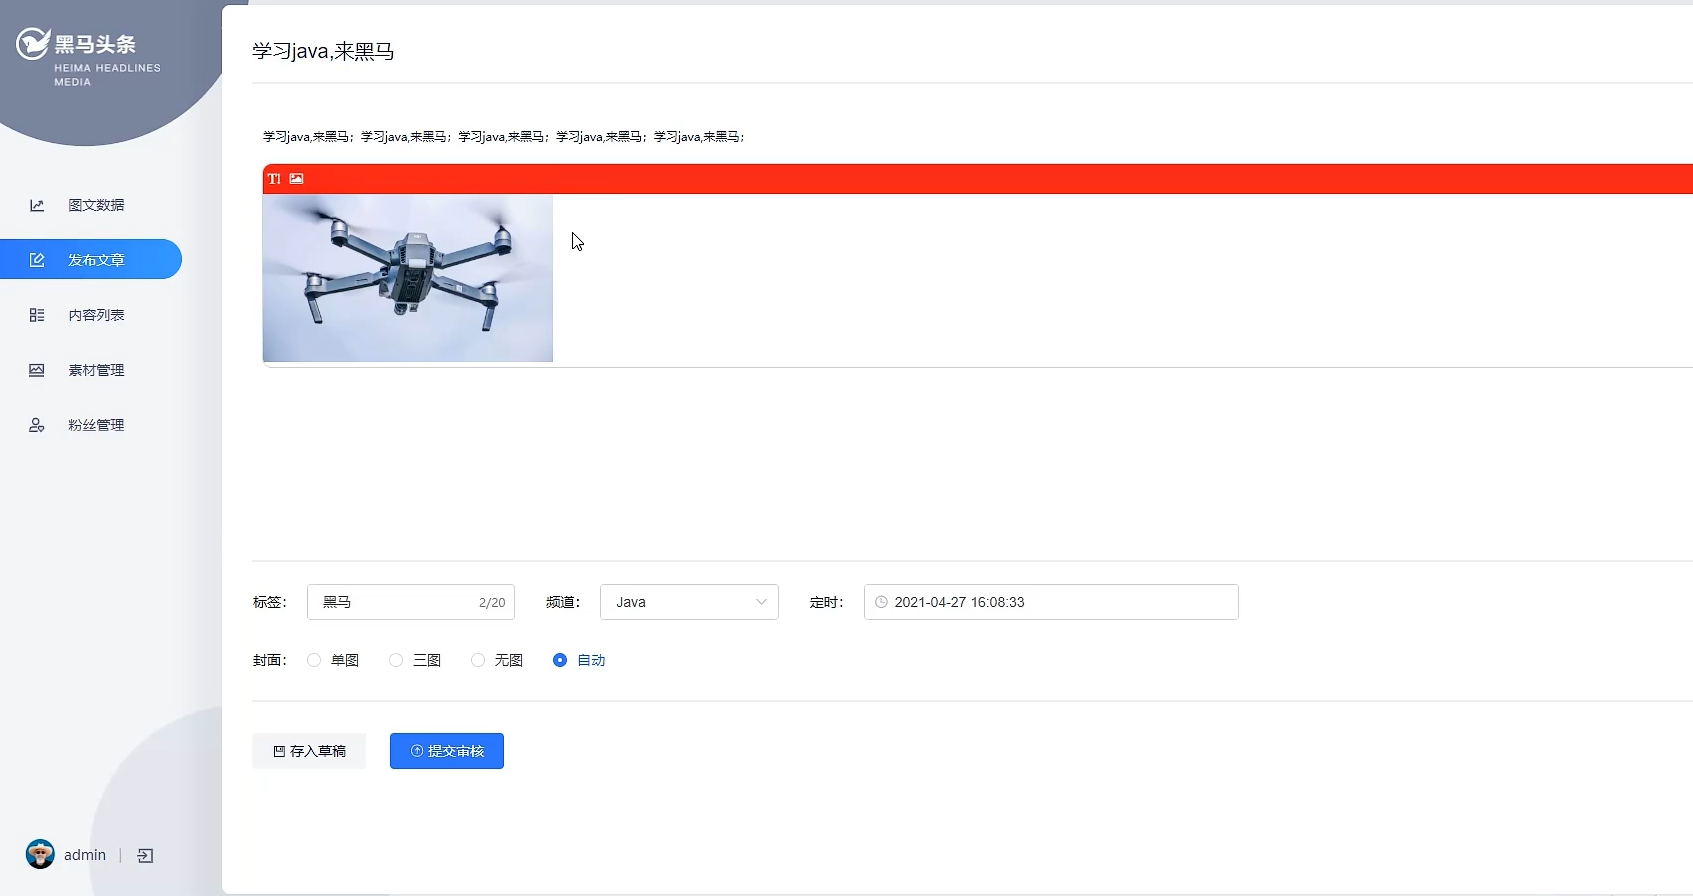
需求分析
业务需求
添加文字
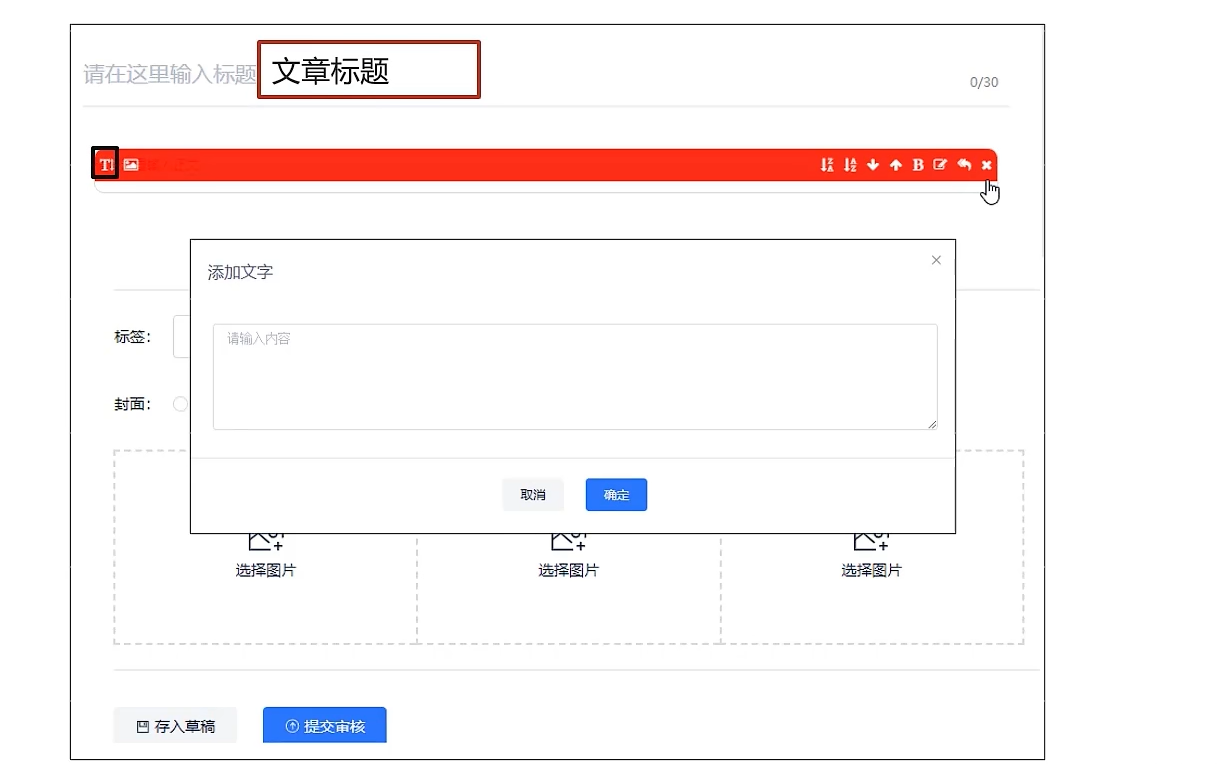
添加图片
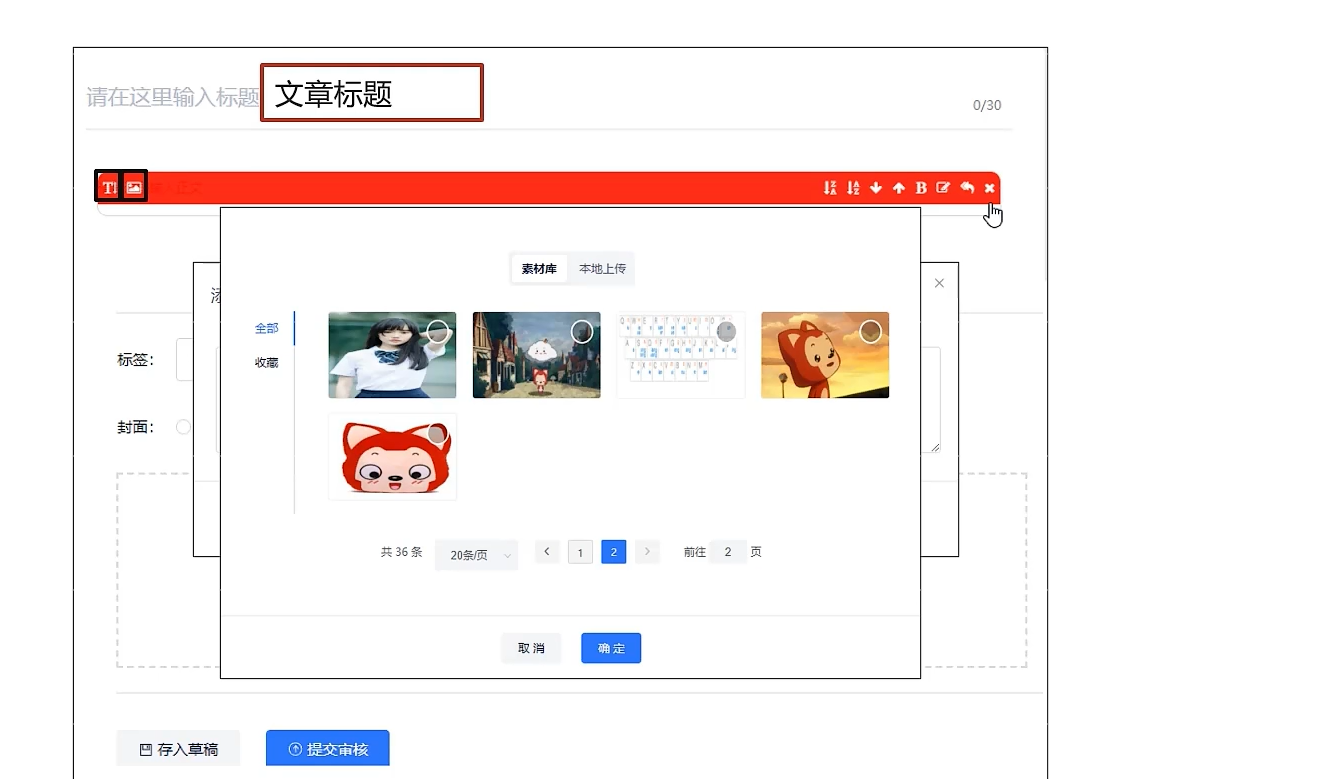
其他功能
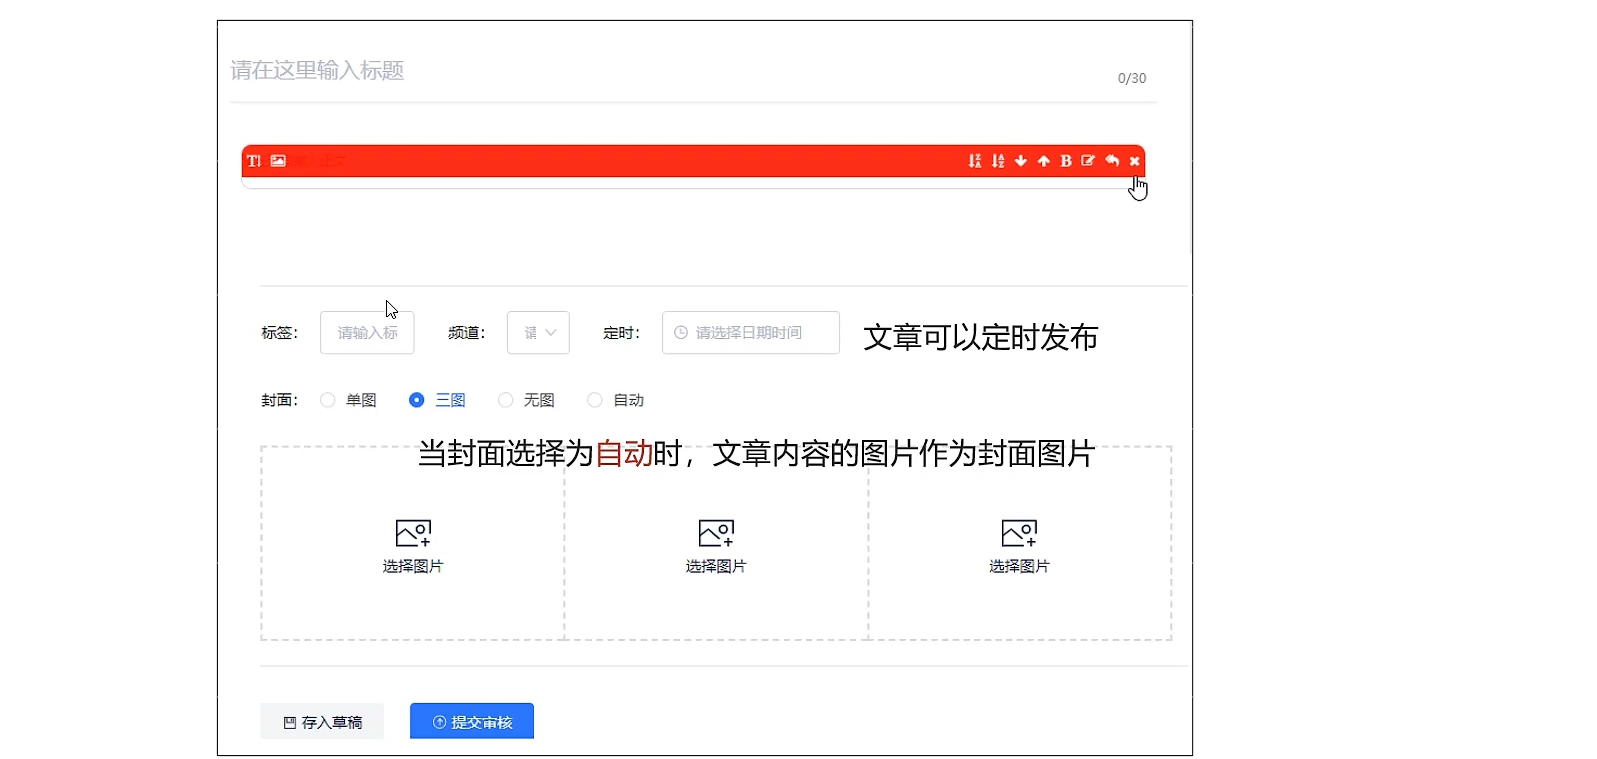
自动设置封面图片规则
- 内容中无图 -> 无图
- 内容中的图片大于1小于3 -> 单图
- 内容中的图片大于等于3 -> 多图
表结构
需要多张表
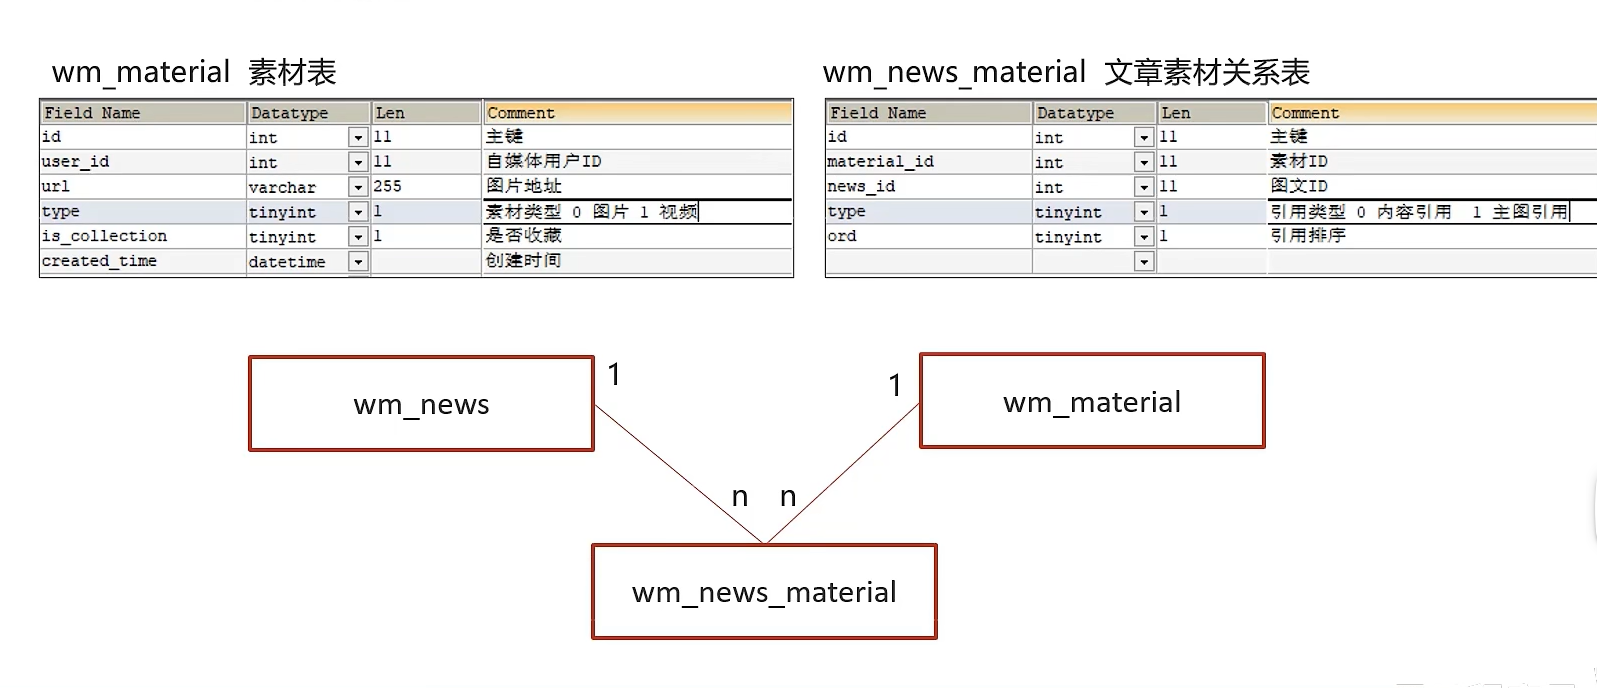
实现思路
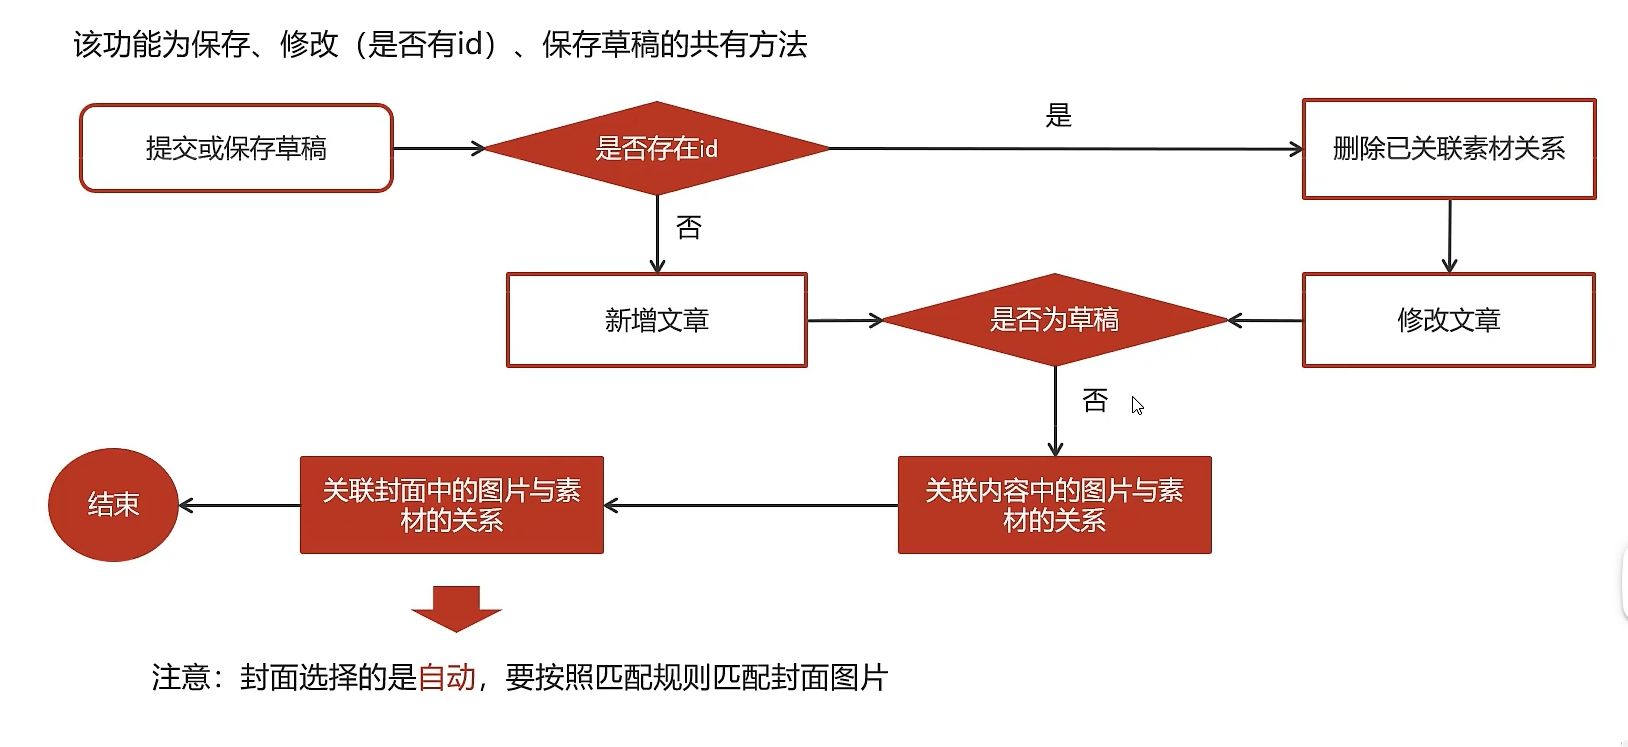
接口定义
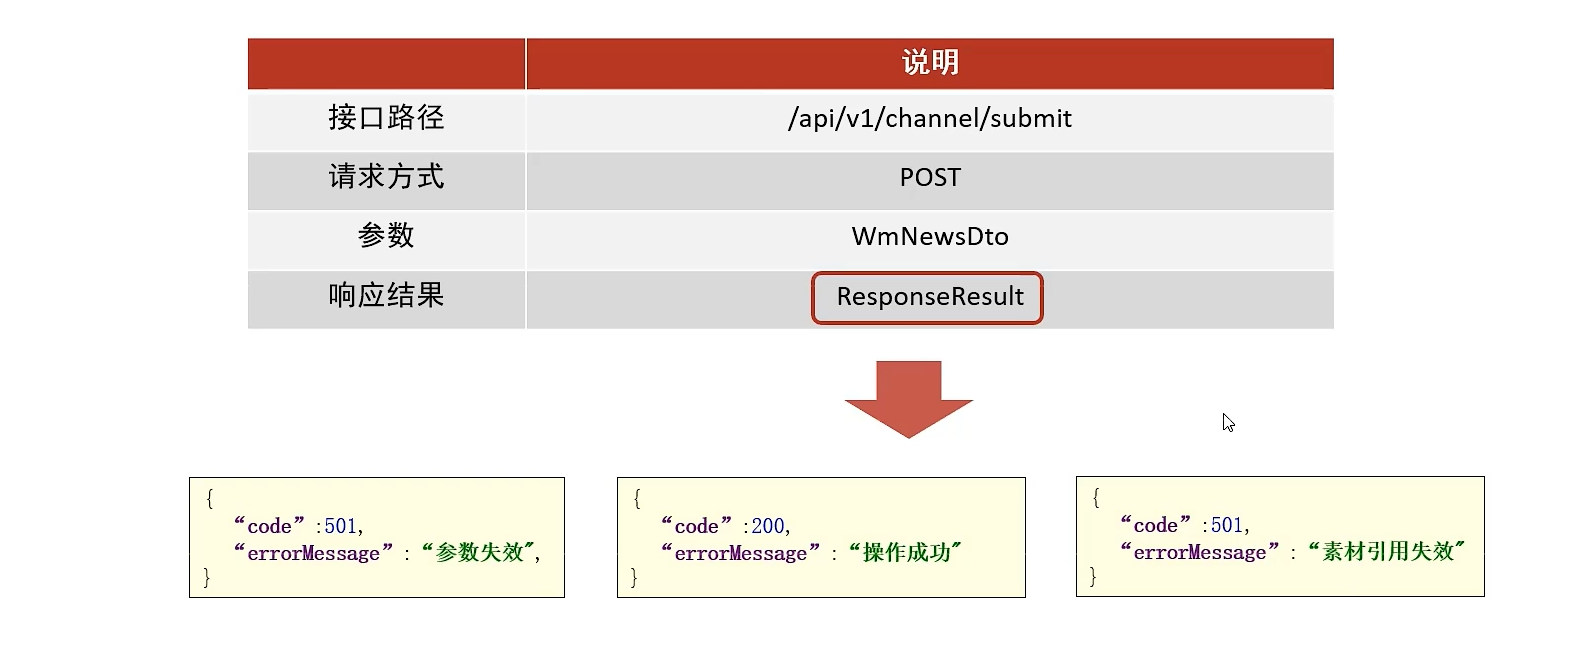
实体类NewsMaterial
package com.heima.model.wemedia.pojos;

import com.baomidou.mybatisplus.annotation.IdType;
import com.baomidou.mybatisplus.annotation.TableField;
import com.baomidou.mybatisplus.annotation.TableId;
import com.baomidou.mybatisplus.annotation.TableName;
import lombok.Data;

import java.io.Serializable;

/**
 * <p>
 * 自媒体图文引用素材信息表
 * </p>
 *
 * @author itheima
 */
@Data
@TableName("wm_news_material")
public class WmNewsMaterial implements Serializable {

    private static final long serialVersionUID = 1L;

    /**
     * 主键
     */
    @TableId(value = "id", type = IdType.AUTO)
    private Integer id;

    /**
     * 素材ID
     */
    @TableField("material_id")
    private Integer materialId;

    /**
     * 图文ID
     */
    @TableField("news_id")
    private Integer newsId;

    /**
     * 引用类型
            0 内容引用
            1 主图引用
     */
    @TableField("type")
    private Short type;

    /**
     * 引用排序
     */
    @TableField("ord")
    private Short ord;

}
WmNewsDto
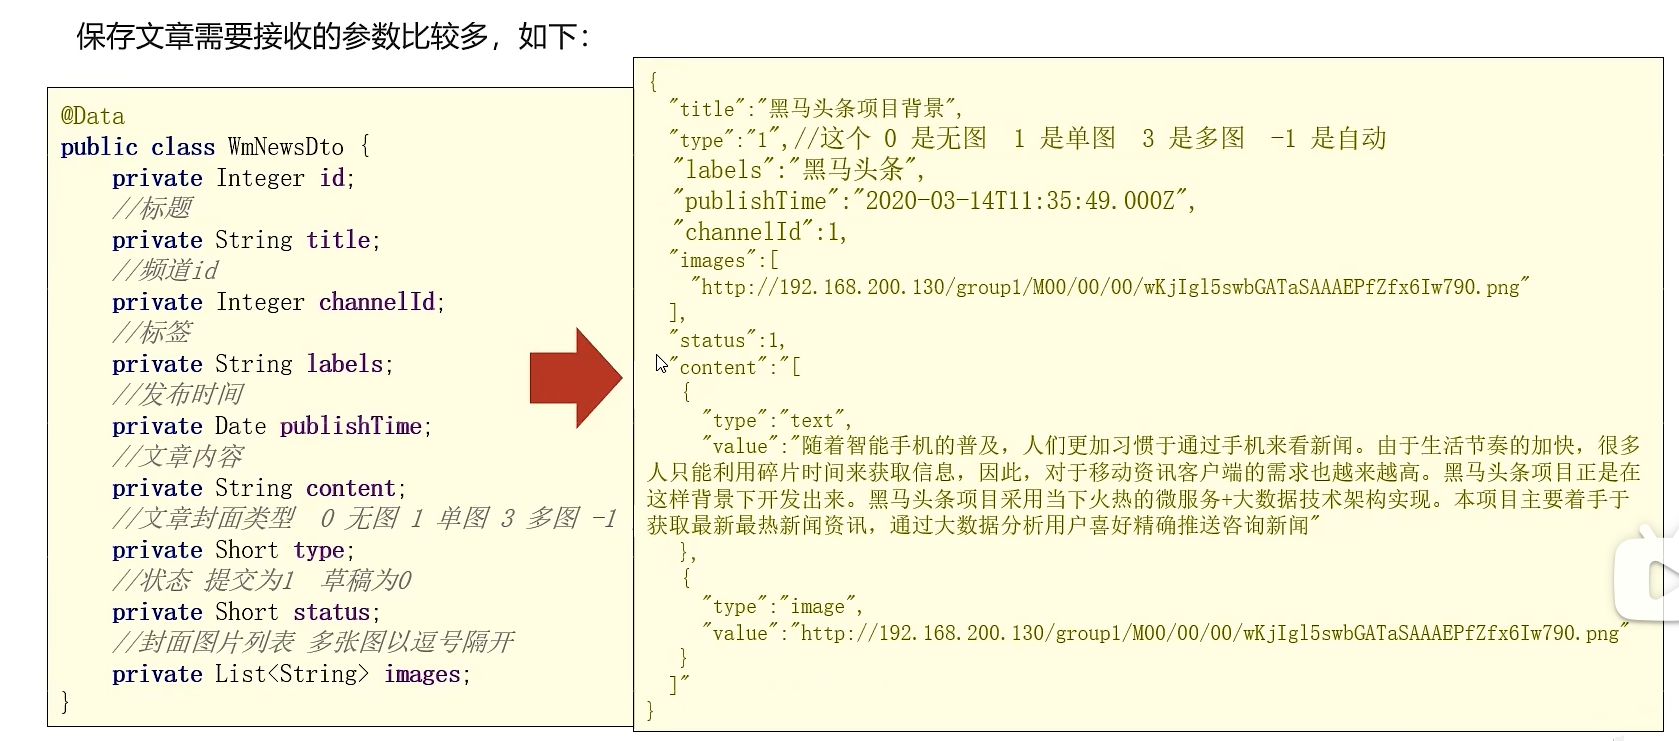
package com.heima.model.wemedia.dtos;

import lombok.Data;

import java.util.Date;
import java.util.List;

@Data
public class WmNewsDto {

    private Integer id;
     /**
     * 标题
     */
    private String title;
     /**
     * 频道id
     */
    private Integer channelId;
     /**
     * 标签
     */
    private String labels;
     /**
     * 发布时间
     */
    private Date publishTime;
     /**
     * 文章内容
     */
    private String content;
     /**
     * 文章封面类型  0 无图 1 单图 3 多图 -1 自动
     */
    private Short type;
     /**
     * 提交时间
     */
    private Date submitedTime;
     /**
     * 状态 提交为1  草稿为0
     */
    private Short status;

     /**
     * 封面图片列表 多张图以逗号隔开
     */
    private List<String> images;
}
功能实现
controller
    /**
     * 发布修改文章和保存草稿
     * @return
     */
    @PostMapping("/submit")
    public ResponseResult submitNews(@RequestBody WmNewsDto dto){
        return wmNewsService.submitNews(dto);
    }
serviceImpl
import org.springframework.transaction.annotation.Transactional;

@Service
@Slf4j
@Transactional
public class WmNewsServiceImpl  extends ServiceImpl<WmNewsMapper, WmNews> implements WmNewsService {
    @Autowired
    private WmNewsMaterialMapper wmNewsMaterialMapper;
    @Autowired
    private WmMaterialMapper wmMaterialMapper;


    /**
     * 发布修改文章和保存草稿
     *
     * @param dto
     * @return
     */
    @Override
    public ResponseResult submitNews(WmNewsDto dto) {
        //条件判断
        if(dto == null || dto.getContent() == null){
            return ResponseResult.errorResult(AppHttpCodeEnum.PARAM_INVALID);
        }
        WmNews wmNews = new WmNews();
        BeanUtils.copyProperties(dto, wmNews);
        //封面图片 list转字符串
        if(dto.getImages() != null && !dto.getImages().isEmpty()){
            wmNews.setImages(StringUtils.join(dto.getImages(), ","));
        }
        //如果当前封面类型为自动
        //根据图片数量设置封面类型
        if(dto.getType().equals(WemediaConstants.WM_NEWS_TYPE_AUTO)){
            wmNews.setType(null);//后续会根据图片数量设置
        }
        //保存或修改文章
        saveOrUpdateNews(wmNews);

        //判断是否是草稿
        //如果是草稿,结束方法
        if(dto.getStatus().equals(Status.NORMAL.getCode())){
            return ResponseResult.okResult(AppHttpCodeEnum.SUCCESS);
        }
        //不是草稿,保存文章内容图片与素材的关系
        //获取文章内容中的图片信息
        List<String> materials = extractImageContent(dto);
        //保存文章内容图片与素材的关系
        saveRelativeImages(materials, wmNews.getId(), WemediaConstants.WM_CONTENT_REFERENCE);
        //保存文章封面图片与素材的关系
        //如果当前封面类型为自动,需要匹配封面图片(到内容图片中找)
        saveRelativeCover(dto,wmNews,materials);
        //返回结果
        return ResponseResult.okResult(AppHttpCodeEnum.SUCCESS);
    }

    /**
     * 功能1:如果当前封面类型为自动,则设置封面类型
     *      匹配规则:
     *      1.如果文章内容中没有图片,则设置为无图
     *      2.如果文章内容中有图片,则第一张图片为封面
     *      3.如果文章内容中的图片数量大于等于3,则设置为多图
     * 功能2:保存封面图片与素材的关系
     * @param dto
     * @param wmNews
     * @param materials
     */
    private void saveRelativeCover(WmNewsDto dto, WmNews wmNews, List<String> materials) {
        //如果当前封面类型为自动,根据图片数量设置封面类型
        if (dto.getType().equals(WemediaConstants.WM_NEWS_TYPE_AUTO)) {
            //如果文章内容中没有图片,则设置为无图
            if (materials == null || materials.isEmpty()) {
                wmNews.setType(WemediaConstants.WM_NEWS_NONE_IMAGE);
            } else if (materials.size() >= 3) {
                //如果文章内容中的图片数量大于等于3,则设置为多图
                wmNews.setType(WemediaConstants.WM_NEWS_MANY_IMAGE);
            } else {
                //如果文章内容中有小于3张图片,则设置为单图
                wmNews.setType(WemediaConstants.WM_NEWS_SINGLE_IMAGE);
            }
        }
        if (materials == null || materials.isEmpty()) {
            return;
        }
        List<String> coverImages = new ArrayList<>();
        if (wmNews.getType() != null) {
            if(wmNews.getType().equals(WemediaConstants.WM_NEWS_SINGLE_IMAGE)){
                coverImages.add(materials.get(0));
            }else if(wmNews.getType().equals(WemediaConstants.WM_NEWS_MANY_IMAGE)){
                if (materials.size() >= 3) {
                    coverImages = materials.subList(0, 3);
                }
            }
        }
        wmNews.setImages(StringUtils.join(coverImages, ","));
        updateById(wmNews);
        saveRelativeImages(coverImages, wmNews.getId(), WemediaConstants.WM_COVER_REFERENCE);
    }


    private void saveRelativeImages(List<String> materials,Integer newsId,Short type) {
        //如果没有图片信息,结束方法
        if(materials == null || materials.isEmpty()){
            log.info("文章中没有图片信息");
            return;
        }
        //通过图片地址查询素材id
        List<WmMaterial> dbMaterials = wmMaterialMapper.selectList(
            Wrappers.<WmMaterial>lambdaQuery()
            .in(WmMaterial::getUrl, materials));
        //判断素材是否有效
        if(dbMaterials == null || dbMaterials.isEmpty()){
            //手动抛出异常 提示调用者素材失效了,并可以进行数据回滚
            throw new CustomException(AppHttpCodeEnum.MATERIAL_REFRENCE_FAIL);
        }
        List<Integer> materialIdList = dbMaterials.stream().map(WmMaterial::getId)
            .collect(Collectors.toList());
        //批量保存文章图片与素材的关系
        wmNewsMaterialMapper.saveRelations(materialIdList,newsId,type);
    }

    private static List<String> extractImageContent(WmNewsDto dto) {
        String content = dto.getContent();
        List<Map> mapList = JSON.parseArray(content, Map.class);
        List<String> materials = new ArrayList<>();
        for (Map map : mapList) {
            if(map.get("type").equals(WemediaConstants.WM_NEWS_TYPE_IMAGE)){//与前端约定好的固定字段
                materials.add(map.get("value").toString());
            }
        }
        return materials;
    }

    private void saveOrUpdateNews(WmNews wmNews) {
        //补全属性
        wmNews.setUserId(WmThreadLocalUtil.getUser().getId());
        wmNews.setCreatedTime(new Date());
        wmNews.setSubmitedTime(new Date());
        wmNews.setEnable((short) 1);//默认上架
        if(wmNews.getId() == null){
            save(wmNews);
        }else{
            //修改文章
            //删除文章图片与素材的关系
            wmNewsMaterialMapper.delete(Wrappers.<WmNewsMaterial>lambdaQuery().eq(WmNewsMaterial::getNewsId, wmNews.getId()));
            //更新文章
            updateById(wmNews);
        }
    }
}
mapper
@Mapper
public interface WmNewsMaterialMapper extends BaseMapper<WmNewsMaterial> {

     /**
      * 批量保存文章和素材的关系
      * @param materialIds
      * @param newsId
      * @param type
      */
     void saveRelations(@Param("materialIds") List<Integer> materialIds,@Param("newsId") Integer newsId, @Param("type")Short type);
}
mapper.xml
<?xml version="1.0" encoding="UTF-8"?>
<!DOCTYPE mapper PUBLIC "-//mybatis.org//DTD Mapper 3.0//EN" "http://mybatis.org/dtd/mybatis-3-mapper.dtd">
<mapper namespace="com.heima.wemedia.mapper.WmNewsMaterialMapper">

    <insert id="saveRelations">
        insert into wm_news_material (material_id,news_id,type,ord)
        values
        <foreach collection="materialIds" index="ord" item="mid" separator=",">
            (#{mid},#{newsId},#{type},#{ord})
        </foreach>
    </insert>

</mapper>
功能测试
第一个是自动模式生成的封面,第二个是手动选择设置的封面
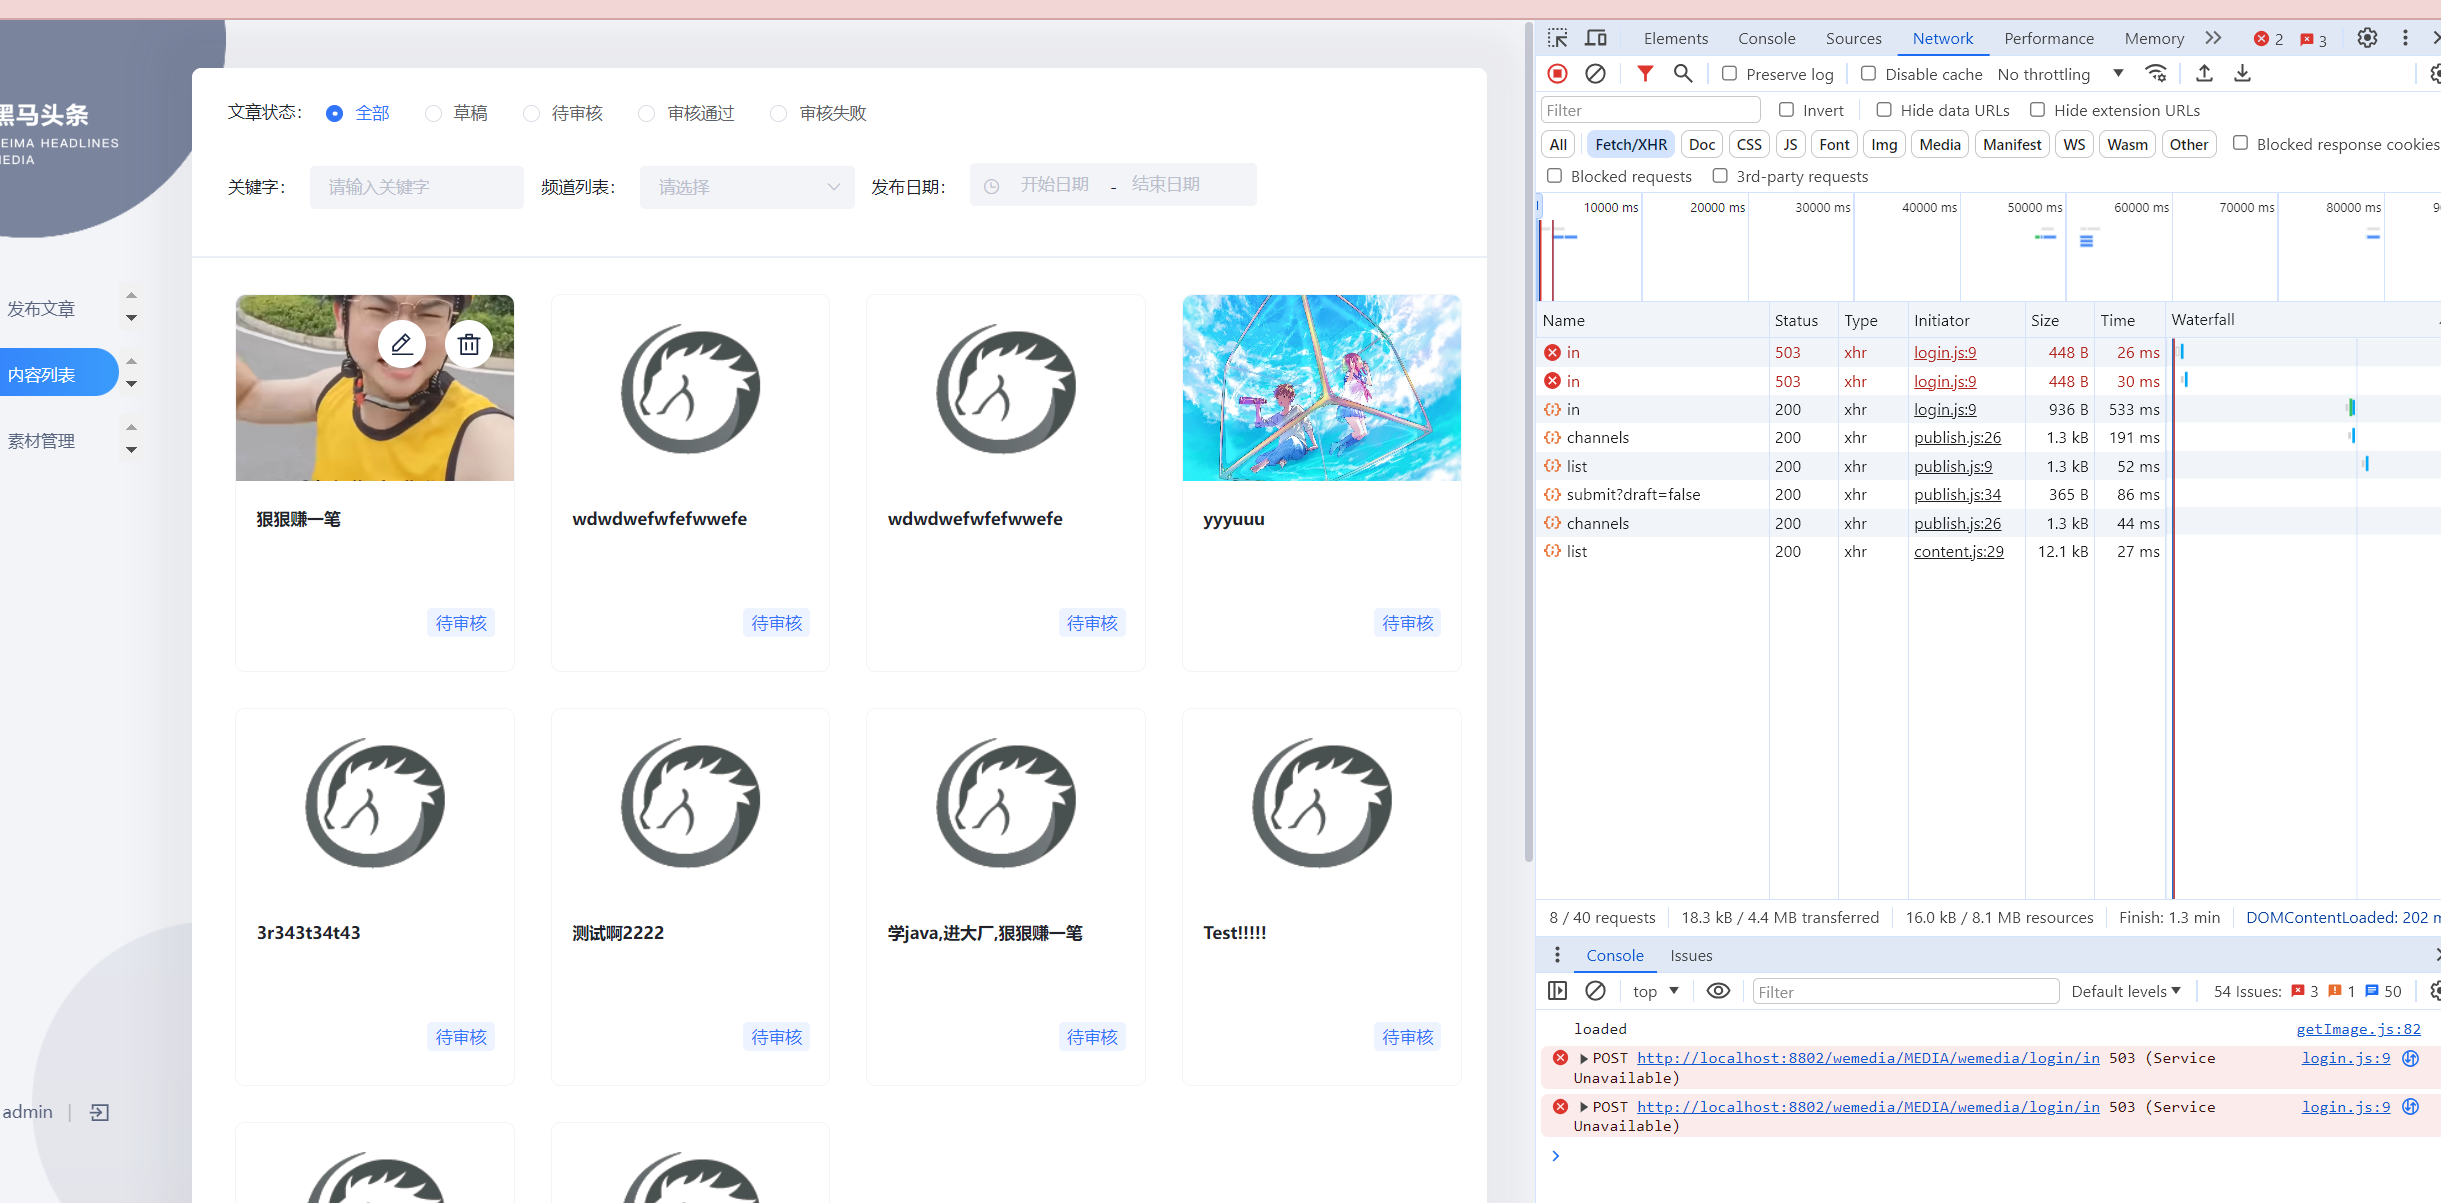
Day04 2024.03.17 自媒体文章审核
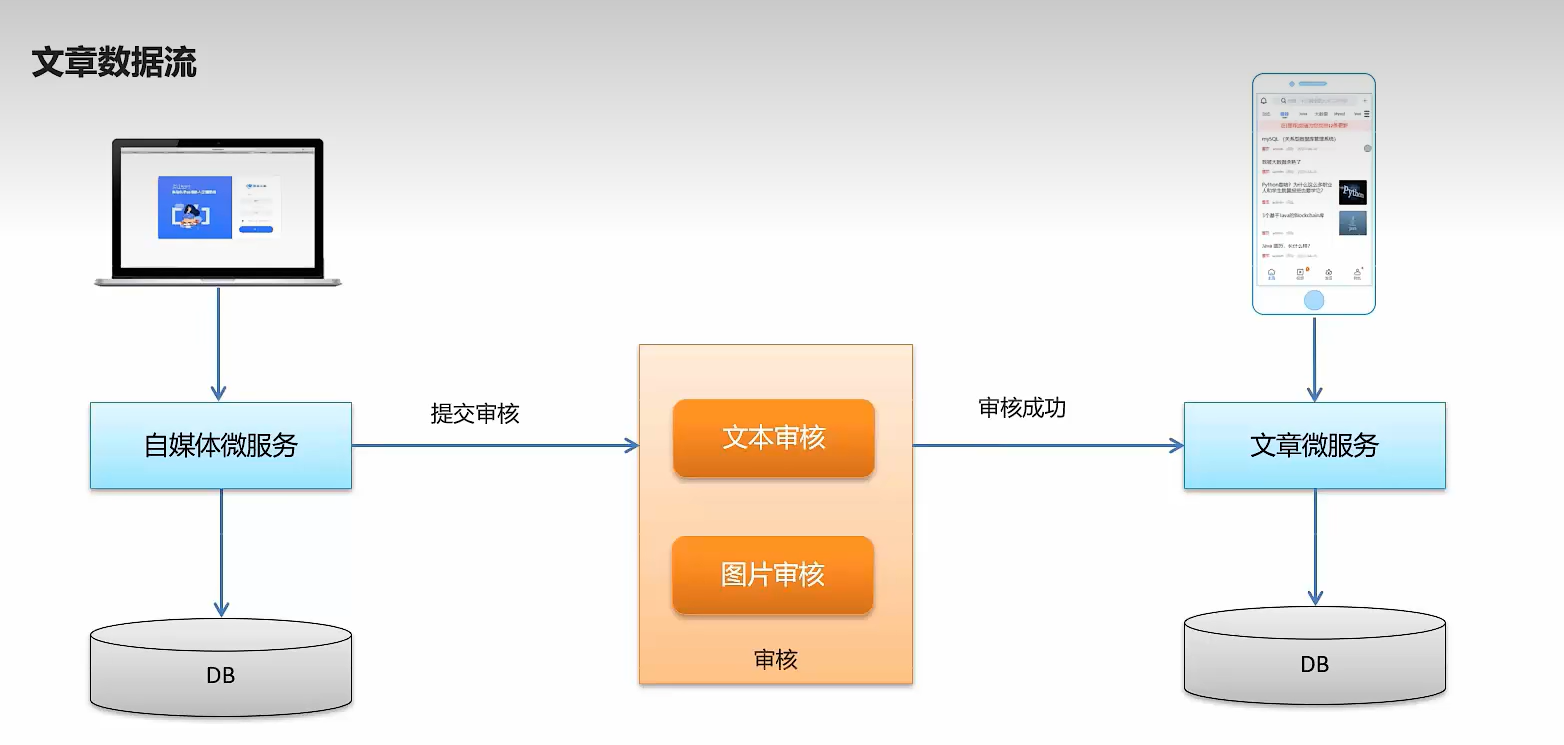
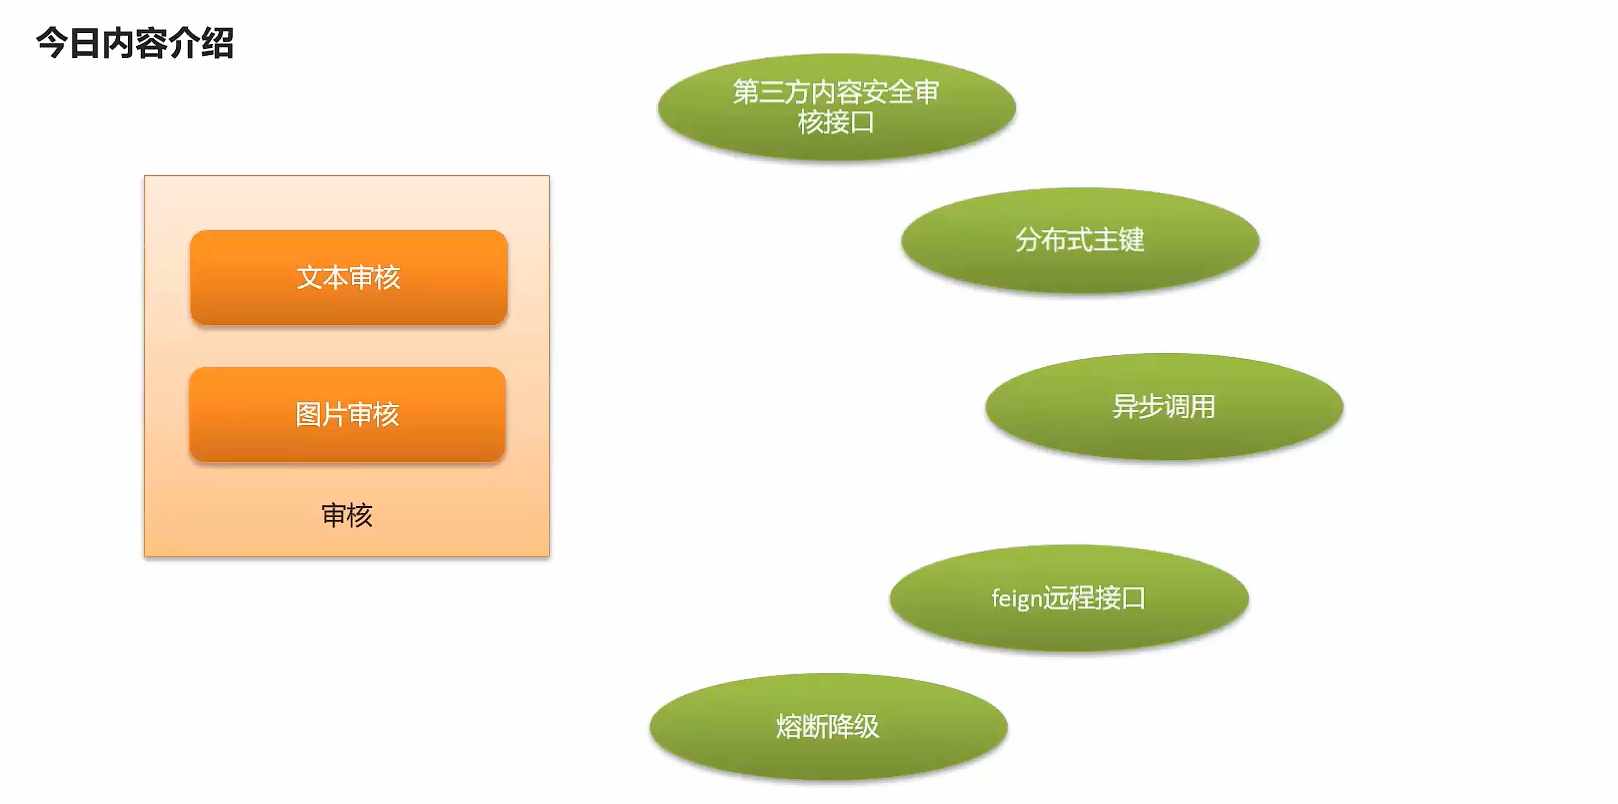
自媒体文章自动审核流程
审核方式
-
自动审核
文章发布之后,系统自动审核,主要是通过第三方接口对文章内容进行审核(成功,失败,不确定)
-
人工审核
自动审核返回不确定信息的时候,转到人工审核,由平台管理员进行审核
时序图
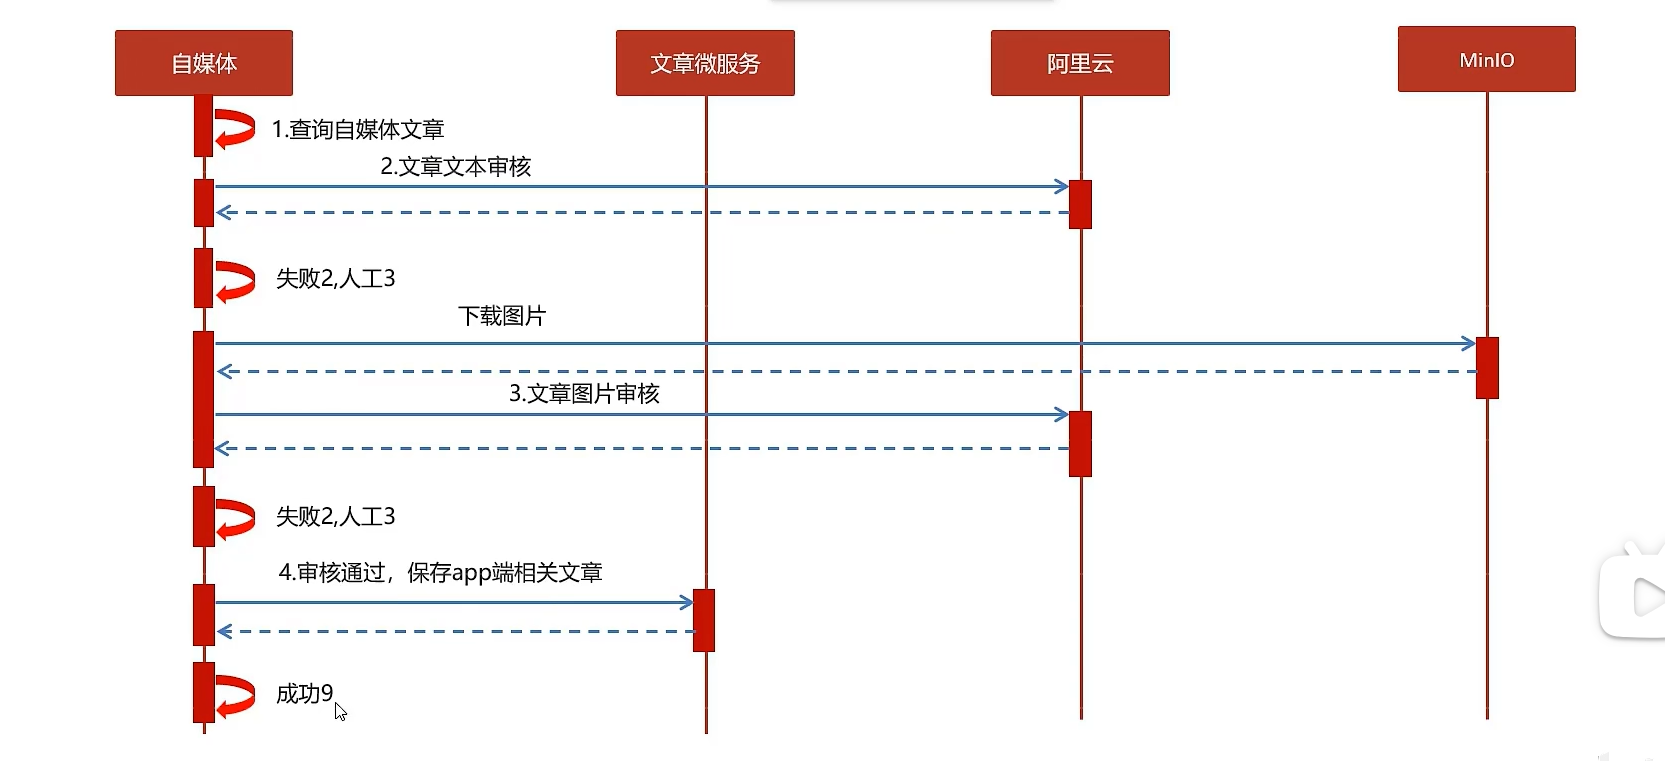
内容安全第三方接口
内容安全接口选型
内容安全属于识别服务,支持对图片,视频,文本,语音等对象进行多样化场景检测,有效降低内容违规风险
目前很多平台都支持内容检测,如阿里云、腾讯云、百度AI、网易云等国内大型互联网公司都对外提供了API。
按照性能和收费来看,黑马头条项目使用的就是阿里云的内容安全接口,使用到了图片和文本的审核。
阿里云收费标准:
https://www.aliyun.com/price/product/?spm=a2c4g.11186623.2.10.4146401eg5oeu8#/lvwang/detail
百度AI平台接口(无需企业认证,有免费额度,推荐使用)
准备工作
-
登录百度智能云平台,登录需要实名验证
-
领取免费额度(只需要先领取文本和图像审核即可),创建应用

项目集成
-
common模块导入百度sdk依赖,替换掉阿里的两个依赖
<dependency> <groupId>com.baidu.aip</groupId> <artifactId>java-sdk</artifactId> <version>4.16.18</version> </dependency> -
创建baiduyun包,编写相关方法(自己写的,如果不优雅请见谅)
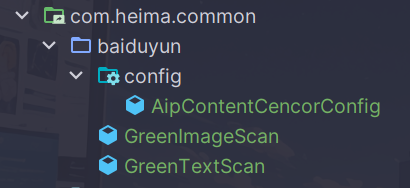
package com.heima.common.baiduyun.config;

import com.baidu.aip.contentcensor.AipContentCensor;
import lombok.Getter;
import lombok.Setter;
import org.springframework.boot.context.properties.ConfigurationProperties;
import org.springframework.context.annotation.Bean;
import org.springframework.context.annotation.Configuration;

@Configuration
@ConfigurationProperties(prefix = "baiduyun")
@Getter
@Setter
public class AipContentCencorConfig {
    private String appId;
    private String apiKey;
    private String secretKey;

    /**
     * 注入百度云内容审核客户端,单例使用
     * @return
     */
    @Bean
    public AipContentCensor buildAipContentCensor() {
        AipContentCensor client = new AipContentCensor(appId, apiKey, secretKey);
//        // 可选:设置网络连接参数
//        client.setConnectionTimeoutInMillis(2000);
//        client.setSocketTimeoutInMillis(60000);
//
//        // 可选:设置代理服务器地址, http和socket二选一,或者均不设置
//        // 设置http代理
//        client.setHttpProxy("proxy_host", proxy_port);
//        // 设置socket代理
//        client.setSocketProxy("proxy_host", proxy_port);
        return client;
    }
    public void testKey() {
        System.out.println(appId);
        System.out.println(apiKey);
        System.out.println(secretKey);
    }
}
package com.heima.common.baiduyun; import com.baidu.aip.contentcensor.AipContentCensor; import com.heima.common.constants.BaiduyunCencorConstants; import com.heima.common.constants.ContentCencorConstants; import java.util.ArrayList; import java.util.HashMap; import java.util.List; import java.util.Map; import lombok.extern.slf4j.Slf4j; import org.json.JSONObject; import org.springframework.beans.factory.annotation.Autowired; import org.springframework.stereotype.Component; @Component @Slf4j public class GreenImageScan { @Autowired private AipContentCensor aipContentCensor; public Map imageScan(List<byte[]> imageList) throws Exception{ if (imageList == null || imageList.isEmpty()) { return null; } List<JSONObject> resList = new ArrayList<>(); imageList.forEach(image -> { JSONObject response = aipContentCensor.imageCensorUserDefined(image, null); resList.add(response); }); return imageScanResHandler(resList); } private Map imageScanResHandler(List<JSONObject> resList){ Map<String, Object> resMap = new HashMap<>(); //遍历resList,如果有一张图片被识别为违规图片,则返回违规信息 for (JSONObject res : resList) { switch (res.getInt("conclusionType")) { case BaiduyunCencorConstants.CONCLUSION_TYPE_LEGAL: break; case BaiduyunCencorConstants.CONCLUSION_TYPE_ILLEGAL: resMap.put(ContentCencorConstants.SUGGESTION, ContentCencorConstants.SUGGESTION_BLOCK); return resMap; case BaiduyunCencorConstants.CONCLUSION_TYPE_SUSPECTED: resMap.put(ContentCencorConstants.SUGGESTION, ContentCencorConstants.SUGGESTION_REVIEW); return resMap; case BaiduyunCencorConstants.CONCLUSION_TYPE_REVIEW_FAILED: log.error("百度云图片审核失败,error_code:{},error_msg:{}", res.getInt("error_code"), res.getString("error_msg")); resMap.put(ContentCencorConstants.SUGGESTION, ContentCencorConstants.SUGGESTION_REVIEW); return resMap; default: log.error("百度云图片审核未知错误"); resMap.put(ContentCencorConstants.SUGGESTION, ContentCencorConstants.SUGGESTION_REVIEW); } resMap.put(ContentCencorConstants.SUGGESTION, ContentCencorConstants.SUGGESTION_PASS); } return resMap; } }package com.heima.common.baiduyun; import com.baidu.aip.contentcensor.AipContentCensor; import com.heima.common.constants.BaiduyunCencorConstants; import com.heima.common.constants.ContentCencorConstants; import java.util.HashMap; import java.util.List; import java.util.Map; import lombok.extern.slf4j.Slf4j; import org.json.JSONObject; import org.springframework.beans.factory.annotation.Autowired; import org.springframework.stereotype.Component; @Component @Slf4j public class GreenTextScan { @Autowired private AipContentCensor aipContentCensor; public Map greeTextScan(String content) throws Exception { if (content == null || content.isEmpty()) { return null; } JSONObject response = aipContentCensor.textCensorUserDefined(content); return textScanResHandler(response); } private Map textScanResHandler(JSONObject res){ Map<String, Object> resMap = new HashMap<>(); switch (res.getInt("conclusionType")) { case BaiduyunCencorConstants.CONCLUSION_TYPE_LEGAL: break; case BaiduyunCencorConstants.CONCLUSION_TYPE_ILLEGAL: resMap.put(ContentCencorConstants.SUGGESTION, ContentCencorConstants.SUGGESTION_BLOCK); return resMap; case BaiduyunCencorConstants.CONCLUSION_TYPE_SUSPECTED: resMap.put(ContentCencorConstants.SUGGESTION, ContentCencorConstants.SUGGESTION_REVIEW); return resMap; case BaiduyunCencorConstants.CONCLUSION_TYPE_REVIEW_FAILED: log.error("百度云图片审核失败,error_code:{},error_msg:{}", res.getInt("error_code"), res.getString("error_msg")); resMap.put(ContentCencorConstants.SUGGESTION, ContentCencorConstants.SUGGESTION_REVIEW); return resMap; default: log.error("百度云图片审核未知错误"); resMap.put(ContentCencorConstants.SUGGESTION, ContentCencorConstants.SUGGESTION_REVIEW); } resMap.put(ContentCencorConstants.SUGGESTION, ContentCencorConstants.SUGGESTION_PASS); return resMap; } }还是头一次使用switch语句啊
-
配置自动依赖
org.springframework.boot.autoconfigure.EnableAutoConfiguration=\ com.heima.common.exception.ExceptionCatch,\ com.heima.common.baiduyun.config.AipContentCencorConfig,\ com.heima.common.baiduyun.GreenImageScan,\ com.heima.common.baiduyun.GreenTextScan -
在heima-leadnews-wemedia中的nacos配置中心添加以下配置(填自己的)
baiduyun: appId: apiKey: secretKey: -
进行方法测试
在自媒体微服务中测试类中注入审核文本和图片的bean进行测试
@SpringBootTest(classes = WemediaApplication.class)
@RunWith(SpringRunner.class)
public class BaiduyunTest {

    @Autowired
    private GreenTextScan greenTextScan;
    @Autowired
    private GreenImageScan greenImageScan;
    @Autowired
    private FileStorageService fileStorageService;
    /**
     * 测试文本内容审核
     */
    @Test
    public void testScanText() throws Exception {
        Map map = greenTextScan.greeTextScan("***(脏话)");
        System.out.println(map);
    }
    @Test
    public void testScanImage() throws Exception {
        byte[] bytes = fileStorageService.downLoadFile("http://hmtt:9000/leadnews/2024/03/16/443030b3cc0547daad9f344fb2fea13b.jpg");
        Map map = greenImageScan.imageScan(Collections.singletonList(bytes));
        System.out.println(map);
    }
}
可以看到输入脏话的时候返回了block
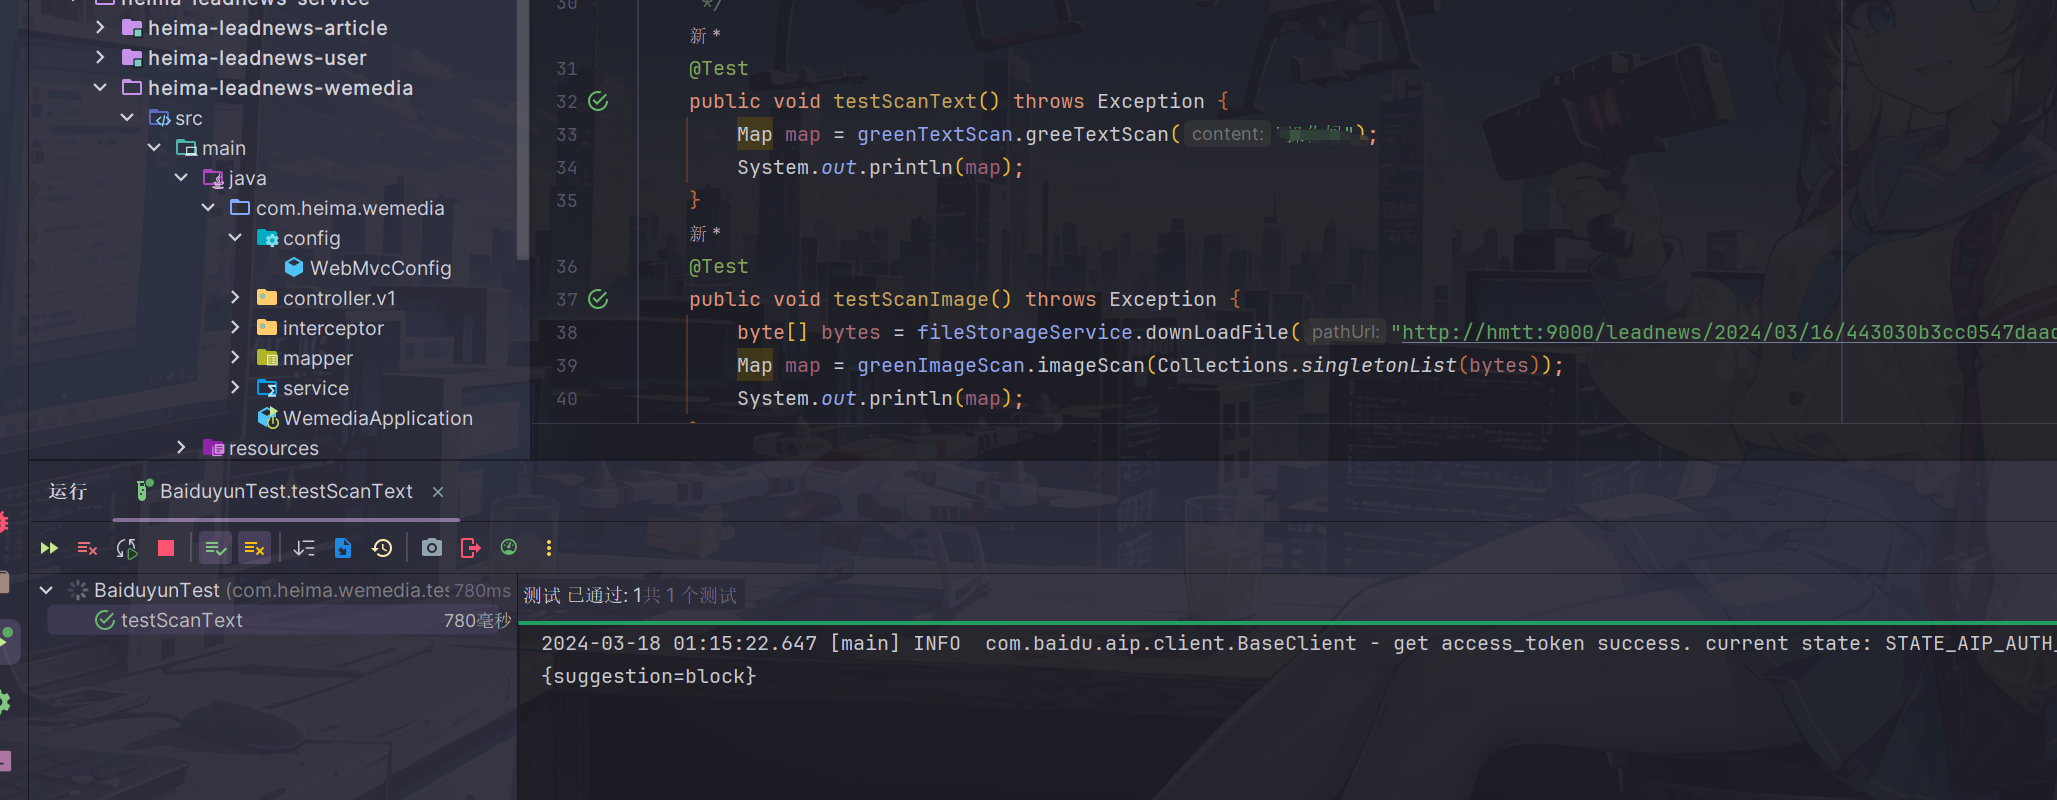
由于手头上没有涩图,就不演示图片审核功能了
阿里云平台接口(老师采用,但需要企业认证,已废弃)
❗ 下面操作可以跳过,本项目采用百度接口开发
准备工作
您在使用内容检测API之前,需要先注册阿里云账号,添加Access Key并签约云盾内容安全。
操作步骤
-
前往阿里云官网注册账号。如果已有注册账号,请跳过此步骤。
需要实名认证
-
点击右上角个人账号来管理Accesskey,推荐把秘钥用环境变量的形式存放起来
-
开通服务(由于需要企业认证,后续我会通过改动代码来跳过这步操作)

项目集成
- 导入阿里云相关依赖拷贝资料文件夹中的类到common模块下面,并添加到自动配置
包括了GreenImageScan和GreenTextScan及对应的工具类
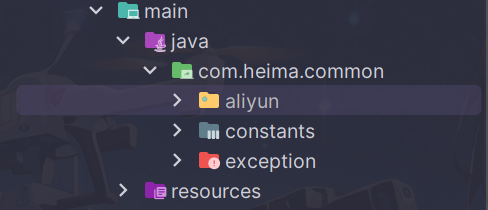
添加到自动配置中
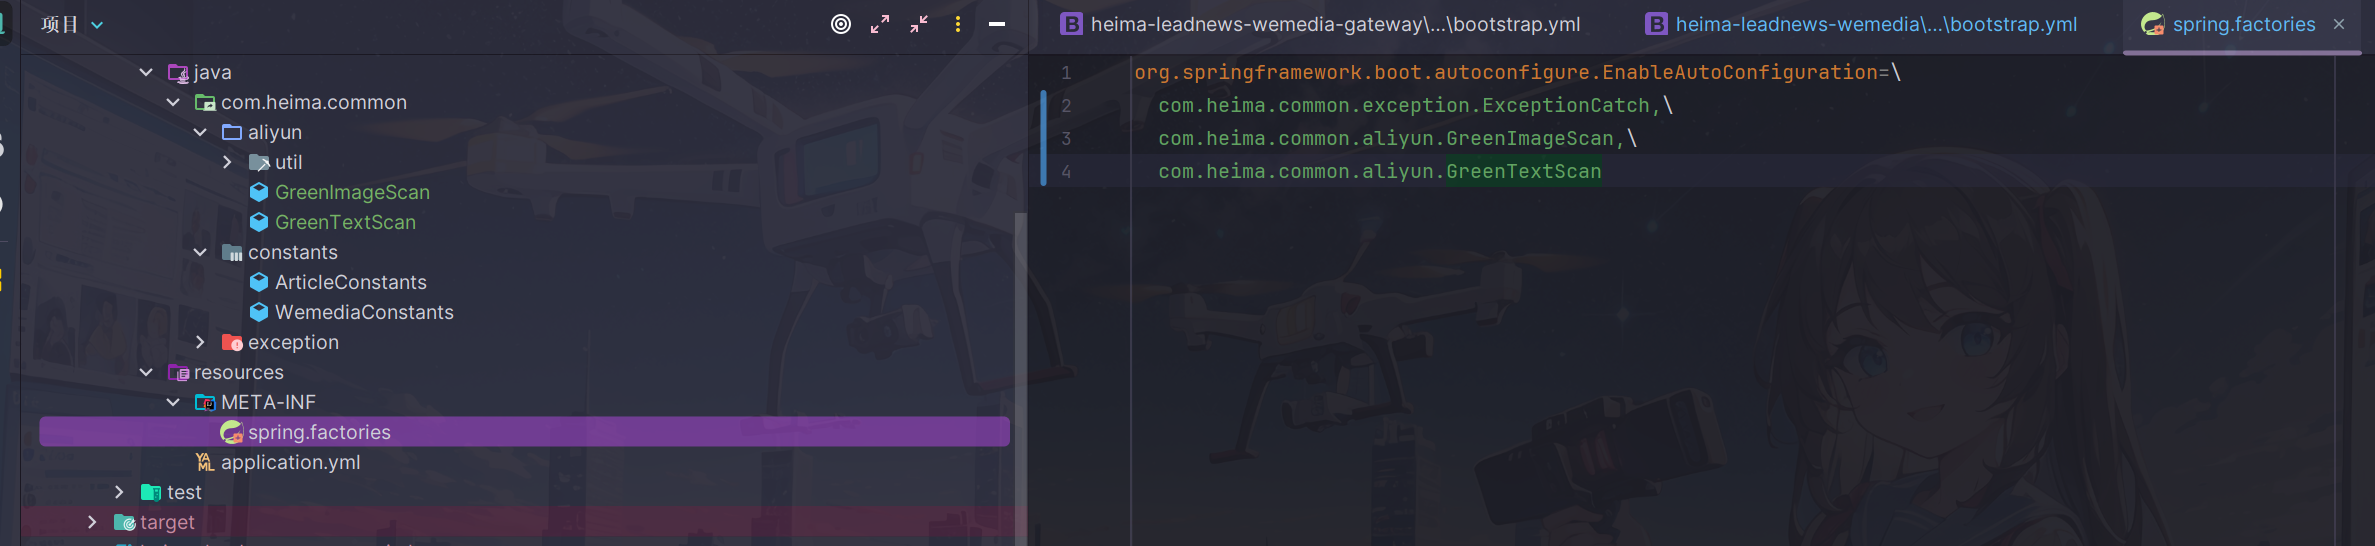
- accessKeyId和secret(需自己申请)
在heima-leadnews-wemedia中的nacos配置中心添加以下配置:
aliyun:
 accessKeyId: LTAI5tCWHCcfvqQzu8k2oKmX
 secret: auoKUFsghimbfVQHpy7gtRyBkoR4vc
#aliyun.scenes=porn,terrorism,ad,qrcode,live,logo
 scenes: terrorism
③:在自媒体微服务中测试类中注入审核文本和图片的bean进行测试
package com.heima.wemedia;

import com.heima.common.aliyun.GreenImageScan;
import com.heima.common.aliyun.GreenTextScan;
import com.heima.file.service.FileStorageService;
import org.junit.Test;
import org.junit.runner.RunWith;
import org.springframework.beans.factory.annotation.Autowired;
import org.springframework.boot.test.context.SpringBootTest;
import org.springframework.test.context.junit4.SpringRunner;

import java.util.Arrays;
import java.util.Map;

@SpringBootTest(classes = WemediaApplication.class)
@RunWith(SpringRunner.class)
public class AliyunTest {

    @Autowired
    private GreenTextScan greenTextScan;

    @Autowired
    private GreenImageScan greenImageScan;

    @Autowired
    private FileStorageService fileStorageService;

    @Test
    public void testScanText() throws Exception {
        Map map = greenTextScan.greeTextScan("我是一个好人,冰毒");
        System.out.println(map);
    }

    @Test
    public void testScanImage() throws Exception {
        byte[] bytes = fileStorageService.downLoadFile("http://192.168.200.130:9000/leadnews/2021/04/26/ef3cbe458db249f7bd6fb4339e593e55.jpg");
        Map map = greenImageScan.imageScan(Arrays.asList(bytes));
        System.out.println(map);
    }
}
app端文章保存接口
当自媒体文章审核成功之后,需要将文章保存在app端展示
表结构说明
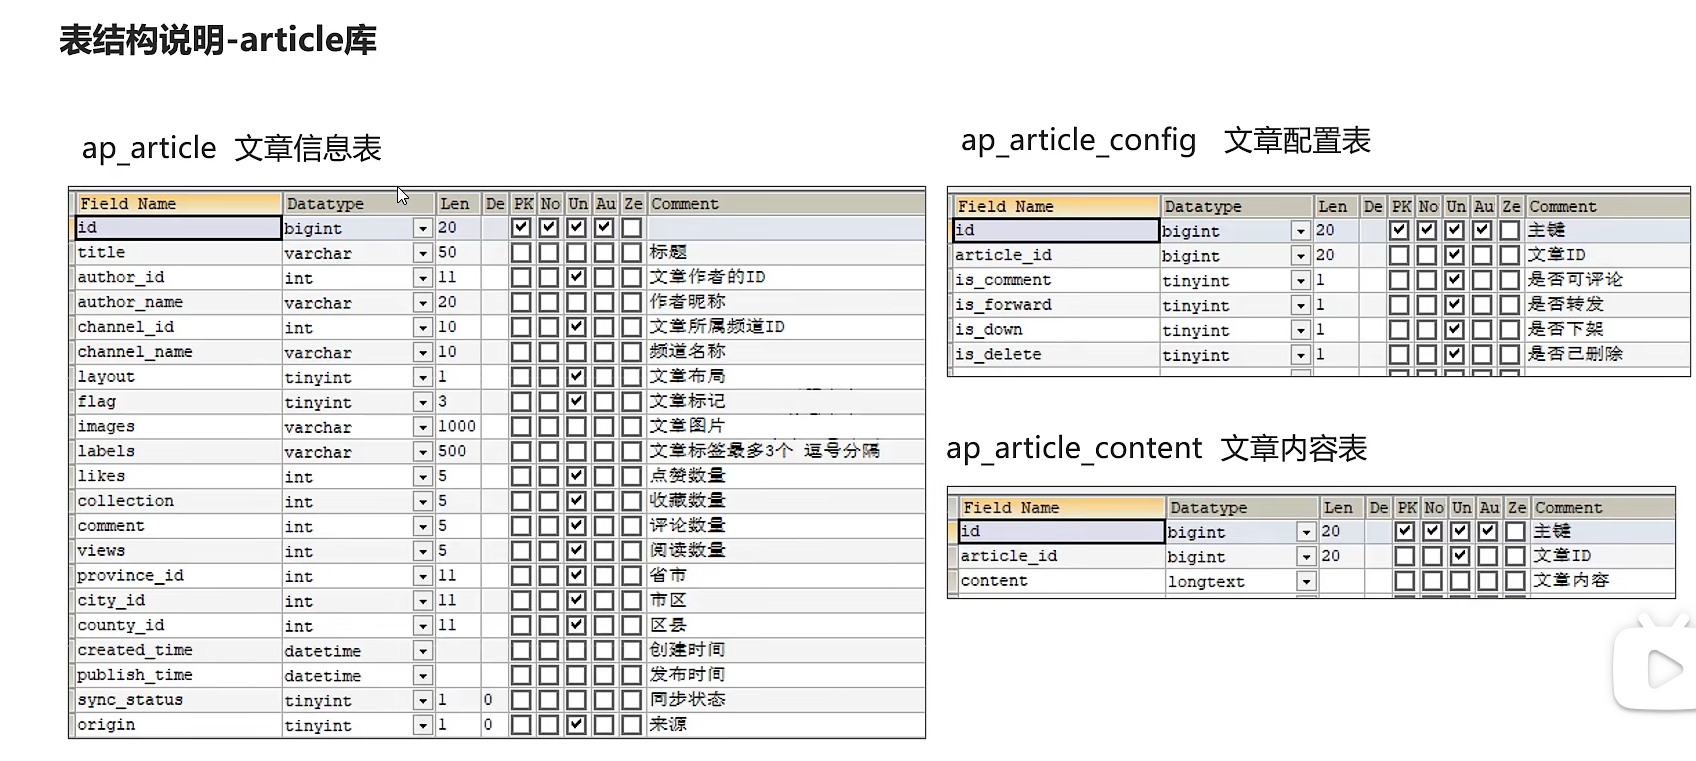
分布式id
随着业务的增长,文章表可能要占用很大的物理存储空间,为了解决该问题,后期使用数据库分片技术。将一个数据库进行拆分,通过数据库中间件连接。如果数据库中该表选用ID自增策略,则可能产生重复的ID,此时应该使用分布式ID生成策略来生成ID。


snowflake是Twitter开源的分布式ID生成算法,结果是一个long型的ID。其核心思想是:使用41bit作为毫秒数,10bit作为机器的ID(5个bit是数据中心,5个bit的机器ID),12bit作为毫秒内的流水号(意味着每个节点在每毫秒可以产生 4096 个 ID),最后还有一个符号位,永远是0
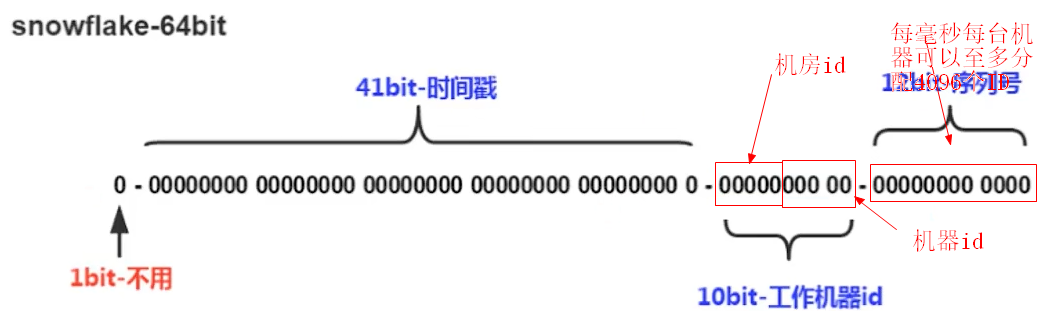
文章端相关的表都使用雪花算法生成id,包括ap_article、 ap_article_config、 ap_article_content
mybatis-plus已经集成了雪花算法,完成以下两步即可在项目中集成雪花算法
第一:在实体类中的id上加入如下配置,指定类型为id_worker
@TableId(value = "id",type = IdType.ID_WORKER)
private Long id;
第二:在application.yml文件中配置数据中心id和机器id
mybatis-plus:
  mapper-locations: classpath*:mapper/*.xml
  # 设置别名包扫描路径,通过该属性可以给包中的类注册别名
  type-aliases-package: com.heima.model.article.pojos
  global-config:
    datacenter-id: 1
    workerId: 1
datacenter-id:数据中心id(取值范围:0-31)
workerId:机器id(取值范围:0-31)
实现思路
在文章审核成功以后需要在app的article库中新增文章数据
1.保存文章信息 ap_article
2.保存文章配置信息 ap_article_config
3.保存文章内容 ap_article_content
实现思路:
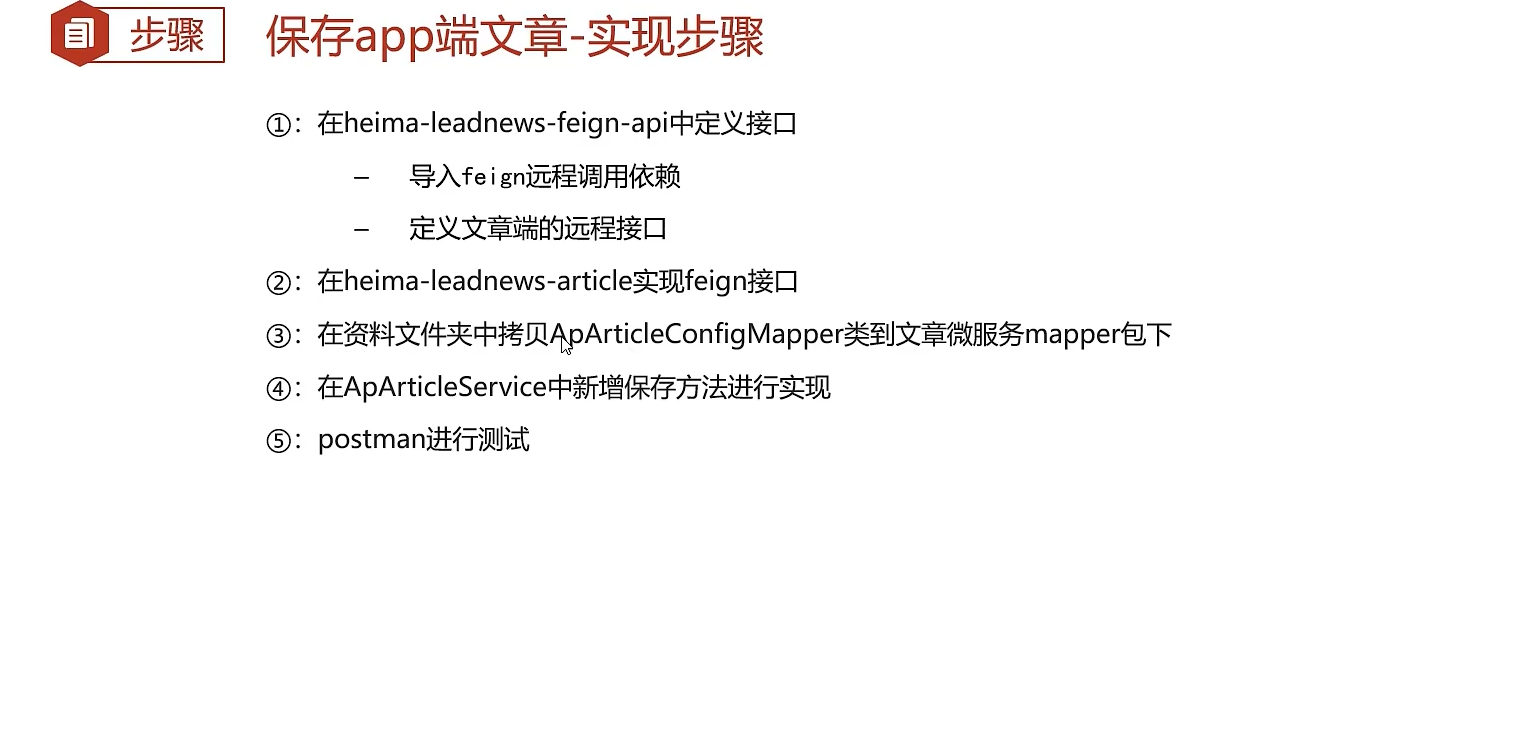
功能实现
| 说明 | |
|---|---|
| 接口路径 | /api/v1/article/save |
| 请求方式 | POST |
| 参数 | ArticleDto |
| 响应结果 | ResponseResult |
导入ArticleDto
package com.heima.model.article.dtos;

import com.heima.model.article.pojos.ApArticle;
import lombok.Data;

@Data
public class ArticleDto  extends ApArticle {
    /**
     * 文章内容
     */
    private String content;
}
- 在heima-leadnews-feign-api中新增接口
导入feign的依赖
<dependency>
    <groupId>org.springframework.cloud</groupId>
    <artifactId>spring-cloud-starter-openfeign</artifactId>
</dependency>
定义文章端的接口
package com.heima.apis.article;

import com.heima.model.article.dtos.ArticleDto;
import com.heima.model.common.dtos.ResponseResult;
import org.springframework.cloud.openfeign.FeignClient;
import org.springframework.web.bind.annotation.PostMapping;
import org.springframework.web.bind.annotation.RequestBody;

@FeignClient("leadnews-article")
public interface IArticleClient {
        @PostMapping("/api/v1/article/save")
        ResponseResult save(@RequestBody ArticleDto dto);

}
自己坚持一个原则,请求方法名和api接口名称保持一致,所以就擅自更改了老师的接口方法名
- 在heima-leadnews-article中实现该方法
package com.heima.article.feign;

import com.heima.apis.article.IArticleClient;
import com.heima.article.service.ApArticleService;
import com.heima.model.article.dtos.ArticleDto;
import com.heima.model.common.dtos.ResponseResult;
import org.springframework.beans.factory.annotation.Autowired;
import org.springframework.web.bind.annotation.*;

import java.io.IOException;

@RestController
public class ArticleClient implements IArticleClient {

    @Autowired
    private ApArticleService apArticleService;

    @Override
    @PostMapping("/api/v1/article/save")
    public ResponseResult save(@RequestBody ArticleDto dto) {
        return apArticleService.saveArticle(dto);
    }

}
- 拷贝mapper
在资料文件夹中拷贝ApArticleConfigMapper类到mapper文件夹中
同时,修改ApArticleConfig类,添加如下构造函数
package com.heima.model.article.pojos;

import com.baomidou.mybatisplus.annotation.IdType;
import com.baomidou.mybatisplus.annotation.TableField;
import com.baomidou.mybatisplus.annotation.TableId;
import com.baomidou.mybatisplus.annotation.TableName;
import lombok.Data;
import lombok.NoArgsConstructor;

import java.io.Serializable;

/**
 * <p>
 * APP已发布文章配置表
 * </p>
 *
 * @author itheima
 */

@Data
@NoArgsConstructor
@TableName("ap_article_config")
public class ApArticleConfig implements Serializable {


    public ApArticleConfig(Long articleId){
        this.articleId = articleId;
        this.isComment = true;
        this.isForward = true;
        this.isDelete = false;
        this.isDown = false;
    }

    @TableId(value = "id",type = IdType.ID_WORKER)
    private Long id;

    /**
     * 文章id
     */
    @TableField("article_id")
    private Long articleId;

    /**
     * 是否可评论
     * true: 可以评论   1
     * false: 不可评论  0
     */
    @TableField("is_comment")
    private Boolean isComment;

    /**
     * 是否转发
     * true: 可以转发   1
     * false: 不可转发  0
     */
    @TableField("is_forward")
    private Boolean isForward;

    /**
     * 是否下架
     * true: 下架   1
     * false: 没有下架  0
     */
    @TableField("is_down")
    private Boolean isDown;

    /**
     * 是否已删除
     * true: 删除   1
     * false: 没有删除  0
     */
    @TableField("is_delete")
    private Boolean isDelete;
}
- 在ApArticleService中新增方法
/**
     * 保存app端相关文章
     * @param dto
     * @return
     */
ResponseResult saveArticle(ArticleDto dto) ;
实现类:
@Autowired
private ApArticleConfigMapper apArticleConfigMapper;

@Autowired
private ApArticleContentMapper apArticleContentMapper;

/**
     * 保存app端相关文章
     * @param dto
     * @return
     */
@Override
public ResponseResult saveArticle(ArticleDto dto) {
    //1.检查参数
    if(dto == null){
        return ResponseResult.errorResult(AppHttpCodeEnum.PARAM_INVALID);
    }

    ApArticle apArticle = new ApArticle();
    BeanUtils.copyProperties(dto,apArticle);

    //2.判断是否存在id
    if(dto.getId() == null){
        //2.1 不存在id  保存  文章  文章配置  文章内容

        //保存文章
        save(apArticle);

        //保存配置
        ApArticleConfig apArticleConfig = new ApArticleConfig(apArticle.getId());
        apArticleConfigMapper.insert(apArticleConfig);

        //保存 文章内容
        ApArticleContent apArticleContent = new ApArticleContent();
        apArticleContent.setArticleId(apArticle.getId());
        apArticleContent.setContent(dto.getContent());
        apArticleContentMapper.insert(apArticleContent);

    }else {
        //2.2 存在id   修改  文章  文章内容

        //修改  文章
        updateById(apArticle);

        //修改文章内容
        ApArticleContent apArticleContent = apArticleContentMapper.selectOne(Wrappers.<ApArticleContent>lambdaQuery().eq(ApArticleContent::getArticleId, dto.getId()));
        apArticleContent.setContent(dto.getContent());
        apArticleContentMapper.updateById(apArticleContent);
    }


    //3.结果返回  文章的id
    return ResponseResult.okResult(apArticle.getId());
}
功能测试
编写junit单元测试,或使用postman进行测试(测试新增)
{
    "title":"黑马头条项目背景22222222222222",
    "authoId":1102,
    "layout":1,
    "labels":"黑马头条",
    "publishTime":"2028-03-14T11:35:49.000Z",
    "images": "http://192.168.200.130:9000/leadnews/2021/04/26/5ddbdb5c68094ce393b08a47860da275.jpg",
    "content":"22222222222222222黑马头条项目背景,黑马头条项目背景,黑马头条项目背景,黑马头条项目背景,黑马头条项目背景"
}
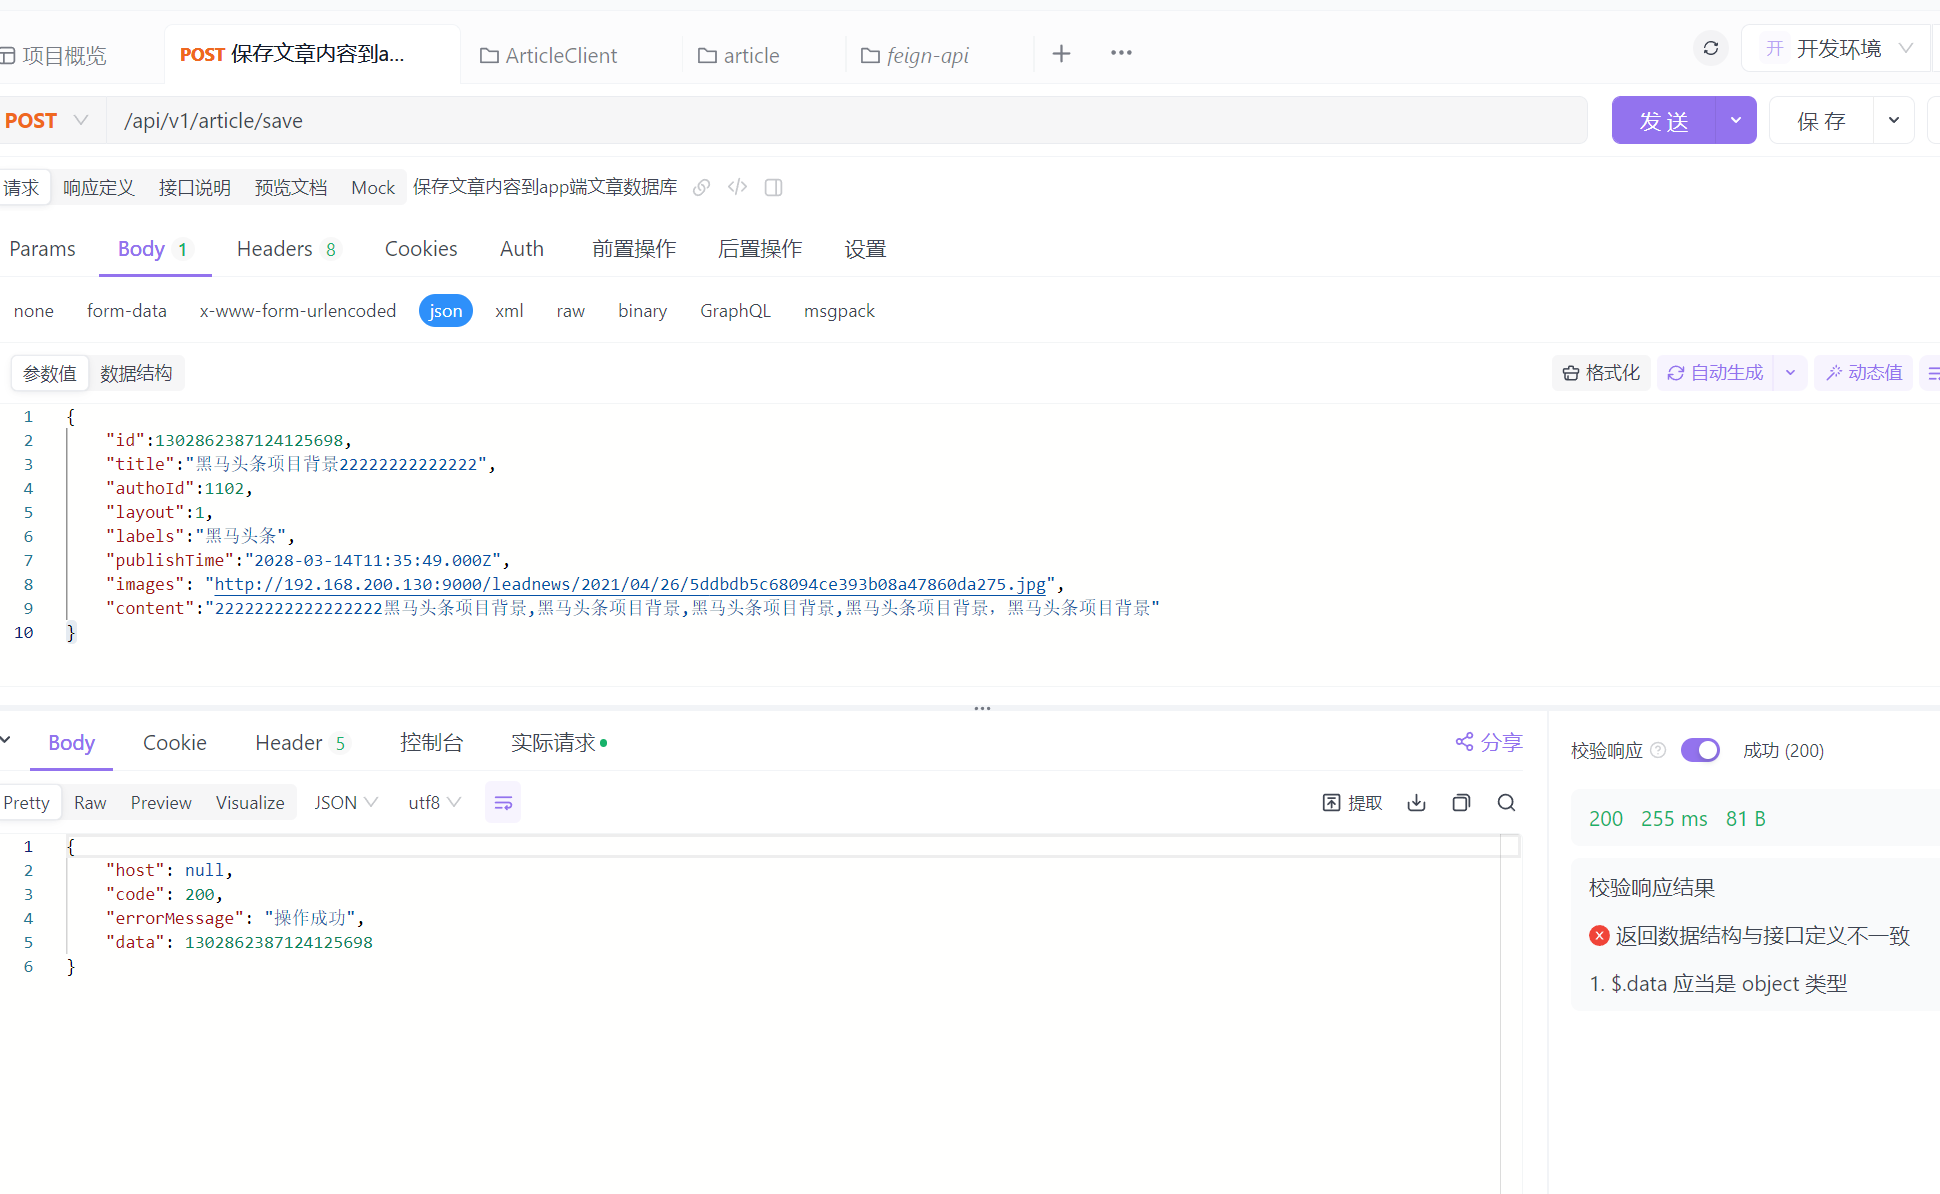
可以看到article表有对应添加

内容也相应添加

自媒体文章自动审核功能实现
表结构说明
wm_news 自媒体文章表
status字段:0 草稿 1 待审核 2 审核失败 3 人工审核 4 人工审核通过 8 审核通过(待发布) 9 已发布
功能实现

在heima-leadnews-wemedia中的service新增接口
package com.heima.wemedia.service;

public interface WmNewsAutoScanService {

    /**
     * 自媒体文章审核
     * @param id  自媒体文章id
     */
    public void autoScanWmNews(Integer id);
}
实现类:
package com.heima.wemedia.service.impl;

import com.alibaba.fastjson.JSONArray;
import com.heima.apis.article.IArticleClient;
import com.heima.common.baiduyun.GreenImageScan;
import com.heima.common.baiduyun.GreenTextScan;
import com.heima.common.constants.ContentCencorConstants;
import com.heima.file.service.FileStorageService;
import com.heima.model.article.dtos.ArticleDto;
import com.heima.model.common.dtos.ResponseResult;
import com.heima.model.wemedia.pojos.WmChannel;
import com.heima.model.wemedia.pojos.WmNews;
import com.heima.model.wemedia.pojos.WmNews.Status;
import com.heima.model.wemedia.pojos.WmUser;
import com.heima.wemedia.mapper.WmChannelMapper;
import com.heima.wemedia.mapper.WmNewsMapper;
import com.heima.wemedia.mapper.WmUserMapper;
import com.heima.wemedia.service.WmNewsAutoScanService;
import java.util.ArrayList;
import java.util.Arrays;
import java.util.Date;
import java.util.HashMap;
import java.util.List;
import java.util.Map;
import java.util.stream.Collectors;
import lombok.extern.slf4j.Slf4j;
import org.apache.commons.lang3.StringUtils;
import org.springframework.beans.BeanUtils;
import org.springframework.beans.factory.annotation.Autowired;
import org.springframework.stereotype.Service;
import org.springframework.transaction.annotation.Transactional;

@Service
@Slf4j
@Transactional
public class WmNewsAutoScanServiceImpl implements WmNewsAutoScanService {
    @Autowired
    private WmNewsMapper wmNewsMapper;
    @Autowired
    private GreenTextScan greenTextScan;
    @Autowired
    private GreenImageScan greenImageScan;
    @Autowired
    private FileStorageService fileStorageService;
    @Autowired
    private IArticleClient articleClient;
    @Autowired
    private WmChannelMapper wmChannelMapper;
    @Autowired
    private WmUserMapper wmUserMapper;

    /**
     * 自媒体文章审核
     *
     * @param id 自媒体文章id
     */
    @Override
    public void autoScanWmNews(Integer id) {
        //查询自媒体文章
        WmNews wmNews = wmNewsMapper.selectById(id);
        if (wmNews == null) {
            throw new RuntimeException(this.getClass().getName()+ "自媒体文章不存在");
        }
        //提取内容和图片
        Map<String,Object> textAndImages =  handleTextAndImages(wmNews);
        //自动审核
        //审核文本内容 百度云接口
        boolean isTextScan = handleTextScan(textAndImages.get("content").toString(), wmNews);
        if(!isTextScan){
            log.warn("自媒体文章文本审核失败,文章id:{}",id);
            return;
        }
        //审核图片  百度云接口
        boolean isImageScan = handleImageScan((List<String>) textAndImages.get("images"), wmNews);
        if (!isImageScan) {
            log.warn("自媒体文章图片审核失败,文章id:{}", id);
            return;
        }
        //审核通过,保存app端的相关文章数据
        ResponseResult responseResult = saveAppArticle(wmNews);
        if(responseResult == null || !responseResult.getCode().equals(200)){
            throw new RuntimeException(this.getClass().getName()+ "文章审核,保存app端文章数据失败");
        }
        //回填文章id
        wmNews.setArticleId((Long) responseResult.getData());
        updateWmNewsStatus(wmNews, Status.PUBLISHED, "审核通过");
    }
    /**
     * 保存app端文章数据
     *
     * @param wmNews
     * @return
     */
    private ResponseResult saveAppArticle(WmNews wmNews) {
        ArticleDto dto = new ArticleDto();
        //属性拷贝
        BeanUtils.copyProperties(wmNews,dto);
        //文章布局
        dto.setLayout(wmNews.getType());
        //频道
        WmChannel wmChannel = wmChannelMapper.selectById(wmNews.getChannelId());
        if(wmChannel != null){
            dto.setChannelName(wmChannel.getName());
        }
        //作者
        dto.setAuthorId(wmNews.getUserId().longValue());
        WmUser wmUser = wmUserMapper.selectById(wmNews.getUserId());
        if(wmUser != null){
            dto.setAuthorName(wmUser.getName());
        }
        //如果文章id不为空,则表示文章之前已经审核成功,需要更新修改文章
        if(wmNews.getArticleId() != null)
        {
            dto.setId(wmNews.getArticleId());
        }
        dto.setCreatedTime(new Date());
        ResponseResult responseResult = articleClient.save(dto);
        return responseResult;
    }
    /**
     * 从自媒体文章中提取文本和图片(包括内容和封面)
     * @param wmNews
     * @return
     */
    private Map<String, Object> handleTextAndImages(WmNews wmNews) {
        StringBuilder textContainer = new StringBuilder();
        List<String> imagesContainer = new ArrayList<>();
        //提取文章内容中的文本和图片
        if(StringUtils.isNotBlank(wmNews.getContent())){
            List<Map> maps = JSONArray.parseArray(wmNews.getContent(), Map.class);
            maps.forEach(map -> {
                if("text".equals(map.get("type"))){
                    textContainer.append(map.get("value"));
                }
                if("image".equals(map.get("type"))){
                    imagesContainer.add(map.get("value").toString());
                }
            });
        }
        //提取封面图片
        if(StringUtils.isNotBlank(wmNews.getImages())){
            imagesContainer.addAll(Arrays.asList(wmNews.getImages().split(",")));
        }
        Map<String,Object> resultMap = new HashMap<>();
        resultMap.put("content",textContainer.toString());
        resultMap.put("images",imagesContainer);
        return resultMap;
    }

    /**
     * 处理文本审核
     * @param content
     * @param wmNews
     * @return
     */
    private boolean handleTextScan(String content,WmNews wmNews){
        boolean flag = true;
        String text = wmNews.getTitle() + "-" + content;
        if(StringUtils.isBlank(text)){
            return flag;
        }
        try {
            Map map = greenTextScan.greeTextScan(content);
            if(map != null){
                switch (map.get(ContentCencorConstants.SUGGESTION).toString()){
                    case ContentCencorConstants.SUGGESTION_BLOCK:
                        //审核不通过
                        updateWmNewsStatus(wmNews, Status.FAIL, "当前文章中存在违规内容");
                        flag = false;
                        break;
                    case ContentCencorConstants.SUGGESTION_REVIEW:
                        //需要人工审核
                        updateWmNewsStatus(wmNews, Status.ADMIN_AUTH,
                            "文本内容存在不确定内容,需要人工审核");
                        flag = false;
                }
            }
        } catch (Exception e) {
            flag = false;
            throw new RuntimeException(e);
        }
        return flag;
    }

    /**
     * 处理图片审核
     * @param images
     * @param wmNews
     * @return
     */
    private boolean handleImageScan(List<String> images, WmNews wmNews) {
        boolean flag = true;
        //下载图片
        //用HashSet去重
        images = images.stream().distinct().collect(Collectors.toList());
        List<byte[]> imageList = new ArrayList<>();
        for(String image : images){
            byte[] bytes = fileStorageService.downLoadFile(image);
            imageList.add(bytes);
        }
        //图片审核
        try {
            Map map = greenImageScan.imageScan(imageList);
            if(map != null) {
                switch (map.get(ContentCencorConstants.SUGGESTION).toString()) {
                    case ContentCencorConstants.SUGGESTION_BLOCK:
                        //审核不通过
                        updateWmNewsStatus(wmNews, Status.FAIL, "当前图片中存在违规内容");
                        flag = false;
                        break;
                    case ContentCencorConstants.SUGGESTION_REVIEW:
                        //需要人工审核
                        updateWmNewsStatus(wmNews, Status.ADMIN_AUTH,
                            "图片存在不确定内容,需要人工审核");
                        flag = false;
                }
            }
        } catch (Exception e) {
            flag = false;
            throw new RuntimeException(e);
        }
        return flag;
    }


    private void updateWmNewsStatus(WmNews wmNews, Status status, String reason) {
        wmNews.setStatus(status.getCode());
        wmNews.setReason(reason);
        wmNewsMapper.updateById(wmNews);
    }
}
feign接口调用实现保存app端文章
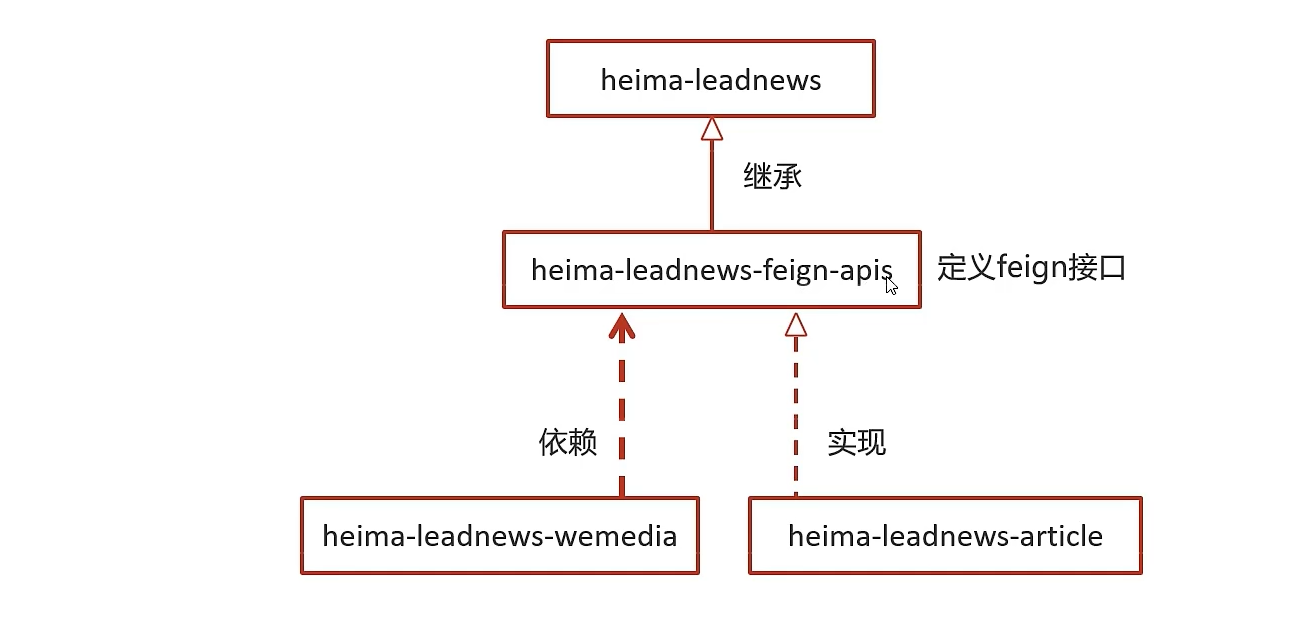
在wemedia启动类上面添加注解
@EnableFeignClients(basePackages = "com.heima.apis") //扫描feign接口
功能测试
这里选择id为6245的文章进行测试
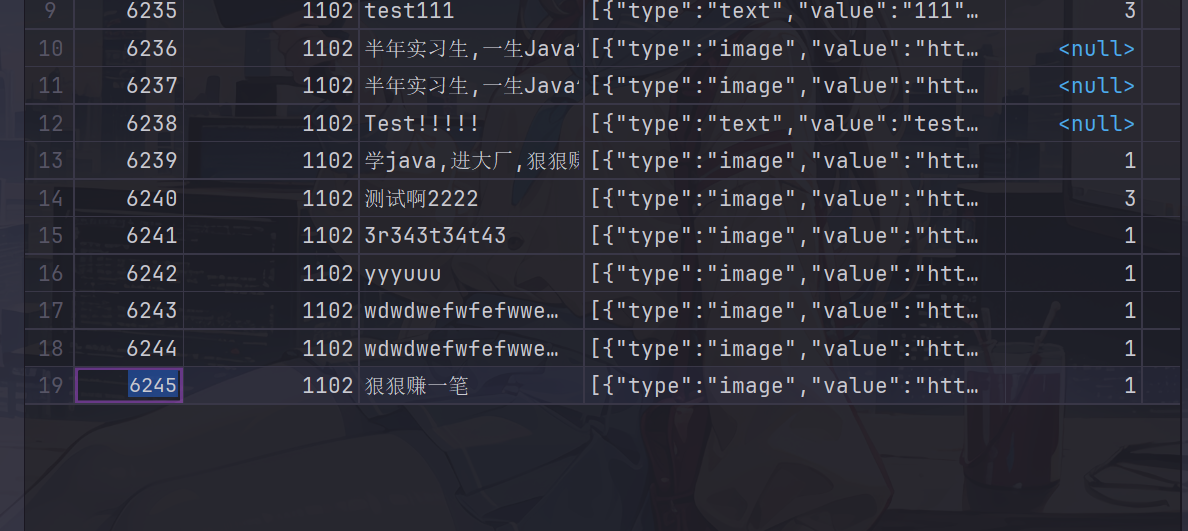
package com.heima.wemedia.service;

import com.heima.wemedia.WemediaApplication;
import org.junit.Test;
import org.junit.runner.RunWith;
import org.springframework.beans.factory.annotation.Autowired;
import org.springframework.boot.test.context.SpringBootTest;
import org.springframework.test.context.junit4.SpringRunner;

import static org.junit.Assert.*;


@SpringBootTest(classes = WemediaApplication.class)
@RunWith(SpringRunner.class)
public class WmNewsAutoScanServiceTest {

    @Autowired
    private WmNewsAutoScanService wmNewsAutoScanService;

    @Test
    public void autoScanWmNews() {

        wmNewsAutoScanService.autoScanWmNews(6238);
    }
}
可以看到审核成功,并且数据成功添加到了app端文章数据库中

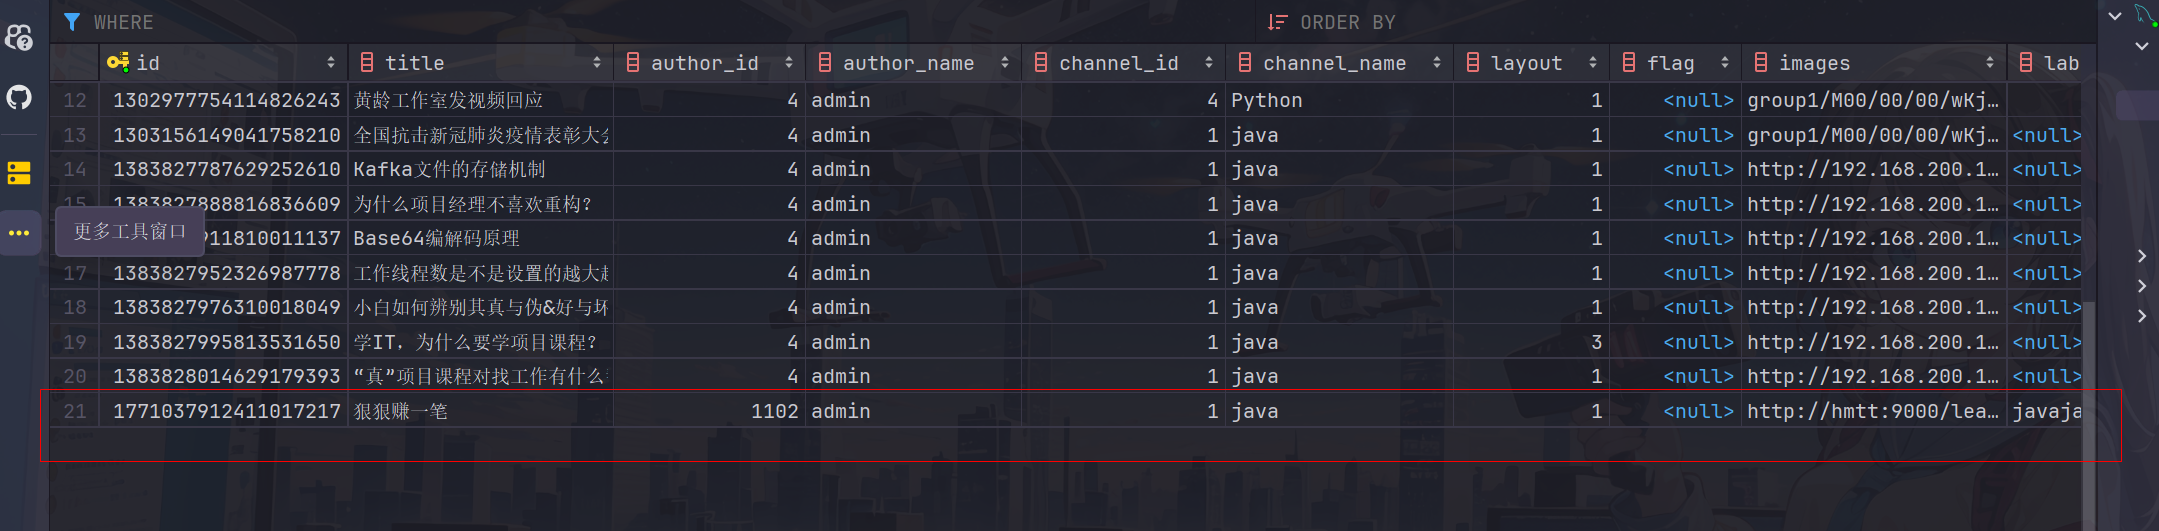
这里自己再拿敏感词和图片测试一下


Feign服务降级处理
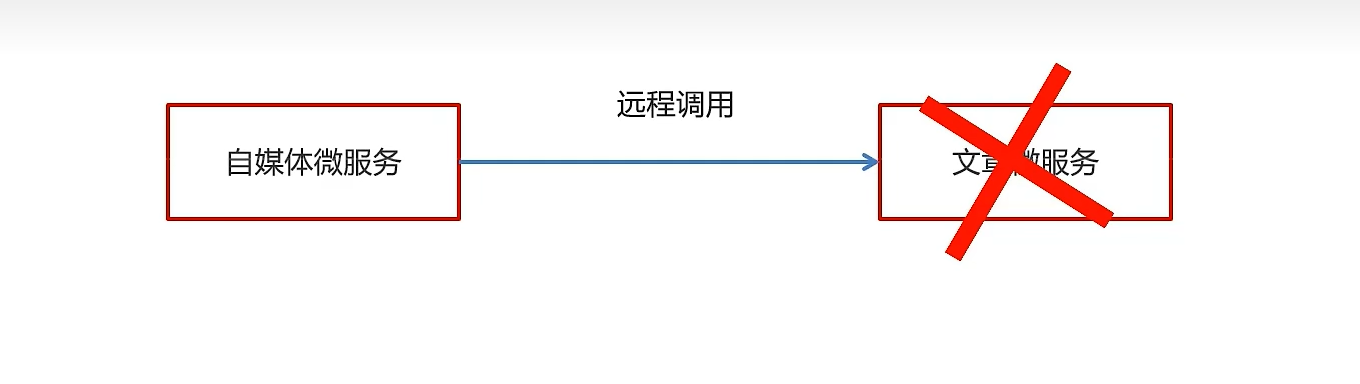
-
服务降级是服务自我保护的一种方式,或者保护下游服务的一种方式,用于确保服务不会受请求突增影响变得不可用,确保服务不会崩溃
-
服务降级虽然会导致请求失败,但是不会导致阻塞。
实现步骤:
①:在heima-leadnews-feign-api编写降级逻辑
package com.heima.apis.article.fallback;

import com.heima.apis.article.IArticleClient;
import com.heima.model.article.dtos.ArticleDto;
import com.heima.model.common.dtos.ResponseResult;
import com.heima.model.common.enums.AppHttpCodeEnum;
import org.springframework.stereotype.Component;

/**
 * feign失败配置
 * @author itheima
 */
@Component
public class IArticleClientFallback implements IArticleClient {
    @Override
    public ResponseResult saveArticle(ArticleDto dto)  {
        return ResponseResult.errorResult(AppHttpCodeEnum.SERVER_ERROR,"获取数据失败");
    }
}
在自媒体微服务中添加类,扫描降级代码类的包
package com.heima.wemedia.config;

import org.springframework.context.annotation.ComponentScan;
import org.springframework.context.annotation.Configuration;

@Configuration
@ComponentScan("com.heima.apis.article.fallback")
public class InitConfig {
}
②:远程接口中指向降级代码
package com.heima.apis.article;

import com.heima.apis.article.fallback.IArticleClientFallback;
import com.heima.model.article.dtos.ArticleDto;
import com.heima.model.common.dtos.ResponseResult;
import org.springframework.cloud.openfeign.FeignClient;
import org.springframework.web.bind.annotation.PostMapping;
import org.springframework.web.bind.annotation.RequestBody;

@FeignClient(value = "leadnews-article",fallback = IArticleClientFallback.class)
public interface IArticleClient {

    @PostMapping("/api/v1/article/save")
    public ResponseResult saveArticle(@RequestBody ArticleDto dto);
}
③:客户端开启降级heima-leadnews-wemedia
在wemedia的nacos配置中心里添加如下内容,开启服务降级,也可以指定服务响应的超时的时间
feign:
  # 开启feign对hystrix熔断降级的支持
  hystrix:
    enabled: true
  # 修改调用超时时间
  client:
    config:
      default:
        connectTimeout: 2000
        readTimeout: 2000
④:测试
在ApArticleServiceImpl类中saveArticle方法添加代码
try {
    Thread.sleep(3000);
} catch (InterruptedException e) {
    e.printStackTrace();
}
在自媒体端进行审核测试,会出现服务降级的现象
发布文章提交审核集成
同步调用与异步调用
同步:就是在发出一个调用时,在没有得到结果之前, 该调用就不返回(实时处理)
异步:调用在发出之后,这个调用就直接返回了,没有返回结果(分时处理)
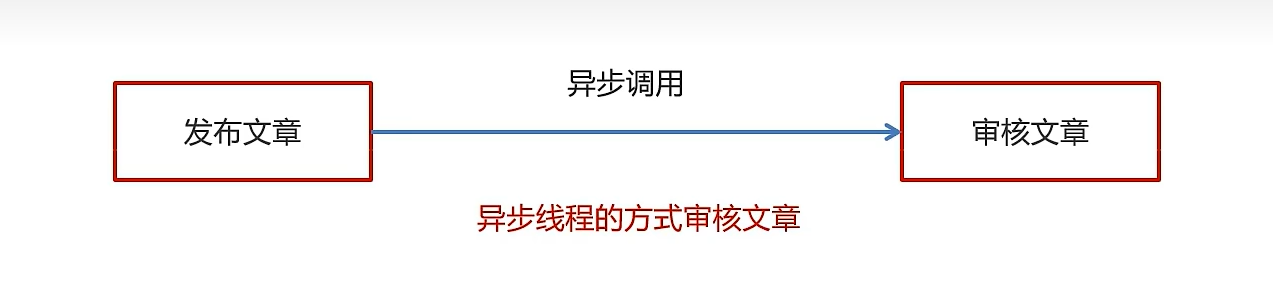
异步线程的方式审核文章
5.2)Springboot集成异步线程调用
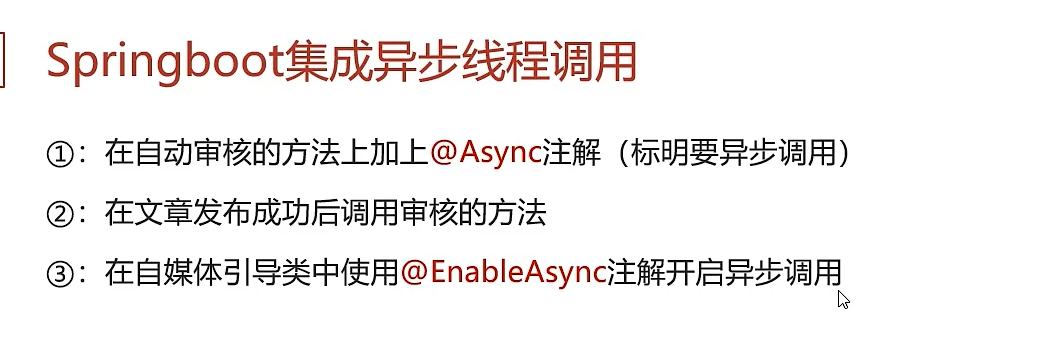
①:在自动审核的方法上加上@Async注解(标明要异步调用)
@Override
@Async  //标明当前方法是一个异步方法
public void autoScanWmNews(Integer id) {
    //由于异步线程可能会在wmNews还没有插入到数据库中就开始审核,所以这里等待1秒
    try {
        Thread.sleep(1000);
    } catch (InterruptedException e) {
        throw new RuntimeException(e);
    }

	//代码略
}
❗注意一定要在autoScanWmNews方法开头加上sleep让线程等待一段时间,否则异步线程会先于插入wmNews代码执行,导致查出来的wmNews数据为空
②:在文章发布成功后调用审核的方法
@Autowired
private WmNewsAutoScanService wmNewsAutoScanService;

/**
 * 发布修改文章或保存为草稿
 * @param dto
 * @return
 */
@Override
public ResponseResult submitNews(WmNewsDto dto) {

    //代码略

    //审核文章
    wmNewsAutoScanService.autoScanWmNews(wmNews.getId());

    return ResponseResult.okResult(AppHttpCodeEnum.SUCCESS);

}
③:在自媒体引导类中使用@EnableAsync注解开启异步调用
@SpringBootApplication
@EnableDiscoveryClient
@MapperScan("com.heima.wemedia.mapper")
@EnableFeignClients(basePackages = "com.heima.apis")
@EnableAsync  //开启异步调用
public class WemediaApplication {

    public static void main(String[] args) {
        SpringApplication.run(WemediaApplication.class,args);
    }

    @Bean
    public MybatisPlusInterceptor mybatisPlusInterceptor() {
        MybatisPlusInterceptor interceptor = new MybatisPlusInterceptor();
        interceptor.addInnerInterceptor(new PaginationInnerInterceptor(DbType.MYSQL));
        return interceptor;
    }
}
新需求-自管理敏感词
需求分析
文章审核功能已经交付了,文章也能正常发布审核。突然,产品经理过来说要开会。
会议的内容核心有以下内容:
-
文章审核不能过滤一些敏感词:
私人xx、针孔xx、信用卡提现、广告代理、代开xx、刻章办、出售xx、小额xx…
没办法,博客园自动审核检测到这些敏感词汇就给ban了
需要完成的功能:
需要自己维护一套敏感词,在文章审核的时候,需要验证文章是否包含这些敏感词
敏感词-过滤
技术选型
| 方案 | 说明 |
|---|---|
| 数据库模糊查询 | 效率太低 |
| String.indexOf("")查找 | 数据库量大的话也是比较慢 |
| 全文检索 | 分词再匹配 |
| DFA算法 | 确定有穷自动机(一种数据结构) |
| 第三方设置 | 百度可以自定义词库,方便好用 |
这里其实也可以直接在百度管理平台进行设置,不过为了保持和老师内容的一致,这里就也采用老师的方法了
DFA实现原理
想起「形式语言与自动机的拷打」
DFA全称为:Deterministic Finite Automaton,即确定有穷自动机。
存储:一次性的把所有的敏感词存储到了多 个map中,就是下图表示这种结构
敏感词:冰毒、大麻、大坏蛋
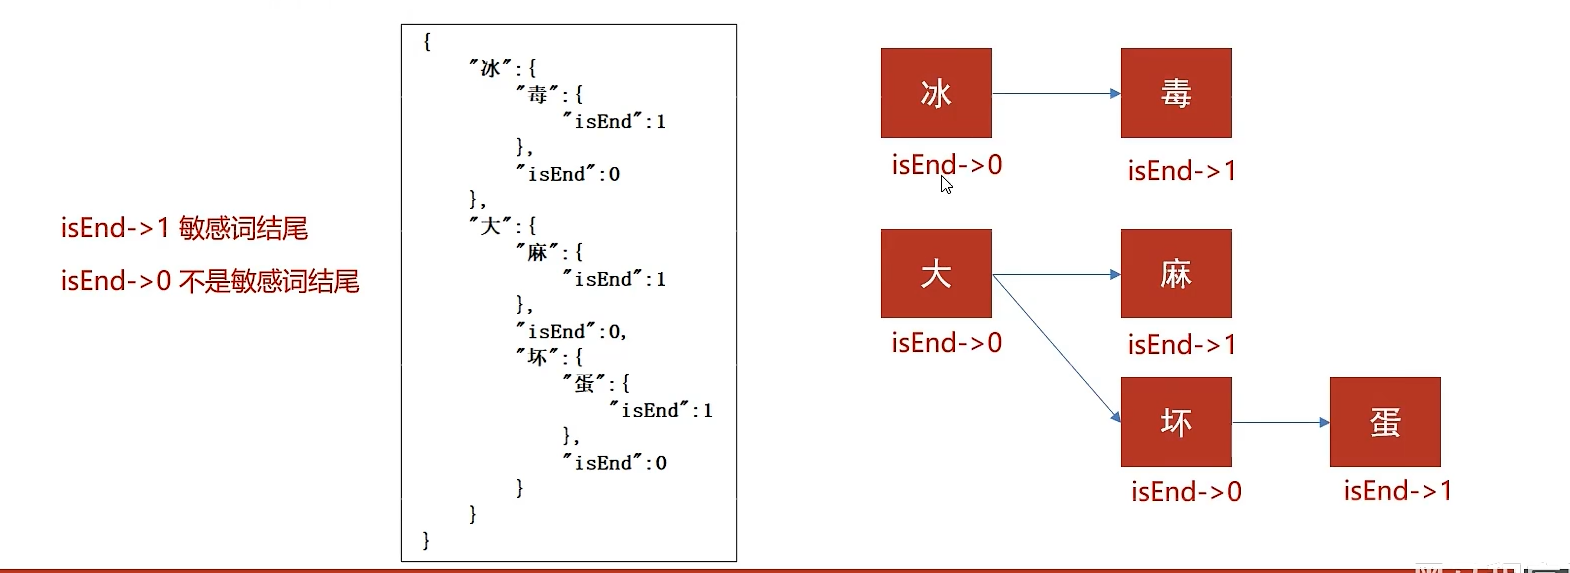
检索的过程
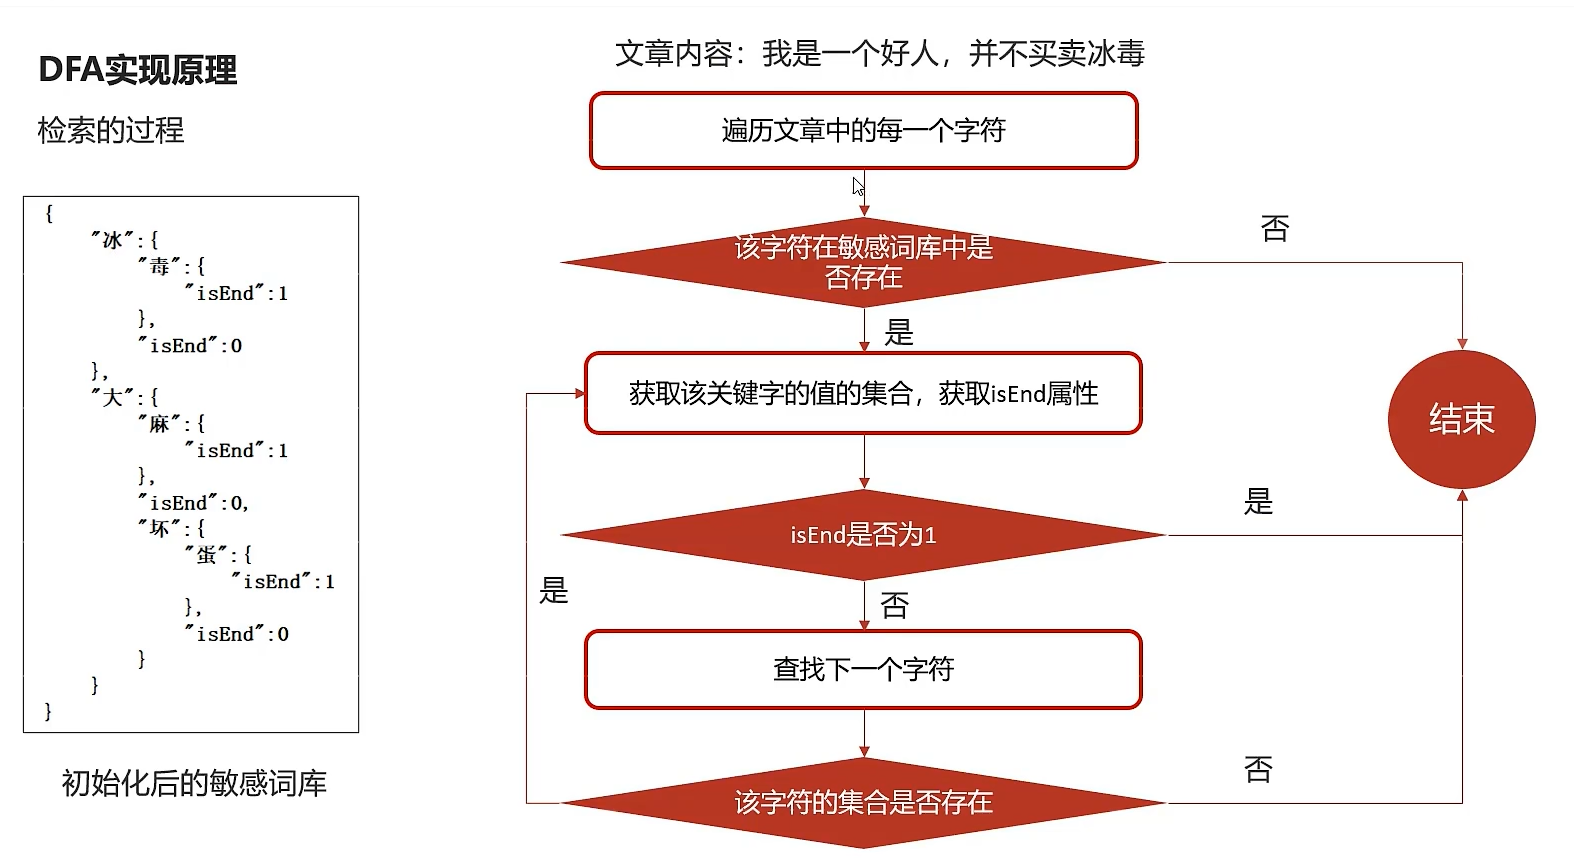
好像和大学学的不太一样?看来大学还是学了个寂寞(笑)
7.4)自管理敏感词集成到文章审核中
①:创建敏感词表,导入资料中wm_sensitive到leadnews_wemedia库中
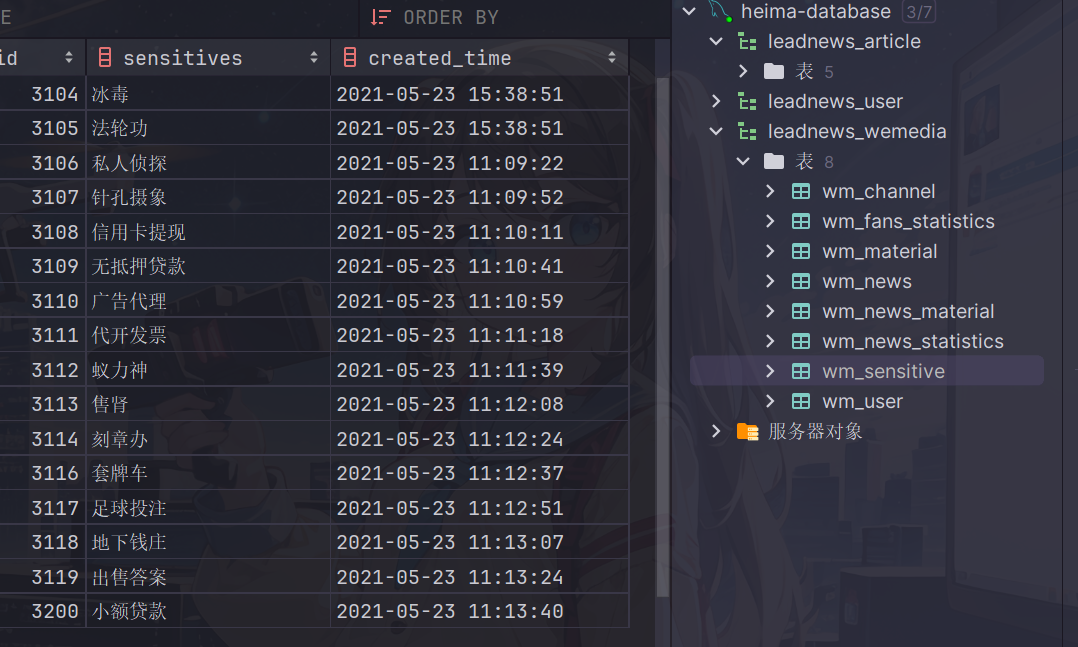
package com.heima.model.wemedia.pojos;

import com.baomidou.mybatisplus.annotation.IdType;
import com.baomidou.mybatisplus.annotation.TableField;
import com.baomidou.mybatisplus.annotation.TableId;
import com.baomidou.mybatisplus.annotation.TableName;
import lombok.Data;

import java.io.Serializable;
import java.util.Date;

/**
 * <p>
 * 敏感词信息表
 * </p>
 *
 * @author itheima
 */
@Data
@TableName("wm_sensitive")
public class WmSensitive implements Serializable {

    private static final long serialVersionUID = 1L;

    /**
     * 主键
     */
    @TableId(value = "id", type = IdType.AUTO)
    private Integer id;

    /**
     * 敏感词
     */
    @TableField("sensitives")
    private String sensitives;

    /**
     * 创建时间
     */
    @TableField("created_time")
    private Date createdTime;

}
②:拷贝对应的wm_sensitive的mapper到项目中
package com.heima.wemedia.mapper;

import com.baomidou.mybatisplus.core.mapper.BaseMapper;
import com.heima.model.wemedia.pojos.WmSensitive;
import org.apache.ibatis.annotations.Mapper;


@Mapper
public interface WmSensitiveMapper extends BaseMapper<WmSensitive> {
}
③:在文章审核的代码中添加自管理敏感词审核
第一:在WmNewsAutoScanServiceImpl中的autoScanWmNews方法上添加如下代码
//从内容中提取纯文本内容和图片
//.....省略

//自管理的敏感词过滤
boolean isSensitive = handleSensitiveScan((String) textAndImages.get("content"), wmNews);
if(!isSensitive) return;

//2.审核文本内容  阿里云接口
//.....省略
新增自管理敏感词审核代码
@Autowired
private WmSensitiveMapper wmSensitiveMapper;

/**
     * 自管理的敏感词审核
     * @param content
     * @param wmNews
     * @return
     */
private boolean handleSensitiveScan(String content, WmNews wmNews) {

    boolean flag = true;

    //获取所有的敏感词
    List<WmSensitive> wmSensitives = wmSensitiveMapper.selectList(Wrappers.<WmSensitive>lambdaQuery().select(WmSensitive::getSensitives));
    List<String> sensitiveList = wmSensitives.stream().map(WmSensitive::getSensitives).collect(Collectors.toList());

    //初始化敏感词库
    SensitiveWordUtil.initMap(sensitiveList);

    //查看文章中是否包含敏感词
    Map<String, Integer> map = SensitiveWordUtil.matchWords(content);
    if(map.size() >0){
        updateWmNews(wmNews,(short) 2,"当前文章中存在违规内容"+map);
        flag = false;
    }

    return flag;
}
功能测试
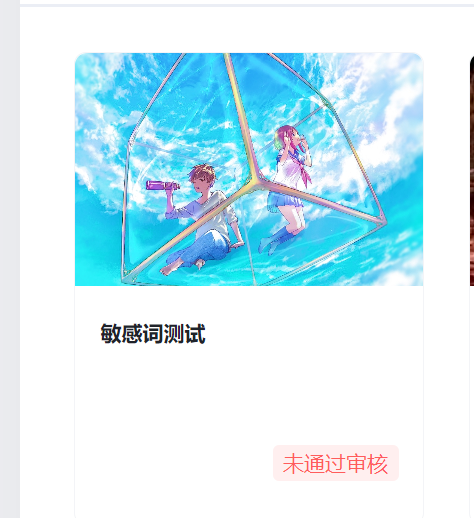


新需求-图片识别文字审核敏感词
需求分析
产品经理召集开会,文章审核功能已经交付了,文章也能正常发布审核。对于上次提出的自管理敏感词也很满意,这次会议核心的内容如下:
- 文章中包含的图片要识别文字,过滤掉图片文字的敏感词
图片文字识别
什么是OCR?
OCR (Optical Character Recognition,光学字符识别)是指电子设备(例如扫描仪或数码相机)检查纸上打印的字符,通过检测暗、亮的模式确定其形状,然后用字符识别方法将形状翻译成计算机文字的过程
| 方案 | 说明 |
|---|---|
| 百度OCR | 收费 |
| Tesseract-OCR | Google维护的开源OCR引擎,支持Java,Python等语言调用 |
| Tess4J | 封装了Tesseract-OCR ,支持Java调用 |
Tesseract-OCR特点:
-
Tesseract支持UTF-8编码格式,并且可以“开箱即用”地识别100多种语
-
Tesseract支持多种输出格式:纯文本,hOCR (HTML),PDF等
-
官方建议,为了获得更好的OCR结果,最好提供给高质量的图像。
-
Tesseract进行识别其他语言的训练
-
具体的训练方式,请参考官方提供的文档:https://tesseract-ocr.github.io/tessdoc/
Tess4j案例
①:创建项目导入tess4j对应的依赖
<dependency>
    <groupId>net.sourceforge.tess4j</groupId>
    <artifactId>tess4j</artifactId>
    <version>4.1.1</version>
</dependency>
②:导入中文字体库, 把资料中的tessdata文件夹拷贝到自己的工作空间下
③:编写测试类进行测试
package com.heima.tess4j;

import net.sourceforge.tess4j.ITesseract;
import net.sourceforge.tess4j.Tesseract;

import java.io.File;

public class Application {

    public static void main(String[] args) {
        try {
            //获取本地图片
            File file = new File("D:\\26.png");
            //创建Tesseract对象
            ITesseract tesseract = new Tesseract();
            //设置字体库路径
            tesseract.setDatapath("D:\\workspace\\tessdata");
            //中文识别
            tesseract.setLanguage("chi_sim");
            //执行ocr识别
            String result = tesseract.doOCR(file);
            //替换回车和tal键  使结果为一行
            result = result.replaceAll("\\r|\\n","-").replaceAll(" ","");
            System.out.println("识别的结果为:"+result);
        } catch (Exception e) {
            e.printStackTrace();
        }
    }
}
管理敏感词和图片文字识别集成到文章审核
①:在heima-leadnews-common中创建工具类,简单封装一下tess4j
需要先导入pom
<dependency>
    <groupId>net.sourceforge.tess4j</groupId>
    <artifactId>tess4j</artifactId>
    <version>4.1.1</version>
</dependency>
工具类
package com.heima.common.tess4j;

import lombok.Getter;
import lombok.Setter;
import net.sourceforge.tess4j.ITesseract;
import net.sourceforge.tess4j.Tesseract;
import net.sourceforge.tess4j.TesseractException;
import org.springframework.boot.context.properties.ConfigurationProperties;
import org.springframework.stereotype.Component;

import java.awt.image.BufferedImage;

@Getter
@Setter
@Component
@ConfigurationProperties(prefix = "tess4j")
public class Tess4jClient {

    private String dataPath;
    private String language;

    public String doOCR(BufferedImage image) throws TesseractException {
        //创建Tesseract对象
        ITesseract tesseract = new Tesseract();
        //设置字体库路径
        tesseract.setDatapath(dataPath);
        //中文识别
        tesseract.setLanguage(language);
        //执行ocr识别
        String result = tesseract.doOCR(image);
        //替换回车和tal键  使结果为一行
        result = result.replaceAll("\\r|\\n", "-").replaceAll(" ", "");
        return result;
    }

}
在spring.factories配置中添加该类,完整如下:
org.springframework.boot.autoconfigure.EnableAutoConfiguration=\
  com.heima.common.exception.ExceptionCatch,\
  com.heima.common.swagger.SwaggerConfiguration,\
  com.heima.common.swagger.Swagger2Configuration,\
  com.heima.common.aliyun.GreenTextScan,\
  com.heima.common.aliyun.GreenImageScan,\
  com.heima.common.tess4j.Tess4jClient
②:在heima-leadnews-wemedia中的配置中添加两个属性(根据自己存放的位置)
这里推荐把配置放在nacos进行统一管理
tess4j:
  data-path: D:\dependencies\java\tess4j\tessdata\
  language: chi_sim
③:在WmNewsAutoScanServiceImpl中的handleImageScan方法上添加如下代码
try {
    for (String image : images) {
        byte[] bytes = fileStorageService.downLoadFile(image);

        //图片识别文字审核---begin-----

        //从byte[]转换为butteredImage
        ByteArrayInputStream in = new ByteArrayInputStream(bytes);
        BufferedImage imageFile = ImageIO.read(in);
        //识别图片的文字
        String result = tess4jClient.doOCR(imageFile);

        //审核是否包含自管理的敏感词
        boolean isSensitive = handleSensitiveScan(result, wmNews);
        if(!isSensitive){
            return isSensitive;
        }

        //图片识别文字审核---end-----


        imageList.add(bytes);

    }
}catch (Exception e){
    e.printStackTrace();
}
最后附上文章审核的完整代码如下:
package com.heima.wemedia.service.impl;

import com.alibaba.fastjson.JSONArray;
import com.baomidou.mybatisplus.core.toolkit.Wrappers;
import com.heima.apis.article.IArticleClient;
import com.heima.common.aliyun.GreenImageScan;
import com.heima.common.aliyun.GreenTextScan;
import com.heima.common.tess4j.Tess4jClient;
import com.heima.file.service.FileStorageService;
import com.heima.model.article.dtos.ArticleDto;
import com.heima.model.common.dtos.ResponseResult;
import com.heima.model.wemedia.pojos.WmChannel;
import com.heima.model.wemedia.pojos.WmNews;
import com.heima.model.wemedia.pojos.WmSensitive;
import com.heima.model.wemedia.pojos.WmUser;
import com.heima.utils.common.SensitiveWordUtil;
import com.heima.wemedia.mapper.WmChannelMapper;
import com.heima.wemedia.mapper.WmNewsMapper;
import com.heima.wemedia.mapper.WmSensitiveMapper;
import com.heima.wemedia.mapper.WmUserMapper;
import com.heima.wemedia.service.WmNewsAutoScanService;
import lombok.extern.slf4j.Slf4j;
import org.apache.commons.lang3.StringUtils;
import org.springframework.beans.BeanUtils;
import org.springframework.beans.factory.annotation.Autowired;
import org.springframework.scheduling.annotation.Async;
import org.springframework.stereotype.Service;
import org.springframework.transaction.annotation.Transactional;

import javax.imageio.ImageIO;
import java.awt.image.BufferedImage;
import java.io.ByteArrayInputStream;
import java.util.*;
import java.util.stream.Collectors;


@Service
@Slf4j
@Transactional
public class WmNewsAutoScanServiceImpl implements WmNewsAutoScanService {

    @Autowired
    private WmNewsMapper wmNewsMapper;

    /**
     * 自媒体文章审核
     *
     * @param id 自媒体文章id
     */
    @Override
    @Async  //标明当前方法是一个异步方法
    public void autoScanWmNews(Integer id) {

//        int a = 1/0;

        //1.查询自媒体文章
        WmNews wmNews = wmNewsMapper.selectById(id);
        if (wmNews == null) {
            throw new RuntimeException("WmNewsAutoScanServiceImpl-文章不存在");
        }

        if (wmNews.getStatus().equals(WmNews.Status.SUBMIT.getCode())) {
            //从内容中提取纯文本内容和图片
            Map<String, Object> textAndImages = handleTextAndImages(wmNews);

            //自管理的敏感词过滤
            boolean isSensitive = handleSensitiveScan((String) textAndImages.get("content"), wmNews);
            if(!isSensitive) return;

            //2.审核文本内容  阿里云接口
            boolean isTextScan = handleTextScan((String) textAndImages.get("content"), wmNews);
            if (!isTextScan) return;

            //3.审核图片  阿里云接口
            boolean isImageScan = handleImageScan((List<String>) textAndImages.get("images"), wmNews);
            if (!isImageScan) return;

            //4.审核成功,保存app端的相关的文章数据
            ResponseResult responseResult = saveAppArticle(wmNews);
            if (!responseResult.getCode().equals(200)) {
                throw new RuntimeException("WmNewsAutoScanServiceImpl-文章审核,保存app端相关文章数据失败");
            }
            //回填article_id
            wmNews.setArticleId((Long) responseResult.getData());
            updateWmNews(wmNews, (short) 9, "审核成功");

        }
    }

    @Autowired
    private WmSensitiveMapper wmSensitiveMapper;

    /**
     * 自管理的敏感词审核
     * @param content
     * @param wmNews
     * @return
     */
    private boolean handleSensitiveScan(String content, WmNews wmNews) {

        boolean flag = true;

        //获取所有的敏感词
        List<WmSensitive> wmSensitives = wmSensitiveMapper.selectList(Wrappers.<WmSensitive>lambdaQuery().select(WmSensitive::getSensitives));
        List<String> sensitiveList = wmSensitives.stream().map(WmSensitive::getSensitives).collect(Collectors.toList());

        //初始化敏感词库
        SensitiveWordUtil.initMap(sensitiveList);

        //查看文章中是否包含敏感词
        Map<String, Integer> map = SensitiveWordUtil.matchWords(content);
        if(map.size() >0){
            updateWmNews(wmNews,(short) 2,"当前文章中存在违规内容"+map);
            flag = false;
        }

        return flag;
    }

    @Autowired
    private IArticleClient articleClient;

    @Autowired
    private WmChannelMapper wmChannelMapper;

    @Autowired
    private WmUserMapper wmUserMapper;

    /**
     * 保存app端相关的文章数据
     *
     * @param wmNews
     */
    private ResponseResult saveAppArticle(WmNews wmNews) {

        ArticleDto dto = new ArticleDto();
        //属性的拷贝
        BeanUtils.copyProperties(wmNews, dto);
        //文章的布局
        dto.setLayout(wmNews.getType());
        //频道
        WmChannel wmChannel = wmChannelMapper.selectById(wmNews.getChannelId());
        if (wmChannel != null) {
            dto.setChannelName(wmChannel.getName());
        }

        //作者
        dto.setAuthorId(wmNews.getUserId().longValue());
        WmUser wmUser = wmUserMapper.selectById(wmNews.getUserId());
        if (wmUser != null) {
            dto.setAuthorName(wmUser.getName());
        }

        //设置文章id
        if (wmNews.getArticleId() != null) {
            dto.setId(wmNews.getArticleId());
        }
        dto.setCreatedTime(new Date());

        ResponseResult responseResult = articleClient.saveArticle(dto);
        return responseResult;

    }


    @Autowired
    private FileStorageService fileStorageService;

    @Autowired
    private GreenImageScan greenImageScan;

    @Autowired
    private Tess4jClient tess4jClient;

    /**
     * 审核图片
     *
     * @param images
     * @param wmNews
     * @return
     */
    private boolean handleImageScan(List<String> images, WmNews wmNews) {

        boolean flag = true;

        if (images == null || images.size() == 0) {
            return flag;
        }

        //下载图片 minIO
        //图片去重
        images = images.stream().distinct().collect(Collectors.toList());

        List<byte[]> imageList = new ArrayList<>();

        try {
            for (String image : images) {
                byte[] bytes = fileStorageService.downLoadFile(image);

                //图片识别文字审核---begin-----

                //从byte[]转换为butteredImage
                ByteArrayInputStream in = new ByteArrayInputStream(bytes);
                BufferedImage imageFile = ImageIO.read(in);
                //识别图片的文字
                String result = tess4jClient.doOCR(imageFile);

                //审核是否包含自管理的敏感词
                boolean isSensitive = handleSensitiveScan(result, wmNews);
                if(!isSensitive){
                    return isSensitive;
                }

                //图片识别文字审核---end-----


                imageList.add(bytes);

            }
        }catch (Exception e){
            e.printStackTrace();
        }


        //审核图片
        try {
            Map map = greenImageScan.imageScan(imageList);
            if (map != null) {
                //审核失败
                if (map.get("suggestion").equals("block")) {
                    flag = false;
                    updateWmNews(wmNews, (short) 2, "当前文章中存在违规内容");
                }

                //不确定信息  需要人工审核
                if (map.get("suggestion").equals("review")) {
                    flag = false;
                    updateWmNews(wmNews, (short) 3, "当前文章中存在不确定内容");
                }
            }

        } catch (Exception e) {
            flag = false;
            e.printStackTrace();
        }
        return flag;
    }

    @Autowired
    private GreenTextScan greenTextScan;

    /**
     * 审核纯文本内容
     *
     * @param content
     * @param wmNews
     * @return
     */
    private boolean handleTextScan(String content, WmNews wmNews) {

        boolean flag = true;

        if ((wmNews.getTitle() + "-" + content).length() == 0) {
            return flag;
        }
        try {
            Map map = greenTextScan.greeTextScan((wmNews.getTitle() + "-" + content));
            if (map != null) {
                //审核失败
                if (map.get("suggestion").equals("block")) {
                    flag = false;
                    updateWmNews(wmNews, (short) 2, "当前文章中存在违规内容");
                }

                //不确定信息  需要人工审核
                if (map.get("suggestion").equals("review")) {
                    flag = false;
                    updateWmNews(wmNews, (short) 3, "当前文章中存在不确定内容");
                }
            }
        } catch (Exception e) {
            flag = false;
            e.printStackTrace();
        }

        return flag;

    }

    /**
     * 修改文章内容
     *
     * @param wmNews
     * @param status
     * @param reason
     */
    private void updateWmNews(WmNews wmNews, short status, String reason) {
        wmNews.setStatus(status);
        wmNews.setReason(reason);
        wmNewsMapper.updateById(wmNews);
    }

    /**
     * 1。从自媒体文章的内容中提取文本和图片
     * 2.提取文章的封面图片
     *
     * @param wmNews
     * @return
     */
    private Map<String, Object> handleTextAndImages(WmNews wmNews) {

        //存储纯文本内容
        StringBuilder stringBuilder = new StringBuilder();

        List<String> images = new ArrayList<>();

        //1。从自媒体文章的内容中提取文本和图片
        if (StringUtils.isNotBlank(wmNews.getContent())) {
            List<Map> maps = JSONArray.parseArray(wmNews.getContent(), Map.class);
            for (Map map : maps) {
                if (map.get("type").equals("text")) {
                    stringBuilder.append(map.get("value"));
                }

                if (map.get("type").equals("image")) {
                    images.add((String) map.get("value"));
                }
            }
        }
        //2.提取文章的封面图片
        if (StringUtils.isNotBlank(wmNews.getImages())) {
            String[] split = wmNews.getImages().split(",");
            images.addAll(Arrays.asList(split));
        }

        Map<String, Object> resultMap = new HashMap<>();
        resultMap.put("content", stringBuilder.toString());
        resultMap.put("images", images);
        return resultMap;

    }
}
功能测试

可以看到成功查看到敏感词汇
文章详情-静态文件生成
思路分析
文章端创建app相关文章时,生成文章详情静态页上传到MinIO中

实现步骤
1.新建ArticleFreemarkerService创建静态文件并上传到minIO中
package com.heima.article.service;

import com.heima.model.article.pojos.ApArticle;

public interface ApArticleFreemarkerService {

    /**
     * 生成静态文件上传到minio中
     * @param apArticle
     * @param content
     */
    void buildArticleToMinio(ApArticle apArticle,String content)
}
实现
package com.heima.article.service.impl;

import com.alibaba.fastjson.JSON;
import com.alibaba.fastjson.JSONArray;
import com.baomidou.mybatisplus.core.toolkit.Wrappers;
import com.heima.article.mapper.ApArticleContentMapper;
import com.heima.article.service.ApArticleService;
import com.heima.article.service.ArticleFreemarkerService;
import com.heima.file.service.FileStorageService;
import com.heima.model.article.pojos.ApArticle;
import freemarker.template.Configuration;
import freemarker.template.Template;
import lombok.extern.slf4j.Slf4j;
import org.apache.commons.lang3.StringUtils;
import org.springframework.beans.BeanUtils;
import org.springframework.beans.factory.annotation.Autowired;
import org.springframework.scheduling.annotation.Async;
import org.springframework.stereotype.Service;
import org.springframework.transaction.annotation.Transactional;

import java.io.ByteArrayInputStream;
import java.io.InputStream;
import java.io.StringWriter;
import java.util.HashMap;
import java.util.Map;

@Service
@Slf4j
@Transactional
public class ArticleFreemarkerServiceImpl implements ArticleFreemarkerService {

    @Autowired
    private ApArticleContentMapper apArticleContentMapper;

    @Autowired
    private Configuration configuration;

    @Autowired
    private FileStorageService fileStorageService;

    @Autowired
    private ApArticleService apArticleService;

    /**
     * 生成静态文件上传到minIO中
     * @param apArticle
     * @param content
     */
    @Async
    @Override
    public void buildArticleToMinIO(ApArticle apArticle, String content) {
        //已知文章的id
        //4.1 获取文章内容
        if(StringUtils.isNotBlank(content)){
            //4.2 文章内容通过freemarker生成html文件
            Template template = null;
            StringWriter out = new StringWriter();
            try {
                template = configuration.getTemplate("article.ftl");
                //数据模型
                Map<String,Object> contentDataModel = new HashMap<>();
                contentDataModel.put("content", JSONArray.parseArray(content));
                //合成
                template.process(contentDataModel,out);
            } catch (Exception e) {
                e.printStackTrace();
            }

            //4.3 把html文件上传到minio中
            InputStream in = new ByteArrayInputStream(out.toString().getBytes());
            String path = fileStorageService.uploadHtmlFile("", apArticle.getId() + ".html", in);


            //4.4 修改ap_article表,保存static_url字段
            apArticleService.update(Wrappers.<ApArticle>lambdaUpdate().eq(ApArticle::getId,apArticle.getId())
                    .set(ApArticle::getStaticUrl,path));


        }
    }

}
2.在ApArticleService的saveArticle实现方法中添加调用生成文件的方法
/**
     * 保存app端相关文章
     * @param dto
     * @return
     */
@Override
public ResponseResult saveArticle(ArticleDto dto) {

    //        try {
    //            Thread.sleep(3000);
    //        } catch (InterruptedException e) {
    //            e.printStackTrace();
    //        }
    //1.检查参数
    if(dto == null){
        return ResponseResult.errorResult(AppHttpCodeEnum.PARAM_INVALID);
    }

    ApArticle apArticle = new ApArticle();
    BeanUtils.copyProperties(dto,apArticle);

    //2.判断是否存在id
    if(dto.getId() == null){
        //2.1 不存在id  保存  文章  文章配置  文章内容

        //保存文章
        save(apArticle);

        //保存配置
        ApArticleConfig apArticleConfig = new ApArticleConfig(apArticle.getId());
        apArticleConfigMapper.insert(apArticleConfig);

        //保存 文章内容
        ApArticleContent apArticleContent = new ApArticleContent();
        apArticleContent.setArticleId(apArticle.getId());
        apArticleContent.setContent(dto.getContent());
        apArticleContentMapper.insert(apArticleContent);

    }else {
        //2.2 存在id   修改  文章  文章内容

        //修改  文章
        updateById(apArticle);

        //修改文章内容
        ApArticleContent apArticleContent = apArticleContentMapper.selectOne(Wrappers.<ApArticleContent>lambdaQuery().eq(ApArticleContent::getArticleId, dto.getId()));
        apArticleContent.setContent(dto.getContent());
        apArticleContentMapper.updateById(apArticleContent);
    }

    //异步调用 生成静态文件上传到minio中
    articleFreemarkerService.buildArticleToMinIO(apArticle,dto.getContent());


    //3.结果返回  文章的id
    return ResponseResult.okResult(apArticle.getId());
}
3.文章微服务开启异步调用
功能测试
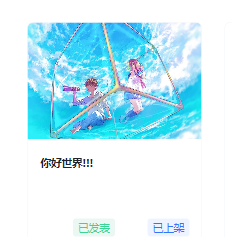
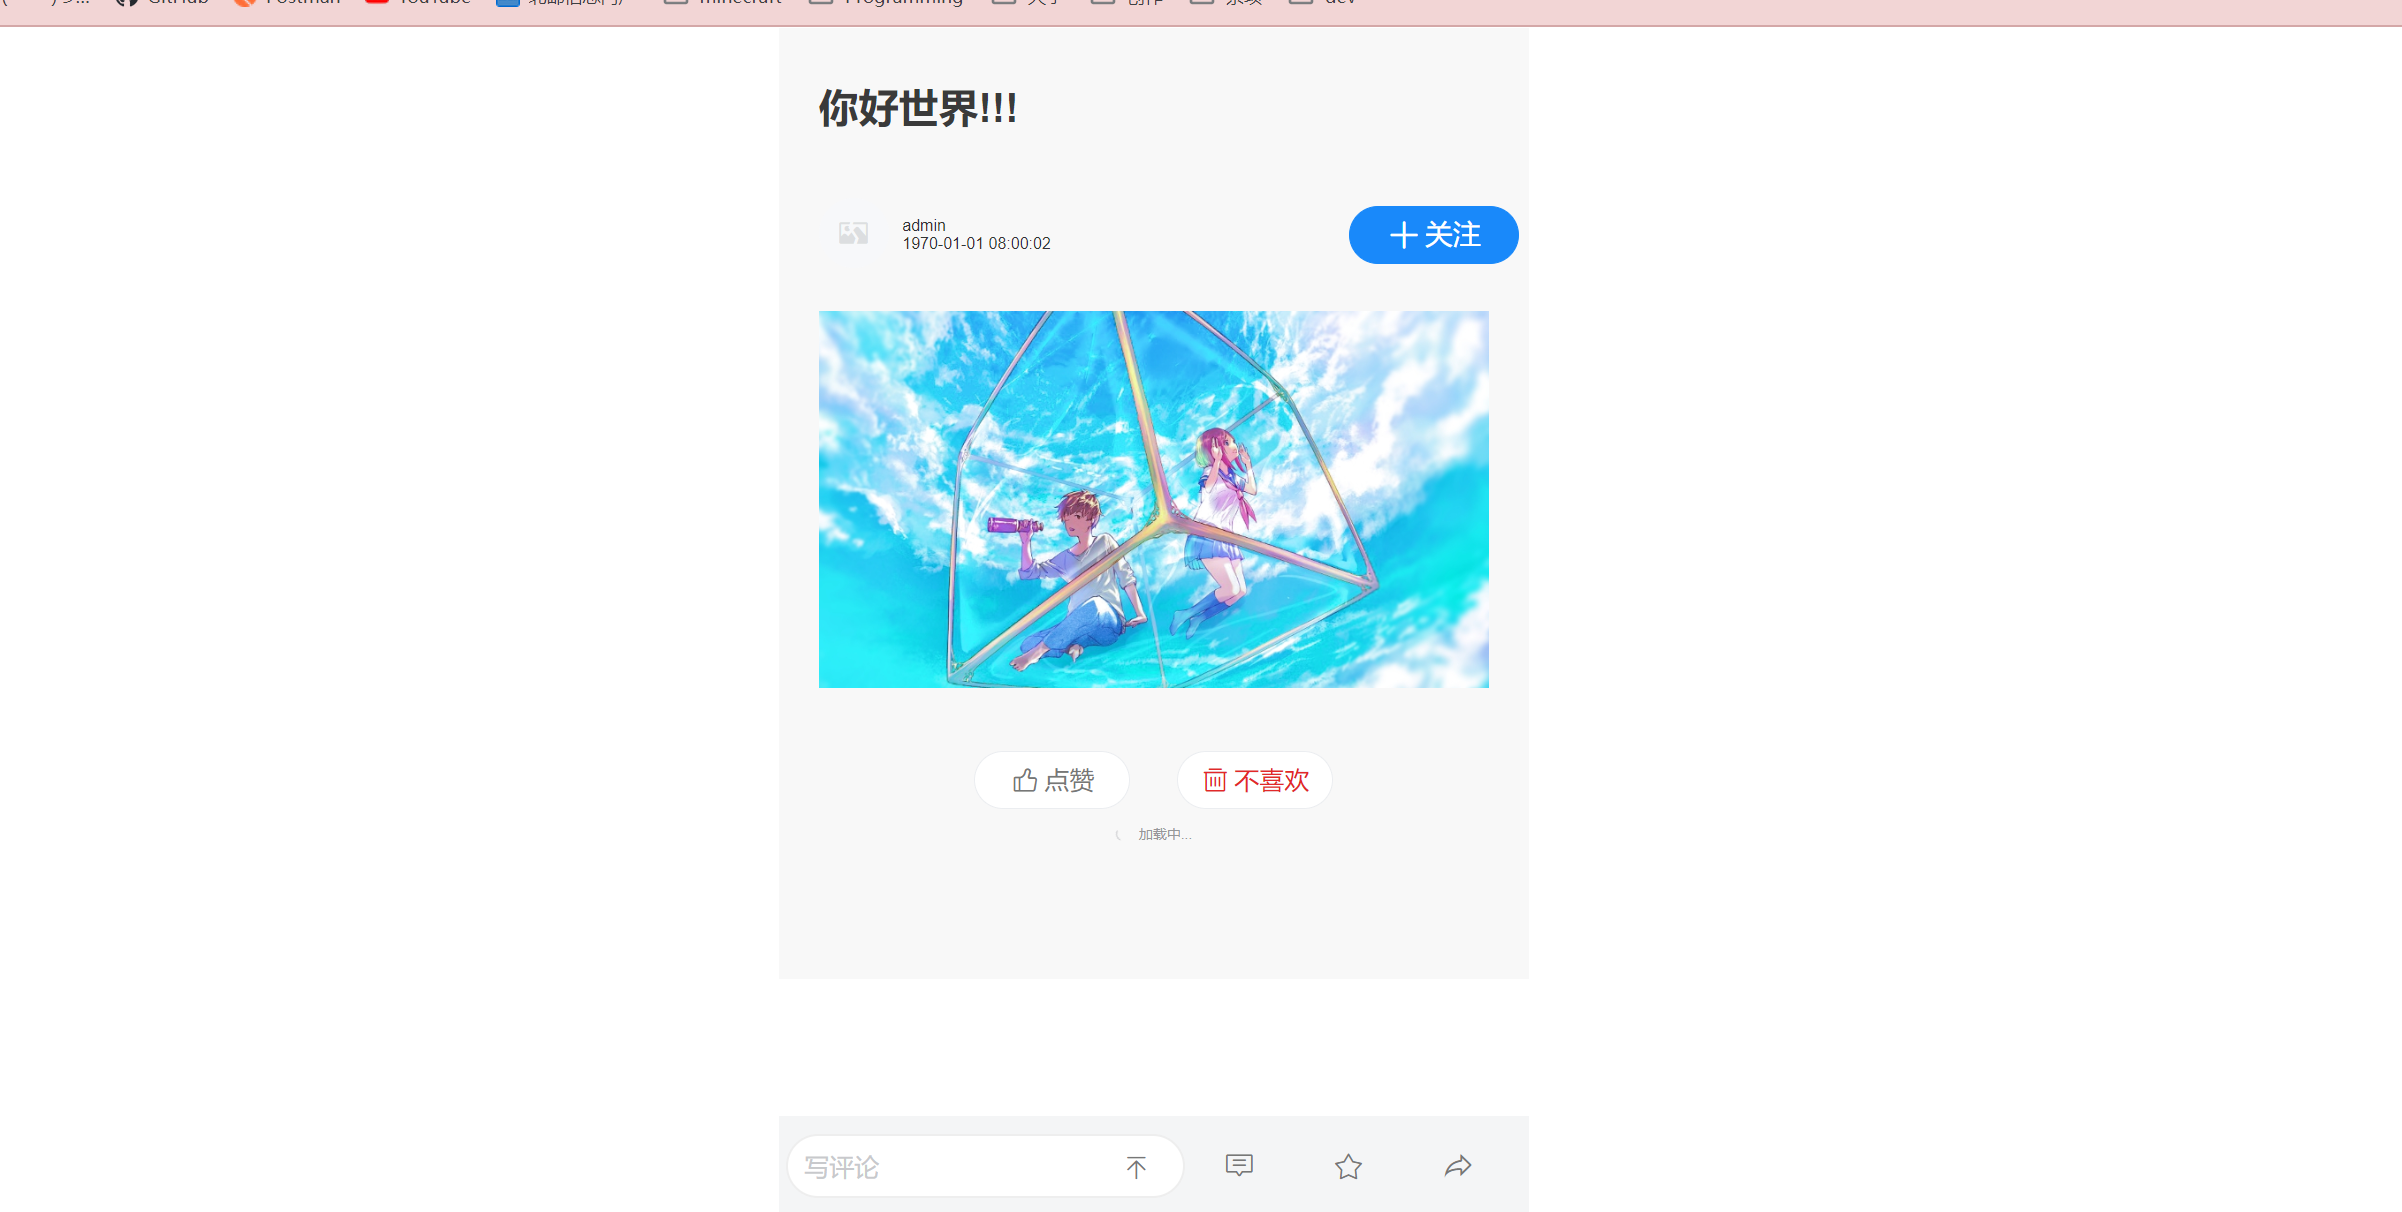
分布式事务(作业)
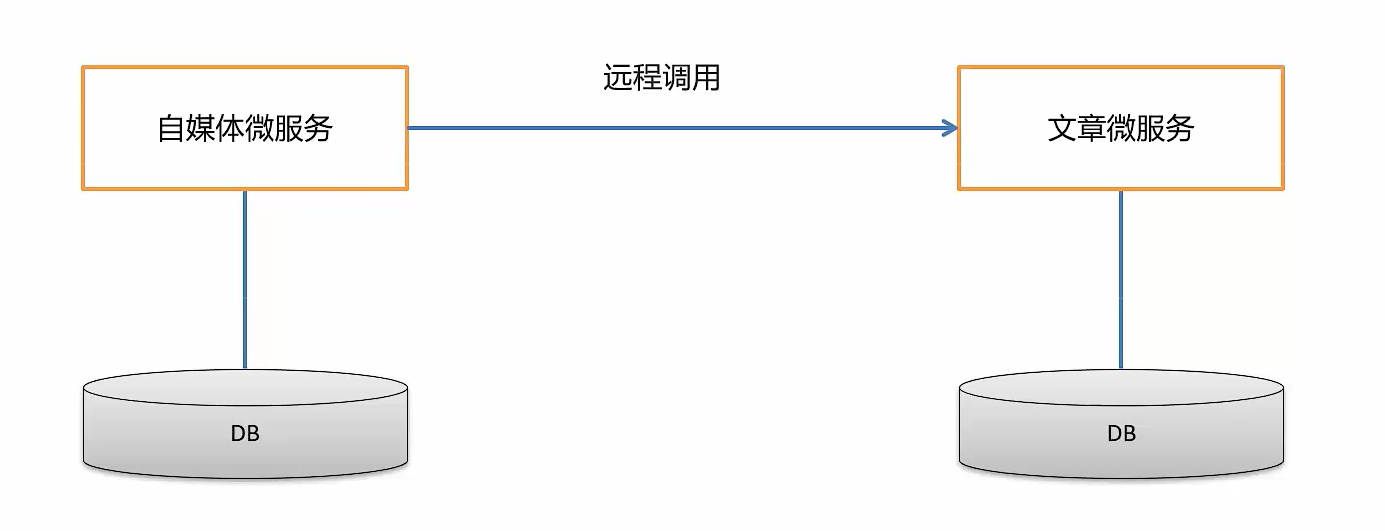
使用seata来解决审核过程中的分布式事务问题

 浙公网安备 33010602011771号