
RectangleGeometry
在使用RectangleGeometry控件绘制矩形时,矩形的位置和尺寸由Rect属性定义,该属性指定矩形的相对位置、高度和宽度。Rect有四个参数,前两个参数表示矩形左上角的位置,后两个参数分别表示矩形的宽和高。下面将通过示例演示如何使用RectangleGeometry控件绘制矩形。
在一个打开的Windows应用商店项目中新建一个空白页,并命名为RectangleGeometryPage,双击打开此页面的RectangleGeometryPage.xaml文件,在Grid元素中添加如下代码。
<Path Fill="red" Stroke="blue" StrokeThickness="3">
<Path.Data>
<RectangleGeometry Rect="300,300,100,100" />
</Path.Data>
</Path>
上面的代码首先定义一个Path控件并设置Fill属性为红色(red)、Stroke属性为蓝色(blue)和StrokeThickness属性为3像素。接着在Path.Data的内部使用RectangleGeometry的Rect属性定义了一个起始坐标为 (300,300)、高度和宽度均为100的矩形。绘制矩形的运行效果如图8-11所示。
接下来在后台使用RectangleGeometry类型的对象绘制一个与前台一样的矩形,代码如下所示:
public RectangleGeometryPage()
{
this.InitializeComponent();
//实例化Path对象
Windows.UI.Xaml.Shapes.Path mypath = new Windows.UI.Xaml.Shapes.Path();
mypath.StrokeThickness = 3;
mypath.Stroke = new SolidColorBrush(Colors.Blue);
mypath.Fill = new SolidColorBrush(Colors.Red);
//实例化rectang对象
RectangleGeometry rectang = new RectangleGeometry();
//设置矩形的位置与大小
rectang.Rect = new Rect(300, 300, 100, 100);
mypath.Data = rectang;
//将mypath添加到MyShow控件中
MyShow.Children.Add(mypath);
}
在上面的代码中,首先实例化Path类型的对象mypath,并设定StrokeThickness 为3像素、Stroke属性为蓝色(Blue)和Fill为红色(Red)。然后定义RectangleGeometry类型的对象rectang,接着用Rect类型的对象给rectang的Rect属性赋值。将rectang对象赋值给mypath对象的Data属性,最后把mypath对象添加到名为MyShow的控件中。
运行此页面,利用RectangleGeometry绘制矩形的效果如图8-10所示。

图8-10 RectangleGeometry 画的矩形
RectangleGeometry对象除了能绘制几何图形,还可以定义图像的剪辑区域,在Geometry的子类中目前只有RectangleGeometry支持定义剪辑区域。下面通过一个简单的示例来展示此功能,代码如下所示:
<!--原图-->
<Image Source="Images/Image.png" Width="200"></Image>
<!--截图代码-->
<Image Source="Images/Image.png" Width="200" >
<Image.Clip>
<RectangleGeometry Rect="20,20,100,100">
</RectangleGeometry>
</Image.Clip>
</Image>
上面的代码添加了两个Image控件,一个用于显示原图,另一个用于显示剪辑后的图片。接着设置Image控件的Source属性为图片在项目中的路径,这需要提前将图片导入到项目中以便获得图片的路径。最后在第二个Image控件的Clip属性中添加一个RectangleGeometry元素,并设置它的Rect属性,这样即可实现图片的剪辑。
运行上面的代码,截图效果对比如图8-11所示。
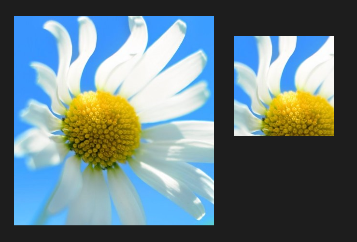
图8-11 截图效果对比图

 浙公网安备 33010602011771号