使用ViewPager+Fragment实现选项卡切换效果
实现效果
本实例主要实现用ViewPage和Fragment实现选项卡切换效果,选项卡个数为3个,点击选项卡或滑动屏幕会切换Fragment并实现选项卡下方下边框条跟随移动效果。
本程序用android4.2.2真机调试,为方便部署,我使用adbWireless做为部署工具,电脑和手机接入同一局域网,在PC端输入名称 adb connect 手机端ip 默认连接5555端口。之后再Eclipse的Devices中即可看到介入设备。前提是android系统需要Root。如下图:

设计实现
- 创建项目(此过程不做赘述)
- 在activity_main.xml中设置布局。xml内容如下:
<LinearLayout xmlns:android="http://schemas.android.com/apk/res/android"
    xmlns:tools="http://schemas.android.com/tools"
    android:layout_width="match_parent"
    android:layout_height="match_parent"
    android:orientation="vertical"
    tools:context="com.example.fengzhengapp.MainActivity" >
    <LinearLayout
        android:layout_width="match_parent"
        android:layout_height="48dp"
        android:orientation="horizontal" >
        <TextView
            android:id="@+id/tv_hot"
            android:layout_width="wrap_content"
            android:layout_height="fill_parent"
            android:layout_weight="1.0"
            android:background="#ffEAEAEA"
            android:gravity="center"
            android:text="@string/tab_hot"
            android:textSize="18sp" />
        <TextView
            android:id="@+id/tv_news"
            android:layout_width="wrap_content"
            android:layout_height="fill_parent"
            android:layout_weight="1.0"
            android:background="#ffEAEAEA"
            android:gravity="center"
            android:text="@string/tab_news"
            android:textSize="18sp" />
        <TextView
            android:id="@+id/tv_fav"
            android:layout_width="wrap_content"
            android:layout_height="fill_parent"
            android:layout_weight="1.0"
            android:background="#ffEAEAEA"
            android:gravity="center"
            android:text="@string/tab_favorite"
            android:textSize="18sp" />
    </LinearLayout>
    <ImageView
        android:id="@+id/cursor"
        android:layout_width="wrap_content"
        android:layout_height="wrap_content"
        android:scaleType="matrix"
        android:src="@drawable/bgborder" />
    <android.support.v4.view.ViewPager
        android:id="@+id/myViewPager"
        android:layout_width="match_parent"
        android:layout_height="0dp"
        android:layout_weight="1"
        android:flipInterval="30" >
    </android.support.v4.view.ViewPager>
</LinearLayout>
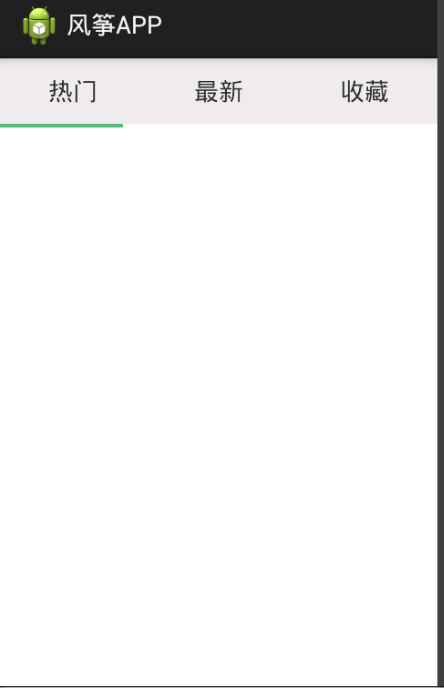
上面布局页实现的效果如下:
- 接下来,增加3个Fragment布局页 ,分别在里面填充简单的内容
第一个:
<?xml version="1.0" encoding="utf-8"?>
<LinearLayout xmlns:android="http://schemas.android.com/apk/res/android"
    android:layout_width="match_parent"
    android:layout_height="match_parent"
    android:orientation="vertical" >
    <TextView
        android:id="@+id/txtHot"
        android:layout_width="match_parent"
        android:layout_height="match_parent"
        android:layout_weight="1"
        android:text="this is the hot tab" >
    </TextView>
</LinearLayout>
第二个:
<?xml version="1.0" encoding="utf-8"?>
<LinearLayout xmlns:android="http://schemas.android.com/apk/res/android"
    android:layout_width="match_parent"
    android:layout_height="match_parent"
    android:orientation="vertical" >
    <TextView
        android:id="@+id/txtNews"
        android:layout_width="match_parent"
        android:layout_height="match_parent"
        android:layout_weight="1"
        android:text="this is the news tab" >
    </TextView>
</LinearLayout>
第三个:
<?xml version="1.0" encoding="utf-8"?>
<LinearLayout xmlns:android="http://schemas.android.com/apk/res/android"
    android:layout_width="match_parent"
    android:layout_height="match_parent"
    android:orientation="vertical" >
    <TextView
        android:id="@+id/txtFav"
        android:layout_width="match_parent"
        android:layout_height="match_parent"
        android:layout_weight="1"
        android:text="this is the Fav tab" >
    </TextView>
</LinearLayout>
以上3个Fragment的布局文件已创建完毕,每个文件中只显示简单的文本内容,用做演示。
- 加载3个Fragment到Activity中。
首先实现3个Fragment对应的后台类
热点布局页对应的类:
import android.os.Bundle;
import android.support.v4.app.Fragment;
import android.view.LayoutInflater;
import android.view.View;
import android.view.ViewGroup;
public class FragmentHot extends Fragment {
	@Override
	public View onCreateView(LayoutInflater inflater, ViewGroup container,
			Bundle savedInstanceState) {
		View view = inflater.inflate(R.layout.fragmenthot, container, false);
		return view;
	}
}
news布局页对应的类:
import android.os.Bundle;
import android.support.v4.app.Fragment;
import android.view.LayoutInflater;
import android.view.View;
import android.view.ViewGroup;
public class FragmentNews extends Fragment {
	@Override
	public View onCreateView(LayoutInflater inflater, ViewGroup container,
			Bundle savedInstanceState) {
		View view = inflater.inflate(R.layout.fragmentnews, container, false);
		return view;
	}
}
收藏布局页对应的类:
import android.os.Bundle;
import android.support.v4.app.Fragment;
import android.view.LayoutInflater;
import android.view.View;
import android.view.ViewGroup;
public class FragmentFavorite extends Fragment {
	@Override
	public View onCreateView(LayoutInflater inflater, ViewGroup container,
			Bundle savedInstanceState) {
		View view = inflater.inflate(R.layout.fragmentfav, container, false);
		return view;
	}
}
- 之后再activity中初始化这3个Fragment
注意要点:
Activity继承自FragmentActivity
要实现一个FragmentPagerAdapter,内容如下:
import java.util.ArrayList;
import android.support.v4.app.Fragment;
import android.support.v4.app.FragmentManager;
import android.support.v4.app.FragmentPagerAdapter;
public class MyFragmentAdapter extends FragmentPagerAdapter {
	ArrayList<Fragment> list;
	public MyFragmentAdapter(FragmentManager fm,ArrayList<Fragment> list){
		super(fm);
		this.list = list;
	}
	@Override
	public Fragment getItem(int arg0) {
		// TODO Auto-generated method stub
		return list.get(arg0);
	}
	@Override
	public int getCount() {
		// TODO Auto-generated method stub
		return list.size();
	}
}
然后在Activity中实现切换和动画效果,代码如下:
import java.util.ArrayList;
import android.app.Activity;
import android.graphics.BitmapFactory;
import android.graphics.Matrix;
import android.os.Bundle;
import android.support.v4.app.Fragment;
import android.support.v4.view.ViewPager;
import android.support.v4.view.ViewPager.OnPageChangeListener;
import android.util.DisplayMetrics;
import android.util.Log;
import android.view.Menu;
import android.view.View;
import android.support.v4.app.FragmentActivity;
import android.view.MenuItem;
import android.view.animation.Animation;
import android.view.animation.TranslateAnimation;
import android.widget.ImageView;
import android.widget.TextView;
import android.widget.Toast;
public class MainActivity extends FragmentActivity {
	private ViewPager mViewPager;
	private ArrayList fragments;
	private TextView view1, view2, view3;
    private int currIndex;
    private ImageView image;
    private static int bmpW;//横线图片宽度
    private static int offset;//图片移动的偏移量
	@Override
	protected void onCreate(Bundle savedInstanceState) {
		super.onCreate(savedInstanceState);
		setContentView(R.layout.activity_main);
		initViewPager();
		InitTextView();
		InitImage();
	}
	@Override
	public boolean onCreateOptionsMenu(Menu menu) {
		// Inflate the menu; this adds items to the action bar if it is present.
		getMenuInflater().inflate(R.menu.main, menu);
		return true;
	}
	@Override
	public boolean onOptionsItemSelected(MenuItem item) {
		// Handle action bar item clicks here. The action bar will
		// automatically handle clicks on the Home/Up button, so long
		// as you specify a parent activity in AndroidManifest.xml.
		int id = item.getItemId();
		if (id == R.id.action_settings) {
			return true;
		}
		return super.onOptionsItemSelected(item);
	}
	private void InitTextView(){
		view1 = (TextView) findViewById(R.id.tv_hot);
		view2 = (TextView) findViewById(R.id.tv_news);
		view3 = (TextView) findViewById(R.id.tv_fav);
		view1.setOnClickListener(new txtListener(0));
		view2.setOnClickListener(new txtListener(1));
		view3.setOnClickListener(new txtListener(2));
	}
	//内部类 重写TextView点击事件
	public class txtListener implements View.OnClickListener{
		private int index = 0;
		public txtListener(int i){
			index = i;
		}
		@Override
		public void onClick(View v){
			mViewPager.setCurrentItem(index);
		}
	}
	/*
     * 初始化图片的位移像素
     */
    public void InitImage(){
        image = (ImageView)findViewById(R.id.cursor);
        bmpW = BitmapFactory.decodeResource(getResources(), R.drawable.bgborder).getWidth();
        DisplayMetrics dm = new DisplayMetrics();
        getWindowManager().getDefaultDisplay().getMetrics(dm);
        int screenW = dm.widthPixels;
        offset = (screenW/3 - bmpW)/2;
        Log.i("screenW",String.valueOf(screenW));
        Log.i("bmpW",String.valueOf(bmpW));
        Log.i("offset",String.valueOf(offset));
        //imgageview设置平移,使下划线平移到初始位置(平移一个offset)
        Matrix matrix = new Matrix();
        matrix.postTranslate(offset, 0);
        image.setImageMatrix(matrix);
    }
	private void initViewPager(){
		mViewPager = (ViewPager)findViewById(R.id.myViewPager);
		fragments = new ArrayList<Fragment>();
		Fragment fragmentHot = new FragmentHot();
		Fragment fragmentNews = new FragmentNews();
		Fragment fragmentFav = new FragmentFavorite();
		fragments.add(fragmentHot);
		fragments.add(fragmentNews);
		fragments.add(fragmentFav);
		mViewPager.setAdapter(new MyFragmentAdapter(getSupportFragmentManager(), fragments));
		mViewPager.setCurrentItem(0);
		mViewPager.setOnPageChangeListener(new myOnPageChangeListener());
	}
	public class myOnPageChangeListener implements OnPageChangeListener {
		private int one = offset*2 +bmpW;//两个相邻页面的偏移量
		@Override
		public void onPageScrolled(int arg0, float arg1, int arg2) {
		}
		@Override
		public void onPageScrollStateChanged(int arg0) {
			// TODO Auto-generated method stub
		}
		@Override
        public void onPageSelected(int arg0) {
            // TODO Auto-generated method stub
			Log.i("aaaaaaaaaaaaa",String.valueOf(arg0));
			Log.i("one",String.valueOf(one));
            Animation animation = new TranslateAnimation(currIndex*one,arg0*one,0,0);//平移动画
            currIndex = arg0;
            animation.setFillAfter(true);//动画终止时停留在最后一帧,不然会回到没有执行前的状态
            animation.setDuration(200);//动画持续时间0.2秒
            image.startAnimation(animation);//是用ImageView来显示动画的
            //int i = currIndex + 1;
           // Toast.makeText(MainActivity.this, "您选择了第"+i+"个页卡", Toast.LENGTH_SHORT).show();
        }
    }
}
源代码地址请访问这里:源码
人生没有回头路,珍惜当下。

 浙公网安备 33010602011771号