使用Docker搭建Redis三主三从集群以及使用SpringBoot连接
1.前言
由于最近项目上生产,采用三主三从的redis集群做缓存,因此进行单机redis改造。
本次采用的是docker+docker-compose进行部署,redis版本为5.0。
2.准备工作
2.1.redis.conf
在搭建redis集群之前,我们需要修改下redis的配置文件redis.conf。该文件的下载地址:https://github.com/antirez/redis/blob/5.0/redis.conf
需要修改的属性如下,主要是修改了一些集群配置和运行端口,端口号需要按需修改为6371~6376:
# 设置运行端口
port 6371
# 开启集群功能
cluster-enabled yes
# 任何主机都可以连接到redis
bind 0.0.0.0
# 集群节点IP地址
cluster-announce-ip 121.36.xxx.xxx
# 节点映射端口
cluster-announce-port 6371
#节点总线端
cluster-announce-bus-port 16371
# 设置节点超时时间,单位毫秒
cluster-node-timeout 15000
# 集群内部配置文件
cluster-config-file "nodes-6391.conf"
# 持久化模式
appendonly yes
cluster-announce-ip:这个IP需要特别注意一下,如果要对外提供访问功能,需要填写宿主机的IP,如果不填或者填写docker分配的IP,可能会导致部分集群节点在跳转时失败。
如果填写没有填宿主机IP,虽然能单机连接正常使用,但是在使用代码连接时,如果有自定义配置,则会报错,初始化失败。
没有填写时会使用内部IP,而代码连接集群时,虽然配置宿主机IP,但是集群内配置仍为内部IP,连接不上内部IP,则会抛出异常。
2.2.docker-compose.yaml
编写docker-compose.yml文件用于编排6个Redis容器,具体属性的作用可以参考下面的注释:
version: "3"
services:
  redis-master1:
    image: redis:5.0 # 基础镜像
    container_name: redis-master1 # 容器名称
    working_dir: /config # 切换工作目录
    environment: # 环境变量
      - PORT=6371 # 会使用config/${PORT}.conf这个配置文件
    ports: # 映射端口,对外提供服务
      - 6371:6371 # redis的服务端口
      - 16371:16371 # redis集群监控端口
    stdin_open: true # 标准输入打开
    tty: true # 后台运行不退出
    network_mode: host # 使用host模式
    privileged: true # 拥有容器内命令执行的权限
    volumes:
      - /data/redis/config:/config #配置文件目录映射到宿主机
    entrypoint: # 设置服务默认的启动程序
      - /bin/bash
      - redis.sh
  redis-master2:
    image: redis:5.0
    working_dir: /config
    container_name: redis-master2
    environment:
      - PORT=6372
    ports:
      - 6372:6372
      - 16372:16372
    stdin_open: true
    network_mode: host
    tty: true
    privileged: true
    volumes:
      - /data/redis/config:/config
    entrypoint:
      - /bin/bash
      - redis.sh
  redis-master3:
    image: redis:5.0
    container_name: redis-master3
    working_dir: /config
    environment:
      - PORT=6373
    ports:
      - 6373:6373
      - 16373:16373
    stdin_open: true
    network_mode: host
    tty: true
    privileged: true
    volumes:
      - /data/redis/config:/config
    entrypoint:
      - /bin/bash
      - redis.sh
  redis-slave1:
    image: redis:5.0
    container_name: redis-slave1
    working_dir: /config
    environment:
      - PORT=6374
    ports:
      - 6374:6374
      - 16374:16374
    stdin_open: true
    network_mode: host
    tty: true
    privileged: true
    volumes:
      - /data/redis/config:/config
    entrypoint:
      - /bin/bash
      - redis.sh
  redis-slave2:
    image: redis:5.0
    working_dir: /config
    container_name: redis-slave2
    environment:
      - PORT=6375
    ports:
      - 6375:6375
      - 16375:16375
    stdin_open: true
    network_mode: host
    tty: true
    privileged: true
    volumes:
      - /data/redis/config:/config
    entrypoint:
      - /bin/bash
      - redis.sh
  redis-slave3:
    image: redis:5.0
    container_name: redis-slave3
    working_dir: /config
    environment:
      - PORT=6376
    ports:
      - 6376:6376
      - 16376:16376
    stdin_open: true
    network_mode: host
    tty: true
    privileged: true
    volumes:
      - /data/redis/config:/config
    entrypoint:
      - /bin/bash
      - redis.sh
从docker-compose.yml文件中我们可以看到,我们的Redis容器分别运行在6371~6376这6个端口之上。
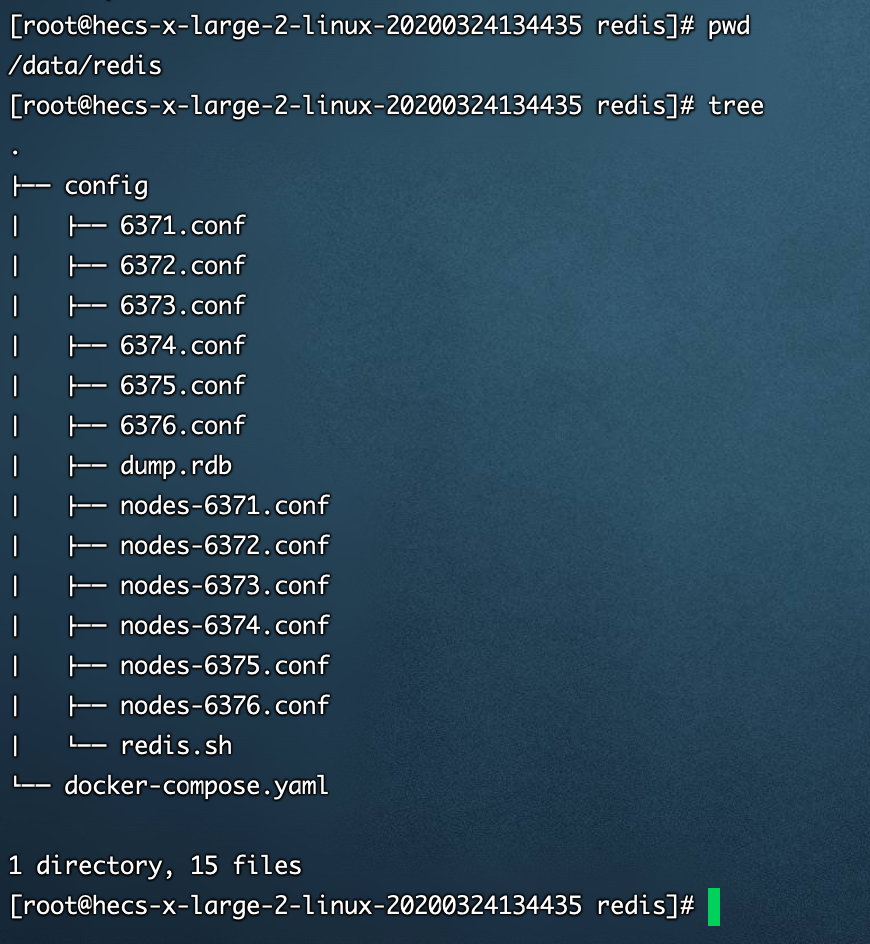
将容器中的/config配置目录映射到了宿主机的/data/redis/config目录,同时还以redis.sh脚本作为该容器的启动脚本。
2.3.redis.sh
redis.sh脚本的作用是根据environment环境变量中的PORT属性,以指定配置文件来启动Redis容器
redis-server /config/${PORT}.conf
2.4.上传服务器
将我们的文件上传服务器,忽略config目录下,6376.conf后的文件,这些文件为运行时创建的。
3.运行集群
启动容器
docker-compose up -d
进入其中一个容器
docker exec -it redis-master1 /bin/bash
初始化redis集群
redis-cli --cluster create 121.36.xxx.xxx:6371 121.36.xxx.xxx:6372 \
  121.36.xxx.xxx:6373 121.36.xxx.xxx:6374  121.36.xxx.xxx:6375 \
  121.36.xxx.xxx:6376 --cluster-replicas 1
cluster-replicas: 集群集,就是主从节点的比例,1代表主从节点一比一,0则表示没有从节点。
集群创建过程中会让你确认配置,输入yes确认即可。
输出以下信息则表示集群创建成功:

4.集群相关操作
创建成功后我们可以使用redis-cli命令连接到其中一个Redis服务;
# 单机模式启动
redis-cli -p 6371
# 集群模式启动
redis-cli -c -p 6371
查看集群信息
cluster nodes
可以看到满足三主三从集群要求:

至此集群搭建完成。
5.SpringBoot连接
5.1.引入依赖
<dependency>
    <groupId>org.apache.commons</groupId>
    <artifactId>commons-pool2</artifactId>
</dependency>
5.2.application.yml
因为spring-boot-starter-data-redis默认的redis客户端是使用lettuce,因此我们这里也采用lettuce连接池。
spring:
  redis:
    password: # Redis服务器连接密码(默认为空)
    timeout: 3000ms # 连接超时时间
    cluster:
      nodes: #所有节点地址
        - 121.36.151.54:6371
        - 121.36.151.54:6372
        - 121.36.151.54:6373
        - 121.36.151.54:6374
        - 121.36.151.54:6375
        - 121.36.151.54:6376
      max-redirects: 5 #连接失败最大重连次数
    lettuce:
      pool:
        max-active: 8 # 连接池最大连接数
        max-idle: 8 # 连接池最大空闲连接数
        min-idle: 0 # 连接池最小空闲连接数
        max-wait: -1ms # 连接池最大阻塞等待时间,负值表示没有限制
5.3.RedisConfig
import org.springframework.boot.autoconfigure.AutoConfigureAfter;
import org.springframework.boot.autoconfigure.data.redis.RedisAutoConfiguration;
import org.springframework.context.annotation.Bean;
import org.springframework.context.annotation.Configuration;
import org.springframework.data.redis.connection.lettuce.LettuceConnectionFactory;
import org.springframework.data.redis.core.RedisTemplate;
import org.springframework.data.redis.serializer.GenericJackson2JsonRedisSerializer;
import org.springframework.data.redis.serializer.StringRedisSerializer;

@Configuration
@AutoConfigureAfter(RedisAutoConfiguration.class)
public class RedisConfig {

    @Bean
    public RedisTemplate<String, Object> redisCacheTemplate(LettuceConnectionFactory redisConnectionFactory) {
        RedisTemplate<String, Object> template = new RedisTemplate<>();
        template.setKeySerializer(new StringRedisSerializer());
        template.setValueSerializer(new GenericJackson2JsonRedisSerializer());
        template.setConnectionFactory(redisConnectionFactory);

        return template;
    }
}
使用时直接注入RedisTemplate即可直接使用。
参考文档:https://www.jianshu.com/p/ca06e437614f

 浙公网安备 33010602011771号