
Flex开发入门
Flex开发入门
1.环境部署
eclipse-jee-indigo-SR1-win32.zip http://www.eclipse.org/downloads/
FlashBuilder_4_6_LS10.exe https://www.adobe.com/cfusion/tdrc/index.cfm?product=flash_builder
blazeds-bin-4.0.0.14931.zip https://www.adobe.com/cfusion/entitlement/index.cfm?e=lc_blazeds
apache-tomcat-7.0.23-windows-x86.zip安装完FlashBuilder后,可以将其作为插件安装到eclipse中,方法是执行D:\Program Files\adobe\Adobe Flash Builder 4.6\utilities\Adobe Flash
Builder 4.6 Plug-in Utility.exe。eclipse 中安装flash builder 4.6后变中文了,解决方法:
找到Eclipse目录下的eclipse.ini文件,在首行添加一句、
-nl
en_US
成功解决问题,注意不能写在一行。
blazeds解压备用,tomcat作为服务器。
-nl
en_US
成功解决问题,注意不能写在一行。
blazeds解压备用,tomcat作为服务器。
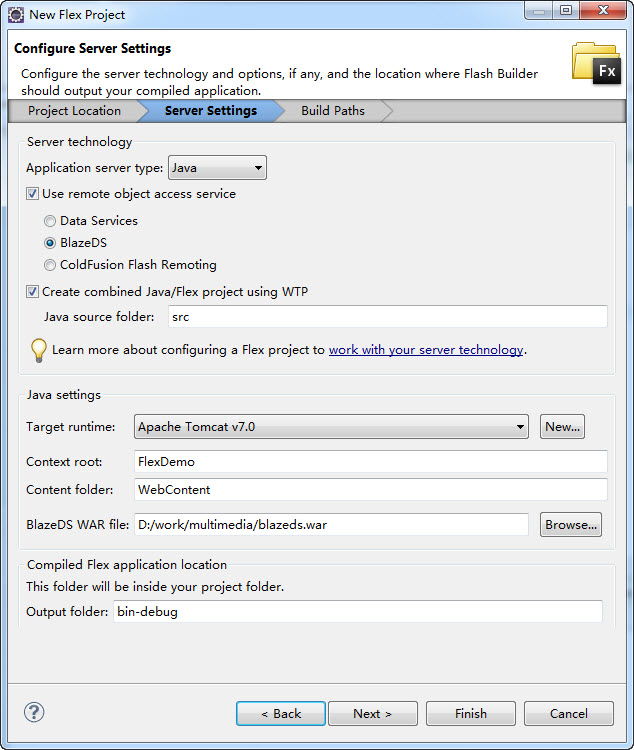
2.创建FlexDemo工程
创建一个Flex工程,关键步骤如下

写两个简单的java类,为前端的Flex提供数据,flex通过RemoteObject对像与java通信
Customer.java
- package com.sample;
- public class Customer {
- private String name;
- private int age;
- private String email;
- public Customer(String name, int age, String email) {
- this.name = name;
- this.age = age;
- this.email = email;
- }
- public String getName() {
- return name;
- }
- public void setName(String name) {
- this.name = name;
- }
- public int getAge() {
- return age;
- }
- public void setAge(int age) {
- this.age = age;
- }
- public String getEmail() {
- return email;
- }
- public void setEmail(String email) {
- this.email = email;
- }
- }
CustomerService.java
- package com.sample;
- import java.util.ArrayList;
- public class CustomerService {
- public CustomerService() {
- // TODO Auto-generated constructor stub
- }
- public ArrayList<Customer> getList() {
- ArrayList<Customer> tempList = new ArrayList<Customer>();
- for (int i = 1; i<=5; i++) {
- tempList.add(new Customer("Tom"+i, 20+i, "tom"+i+"@163.com"));
- }
- return tempList;
- }
- }
修改WebContent/WEB-INF/Flex/remoting-config.xml文件,增加一个destination结点,建立Flex与java类之间的联系
- <?xml version="1.0" encoding="utf-8"?>
- <?xml version="1.0" encoding="UTF-8"?>
- <service id="remoting-service" class="flex.messaging.services.RemotingService">
- <adapters>
- <adapter-definition id="java-object"
- class="flex.messaging.services.remoting.adapters.JavaAdapter"
- default="true" />
- </adapters>
- <default-channels>
- <channel ref="my-amf" />
- </default-channels>
- <destination id="customerServiceDest">
- <properties>
- <source>com.sample.CustomerService</source>
- </properties>
- </destination>
- </service>
FlexDemo.mxml中添加一个DataGrid组件,使用RemoteObject对象获取远程java类中的数据,并填充到DataGrid组件中
<s:Application xmlns:fx="http://ns.adobe.com/mxml/2009"
- xmlns:s="library://ns.adobe.com/flex/spark"
- xmlns:mx="library://ns.adobe.com/flex/mx"
- minWidth="955" minHeight="600" creationComplete="init();
- ">
- <fx:Declarations>
- <!-- Place non-visual elements (e.g., services, value objects) here -->
- <mx:RemoteObject id="customerServiceR" destination="customerServiceDest"
- fault="faultHandler(event);" result="resultHandler(event);"
- endpoint="http://localhost:8080/FlexDemo/messagebroker/amf"/>
- </fx:Declarations>
- <fx:Script>
- <![CDATA[
- import mx.collections.ArrayCollection;
- import mx.controls.Alert;
- import mx.rpc.events.FaultEvent;
- import mx.rpc.events.ResultEvent;
- [Bindable]
- private var customerList:ArrayCollection ;
- private function init():void {
- customerServiceR.getList();
- }
- private function resultHandler(event:ResultEvent):void {
- customerList = (event.result as ArrayCollection);
- }
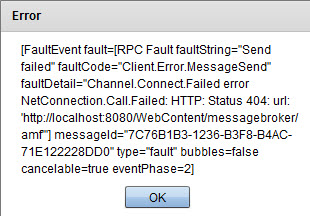
- private function faultHandler(event:FaultEvent):void {
- Alert.show(event.toString(), "Error");
- }
- ]]>
- </fx:Script>
- <s:DataGrid x="62" y="58" dataProvider="{customerList}">
- <s:columns>
- <s:ArrayList>
- <s:GridColumn dataField="name" headerText="name"></s:GridColumn>
- <s:GridColumn dataField="age" headerText="age"></s:GridColumn>
- <s:GridColumn dataField="email" headerText="email"></s:GridColumn>
- </s:ArrayList>
- </s:columns>
- </s:DataGrid>
- </s:Application>
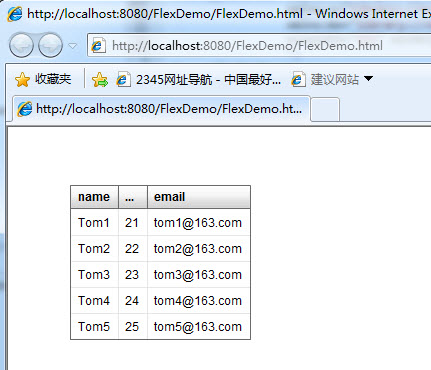
现在运行程序Run As ->Web Application
3.关于调试
在chrome中输入:chrome://plugins/,打开插件列表,停用非Debuger的flash版本

 浙公网安备 33010602011771号