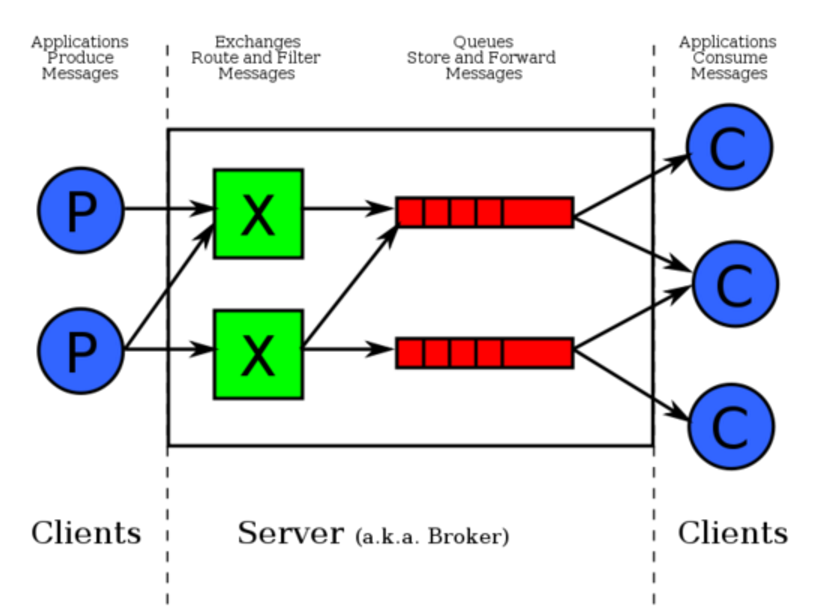
rabbitmq
一、安装


linux(centos7)
    yum install erlang
    yum install rabbitmq-server*

    可参考:https://www.cnblogs.com/web424/p/6761153.html
问题1:
Failed to start LSB: Enable AMQP service provided by RabbitMQ broker.

# vi /etc/rabbitmq/rabbitmq-env.conf
NODENAME=rabbit@localhost
搞定!
(参考:http://blog.csdn.net/testcs_dn/article/details/52514199)
    windows
    安装erlang,官网http://www.erlang.org/downloads
    安装RabbitMQ,官网http://www.rabbitmq.com/download.html


    可参考:https://www.cnblogs.com/ericli-ericli/p/5902270.html
问题1:
C:\Program Files\RabbitMQ Server\rabbitmq_server-3.7.4\sbin>rabbitmqctl.bat status
Status of node rabbit@fat39 ...
Error: unable to perform an operation on node 'rabbit@fat39'. Please see diagnostics information and suggestions below.

Most common reasons for this are:

 * Target node is unreachable (e.g. due to hostname resolution, TCP connection or firewall issues)
 * CLI tool fails to authenticate with the server (e.g. due to CLI tool's Erlang cookie not matching that of the server)
 * Target node is not running

In addition to the diagnostics info below:

 * See the CLI, clustering and networking guides on http://rabbitmq.com/documentation.html to learn more
 * Consult server logs on node rabbit@fat39

DIAGNOSTICS
===========

attempted to contact: [rabbit@fat39]

rabbit@fat39:
  * connected to epmd (port 4369) on fat39
  * epmd reports node 'rabbit' uses port 25672 for inter-node and CLI tool traffic
  * TCP connection succeeded but Erlang distribution failed

  * Authentication failed (rejected by the remote node), please check the Erlang cookie


Current node details:
 * node name: rabbitmqcli84@fat39
 * effective user's home directory: C:\Users\fat39
 * Erlang cookie hash: E6ohUpM/NQ9szEKtdnLQnQ==


用搜索工具对电脑文件系统进行检索,找到C:\Windows\System32\config\systemprofile下有个.erlang.cookie文件,内容与C:\User\lujie\.erlang.cookie不一样,后来修改其中一个文件的内容,使两个文件内容一样。 再次执行命令rabbitmqctl status,成功
补充:linux测试有效参考:https://blog.csdn.net/lilin0800/article/details/80690752
二、使用
0、使用前准备
linux
# 新增用户
sudo rabbitmqctl add_user admin admin123
# 授权
sudo rabbitmqctl set_permissions -p / admin ".*" ".*" ".*"

windows
# 新增用户
C:\Program Files\RabbitMQ Server\rabbitmq_server-3.7.4\sbin\rabbitmqctl.bat add_user admin admin123
# 授权
C:\Program Files\RabbitMQ Server\rabbitmq_server-3.7.4\sbin\rabbitmqctl.bat set_permissions -p / admin ".*" ".*" ".*"
rabbitmqctl.bat add_user admin admin123  # 创建账号密码
rabbitmqctl.bat list_users  # 查看账号
rabbitmqctl.bat set_permissions admin .* .* .*  # 分发权限
rabbitmqctl.bat list_permissions  # 查看权限
rabbitmqctl.bat list_queues  # 查看队列、数量

./rabbitmqctl add_user admin admin
./rabbitmqctl set_user_tags admin administrator  # 管理员
参数说明:
1、队列持久化durable
    说明:
        该queue保存在rabbitmq数据库中,若配置了True,则在rabbitmq重启后该queue还在;若False,则丢失。
        此配置与消息持久化delivery_mode配合使用
    配置:
        在producer端:
        channel.queue_declare(queue='myqueue',durable=True)


2、消息持久化delivery_mode
    说明:
        队列持久化的前提下配置消息持久化delivery_mode=2,则消息不会丢失;否则丢失。
        rabbitmq重启后的集中情况:
            队列不持久,消息不持久:均丢失;
            队列持久、消息持久:均不丢失;
            队列持久、消息不持久:队列不丢失、消息丢失;

    配置:
        在producer端:
        channel.basic_publish(exchange='',  # exchange与订阅有关
                              routing_key='myqueue',  # 发往的队列
                              body=msg,  # 消息内容
                              properties=pika.BasicProperties(
                                  delivery_mode=2,  # 消息持久化
                              ),
                              )

3、公平分发
    说明:
        默认消息队列里的数据是按照顺序被消费者拿走,例如:消费者1 去队列中获取 奇数 序列的任务,消费者2去队列中获取 偶数 序列的任务。
        channel.basic_qos(prefetch_count=1) 表示谁来谁取,不再按照奇偶数排列
    配置:
        在consumer端:
        channel.basic_qos(prefetch_count=1)  # 公平分发

4、消息确认basic_ack、no_ack
    说明:
        未确认:
            如果consumer从queue中提取消息的途中出错,导致消息没被处理,但消息已从producer取走,消息丢失。
        配置确认:
            consumer在处理callback函数的最后发出ack,告诉producer已处理完毕。如果处理消息途中出错,producer未收到ack,则producer重新把消息放回queue。

        no-ack = False,如果消费者遇到情况(its channel is closed, connection is closed, or TCP connection is lost)挂掉了,那么,RabbitMQ会重新将该任务添加到队列中。

    配置:
        在consumer端:
        def mycallback(ch, method, properties, body):
            print(" [x] Received %r" % body)
            time.sleep(6)
            print('msg handle done...', body)
            ch.basic_ack(delivery_tag=method.delivery_tag)  # 消息接收后,给rabbitmq返回确认消息

        channel.basic_consume(
            consumer_callback=mycallback, #取到消息后,调用callback 函数
            queue="myqueue",  # 目标队列
            # no_ack=True,  # 不返回确认消息
        )
1、简单使用
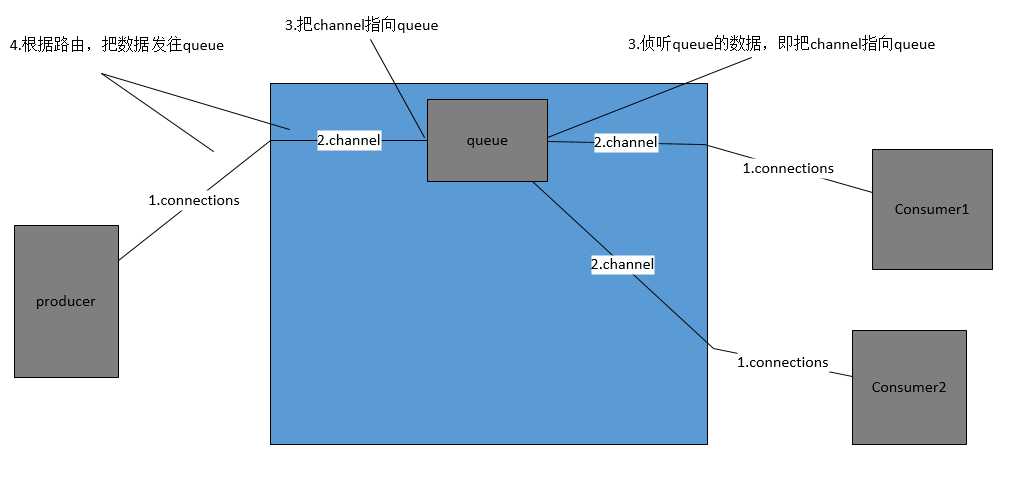
配置流程
import pika

connection = pika.BlockingConnection(pika.ConnectionParameters(
               'localhost'))
channel = connection.channel()

channel.queue_declare(queue='hello1',durable=True)  # durable队列持久化

channel.basic_publish(exchange='',
                      routing_key='hello1',
                      body='Hello World!',
                      properties=pika.BasicProperties(
                          delivery_mode=2,  # 消息持久化
                      ),
                      )
print(" [x] Sent 'Hello World!'")
connection.close()
__author__ = 'Administrator'


import pika


# credentials = pika.PlainCredentials('admin', 'admin123')
#
# parameters = pika.ConnectionParameters(host='localhost',credentials=credentials)
# connection = pika.BlockingConnection(parameters)
#
# channel = connection.channel() #队列连接通道

connection = pika.BlockingConnection(pika.ConnectionParameters(
               'localhost'))
channel = connection.channel()

channel.basic_qos(prefetch_count=1)  # 公平分发

def callback(ch, method, properties, body):
    print(" [x] Received %r" % body)
    #time.sleep(15)
    print('msg handle done...',body)
    ch.basic_ack(delivery_tag=method.delivery_tag)

channel.basic_consume(callback, #取到消息后,调用callback 函数
                      queue='hello1',)
                      #no_ack=True) #消息处理后,不向rabbit-server确认消息已消费完毕

print(' [*] Waiting for messages. To exit press CTRL+C')
channel.start_consuming() #阻塞模式
2、订阅
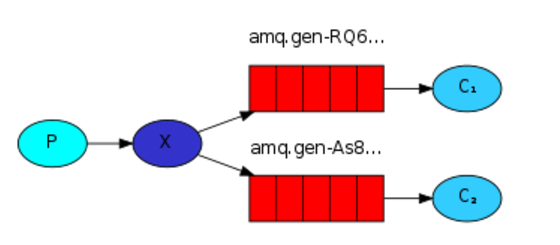
之前的例子都基本都是1对1的消息发送和接收,即消息只能发送到指定的queue里,但有些时候你想让你的消息被所有的Queue收到,类似广播的效果,这时候就要用到exchange了,
Exchange在定义的时候是有类型的,以决定到底是哪些Queue符合条件,可以接收消息
fanout: 所有bind到此exchange的queue都可以接收消息
direct: 通过routingKey和exchange决定的那个唯一的queue可以接收消息
topic:所有符合routingKey(此时可以是一个表达式)的routingKey所bind的queue可以接收消息
表达式符号说明:#代表一个或多个字符,*代表任何字符
例:#.a会匹配a.a,aa.a,aaa.a等
*.a会匹配a.a,b.a,c.a等
注:使用RoutingKey为#,Exchange Type为topic的时候相当于使用fanout
headers: 通过headers 来决定把消息发给哪些queue
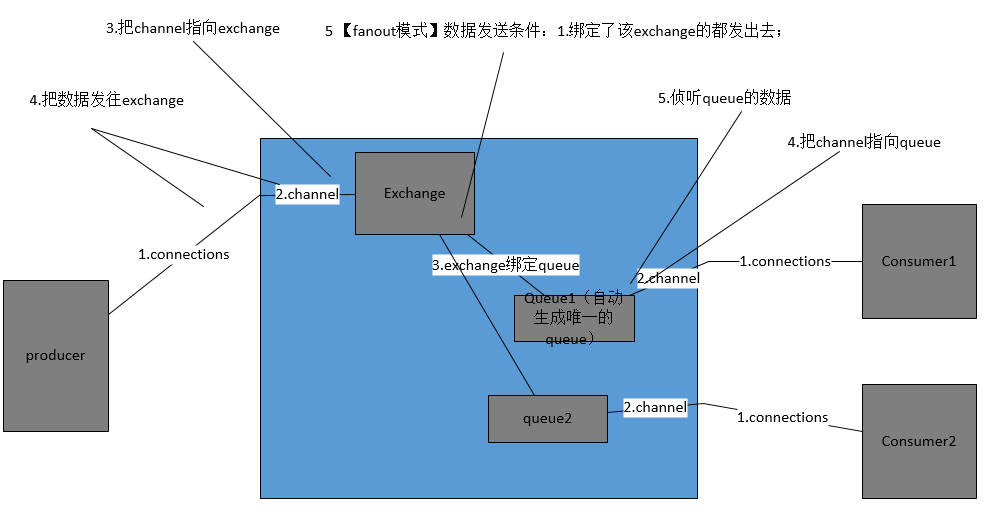
(1)fanout模式
配置流程:
# -*- coding:utf-8 -*-
import sys
import pika
# 认证消息
credentials = pika.PlainCredentials('admin', 'admin123')
# 连接的参数,ip,端口,认证
parameters = pika.ConnectionParameters(host='localhost',credentials=credentials)
# 连接rabbitmq
connection = pika.BlockingConnection(parameters)
# 向rabbitmq声明通道,即创建通道
channel = connection.channel()
# 绑定通道和队列
channel.exchange_declare(exchange="myexchange",exchange_type="fanout")

msg = "...."
msg = ' '.join(sys.argv[1:]) or "info: Hello World!"
channel.basic_publish(
    exchange="myexchange",
    routing_key='',
    body=msg,
)

connection.close()
# -*- coding:utf-8 -*-

import pika
# 认证消息
credentials = pika.PlainCredentials('admin', 'admin123')
# 连接的参数,ip,端口,认证
parameters = pika.ConnectionParameters(host='localhost',credentials=credentials)
# 连接rabbitmq
connection = pika.BlockingConnection(parameters)
# 向rabbitmq声明通道,即创建通道
channel = connection.channel()
# 绑定通道和频道
channel.exchange_declare(exchange="myexchange",exchange_type="fanout")  # 订阅频道为myexchange的消息,模式是广播fanout

# 自动生成一个唯一的队列
queue_obj = channel.queue_declare(exclusive=True) #不指定queue名字,rabbit会随机分配一个名字,exclusive=True会在使用此queue的消费者断开后,自动将queue删除
queue_name = queue_obj.method.queue
channel.queue_bind(queue=queue_name,exchange="myexchange")  # 队列和频道绑定在一块


print(' [*] Waiting for myexchange. To exit press CTRL+C')

def mycallback(ch, method, properties, body):
    print(" [x] %r" % body)

channel.basic_consume(
    consumer_callback=mycallback,
    queue=queue_name,
    no_ack=True,
)

channel.start_consuming()
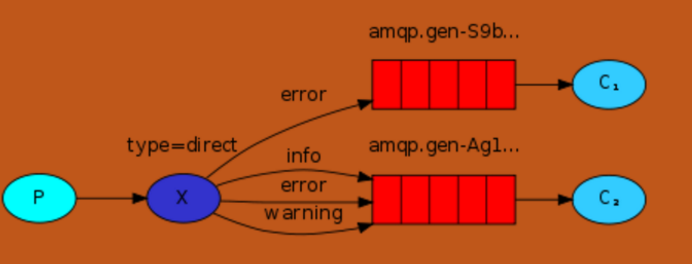
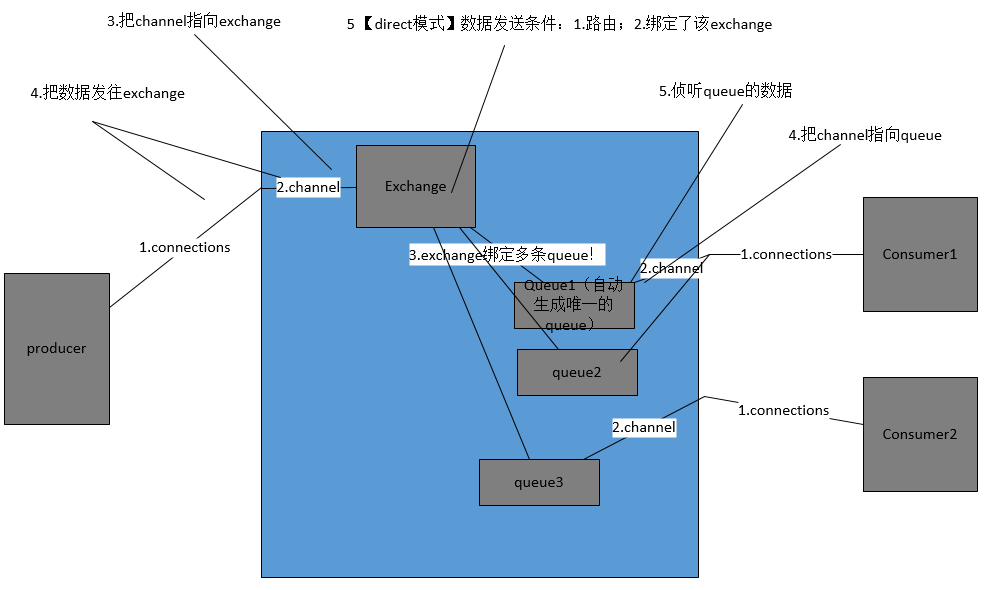
(2)direct模式
RabbitMQ还支持根据关键字发送,即:队列绑定关键字,发送者将数据根据关键字发送到消息exchange,exchange根据 关键字 判定应该将数据发送至指定队列。
配置流程:
__author__ = 'Administrator'
import pika
import sys

credentials = pika.PlainCredentials('admin', 'admin123')

parameters = pika.ConnectionParameters(host='localhost',credentials=credentials)
connection = pika.BlockingConnection(parameters)

channel = connection.channel() #队列连接通道

channel.exchange_declare(exchange='direct_log',exchange_type='direct')

log_level =  sys.argv[1] if len(sys.argv) > 1 else 'info'

message = ' '.join(sys.argv[1:]) or "info: Hello World!"

channel.basic_publish(exchange='direct_log',
                      routing_key=log_level,
                      body=message)
print(" [x] Sent %r" % message)
connection.close()
__author__ = 'Administrator'
import pika,sys
credentials = pika.PlainCredentials('admin', 'admin123')

parameters = pika.ConnectionParameters(host='localhost',credentials=credentials)
connection = pika.BlockingConnection(parameters)

channel = connection.channel() #队列连接通道

queue_obj = channel.queue_declare(exclusive=True) #不指定queue名字,rabbit会随机分配一个名字,exclusive=True会在使用此queue的消费者断开后,自动将queue删除
queue_name = queue_obj.method.queue
print('queue name',queue_name,queue_obj)

log_levels = sys.argv[1:] # info warning errr

if not log_levels:
    sys.stderr.write("Usage: %s [info] [warning] [error]\n" % sys.argv[0])
    sys.exit(1)


for level in log_levels:
    channel.queue_bind(exchange='direct_log',
                       queue=queue_name,
                       routing_key=level) #绑定队列到Exchange

print(' [*] Waiting for logs. To exit press CTRL+C')

def callback(ch, method, properties, body):
    print(" [x] %r" % body)

channel.basic_consume(callback,queue=queue_name, no_ack=True)

channel.start_consuming()
consumer1:python consumer-4-direct.py info error
consuumer2: python consumer-4-direct.py info alert
producer:
1、python producer-4-direct.py info information
2、python producer-4-direct.py error errorinformation
3、python producer-4-direct.py alert alertinformat
c1:

c2:

p:

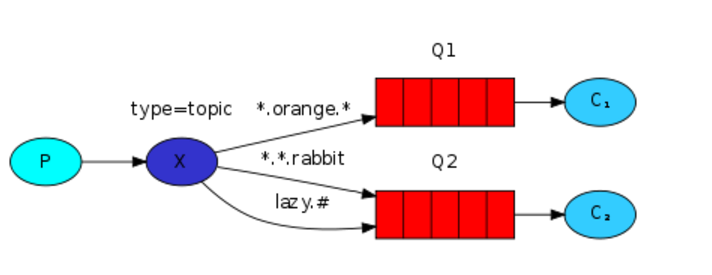
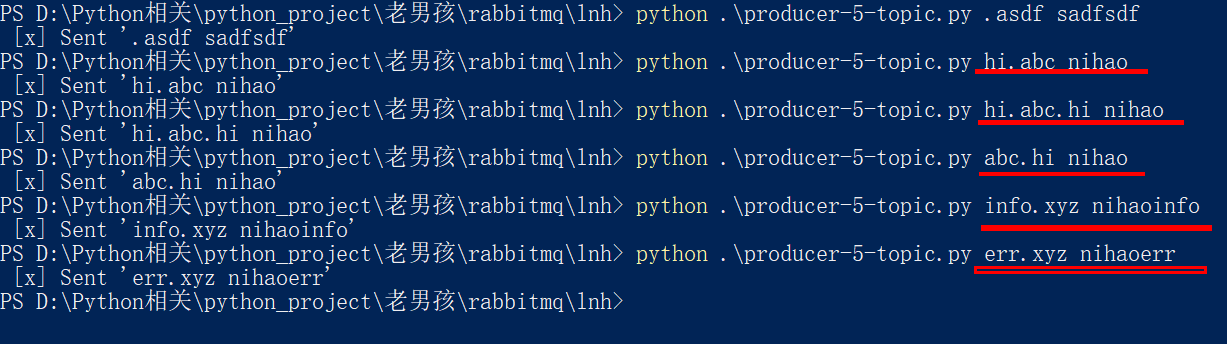
(3)topic模式
配置流程:

__author__ = 'Administrator'
import pika
import sys

credentials = pika.PlainCredentials('admin', 'admin123')

parameters = pika.ConnectionParameters(host='localhost',credentials=credentials)
connection = pika.BlockingConnection(parameters)

channel = connection.channel() #队列连接通道

channel.exchange_declare(exchange='topic_log',exchange_type='topic')

#log_level =  sys.argv[1] if len(sys.argv) > 1 else 'info'
log_level =  sys.argv[1] if len(sys.argv) > 1 else 'all.info'

message = ' '.join(sys.argv[1:]) or "all.info: Hello World!"

channel.basic_publish(exchange='topic_log',
                      routing_key=log_level,
                      body=message)
print(" [x] Sent %r" % message)
connection.close()
__author__ = 'Administrator'
import pika,sys
credentials = pika.PlainCredentials('admin', 'admin123')

parameters = pika.ConnectionParameters(host='localhost',credentials=credentials)
connection = pika.BlockingConnection(parameters)

channel = connection.channel() #队列连接通道

queue_obj = channel.queue_declare(exclusive=True) #不指定queue名字,rabbit会随机分配一个名字,exclusive=True会在使用此queue的消费者断开后,自动将queue删除
queue_name = queue_obj.method.queue


log_levels = sys.argv[1:] # info warning errr

if not log_levels:
    sys.stderr.write("Usage: %s [info] [warning] [error]\n" % sys.argv[0])
    sys.exit(1)


for level in log_levels:
    channel.queue_bind(exchange='topic_log',
                       queue=queue_name,
                       routing_key=level) #绑定队列到Exchange

print(' [*] Waiting for logs. To exit press CTRL+C')

def callback(ch, method, properties, body):
    print(" [x] %r" % body)

channel.basic_consume(callback,queue=queue_name, no_ack=True)

channel.start_consuming()
接收所有logs
"#"
python receive_logs_topic.py "#"

接收以xx开头、xx中间、xx结尾
以"*"为占位符
python receive_logs_topic.py "kern.*"
python receive_logs_topic.py "kern.*" "abc.*.critical"
python receive_logs_topic.py "kern.*" "*.critical"
c1:侦听 *.abc.* info.* err.*

c2:侦听 abc.*

p:
3、RPC模式
clinet和server需要对话时,使用rpc模式。
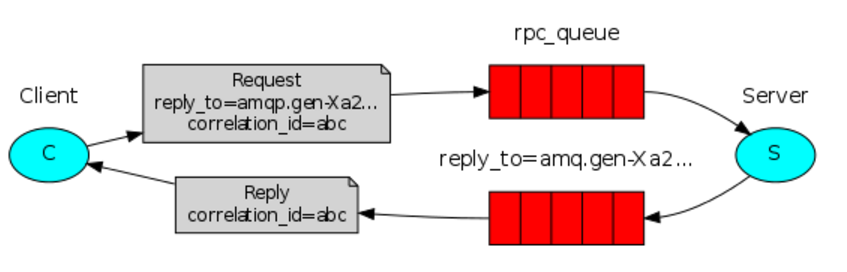
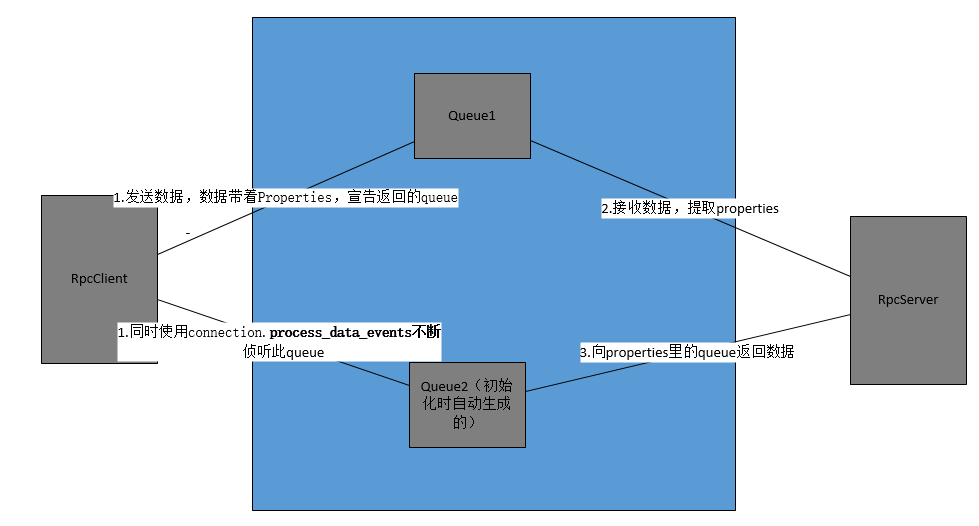
__author__ = 'Administrator'

# 1.声明一个队列,作为reply_to返回消息结果的队列
# 2.  发消息到队列,消息里带一个唯一标识符uid,reply_to
# 3.  监听reply_to 的队列,直到有结果
import queue

import pika
import uuid

class CMDRpcClient(object):
    def __init__(self):
        credentials = pika.PlainCredentials('admin', 'admin123')
        parameters = pika.ConnectionParameters(host='localhost', credentials=credentials)
        self.connection = pika.BlockingConnection(parameters)
        self.channel = self.connection.channel()

        queue_obj = self.channel.queue_declare(exclusive=True)
        self.callback_queue = queue_obj.method.queue #命令的执行结果的queue

        #声明要监听callback_queue
        self.channel.basic_consume(self.on_response, no_ack=True,
                                   queue=self.callback_queue)

    def on_response(self, ch, method, props, body):
        """
        收到服务器端命令结果后执行这个函数
        :param ch:
        :param method:
        :param props:
        :param body:
        :return:
        """
        if self.corr_id == props.correlation_id:
            self.response = body.decode("gbk") #把执行结果赋值给Response

    def call(self, n):
        self.response = None
        self.corr_id = str(uuid.uuid4()) #唯一标识符号
        self.channel.basic_publish(exchange='',
                                   routing_key='rpc_queue2',
                                   properties=pika.BasicProperties(
                                         reply_to = self.callback_queue,
                                         correlation_id = self.corr_id,
                                         ),
                                   body=str(n))


        while self.response is None:
            self.connection.process_data_events()  #检测监听的队列里有没有新消息,如果有,收,如果没有,返回None
            #检测有没有要发送的新指令
        return self.response

cmd_rpc = CMDRpcClient()

print(" [x] Requesting fib(30)")
response = cmd_rpc.call('ipconfig')

print(response)
__author__ = 'Administrator'

#1 。 定义fib函数
#2. 声明接收指令的队列名rpc_queue
#3. 开始监听队列,收到消息后 调用fib函数
#4 把fib执行结果,发送回客户端指定的reply_to 队列
import subprocess
import pika
import time
credentials = pika.PlainCredentials('admin', 'admin123')

parameters = pika.ConnectionParameters(host='localhost',credentials=credentials)
connection = pika.BlockingConnection(parameters)

channel = connection.channel() #队列连接通道

channel.queue_declare(queue='rpc_queue2')

def fib(n):
    if n == 0:
        return 0
    elif n == 1:
        return 1
    else:
        return fib(n-1) + fib(n-2)


def run_cmd(cmd):
    cmd_obj = subprocess.Popen(cmd,shell=True,stdout=subprocess.PIPE,stderr=subprocess.PIPE)
    result = cmd_obj.stdout.read() + cmd_obj.stderr.read()

    return result


def on_request(ch, method, props, body):
    cmd = body.decode("utf-8")

    print(" [.] run (%s)" % cmd)
    response = run_cmd(cmd)

    ch.basic_publish(exchange='',
                     routing_key=props.reply_to, #队列
                     properties=pika.BasicProperties(correlation_id = \
                                                         props.correlation_id),
                     body=response)

    ch.basic_ack(delivery_tag = method.delivery_tag)

channel.basic_consume(on_request, queue='rpc_queue2')

print(" [x] Awaiting RPC requests")
channel.start_consuming()

 浙公网安备 33010602011771号