一、什么是线程
在传统操作系统中,每个进程有一个地址空间,而且默认就有一个控制线程。
进程只是用来把资源集中到一起(进程只是一个资源单位,或者说资源集合),而线程才是cpu上的执行单位。
多线程(即多个控制线程)的概念是,在一个进程中存在多个控制线程,多个控制线程共享该进程的地址空间,相当于一个车间内有多条流水线,都共用一个车间的资源。
二、线程的创建开销小
创建进程的开销要远大于线程。
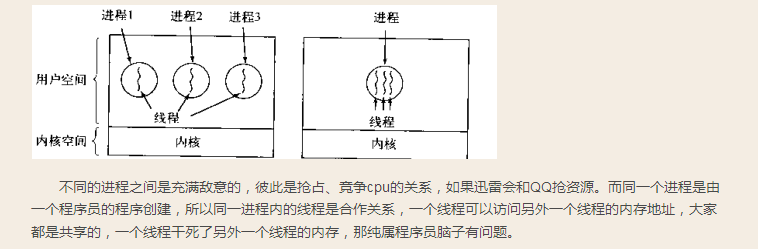
进程之间是竞争关系,线程之间是协作关系。
不同的进程直接是竞争关系,是不同的程序员写的程序运行的。
同一进程的线程之间是合作关系,是同一个程序写的程序内开启动。
三、线程与进程的区别
1、线程共享创建它的进程的地址空间,进程有自己的地址空间。
2、线程可以直接访问其进程的数据段,进程有它们自己的父进程数据段的副本。
3、线程可以直接与进程的其他线程通信,进程必须使用进程间通信来与其他进程通信。
4、新线程很容易创建,新进程需要复制父进程。
5、线程可以对同一进程的线程进行相当大的控制,进程只能对子进程进行执行控制。
6、对主线程的更改(取消,优先级更改等)可能会影响该进程的其他线程的行为,对父进程的更改不会影响子进程。
四、为何要用多线程
多线程指的是,在一个进程中开启多个线程,简单的讲:如果多个任务共用一块地址空间,那么必须咋一个进程内开启多个线程。详细的分为4点:
1、多线程共享一个进程的地址空间
2、线程比进程更轻量级,线程比进程更容易创建可撤销,在许多操作系统中,创建一个线程比创建一个进程要快10-100倍,在有大量线程需要动态和快速修改时,这一特性很有用。
3、若多个线程都是cpu密集型的,那么并不能获得性能上的增强,但是如果存在大量的计算和大量的I/o处理,拥有多个线程这些活动彼此重叠运行,从而会加快程序执行的速度。
4、在多核cpu系统中,为了最大限度的利用多核,可以开启多个线程,比开进程开销要小的多。(这一条并不适用于python)
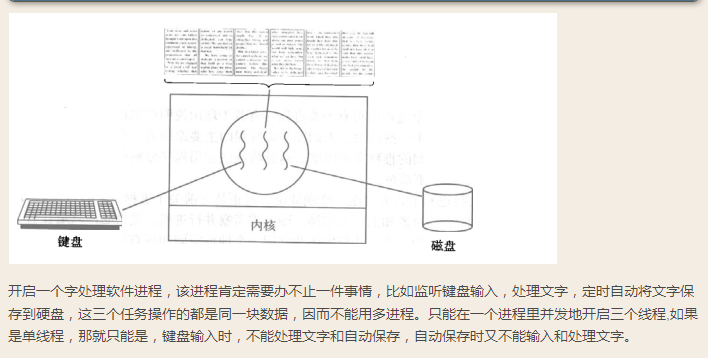
五、多线程的应用举例
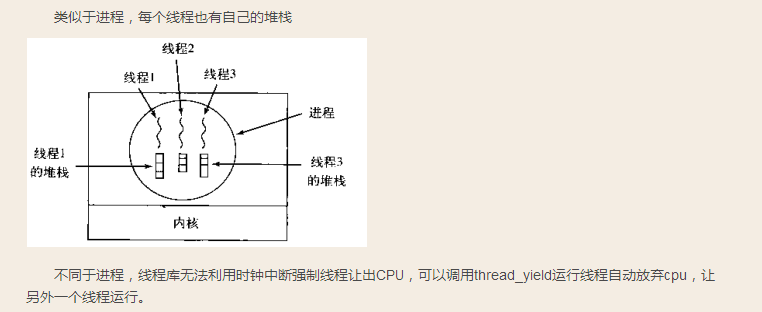
六、经典的线程模型
多个线程共享同一个进程的地址空间中的资源,是对一台计算机上多个进程的模拟,有时也称线程为轻量级的进程,而对一台计算机上多个进程,则共享物理内存,磁盘,打印机等其他物理资源。多线程的运行和多进程的运行类似,是cpu在多个线程之间的快速切换。
线程通常是有益的,但是带来了不小程序设计难度,线程的问题:
1、父进程有多个线程,那么开启的子进程是否需要同样多的线程,如果是,那么附近中某个线程被阻塞,那么copy到子进程后,copy版的线程也要被阻塞。nginx的多线程模式接收用户连接。
2、在同一个进程中,如果一个线程关闭了问题,而另外一个线程正准备往该文件内写内容呢?如果一个线程注意到没有内存了,并开始分配更多的内存,在工作一半时,发生线程切换,新的线程也发现内存不够用了,又开始分配更多的内存,这样内存就被分配了多次,这些问题都是多线程编程的典型问题,需要仔细思考和设计。
七、threading模块介绍
multiprocessing模块的完全模仿了threading模块的接口,二者在使用层面,有很大的相似性,因而不再详细介绍
https://docs.python.org/3/library/threading.html?highlight=threading#
八、开启线程的两种方式


 1 #方式一
 2 from threading import Thread
 3 import time
 4 def sayhi(name):
 5     time.sleep(2)
 6     print('%s say hello' %name)
 7
 8 if __name__ == '__main__':
 9     t=Thread(target=sayhi,args=('egon',))
10     t.start()
11     print('主线程')
12
13 方式一
 1 #方式二
 2 from threading import Thread
 3 import time
 4 class Sayhi(Thread):
 5     def __init__(self,name):
 6         super().__init__()
 7         self.name=name
 8     def run(self):
 9         time.sleep(2)
10         print('%s say hello' % self.name)
11
12
13 if __name__ == '__main__':
14     t = Sayhi('egon')
15     t.start()
16     print('主线程')
17
18 方式二
九、在一个进程下开启多个线程与在一个进程下开启多个子进程的区别
 1 from threading import Thread
 2 from multiprocessing import Process
 3 import os
 4
 5 def work():
 6     print('hello')
 7
 8 if __name__ == '__main__':
 9     #在主进程下开启线程
10     t=Thread(target=work)
11     t.start()
12     print('主线程/主进程')
13     '''
14     打印结果:
15     hello
16     主线程/主进程
17     '''
18
19     #在主进程下开启子进程
20     t=Process(target=work)
21     t.start()
22     print('主线程/主进程')
23     '''
24     打印结果:
25     主线程/主进程
26     hello
27     '''
28 谁的开启速度快
 1 from threading import Thread
 2 from multiprocessing import Process
 3 import os
 4
 5 def work():
 6     print('hello',os.getpid())
 7
 8 if __name__ == '__main__':
 9     #part1:在主进程下开启多个线程,每个线程都跟主进程的pid一样
10     t1=Thread(target=work)
11     t2=Thread(target=work)
12     t1.start()
13     t2.start()
14     print('主线程/主进程pid',os.getpid())
15
16     #part2:开多个进程,每个进程都有不同的pid
17     p1=Process(target=work)
18     p2=Process(target=work)
19     p1.start()
20     p2.start()
21     print('主线程/主进程pid',os.getpid())
22 瞅一瞅pid
 1 from  threading import Thread
 2 from multiprocessing import Process
 3 import os
 4 def work():
 5     global n
 6     n=0
 7
 8 if __name__ == '__main__':
 9     # n=100
10     # p=Process(target=work)
11     # p.start()
12     # p.join()
13     # print('主',n) #毫无疑问子进程p已经将自己的全局的n改成了0,但改的仅仅是它自己的,查看父进程的n仍然为100
14
15
16     n=1
17     t=Thread(target=work)
18     t.start()
19     t.join()
20     print('主',n) #查看结果为0,因为同一进程内的线程之间共享进程内的数据
21 同一进程内的线程共享该进程的数据?
十、练习
练习一:
 1 from threading import Thread
 2 import socket
 3 s=socket.socket(socket.AF_INET,socket.SOCK_STREAM)
 4 s.bind(('127.0.0.1',8080))
 5 s.listen(5)
 6 def action(conn):
 7     while True:
 8         data=conn.recv(1024)
 9         print(data)
10         conn.send(data.upper())
11
12 if __name__ == '__main__':
13     while True:
14         conn,addr=s.accept()
15         p=Thread(target=action,args=(conn,))
16         p.start()
 1 #/usr/bin/python
 2 #-*- coding:utf-8 -*-
 3
 4
 5 import socket
 6
 7 s=socket.socket(socket.AF_INET,socket.SOCK_STREAM)
 8 s.connect(('127.0.0.1',8080))
 9
10 while True:
11     msg=input('>>: ').strip()
12     if not msg:continue
13
14     s.send(msg.encode('utf-8'))
15     data=s.recv(1024)
16     print(data)
练习二:
三个任务,一个接收用户输入,一个将用户输入的内容格式化成大写,一个将格式后的结果存入文件
 1 from threading import Thread
 2 msg_l=[]
 3 format_l=[]
 4 def talk():
 5     while True:
 6         msg=input('>>: ').strip()
 7         if not msg:continue
 8         msg_l.append(msg)
 9
10 def format_msg():
11     while True:
12         if msg_l:
13             res=msg_l.pop()
14             format_l.append(res.upper())
15
16 def save():
17     while True:
18         if format_l:
19             with open('db.txt','a',encoding='utf-8') as f:
20                 res=format_l.pop()
21                 f.write('%s\n' %res)
22
23 if __name__ == '__main__':
24     t1=Thread(target=talk)
25     t2=Thread(target=format_msg)
26     t3=Thread(target=save)
27     t1.start()
28     t2.start()
29     t3.start()
十一、线程相关的其他方法
Thread实例对象的方法
  # isAlive(): 返回线程是否活动的。
  # getName(): 返回线程名。
  # setName(): 设置线程名。

threading模块提供的一些方法:
  # threading.currentThread(): 返回当前的线程变量。
  # threading.enumerate(): 返回一个包含正在运行的线程的list。正在运行指线程启动后、结束前,不包括启动前和终止后的线程。
  # threading.activeCount(): 返回正在运行的线程数量,与len(threading.enumerate())有相同的结果。
 1 from threading import Thread
 2 import threading
 3 from multiprocessing import Process
 4 import os
 5
 6 def work():
 7     import time
 8     time.sleep(3)
 9     print(threading.current_thread().getName())
10
11
12 if __name__ == '__main__':
13     #在主进程下开启线程
14     t=Thread(target=work)
15     t.start()
16
17     print(threading.current_thread().getName())
18     print(threading.current_thread()) #主线程
19     print(threading.enumerate()) #连同主线程在内有两个运行的线程
20     print(threading.active_count())
21     print('主线程/主进程')
22
23     '''
24     打印结果:
25     MainThread
26     <_MainThread(MainThread, started 140735268892672)>
27     [<_MainThread(MainThread, started 140735268892672)>, <Thread(Thread-1, started 123145307557888)>]
28     主线程/主进程
29     Thread-1
30     '''
主线程等待子线程结束
from threading import Thread
import time
def sayhi(name):
    time.sleep(2)
    print('%s say hello' %name)

if __name__ == '__main__':
    t=Thread(target=sayhi,args=('egon',))
    t.start()
    t.join()
    print('主线程')
    print(t.is_alive())
    '''
    egon say hello
    主线程
    False
    '''
十二、守护线程
无论是进程还是线程,都遵循:守护xxx会等待主xxx运行完毕后被销毁,需要强调的是:运行完毕并非终止运行
#1.对主进程来说,运行完毕指的是主进程代码运行完毕
#2.对主线程来说,运行完毕指的是主线程所在的进程内所有非守护线程统统运行完毕,主线程才算运行完毕
详细解释:
#1 主进程在其代码结束后就已经算运行完毕了(守护进程在此时就被回收),然后主进程会一直等非守护的子进程都运行完毕后回收子进程的资源(否则会产生僵尸进程),才会结束,

#2 主线程在其他非守护线程运行完毕后才算运行完毕(守护线程在此时就被回收)。因为主线程的结束意味着进程的结束,进程整体的资源都将被回收,而进程必须保证非守护线程都运行完毕后才能结束。
from threading import Thread
import time
def sayhi(name):
    time.sleep(2)
    print('%s say hello' %name)

if __name__ == '__main__':
    t=Thread(target=sayhi,args=('egon',))
    t.setDaemon(True) #必须在t.start()之前设置
    t.start()

    print('主线程')
    print(t.is_alive())
    '''
    主线程
    True
    '''
 1 from threading import Thread
 2 import time
 3 def foo():
 4     print(123)
 5     time.sleep(1)
 6     print("end123")
 7
 8 def bar():
 9     print(456)
10     time.sleep(3)
11     print("end456")
12
13
14 t1=Thread(target=foo)
15 t2=Thread(target=bar)
16
17 t1.daemon=True
18 t1.start()
19 t2.start()
20 print("main-------")
21
22 迷惑人的例子
十三、python GIL(Glbal Interpreter Lock)
链接:http://www.cnblogs.com/linhaifeng/articles/7449853.html
十四、同步锁
三个需要注意的点:
#1.线程抢的是GIL锁,GIL锁相当于执行权限,拿到执行权限后才能拿到互斥锁Lock,其他线程也可以抢到GIL,但如果发现Lock仍然没有被释放则阻塞,即便是拿到执行权限GIL也要立刻交出来

#2.join是等待所有,即整体串行,而锁只是锁住修改共享数据的部分,即部分串行,要想保证数据安全的根本原理在于让并发变成串行,join与互斥锁都可以实现,毫无疑问,互斥锁的部分串行效率要更高

#3. 一定要看本小节最后的GIL与互斥锁的经典分析
GIL VS Lock
GIL保证同一时间只能有一个线程来执行。
锁的目的是为了保护共享的数据,同一时间只能有一个线程来修改共享的数据
结论:保护不同的数据就应该加不同的锁。
GIL与Lock是两把锁,保护的数据不一样,前者是解释器级别的(当然保护的就是解释器级别的数据,比如垃圾回收的数据),后者是保护用户自己开发的应用程序的数据,很明显GIL不负责这件事,只能用户自定义加锁处理,即Lock。
过程分析:所有线程抢的是GIL锁,或者说所有线程抢的是执行权限
线程1抢到GIL锁,拿到执行权限,开始执行,然后加了一把Lock,还没有执行完毕,即线程1还未释放Lock,有可能线程2抢到GIL锁,开始执行,执行过程中Lock还没有被线程1释放,于是线程2进入阻塞,被夺走执行权限,有可能线程1拿到GIL,然后正常到释放Lock....这就导致了串行运行的效果。
既然是串行,那我们执行
t1.start()
t1.join
t2.start()
t2.join()
这也是串行执行,为何还要加lock,需知join是等待t1所有的代码执行完,相当于锁住了t1的所有代码,而lock只是锁住一部分操作共享数据的代码。
因为Python解释器帮你自动定期进行内存回收,你可以理解为python解释器里有一个独立的线程,每过一段时间它起wake up做一次全局轮询看看哪些内存数据是可以被清空的,此时你自己的程序 里的线程和 py解释器自己的线程是并发运行的,假设你的线程删除了一个变量,py解释器的垃圾回收线程在清空这个变量的过程中的clearing时刻,可能一个其它线程正好又重新给这个还没来及得清空的内存空间赋值了,结果就有可能新赋值的数据被删除了,为了解决类似的问题,python解释器简单粗暴的加了锁,即当一个线程运行时,其它人都不能动,这样就解决了上述的问题, 这可以说是Python早期版本的遗留问题。
from threading import Thread
import os,time
def work():
    global n
    temp=n
    time.sleep(0.1)
    n=temp-1
if __name__ == '__main__':
    n=100
    l=[]
    for i in range(100):
        p=Thread(target=work)
        l.append(p)
        p.start()
    for p in l:
        p.join()

    print(n) #结果可能为99
锁通常被用来实现对共享资源的同步访问,为每一个共享资源创建一个lock对象,当你需要访问该资源时,调用acquire方法来获取锁对象(如果其他线程已经获得了该锁,则当前线程需要等待其被释放),等待资源访问完后,再调用release方法释放锁:
1 import threading
2
3 R=threading.Lock()
4
5 R.acquire()
6 '''
7 对公共数据的操作
8 '''
9 R.release()
 1 from threading import Thread,Lock
 2 import os,time
 3 def work():
 4     global n
 5     lock.acquire()
 6     temp=n
 7     time.sleep(0.1)
 8     n=temp-1
 9     lock.release()
10 if __name__ == '__main__':
11     lock=Lock()
12     n=100
13     l=[]
14     for i in range(100):
15         p=Thread(target=work)
16         l.append(p)
17         p.start()
18     for p in l:
19         p.join()
20
21     print(n) #结果肯定为0,由原来的并发执行变成串行,牺牲了执行效率保证了数据安全
1 分析:
2   #1.100个线程去抢GIL锁,即抢执行权限
3      #2. 肯定有一个线程先抢到GIL(暂且称为线程1),然后开始执行,一旦执行就会拿到lock.acquire()
4      #3. 极有可能线程1还未运行完毕,就有另外一个线程2抢到GIL,然后开始运行,但线程2发现互斥锁lock还未被线程1释放,于是阻塞,被迫交出执行权限,即释放GIL
5     #4.直到线程1重新抢到GIL,开始从上次暂停的位置继续执行,直到正常释放互斥锁lock,然后其他的线程再重复2 3 4的过程
6
7 GIL锁与互斥锁综合分析(重点!!!)
  1 #不加锁:并发执行,速度快,数据不安全
  2 from threading import current_thread,Thread,Lock
  3 import os,time
  4 def task():
  5     global n
  6     print('%s is running' %current_thread().getName())
  7     temp=n
  8     time.sleep(0.5)
  9     n=temp-1
 10
 11
 12 if __name__ == '__main__':
 13     n=100
 14     lock=Lock()
 15     threads=[]
 16     start_time=time.time()
 17     for i in range(100):
 18         t=Thread(target=task)
 19         threads.append(t)
 20         t.start()
 21     for t in threads:
 22         t.join()
 23
 24     stop_time=time.time()
 25     print('主:%s n:%s' %(stop_time-start_time,n))
 26
 27 '''
 28 Thread-1 is running
 29 Thread-2 is running
 30 ......
 31 Thread-100 is running
 32 主:0.5216062068939209 n:99
 33 '''
 34
 35
 36 #不加锁:未加锁部分并发执行,加锁部分串行执行,速度慢,数据安全
 37 from threading import current_thread,Thread,Lock
 38 import os,time
 39 def task():
 40     #未加锁的代码并发运行
 41     time.sleep(3)
 42     print('%s start to run' %current_thread().getName())
 43     global n
 44     #加锁的代码串行运行
 45     lock.acquire()
 46     temp=n
 47     time.sleep(0.5)
 48     n=temp-1
 49     lock.release()
 50
 51 if __name__ == '__main__':
 52     n=100
 53     lock=Lock()
 54     threads=[]
 55     start_time=time.time()
 56     for i in range(100):
 57         t=Thread(target=task)
 58         threads.append(t)
 59         t.start()
 60     for t in threads:
 61         t.join()
 62     stop_time=time.time()
 63     print('主:%s n:%s' %(stop_time-start_time,n))
 64
 65 '''
 66 Thread-1 is running
 67 Thread-2 is running
 68 ......
 69 Thread-100 is running
 70 主:53.294203758239746 n:0
 71 '''
 72
 73 #有的同学可能有疑问:既然加锁会让运行变成串行,那么我在start之后立即使用join,就不用加锁了啊,也是串行的效果啊
 74 #没错:在start之后立刻使用jion,肯定会将100个任务的执行变成串行,毫无疑问,最终n的结果也肯定是0,是安全的,但问题是
 75 #start后立即join:任务内的所有代码都是串行执行的,而加锁,只是加锁的部分即修改共享数据的部分是串行的
 76 #单从保证数据安全方面,二者都可以实现,但很明显是加锁的效率更高.
 77 from threading import current_thread,Thread,Lock
 78 import os,time
 79 def task():
 80     time.sleep(3)
 81     print('%s start to run' %current_thread().getName())
 82     global n
 83     temp=n
 84     time.sleep(0.5)
 85     n=temp-1
 86
 87
 88 if __name__ == '__main__':
 89     n=100
 90     lock=Lock()
 91     start_time=time.time()
 92     for i in range(100):
 93         t=Thread(target=task)
 94         t.start()
 95         t.join()
 96     stop_time=time.time()
 97     print('主:%s n:%s' %(stop_time-start_time,n))
 98
 99 '''
100 Thread-1 start to run
101 Thread-2 start to run
102 ......
103 Thread-100 start to run
104 主:350.6937336921692 n:0 #耗时是多么的恐怖
105 '''
106
107 互斥锁与join的区别(重点!!!)
十五、死锁现象与递归锁
进程也有死锁与递归锁。
所谓死锁:是指两个或两个以上的进程或线程在执行过程中,因争夺资源而造成的一种互相等待的现象,若无外力作用,它们都将无法推进下去,此时称系统处于死锁状态或系统产生了死锁,这些永远在互相等待的进程称为死锁进程,如下就是死锁
 1 from threading import Thread,Lock
 2 import time
 3 mutexA=Lock()
 4 mutexB=Lock()
 5
 6 class MyThread(Thread):
 7     def run(self):
 8         self.func1()
 9         self.func2()
10     def func1(self):
11         mutexA.acquire()
12         print('\033[41m%s 拿到A锁\033[0m' %self.name)
13
14         mutexB.acquire()
15         print('\033[42m%s 拿到B锁\033[0m' %self.name)
16         mutexB.release()
17
18         mutexA.release()
19
20     def func2(self):
21         mutexB.acquire()
22         print('\033[43m%s 拿到B锁\033[0m' %self.name)
23         time.sleep(2)
24
25         mutexA.acquire()
26         print('\033[44m%s 拿到A锁\033[0m' %self.name)
27         mutexA.release()
28
29         mutexB.release()
30
31 if __name__ == '__main__':
32     for i in range(10):
33         t=MyThread()
34         t.start()
35
36 '''
37 Thread-1 拿到A锁
38 Thread-1 拿到B锁
39 Thread-1 拿到B锁
40 Thread-2 拿到A锁
41 然后就卡住,死锁了
42 '''
解决方法,递归锁,在python中为了支持在同一线程中多次请求同一资源,python提供了可重入锁RLock。
这个RLock内部维护着一个Lock和一个counter变量,counter记录了acquire的次数,从而使得资源可以被多次require,直到一个线程所有的acquire都被release,其他的线程才能获得资源,上面的例子如果使用RLock代替lock,则不会发生死锁:
mutexA=mutexB=threading.RLock() #一个线程拿到锁,counter加1,该线程内又碰到加锁的情况,则counter继续加1,这期间所有其他线程都只能等待,等待该线程释放所有锁,即counter递减到0为止
 1 #递归锁
 2 from threading import Thread,Lock,RLock
 3 import time
 4 mutex=RLock()
 5 class Mythread(Thread):
 6     def run(self):
 7         self.f1()
 8         self.f2()
 9
10     def f1(self):
11         mutex.acquire()
12         print('\033[45m%s 抢到A锁\033[0m' %self.name)
13         mutex.acquire()
14         print('\033[44m%s 抢到B锁\033[0m' %self.name)
15         mutex.release()
16         mutex.release()
17
18     def f2(self):
19         mutex.acquire()
20         print('\033[44m%s 抢到B锁\033[0m' %self.name)
21         time.sleep(1)
22         mutex.acquire()
23         print('\033[45m%s 抢到A锁\033[0m' %self.name)
24         mutex.release()
25         mutex.release()
26
27
28 if __name__ == '__main__':
29     for i in range(20):
30         t=Mythread()
31         t.start()
十六、信号量Semaphore
同进程的一样
Semaphore管理一个内置的计数器
每当调用acquire()时内置计数器-1;调用release()时内置计数器+1;计数器不能小于0;当计数器为0时,acquire()将阻塞线程直到其他线程调用release()。
实例:(同时只有5个线程可以获得semaphore,即可以限制最大连接数为5):
 1 from threading import Thread,Semaphore
 2 import threading
 3 import time
 4 # def func():
 5 #     if sm.acquire():
 6 #         print (threading.currentThread().getName() + ' get semaphore')
 7 #         time.sleep(2)
 8 #         sm.release()
 9 def func():
10     sm.acquire()
11     print('%s get sm' %threading.current_thread().getName())
12     time.sleep(3)
13     sm.release()
14 if __name__ == '__main__':
15     sm=Semaphore(5)
16     for i in range(23):
17         t=Thread(target=func)
18         t.start()
19
20
21 from threading import Thread,current_thread,Semaphore
22 import time,random
23
24 sm=Semaphore(5)
25 def work():
26     sm.acquire()
27     print('%s 上厕所' %current_thread().getName())
28     time.sleep(random.randint(1,3))
29     sm.release()
30
31 if __name__ == '__main__':
32     for i in range(20):
33         t=Thread(target=work)
34         t.start()
与进程池是完全不同的概念,进程池Pool(4),最大只能产生4个进程,而且从头到尾都只是这四个进程,不会产生新的,而信号量是产生一堆线程/进程。(信号量semaphore默认开启线程是cpu个数的*5)
十七、事件 Event
同进程的一样
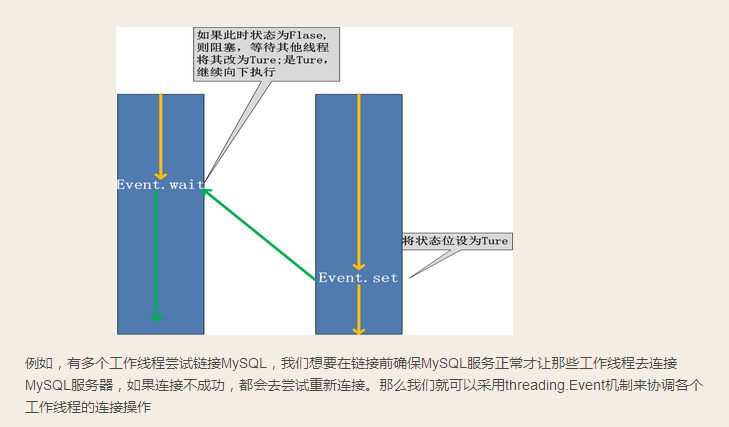
线程的一个关键特性是每个线程都是独立运行且状态不可预测,如果程序中的其他线程需要通过判断某个线程的状态来确定自己下一步的操作,这时线程同步问题就会变得非常棘手,为了解决这些问题,我们需要使用threading库中的Event对象,对象包含一个可由线程设置的信号标志,它允许线程等待某些事件的发生,在初始情况下,Event对象中的信号标志被设置为假,如果有线程等待一个Event对象,而这个Event对象的标志为假,那么这个线程将会被一直阻塞直至该标志为真。一个线程如果将一个Event对象的信号标志设置为真,它将唤醒所有等待这个Event对象的线程,如果一个线程等待一个已经被设置为真的Event对象,那么它将忽略这个事件,继续执行
1 event.isSet():返回event的状态值;
2
3 event.wait():如果 event.isSet()==False将阻塞线程;
4
5 event.set(): 设置event的状态值为True,所有阻塞池的线程激活进入就绪状态, 等待操作系统调度;
6
7 event.clear():恢复event的状态值为False。
 1 from threading import Thread,Event
 2 import threading
 3 import time,random
 4 def conn_mysql():
 5     count=1
 6     while not event.is_set():
 7         if count > 3:
 8             raise TimeoutError('链接超时')
 9         print('<%s>第%s次尝试链接' % (threading.current_thread().getName(), count))
10         event.wait(0.5)
11         count+=1
12     print('<%s>链接成功' %threading.current_thread().getName())
13
14
15 def check_mysql():
16     print('\033[45m[%s]正在检查mysql\033[0m' % threading.current_thread().getName())
17     time.sleep(random.randint(2,4))
18     event.set()
19 if __name__ == '__main__':
20     event=Event()
21     conn1=Thread(target=conn_mysql)
22     conn2=Thread(target=conn_mysql)
23     check=Thread(target=check_mysql)
24
25     conn1.start()
26     conn2.start()
27     check.start()
十八、定时器
定时器,指定n秒后执行某操作
from threading import Timer


def hello():
    print("hello, world")

t = Timer(1, hello)
t.start()  # after 1 seconds, "hello, world" will be printed
十九、线程queue队列
queue队列:使用import queue,用法与进程的Queue一样
queue is especially useful in threaded programming when information must be exchanged safely between multiple threads.
class queue.Queue(maxsize=0)#队列:先进先出
 1 import queue
 2 q=queue.Queue(3) #队列:先进先出
 3 q.put(1)
 4 q.put(2)
 5 q.put(3)
 6
 7 print(q.get())
 8 print(q.get())
 9 print(q.get())
10 '''
11 结果(先进先出)
12 1
13 2
14 3
15 '''
class queue.LifoQueue(maxsize=0)#last in fisrt out
 1 import queue
 2
 3 q=queue.LifoQueue(3) #堆栈:后进先出
 4 q.put(1)
 5 q.put(2)
 6 q.put(3)
 7
 8 print(q.get())
 9 print(q.get())
10 print(q.get())
11
12 '''
13 结果(后进先出)
14 3
15 2
16 1
17 '''
class queue.PriorityQueue(maxsize=0)#存储数据时可设置优先级的队列
 1 import queue
 2
 3 q=queue.PriorityQueue()
 4 #put进入一个元组,元组的第一个元素是优先级(通常是数字,也可以是非数字之间的比较),数字越小优先级越高
 5 q.put((20,'a'))
 6 q.put((10,'b'))
 7 q.put((30,'c'))
 8
 9 print(q.get())
10 print(q.get())
11 print(q.get())
12 '''
13 结果(数字越小优先级越高,优先级高的优先出队):
14 (10, 'b')
15 (20, 'a')
16 (30, 'c')
17 '''
其他
 1 Constructor for a priority queue. maxsize is an integer that sets the upperbound limit on the number of items that can be placed in the queue. Insertion will block once this size has been reached, until queue items are consumed. If maxsize is less than or equal to zero, the queue size is infinite.
 2
 3 The lowest valued entries are retrieved first (the lowest valued entry is the one returned by sorted(list(entries))[0]). A typical pattern for entries is a tuple in the form: (priority_number, data).
 4
 5 exception queue.Empty
 6 Exception raised when non-blocking get() (or get_nowait()) is called on a Queue object which is empty.
 7
 8 exception queue.Full
 9 Exception raised when non-blocking put() (or put_nowait()) is called on a Queue object which is full.
10
11 Queue.qsize()
12 Queue.empty() #return True if empty
13 Queue.full() # return True if full
14 Queue.put(item, block=True, timeout=None)
15 Put item into the queue. If optional args block is true and timeout is None (the default), block if necessary until a free slot is available. If timeout is a positive number, it blocks at most timeout seconds and raises the Full exception if no free slot was available within that time. Otherwise (block is false), put an item on the queue if a free slot is immediately available, else raise the Full exception (timeout is ignored in that case).
16
17 Queue.put_nowait(item)
18 Equivalent to put(item, False).
19
20 Queue.get(block=True, timeout=None)
21 Remove and return an item from the queue. If optional args block is true and timeout is None (the default), block if necessary until an item is available. If timeout is a positive number, it blocks at most timeout seconds and raises the Empty exception if no item was available within that time. Otherwise (block is false), return an item if one is immediately available, else raise the Empty exception (timeout is ignored in that case).
22
23 Queue.get_nowait()
24 Equivalent to get(False).
25
26 Two methods are offered to support tracking whether enqueued tasks have been fully processed by daemon consumer threads.
27
28 Queue.task_done()
29 Indicate that a formerly enqueued task is complete. Used by queue consumer threads. For each get() used to fetch a task, a subsequent call to task_done() tells the queue that the processing on the task is complete.
30
31 If a join() is currently blocking, it will resume when all items have been processed (meaning that a task_done() call was received for every item that had been put() into the queue).
32
33 Raises a ValueError if called more times than there were items placed in the queue.
34
35 Queue.join() block直到queue被消费完毕
二十、python标准模块--concurrent.futures(开启进程池和线程池)
https://docs.python.org/dev/library/concurrent.futures.html
 1 from concurrent.futures import ProcessPoolExecutor,ThreadPoolExecutor
 2 from threading import current_thread
 3 import os,time,random
 4 def work(n):
 5     print('%s is running' %current_thread().getName())
 6     time.sleep(random.randint(1,3))
 7     return n**2
 8
 9 if __name__ == '__main__':
10     p=ThreadPoolExecutor()
11     objs=[]
12     for i in range(21):
13         obj=p.submit(work,i)
14         objs.append(obj)
15     p.shutdown()
16     for obj in objs:
17         print(obj.result())
 1 #进程池
 2 import requests #pip3 install requests
 3 import os,time
 4 from multiprocessing import Pool
 5 from concurrent.futures import ProcessPoolExecutor,ThreadPoolExecutor
 6 def get_page(url):
 7     print('<%s> get :%s' %(os.getpid(),url))
 8     respone = requests.get(url)
 9     if respone.status_code == 200:
10         return {'url':url,'text':respone.text}
11
12 def parse_page(obj):
13     dic=obj.result()
14     print('<%s> parse :%s' %(os.getpid(),dic['url']))
15     time.sleep(0.5)
16     res='url:%s size:%s\n' %(dic['url'],len(dic['text'])) #模拟解析网页内容
17     with open('db.txt','a') as f:
18         f.write(res)
19
20
21 if __name__ == '__main__':
22
23     # p=Pool(4)
24     p=ProcessPoolExecutor()
25     urls = [
26         'http://www.baidu.com',
27         'http://www.baidu.com',
28         'http://www.baidu.com',
29         'http://www.baidu.com',
30         'http://www.baidu.com',
31         'http://www.baidu.com',
32         'http://www.baidu.com',
33     ]
34
35
36     for url in urls:
37         # p.apply_async(get_page,args=(url,),callback=parse_page)
38         p.submit(get_page,url).add_done_callback(parse_page)
39
40     p.shutdown()
41     print('主进程pid:',os.getpid())
 1 #线程池
 2 import requests #pip3 install requests
 3 import os,time,threading
 4 from multiprocessing import Pool
 5 from concurrent.futures import ProcessPoolExecutor,ThreadPoolExecutor
 6 def get_page(url):
 7     print('<%s> get :%s' %(threading.current_thread().getName(),url))
 8     respone = requests.get(url)
 9     if respone.status_code == 200:
10         return {'url':url,'text':respone.text}
11
12 def parse_page(obj):
13     dic=obj.result()
14     print('<%s> parse :%s' %(threading.current_thread().getName(),dic['url']))
15     time.sleep(0.5)
16     res='url:%s size:%s\n' %(dic['url'],len(dic['text'])) #模拟解析网页内容
17     with open('db.txt','a') as f:
18         f.write(res)
19
20
21 if __name__ == '__main__':
22
23     # p=Pool(4)
24     p=ThreadPoolExecutor(3)
25     urls = [
26         'http://www.baidu.com',
27         'http://www.baidu.com',
28         'http://www.baidu.com',
29         'http://www.baidu.com',
30         'http://www.baidu.com',
31         'http://www.baidu.com',
32         'http://www.baidu.com',
33     ]
34
35
36     for url in urls:
37         # p.apply_async(get_page,args=(url,),callback=parse_page)
38         p.submit(get_page,url).add_done_callback(parse_page)
39
40     p.shutdown()
41     print('主进程pid:',os.getpid())
 1 from concurrent.futures import ProcessPoolExecutor,ThreadPoolExecutor
 2 import os,time,random
 3 def work(n):
 4     print('%s is running' %os.getpid())
 5     time.sleep(random.randint(1,3))
 6     return n**2
 7
 8 if __name__ == '__main__':
 9     p=ProcessPoolExecutor()
10     objs=[]
11     for i in range(10):
12         obj=p.submit(work,i)
13         objs.append(obj)
14     p.shutdown()
15     for obj in objs:
16         print(obj.result())
17 #新方法
18 if __name__ == '__main__':
19     p = ProcessPoolExecutor()
20     obj=p.map(work,range(10))
21     p.shutdown()
22     print(list(obj))
二十一、python并发编程之协程
详细地址:http://www.cnblogs.com/fanglingen/articles/7486020.html
二十二、python并发编程之io模型
详细地址:http://www.cnblogs.com/fanglingen/articles/7490901.html

 浙公网安备 33010602011771号